creating a library presence in canvas
TRANSCRIPT

2016
Creating a Library Presence in Canvas FOR CALIFORNIA COMMUNITY COLLEGES Prepared by Erin Daniels and Phyllis Usina Commissioned by the Council of Chief Librarians, California Community Colleges

Creating a Library Presence in Canvas | 2016
1
TABLE OF CONTENTS Table of Contents ................................................................................................................................................................................................... 1
Overview ................................................................................................................................................................................................................... 2
Create Custom Librarian Role ............................................................................................................................................................................ 4
Add Ask-a-Librarian Link to Help Menu in Global Navigation .................................................................................................................... 6
Add Library Icon to Global Navigation Menu* ................................................................................................................................................ 8
Use Redirect Tool to Link to Library Resources.......................................................................................................................................... 10
Embed Discipline-Specific Springshare Content across Courses.............................................................................................................. 12
Use Conferences App for Research Appointments ..................................................................................................................................... 14
Create a Library Resources Module for Canvas Commons ...................................................................................................................... 16
Embed LibGuides Assets ..................................................................................................................................................................................... 18
Embed EBSCO’s Curriculum Builder Reading List ....................................................................................................................................... 20
Embed ExLibris’ Leganto Reading List .............................................................................................................................................................. 22
Host Librarian Led Discussion ........................................................................................................................................................................... 24
Link to Single Article, eBook, or Video ........................................................................................................................................................... 26
Embed ProQuest’s SIPX Reading Lists ............................................................................................................................................................ 28
Create a General Library Services Page .......................................................................................................................................................... 30
Embed Search Box Widget from EBSCO Discovery Service .................................................................................................................... 32
Embed Search Box Widget from EBSCO Databases (not Discovery) .................................................................................................... 34
Embed Search Box Widget from ExLibris Primo .......................................................................................................................................... 36
Appendix 1: iFrame options for EBSCO Database Search Widgets ........................................................................................................ 38
Appendix 2: Permissions for Custom Librarian Role in Canvas ............................................................................................................... 40
About the Authors ................................................................................................................................................................................................ 41

Creating a Library Presence in Canvas | 2016
2
Overview
This guide identifies ways commonly available library services, resources, and programs can be integrated into the Canvas Learning Management System (LMS).
This guide includes implementation actions that librarians can take or can give to college IT, Distance Education, and discipline faculty to further library academic support integration into online instruction.
The library-integrated implementation areas include options that can be implemented at all levels of Canvas (System, Global Navigation, Course Navigation, Module Level, or Page Level), for example:
Create Custom Librarian Role (similar to a TA Role)
Add Ask-a-Librarian Link to Help Menu in Global Navigation
Add Library Icon to Global Navigation
Use Redirect Tool to Link to Library Resources in Course Navigation
Embed Discipline-Specific Springshare Content across Courses (Springshare’s LTI Automagic)
Use Conferences App for Research Appointments
Create Library Module for Canvas Commons
Embed LibGuide Assets (Springshare’s LTI Manual Mode)
Embed EBSCO’s Curriculum Builder Reading List
Embed ExLibris’ Leganto Reading List
Host Librarian Led Discussion
Link to Single Article, eBook, or Video
Embed ProQuest’s SIPX Reading List
Create a General Library Services Page
Embed Search Box Widget from EBSCO Discovery Service
Embed Search Box Widget from EBSCO Databases (not Discovery)
Embed Search Box Widget from ExLibris Primo
When implementing any of these tools, librarians will need to work closely with the LMS/Canvas Administrator on their campuses. Also, if available, the campus’ instructional designer should be made aware of the tools, as they are frequently interfacing with discipline faculty on the use of various tools in Canvas.
Displays in Canvas at: SYSTEM LEVEL
Displays in Canvas at: GLOBAL NAVIGATION LEVEL
Displays in Canvas at: COURSE NAVIGATION LEVEL
Displays in Canvas at: MODULE, then PAGE LEVEL
Displays in Canvas at: PAGE or MODULE LEVEL
Displays in Canvas at: PAGE LEVEL

Creating a Library Presence in Canvas | 2016
3
DEVELOPING MODULES
Librarians can use any combination of the above tools to develop a module appropriate for their campus.
The authors ran into challenges when trying to develop example modules items that can be shared across campuses since many of the tools outlined rely on users being logged in, access to specific products, and, in many cases, product keys obtained from vendors. Since the purview of this project was not in developing content, but rather in outlining administrative steps, many of the recommendations will need to be implemented at the campus level to see their full effect.
Five of the items covered in this document lent themselves to replication in a public Canvas page. This module can be viewed at this public Canvas course: https://canvas.santarosa.edu/courses/19390
For each of those items not replicated in the public Canvas course above, a screenshot is provided in the document which shows how each item will look once implemented in a normal Canvas course.
The module is also shared to Canvas Commons as “Creating a Library Presence in Canvas (CCL).”
While the scope of this document was on the implementation and administrative set up of library services and tools within Canvas, there is much room for growth in the development of actual information literacy modules that could complement the work done in this document.

Creating a Library Presence in Canvas | 2016
4
Create Custom Librarian Role
KEY RESOURCES
Canvas Roles & Permissions: https://s3.amazonaws.com/tr-learncanvas/docs/Canvas_Permissions_Course.pdf
WHO NEEDS TO BE INVOLVED
The following need to be involved for this to work:
Instructor of the course
Librarian (for initial set-up and continued support)
LMS/Canvas Administrator (for initial set-up)
BEFORE GETTING STARTED IN CANVAS
Before contacting the LMS Administrator to set up the Librarian Role, librarians need to decide what level of access they would like to have in courses if the Librarian Role is activated by an instructor.
Similar to a TA Role, the level of permission set up by the LMS Administrator governs a librarian’s ability to add/modify content (adding customized library modules), send out reminders, and/or create/moderate discussions, chats, or collaborations (Research Q & A and Appointments). A main consideration is the decision to allow grading/evaluation (library quizzes) or analytics (usage data) access or not.
See Appendix 2: Permissions for Custom Librarian Role in Canvas.
LMS/CANVAS ADMINISTRATIVE SET-UP
Once the institution has decided the desired Librarian Role permissions (see Before Getting Started in Canvas in above step), LMS/Canvas Administrator needs to do a one-time set-up:
Canvas Roles & Permissions: https://s3.amazonaws.com/tr-learncanvas/docs/Canvas_Permissions_Course.pdf
At the account level, when creating a custom role the institution should copy the appropriate base permissions and then add or remove librarian specific ones.
Displays in Canvas at: SYSTEM LEVEL
What Is It? • Creates a custom Librarian Role (similar to a TA) which provides an way for instructors to give librarians access to their course.
Why Use It? • Using the Librarian Role allows instructors to add
librarians into their course to provide research instruction and support.
Creating a Library Presence in Canvas | 2016
5
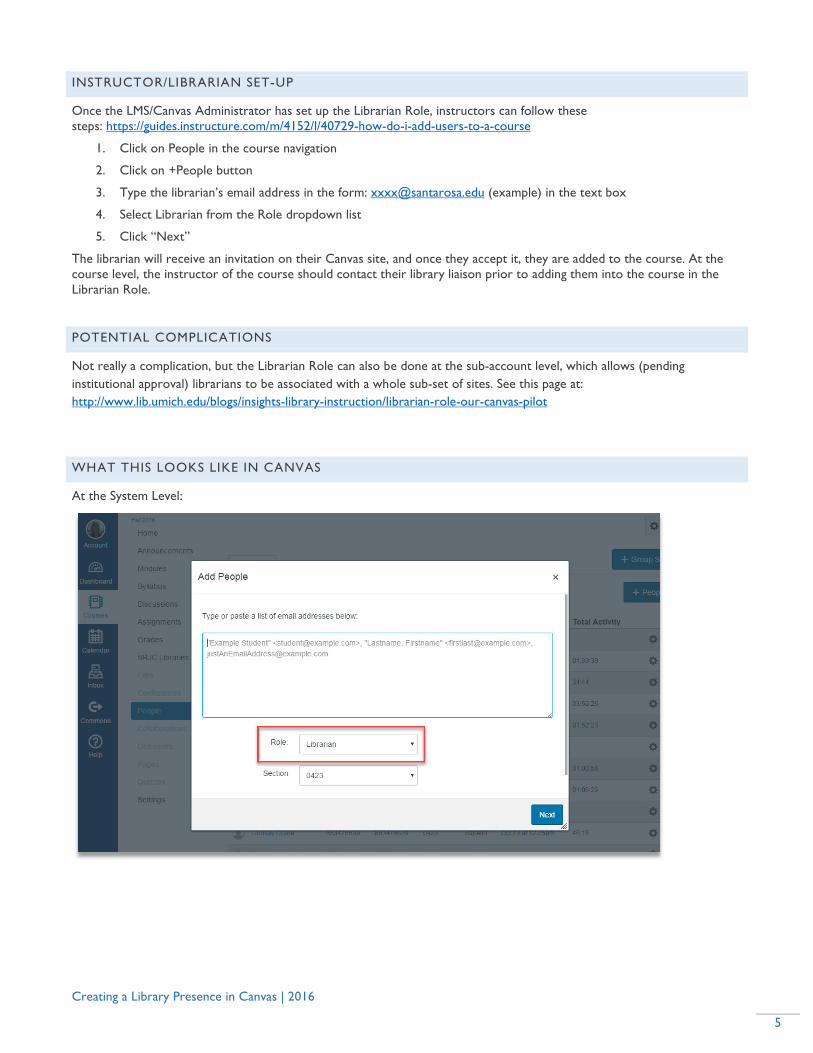
INSTRUCTOR/LIBRARIAN SET-UP
Once the LMS/Canvas Administrator has set up the Librarian Role, instructors can follow these steps: https://guides.instructure.com/m/4152/l/40729-how-do-i-add-users-to-a-course
1. Click on People in the course navigation
2. Click on +People button
3. Type the librarian’s email address in the form: [email protected] (example) in the text box
4. Select Librarian from the Role dropdown list
5. Click “Next”
The librarian will receive an invitation on their Canvas site, and once they accept it, they are added to the course. At the course level, the instructor of the course should contact their library liaison prior to adding them into the course in the Librarian Role.
POTENTIAL COMPLICATIONS
Not really a complication, but the Librarian Role can also be done at the sub-account level, which allows (pending institutional approval) librarians to be associated with a whole sub-set of sites. See this page at: http://www.lib.umich.edu/blogs/insights-library-instruction/librarian-role-our-canvas-pilot
WHAT THIS LOOKS LIKE IN CANVAS
At the System Level:

Creating a Library Presence in Canvas | 2016
6
Add Ask-a-Librarian Link to Help Menu in Global Navigation
KEY RESOURCES
Canvas Help Menu: https://guides.instructure.com/m/8470/l/41954-how-do-i-get-help-with-canvas Canvas Help Menu Customization: https://guides.instructure.com/m/4214/l/610054-how-do-i-customize-the-canvas-
help-menu-for-an-account
WHO NEEDS TO BE INVOLVED
The following need to be involved for this to work:
Librarian (for initial set-up)
LMS/Canvas Administrator (for initial set-up)
BEFORE GETTING STARTED IN CANVAS
Librarian obtains the link and/or code from their online web-based library assistance services vendor (LibAnswers, QuestionPoint, etc.). Librarian determines name of link and wording for the short description. For example for the name of the menu item could be: Ask-a-Librarian and a short description could be: Contact a librarian using chat, SMS, or email. An additional consideration is determining the preferred link visibility for different user roles (Student, Teacher, TA, etc.).
LMS/CANVAS ADMINISTRATIVE SET-UP
Once librarian has done above preliminary step, they will need to work with the LMS/Canvas Administrator. Canvas provides administrators with the flexibility of adding additional items to the Help menu located in the global navigation. Steps for Help menu customization can be found at: https://guides.instructure.com/m/4214/l/610054-how-do-i-customize-the-canvas-help-menu-for-an-account
POTENTIAL COMPLICATIONS
Displays in Canvas at: GLOBAL NAVIGATION LEVEL
What Is It? • The ability to add additional menu items such as, Ask-a-Librarian or the Library home page, to the Help menu in Canvas.
Why Use It? • Provides a link to Library at Global Level, therefore in all courses automatically.

Creating a Library Presence in Canvas | 2016
7
The Help menu has the potential complication of many items competing for the limited space on the menu. Librarians will need to be prepared to justify the need for the addition to the menu. If there is abundant space librarians can consider providing an additional access point for students to the library home page.
Depending on the web-based library assistance service vendor used the assistance could only occur during a library’s open hours or via a 24/7 model. Librarians will need to determine how best to communicate service availability so students have realistic expectations.
Multi-college districts using a "district instance" of Canvas have an additional complication. The "district instance" limits adding individual college library options to the Help menu in the Global Navigation because they would display to all colleges in the district.
WHAT THIS LOOKS LIKE IN CANVAS
At Global Navigation Level:

Creating a Library Presence in Canvas | 2016
8
Add Library Icon to Global Navigation Menu*
* Canvas does not provides administrators with a setting for adding additional Global Navigation Menu items. However, this can be a possibility using JavaScript. Issues still need to be worked out; requires some coding skills.
KEY RESOURCES
Using the Global Navigation Menu: https://guides.instructure.com/m/4152/l/420898-how-do-i-use-the-global-navigation-menu
WHO NEEDS TO BE INVOLVED
The following need to be involved for this to work:
Librarian (for initial set-up)
Staff/Librarian with JavaScript skills
LMS/Canvas Administrator (for initial set-up)
BEFORE GETTING STARTED IN CANVAS
Librarian must determine the link and/or code, the name, and desired Global Navigation menu icon. An additional consideration is determining the preferred visibility of the link for different user roles (Student, Teacher, TA, etc.). If code for a slide out menu list option is used then the librarian will have to designate multiple links and names.
LMS/CANVAS ADMINISTRATIVE SET-UP
Once librarian has done above preliminary step, they will need to work with the LMS/Canvas Administrator.
Canvas does not provides administrators with a native setting in the Theme Editor for adding additional Global Navigation Menu items. However, there is the potential to use JavaScript code for adding icons to the Global Navigation Menu.
JavaScript Code for Adding Items to the Global Navigation Menu: https://community.canvaslms.com/thread/6105
Custom Global Navigation Menu Items Idea: https://community.canvaslms.com/ideas/4034
Standard Icon Style Guide: https://canvas.instructure.com/styleguide#icons
There is also the potential to include additional JavaScript code that allows for a slide out menu list of multiple resources.
Displays in Canvas at: GLOBAL NAVIGATION LEVEL
What Is It? • The ability to add icons that link to Library Resources in the Global Navigation menu.
Why Use It? • Providing a Library Resources link at the global navigation
level ensures quick access to essential sources that support students' academic research needs.

Creating a Library Presence in Canvas | 2016
9
POTENTIAL COMPLICATIONS
The Global Navigation menu has the potential problem of many items competing for the limited space on the menu. Librarians will need to be prepared to justify the need for the icon.
The Global Navigation menu is not designed to scroll so while that is responsive for smaller screens it adds the complication that when the browser window size is reduced to a tablet width or smaller, the Global Navigation menu narrows and icons on the menu can be hidden.
Multi-college districts using a "district instance" of Canvas have an additional complication. The "district instance" limits adding individual college library options to the Global Navigation menu because they would display to all colleges in the district.
WHAT THIS LOOKS LIKE IN CANVAS
At the Global Navigation Level:
(Image from Nevada State College at http://www.nsc.edu/library/index.aspx / Francesca Marineo and Maya Hobscheid)

Creating a Library Presence in Canvas | 2016
10
Use Redirect Tool to Link to Library Resources
KEY RESOURCES
Redirect Tool App: https://www.eduappcenter.com/apps/redirect#.WAhyY8nAaio
Using the Redirect Tool (SJSU School of Information): https://www.youtube.com/watch?v=TceHLPasVvg
WHO NEEDS TO BE INVOLVED
The following need to be involved for this to work:
Instructor of the course
LMS Administrator (optional; only if implementing this as standard in all courses)
BEFORE GETTING STARTED IN CANVAS
The instructor of the course needs to decide which source they want to link to using the redirect tool. The link can link to any destination. Some library related destinations include linking to: a library’s homepage, chat service, an HTML page specialized for online learning, a list of library databases, etc. The link can link to any destination.
INSTRUCTOR/LIBRARIAN SET-UP
1. From an existing course, click on “Settings”
2. From the Setting Page, click on “Apps”
3. In the Filter by Name box, type “Redirect”
4. Click on the image for the Redirect Tool
5. Click “Add App”, which will open a pop up window
6. Replace the Name field with the desired name of link (i.e. SRJC Libraries or Ask-a-Librarian) and insert the desired link and click “Add App”
7. Navigate back to course homepage and there will be a new link in the Course Navigation menu
Displays in Canvas at: COURSE NAVIGATION LEVEL
What Is It? • A Canvas App that places a link in the course navigation menu. The link can go to any external website.
Why Use It? • It provides a high profile link in courses to a wide varietyof library resources.

Creating a Library Presence in Canvas | 2016
11
POTENTIAL COMPLICATIONS
Many sites will not open directly within Canvas. In these cases, the page will open in a new tab outside of Canvas.
WHAT THIS LOOKS LIKE IN CANVAS
At the Course Navigation Level:

Creating a Library Presence in Canvas | 2016
12
Embed Discipline-Specific Springshare Content across Courses
KEY RESOURCES
LibApps LTI (Learning Technology Integration) Tool Directions (requires LibApps login): http://support.springshare.com/friendly.php?s=libapps/lti
WHO NEEDS TO BE INVOLVED
The following need to be involved for this to work:
Instructor of the course
Librarian (for initial set-up and continued support)
LMS Administrator (for initial set-up)
BEFORE GETTING STARTED IN CANVAS
Libraries need to have a subscription to Springshare’s LibApps to use the LibGuide LTI (Learning Technology Integration) tools.
From LibApps > Admin > LTI Tool Builder, the librarian will need get the following information for the LMS Administrator:
(Image from: http://support.springshare.com/friendly.php?s=libapps/lti)
The librarian will also need to decide what Springshare content they would like to display using this LTI. This can include content from LibGuides, LibGuides A-Z list, LibCal room booking widgets, LibCal appointment schedulers, LibCal Hours
Displays in Canvas at: COURSE NAVIGATION LEVEL
What Is It? • Springshare's "Automagic LTI" that automatically createsa library landing page across designated courses.
Why Use It? • To automatically populate discipline specific library resources within courses.

Creating a Library Presence in Canvas | 2016
13
widgets, LibChat widgets, LibAnswers search boxes, eReserves, and more. The librarian needs to build the library landing page in LibApps > Admin > LTI Tool Builder > LTI Automagic > Library LTI Page Builder.
Recommended: Librarian may wish to get departmental permission prior to adding the Automagic version of Springshare’s LTI because it will automatically populate courses with the library’s landing page.
LMS/CANVAS ADMINISTRATIVE SET-UP
After librarian gathered the information in the previous step (i.e. LTI Config URL, etc.), they will need to work with the LMS/Canvas Administrator to follow the directions for setting up LTI Automagic in Canvas located at: http://support.springshare.com/libapps/lti/lmssetup/canvas.
Once this step is done, the “library landing pages” are automatically included in the course navigation menu of all courses, as assigned during the administrative set-up process.
The library’s Springshare administrator can gather statistics on the usage of these resources.
POTENTIAL COMPLICATIONS
This is a large-scale deployment of Springshare tools into courses, as such, departments may wish to have input on whether they would like this type of library presence automatically put into courses.
WHAT THIS LOOKS LIKE IN CANVAS
At the Course Navigation Level:
(Image from: http://buzz.springshare.com/springynews/news-31/lti)

Creating a Library Presence in Canvas | 2016
14
Use Conferences App for Research Appointments
KEY RESOURCES
Conferences: https://guides.instructure.com/m/4152/l/40302-what-are-conferences How to Use Conferences: https://guides.instructure.com/m/4152/l/65961-how-do-i-use-the-conference-interface
WHO NEEDS TO BE INVOLVED
The following need to be involved for this to work:
Librarian Instructor of the course
BEFORE GETTING STARTED IN CANVAS
The instructor of the course will need to give the librarian access to the course by adding the librarian using the Librarian Role (see Create Custom Librarian Role on page 4). Librarian could also be added as a TA or student.
Instructor needs to make the Conferences App active Course Navigation Menu of the course. The librarian will need to establish a procedure for scheduling and communicating with students about Conferences.
LMS/CANVAS ADMINISTRATIVE SET-UP
Displays in Canvas at: COURSE NAVIGATION LEVEL
What Is It? • The ability to schedule, record and caption Conferences with students in a particular course using a standard Course Navigation menu item.
Why Use It?
• Using Conferences allows librarians to interact with students using audio and video in real-time. This option can be used to conduct research appointment, lead a discussion, share presentation material, and demo resources.

Creating a Library Presence in Canvas | 2016
15
No additional set-up is required. Conferences are a standard feature in the native Canvas LMS. Canvas integrates with the vendor BigBlueButton. Conferences use web real-time communications (WebRTC) audio for users of Firefox and Chrome. To read more about BigBlueButton, visit the BigBlueButton website: http://bigbluebutton.org/overview/.
INSTRUCTOR/LIBRARIAN SET-UP
Canvas provides specific guides for starting, recording, using, live captioning, and ending Conferences at: https://community.canvaslms.com/community/answers/guides/. BigBlueButton can accommodate up to 50 users in a conference at one time.
Conferences Overview: https://community.canvaslms.com/videos/1101
POTENTIAL COMPLICATIONS
Conferences can be recorded so students can view them at a later date but recordings are automatically deleted 14 days after the conference ends. For a fee, conferences can be kept longer.
WHAT THIS LOOKS LIKE IN CANVAS
At the Course Navigation Level:

Creating a Library Presence in Canvas | 2016
16
Create a Library Resources Module for Canvas Commons
KEY RESOURCES
Canvas Commons: https://guides.instructure.com/s/2204/m/38287/l/257492-what-is-canvas-commons Modules, Creation and Management: https://community.canvaslms.com/videos/1114 Share a Resource to Commons: https://guides.instructure.com/s/2204/m/38287/l/257503-how-do-i-share-a-
resource-to-commons Import a Resource from Commons: https://guides.instructure.com/s/2204/m/38287/l/257495-how-do-i-import-and-
view-a-commons-resource-in-canvas
WHO NEEDS TO BE INVOLVED
The following need to be involved for this to work:
Instructor of the course
Librarian (for initial set-up and continued support)
LMS/Canvas Administrator (for initial set-up of Canvas Commons)
BEFORE GETTING STARTED IN CANVAS
Librarian needs to decide what content to include in the module, and then decide on how it will be delivered (through Canvas Commons, as part of a default course shell, or shared through a publicly available Canvas shell). The practices discussed in this document provide ideas of what to include in a library module.
LMS/CANVAS ADMINISTRATIVE SET-UP
The LMS/ Canvas Administrator will need to enable Commons within the Canvas instance.
INSTRUCTOR/LIBRARIAN SET-UP
Librarian develops a Library Resources module that can be shared with discipline instructors through the Canvas Commons learning object repository. Settings for sharing can be set to the department, institution or canvas community level.
A Library Resources module could contain discipline-specific material to use when building a course, or it could have a template of materials librarians can use to integrate information literacy instruction within a variety of courses. Examples of
Displays in Canvas at: MODULE, then PAGE LEVEL
What Is It? • The ability to use Canvas Commons as a mechanism to import Library Resources into a discipline course.
Why Use It? • Allows Librarians to provide ready-to-import information literacy modules to discipline instructors.

Creating a Library Presence in Canvas | 2016
17
module content includes tutorials, search widgets, research guides (LibGuides or Canvas content pages), reading lists, discussions, conferences, assignments, guided tours, etc.
Once the module is built, the Librarian shares to the Commons. When sharing the librarian will need to add details about the resource, select a content license, and choose a sharing option.
Another alternative would be to include a Library Resources Module as a permanent module available as part of the institution’s standard class template/shell or readiness module. Course instructors would have the option to reorder or hide the module as desired, but the default would be to have it visible.
POTENTIAL COMPLICATIONS
Options and settings such as, published or unpublished status, are generally retained in Commons imports but all due dates are removed. Note, when sharing a module that uses an External Tool like LibGuides via Commons the imported module can result in some settings being lost so librarian should verify all module components are functioning after import into discipline course.
By default, content is considered copyrighted and private. Librarian will need to select the appropriate Creative Commons license for the extent they want to allow others to copy, distribute, or display content. For example, the ShareAlike license allows others to copy, distribute, and use content only if they redistribute it using the same Creative Commons license.
Creative Commons License: https://guides.instructure.com/m/4152/l/57093-how-do-i-set-a-creative-commons-license-for-a-course
Standard Canvas file storage limits apply. When importing a file that exceeds 500MB, a warning that the import may not be successful will be generated. Learn more about Canvas file storage: https://guides.instructure.com/m/4152/l/41466
WHAT THIS LOOKS LIKE IN CANVAS
Library Resources Module example:
See other example of library modules from Nevada State College (Francesca Marineo and Maya Hobscheid) at: https://nsc.instructure.com/courses/1641574/modules

Creating a Library Presence in Canvas | 2016
18
Embed LibGuides Assets
KEY RESOURCES
LibApps LTI (Learning Technology Integration) Tool Directions (requires LibApps login): http://support.springshare.com/friendly.php?s=libapps/lti
WHO NEEDS TO BE INVOLVED
The following need to be involved for this to work:
Instructor of the course
Librarian (for initial set-up and continued support)
LMS/Canvas Administrator (for initial set-up)
BEFORE GETTING STARTED IN CANVAS
Libraries must have a subscription to Springshare’s LibApps to use the LibGuide LTI (Learning Technology Integration) tools. Libraries need to have their LibGuides/content boxes built prior to using this tool.
From LibApps > Admin > LTI Tool Builder, the librarian will need get the following information:
(Image from: http://support.springshare.com/friendly.php?s=libapps/lti)
Displays in Canvas at: MODULE, then PAGE LEVEL
What Is It? • Embed individual LibGuides into a content page. Allows
the capability to embed an entire guide, a page from a guide, or a content box from a guide.
Why Use It? • Easy access to curated library resources. Also allows for linking to additional Springshare services such as LibChat.

Creating a Library Presence in Canvas | 2016
19
LMS/CANVAS ADMINISTRATIVE SET-UP
After librarian gathers the information in the previous step (i.e. LTI Config URL, etc.), they work with the LMS/Canvas Administrator using the directions to do the initial set-up of LTI (Learning Technology Integration) Manual Mode in Canvas located at: http://support.springshare.com/libapps/lti/lmssetup/canvas.
INSTRUCTOR/LIBRARIAN SET-UP
Once the LMS/Canvas Administrator has set up LibGuides LTI Manual Mode, instructors and/or librarians can embed LibGuides/Pages/Content Boxes into discipline-specific course pages using these steps:
1. From an existing module, click the “+” button
2. Add “External Tool”
3. Select “Library Guides” from the menu of items and click “Add Item”
4. From the module level, click on the Page titled “Library Guides”, this will display a page titled “LibApps Library Content Selection”
5. Choose the desired LibGuide/Page/Content Box from the drop down menus and click “Embed Content”
Keep in mind: Since a single content box can be embedded, this allows any item in a library guide (such LibChat widget, LibCal widgets, A-Z database assets, etc.) to be included.
POTENTIAL COMPLICATIONS
When a LibGuide is embedded into a module page that is shared to Canvas Commons, the LibGuide will need to be reset to the desired LibGuide/Page/Content Box when anyone imports that module.
WHAT THIS LOOKS LIKE IN CANVAS
Link to guide displays on Module Level:
Then actual guide is displayed on Page Level:

Creating a Library Presence in Canvas | 2016
20
Embed EBSCO’s Curriculum Builder Reading List
KEY RESOURCES
EBSCO Apps & Cloud Services > Curriculum Builder: https://cloud.ebsco.com/apps/curriculum-builder?_ga=1.37864939.950623942.1474051039
Canvas & Libraries | EBSCO Curriculum Builder (Screencast by Loretta Esparza): https://youtu.be/R67hb5sZ8qk
WHO NEEDS TO BE INVOLVED
The following need to be involved for this to work:
Instructor of the course
Librarian (for initial set-up and continued support)
LMS/Canvas Administrator (for initial set-up)
BEFORE GETTING STARTED IN CANVAS
Libraries need to have a subscription to EBSCO’s Discovery Service to use Curriculum Builder.
Librarian can submit a request at: https://cloud.ebsco.com/apps/curriculum-builder?_ga=1.37864939.950623942.1474051039
EBSCO will provide the necessary information for working with the LMS/Canvas Administrator
LMS/CANVAS ADMINISTRATIVE SET-UP
Once a librarian has submitted a request to EBSCO (see Before Getting Started in Canvas in above step), EBSCO will provide the necessary information for working with the LMS/Canvas Administrator.
INSTRUCTOR/LIBRARIAN SET-UP
Once the LMS/Canvas Administrator has set up Curriculum Builder, instructors/librarians can set up reading lists using the following steps:
1. From an existing module, click the “+” button
2. Add “External Tool”
Displays in Canvas at: MODULE, then PAGE LEVEL
What Is It? • An LMS Plug-in that allows instructors select a list of
articles/books from Ebsco Discovery to display to students. Allows instructors to annotate readings.
Why Use It? • Helps lower costs of required readings for students. Provides direct access to library resources.

Creating a Library Presence in Canvas | 2016
21
3. Select “Curriculum Builder” (this may be named differently depending on how it was set up) from the menu of items and click “Add Item”
4. From the module level, click on the Page titled “Curriculum Builder” (pages name can be changed at the previous step)
5. From here either “start fresh” or copy a previously built reading list
6. If using “start fresh”, then click “Continue without Copying”
7. This will bring up a page for entering the search terms.
8. From the results list click “Add to Reading List”
9. To see the current reading list and to add notes to each article, click on “See Current Reading List” towards the top of the page
10. Go into “Student View” under “Settings” in course navigation to see how a student would view the reading list
POTENTIAL COMPLICATIONS
When LMS/Canvas Administrator is configuring the LTI (Learning Technology Integration), be sure double-check the App/External Tool Placement so that the app/external tool shows in the appropriate places (i.e. Course Navigation, Rich Text Editor, etc.)
WHAT THIS LOOKS LIKE IN CANVAS
Link to Curriculum Builder reading list displays on Module Level:
Then actual reading list is displayed on Page Level:

Creating a Library Presence in Canvas | 2016
22
Embed ExLibris’ Leganto Reading List
KEY RESOURCES
ExLibris Alma: Create an LTI (Learning Technology Integration) Tool Integration Profile: https://developers.exlibrisgroup.com/leganto/integrations/lti/alma
ExLibris: Creating an External App in Canvas: https://developers.exlibrisgroup.com/leganto/integrations/lti/canvas/admin
ExLibris: Creating a Leganto Link in a Course: https://developers.exlibrisgroup.com/leganto/integrations/lti/canvas/createlink
WHO NEEDS TO BE INVOLVED
The following need to be involved for this to work:
Instructor of the course
Librarian (for initial set-up and continued support)
LMS/Canvas Administrator (for initial set-up)
BEFORE GETTING STARTED IN CANVAS
Libraries need to have a subscription to ExLibris’ Alma and Primo.
Librarian needs to create the LTI (Learning Technology Integration) Integration Profile in Alma: https://developers.exlibrisgroup.com/leganto/integrations/lti/alma
LMS/CANVAS ADMINISTRATIVE SET-UP
Once the librarian has created the LTI Integration Profile in Alma (see Before Getting Started in Canvas in above step), The LMS/Canvas Administrator will need to use these steps to do a one-time set-up of an External App for ExLibris’ Leganto in Canvas: https://developers.exlibrisgroup.com/leganto/integrations/lti/canvas/admin
INSTRUCTOR/LIBRARIAN SET-UP
Displays in Canvas at: MODULE, then PAGE LEVEL
What Is It? • Places links within LMS courses, redirecting students to reading lists in Leganto.
Why Use It? • Helps lower costs of required readings for students. Provides direct access to library resources.

Creating a Library Presence | 2016
23
Once the LMS/Canvas Administrator has set up the External App for ExLibris’ Leganto, instructors/librarians can follow the steps for setting up the link to Leganto at: https://developers.exlibrisgroup.com/leganto/integrations/lti/canvas/createlink
POTENTIAL COMPLICATIONS
Authors unable to test.
WHAT THIS LOOKS LIKE IN CANVAS
Link to ExLibris’ Leganto reading list displays on Module Level (screen shot from ExLibris):
Authors unable to get screenshot at Page Level.

Creating a Library Presence | 2016
24
Host Librarian Led Discussion
KEY RESOURCES
Discussions Overview: https://guides.instructure.com/m/4152/l/40312-what-are-discussions-for-instructors Create Discussions: https://guides.instructure.com/m/8472/l/49996-how-do-i-create-a-discussion-as-an-instructor Create Group Discussions: https://guides.instructure.com/m/4152/l/64224-how-do-i-create-a-group-discussion-in-a-
course
WHO NEEDS TO BE INVOLVED
The following need to be involved for this to work:
Librarian (for set-up and continued support)
BEFORE GETTING STARTED IN CANVAS
The Librarian will need to gain access to the discipline based course by having the Instructor add them using the Librarian Role. Work with the discipline instructor to determine the best timeframe for embedding a Discussion in the course. For example a Q & A discussion could be useful a week or two before a research assignment is due. Additionally the Librarian will need to be prepared to communicate the parameters for how often they will monitor the Discussion (e.g. once, twice or more daily).
LMS/CANVAS ADMINISTRATIVE SET-UP
No additional set-up is required. Discussions are a standard feature in the native Canvas LMS.
INSTRUCTOR/LIBRARIAN SET-UP
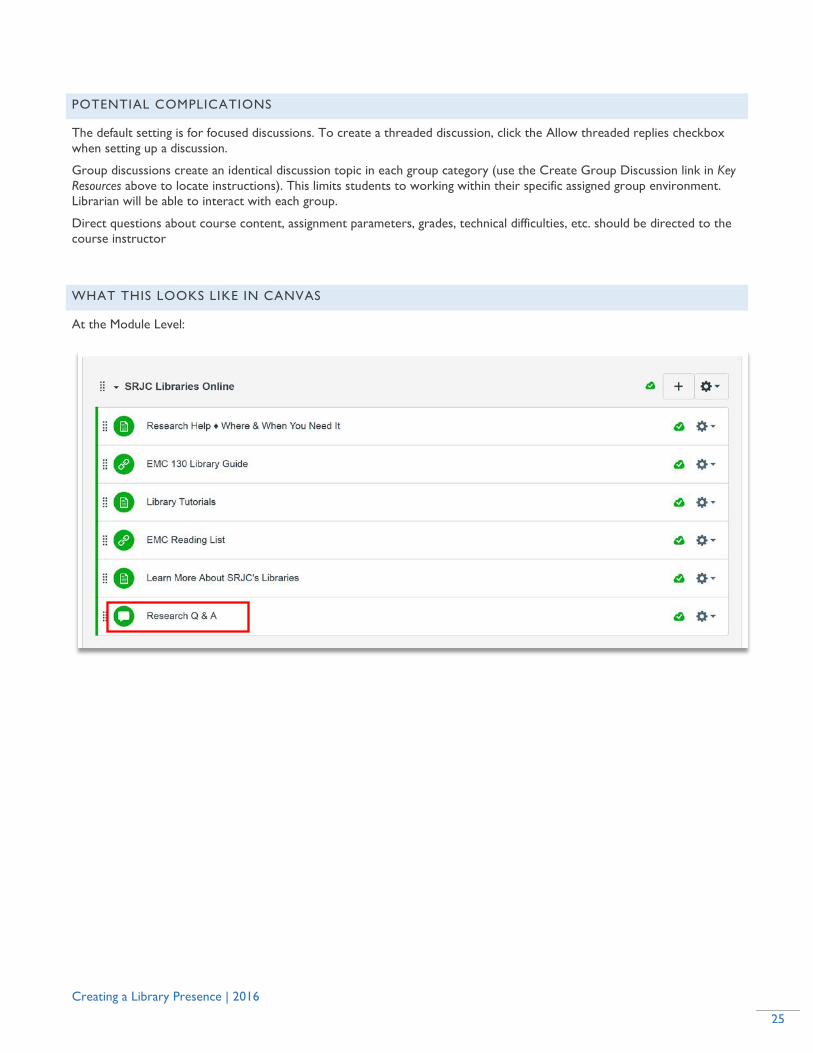
A Discussion can be embedded and accessed within a Module or using the Discussions link in the Course Navigation Menu. Canvas provides specific guides for creating discussions (see Key Resources above). Librarian can add text, links, files, videos, and images to a discussion using the Rich Content Editor. The Record/Upload Media Comment tool in the Rich Content Editor allows Librarian to include audio or video.
Displays in Canvas at: PAGE or MODULE LEVEL
What Is It? • The ability to set up and moderate asynchronous Discussions.
Why Use It? • Using threaded Discussions allows librarians to interact
with students to answer research related questions or moderate a discussion on a focused theme.
Creating a Library Presence | 2016
25
POTENTIAL COMPLICATIONS
The default setting is for focused discussions. To create a threaded discussion, click the Allow threaded replies checkbox when setting up a discussion.
Group discussions create an identical discussion topic in each group category (use the Create Group Discussion link in Key Resources above to locate instructions). This limits students to working within their specific assigned group environment. Librarian will be able to interact with each group.
Direct questions about course content, assignment parameters, grades, technical difficulties, etc. should be directed to the course instructor
WHAT THIS LOOKS LIKE IN CANVAS
At the Module Level:

Creating a Library Presence | 2016
26
Link to Single Article, eBook, or Video
KEY RESOURCES
Canvas & Libraries | Permalinks (Screencast): http://screencast-o-matic.com/watch/cD6nFejtrC
WHO NEEDS TO BE INVOLVED
The following need to be involved for this to work:
Instructor of the course
Library Liaison and/or Instructional Designer (optional; can provide support for using databases to locate permalinks)
BEFORE GETTING STARTED IN CANVAS
Instructors will need to locate the permalink of the desired article, eBook, or video from within the library’s subscription databases. Many subscription databases provide permalinks (or stable URLs). These are often different from the URL present at the top of the browser. Library liaisons can help instructors with this process.
INSTRUCTOR/LIBRARIAN SET-UP OPTION 1: MODULE LEVEL
1. From an existing module, click the “+” button
2. Add “External URL”
3. Paste in the permalink of the article, eBook, or video
4. Select “Load in New Tab”
5. Click “Add Item”
Please note: Many articles, eBooks and videos from subscription databases will not load within the Canvas frame. After students click on the module item, they will need to click again on the article title for the page to open in a new window.
Displays in Canvas at: PAGE or MODULE LEVEL
What Is It?
• The ability to link directly to specific library resources within a content page you create in Canvas. Provides access to articles, eBooks or streaming videos from library subscription databases.
Why Use It? • Using permalinks to embed resources allows one to
respect copyright by linking to these resources rather than uploading a PDF.

Creating a Library Presence | 2016
27
INSTRUCTOR/LIBRARIAN SET-UP OPTION 2: PAGE LEVEL
1. From an existing module, click the “+” button
2. Add “Content Page”
3. Select “[New Page]” and fill out the “Page Name”
4. Click “Add Item”
5. Once page is set up, click on the Page, then click on “Edit”
6. Paste in the title of the article, then click the “Link to URL” icon and paste in the permalink and click “Update Link”
7. Click “Save”
POTENTIAL COMPLICATIONS
Instructors may need to check with library liaison to determine the number of user licenses (single or unlimited) per resource to determine the simultaneous user view options.
WHAT THIS LOOKS LIKE IN CANVAS
At the Module Level:
Or, at the Page Level:

Creating a Library Presence | 2016
28
Embed ProQuest’s SIPX Reading Lists
KEY RESOURCES
SIPX from EduApp Center (for LMS admin): https://www.eduappcenter.com/apps/398#.V_qmwPkrKUk
SIPX in Canvas Modules: For Instructors: https://www.dropbox.com/s/a4v7rtwcejg9cij/SIPXinCanvas-ForInstructors.pdf?dl=0
SIPX in Canvas Pages: For Instructors: https://www.dropbox.com/s/i9r1kfdpfairw7x/UsingSIPXLinksinCanvasPages.pdf?dl=0
WHO NEEDS TO BE INVOLVED
The following need to be involved for this to work:
Instructor of the course
Librarian (for initial set-up and continued support)
LMS/Canvas Administrator (for initial set-up)
BEFORE GETTING STARTED IN CANVAS
Library needs to have a subscription for a ProQuest SIPX account.
LMS/CANVAS ADMINISTRATIVE SET-UP
Once the ProQuest’s SIPX account is established on campus, the LMS Administrator needs to make the SIPX app available in the college’s instance of Canvas. The link to the app is here: https://www.eduappcenter.com/apps/398#.V_qmwPkrKUk
INSTRUCTOR/LIBRARIAN SET-UP
See the instructions designated for instructors listed in Key Resources above. Reading lists can be implemented at the Module and Page level in Canvas.
POTENTIAL COMPLICATIONS
Displays in Canvas at: PAGE or MODULE LEVEL
What Is It? • Places links to SIPX readings lists directly in courses.
Why Use It? • Provides links to course readings and e-readers. Takes care of copyright clearance process.

Creating a Library Presence | 2016
29
Authors unable to test.
WHAT THIS LOOKS LIKE IN CANVAS
At the Module Level:
(Image from: https://www.dropbox.com/s/i9r1kfdpfairw7x/UsingSIPXLinksinCanvasPages.pdf?dl=0)
Or, at the Page Level:
(Image from: https://www.dropbox.com/s/i9r1kfdpfairw7x/UsingSIPXLinksinCanvasPages.pdf?dl=0)

Creating a Library Presence | 2016
30
Create a General Library Services Page
KEY RESOURCES
Example: Faculty - Library in Canvas Course Resources (Coastline Community College): https://www.youtube.com/watch?v=1qtJxBspgLY&feature=youtu.be
WHO NEEDS TO BE INVOLVED
The following need to be involved for this to work:
Instructor of the course
Librarian (for initial set-up)
BEFORE GETTING STARTED IN CANVAS
Library needs to decide what content it would like to have on a generic library services page. Library needs to decide how to implement in Canvas. Two possible ways are providing HTML code for faculty to paste into a Canvas page or embedding a generic library services LibGuide (for LibGuide option see Embed LibGuide Assets on page 14)
LIBRARIAN SET-UP:
1. Create an HTML file for a library services page
2. Upload HTML file to Google Docs
3. Provide URL for HTML file to faculty
Librarians could also work with LMS/Canvas Administrator to have Library Services page be part of the default course shells for a campus.
INSTRUCTOR SET-UP:
See video listed in Key Resources above from Coastline Community College by Elizabeth Horan
Displays in Canvas at: PAGE LEVEL
What Is It? • A page providing an overview of library services for students. Could be targeted for distance learning.
Why Use It? • It creates a one-stop place in Canvas for information about library services.

Creating a Library Presence | 2016
31
WHAT THIS LOOKS LIKE IN CANVAS
At the Page Level:
(Image from Coastline Community College / Elizabeth Horan: https://www.youtube.com/watch?v=1qtJxBspgLY&feature=youtu.be)

Creating a Library Presence | 2016
32
Embed Search Box Widget from EBSCO Discovery Service
KEY RESOURCES
Canvas & Libraries | EBSCO Discovery Search Box (Screencast): http://screencast-o-matic.com/watch/cD6nYQjtTK
WHO NEEDS TO BE INVOLVED
The following need to be involved for this to work:
Instructor of the course
Librarian/IT person in charge of web services if a server upon which to host the search box code is needed
BEFORE GETTING STARTED IN CANVAS
Embedding source code from EBSCO’s Search Box Builder directly into Canvas pages will not work because Canvas prevents the embedding of JavaScript. Here are two alternative options:
1. If the library has a separate web server, upload an HTML document with the search box, and then use an iFrame to embed that page in Canvas:
<iframe src="https://libraries.santarosa.edu/files/canvas_smartsearch.html"></iframe>
2. If the library does NOT have a separate web server, EBSCO provides a search box that has several customization options, including logo placement, sizing, proxy server configuration, default search options, etc. The code that will need to be copied-and-pasted into Canvas will look something like this:
<iframe src="http://widgets.ebscohost.com/prod/search/iframesearchbox/iframe_searchbox.php?custID=CUSTOMERID&groupID=GROUPID&profID=PROFILEID&authtype=cookie,ip,guest"></iframe>
Replace the following fields: CUSTOMERID, GROUPID, and PROFILEID
Replace http with https
See the directions for replacing these fields as well as other search box options at: http://edswiki.ebscohost.com/IFrame_Search_Boxes (EDS Wiki login required)
Displays in Canvas at: PAGE LEVEL
What Is It? • Embedding search box widgets allows students to search Ebsco Discovery content from directly within Canvas.
Why Use It? • To give easy access to library resources within a course.

Creating a Library Presence | 2016
33
Once librarian determined which approach to use (host on own web server or use EBSCO hosted code), proceed with Canvas set-up.
INSTRUCTOR/LIBRARIAN SET-UP: PAGE LEVEL
4. From an existing module, click the “+” button
5. Add “Content Page”
6. Select “[New Page]” and fill out the “Page Name”
7. Click “Add Item”
8. Once page is set up, click on the Page, then click on “Edit”
9. In Edit mode, click on “HTML Editor”
10. Paste in the <iframe> code* (see Before Getting Started in Canvas in above step)
11. Click “Save”
*The library needs to make the iFrame HTML available to instructors in some way. For example, built into part of a module in the commons, hosted on a LibGuide, etc.
POTENTIAL COMPLICATIONS
See steps in Before Getting Started in Canvas above. Use the Embed a Search Box Widget from EBSCO Databases on page 30 for search widget directions for individual EBSCO databases (i.e. CINAHL, Business Source Complete, etc.).
WHAT THIS LOOKS LIKE IN CANVAS
At the Page Level:

Creating a Library Presence | 2016
34
Embed Search Box Widget from EBSCO Databases (not Discovery)
KEY RESOURCES
Canvas & Libraries | EBSCO Discovery Search Box (Screencast): http://screencast-o-matic.com/watch/cD6nYQjtTK
WHO NEEDS TO BE INVOLVED
The following need to be involved for this to work:
Instructor of the course
Librarian (to provide the iframe code for the search box)
BEFORE GETTING STARTED IN CANVAS
Embedding source code from EBSCO’s Search Box Builder directly into Canvas pages will not work because Canvas prevents the embedding of JavaScript. EBSCO’s iframe option for search boxes can be used:
1. EBSCO provides a search box that can be embedded embed that has several customization options, including logo placement, sizing, proxy server configuration, default search options, etc. This is the starting code for to paste into Canvas:
<iframe src="https://widgets.ebscohost.com/prod/search/iframesearchbox/iframe_ehost_searchbox.php?custID=CUSTOMERID&groupID=GROUPID&profID=PROFILEID&authtype=ip&showFT=1&showRV=1" width="500" height="175"></iframe>
2. Then see Appendix 1: iFrame options for EBSCO Database Search Widgets on page 34 for customization options
INSTRUCTOR/LIBRARIAN SET-UP: PAGE LEVEL
1. From an existing module, click the “+” button
2. Add “Content Page”
Displays in Canvas at: PAGE LEVEL
What Is It? • Embedding search box widgets allows students to search library database content from directly within Canvas.
Why Use It? • Provides access to specific library databases within courses.

Creating a Library Presence | 2016
35
3. Select “[New Page]” and fill out the “Page Name”
4. Click “Add Item”
5. Once page is set up, click on the Page, then click on “Edit”
6. In Edit mode, click on “HTML Editor”
7. Paste in the <iframe> code* (see Before Getting Started in Canvas in above step)
8. Click “Save”
POTENTIAL COMPLICATIONS
See steps in Before Getting Started in Canvas above. Currently, EBSCO does not have a public page with this information about the iframe search box in regards to individual databases.
*The library needs to make the iFrame HTML available to instructors in some way. For example, built into part of a module in the commons, hosted on a LibGuide, etc.
WHAT THIS LOOKS LIKE IN CANVAS
At the Page Level:
The search box can be modified, see Appendix 1: iFrame options for EBSCO Database Search Widgets on page 34 for customization options.

Creating a Library Presence | 2016
36
Embed Search Box Widget from ExLibris Primo
KEY RESOURCES
Embedding a Primo Search Box: https://knowledge.exlibrisgroup.com/Primo/Product_Documentation/Technical_Guide/110Embedding_the_Primo_Search_into_a_Local_Site/010Embedding_a_Primo_Search_Box
Canvas & Libraries | EBSCO Discovery Search Box (Screencast): http://screencast-o-matic.com/watch/cD6nYQjtTK
ExLibris Primo and EBSCO Discovery Service have the same implementation problems with their search box code. Apply the information in the EBSCO Discovery Search Box Screencast to the implementation of a Primo search box.
WHO NEEDS TO BE INVOLVED
The following need to be involved for this to work:
Instructor of the course
Librarian/IT person in charge of web services if a server upon which to host the search box code is needed
BEFORE GETTING STARTED IN CANVAS
Embedding source code from ExLibris’ search box page (linked above) directly into Canvas pages will not work because Canvas prevents the embedding of JavaScript.
Here is the alternative:
If the library has a separate web server, upload an HTML document with the search box code, and then use an iFrame to embed that page in Canvas.
For example:
<iframe src="https://libraries.santarosa.edu/files/primo_canvas.html"></iframe>
Get the code for the HTML document from here:
Embedding a Primo Search Box: https://knowledge.exlibrisgroup.com/Primo/Product_Documentation/Technical_Guide/110Embedding_the_Primo_Search_into_a_Local_Site/010Embedding_a_Primo_Search_Box
Displays in Canvas at: PAGE LEVEL
What Is It? • Embedding search box widgets allows students to search library database content from directly within Canvas.
Why Use It? • To give easy access to library resources within a course.

Creating a Library Presence | 2016
37
Several fields within the example code will need to be replaced with institution support.
Once the code is hosted on the local server, proceed with set-up in Canvas.
INSTRUCTOR/LIBRARIAN SET-UP: PAGE LEVEL
1. From an existing module, click the “+” button
2. Add “Content Page”
3. Select “[New Page]” and fill out the “Page Name”
4. Click “Add Item”
5. Once page is set up, click on the Page, then click on “Edit”
6. In Edit mode, click on “HTML Editor”
7. Paste in the <iframe> code* (see Before Getting Started in Canvas in above step)
8. Click “Save”
*The library needs to make the iFrame HTML available to instructors in some way. For example, built into part of a module in the commons, hosted on a LibGuide, etc.
POTENTIAL COMPLICATIONS
See steps in Before Getting Started in Canvas above.
WHAT THIS LOOKS LIKE IN CANVAS
At the Page Level:

Creating a Library Presence | 2016
38
Appendix 1: iFrame options for EBSCO Database Search Widgets
The following iFrame Options are Not for EBSCO Discovery. These are for widgets for individual databases. For EBSCO Discovery widget options, see Embed a Search Box Widget from EBSCO Discovery Service on page 28 above.
iFrame Options
* - default
*** - required
newwindow:
0 = search results appear in the same window
*1 = search results appear in a new window
***custID: the institution's customer ID number (the log in to eadmin)
groupID: the ID of the group that contains the profile to search
*main = the MAIN group, which is generally the best option if not sure
profID: the ID of the profile to search
*ehost = the default ehost profile
user: if using UID as an authtype, put the username in this profile
*none
password: if using UID as an authtype, put the password in this profile
*none
type: EBSCOhost search box type -
1 = displays advanced (3 boxes)
*0 = displays basic (1 box)
lang: language the search interface should be in
*en
authtype: -- separate each authtype with commas (e.g., "cookie,ip")
*ip - IP Range
*cookie - Cookie
uid - User ID
athens - Athens
user - Personal User
url - referring URL
shib - Shibboleth
Other authtypes currently not supported in this iFrame: Patron ID and Patterned ID
mode: type of search
or = ANY search term must appear in each result
*and = ALL search terms must appear in each results
bool = treat the search terms as BOOLEAN (phrase searching)
title: text above the search box. When writing the iFrame URL, include '+' between each word in place of the space (e.g. Research+Databases will produce "Research Databases")
*Research Databases
showAllOptions:

Creating a Library Presence | 2016
39
1 = Show all limiter check boxs and radio buttons
*0 = Show only limiters and options specified with "show" variables below
showTitleAuthorButtons:
N = Do not show Keyword/Title/Author radio buttons below search box (default is KEYWORD search)
*<anything else> = Show these radio buttons
showFT, showRV, showRA -- show the FULL TEXT, PEER REVIEWED, and REFERENCES AVAILABLE, respectively
1 = Show the limiter
*0 = Do NOT show the limiter
defaultFT, defaultRV, defaultRA: -- default values for the FULL TEXT, PEER REVIEWED, and REFERENCES AVAILABLE, respectively
these limiters will be applied whether or not they are shown to the user (e.g., default the search to FULL TEXT even without SHOWING the checkbox to users)
1 = Default to CHECKED
*0 = Default to UNchecked
labelFT, labelRV, labelRA: -- labels for the various limiters. They default to: "FULL TEXT", "PEER REVIEWED", and "REFERENCES AVAILABLE"
logoURL: -- URL to the logo. No QUESTION MARKS or AMPHERSANDS (&) allowed in the URL
default: //widgets.ebscohost.com/prod/common/images/ehost100.gif
logoWidth: -- padding to the left of the searchbox text and input field
default: 110
logoHeight: -- padding on top of the searchbox text and input field
default: 5
width: -- width of the entire searchbox
default: 375
height: -- height of the entire searchbox
default: 66
boxsize: -- size (in characters) of the searchbox input field
default: 23
nologo: -- remove the logo from the searchbox altogether
1 = no logo will appear
*0 = logo will appear
bgcolor: -- background color hexcode (without the # symbol)
default: none
FFFFFF: white
db: -- input database (db) codes to limit to specific databases (Find the db codes in EBSCOadmin > EBSCOhost
Profile > Databases: http://screencast.com/t/hUiL10Dxcf)
default: if &db= isn't specified, the search box will use the default databases
list as many databases as preferred separated by commas (db codes must be valid) e.g. &db=aph,gnh,apn,31h

Creating a Library Presence | 2016
40
Appendix 2: Permissions for Custom Librarian Role in Canvas
The following are the permissions available in Canvas when LMS Admins are setting up a Role. Items marked with a check illustrates a model for a custom Librarian Role based on a TA Role with the grading permissions removed.
Add, edit and delete events on the course calendar
Add/remove other teachers, course designers or TAs to the course
Add/remove students for the course
Change course state
Create and edit assessing rubrics
Create student collaborations
Create web conferences
Edit grades
Manage (add / edit / delete) assignments and quizzes
Manage (add / edit / delete) course files
Manage (create / edit / delete) course sections
Manage (create / edit / delete) groups
Manage alerts
Manage all other course content
Manage faculty journal entries
Manage learning outcomes
Manage wiki (add / edit / delete pages)
Moderate Grades
Moderate discussions (delete / edit other's posts, lock topics)
Post to discussions
See the list of users
Send messages to individual course members
Send messages to the entire class
View all grades
View all students' submissions and make comments on them
View analytics pages
View and link to question banks
View discussions
View the group pages of all student groups
View usage reports for the course

Creating a Library Presence | 2016
41
About the Authors
ERIN DANIELS
Erin Daniels is the Electronic Services Librarian at Santa Rosa Junior College. She has over a decade of experience with information literacy instruction, both in person and online and currently teaches LIR10: Introduction to Information Literacy in Canvas. Erin has a master’s degrees in Library & Information Science from Simmons College.
PHYLLIS USINA
Phyllis Usina is a librarian at the Santa Rosa Junior College, where she has taught online information literacy classes since 1997. She has used most of the Learning Management Systems and is excited by the opportunities Canvas provides for integrating library services into the online classroom. She holds a doctorate degree in Higher Education Leadership from Walden University and a master’s degrees in Library & Information Science from the University of Illinois at Urbana-Champaign.
COUNCIL OF CHIEF LIBRARIANS
The Council of Chief Librarians represent, promote and advance libraries in public California community college education and to provide a vehicle for communication among chief librarians, other community college personnel, and state agencies.
ACKNOWLEDGEMENTS
The author’s would like to acknowledge CCL’s OEI SC Library Services workgroup and Alicia Virtue, Dean of Learning Resources for Santa Rosa Junior College for their assistance on this project. The authors would also like to thank Santa Rosa Junior College’s Distance Education Department.