cpu-1232 - eurotech
TRANSCRIPT

EmbeddedDNA ®
PC/104 CPU Module
CPU-1232; TFT Digital Interface
Rev. 1.0 Sep. 2003
COPYRIGHT 1994-2003 Eurotech S.p.A. All Rights Reserved.
An0031

2 Application Note
ABOUT THIS MANUAL
This application note contains information about the TFT Digital Interface installed on the CPU-1232.
Via J. Linussio 1 33020 AMARO (UD)
ITALY Phone: +39 0433 485 411 Fax: +39 0433 485 499
web: http://www.eurotech.it
e-mail: mailto:[email protected]
NOTICE
Although all the information contained herein has been carefully verified, Eurotech S.p.A. assumes no responsibility for errors that might appear in this document, or for damage to property or persons resulting from an improper use of this manual and of the related software. Eurotech S.p.A. reserves the right to change the contents and form of this document, as well as the features and specifications of its products at any time, without notice. Trademarks and registered trademarks appearing in this document are the property of their respective owners

Application Note 3
Conventions
The following table lists conventions used throughout this guide.
Icon Notice Type Description
Information note Important features or
instructions
Warning
Information to alert you to potential damage to a program, system or device or potential personal injury

(This page is intentionally left blank.)

Table of Contents
Conventions ................................................................................................................................................... 3
Table of Contents ............................................................................................................................................ 5
Chapter 1 CPU-1232 TFT Digital Interface ................................................................................................ 7 TFT Digital Interface Overview ...................................................................................................................... 7 J19 TFT Digital Interface Connector .............................................................................................................. 8 J19 TFT Digital Interface Pin Out................................................................................................................... 9 J19 TFT Digital Interface Signal Description................................................................................................ 10
Chapter 2 BIOS Setup ............................................................................................................................... 11 CPU-1232 BIOS Menu................................................................................................................................. 11 CPU-1232 BIOS Flat Panel parameters ...................................................................................................... 12 Defining CPU-1232 BIOS Parameters......................................................................................................... 12 Timings Diagrams ........................................................................................................................................ 14
Chapter 3 Connecting the TFT-LCD to the CPU-1232............................................................................ 16

(This page is intentionally left blank.)

Chapter 1 CPU-1232 TFT Digital Interface
This brief application note contains information about using the CPU-1232 TFT digital interface to help users connect TFT-LCD panels to the CPU-1232 module.
TFT Digital Interface Overview
The CPU-1232 allows users to connect various models of LCD-TFT flat panel displays via its J19 connector. The following table shows the supported LCD-TFT video resolutions
Resolution Simultaneous Colours
Refresh Rate (Hz)
640x480 8bpp 256 colours 60 640x480 16bpp 64K colours 60 800x600 8bpp 256 colours 60 800x600 16bpp 64K colours 60 1024x768 8bpp 256 colours 60 1024x768 16bpp 64K colours 60
Table 1. LCD-TFT video resolutions (*) (*)- This list is not meant to be a complete list of all the possible supported TFT video
For further info about other/new LCD-TFT flat panels supported, please contact the Eurotech Customer Support Service.

8 Application Note
J19 TFT Digital Interface Connector
The TFT digital interface is accessible via the J19 connector, which is a 20x2 pitch 1.25mm SMT connector.
U1
J19
NSGeode Gx1
Process
NS Geode CS5530A
I/OCompanion
SSD
Figure 1. Connectors layout The following table shows the J19 connector type and its matching models:
Connector Reference Connector TyJ19 Used Connector Hirose DF13-40DP
J19 Corresponding connector Hirose DF13-40DS
Table 2. J19 mating connectors
For further information about connectors (electrical, mechanical, …) pleashttp://www.hirose.com/ referring to the DF13 connector family.
2
9 0
3 4pe -1.25V -1.25C
e refer to the Hirose website:

Application Note 9
J19 TFT Digital Interface Pin Out
The following table describes the J19 TFT Digital Interface connector signals:
Pin Number Function Pin Number Function 2 Reserved 1 GND 4 GND 3 GND 6 NC 5 VDD 8 GND 7 VDD 10 GREEN5 (MSB) 9 FP_HSYNC 12 GREEN4 11 GND 14 GREEN3 13 FP_VSYNC 16 GREEN2 15 VDD 18 GND 17 VDD 20 GREEN1 19 Data Enable 22 GREEN0 (LSB) 21 GND 24 BLUE5 (MSB) 23 RED5 (MSB) 26 BLUE4 25 RED4 28 GND 27 RED3 30 BLUE3 29 VDD Enable 32 BLUE2 31 BackLight Enable 34 BLUE1 33 RED2 36 BLUE0 (LSB) 35 RED1 38 GND 37 RED0 (LSB) 40 Dot Clock 39 GND
Table 3. J19 TFT Digital Interface connector pinout
For physical correspondence with the J19 connector pins, please refer to Figure 1. The purpose of the information shown herein is to help the user properly build the cable for connecting the digital interface of the CPU-1232 with a TFT LCD Panel.
Reducing the cable length will reduce interferences to the TFT LCD digital signals.

10 Application Note
J19 TFT Digital Interface Signal Description
The digital TFT interface signals are described in the following table: SIGNAL NAME Description Electrical Characteristics
Dot Clock Pixel Port Clock Dot Clock is the pixel dot clock output. It clocks the pixel data. TTL 8mA VHMAX = 3.3V
FP_HSYNC Flat Panel Horizontal Sync Flat Panel Horizontal Sync establishes the line rate and horizontal Retrace interval for a TFT display.
TTL 8mA VHMAX = 3.3V
FP_VSYNC
Flat Panel Vertical Sync Flat Panel Vertical Sync establishes the screen refresh rate and vertical retrace interval for a TFT display.
TTL 8mA VHMAX = 3.3V
ENA_DISP Display Enable Display Enable indicates the active display portion of a scan line.
TTL 8mA VHMAX = 3.3V
VDD ENABLE TTL 8mA VHMAX = 3.3V DATA ENABLE This is a data valid signal TTL 8mA VHMAX = 3.3V BACKLIGHT ENABLE
This is a useful signal which allow you to control the switching on-off of the lamps TTL 8mA VHMAX = 3.3V
RED[5:0] Graphics Red Pixel Data Bus This bus drives graphics pixel data synchronous to the Dot Clock output.
TTL 8mA VHMAX = 3.3V
GREEN[5:0] Graphics Green Pixel Data Bus This bus drives graphics pixel data synchronous to the Dot Clock output.
TTL 8mA VHMAX = 3.3V
BLUE[5:0] Graphics Blue Pixel Data Bus This bus drives graphics pixel data synchronous to the Dot Clock output.
TTL 8mA VHMAX = 3.3V
VDD Power Supply +5V +/- 5% GND Ground Ground
Table 4. Signal Description - Electrical Characteristics

Application Note 11
Chapter 2 BIOS Setup
To enable the TFT Digital Interface functionality, the user sbould properly configure the BIOS settings. This section will show which BIOS settings to modify to properly control the LCD-TFT. For further information on how to set the BIOS, please refer to the CPU-1232 user manual.
CPU-1232 BIOS Menu
After entering BIOS setup (pressing the “F2” key during the boot time), select the Flat Panel page using the cursor arrows. The following image will appear on the screen.
Figure 2. BIOS setup - Flat Panel section
12 Application Note
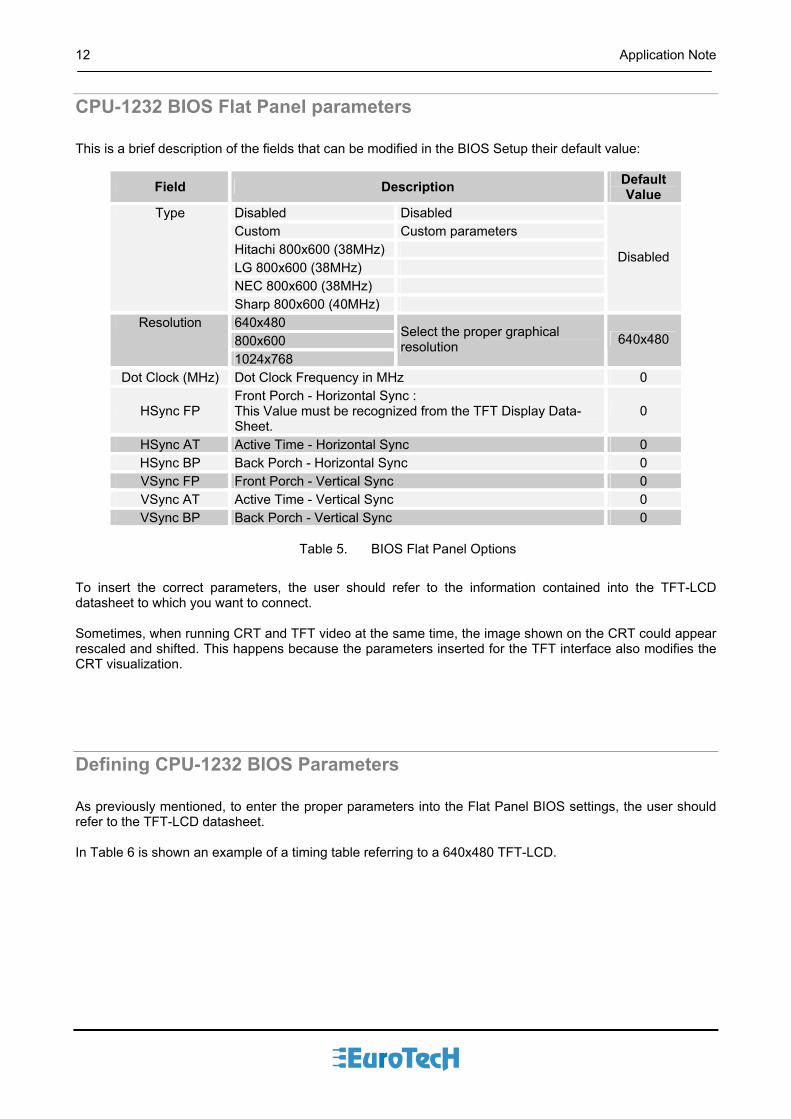
CPU-1232 BIOS Flat Panel parameters
This is a brief description of the fields that can be modified in the BIOS Setup their default value:
Field Description Default Value
Disabled Disabled Custom Custom parameters Hitachi 800x600 (38MHz) LG 800x600 (38MHz) NEC 800x600 (38MHz)
Type
Sharp 800x600 (40MHz)
Disabled
640x480 800x600
Resolution
1024x768
Select the proper graphical resolution 640x480
Dot Clock (MHz) Dot Clock Frequency in MHz 0
HSync FP Front Porch - Horizontal Sync : This Value must be recognized from the TFT Display Data-Sheet.
0
HSync AT Active Time - Horizontal Sync 0 HSync BP Back Porch - Horizontal Sync 0 VSync FP Front Porch - Vertical Sync 0 VSync AT Active Time - Vertical Sync 0 VSync BP Back Porch - Vertical Sync 0
Table 5. BIOS Flat Panel Options
To insert the correct parameters, the user should refer to the information contained into the TFT-LCD datasheet to which you want to connect. Sometimes, when running CRT and TFT video at the same time, the image shown on the CRT could appear rescaled and shifted. This happens because the parameters inserted for the TFT interface also modifies the CRT visualization.
Defining CPU-1232 BIOS Parameters
As previously mentioned, to enter the proper parameters into the Flat Panel BIOS settings, the user should refer to the TFT-LCD datasheet. In Table 6 is shown an example of a timing table referring to a 640x480 TFT-LCD.

Application Note 13
Table 6. Timing Characteristic Example for a TFT-LCD
The following instructions are an example on how to define the values to enter in the Setup, relating to timing characteristics shown in Table 6.

14 Application Note
BIOS Field BIOS Value Notes Type Custom We would enter custom parameters
Resolution 640x480 Obtained from the TFT-LCD datasheet, this is a characteristic.
Dot Clock (MHz) 25 Referring Table 6 CLK (1/Tc) Typical value. The reported value 25.175MHz is approximated to 25Mhz
HSync FP 2 Referring Table 6 HSync Front Porch (thf) Typical value. The reported value 16CLK. So the value you've to enter the BIOS is 2 to obtain 16 = ( 2 x 8 )
HSync AT 12 Referring Table 6 HSync Pulse width (thp*) Typical value. The reported value 96CLK. The value you've to enter the BIOS is 12 to obtain 96 = ( 12 x 8 )
HSync BP 6 Referring Table 6 HSync Pulse Back-porch (thb*) Typical value. The reported value 48CLK. The value you've to enter the BIOS is 6 to obtain 48 = ( 6 x 8 )
VSync FP 12 Referring Table 6 VSync Front Porch (tvf) Typical value. The reported value 12CLK.
VSync AT 2 Referring Table 6 VSync Pulse width (tvp*) Typical value. The reported value 2 H.
VSync BP 31 Referring Table 6 VSync Back Porch (thb*) Typical value. The reported value 31CLK.
Table 7. Flat Panel BIOS parameters
Timings Diagrams
The followings images show a graphical mode to represent timing data. The information is not represented in the same graphical order shown into the Flat Panel BIOS setup, but the contents are the same.
Figure 3. Timing Diagram Horizontal Mode

Application Note 15
Figure 4. Timing Diagram Vertical Mode
The previous Figures may be useful to verify graphically if the entered BIOS parameters match the TFT timing diagram. Regarding the timing, the following relationships should be ensured: Horizontal Sync. : Period (th) = Display Period (thd) + Front Porch (thf) + Pulse Width (thp*) + Back Porch (thb*) Vertical Sync. : Period (tv) = Display Period (tvd) + Front Porch (tvf) + Pulse Width (tvp*) + Back Porch (tvb*) Practically, referring to Table 6 and to Table 7, the results are: Horizontal Sync : 800 = 640 + 16 + 96 + 48 Vertical Sync : 525 = 480 + 12 + 31 + 2

16 Application Note
Chapter 3 Connecting the TFT-LCD to the CPU-1232
This section contains a brief checklist of the actions to perform before connecting a TFT–LCD display to the CPU-1232. First of all, download all information about the TFT-LCD module and its inverter selected;
Verify that the resolution of the TFT panel is compatible with and supported by the resolution shown in
Table 1 of this application note; Read carefully the TFT-LCD datasheet,in particular the Electrical Characteristics that must be
compatible with the electrical interface of the CPU-1232 TFT LCD interface referred to in Table 4; Consulting the TFT-LCD datasheet and the Table 3 CPU-1232 connector pin-out, write a table with the
connections between the J19 CPU-1232 connector and the TFT-LCD selected; this may be useful when building the connection cable;
Consulting the TFT-LCD inverter datasheet and Table 3 CPU-1232 connector pin-out, make the proper
cable. Refer to the TFT-LCD input signal timing datasheet section to detect the parameters to insert into the
CPU-1232 BIOS Flat Panel section and calculate it as described in the Chapter 2 BIOS Setup. To connect the system, first carefully verify the connections cable, the BIOS settings and all the
information to prevent erroneous damages to the system. After verifying the information, power up the system verifying all information is properly displayed on the
TFT-LCD module. Try some graphical test programs to detect the functionality of the images.