abaco machines operation manual abaco site saw mod s2
TRANSCRIPT

1
ABACO MACHINES OPERATION MANUAL
Abaco Site Saw Mod S2
ABACO MACHINES USA, INC. (EAST COAST OPERATION)
505 Edwards Court
Newport News, VA 23608
Tel: 757-877-5243 Fax: 757-877-5863
Email: [email protected] Website:
www.abacomachines.com
ABACO MACHINES USA, INC. (WEST COAST OPERATION)
20224 S. Normandie Ave.
Torrance, CA 90502
Tel: 310-532-0366 Fax: 310-532-0499
Email: [email protected] Website:
www.abacomachines.com
ABACO MACHINES INTERNATIONAL
Unit 4/34-36 Fairfield Street
Fairfield N.S.W. 2163 Australia
Tel: 61-2-9632-4990 Fax: 61-2-9632-1510
Email: [email protected] Website: www.abaco.com.au

2
Abaco Site Saw Mod S2
Instruction Manual and Safety Instructions
READ THIS MANUAL BEFORE USING THE SAW. Contents:
Safety pg. 3 Product Specifications pg. 8
Unpacking and Assembly pg. 14
Operation pg. 18
Clean up pg. 21
Maintenance pg. 21
Troubleshooting pg. 22

3
1. Safety
READ AND UNDERSTAND ALL OF THE OPERATING INSTRUCTIONS, SAFETY PRECAUTIONS AND WARNINGS IN THE INSTRUCTION MANUAL BEFORE OPERATING OR
MAINTAINING THIS SAW. Most accidents that result from the operation and maintenance of Wet Saws are caused by the failure to observe basic safety rules or precautions. An accident can often be avoided by recognizing a potentially hazardous situation before it occurs, and by observing appropriate safety procedures. Safety messages inform the user about potential hazards that could lead to injury, death and/or equipment damage. Each safety message will be preceded by one of the following (3) three words that identify the severity of the message. Definitions of Signal Words
DANGER Not following instructions WILL lead to DEATH or SERIOUS INJURY
WARNING Not following instructions COULD lead to DEATH or SERIOUS INJURY
CAUTION Not following instructions CAN lead to injury Damage Prevention and Important Messages A Damage Prevention Message is used to inform the user of important information and/or instructions that could lead to equipment or other property damage if not followed. Information Messages convey information that pertains to the equipment being used. Each message will be preceded by the word NOTE, as in the example below. Note: Equipment and/or property damage may result if these instructions are not followed.

4
Important Safety Precautions:
Read all Instructions before use. Always wear eye protection.
• When operating the Saw, always wear eye protection, and make sure others in the work area wear eye protection, too.
Wear a dust mask.
• A face dust mask or respirator should be worn if the cutting operation is dusty.
Always wear ear protection. Always wear ear protection to protect your ears from loud noise. Keep all guards in place.
• In order to prevent injury, keep guards in place and in working order at all times.
Keep the work area clean.
• Cluttered areas invite injuries. Clear all work areas of unnecessary tools, debris, etc.
Do not use in dangerous environments.
• Do not use the Saw in wet locations or expose it to rain. Always ensure that the work area has plenty of light.
Keep children and visitors away
• All visitors and children should be kept a safe distance from the work area.
Do not force the Saw.
• The Saw will do a better job and operate safer at the rate for which it was designed.
Dress properly.
• Do not wear loose clothing or jewelry as they can be caught in moving parts. Non-slip footwear is recommended.

5
• Wear protective hair covering to contain long hair.
Secure your work.
• Clamps or a vise should be used to hold your work whenever practical. Keeping your hands free to operate the saw is safer.
Do not overreach.
• Keep proper footing and balance at all times by not overreaching. Stay alert
• Focus on what you are doing. Use common sense. Do not operate the Saw when you are tired.
• The Saw should never be used if you are under the influence of alcohol,
drugs or medication that makes you drowsy. Never stand on the saw.
• Serious injury could occur if the Saw is tipped, or if the Saw is unintentionally contacted.
Disconnect tools.
• Power should always be disconnected before servicing or when changing accessories, such as blades, pumps, etc.
Check for damaged parts.
• Before using the Saw, check for damaged parts. A guard or any other part that is damaged should be carefully checked to determine if it will operate properly and perform its intended function.
• Always check moving parts for proper alignment or binding. Check for
broken parts and mountings and all other conditions that may affect the operation of the saw. A guard, or any damaged part, should be properly repaired or replaced.
Check the direction of feed.
• Always feed work into a blade against the direction of rotation. A blade should always be installed such that rotation is in the direction of the arrow imprinted on the side of the blade.
Never leave the saw running unattended. Turn the power off.
6
• Do not leave the Saw until it comes to a complete stop. Always turn the saw OFF when leaving the work area or when a cut is finished.
Use the proper extension cord.
• If using an extension cord, make sure it is in good condition. When using an extension cord, be sure to use one heavy enough to carry the current your product will draw.
• An undersized cord will cause a drop in line voltage that will result in a loss
of power and overheating. Maintain the Saw with care.
• Keep the Saw clean for the best and safest performance. Always follow the maintenance instructions for lubricating and when changing accessories.
Keep clear of rotating or moving parts.
• Keep hands, feet, hair, and clothing away from all moving parts to prevent injury. Never operate the Saw with covers, shrouds, or guards removed.
Avoid electrical shock.
• Never touch electrical wires or components while the motor is running. Exposed, frayed or worn electrical motor wiring can be sources of electrical shock that can cause severe injury or burns.
Electrical Requirements and Grounding Instructions
In order to prevent potential electrical shock and injury, the following electrical safety precautions should be followed at all times!
• In case of a malfunction or breakdown, grounding provides a path of least resistance for an electric current to reduce the risk of electric shock. This saw is equipped with an electric chord having a grounding conductor and a grounding plug. The plug must be plugged into a matching outlet that is properly installed and grounded in accordance with all local codes and ordinances.
• Do not modify the plug provided. If it will not fit the outlet, have the
proper outlet installed by a qualified electrician.
• Improper connection of the equipment or the grounding conductor can result in a risk of electric shock.
• The grounding conductor is the insulated conductor that has an outer
surface that is green, with or without yellow stripes.
• If a repair or replacement of the electric cord or plug is necessary, do not connect the grounding conductor to a live terminal.

7
• Check with a qualified electrician or service personnel if the grounding
instructions are not completely understood, or if in doubt as to whether the Saw is properly grounded.
• Use only 3-wire extension cords that have 3-prong grounding plugs and 3-pole receptacles that accept the Saw's plug.
• Repair or replace a damaged or worn cord immediately.
• To reduce the risk of electrocution, keep all connections dry and off the
ground.

8
2. Product Specifications The Abaco SITE SAW MOD S2 is a Precision Saw designed to cut all types of materials including, but not limited to, granite, pavers, porcelain, terracotta, marble, quarry, sandstone and slate, and almost any other non-ferrous material. General Description The Abaco SITE SAW MOD S2 has a “Cast Aluminum Machined Working Table” guided by dual linear bearings on an induction hardened chrome bar (Rust Free). The Saw includes a powerful 3HP motor and a thermal protective overload.
Model Mod-S2 (USA Mod) Mod-S2 (Aus Mod) Power 3HP 2.2KW Voltage 220V 240V Hertz (Cycle) 60 50 Full Load Amps 14.4 13 Motor RPM 3400 2800 Switch Contains Thermal Circuit Breaker Inches Millimeters Blade Capacity 10 x 12 x 14 254 x 304 x 355 Arbor Size 1 25.4 Depth of Cut at 90° 2 x 3 x 4 50 x 75 x 100 Depth of Cut at 45° 1.2 x 2 x 3 30 x 50 x 75 Length of Cut 65 1650 Working Table 67 x 26 1700 x 650 2X Support Arms 20 x 4 520 x 100 Saw Weight uncrated 396lbs 180kg Water Tray Capacity 48G 180L

9
017
016
015
014
007
009
013
012010
011
010
009
008
007
006
005
002
003
004
PO
S
Descrip
tion
Q
ty
001
Ruler / S
quare G
uid
e 01
002
Hex B
olt M
8 x 2
0
02
003
Wash
er Ø8 x Ø
19 x1
.5
06
004
Leveling G
uid
e 01
005
Cap
screw M
6 x 1
5
05
006
Roller T
able Fram
e 01
007
Roller B
earing
10
008
Plastic Roller
05
009
Bearin
g 6
000z
10
010
Circlip
Ø10
10
011
Roller S
haft
05
012
Al. W
asher Ø
10 x Ø
16 x 0
.8
05
013
Roller S
prin
g
05
014
M8 K
nob
11
015
Lockin
g B
racket 02
016
Exten
sion Leg
02
017
Rubber C
ap 4
0m
m
10

10
018
019
014
020
026
014
027
031
041043044
045
046
014
047
032
048
049
051047
042
PO
S
Descrip
tion
Q
ty
018
Saw
Tab
le 01
019
Sto
p G
uid
e 01
020
Cap
Screw
M8 x 4
0
06
021
Support tab
le stopper
02
022
Sto
p R
od
02
023
Nut M
8
10
024
Cap
Screw
M8 x 3
0
02
025
Support T
able
02
026
Sto
pper Lockin
g screw
02
027
Tray Leg
02
028
Hex B
olt M
10 x 3
0
06
029
Sprin
g W
asher Ø
10
06
030
Wash
er Ø10 x Ø
20 x 1
.5
06
031
Support T
able B
ar 01
032
Hex B
olt M
8 x 3
0
08
033
Wash
er Ø10 x Ø
22 x 1
04
034
Nylo
n N
ut M
10
02
035
Bearin
g 6
021z
02
036
Bearin
g S
haft
02
037
Circlip
Ø12
05
038
Rubber G
rom
met
01
039
Water Pu
mp
01
040
Pum
p p
rotecto
r 01
041
Water Tray
01
042
PVC co
nnector m
ale 01
043
Circlip
Ø20
04
044
Wash
er Ø20 x Ø
24 x 1
04
045
Solid
Rubber W
heel Ø
205
02
046
Tray Leg
with
Wheel S
haft
02
047
Wash
er Ø8 x Ø
30 x2
.5
06
048
Counter-S
unk C
ap S
crew M
10 x 4
0
02
049
Sw
ing A
rm
02
050
Rubber p
lug
01
051
M8 K
nob
02
052
Rubber C
ap 5
0
08
11
065064063062
060
059
058
057
056
055
054
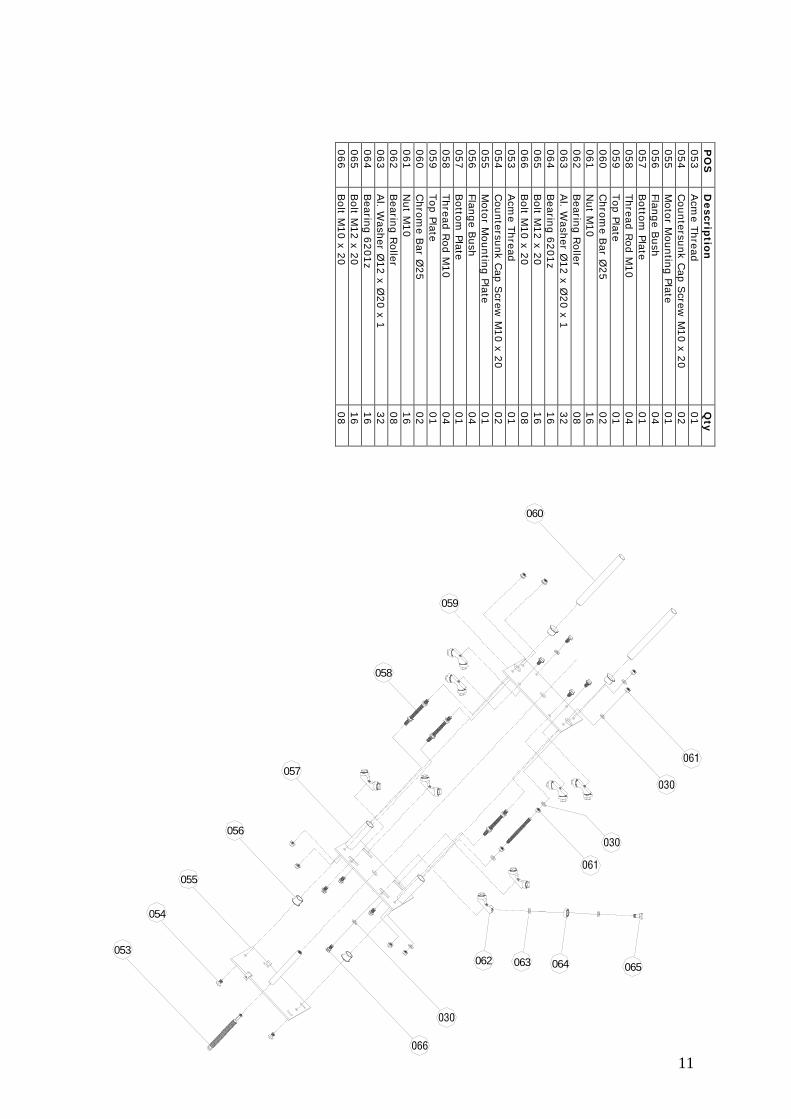
053
PO
S
Descrip
tion
Q
ty
053
Acm
e Thread
01
054
Countersu
nk C
ap S
crew M
10 x 2
0
02
055
Moto
r Mountin
g Plate
01
056
Flange B
ush
04
057
Botto
m Plate
01
058
Thread
Rod M
10
04
059
Top Plate
01
060
Chro
me B
a r Ø25
02
061
Nut M
10
16
062
Bearin
g R
oller
08
063
Al. W
asher Ø
12 x Ø
20 x 1
32
064
Bearin
g 6
201z
16
065
Bolt M
12 x 2
0
16
066
Bolt M
10 x 2
0
08
053
Acm
e Thread
01
054
Countersu
nk C
ap S
crew M
10 x 2
0
02
055
Moto
r Mountin
g Plate
01
056
Flange B
ush
04
057
Botto
m Plate
01
058
Thread
Rod M
10
04
059
Top Plate
01
060
Chro
me B
ar Ø25
02
061
Nut M
10
16
062
Bearin
g R
oller
08
063
Al. W
asher Ø
12 x Ø
20 x 1
32
064
Bearin
g 6
201z
16
065
Bolt M
12 x 2
0
16
066
Bolt M
10 x 2
0
08

12
084
032
083
082
023
081
080
079
078
028
077
076
075
074
073
072067
029
030
082
084
PO
S
Descrip
tion
Q
ty
067
Rubber C
ap
04
068
Chro
me B
ar Hold
er 02
069
Cuppoin
t Socket H
ead S
crew M
8 x 1
0
04
070
Counter S
unk C
apscrew
M8 x 3
0
02
071
Chro
me B
ar Ø60
02
072
Abso
rbin
g R
ubber
01
073
Sto
pper
01
074
Wheel H
andle
01
075
Han
dle S
pin
dle
01
076
Han
dle S
pacer
01
077
Han
d W
heel
01
078
Flange B
earing F2
05
01
079
Counter S
unk C
aps S
crew M
8 x 3
0
04
080
Housin
g C
over 01
081
Wash
er Ø8 x Ø
20 x 2
.5
01
082
Cap
s Screw
M6 x 2
0
06
083
Moto
r 2.2
Kw
01
084
Screw
M6 x 1
5
02
085
Rubber Piece
01
086
Moto
r Flange (in
side)
01
087
Blad
e 01
088
Moto
r Flange (o
utsid
e) 01
089
Nut M
20
01
090
Blad
e Cover
01
091
Knob M
6
03
092
Nozzle H
old
er 01
093
Water N
ozzle
02
094
Blad
e Guard
01
095
Rubber A
bsorb
er Ø60 x 1
0
01
096
Sto
pper
01
097
Exten
sion H
ousin
g
01
098
Cap
Screw
M10 x 2
0
01
099
Rubber C
ap 2
0
02
100
Exten
sion B
ar Han
dle
01
101
Exten
sion B
ar 01
102
Nut M
5
02
103
Screw
M5 x 5
0
02
104
Screw
M6 x 1
0
02
105
Lockin
g Pin
01
106
Lockin
g S
prin
g
01
107
Positio
nin
g B
ush
01
108
Spacer
01

13
003
112
PO
S
Descrip
tion
Q
ty
112
Cap
Screw
M8 x 2
0
04
113
Cap
Screw
M10 x 5
0
06
115
Plastic P Clip
05
116
Screw
M4 x 1
5
05
117
Flexible S
prin
g H
old
er 01

14
3. Unpacking and Assembly of the Abaco Site Saw Mod S2 UNPACKING Your Saw has been shipped from our factory thoroughly inspected. The Saw has been aligned and adjusted, and is ready for work. Package Contents Packed into your container you will find: 1 x Abaco SITE SAW MOD S2 1 x Water Recycling Pump (installed) 1 x Pump Guard/ Water Filter (installed) 1 x Cutting Guide 1 x Spanner 1 x Allen Key 6mm 2 x Legs with Wheels 2 x Legs 4 x Knob Screws for Legs 1 x Water Tray Drain Plug 1 x Overflow Drain Valve 2 x Support/ Stop Arms 2 x Side Table with 2 Legs Assembly THE SITE SAW MOD S2 COMES STANDARD WITH THE EUROPEAN POWER PLUG.
1. Alternately this power plug has been removed. Ensure that the correct plug is fitted to the power cable. Check with your local authorized service center for more information.
2. Ensure that the Saw is placed on level ground.
3. Screw the 4 legs onto the water tray of the Saw using the 4 Knob screws
provided, ensuring that the legs with wheels are at the motor’s beginning position end (closest to the water pump).
4. Fit the support/stop arms into the desired position on the off cut side of
the Saw by slotting over the tension bar and tightening.
5. Screw the side table legs onto the side table. Adjust the height of the table using a spirit level to ensure that the side table and working are level.
6. Loosen the ”Travel Lock” on the chrome bars before use.

15
Your Abaco SITE SAW MOD S2 comes standard with a “Travel Lock” located on the induction hardened chrome bar.
1. Before transporting the Saw, ensure that the “Travel Lock” is in position and tightened using the 5mm Allen key supplied.
2. Return the Saw’s head to the first position.
3. Slide the “Travel Lock” against the Saw’s head.
4. Tighten using the 5mm Allen key supplied. Your Abaco SITE SAW MOD S2 has a unique “Single Person Moving System”
1. The bearings on the underside of the carry handle are used to roll the Saw onto the vehicle.
2. Lay the handle with the bearings onto the tray of the vehicle.
3. Unscrew the front legs.
4. Slide the Saw onto the tray.
5. Lock the Saw’s head using the 5mm Allen key.
6. Secure the Saw firmly to the vehicle.

16
Diamond Blade Installation
Important - Do not “cross thread” and do not over tighten the retaining-nut. The Abaco SITE SAW MOD S2 can be fitted with a 10”, 12” or 14” diamond blade.
1. Use the spanner and 6mm Allen key provided.
2. Ensure the power is off and the power cable is disconnected.
3. Remove the blade cover by unscrewing the 3 black knobs.
4. Insert the 6mm Allen key into the middle of the motor shaft. This will lock the shaft.
5. While holding the Allen key, remove the retaining-nut (left hand thread)
and the outer flange using the spanner provided.
6. Install the diamond blade onto the blade shaft.
7. Make sure that the direction of rotation is correct.
8. Verify that the arrow on the blade cover and the arrow on the blade are rotating in the same direction.
9. Reinstall the outer flange and the retaining-nut (left hand thread) holding
the shaft locked with the Allen key. Tighten the retaining-nut.
10. Reinstall the blade cover screw back on using the 3 black knobs. Head Adjustment Depending on the size of the blade and type of cut required (i.e Step Treads). The Abaco SITE SAW MOD S2’s head is adjustable.
1. Ensure the locking lever located next to the hand wheel lever is UP.
2. Turn the hand wheel on the top of the Saw to the desired height.
3. Ensure not to lower the head too deep to cut the working table.
4. Once the desired height has been reached, lock the wheel with the locking lever located next to the hand wheel lever.

17
Water Pump Operation The water pump is designed for water recirculation.
1. Ensure that the drain plug is installed into the water tray.
2. Ensure that the water pump’s guard is installed.
3. Fill the water tray until the water completely covers the water pump.
4. The overflow drain valve is supplied for use of the Saw when indoors or a place that the water in the water tray cannot simply be let out.
5. Screw the overflow drain valve to the under side of the drain hole.
6. Connect a hose to the overflow drain valve to run the water to the desired
location.
7. Remove the drain plug in the water tray to start water removal.

18
4. Operating the Abaco Site Saw Mod S2 Cutting Straight Edges
1. Ensure the saw is turned OFF.
2. Tighten the cutting guide to the desired location using the ruler on the working table.
3. Place the tile against the ruler and the cutting guide.
4. Turn the motor ON.
5. Make sure water is flowing through the nozzles before cutting.
6. Perform the cut.
7. Turn the motor OFF when the cut is complete.

19
Cutting 45° Miter
1. Ensure the Saw is turned OFF.
2. Loosen both knobs on the support arms of the Saw.
3. Swing the Tile Saw’s head over to 45°.
4. Tighten both knobs on the support arms of the Saw.
5. Tighten the cutting guide to the desired location using the ruler on the working table.
6. Place the tile against the ruler and the cutting guide.
7. Turn the motor ON.
8. Make sure water is flowing through the nozzles before cutting.
9. Perform the cut.
10. Turn the motor OFF when the cut is complete.

20
Cutting Step Treads
1. Ensure the Saw is turned OFF.
2. Turn the hand wheel on the top of the Saw to the desired height.
3. Once the desired height has been reached, lock the wheel with the locking lever located next to the hand wheel lever.
4. Tighten the cutting guide to desired location using the ruler on the working
table.
5. Place tile against the ruler and the cutting guide.
6. Turn the motor ON.
7. Make sure water is flowing through the nozzles before cutting.
8. Perform the cut.
9. Turn the motor OFF when the cut is complete.
10. Repeat steps 4, 5, 6, 7, 8, 9.
11. Turn the motor OFF when complete.

21
Clean Up To ensure long life of the water pump, it should be cleaned after every job.
1. Ensure the Saw is turned OFF.
2. Drain the water from the water tray.
3. The water pump comes apart for easy cleaning.
4. Clean the water pump.
5. Clean the water tray.
6. Clean the Tile Saw with clean water. Maintenance To ensure long life of the saw, maintenance should be performed after each use.
1. Ensure the Saw is turned OFF.
2. Unplug the Saw at the wall socket.
3. Wipe the induction hardened chrome bars after every use with a clean cloth.
4. Remove the diamond blade and lubricate the retaining-nut, the outer
flange and inner flange with a light oil such as WD-40.
5. Periodically lubricate the leg screw threads and blade cover knobs with a light oil such as WD-40.

22
5. Troubleshooting Blade Dressing Diamond blades perform best when they are dressed. Over time and use, diamonds on the outer edge of the blade will become smoothed or glazed over. This will reduce cutting efficiency and may cause the blade to wander or bend giving the illusion of an alignment problem. When this occurs the blade will need to be dressed. You can dress your blade using a dressing block.
1. Ensure the Saw is turned OFF.
2. Tighten the cutting guide to the desired location using the ruler on the working table.
3. Place the dressing block against the ruler and the cutting guide.
4. Turn the motor ON.
5. Make sure water is flowing through the nozzles before cutting.
6. Cut the dressing block 5 – 10 times to “dress the blade”.
7. Turn the motor off when complete.
Blade Will Not Cut Properly
1. Check for smoothness or “glazing”. Dress the blade (see above) if required.
2. Check that rotation direction is correct. Verify that the arrow on the blade
cover and the arrow on the blade are rotating in the same direction.
3. Ensure that there is tension on the blade. If bent, change the blade.
4. Ensure that you use the correct blade for the material being cut.
5. Contact your distributor for repair details. Water Pump Problems
1. Disassemble the pump’s casing and check for debris/ restrictions.
2. Check the pump’s impeller for damage.
3. Check the hose line and nozzles for debris/ restrictions.

23
4. Contact your distributor for repair details.