outlook add-in user manual nospamproxy 13
TRANSCRIPT
NoSpamProxy 13.2
Outlook Add-In User Manual
• Protection• Encryption• Large Files
ImprintAll rights reserved. This manual and the depicted applications are copyrighted products of Netat Work GmbH, Paderborn, Germany and are subject to change without notice. The informationcontained in this manual does not represent any grounds for liability, warranty or other claims.No part of the publication may be reproduced without prior written permission by Net at WorkGmbH.Copyright © 2019 Net at Work GmbHNet at Work GmbHAm Hoppenhof 32aD-33104 Paderborn
TrademarksMicrosoft®, Windows®, Windows Server 2008®, Windows Server 2012®, Windows Server2012 R2® und Windows Server 2016® are registered trademarks of Microsoft Corporation.NoSpamProxy® is a registered trademark of Net at Work GmbH.
13 February 2020
Contents
1. Using the NoSpamProxy Outlook Add-In ............................................................................. 4Installation notes .................................................................................................................. 4Functions of the Outlook Add-In .......................................................................................... 4Composing Emails ............................................................................................................... 4
PDF Mail ........................................................................................................................ 5S/MIME or PGP ............................................................................................................. 7Automatic encryption ...................................................................................................... 8De-Mail ........................................................................................................................... 9Large Files ..................................................................................................................... 9Protecting Large Files links with a password ............................................................... 11
Settings in NoSpamProxy ...................................................................................... 12Enabling password protection ................................................................................ 12
Reading Emails .................................................................................................................. 13Decrypting PDF attachments ....................................................................................... 14Deleting passwords ...................................................................................................... 15
2. Hideable sections ............................................................................................................... 16Composing Emails ............................................................................................................. 16Reading mails .................................................................................................................... 18
3. Help and support ................................................................................................................ 20
Net at Work GmbH13 February 2020
Using the NoSpamProxy Outlook Add-In
1. Using the NoSpamProxy Outlook Add-In
Installation notes
When installing the Outlook Add-in via MSI file, it must be located on a local hard disk.Installation via a UNC path is not possible.
Functions of the Outlook Add-In
The functions of the Outlook Add-In are displayed on the main ribbon. The add-in offers support forComposing Mails as well as Reading protected mails.
Composing Emails
The following functions are available:
• Automatic encryptionProtects the email using one of the available security measures.
• PDF MailConverts email content including all attachments into a password-protected PDF document.
• S/MIME or PGPAllows signing and encrypting of emails via cryptographic keys such as PGP key pairs or S/MIMEcertificates.
• De-MailShows all delivery options for De-Mails.
• Large FilesTransfers large files via the NoSpamProxy Web Portal. This capability creates a link throughwhich the recipient can download sent files securely via SSL. Password protection can be addedto the link created.
When composing new emails, available functions are displayed on the Message tab on the main ribbon(Picture 1). The functions are divided into three sections: Email protection, De-Mail and Large Files.
Page 4
Using the NoSpamProxy Outlook Add-In
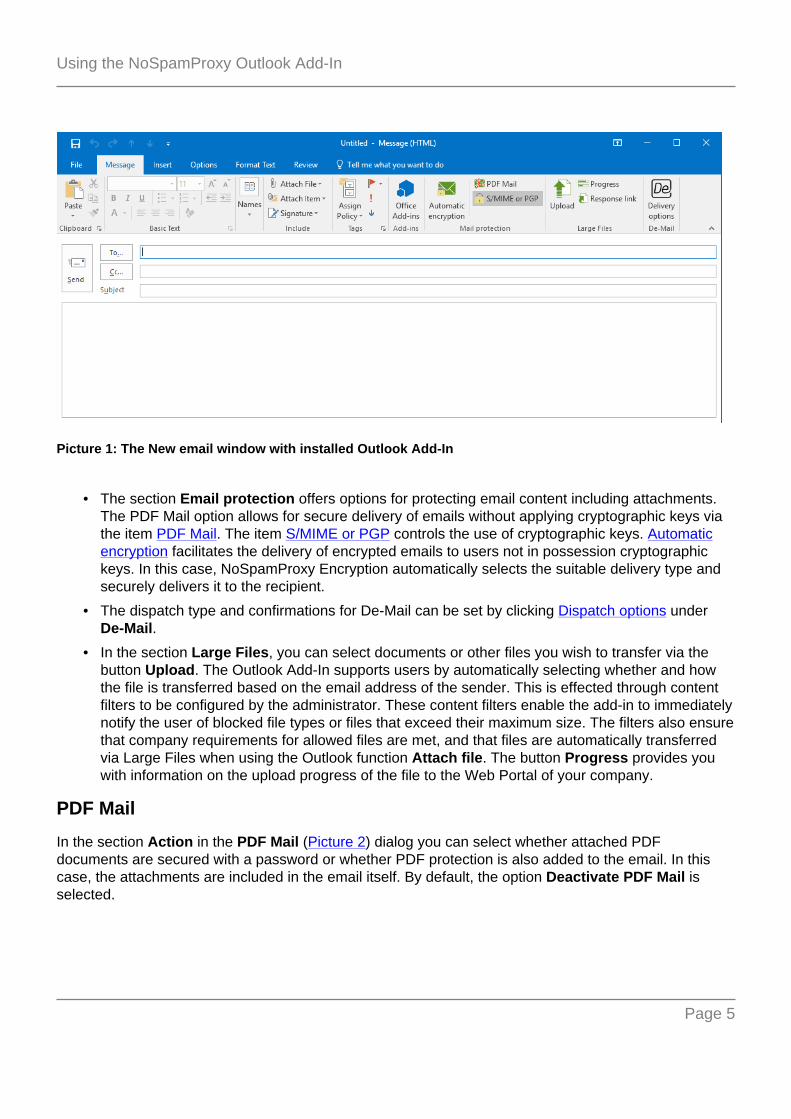
Picture 1: The New email window with installed Outlook Add-In
• The section Email protection offers options for protecting email content including attachments.The PDF Mail option allows for secure delivery of emails without applying cryptographic keys viathe item PDF Mail. The item S/MIME or PGP controls the use of cryptographic keys. Automaticencryption facilitates the delivery of encrypted emails to users not in possession cryptographickeys. In this case, NoSpamProxy Encryption automatically selects the suitable delivery type andsecurely delivers it to the recipient.
• The dispatch type and confirmations for De-Mail can be set by clicking Dispatch options underDe-Mail.
• In the section Large Files, you can select documents or other files you wish to transfer via thebutton Upload. The Outlook Add-In supports users by automatically selecting whether and howthe file is transferred based on the email address of the sender. This is effected through contentfilters to be configured by the administrator. These content filters enable the add-in to immediatelynotify the user of blocked file types or files that exceed their maximum size. The filters also ensurethat company requirements for allowed files are met, and that files are automatically transferredvia Large Files when using the Outlook function Attach file. The button Progress provides youwith information on the upload progress of the file to the Web Portal of your company.
PDF Mail
In the section Action in the PDF Mail (Picture 2) dialog you can select whether attached PDFdocuments are secured with a password or whether PDF protection is also added to the email. In thiscase, the attachments are included in the email itself. By default, the option Deactivate PDF Mail isselected.
Page 5
Using the NoSpamProxy Outlook Add-In
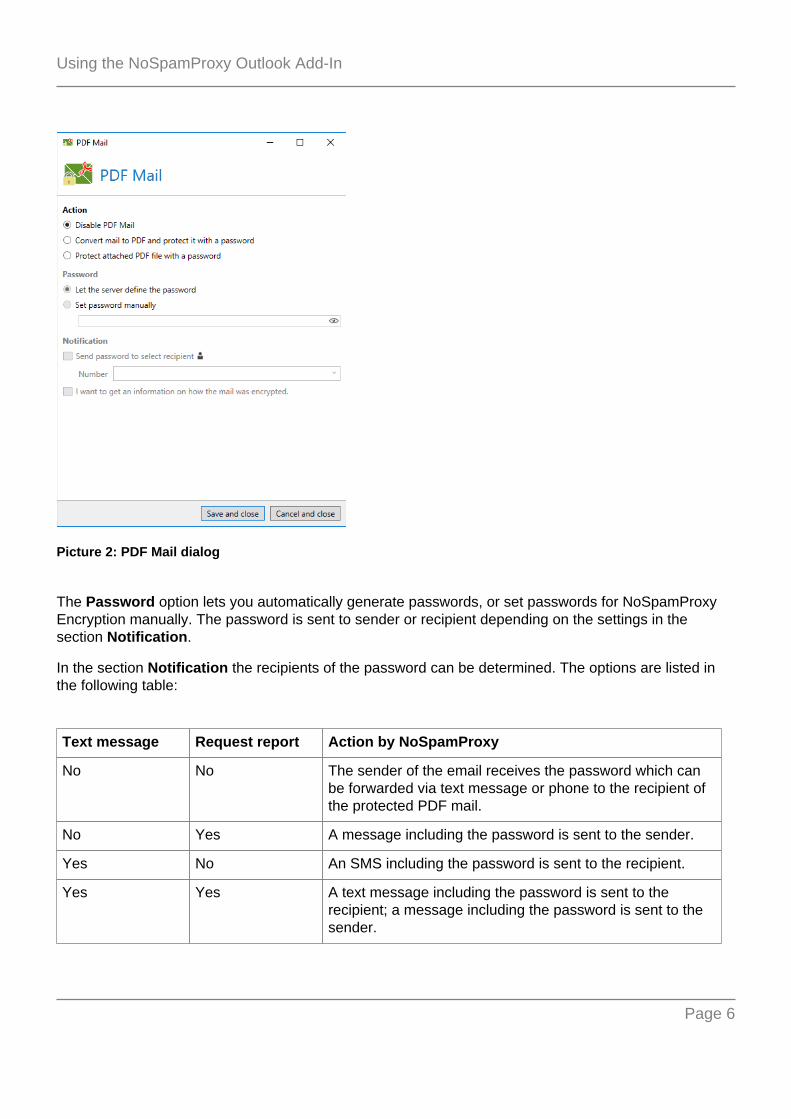
Picture 2: PDF Mail dialog
The Password option lets you automatically generate passwords, or set passwords for NoSpamProxyEncryption manually. The password is sent to sender or recipient depending on the settings in thesection Notification.
In the section Notification the recipients of the password can be determined. The options are listed inthe following table:
Text message Request report Action by NoSpamProxy
No No The sender of the email receives the password which canbe forwarded via text message or phone to the recipient ofthe protected PDF mail.
No Yes A message including the password is sent to the sender.
Yes No An SMS including the password is sent to the recipient.
Yes Yes A text message including the password is sent to therecipient; a message including the password is sent to thesender.
Page 6
Using the NoSpamProxy Outlook Add-In
In order to send the password via text message to the recipient, please use the function Send passwordto and select the desired recipient via the image at the end of the line. If recipients have been enteredinto the "To" field of the email in the Compose email dialog, the contact data of the first recipient isentered into the Send password to field automatically. Please check the phone number after theselection of a text message recipient or enter the phone number for the text message receipt directly intothe drop down list.
The following phone number formats are valid and can be used:
+49 (code without 0) numbere.g.: +49 (1234) 567890e.g.: +49 1234 567890
0049 (code without 0) numbere.g.: 0049 (1234) 567890e.g.: 0049 1234 567890
code without 0 numbere.g.: 01234 567890
S/MIME or PGP
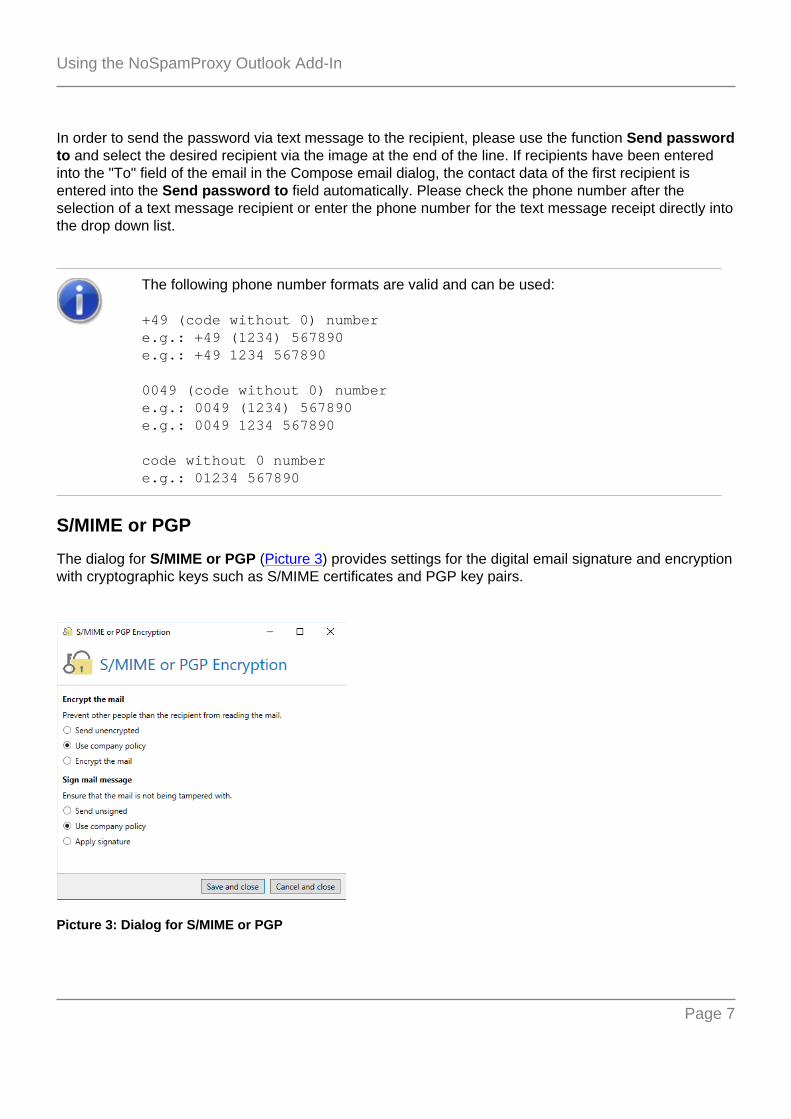
The dialog for S/MIME or PGP (Picture 3) provides settings for the digital email signature and encryptionwith cryptographic keys such as S/MIME certificates and PGP key pairs.
Picture 3: Dialog for S/MIME or PGP
Page 7
Using the NoSpamProxy Outlook Add-In
In the dialog for S/MIME or PGP (Picture 3), you can set whether signature and encryption should beenforced, suppressed or configured based on the company policy.
If an action is set in this dialog that is in conflict with the existing configuration ofNoSpamProxy Encryption, the email will not be delivered.
Automatic encryption
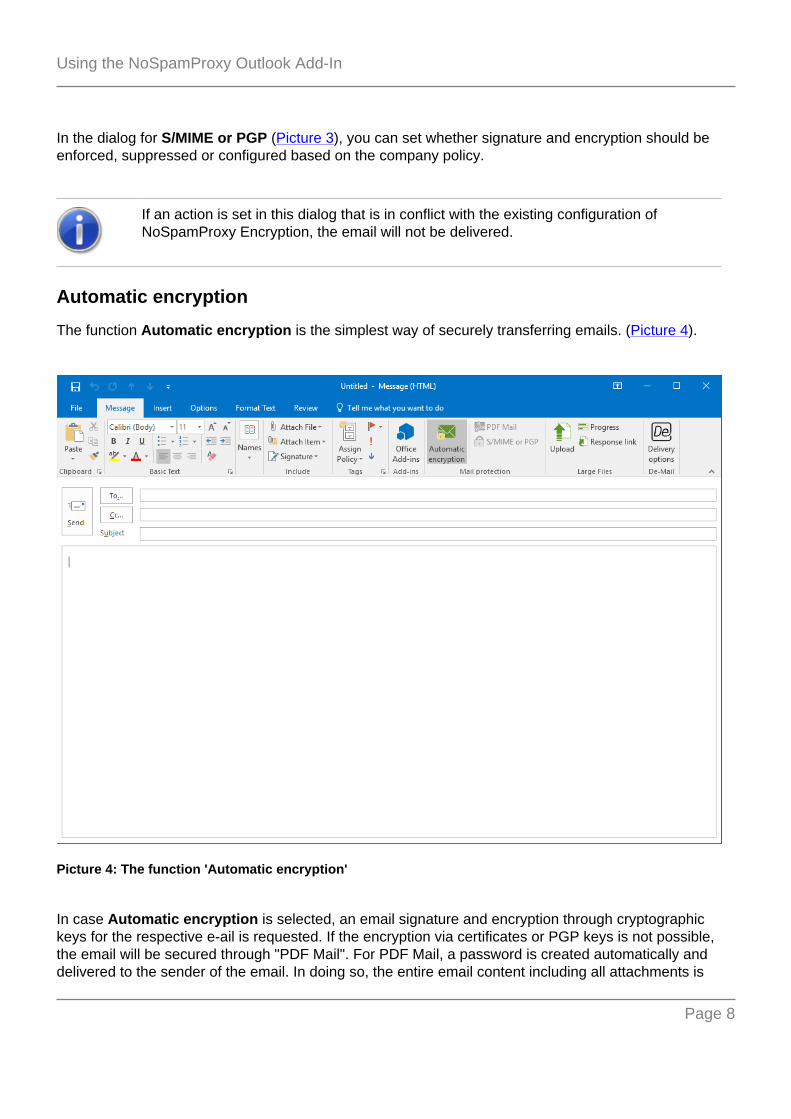
The function Automatic encryption is the simplest way of securely transferring emails. (Picture 4).
Picture 4: The function 'Automatic encryption'
In case Automatic encryption is selected, an email signature and encryption through cryptographickeys for the respective e-ail is requested. If the encryption via certificates or PGP keys is not possible,the email will be secured through "PDF Mail". For PDF Mail, a password is created automatically anddelivered to the sender of the email. In doing so, the entire email content including all attachments is
Page 8

Using the NoSpamProxy Outlook Add-In
embedded into the protected PDF document, facilitating the secure delivery of emails to all recipients,even if they are not in the possession of cryptographic keys.
De-Mail
Via the button Dispatch options in the section De-Mail you open a dialog for configuring confirmationsand delivery options for De-Mails (Picture 5).
Picture 5: De-Mail dialog
In the section Confirmation you configure confirmation notifications for dispatch, receipt and retrieval ofmessages. The section Dispatch type defines how De-Mail messages are transferred.
Large Files
To securely transfer such documents to recipients, you can transfer the files via the NoSpamProxy WebPortal. To do so, click on Upload under Large Files on the main ribbon and select the files you wish totransfer. The files are then transferred to the Web Portal in the background. As soon as the transfer iscompleted, a link for each selected file is attached to the email. This link can be used to download the fileto a computer.
To check the progress of the upload, click on the button Progress (Picture 6). Potential issues occurringduring file transfer are also displayed here, for example if the file you selected exceeds the maximum
Page 9

Using the NoSpamProxy Outlook Add-In
size set by your system administrator. By clicking on the red X, you can cancel the file upload or removefiles that have not yet been uploaded.
Picture 6: Two files uploaded to the Web Portal
As usual, you can also attach files to the email via the button Attach files or via Drag and Drop.Depending on the settings, the file is either attached to the email directly or transferred via the WebPortal.
The "Attach file" button can, depending on your email server settings, attach files of amaximum of 20MB to the email. By default, files larger than 2MB are replaced with anHTML file which points to the Web Portal. This file is used to download the original filefrom the Web Portal. The "Upload" button in Large Files never attaches files to the emaildirectly but always uses the Web Portal. The upload function is not limited in size butdetermined by the administrator of NoSpamProxy. Thus, if allowed by the administrator,the upload of files with sizes of up to several gigabytes is possible.
You can also add a Response link to the email. Via this link, the recipient(s) can reply via the secureWeb Portal and transfer large files (Picture 7). Upon clicking the button, the dialog (Picture 8) opens.This dialog is used to determine the text for the link. In addition, you can restrict the period of validityfor the link. For example, you can set that the recipient(s) can only use the link for one month and threereplies. If you restrict the replies to a certain number, each recipient has the possibility to exhaust theselected number of replies. Via the button Always use these values, you can determine whether thevalues you just set are also used as default values for future links in this dialog.
Page 10

Using the NoSpamProxy Outlook Add-In
Picture 7: Reply link in the email
Picture 8: Reply link
Protecting Large Files links with a password
You can protect large files links with a password by configuring a password protection either through anappropriate content filtering action in NoSpamProxy or through manual activation during composition.The password requested for download is always the password stored in the individual partner userentries.
Page 11
Using the NoSpamProxy Outlook Add-In
Settings in NoSpamProxy
In order to enable password protection of Large Files links, you must make the following settings via theNoSpamProxy console:
• Make sure that under Configuration/Rules, for an outbound email rule on the General tab youhave selected the option Enabled under Content filtering. Please refer to the Rules chapter inthe NoSpamProxy manual.
• Decide under Configuration/Content filter/Content filter actions on the tab Attachments ofan action, whether you want to require password protection for all outbound emails or let therespective user decide. Please refer to the chapter Content filter actions in the NoSpamProxymanual.
• Make sure that under Configuration/Content filter/Content filters you have created a contentfilter entry for a content filter that triggers the desired action for Untrusted or outbound emails.Please refer to the Content Filter chapter in the NoSpamProxy manual.
• Make sure that the appropriate outbound policy (content filter) is configured for corporate users.You can set this as a default user setting, at the user level, or for individual email addresses. SeeDomains and users in the NoSpamProxy manual.
• Make sure that the appropriate outbound policy (content filter) is configured for partners. You canconfigure this as a default partner setting, at the domain level, or at the user level. See Partner inthe NoSpamProxy manual.
Enabling password protection
In the window for a new email, click Protect all files under Large Files in the ribbon. The passwordprotection for Large Files links is then activated for the respective email. The password requested is thepassword stored in a partner for the respective user. Please refer to the chapter User entry of a partnerdomain in the NoSpamProxy user manual.
If Protect all files is disabled, the password protection has already been preset by youradministrator in the content filter action.
Page 12

Using the NoSpamProxy Outlook Add-In
Picture 9: Enabling password protection for Large Files links
Reading Emails
When reading emails the following functions are available:
• Decrypt PDF attachmentsDecrypts password-protected PDF attachments and removes the password.
• Delete passwordsDeletes stored PDF decryption passwords.
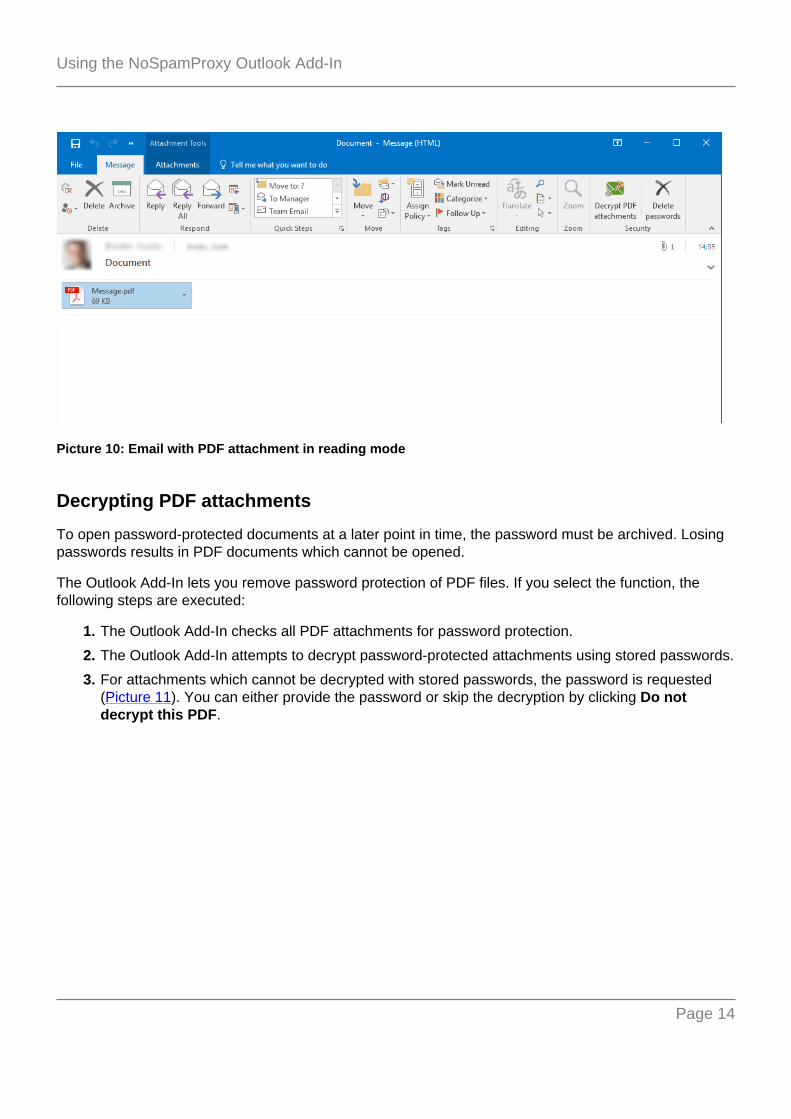
When reading an email, available functions are displayed on the main ribbon. The functions for the PDFencryption can be activated by either selecting or opening emails with one or more PDF attachment(s)(Picture 10).
Page 13
Using the NoSpamProxy Outlook Add-In
Picture 10: Email with PDF attachment in reading mode
Decrypting PDF attachments
To open password-protected documents at a later point in time, the password must be archived. Losingpasswords results in PDF documents which cannot be opened.
The Outlook Add-In lets you remove password protection of PDF files. If you select the function, thefollowing steps are executed:
1. The Outlook Add-In checks all PDF attachments for password protection.
2. The Outlook Add-In attempts to decrypt password-protected attachments using stored passwords.
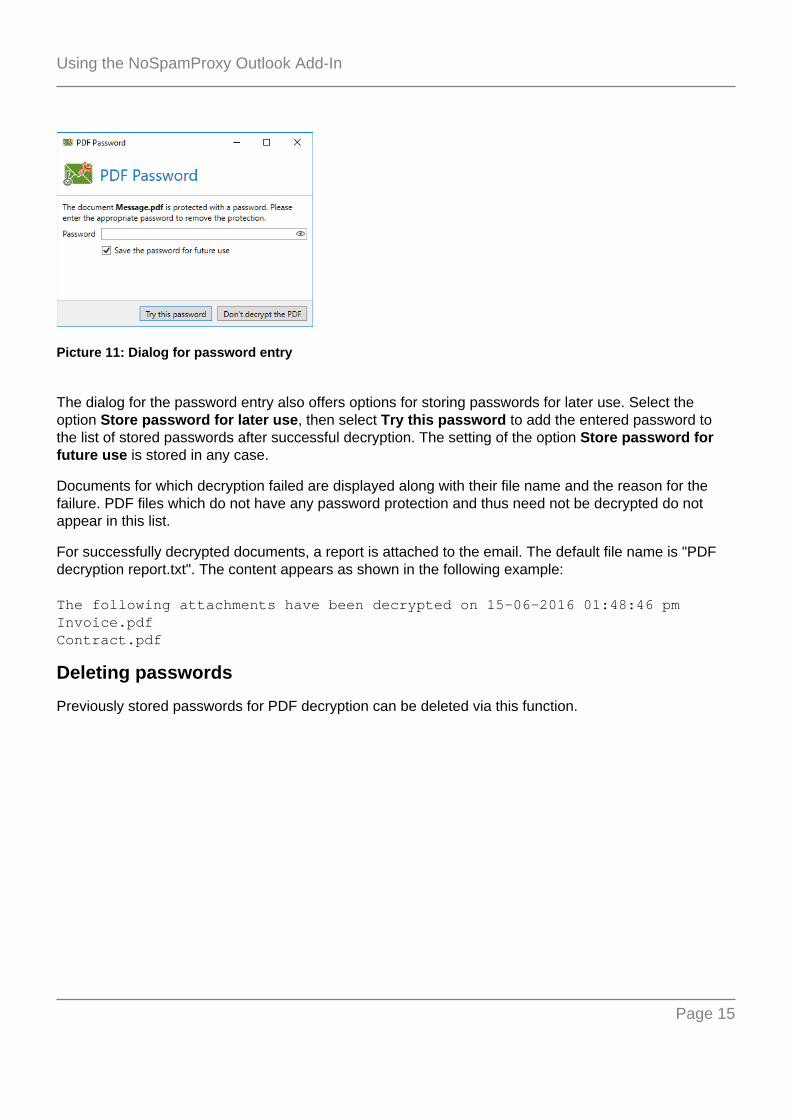
3. For attachments which cannot be decrypted with stored passwords, the password is requested(Picture 11). You can either provide the password or skip the decryption by clicking Do notdecrypt this PDF.
Page 14
Using the NoSpamProxy Outlook Add-In
Picture 11: Dialog for password entry
The dialog for the password entry also offers options for storing passwords for later use. Select theoption Store password for later use, then select Try this password to add the entered password tothe list of stored passwords after successful decryption. The setting of the option Store password forfuture use is stored in any case.
Documents for which decryption failed are displayed along with their file name and the reason for thefailure. PDF files which do not have any password protection and thus need not be decrypted do notappear in this list.
For successfully decrypted documents, a report is attached to the email. The default file name is "PDFdecryption report.txt". The content appears as shown in the following example:
The following attachments have been decrypted on 15-06-2016 01:48:46 pmInvoice.pdfContract.pdf
Deleting passwords
Previously stored passwords for PDF decryption can be deleted via this function.
Page 15
Hideable sections
2. Hideable sections
Specific sections of the Outlook Add-In are configurable. If functions of the Add-In are not availablein your company, the respective sections can be hidden. The functional scope of the add-in can beadjusted to your company's requirements. Find more information on showing and hiding sections underNoSpamProxy - Outlook Add-In group policies. The configurable sections are listed in the followingchapters.
Composing Emails
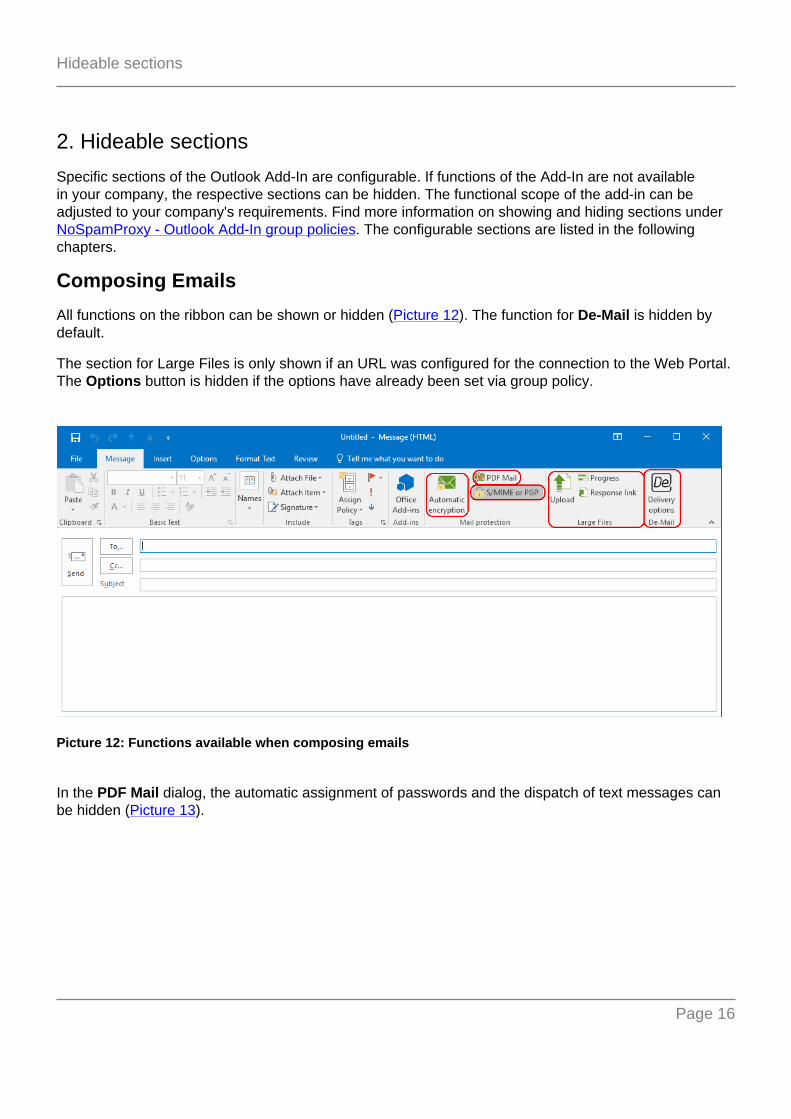
All functions on the ribbon can be shown or hidden (Picture 12). The function for De-Mail is hidden bydefault.
The section for Large Files is only shown if an URL was configured for the connection to the Web Portal.The Options button is hidden if the options have already been set via group policy.
Picture 12: Functions available when composing emails
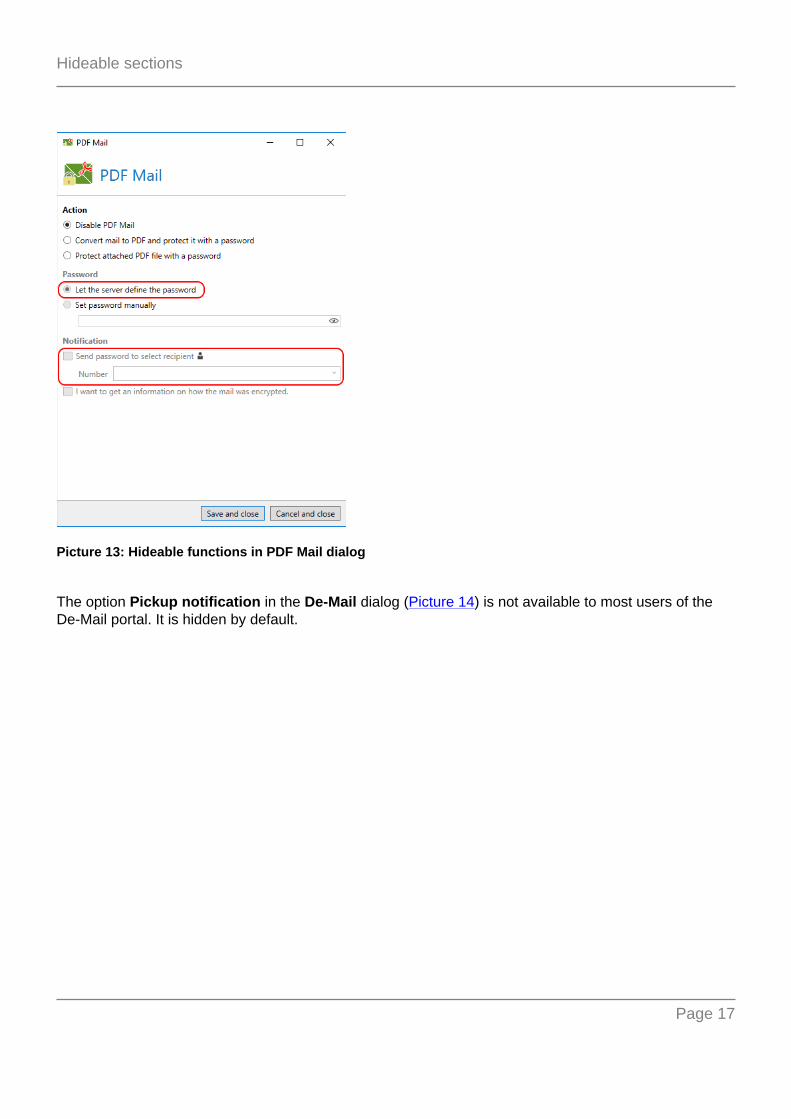
In the PDF Mail dialog, the automatic assignment of passwords and the dispatch of text messages canbe hidden (Picture 13).
Page 16
Hideable sections
Picture 13: Hideable functions in PDF Mail dialog
The option Pickup notification in the De-Mail dialog (Picture 14) is not available to most users of theDe-Mail portal. It is hidden by default.
Page 17

Hideable sections
Picture 14: Hideable functions in De-Mail dialog
Reading mails
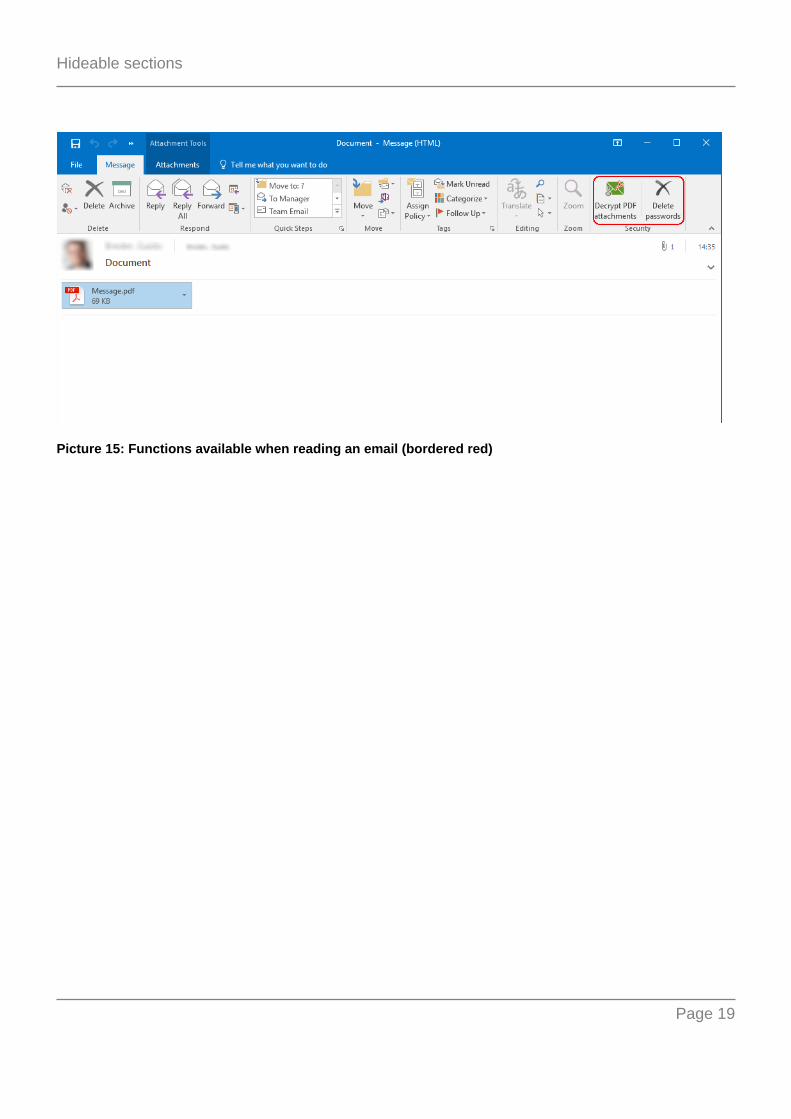
The section on decrypting PDF attachments and deleting stored passwords as well as the creation of apassword reset email can be shown or hidden (Picture 15).
Page 18
Hideable sections
Picture 15: Functions available when reading an email (bordered red)
Page 19

Help and support
3. Help and support
Net at Work offers many forms of help and support for the installation and the operation ofNoSpamProxy.
• Training videosTraining videos provide an overview of different areas and include step-by-step configurationtutorials as well as practical examples.
• BlogThe Blog provides daily updated alerts for new product versions, suggested changes to yourconfiguration, warnings on compatibility issues and more help. To make sure you do not missany important advice, you can also find the latest news from the blog on the start page of theNoSpamProxy configuration console.
• Knowledge BaseThe Knowledge Base contains additional information on specific issues.
• SupportIf you require additional support, please visit our support website.
Page 20