documentation for spamtitan outlook add-in
TRANSCRIPT
OUTLOOK ADDIN V1.5
ABOUT THE ADDIN
The SpamTitan Outlook Addin v1.5 allows reporting of SPAM and HAM messages to the SpamTitan
appliance, these messages are then examined by the SpamTitan Bayesian filter to be trained to filter
future SPAM messages containing these tokens. It integrates seamlessly into Outlook main toolbar
and single mail viewer.
REQUIREMENTS
Net Framework 3.5 SP1
Office 2007 Primary Interop Assemblies
Visual Studio 2010 tools for Office Runtime (x86, x64)
SpamTitan v5.12 or later.
Outlook 2007 / 2010 / 2013
Windows XP or later
This software must be installed on each machine before the STOA (SpamTitan Outlook Addin) can be
installed.
2
SINGLE USER INSTALLATION INSTRUCTIONS
For Multi-User Group Policy install – see below.
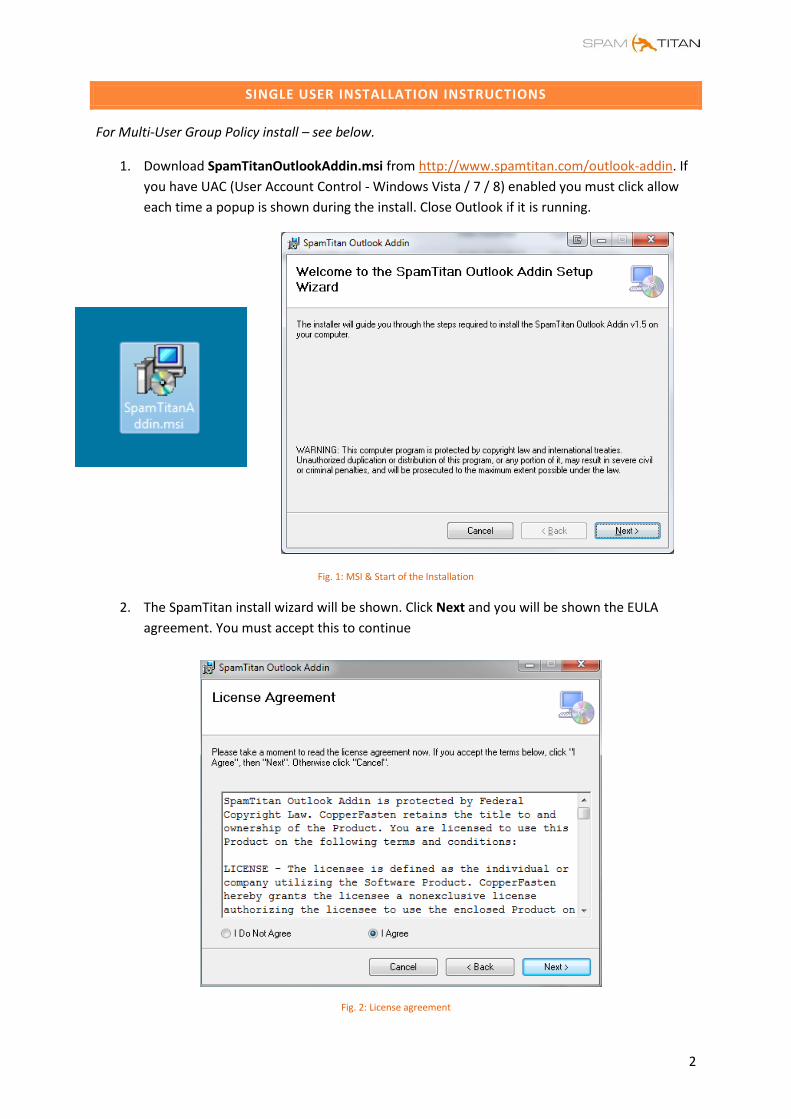
1. Download SpamTitanOutlookAddin.msi from http://www.spamtitan.com/outlook-addin. If
you have UAC (User Account Control - Windows Vista / 7 / 8) enabled you must click allow
each time a popup is shown during the install. Close Outlook if it is running.
Fig. 1: MSI & Start of the Installation
2. The SpamTitan install wizard will be shown. Click Next and you will be shown the EULA
agreement. You must accept this to continue
Fig. 2: License agreement
3
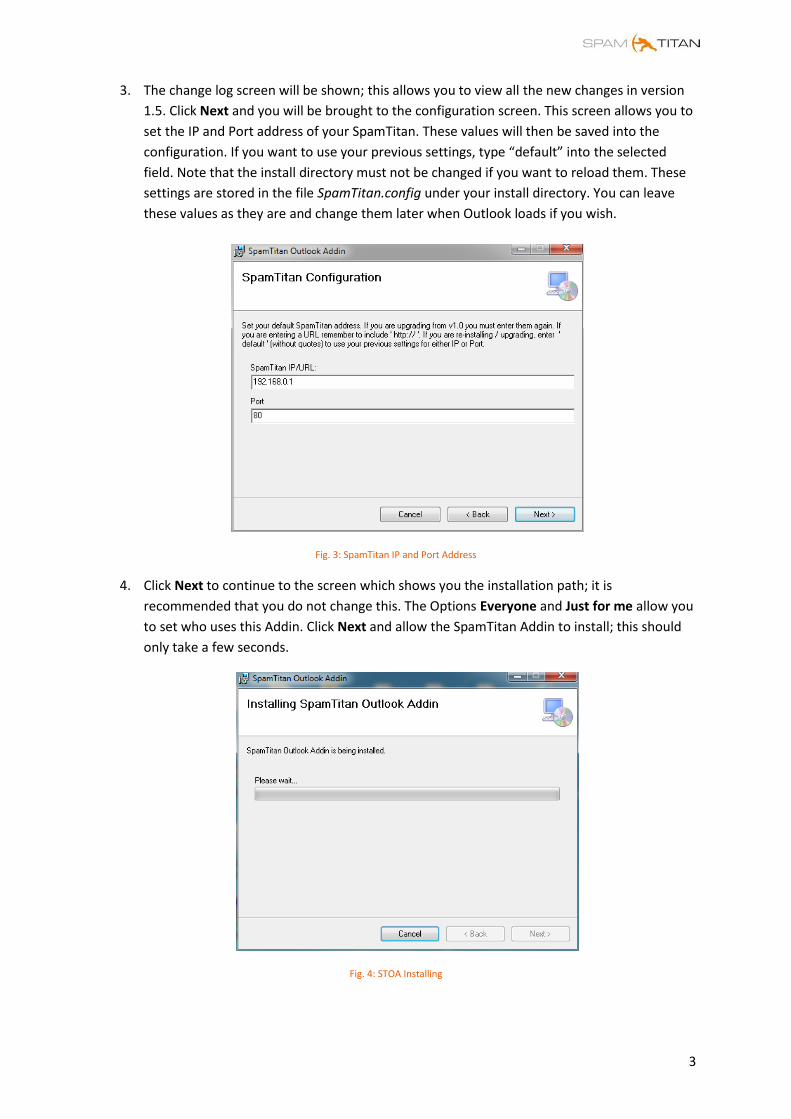
3. The change log screen will be shown; this allows you to view all the new changes in version
1.5. Click Next and you will be brought to the configuration screen. This screen allows you to
set the IP and Port address of your SpamTitan. These values will then be saved into the
configuration. If you want to use your previous settings, type “default” into the selected
field. Note that the install directory must not be changed if you want to reload them. These
settings are stored in the file SpamTitan.config under your install directory. You can leave
these values as they are and change them later when Outlook loads if you wish.
Fig. 3: SpamTitan IP and Port Address
4. Click Next to continue to the screen which shows you the installation path; it is
recommended that you do not change this. The Options Everyone and Just for me allow you
to set who uses this Addin. Click Next and allow the SpamTitan Addin to install; this should
only take a few seconds.
Fig. 4: STOA Installing
4
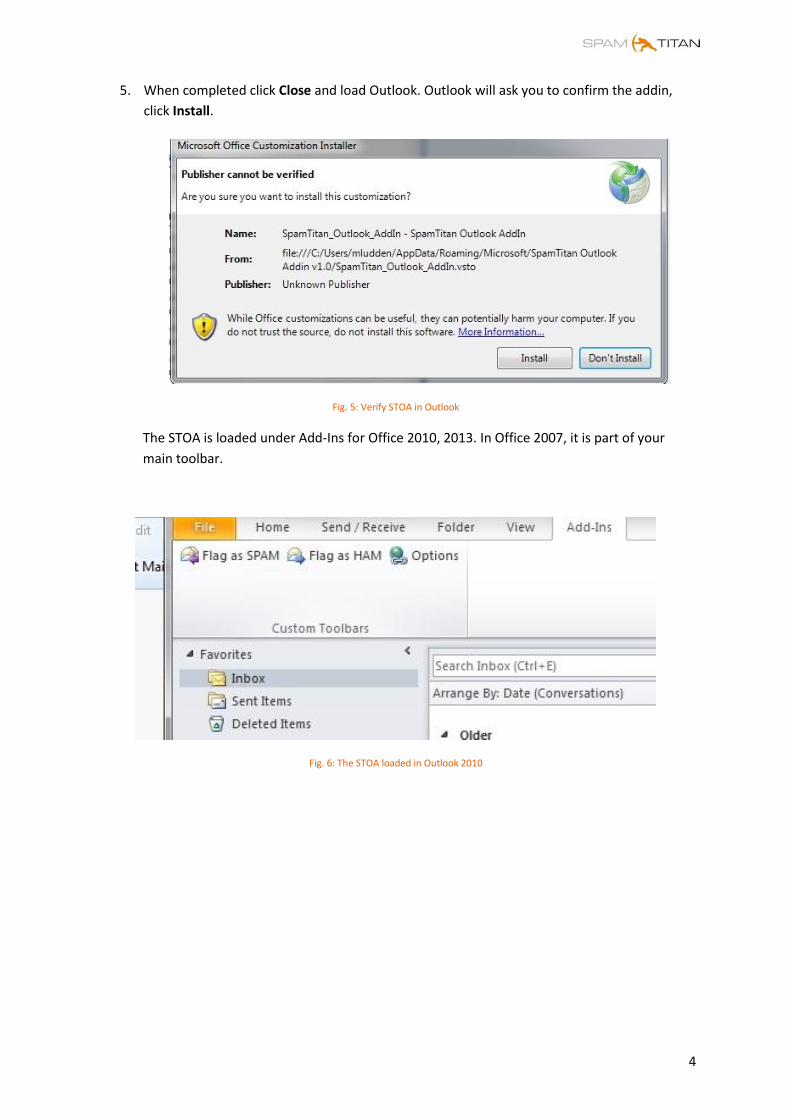
5. When completed click Close and load Outlook. Outlook will ask you to confirm the addin,
click Install.
Fig. 5: Verify STOA in Outlook
The STOA is loaded under Add-Ins for Office 2010, 2013. In Office 2007, it is part of your
main toolbar.
Fig. 6: The STOA loaded in Outlook 2010
5
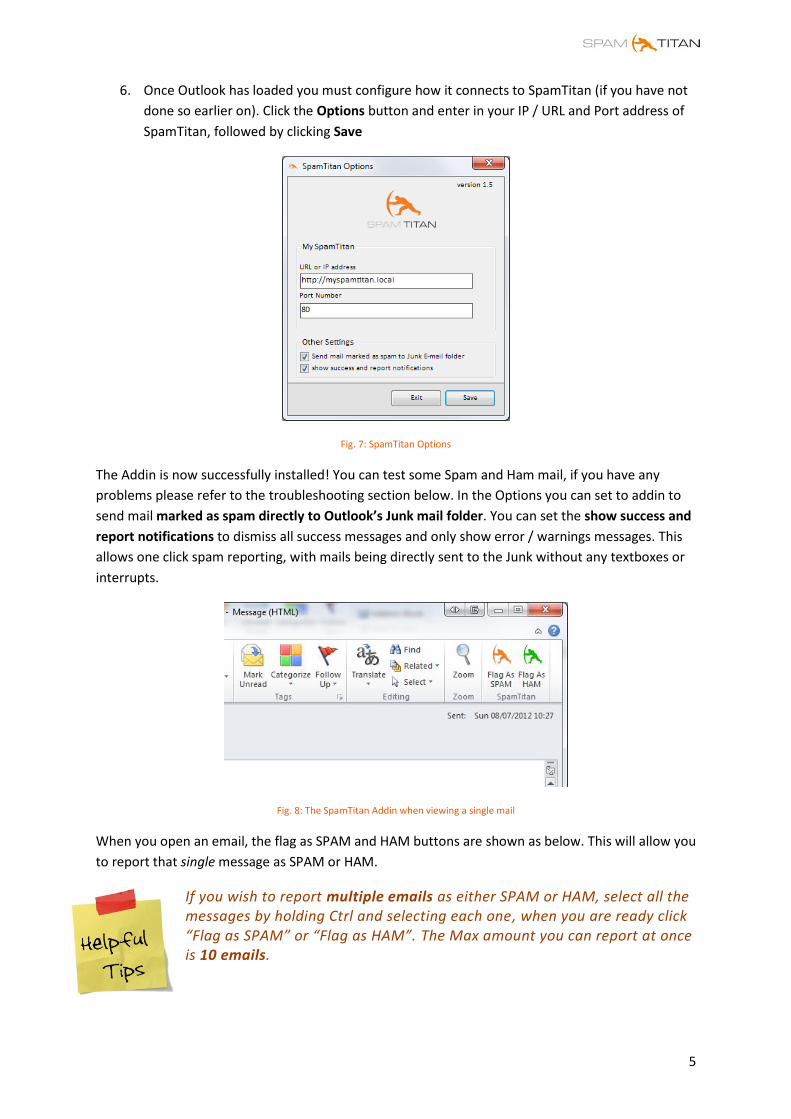
6. Once Outlook has loaded you must configure how it connects to SpamTitan (if you have not
done so earlier on). Click the Options button and enter in your IP / URL and Port address of
SpamTitan, followed by clicking Save
Fig. 7: SpamTitan Options
The Addin is now successfully installed! You can test some Spam and Ham mail, if you have any
problems please refer to the troubleshooting section below. In the Options you can set to addin to
send mail marked as spam directly to Outlook’s Junk mail folder. You can set the show success and
report notifications to dismiss all success messages and only show error / warnings messages. This
allows one click spam reporting, with mails being directly sent to the Junk without any textboxes or
interrupts.
Fig. 8: The SpamTitan Addin when viewing a single mail
When you open an email, the flag as SPAM and HAM buttons are shown as below. This will allow you
to report that single message as SPAM or HAM.
If you wish to report multiple emails as either SPAM or HAM, select all the messages by holding Ctrl and selecting each one, when you are ready click “Flag as SPAM” or “Flag as HAM”. The Max amount you can report at once is 10 emails.
6
GROUP POLICY INSTALLATION INSTRUCTIONS USING ACTIVE DIRECTORY
For this tutorial we will be using Microsoft Active Directory 2008
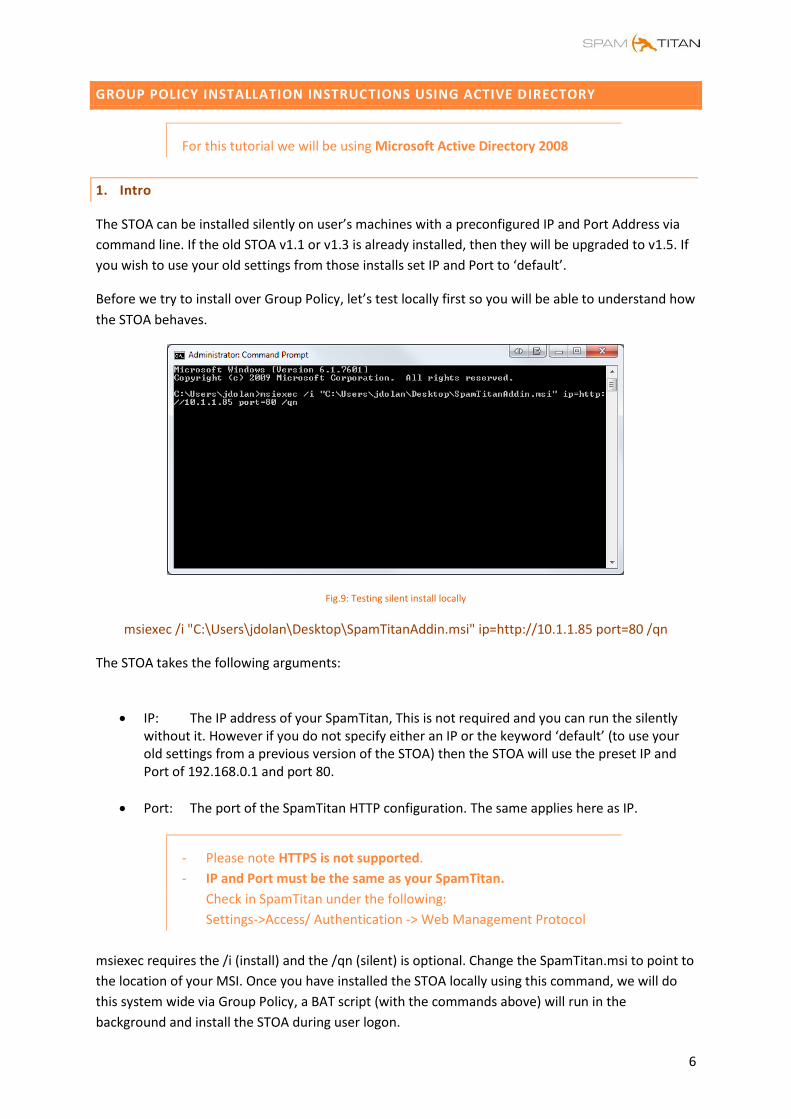
1. Intro
The STOA can be installed silently on user’s machines with a preconfigured IP and Port Address via
command line. If the old STOA v1.1 or v1.3 is already installed, then they will be upgraded to v1.5. If
you wish to use your old settings from those installs set IP and Port to ‘default’.
Before we try to install over Group Policy, let’s test locally first so you will be able to understand how
the STOA behaves.
Fig.9: Testing silent install locally
msiexec /i "C:\Users\jdolan\Desktop\SpamTitanAddin.msi" ip=http://10.1.1.85 port=80 /qn
The STOA takes the following arguments:
IP: The IP address of your SpamTitan, This is not required and you can run the silently without it. However if you do not specify either an IP or the keyword ‘default’ (to use your old settings from a previous version of the STOA) then the STOA will use the preset IP and Port of 192.168.0.1 and port 80.
Port: The port of the SpamTitan HTTP configuration. The same applies here as IP.
- Please note HTTPS is not supported.
- IP and Port must be the same as your SpamTitan.
Check in SpamTitan under the following:
Settings->Access/ Authentication -> Web Management Protocol
msiexec requires the /i (install) and the /qn (silent) is optional. Change the SpamTitan.msi to point to
the location of your MSI. Once you have installed the STOA locally using this command, we will do
this system wide via Group Policy, a BAT script (with the commands above) will run in the
background and install the STOA during user logon.
7
2. Logon scripts & Requirements
Before we start you must have the SpamTitanAddin.msi downloaded and available on your Active
Directory. Create a public share for your files under C:/STOA and place your files under here. If you
are unsure how to create a public share, navigate to the C drive, create a new folder called STOA and
copy over the SpamTitanAddin.msi. Once that is done right click the new STOA folder, select
properties->share, then add the users who can access this share (in our case, add everyone) .
The share should now be assessable to all users by typing:
\\YOURSERVERNAME\STOA\
Test it by navigating to it in a browser. This will be the address we will use for the BAT script.
To create the script, create a new text file and type:
msiexec /i \\YOURSERVERNAME\STOA\SpamTitanAddin.msi ip=http://1.2.3.4 port=80 /qn
Where 1.2.3.4 is the IP Address of your SpamTitan and YOURSERVERNAME is your active directory
server name, save this file as stoa_launcher.bat. Store this file beside the SpamTitanAddin.msi in
your share.
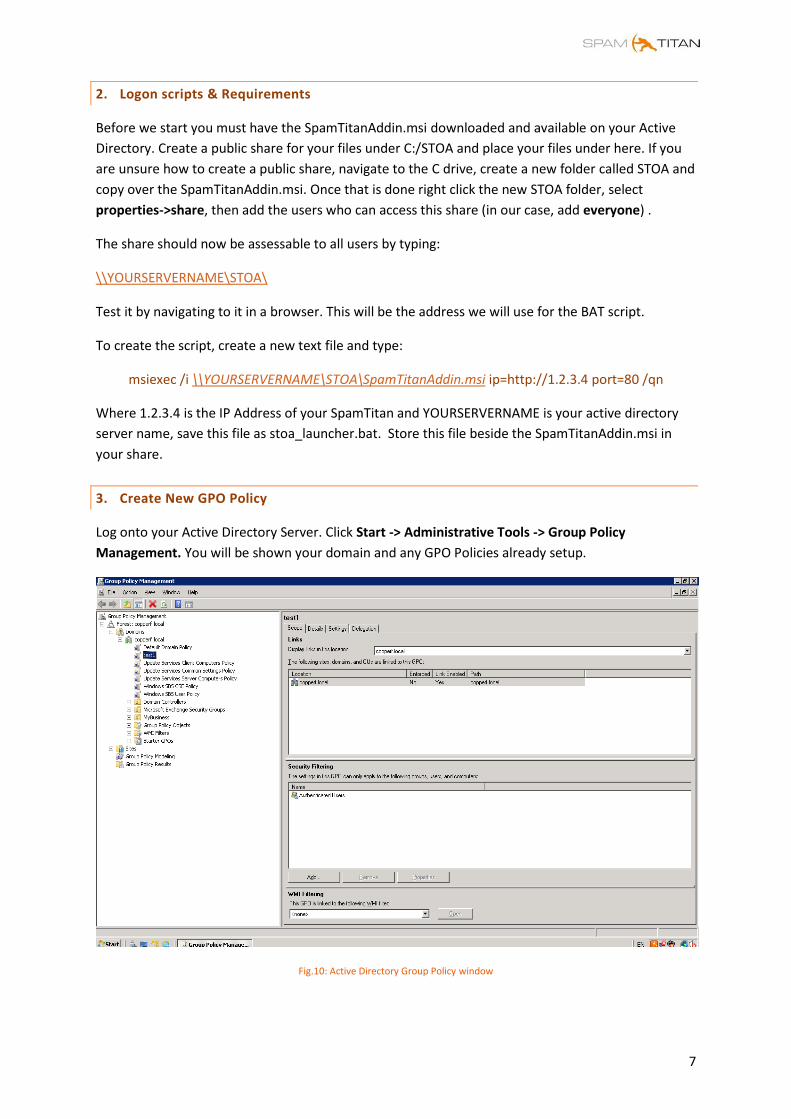
3. Create New GPO Policy
Log onto your Active Directory Server. Click Start -> Administrative Tools -> Group Policy
Management. You will be shown your domain and any GPO Policies already setup.
Fig.10: Active Directory Group Policy window

8
Right click your domain and select Create a GPO in this domain, and Link it here…
Fig.11: Adding new Group Policy
Give it a name, for this doc we will simply call it SpamTItanOutlookAddin. Leave the Source Starter
GPO as none. Once the new policy has been created, you can select it. If you click the Settings tab
you can see all the actions this policy will perform, right now we haven’t enabled anything yet so it
should say “no settings defined”.
Right click the policy and select Edit and a new window will open.
4. Policy management
For this Policy we want the STOA to run whenever a user logs in, we can use the BAT script that we
wrote earlier to execute the MSI installer. Navigate to User Configuration -> Windows Settings ->
Scripts (Logon / Logoff) and right click Logon -> Properties on the right hand side. This window will
be shown.
Fig.12: Adding new logon action

9
Click Add… -> Browse… and select the BAT script created. Leave script parameters empty. Click
Apply and then OK.
Fig.13: Linking BAT script with User Logon
You are now ready to test your configuration!
UAC
For some windows installs, UAC may block the install during logon. If
you find the STOA does not appear after login, check on your machine if
UAC enabled and then disable it. You can remove the /qn option to
verify if the install is happening during logon.
10
Alternate GPO Install Method
If disabling UAC / User logon script is not an option, you can install the MSI using typical GPO
software install (you cannot pass arguments using this method), and then create another GPO to
edit the SpamTitan.config file under the SpamTitan Outlook Addin install directory.
Typically: C:\Users\*user*\AppData\Roaming\SpamTitan\SpamTitan Outlook Addin\
SpamTitan.config
This file contains the IP and port - formatted like 1.2.3.4%%sep%%80 – with 1.2.3.4 being the IP and
80 being the port. When you edit this file the STOA will pick up the changes and point to this new
address. This will have to be done on every client machine STOA is installed on.
To install using GPO Software Installation:
In Group Policy Management, right-click the domain, and then click Properties.
In the Properties dialog box, on the Group Policy tab, click Open.
In Group Policy Management, right-click the domain, click Create a GPO in this domain, and
Link it here, type a name for the GPO and then click OK.
Right-click the GPO that you created in the previous step, and then click Edit.
In Group Policy Management Editor, expand Policies under User Configuration (make sure
you select User and not computer), and then expand Software Settings.
Right-click Software Installation, point to New, and then select Package.
Type the full path or locate the STOA for Outlook Windows Installer package
(SpamTitanAddin.msi) and then click Open.
Note: Users must have read access to this path.
Highlight the new package, Click Action->Publish to publish the STOA.
You can right click the package and edit the properties.
11
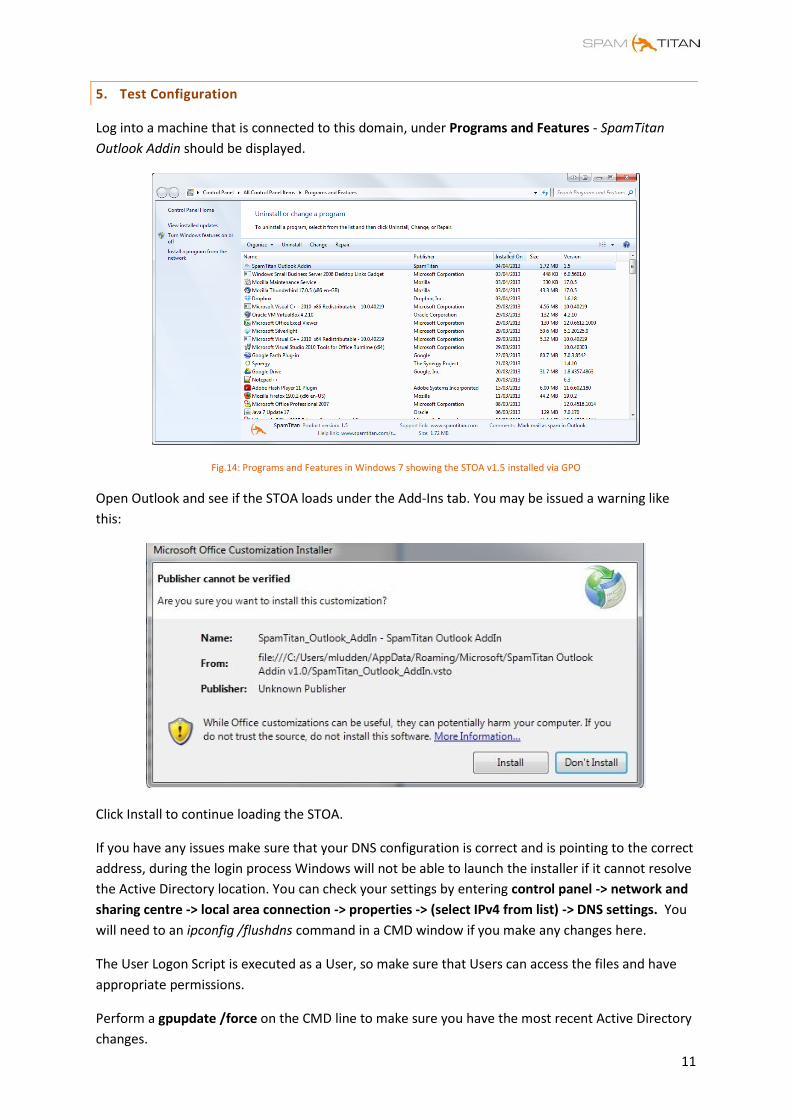
5. Test Configuration
Log into a machine that is connected to this domain, under Programs and Features - SpamTitan
Outlook Addin should be displayed.
Fig.14: Programs and Features in Windows 7 showing the STOA v1.5 installed via GPO
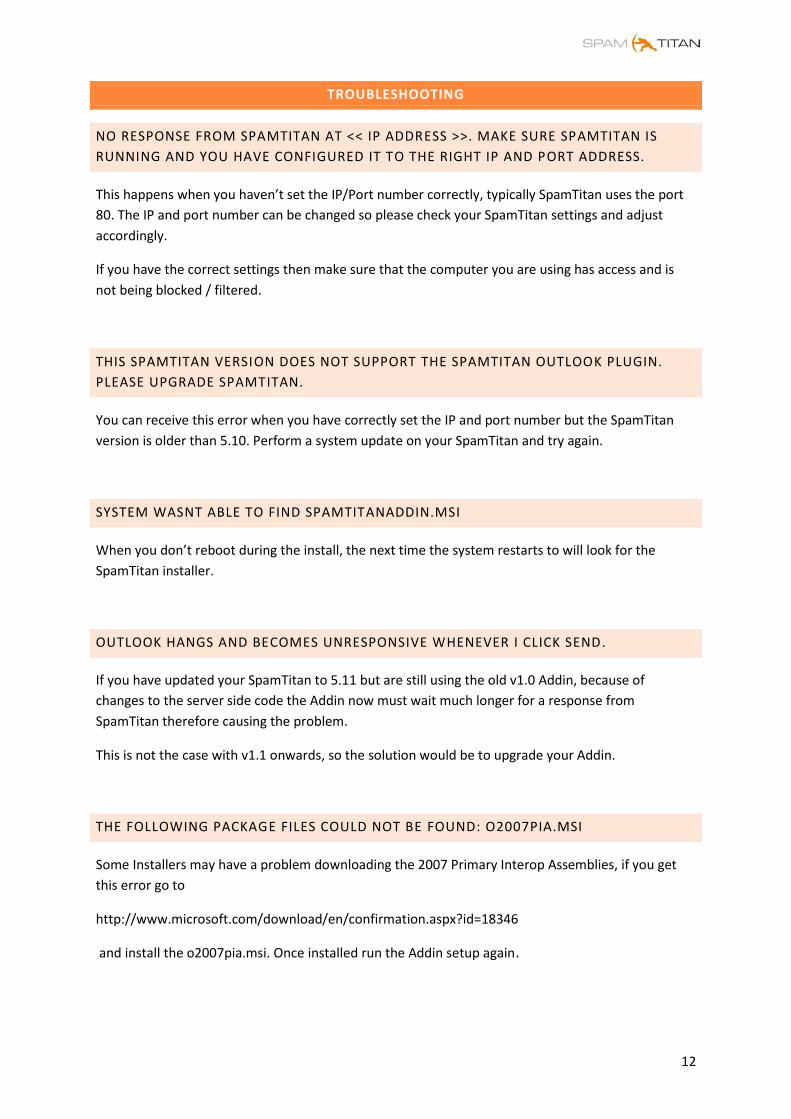
Open Outlook and see if the STOA loads under the Add-Ins tab. You may be issued a warning like
this:
Click Install to continue loading the STOA.
If you have any issues make sure that your DNS configuration is correct and is pointing to the correct
address, during the login process Windows will not be able to launch the installer if it cannot resolve
the Active Directory location. You can check your settings by entering control panel -> network and
sharing centre -> local area connection -> properties -> (select IPv4 from list) -> DNS settings. You
will need to an ipconfig /flushdns command in a CMD window if you make any changes here.
The User Logon Script is executed as a User, so make sure that Users can access the files and have
appropriate permissions.
Perform a gpupdate /force on the CMD line to make sure you have the most recent Active Directory
changes.
12
TROUBLESHOOTING
NO RESPONSE FROM SPAMTITAN AT << IP ADDRESS >>. MAKE SURE SPAMTITAN IS
RUNNING AND YOU HAVE CONFIGURED IT TO THE RIGHT IP AND PORT ADDRESS.
This happens when you haven’t set the IP/Port number correctly, typically SpamTitan uses the port
80. The IP and port number can be changed so please check your SpamTitan settings and adjust
accordingly.
If you have the correct settings then make sure that the computer you are using has access and is
not being blocked / filtered.
THIS SPAMTITAN VERSION DOES NOT SUPPORT THE SPAMTITAN OUTLOOK PLUGIN.
PLEASE UPGRADE SPAMTITAN.
You can receive this error when you have correctly set the IP and port number but the SpamTitan
version is older than 5.10. Perform a system update on your SpamTitan and try again.
SYSTEM WASNT ABLE TO FIND SPAMTITANADDIN.MSI
When you don’t reboot during the install, the next time the system restarts to will look for the
SpamTitan installer.
OUTLOOK HANGS AND BECOMES UNRESPONSIVE WHENEVER I CLICK SEND.
If you have updated your SpamTitan to 5.11 but are still using the old v1.0 Addin, because of
changes to the server side code the Addin now must wait much longer for a response from
SpamTitan therefore causing the problem.
This is not the case with v1.1 onwards, so the solution would be to upgrade your Addin.
THE FOLLOWING PACKAGE FILES COULD NOT BE FOUND: O2007PIA.MSI
Some Installers may have a problem downloading the 2007 Primary Interop Assemblies, if you get
this error go to
http://www.microsoft.com/download/en/confirmation.aspx?id=18346
and install the o2007pia.msi. Once installed run the Addin setup again.
13
GPO – THE ADDIN DOES NOT APPEAR AFTER LOGON
Make sure that the Group Policy has been applied to your computer and it is part of the domain.
Perform gpresult /h result.html on the CMD line to log a report of the current group policy applied,
this will show any errors.
The STOA may be disabled – In Outlook, click file -> Options -> Add-Ins, select Manage COM Add-
Ins->Go… then recheck the SpamTitan Addin box and click OK.
For some windows installs, UAC may block the install during logon. If you find the STOA does not
appear after login, check on your machine if UAC enabled and then disable it. You can remove the
/qn option to verify if the install is happening during logon.
UNINSTALLING
SpamTitan Outlook Addin is listed under programs and features under control panel, to remove it
click uninstall. You can run the SpamTitanAddin.msi to remove / repair.
Your settings will remain in the install directory if you decide to reinstall later.