operating instructions - mielem.miele.ca/operatinginstructions/en-ca/vacuums/previous models... ·...
TRANSCRIPT

Operating instructions
Vacuum cleanerS 4000
To prevent accidentsand machine damage,read these instructionsbefore installation and use.
UV
M.-Nr. 06 579 360

2
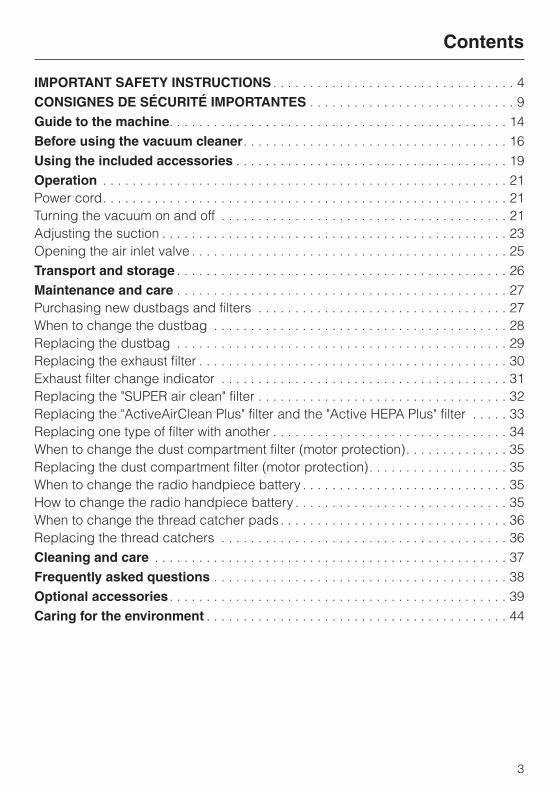
IMPORTANT SAFETY INSTRUCTIONS . . . . . . . . . . . . . . . . . . . . . . . . . . . . . . . . . 4CONSIGNES DE SÉCURITÉ IMPORTANTES . . . . . . . . . . . . . . . . . . . . . . . . . . . . 9Guide to the machine. . . . . . . . . . . . . . . . . . . . . . . . . . . . . . . . . . . . . . . . . . . . . . 14Before using the vacuum cleaner. . . . . . . . . . . . . . . . . . . . . . . . . . . . . . . . . . . . 16Using the included accessories . . . . . . . . . . . . . . . . . . . . . . . . . . . . . . . . . . . . . 19Operation . . . . . . . . . . . . . . . . . . . . . . . . . . . . . . . . . . . . . . . . . . . . . . . . . . . . . . . 21Power cord. . . . . . . . . . . . . . . . . . . . . . . . . . . . . . . . . . . . . . . . . . . . . . . . . . . . . . . 21Turning the vacuum on and off . . . . . . . . . . . . . . . . . . . . . . . . . . . . . . . . . . . . . . . 21Adjusting the suction . . . . . . . . . . . . . . . . . . . . . . . . . . . . . . . . . . . . . . . . . . . . . . . 23Opening the air inlet valve . . . . . . . . . . . . . . . . . . . . . . . . . . . . . . . . . . . . . . . . . . . 25Transport and storage . . . . . . . . . . . . . . . . . . . . . . . . . . . . . . . . . . . . . . . . . . . . . 26Maintenance and care . . . . . . . . . . . . . . . . . . . . . . . . . . . . . . . . . . . . . . . . . . . . . 27Purchasing new dustbags and filters . . . . . . . . . . . . . . . . . . . . . . . . . . . . . . . . . . 27When to change the dustbag . . . . . . . . . . . . . . . . . . . . . . . . . . . . . . . . . . . . . . . . 28Replacing the dustbag . . . . . . . . . . . . . . . . . . . . . . . . . . . . . . . . . . . . . . . . . . . . . 29Replacing the exhaust filter . . . . . . . . . . . . . . . . . . . . . . . . . . . . . . . . . . . . . . . . . . 30Exhaust filter change indicator . . . . . . . . . . . . . . . . . . . . . . . . . . . . . . . . . . . . . . . 31Replacing the "SUPER air clean" filter . . . . . . . . . . . . . . . . . . . . . . . . . . . . . . . . . . 32Replacing the "ActiveAirClean Plus" filter and the "Active HEPA Plus" filter . . . . . 33Replacing one type of filter with another . . . . . . . . . . . . . . . . . . . . . . . . . . . . . . . . 34When to change the dust compartment filter (motor protection). . . . . . . . . . . . . . 35Replacing the dust compartment filter (motor protection). . . . . . . . . . . . . . . . . . . 35When to change the radio handpiece battery . . . . . . . . . . . . . . . . . . . . . . . . . . . . 35How to change the radio handpiece battery . . . . . . . . . . . . . . . . . . . . . . . . . . . . . 35When to change the thread catcher pads . . . . . . . . . . . . . . . . . . . . . . . . . . . . . . . 36Replacing the thread catchers . . . . . . . . . . . . . . . . . . . . . . . . . . . . . . . . . . . . . . . 36Cleaning and care . . . . . . . . . . . . . . . . . . . . . . . . . . . . . . . . . . . . . . . . . . . . . . . . 37Frequently asked questions . . . . . . . . . . . . . . . . . . . . . . . . . . . . . . . . . . . . . . . . 38Optional accessories . . . . . . . . . . . . . . . . . . . . . . . . . . . . . . . . . . . . . . . . . . . . . . 39Caring for the environment . . . . . . . . . . . . . . . . . . . . . . . . . . . . . . . . . . . . . . . . . 44
Contents
3

When using an electrical appliance, basic precautions should always be followed,including the following:
READ ALL INSTRUCTIONS BEFOREUSING THIS APPLIANCEThe manufacturer cannot be held responsible for any damage caused bynon-compliance of these Important Safety Instructions.
WARNING-To reduce the risk of fire, electricshock or injury:
Before usingCheck the voltage rating of thevacuum cleaner before connecting
the power cord to an electrical outlet.Your power source should correspondwith the voltage rating plate located onthe underside of the vacuum. Use onlyhousehold AC outlets. Never use DCpower sources. If you are not sure ofyour home’s voltage supply, consult aqualified electrician. Connecting thevacuum cleaner to a higher voltagethan indicated in these instructions mayresult in damage to the vacuum cleaneror injury.
To reduce the risk of electric shock,this appliance has a polarized plug
(one blade is wider than the other.) Thisplug will fit in a polarized outlet only oneway. If the plug does not fit fully in theoutlet, reverse the plug. If it still doesnot fit, contact a qualified electrician toinstall the proper outlet. Do not alter theplug in any way.
A damaged vacuum cleaner canbe dangerous. Check the
packaging, vacuum cleaner andaccessories for any signs of damage.Do not use a damaged appliance.
Do not use with a damaged cord orplug. If the appliance is not
working as it should, has beendropped, damaged, left outdoors orsubmerged in water, bring it to aservice center.
The electrical outlet must be fittedwith a 15 A fuse.
IMPORTANT SAFETY INSTRUCTIONS
4

UseDo not use on people or onanimals.
Do not use outdoors or on wetsurfaces. Only dry surfaces should
be vacuumed.
Use only as described in thismanual. Use only Miele
recommended accessories.
The hose and the telescopic wandcontain electrical wires. Do not use
the vacuum cleaner if these parts aredamaged in any way. Danger of electricshock!
The manufacturer cannot be heldresponsible for damage caused by
non-compliance with these ImportantSafety Instructions. This appliance isintended strictly for household use only.
This vacuum should not be used toentrap or retain any hazardous
materials.
Do not allow the vacuum cleaner tobe used as a toy. Close attention is
necessary when used near children.
Do not pull or carry by the cord,use the cord as a handle, close a
door on the cord, or pull the cordaround sharp edges or corners. Do notrun the appliance over the cord. Keepthe cord away from heated surfaces.
Do not unplug by pulling on thecord. To unplug, grasp the plug,
not the cord.
Do not handle the plug or vacuumwith wet hands.
Keep hair, loose clothing, fingersand all parts of the body away from
openings and moving parts.
Turn off all controls beforeunplugging.
Use extra care when cleaning onstairs.
Floor attachments, accessoriesand wands must not be used at
head level to avoid injury to eyes andears.
Do not use to pick up flammable orcombustible liquids, such as
gasoline, or use in areas where theymay be present.
IMPORTANT SAFETY INSTRUCTIONS
5

Do not use the vacuum cleaner topick up liquids, this could impair
the electrical safety of the vacuumcleaner. Wait for freshly shampooedcarpets to dry.
Do not vacuum anything that isburning or smoking, such as
cigarettes, matches, or hot ashes.
Do not vacuum up items which areheavy, hard or have sharp edges.
They could cause a blockage anddamage the appliance.
Do not vacuum toner dust. Toner,such as that used in printers and
photocopiers can conduct electricity.
Unplug the vacuum whenchanging accessories, especially
the Turbobrush and RechargeableBattery brush.
Do not turn on or attempt tooperate the vacuum cleaner unless
a dustbag, dust compartment filter andexhaust filter are in place. Use onlygenuine Miele double-layer dustbagsand filters. See "Maintenance and care"for instructions on how to insert thedustbag and filters. If a dustbag hasnot been inserted, the dustcompartment cover will not close. Donot use force!
Unwind the cord completely to aidthe vacuum in dissipating heat.
A temperature limiter automaticallyswitches off the vacuum cleaner if
it gets too hot, see "Frequently askedquestions".
On the underside of the vacuumhandpiece is a metal insert
designed to absorb static electricity.Please make certain that your handremains around this metal insert.
Do not leave the vacuum pluggedin. Unplug it from the outlet when
not in use and before servicing.
Do not place anything into theopenings of the vacuum. Do not
use if any openings are blocked; keepthem free of dust, lint, hair, or anythingthat may reduce air flow.
This appliance is equipped with apower cord reel. Hold plug when
rewinding onto cord reel. Do not allowplug to whip when rewinding.
IMPORTANT SAFETY INSTRUCTIONS
6
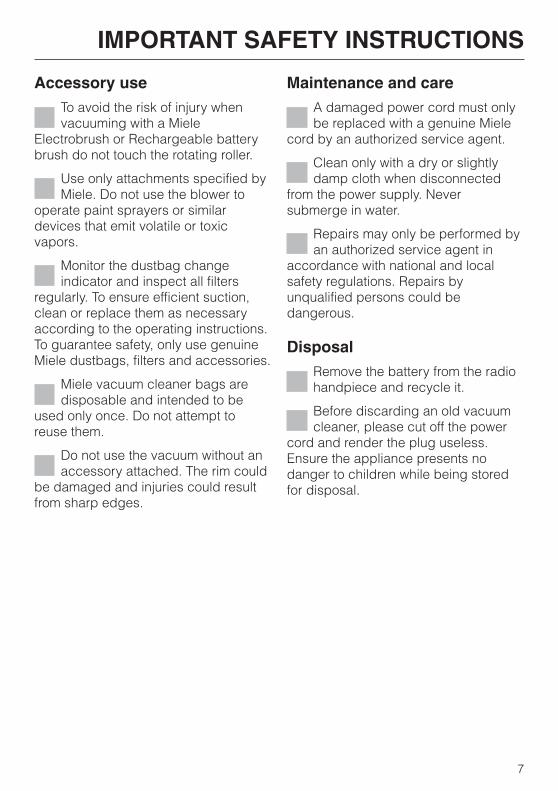
Accessory useTo avoid the risk of injury whenvacuuming with a Miele
Electrobrush or Rechargeable batterybrush do not touch the rotating roller.
Use only attachments specified byMiele. Do not use the blower to
operate paint sprayers or similardevices that emit volatile or toxicvapors.
Monitor the dustbag changeindicator and inspect all filters
regularly. To ensure efficient suction,clean or replace them as necessaryaccording to the operating instructions.To guarantee safety, only use genuineMiele dustbags, filters and accessories.
Miele vacuum cleaner bags aredisposable and intended to be
used only once. Do not attempt toreuse them.
Do not use the vacuum without anaccessory attached. The rim could
be damaged and injuries could resultfrom sharp edges.
Maintenance and careA damaged power cord must onlybe replaced with a genuine Miele
cord by an authorized service agent.
Clean only with a dry or slightlydamp cloth when disconnected
from the power supply. Neversubmerge in water.
Repairs may only be performed byan authorized service agent in
accordance with national and localsafety regulations. Repairs byunqualified persons could bedangerous.
DisposalRemove the battery from the radiohandpiece and recycle it.
Before discarding an old vacuumcleaner, please cut off the power
cord and render the plug useless.Ensure the appliance presents nodanger to children while being storedfor disposal.
IMPORTANT SAFETY INSTRUCTIONS
7

FCC and Industry Canadainformation:This device complies with part 15 of theFCC Rules. Operation is subject to thefollowing two conditions: (1) This devicemay not cause harmful interference,and (2) this device must accept anyinterference received, includinginterference that may cause undesiredoperation.
,Warning: Changes ormodifications to this unit notexpressly approved by the partyresponsible for compliance couldvoid the user’s authority to operatethe equipment.
Note:
This equipment has been tested andfound to comply with the limits for aClass B digital device, pursuant to Part15 of the FCC Rules. These limits aredesigned to provide reasonableprotection against harmful interferencewhen the equipment is operated in aresidential installation. This equipmentgenerates, uses and can radiate radiofrequency energy, and if not installedand used in accordance with theinstructions, may cause harmfulinterference to radio communications.However there is no guarantee thatinterference will not occur in aparticular installation. If this equipmentdoes cause harmful interference toradio or television reception, which canbe determined by turning theequipment off and on, the user isencouraged to try to correct theinterference by one or more of thefollowing measures:
– Reorient or relocate the receivingantenna
– Increase the separation between theequipment and receiver.
– Connect the equipment into an outleton a circuit different from that towhich the receiver is connected.
– Consult the dealer or an experiencedradio/TV technician for help.
SAVE THESE
INSTRUCTIONS
IMPORTANT SAFETY INSTRUCTIONS
8
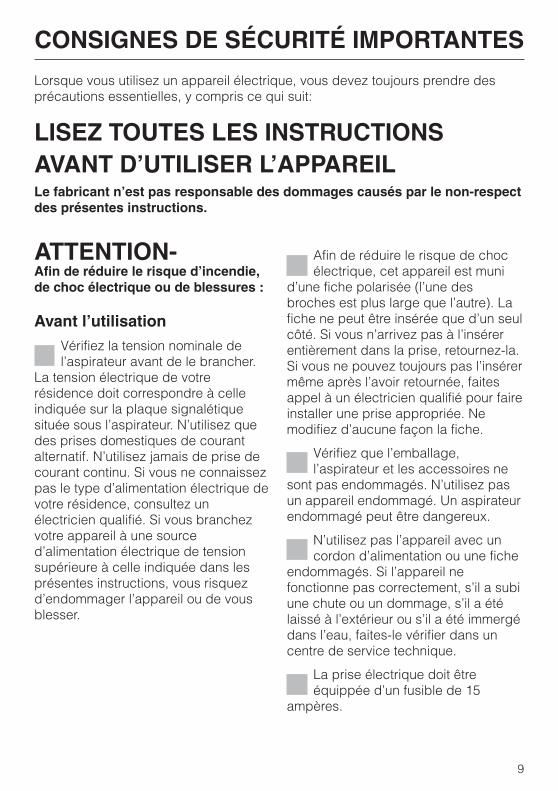
Lorsque vous utilisez un appareil électrique, vous devez toujours prendre desprécautions essentielles, y compris ce qui suit:
LISEZ TOUTES LES INSTRUCTIONSAVANT D’UTILISER L’APPAREILLe fabricant n’est pas responsable des dommages causés par le non-respectdes présentes instructions.
ATTENTION-Afin de réduire le risque d’incendie,de choc électrique ou de blessures :
Avant l’utilisationVérifiez la tension nominale del’aspirateur avant de le brancher.
La tension électrique de votrerésidence doit correspondre à celleindiquée sur la plaque signalétiquesituée sous l’aspirateur. N’utilisez quedes prises domestiques de courantalternatif. N’utilisez jamais de prise decourant continu. Si vous ne connaissezpas le type d’alimentation électrique devotre résidence, consultez unélectricien qualifié. Si vous branchezvotre appareil à une sourced’alimentation électrique de tensionsupérieure à celle indiquée dans lesprésentes instructions, vous risquezd’endommager l’appareil ou de vousblesser.
Afin de réduire le risque de chocélectrique, cet appareil est muni
d’une fiche polarisée (l’une desbroches est plus large que l’autre). Lafiche ne peut être insérée que d’un seulcôté. Si vous n’arrivez pas à l’insérerentièrement dans la prise, retournez-la.Si vous ne pouvez toujours pas l’insérermême après l’avoir retournée, faitesappel à un électricien qualifié pour faireinstaller une prise appropriée. Nemodifiez d’aucune façon la fiche.
Vérifiez que l’emballage,l’aspirateur et les accessoires ne
sont pas endommagés. N’utilisez pasun appareil endommagé. Un aspirateurendommagé peut être dangereux.
N’utilisez pas l’appareil avec uncordon d’alimentation ou une fiche
endommagés. Si l’appareil nefonctionne pas correctement, s’il a subiune chute ou un dommage, s’il a étélaissé à l’extérieur ou s’il a été immergédans l’eau, faites-le vérifier dans uncentre de service technique.
La prise électrique doit êtreéquippée d’un fusible de 15
ampères.
CONSIGNES DE SÉCURITÉ IMPORTANTES
9

UtilisationN’utilisez pas l’appareil pournettoyer des personnes ou des
animaux.
N’utilisez pas l’appareil à l’extérieurou pour nettoyer des surfaces
mouillées. Ne nettoyez que dessurfaces sèches.
Pour utiliser l’aspirateur, suivezuniquement les instructions
d’utilisation contenues dans le présentmanuel. N’utilisez que les accessoiresMiele recommandés.
Le tuyau d’aspiration et le tubetélescopique renferment des fils
électriques. N’utilisez pas l’aspirateur sices pièces sont endommagées,coupées ou perforées. Danger de chocélectrique!
Le fabricant décline touteresponsabilité quant à des
dommages causés par lanon-conformité aux présentesinstructions. Cet appareil est destinéuniquement à l’usage domestique.
N’utilisez pas l’appareil pourcontenir ou circonscrire des
substances toxiques.
Ne laissez pas les enfants joueravec l’aspirateur. Si un enfant
l’utilise ou si vous l’utilisez dans unendroit où se trouvent des enfants,soyez vigilant.
Ne tirez pas sur le cordond’alimentation pour transporter
l’appareil, n’utilisez pas le cordond’alimentation comme poignée, nefermez pas une porte sur le cordond’alimentation, ne le passez pas sur desextrémités ou des recoins tranchants.Ne passez pas l’appareil sur le cordond’alimentation. Veillez à ce que lecordon d’alimentation ne se trouve pas àproximité de surfaces chaudes.
Ne tirez pas sur le cordond’alimentation pour débrancher
l’appareil. Pour le débrancher, tirez surla fiche et non sur le cordond’alimentation.
Ne manipulez pas la fiche oul’aspirateur avec des mains
mouillées.
Veillez à ce que vos cheveux, vosvêtements - s’ils sont amples - vos
doigts et toutes les autres extrémités devotre corps ne se trouvent pas àproximité des ouvertures et des partiesmotrices de l’appareil.
Mettez hors service toutes lescommandes avant de débrancher
l’appareil.
Redoublez d’attention lorsque vousnettoyez un escalier.
N’utilisez pas les brosses àparquet, les accessoires et les
tubes au niveau de la tête pour éviterdes blessures aux yeux et aux oreilles.
N’utilisez pas l’appareil pouréponger des liquides inflammables
ou combustibles, tels que l’essence, oudans des pièces où de tels liquidespourraient être entreposés.
CONSIGNES DE SÉCURITÉ IMPORTANTES
10

N’utilisez pas l’aspirateur pouréponger des liquides, car cela
pourrait nuire à la sécurité électrique del’appareil. Attendez que les tapisfraîchement lavés soient secs.
N’utilisez pas l’aspirateur pourramasser un objet brûlant ou
fumant, tel que cigarettes, allumettesou cendres encore chaudes.
N’aspirez pas des articles lourds,durs ou ayant des bords
tranchants ou pointus. Ils pourraientboucher et endommager l’appareil.
Ne nettoyez pas de l’encre enpoudre avec l’aspirateur. L’encre
en poudre utilisée pour les imprimanteset les photocopieurs peut êtreconductrice d’électricité.
Débranchez l’aspirateur avant dechanger d’accessoire, en
particulier la turbobrosse et la brosse àpiles rechargeables.
N’utilisez pas l’aspirateur sans lesac à poussière ou les filtres.
Ne faites fonctionner l’aspirateur que sile sac à poussière, le filtre du réservoirà poussière et le filtre d’évacuation sontbien en place. N’utilisez que des sacs àpoussière doublés et des filtres Miele(consultez la section « Nettoyage etentretien » pour les instructionsd’insertion du sac à poussière et desfiltres). Si vous n’avez pas inséré unsac à poussière, le couvercle duréservoir à poussière ne se refermerapas. Ne le forcez pas !
Déroulez le cordon d’alimentationjusqu’au bout afin d’aider
l’aspirateur à évacuer la chaleur.
L’aspirateur est muni d’un limiteurde température qui éteint
automatiquement l’appareil s’il chauffetrop. Consultez la section portant sur larésolution de problèmes.
Pour absorber la chargeélectrostatique qui se produit
lorsque l’aspirateur fonctionne, unepièce métallique est placée sous lapoignée de l’appareil. Assurez-vousque votre main enveloppe bien cettepièce métallique.
Ne laissez pas l’aspirateurbranché. Débranchez-le lorsque
vous ne l’utilisez pas et avant deprocéder à son entretien.
Ne placez aucun objet dansaucune des ouvertures. N’utilisez
pas l’aspirateur si une des ouverturesest bloquée. Veillez à ce que poussière,peluches, cheveux ou autresn’obstruent pas l’aspirateur, ce quipourrait réduire le débit d’air.
Cet appareil est muni d’unenrouleur. Tenez la fiche lorsque
vous rembobinez le cordond’alimentation et ne la laissez pasfouetter le plancher.
CONSIGNES DE SÉCURITÉ IMPORTANTES
11

Utilisation des accessoires
Pour éviter les risques deblessures lorsque vous nettoyez
avec l’électrobrosse ou la brosse àbatterie rechargeable Miele, ne touchezpas à la brosse rotative.
Utilisez uniquement desaccessoires désignés par Miele.
N’utilisez pas la soufflerie pour fairefonctionner des pistolets à peinture oudes dispositifs semblables qui émettentdes substances volatiles ou toxiques.
Surveillez le voyant de remplissagedu sac et vérifiez régulièrement
tous les filtres. Afin d’assurer unesuccion efficace, nettoyez-les ouremplacez-les, lorsque nécessaire,selon les instructions d’utilisation. Pourgarantir la sécurité de l’appareil, utilisezuniquement des sacs à poussière,filtres et accessoires originaux deMiele.
Les sacs à poussière Miele sontjetables et conçus pour être utilisés
une seule fois. Ne les réutilisez pas.
Il n’est pas recommandé d’utiliserl’aspirateur avec le tube seul,
c’est-à-dire sans avoir raccordé unaccessoire, car vous pourriez enendommager le rebord et vous blesserau contact des bords coupants.
EntretienSi le cordon d’alimentation estendommagé, ne le remplacez que
par un cordon d’alimentation originalMiele que vous pouvez vous procurerchez un agent de service techniqueautorisé.
Nettoyez-le seulement avec unlinge sec ou légèrement humide
lorsqu’il est débranché. Ne l’immergezjamais dans l’eau.
Les réparations doivent êtreeffectuées uniquement par un
technicien autorisé conformément auxcodes et règlements locaux. Desréparations effectuées par despersonnes non-qualifiées pourraientêtre dangereuses.
Mise au rebutRetirez la pile de laradiocommande et recyclez-la.
Avant de jeter un vieil aspirateur,coupez le cordon d’alimentation et
rendez la fiche inutilisable. Veillez à ceque l’appareil ne présente aucundanger pour les enfants pendant sonentreposage pour mise au rebut.
CONSIGNES DE SÉCURITÉ IMPORTANTES
12
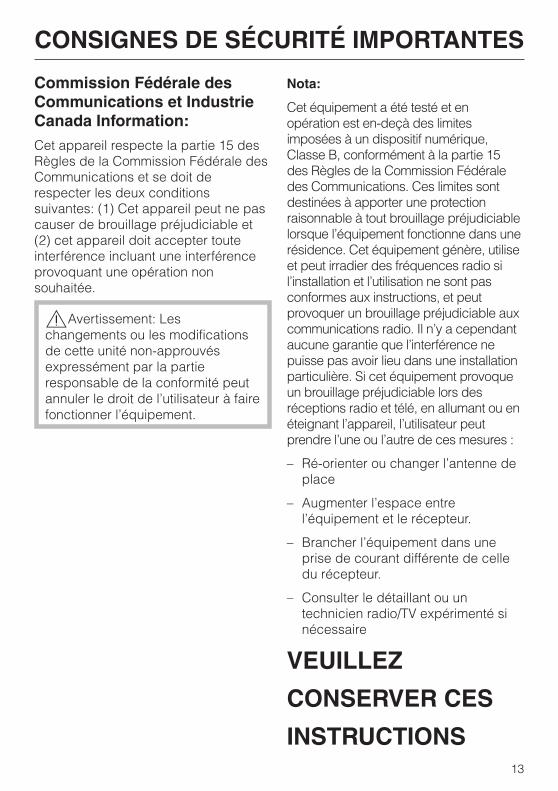
Commission Fédérale desCommunications et IndustrieCanada Information:Cet appareil respecte la partie 15 desRègles de la Commission Fédérale desCommunications et se doit derespecter les deux conditionssuivantes: (1) Cet appareil peut ne pascauser de brouillage préjudiciable et(2) cet appareil doit accepter touteinterférence incluant une interférenceprovoquant une opération nonsouhaitée.
,Avertissement: Leschangements ou les modificationsde cette unité non-approuvésexpressément par la partieresponsable de la conformité peutannuler le droit de l’utilisateur à fairefonctionner l’équipement.
Nota:
Cet équipement a été testé et enopération est en-deçà des limitesimposées à un dispositif numérique,Classe B, conformément à la partie 15des Règles de la Commission Fédéraledes Communications. Ces limites sontdestinées à apporter une protectionraisonnable à tout brouillage préjudiciablelorsque l’équipement fonctionne dans unerésidence. Cet équipement génère, utiliseet peut irradier des fréquences radio sil’installation et l’utilisation ne sont pasconformes aux instructions, et peutprovoquer un brouillage préjudiciable auxcommunications radio. Il n’y a cependantaucune garantie que l’interférence nepuisse pas avoir lieu dans une installationparticulière. Si cet équipement provoqueun brouillage préjudiciable lors desréceptions radio et télé, en allumant ou enéteignant l’appareil, l’utilisateur peutprendre l’une ou l’autre de ces mesures :
– Ré-orienter ou changer l’antenne deplace
– Augmenter l’espace entrel’équipement et le récepteur.
– Brancher l’équipement dans uneprise de courant différente de celledu récepteur.
– Consulter le détaillant ou untechnicien radio/TV expérimenté sinécessaire
VEUILLEZ
CONSERVER CES
INSTRUCTIONS
CONSIGNES DE SÉCURITÉ IMPORTANTES
13
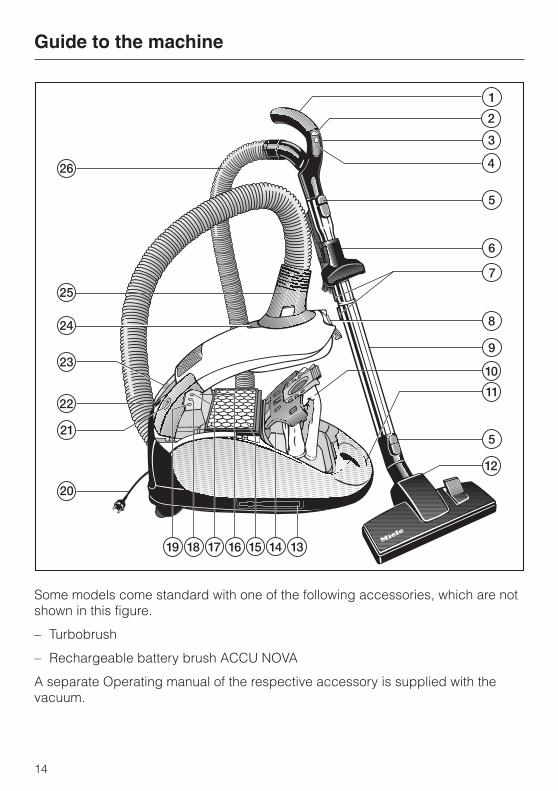
Some models come standard with one of the following accessories, which are notshown in this figure.
– Turbobrush
– Rechargeable battery brush ACCU NOVA
A separate Operating manual of the respective accessory is supplied with thevacuum.
Guide to the machine
14

a Handpiece (some models may include an air inlet valve) *
b Suction power buttons + / – *
c Standby switch *
d LED *
e Locking button
f Accessory clip *
g Telescopic wand release button *
h Dust compartment lid release
i Telescopic wand *
j Dust bag
k Carrying handle
l Floor tool *
m Transport/storage holder
n Dust compartment filter (motor protection)
o Exhaust filter *
p Suction power selector *
q Standby indicator *
r Thermo indicator , *
s Exhaust filter change indicator (Reset button) *
t Power cord with plug
u Cord rewind switch
v Park-System
w On / Off switch
x Dustbag change indicator
y Elbow
z Suction hose
The features marked * may vary or not be available depending on your model.
Guide to the machine
15

Attaching the suction hose^ Insert the elbow into the suction
socket until it clicks. Use the inletguides to direct insertion.
Removing the suction hose^ Press the release buttons at the sides
of the elbow and lift the hose from thesocket.
Connecting the handpiece andtelescopic wand^ Insert the handpiece into the
telescopic wand until it clicks. Usethe inlet guides to direct insertion.
^ To release the handpiece from thetelescopic wand press the lockingbutton (see arrow) and pull thehandpiece away from the telescopicwand.
Before using the vacuum cleaner
16

Depending on your model, the vacuumwill included one of the followingtelescopic wands:
– Telescopic wand
– XXL telescopic wand
Adjusting the telescopic wandOne section of the telescopic wand isinside the other and can be adjustedfor comfortable vacuuming.
^ Press the telescopic wand releasebutton (see arrow) to release thetubes and adjust to the desiredheight.
Adjusting the XXL telescopicwandThis telescopic wand consists of threesections which are height-adjustable.
^ Pull and extend the lower section ofthe wand, a, until it clicks. Press therelease button if you want to retractthe lower section again.
^ Press the adjustment button, b, torelease the tubes and adjust to thedesired height.
Before using the vacuum cleaner
17

Attaching the floor brush^ Insert the wand into the floor brush
and twist until it locks with a click.
^ To release the floor brush from thetelescopic wand, press the lockingbutton (see arrow) and pull the wandout of the floor brush.
The floor brush is suitable for cleaningcarpets, rugs, and hard surfaces. Forflooring susceptible to scratches, useone of the special Miele floor brushes(see "Optional accessories").
Observe the cleaning instructions ofthe floor manufacturer.
To clean carpets and area rugs:
^ Press the foot switch marked ö.
To clean hard flooring:
^ Press the foot switch marked ä.
Turbobrush / Rechargeable batterybrush ACCU NOVA
Some models have optional floor toolsas accessories. Please refer to theseparate operating instructionssupplied with these brushes forinstruction on use and maintenance.
Before using the vacuum cleaner
18

The following accessories are included:
a Crevice nozzle
b Dusting brush (depending on model)
c Upholstery tool
d Accessory clip for the respectiveincluded accessories
e Filter frame
The filter frame is supplied only withthose models which are fitted with an"ActiveAirClean Plus" or "Active HEPAPlus" exhaust filter as standard. Thefilter frame is required to replace one ofthese filters with a "SUPER air clean"filter (see "Maintenance and care -Replacing one type of filter withanother").
Accessory clip^ The accessory clip can be attached
to the handpiece.
Standard floor brushThe standard floor brush can be usedfor normal cleaning of carpets, rugs,hard surfaces, carpeted stairs, etc.
Using the included accessories
19
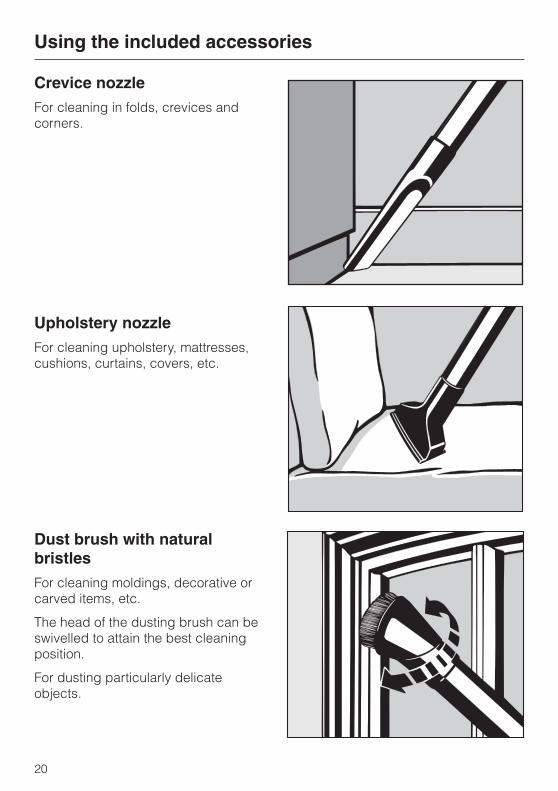
Crevice nozzleFor cleaning in folds, crevices andcorners.
Upholstery nozzleFor cleaning upholstery, mattresses,cushions, curtains, covers, etc.
Dust brush with naturalbristlesFor cleaning moldings, decorative orcarved items, etc.
The head of the dusting brush can beswivelled to attain the best cleaningposition.
For dusting particularly delicateobjects.
Using the included accessories
20

Power cord
,Unwind the cable completely toaid the vacuum in dissipating heat.
Unwinding
^ Hold the plug and pull the powercord out to the required length(maximum 18 ft / 5.5 m).
, To reduce the risk of electricshock, the vacuum has a polarizedplug (one blade is wider than theother). This plug will fit in a polarizedoutlet only one way. If the plug doesnot fit fully in the outlet, reverse theplug. If it still does not fit, contact aqualified electrician. Do not alter theplug in any way.Danger of overheating and damage.
Rewinding
^ Unplug the vacuum from the outlet.
^ Press the rewind switch briefly andthe power cord will rewindautomatically.
^ Press the rewind switch again to stopthe rewinding.
^ Hold the plug so that it does not whiparound when rewinding.
Turning the vacuum on and off^ Press the On/Off switch.
Operation
21

Models with radio frequency controls
The operating state is shown by theStandby indicator on the vacuum.
The vacuum can be switched to astandby mode during pauses.
^ Press the Standby button on thehandpiece.
When the button is pressed again, thevacuum will turn on to the last selectedpower level.
Every push of a button at the radiohandpiece is displayed by the indicatorlight.
While vacuumingThe vacuum cleaner can also stand onits end for vacuuming stairs, drapesetc.
,To prevent static electricity yourhand must touch the metal inlay onthe underside of the vacuumhandpiece. Be certain tocontinuously touch this inlay whenvacuuming fine dust, flour orsawdust as these materials are morelikely to create a static discharge. Tofurther prevent static dischargewhile vacuuming, pull the vacuumalong by the hose with one handwhile continuing to hold thehandpiece in the other hand.
Operation
22

Adjusting the suctionThe symbols on the controls indicatewhat each setting is suitable for.
a curtains, lightweight fabrics
b upholstery, cushions
c thick pile carpets, rugs andrunners
d energy-saving, daily use
e lightly soiled textured carpets
f textured hard flooring, andintensive cleaning of carpets
Operation
23
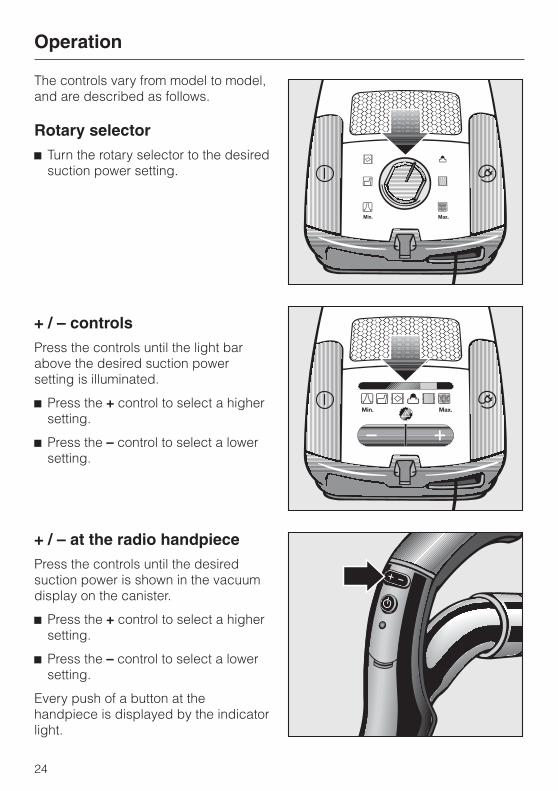
The controls vary from model to model,and are described as follows.
Rotary selector^ Turn the rotary selector to the desired
suction power setting.
+ / – controlsPress the controls until the light barabove the desired suction powersetting is illuminated.
^ Press the + control to select a highersetting.
^ Press the – control to select a lowersetting.
+ / – at the radio handpiecePress the controls until the desiredsuction power is shown in the vacuumdisplay on the canister.
^ Press the + control to select a highersetting.
^ Press the – control to select a lowersetting.
Every push of a button at thehandpiece is displayed by the indicatorlight.
Operation
24
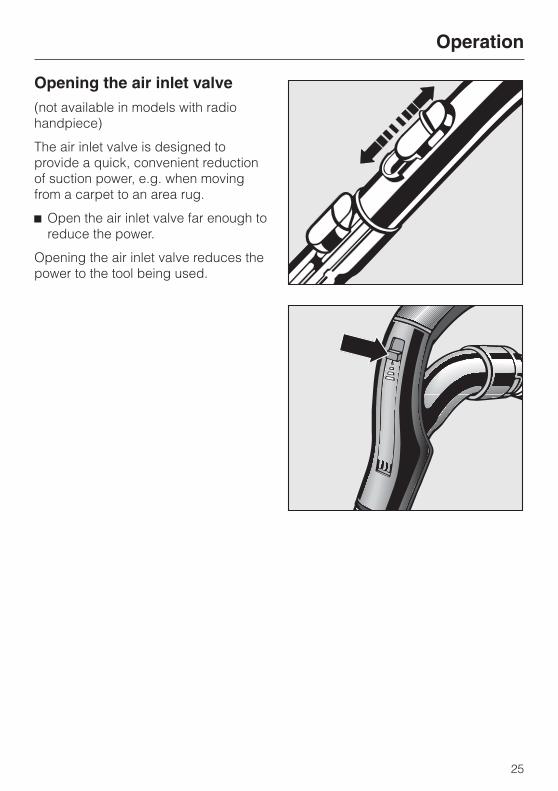
Opening the air inlet valve(not available in models with radiohandpiece)
The air inlet valve is designed toprovide a quick, convenient reductionof suction power, e.g. when movingfrom a carpet to an area rug.
^ Open the air inlet valve far enough toreduce the power.
Opening the air inlet valve reduces thepower to the tool being used.
Operation
25
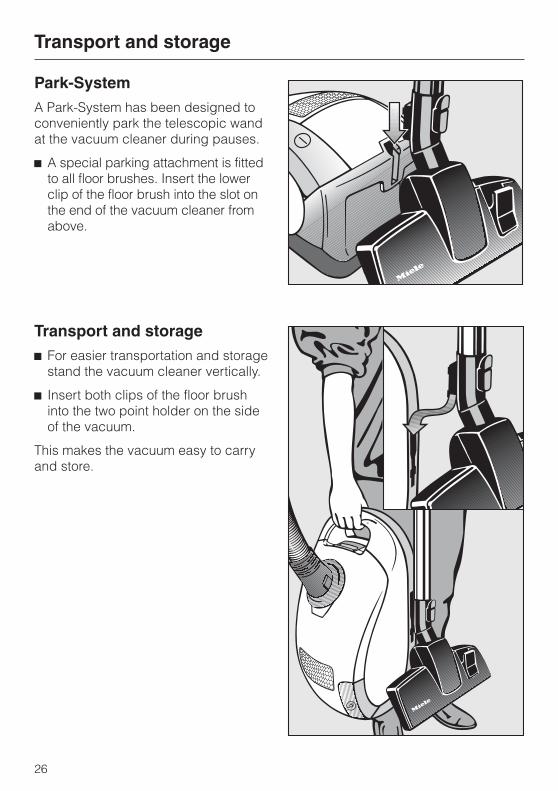
Park-SystemA Park-System has been designed toconveniently park the telescopic wandat the vacuum cleaner during pauses.
^ A special parking attachment is fittedto all floor brushes. Insert the lowerclip of the floor brush into the slot onthe end of the vacuum cleaner fromabove.
Transport and storage^ For easier transportation and storage
stand the vacuum cleaner vertically.
^ Insert both clips of the floor brushinto the two point holder on the sideof the vacuum.
This makes the vacuum easy to carryand store.
Transport and storage
26
,Turn off the vacuum and unplugit from the outlet before performingany maintenance work.
The Miele filter system consists of threefilters which must be replaced from timeto time to ensure efficient suction.
– Dustbag
– Exhaust filter
– Dust compartment filter(motor protection)
Use only Miele dustbags with theMiele quality signet and originalMiele filter. This ensures optimumperformance of the suction powerand also ensures that the bag isused to capacity.The use of non-Miele dustbagscould cause damage to the vacuumcleaner.
Purchasing new dustbags andfiltersReplacement dustbags and filters canbe purchased from your local MieleDealer.
Which dustbags and filters arethe right ones?Order original Miele dustbags with theletters F/J/M.
A "SUPER air clean" exhaust filter and adust compartment filter are suppliedwith every box of Miele dustbags. If youwish to purchase exhaust filters or dustcompartment filters separately, pleasequote the model number on the dataplate located underneath theappliance.
You can replace the exhaust filtersupplied with the vacuum cleaner withone of the other types of filters (see"Optional accessories").
Maintenance and care
27

When to change the dustbagChange the dustbag when the coloredmarker in the dustbag change indicatorfills the display.
The dust bags are disposable andintended to be used only once. Donot attempt to reuse.
Checking the dustbag changeindicator
^ Attach the floor brush to the vacuumcleaner.(Perform this test with the floor brushonly, since other attachments canaffect the function of the dustbagchange indicator.)
^ Turn the vacuum cleaner on andselect the highest power setting.
^ Lift the floor brush slightly off thefloor. If the marker completely fills theindicator window, the dust bag needsto be changed.
How the dustbag change indicatorworks
The dustbag change indicator isdesigned to show when the bag is fullof common household dust and tomeasure the amount of air flow throughthe dustbag. Normal household dust isa mixture of dust, hair, carpet fluff,threads, sand, etc.
However, if fine dust, such as drill dust,sand, plaster or flour is vacuumed, thepores of the dustbag will becomeblocked. The marker will indicate thatthe bag is "full" even when it is not. Thedustbag should be changed becausethe suction power is greatly reduced.
If the bag is bulging with pet fur, hair,carpet fluff, etc., the indicator may notregister "full". This is because the airflow of the dustbag may still be highenough not to activate the marker toshow maximum. The dustbag shouldstill be changed.
Maintenance and care
28

Replacing the dustbag^ Open the dust compartment lid.
^ Grasp the collar by the two fingerholes and pull it out of the dustbagholder.
The dustbag has a flap which closesautomatically to prevent dust fromescaping when it is removed.
^ Insert the new dust bag as far as itwill go into the dustbag holder. Donot unfold the dustbag when taking itout of the box. Keeping it folded willprevent it from getting caught whenthe dust compartment lid is closed.
^ Close the dust compartment lid untilit clicks into place. Take care not tocatch the dust bag in the lid.
,A empty-operation-barrier willblock the dust compartment lid fromclosing if no dustbag is inserted or ifit is not inserted all the way.Do Not Use Force!
Maintenance and care
29

Replacing the exhaust filterDepending on model, the vacuumcleaner will be equipped with one of thefollowing exhaust filters:
a SUPER air clean filter
b ActiveAirClean Plus filter
c Active HEPA Plus filter
"SUPER air clean" filter
A "SUPER air clean" filter is suppliedwith every box of Miele dustbags. Itshould be replaced each time a newbox of bags is started.
"ActiveAirClean Plus" or the "ActiveHEPA Plus" filter
An "ActiveAirClean Plus" or "ActiveHEPA Plus" filter should be changedapproximately once a year. Change thefilter sooner if it is obviously soiled or nolonger effective.
It is helpful to note the date directly onthe filter as a reminder for when to nextchange it. See "Optional Accessories"for filter descriptions.
Maintenance and care
30
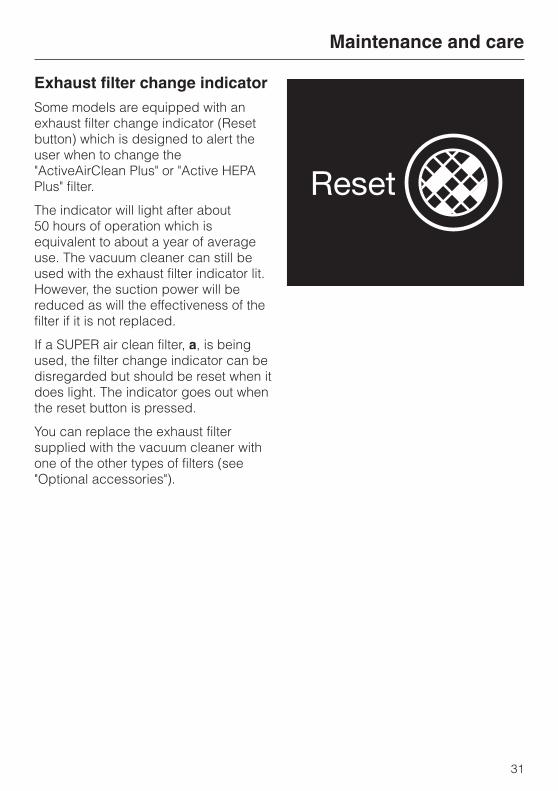
Exhaust filter change indicatorSome models are equipped with anexhaust filter change indicator (Resetbutton) which is designed to alert theuser when to change the"ActiveAirClean Plus" or "Active HEPAPlus" filter.
The indicator will light after about50 hours of operation which isequivalent to about a year of averageuse. The vacuum cleaner can still beused with the exhaust filter indicator lit.However, the suction power will bereduced as will the effectiveness of thefilter if it is not replaced.
If a SUPER air clean filter, a, is beingused, the filter change indicator can bedisregarded but should be reset when itdoes light. The indicator goes out whenthe reset button is pressed.
You can replace the exhaust filtersupplied with the vacuum cleaner withone of the other types of filters (see"Optional accessories").
Maintenance and care
31

Replacing the "SUPER airclean" filter^ Open the dust compartment lid.
^ Open the filter frame and remove theused "SUPER air clean" filter with theclean corner (see arrow).
^ Insert the new filter.
^ Close the filter frame.
^ Close the dust compartment lid firmlyuntil it clicks into place.
Maintenance and care
32
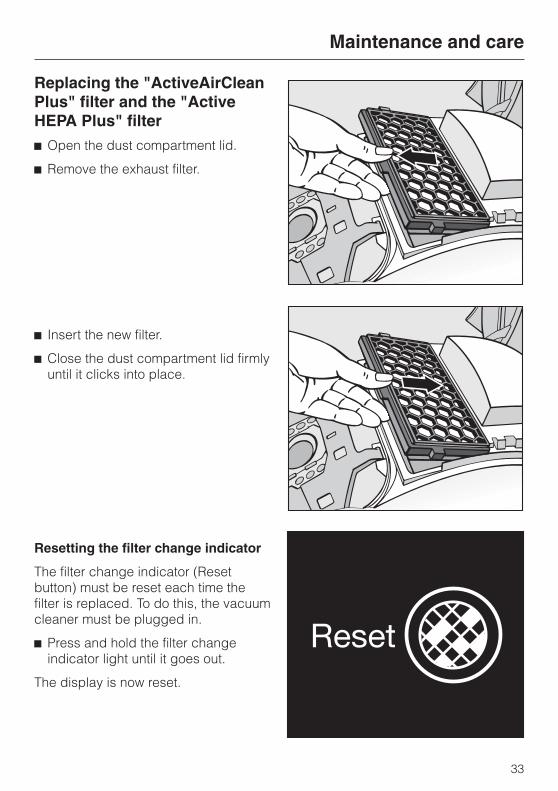
Replacing the "ActiveAirCleanPlus" filter and the "ActiveHEPA Plus" filter^ Open the dust compartment lid.
^ Remove the exhaust filter.
^ Insert the new filter.
^ Close the dust compartment lid firmlyuntil it clicks into place.
Resetting the filter change indicator
The filter change indicator (Resetbutton) must be reset each time thefilter is replaced. To do this, the vacuumcleaner must be plugged in.
^ Press and hold the filter changeindicator light until it goes out.
The display is now reset.
Maintenance and care
33
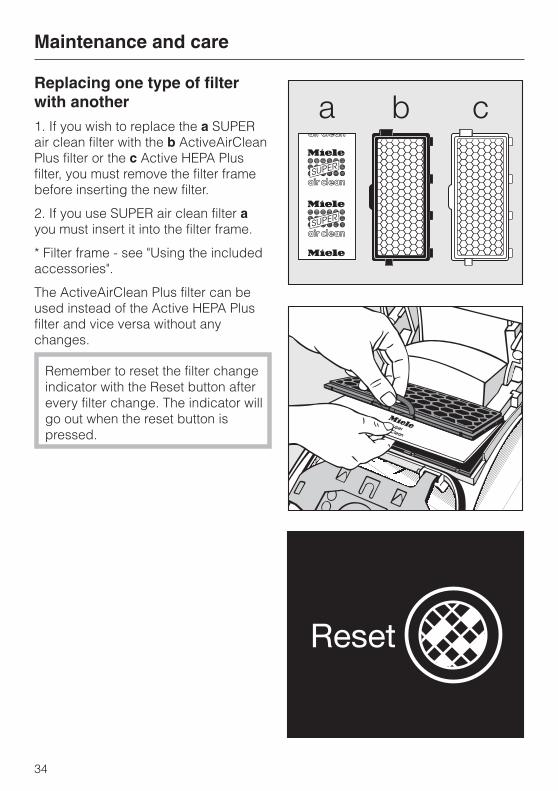
Replacing one type of filterwith another1. If you wish to replace the a SUPERair clean filter with the b ActiveAirCleanPlus filter or the c Active HEPA Plusfilter, you must remove the filter framebefore inserting the new filter.
2. If you use SUPER air clean filter ayou must insert it into the filter frame.
* Filter frame - see "Using the includedaccessories".
The ActiveAirClean Plus filter can beused instead of the Active HEPA Plusfilter and vice versa without anychanges.
Remember to reset the filter changeindicator with the Reset button afterevery filter change. The indicator willgo out when the reset button ispressed.
Maintenance and care
34

When to change the dustcompartment filter (motorprotection)Replace the dust compartment filterevery time you start a new box ofdustbags. A dust compartment filter issupplied with each box of Mieledustbags.
Replacing the dustcompartment filter (motorprotection)^ Open the dust compartment lid.
^ Open the filter frame, remove the oldfilter and replace with a new one.
^ Close the filter frame.
When to change the radiohandpiece batteryEvery 18 monthsKeep a 3 V lithium battery handy.
The vacuum can still be used if thebattery is weak or not inserted at all.The vacuum will operatecontinuously on the maximumsuction power.
How to change the radiohandpiece battery^ Lift the battery compartment lid and
take the old battery out. Pleaserecycle.
^ Replace the battery with a new one.Pay attention to the polarity.
^ Close the battery compartment.
Maintenance and care
35
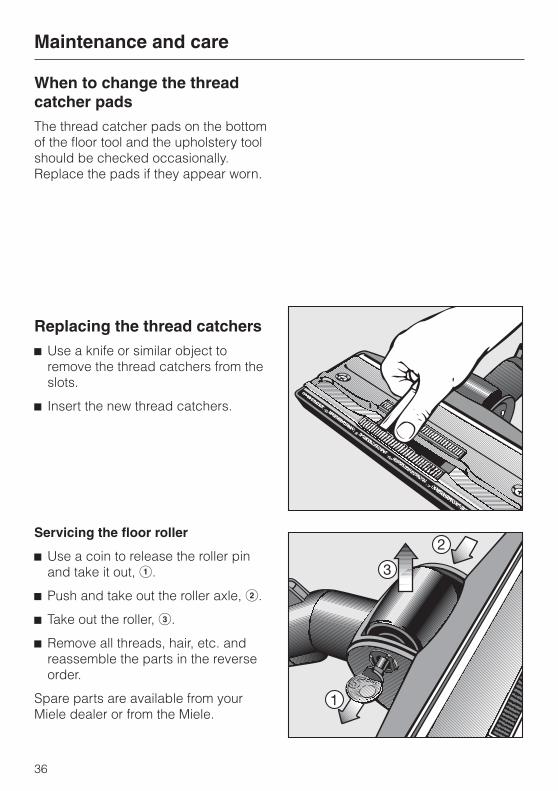
When to change the threadcatcher padsThe thread catcher pads on the bottomof the floor tool and the upholstery toolshould be checked occasionally.Replace the pads if they appear worn.
Replacing the thread catchers^ Use a knife or similar object to
remove the thread catchers from theslots.
^ Insert the new thread catchers.
Servicing the floor roller
^ Use a coin to release the roller pinand take it out, a.
^ Push and take out the roller axle, b.
^ Take out the roller, c.
^ Remove all threads, hair, etc. andreassemble the parts in the reverseorder.
Spare parts are available from yourMiele dealer or from the Miele.
Maintenance and care
36

,Turn off the vacuum and unplugit before performing anymaintenance work.
Vacuum cleaner and accessories
External surfaces of the vacuumcleaner and accessories can becleaned with a slightly damp cloth orwith a cleaner suitable for plastics.
,Do not use abrasive, glass or allpurpose cleaners! They will damagethe surface.
Dust compartment
The dust compartment can, ifnecessary, be cleaned using a drycloth, dusting brush or a secondvacuum to suck out any dust.
Monitor the change dustbag indicatorand inspect all filters regularly. Clean orreplace them when necessaryaccording to these OperatingInstructions.
,Do not submerge the vacuum inwater! If moisture gets into theappliance there is the risk of anelectric shock.
Cleaning and care
37
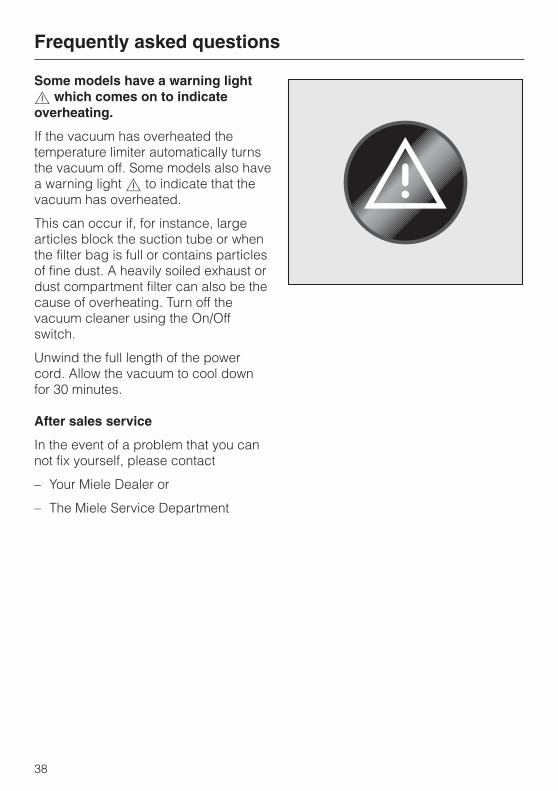
Some models have a warning light, which comes on to indicateoverheating.
If the vacuum has overheated thetemperature limiter automatically turnsthe vacuum off. Some models also havea warning light , to indicate that thevacuum has overheated.
This can occur if, for instance, largearticles block the suction tube or whenthe filter bag is full or contains particlesof fine dust. A heavily soiled exhaust ordust compartment filter can also be thecause of overheating. Turn off thevacuum cleaner using the On/Offswitch.
Unwind the full length of the powercord. Allow the vacuum to cool downfor 30 minutes.
After sales service
In the event of a problem that you cannot fix yourself, please contact
– Your Miele Dealer or
– The Miele Service Department
Frequently asked questions
38

Each model may be accessorized withone or several of the following tools.
Rechargeable battery brushSAB 100-3
The rechargeable battery brush isintended for intensive cleaning andrestoring of thick pile carpeting. It isparticularly suitable for cleaning andrestoring crushed carpet pile of floorcoverings subject to hard wear,especially in high traffic areas.
Observe the cleaning instructions ofthe floor manufacturer.
TurbobrushSTB 205-3
The Turbobrush is intended for cleaningshort to medium pile carpeting. It ismechanically driven by the suctionpower of the vacuum. In addition todust particles it also removesstubbornly adhered threads, hairs, fluff,etc.
Observe the cleaning instructions ofthe floor manufacturer.
Hand TurbobrushSTB 101
The Hand Turbobrush is intended forvacuuming upholstery, mattresses, carseats, carpeted stairs and other areasinaccessible with the standardTurbobrush.
Optional accessories
39

Hard floor brushSBB 235-3
To vacuum sturdy hard floors, e.g. tilesand stone floors.
Parquet floor brushSBB Parquet-3
Special brush with natural bristlesintended for cleaning parquet andlaminate floors, especially thosesusceptible to scratching.
Universal brush
For dusting books, shelves, etc.
Optional accessories
40

Dust brush with natural bristles
For dusting particularly delicateobjects.
Radiator brush
(only usable with the crevice nozzle)
For cleaning radiators, narrow shelvesor crevices.
Mattress tool
For cleaning deep crevices, mattressesand upholstery.
Optional accessories
41
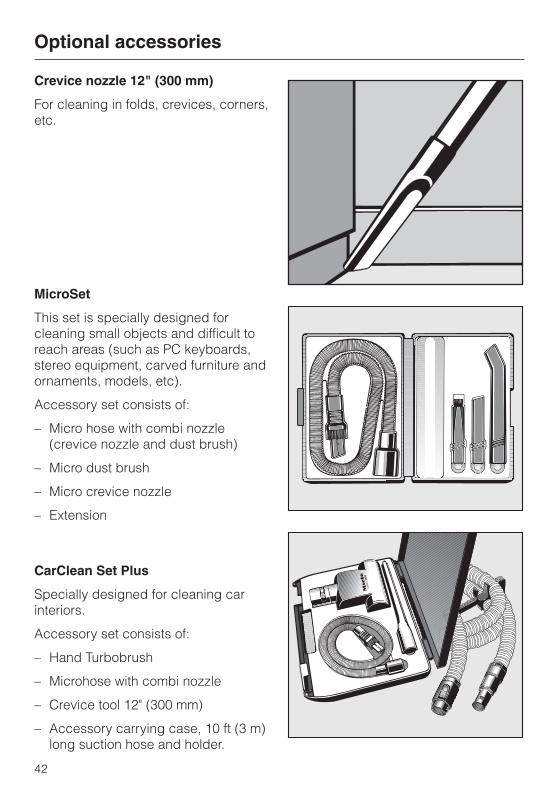
Crevice nozzle 12" (300 mm)
For cleaning in folds, crevices, corners,etc.
MicroSet
This set is specially designed forcleaning small objects and difficult toreach areas (such as PC keyboards,stereo equipment, carved furniture andornaments, models, etc).
Accessory set consists of:
– Micro hose with combi nozzle(crevice nozzle and dust brush)
– Micro dust brush
– Micro crevice nozzle
– Extension
CarClean Set Plus
Specially designed for cleaning carinteriors.
Accessory set consists of:
– Hand Turbobrush
– Microhose with combi nozzle
– Crevice tool 12" (300 mm)
– Accessory carrying case, 10 ft (3 m)long suction hose and holder.
Optional accessories
42
ActiveAirClean Plus filter
A special active charcoal filter whichabsorbs odors from the dust collectedin the dustbag. The "ActiveAirCleanPlus" filter can be used in place of the"SUPER air clean" filter. There is nodifference in the fine dust performanceof the "ActiveAirClean Plus" and the"SUPER air clean" filter.
Active HEPA Plus Filter
The "Active HEPA Plus" filter combinesactivated charcoal and HEPA filtrationin one. The active charcoal layerabsorbs odors from the dust collectedin the dustbag. Vacuum cleanersequipped with this exhaust filter areparticularly suitable for allergy sufferersand those concerned with a high levelof hygiene because of its ability to traprespirable particles and allergens.
Optional accessories
43
Disposal of the packingmaterialsThe cardboard box and packingmaterials protect the appliance duringshipping. They have been designed tobe biodegradable and recyclable.
Ensure that any plastic wrappings,bags, etc. are disposed of safely andkept out of the reach of children. Theseitems pose a danger of suffocation.
Disposing of the dustbag andfiltersGenuine Miele dustbags and filters aremade of environmentally friendlymaterials. They can be thrown out withthe household trash provided thevacuum has been used only for normalhousehold dust.
Caring for the environment
44

45

46

47

All rights reserved/1305 M.-Nr. 06 579 360 / 00-