operating instructions - mielem.miele.ca/operatinginstructions/en-ca/dishwashers... · operating...
TRANSCRIPT

Operating instructions
IncognitoG 658 SCViG 858 SCVi
To prevent accidents UVand machine damage,read these instructionsbeforeinstallation or use. M.-Nr. 05 431 330


IMPORTANT SAFETY INSTRUCTIONSMESURES DE SÉCURITÉ IMPORTANTESCaring for the environmentEnergy saving washing . . . . . . . . . . . . . . . . . . . . . . . . . . . . . . . . . . . . . . . . . . . . . . 9Guide to the dishwasherWash cabinet . . . . . . . . . . . . . . . . . . . . . . . . . . . . . . . . . . . . . . . . . . . . . . . . . . . . . 10Control panel . . . . . . . . . . . . . . . . . . . . . . . . . . . . . . . . . . . . . . . . . . . . . . . . . . . . . 11Before using for the first timeTo open the door . . . . . . . . . . . . . . . . . . . . . . . . . . . . . . . . . . . . . . . . . . . . . . . . . . 12To close the door . . . . . . . . . . . . . . . . . . . . . . . . . . . . . . . . . . . . . . . . . . . . . . . . . . 12Water softener . . . . . . . . . . . . . . . . . . . . . . . . . . . . . . . . . . . . . . . . . . . . . . . . . . . . 13
Programming the water softener . . . . . . . . . . . . . . . . . . . . . . . . . . . . . . . . . . . 14Checking the programmed water hardness. . . . . . . . . . . . . . . . . . . . . . . . . . . 15
Salt indicator . . . . . . . . . . . . . . . . . . . . . . . . . . . . . . . . . . . . . . . . . . . . . . . . . . . . . 17Rinse aid . . . . . . . . . . . . . . . . . . . . . . . . . . . . . . . . . . . . . . . . . . . . . . . . . . . . . . . . 18Adding rinse aid . . . . . . . . . . . . . . . . . . . . . . . . . . . . . . . . . . . . . . . . . . . . . . . . . . 18Adjusting the dosage. . . . . . . . . . . . . . . . . . . . . . . . . . . . . . . . . . . . . . . . . . . . . . . 19Rinse aid indicator . . . . . . . . . . . . . . . . . . . . . . . . . . . . . . . . . . . . . . . . . . . . . . . . . 19Loading the dishwasherItems not recommended for dishwashing . . . . . . . . . . . . . . . . . . . . . . . . . . . . . . . 21Cutlery tray (SC units) . . . . . . . . . . . . . . . . . . . . . . . . . . . . . . . . . . . . . . . . . . . . . . 22Upper basket . . . . . . . . . . . . . . . . . . . . . . . . . . . . . . . . . . . . . . . . . . . . . . . . . . . . . 23
Adjusting the upper basket . . . . . . . . . . . . . . . . . . . . . . . . . . . . . . . . . . . . . . . 23Adjustable cup racks . . . . . . . . . . . . . . . . . . . . . . . . . . . . . . . . . . . . . . . . . . . . 24Coffee bar . . . . . . . . . . . . . . . . . . . . . . . . . . . . . . . . . . . . . . . . . . . . . . . . . . . . . 24
Lower basket . . . . . . . . . . . . . . . . . . . . . . . . . . . . . . . . . . . . . . . . . . . . . . . . . . . . . 25Lower basket inserts
Removing an insert . . . . . . . . . . . . . . . . . . . . . . . . . . . . . . . . . . . . . . . . . . . . . 26Inserting an insert . . . . . . . . . . . . . . . . . . . . . . . . . . . . . . . . . . . . . . . . . . . . . . . 26Foldable spike insert . . . . . . . . . . . . . . . . . . . . . . . . . . . . . . . . . . . . . . . . . . . . 27PlateGuard Plus insert . . . . . . . . . . . . . . . . . . . . . . . . . . . . . . . . . . . . . . . . . . . 28Bottle holder . . . . . . . . . . . . . . . . . . . . . . . . . . . . . . . . . . . . . . . . . . . . . . . . . . . 28
Basket accessories
Contents
3
OperationAdding detergent. . . . . . . . . . . . . . . . . . . . . . . . . . . . . . . . . . . . . . . . . . . . . . . . . . 30Running the dishwasher . . . . . . . . . . . . . . . . . . . . . . . . . . . . . . . . . . . . . . . . . . . . 31At the end of a program. . . . . . . . . . . . . . . . . . . . . . . . . . . . . . . . . . . . . . . . . . . . . 31Interrupting a program. . . . . . . . . . . . . . . . . . . . . . . . . . . . . . . . . . . . . . . . . . . . . . 32Changing a program . . . . . . . . . . . . . . . . . . . . . . . . . . . . . . . . . . . . . . . . . . . . . . . 32Program guide . . . . . . . . . . . . . . . . . . . . . . . . . . . . . . . . . . . . . . . . . . . . . . . . . . . . 33Additional features . . . . . . . . . . . . . . . . . . . . . . . . . . . . . . . . . . . . . . . . . . . . . . . . . 34
"Top Solo" (2) . . . . . . . . . . . . . . . . . . . . . . . . . . . . . . . . . . . . . . . . . . . . . . . . . . 34Delay start (d) . . . . . . . . . . . . . . . . . . . . . . . . . . . . . . . . . . . . . . . . . . . . . . . . . 35
Frequently asked questionsAfter sales serviceTransportUser Maintenance Instructions
Cleaning the spray arms . . . . . . . . . . . . . . . . . . . . . . . . . . . . . . . . . . . . . . . . . . . . 48Cleaning the wash cabinet . . . . . . . . . . . . . . . . . . . . . . . . . . . . . . . . . . . . . . . . . . 49Cleaning the door and door seal . . . . . . . . . . . . . . . . . . . . . . . . . . . . . . . . . . . . . . 49Cleaning the exterior . . . . . . . . . . . . . . . . . . . . . . . . . . . . . . . . . . . . . . . . . . . . . . . 49Cleaning the water inlet filter . . . . . . . . . . . . . . . . . . . . . . . . . . . . . . . . . . . . . . . . . 50Cleaning the drain pump and non-return valve. . . . . . . . . . . . . . . . . . . . . . . . . . . 51
Contents
4

WARNING –When using your dishwasher, followbasic precautions, including the fol-lowing:
Read all instructions before installa-tion or use of the dishwasher to pre-vent injury and machine damage.
The manufacturer cannot be held re-sponsible for damage or injurycaused by improper use of this ap-pliance.
Use the dishwasher only for its in-tended purpose. This appliance isintended for residential use only.
Keep these operating instructions ina safe place and pass them on toany future user.
Electrical safetyBefore installation make sure thatthe voltage and frequency listed on
the data plate correspond with thehousehold electrical supply. This datamust correspond to prevent injury andmachine damage. Consult a qualifiedelectrician if in doubt.
Before installation or service, dis-connect the power supply to the
work area by unplugging the unit, “trip-ping” the circuit breaker or removingthe fuse.
Do not use an extension cord toconnect this appliance to electric-
ity. Extension cords do not guaranteethe required safety of the appliance(e.g. danger of overheating).
Be certain your appliance is prop-erly installed and grounded by a
qualified technician. To guarantee theelectrical safety of this appliance, conti-nuity must exist between the applianceand an effective grounding system. It isimperative that this basic safety require-ment be met. If there is any doubt, havethe electrical system of the housechecked by a qualified electrician. Themanufacturer cannot be held responsi-ble for damages caused by the lack, orinadequacy of, an effective groundingsystem.
InstallationInstallation and repair work shouldbe by a Miele authorized service
technician. Work by unqualified per-sons could be dangerous and couldvoid the warranty.
This equipment is not designed formaritime use or for use in mobile
installations such as caravans or air-craft. However, under certain conditionsit may be possible for an installation inthese applications. Please contact thenearest Miele dealer or the Miele Tech-nical Service Department with specificrequirements.
Inspect the dishwasher for ship-ping damage. Do not install or op-
erate a damaged unit. Contact theplace of purchase.
IMPORTANT SAFETY INSTRUCTIONS
5

Ensure that any plastic wrappings,bags etc. are disposed of safely
and kept out of the reach of babies andyoung children. Danger of suffocation!
This dishwasher should only be in-stalled under a continuous
countertop secured to adjacentcabinetry.
Do not install this dishwasher be-neath a cooking surface or oven.
Do not, under any circumstancescut the intake hose or submerge in
liquid. This hose contains electricalcomponents that could cause injury orproperty damage if cut or submerged.
UseOnly use the dishwasher if all pan-els are properly in place.
Do not tamper with the controls.
To reduce the risk of injury, do notallow children to play in, on, or
near the dishwasher.
Do not abuse, sit, or stand on thedoor or baskets of the dishwasher.
Under certain conditions, hydrogengas may be produced in a hot
water system that has not been usedfor two weeks or more. HYDROGENGAS IS EXPLOSIVE. If the hot watersystem has not been used for such aperiod, turn on all hot water faucets andlet water flow from each for several min-utes before using the dishwasher. Thiswill release any accumulated hydrogengas. Do not smoke or use an openflame during this time.
Do not wash plastic items unlessthey are labeled "dishwasher safe"
or the equivalent. For items not labeled,check the manufacturer’s recommenda-tions.
When loading tableware, placesharp items away from the door
seal to prevent damage to the seal.Load knives pointing downwards toprevent injuries.
Only use detergents and rinse aidsrecommended for residential dish-
washers. Keep all detergents and rinseaids out of the reach of children.
Do not drink water from the dish-washer! Harmful residues could be
present.
For dishwashers with visible heatingelement
Do not touch the heating elementduring or immediately after use.
Disposal of an applianceIf the appliance is removed from itsinstallation and will not be used,
the door to the wash cabinet should beremoved to prevent children from beinglocked in the machine. When discard-ing an old dishwasher, unplug it fromthe power outlet, remove the door to thewash cabinet and cut off the powercord.
SAVE THESEINSTRUCTIONS
IMPORTANT SAFETY INSTRUCTIONS
6

AVERTISSEMENT –Au moment d’utiliser votrelave-vaisselle, veuillez observertoutes les mesures de sécurité debase.
Cet appareil électroménager est con-forme à tous les règlements et codessur la sécurité. Pour éviter de vousblesser et d’endommager l’appareil,veuillez lire soigneusement les in-structions sur l’utilisation.
N’utilisez le lave vaiselle que pourlaver la vaiselle.Le fabricant ne peut être tenuresponsable des dommages oublessures causés par une utilisationinadéquate ou par des utilisationsautres que celles auxquellesl’appareil est destiné.
Les réparations doivent être effec-tuées uniquement par une per-
sonne compétente. Débrancher l’appa-reil de la prise de courant avant d’enfaire l’entretien (enlever la fiche de laprise ou fermer le disjoncteur).
Installer uniquement ce lave-vais-selle sous un comptoir continu qui
est fixé à des meubles adjacents.
Vous devez mettre le lave-vaisselleà la terre. Installer le lave-vaisselle
en observant les instructions pour l’ins-tallation ci-jointes.
Utiliser des détersifs pour leslave-vaiselle ménagers seulement.
Utiliser uniquement des détersifs et desproduits de rinçage recommandés pourles lave-vaisselle.
Ne pas utiliser votre lave-vaisselleà moins que tous les panneaux
soient bien en place.
Ne pas permettre aux enfants dejouer dans ou sur le lave-vaisselle.
Ranger tous les détersifs et pro-duits de rinçage hors de la portée
des enfants.
Ne pas modifierles commandes.
Ne pas boire l’eau du meuble delavage.
MESURES DE SÉCURITÉ IMPORTANTES
7

Au moment de remplir le lave-vais-selle :
– Mettre les articles pointus demanière à ce qu’ils n’endommagentpas le seau étanche de la porte.
– Mettre le tranchant des couteauxvers le bas afin de réduir les risquesde blessure.
Ne pas laver les articles en plas-tique à moins qu’ils n’indiquent "Va
au lave-vaisselle" ou l’équivalent. Véri-fier les recommandations du fabricantpoir les articles non étiquetés.
Dans certaines conditions, un sys-tème d’eau chaude qui n’a pas été
utilisé pendant plus de deux semaines,peut dégager de l’azote.L’AZOTE EST EXPLOSIF. Si le systèmed’eau chaude n’a pas été utilisé pen-dant une telle période de temps, ouvrirtous les robinets d’eau chaude et lais-ser l’eau couler pendant plusieurs mi-nutes avant d’utiliser le lave-vaisselle.Ceci dissipera tout l’azote accumulé.Ne pas fumer ni utiliser une flamme nuedurant ce temps.
Ne pas abuser et ne pas vous as-seoir ni vous tenir sur la porte ou
sur les paniers du lave-vaisselle.
Enlever la porte et couper le cor-don du lave-vaisselle avant de l’en-
lever aux déchets afin d’empêcher lesenfants de se blesser ou de s’enfermerdans l’appareil par accident.
Lave-vaiselle avec l’élémentchauffant
Ne touchez pas l’élément chauffantpendant le fonctionnement de l’ap-
pareil ou immédiatement après.
CONSERVER CESINSTRUCTIONS
MESURES DE SÉCURITÉ IMPORTANTES
8

Energy saving washingThis dishwasher is exceptionally eco-nomical in the use of water and electric-ity. For best results follow these tips:
^ For lowest energy consumption andthe gentlest washing of china andcrystal, connect the dishwasher to acold water source.
^ For fastest possible wash times, yethigher energy consumption, connectthe dishwasher to a hot water source.
^ Make full use of the baskets withoutoverloading for the most economicalwashing.
^ Choose a program that best suits thedegree of soiling and the type ofdishes being washed.
^ For small loads:Select the "Top Solo" feature (see"Additional features").
^ If baskets are only half full, select the"Economy" program.
^ Use the correct amounts of detergentand rinse aid.
Caring for the environment
9

Wash cabinet
1 Upper spray arm (not visible)
2 Cutlery tray
3 Upper basket
4 Water feed for middle spray arm
5 Middle spray arm
6 Lower spray arm
7 Rinse aid reservoir
8 Detergent dispenser
9 Data plate
10 Control panel
11 Optic indicator
12 Salt reservoir
13 Triple Filter System
14 Four height adjustable feet
Guide to the dishwasher
10

Control panel
15 On button / Indicator
16 Off button
17 Delay Start display
18 Delay Start button
Note:Remove the protective film from theprogram list before the first use.
19 Top Solo button / Indicator
20 Check / Refill indicators
21 Program list
22 Program selection buttons /indicators
Every dishwasher is tested before leaving the factory. Any water remaining inthe machine is from these tests and does not indicate that the machine hasbeen used.
Guide to the dishwasher
11

To open the door
^ Pull the handle.
If the door is opened during operation,the dishwasher will stop running. Oncethe door is closed the program will re-start.
Instructions on how to open thedishwasher if a door panel has notyet been installed can be found inthe Installation Instructions.
To close the door^ Push the baskets in.
^ Lift the door and push until it clicksinto position.
Before using for the first time
12

Water softenerTo achieve good cleaning results, thedishwasher needs soft water. Hardwater results in calcium deposits ondishware and in the dishwasher.If your tap water hardness is above8 gr/gal (values are in US gallons)(140 ppm), the water should be soft-ened. This takes place automatically inthe unit’s integrated water softener.
– Your local water authority will be ableto advise you of the water hardnesslevel in your area.
– The dishwasher must be pro-grammed to correspond to the waterhardness in your area.
– The water softener must be filled withdishwasher salt for reactivation.
If your water hardness is consistentlylower than 8 gr/gal (140 ppm), you donot need to add dishwasher salt. How-ever, the dishwasher must still be pro-grammed to correspond to the localwater hardness.
Where the water hardness fluctuatese.g. between 9 - 17 gr/gal (160 - 310ppm), always program the machine tothe higher value, 17 gr/gal (310 ppm) inthis example.
If there is a fault, it will help the servicetechnician to know the hardness of yourlocal water supply.
^ Please note the water hardness:
gr/gal
Before using for the first time
13

Programming the water softener
Your water hardness level must be pro-grammed into the dishwasher using thebuttons on the control panel.
The programming can be cancelledand restarted at any time by turningthe dishwasher off using the "Off"button, (16).
^ Open the door.
^ Turn off the dishwasher.
^ Press and hold the a and c buttons.At the same time turn on the dish-washer with the "On" (15) button.
^ Release all buttons.
The "Salt" and b indicators will flash.If this is not the case, the above stepsmust be repeated.
^ Press the b button.
The b indicator goes out and the "Salt"indicator will flash.
If your water hardness is greaterthan 12 gr/gal (220 ppm) proceed tothe next page.
1 - 12 gr/gal:
An indicator corresponding to a presetwater hardness will light (see Table 1).
Table 1:
gr/gal* ppm Button
1 - 4** 20 - 70 a
5 - 6 90 - 110 b
7 130 c
8 - 10 140 - 180 d
11 - 12 200 - 220 e
* US gallons
** Factory preset
If this value corresponds with the waterhardness in your area:
^ Turn off the dishwasher.
If you need to program a different waterhardness:
^ Press the button, which correspondswith your water hardness (seeTable 1).
The "Salt" and b indicators will flash.
^ Press the f button twice.
The "Salt" and f indicators will flash.
The new water hardness is set.
^ Turn off the dishwasher.
Before using for the first time
14

13 - 70 gr/gal:
^ Press the f button.
The f indicator will light.
An indicator corresponding to a setwater hardness will light (see Table 2).
Table 2:
gr/gal ppm Button
13 230 a
14 - 16 250 - 290 b
17 - 22 310 - 400 c
23 - 35 410 - 630 d
36 - 70 650 - 1260 e
If this value corresponds with the waterhardness in your area:
^ Turn off the dishwasher.
If you need to program a different waterhardness:
^ Press the button which correspondsto your water hardness (see Table 2).
The "Salt" and b indicators will flash.
^ Press the f button twice.
The "Salt" and f indicators will flash.
The new water hardness is set.
^ Turn off the dishwasher.
Checking the programmed waterhardness
^ Open the door.
^ Turn off the dishwasher.
^ Press and hold the a and c buttons.At the same time turn on the dish-washer with the "On" (15) button.
^ Release all buttons.
The "Salt" and b indicators will flash.If this is not the case, the above stepsmust be repeated.
^ Press the b button.
The programmed water hardness is in-dicated by:
1 - 12 gr/gal
Corresponding indicator is lit, (seeTable 1).
^ If an indicator is not lit, press the f
button.
13 - 70 gr/gal:
The f indicator and an additionalcorresponding indicator is lit, (seeTable 2).
^ Turn off the dishwasher.
Before using for the first time
15

Filling the salt reservoir
If your water hardness level is greaterthan 8 gr/gal, the salt reservoir shouldbe filled before the first use and whenthe "Salt" indicator lights.
Only use water softener salt speciallyformulated for dishwashers. Other saltsmay contain insoluble additives whichcan impair the water softener.
The proper salt can be purchased fromyour Miele dealer or Miele’s TechnicalService Department.
,Inadvertently filling the saltreservoir with dishwashing deter-gent will damage the water soft-ener.
To fill the salt reservoir:
^ Remove the lower basket.
^ Unscrew and remove the salt reser-voir cap located on the floor of thewash cabinet.
^ Place the provided funnel over thesalt reservoir.
The salt reservoir must be filled with2 quarts (2 l) of water before addingsalt for the first time. Water does nothave to be added with subsequentrefills.
^ Carefully fill with salt. The salt reser-voir holds approximately 4.5 lbs(2 kg) of salt. As it is filled, water willrun out.
^ Clean any excess salt from thethreads of the reservoir opening.
^ Screw the cap on firmly.
^ If the dishwasher will not be used im-mediately, run the "Rinse & Hold" pro-gram. This will remove any traces ofsalt from inside the wash cabinet.
Before using for the first time
16

Salt indicatorWhen the salt reservoir is empty, the"Salt-PC" indicator will light, indicatingthat it should be refilled with reactiva-tion salt.
After the reservoir has been filled, thewater softener is automatically reacti-vated the next time the dishwasher isstarted. The "Salt" indicator will be litduring this process.
Bypassing the salt indicator
If your water is soft (below 8 gr/gal) thesalt reservoir should not be filled withsalt. The indicator will remain lit andshould be disregarded or bypassed.
^ Remove the salt reservoir cap.
Looking into the salt reservoir, you willsee the top of the float chamber on theright hand side, a.
^ Using a screwdriver, carefully pivotthe float chamber towards the centerof the reservoir.
^ Using needle nose pliers, pull thecap, b, off of the float chamber, andremove the float, c.
Replace the float chamber cap, pushthe chamber back into its upright posi-tion, and replace the salt reservoir cap.The "Salt" indicator should no longer belit.
Before using for the first time
17

Rinse aidRinse aid is recommended to preventspotting on dishes and glassware.
,Filling the rinse aid reservoir withdetergent will damage the reservoir.Only pour rinse aid formulated forresidential dishwashers into thereservoir.
Adding rinse aid
^ Add rinse aid before the first use andwhenever the "Rise aid" indicatorlights.
^ Press the button in the direction ofthe arrow until the flap springs open.
^ Pour liquid rinse aid into the reservoiruntil it is visible on the surface of thescreen.
^ Press on the flap until you hear itclick shut. Failure to close it all theway will allow water to enter the res-ervoir during the wash program.
^ Wipe up any spilled rinse aid. Theflap will remain closed during normaloperation.
Before using for the first time
18

Adjusting the dosageThe dosage selector is preset to 3. Thisdispenses approximately 3 ml of rinseaid per program. It can be adjustedfrom 1 to 6.
^ Use a higher setting if spots appearon dry glassware.
^ Use a lower setting if streaking ap-pears on dishes or glasses.
Rinse aid indicatorThe rinse aid indicator on the controlpanel will light when the rinse aid reser-voir needs refilling.
When the indicator first comes on, therewill be enough rinse aid left for 2 - 3washes.
Before using for the first time
19

,Do not wash items soiled withash, sand, wax, grease or paint inthe dishwasher.Ash and sand do not dissolve andwill be distributed through out the in-side of the dishwasher.Wax, grease and paint will causepermanent discoloration or damageto the dishwasher.
^ Scrape food from dishes before plac-ing in the dishwasher.Do not rinse dishes.
^ Load dishes so that water can reachall surfaces. Do not place dishes andcutlery inside other pieces.
^ Hollow items such as cups andglasses should be placed upsidedown in the upper basket.
^ Concave based items, such as mugsor bowls, should be placed at an an-gle on top of the coffee bar, so thatwater does not pool.
^ To ensure good water coverage tall,narrow, hollow pieces, such as avase, should be placed in the centerof the basket, rather than in the cor-ners.
^ Small cups and glasses should beplaced on the cup racks. Taller mugsand glasses can be placed beneaththe rack.
^ Place very small items in the cutlerytray or basket so they do not fall tothe bottom of the wash cabinet.
^ The spray arms must not be blockedby items that are too tall or hangthrough the baskets. Check clear-ance by manually rotating the sprayarms.
^ Food residue and spilt liquids shouldbe cleaned from the sides of thedishwasher door. These are outsideof the wash cabinet and are notcleaned by water from the sprayarms.
Loading the dishwasher
20

Items not recommended fordishwashing– Cutlery with wooden handles.
– Wooden cutting boards.
– Glued items such as old knives withhandles glued together around theshank of the blade.
– Hand made craft items, antique,metal trimmed or decorative glass-ware.
– Lead crystal.
– Copper, brass, tin or pewter.
– Plastic items that are not heat resis-tant.
– Dishes with color painted over theglaze. These dishes may fade overtime.
– Cast iron pots and pans.
Glassware:
– There are no standard guidelines forwashing glassware but, when indoubt wash by hand.
– Wash delicate glassware with a lowtemperature program and without theextended drying feature to reducethe risk of clouding. See the "Pro-gram guide".
– If crystal or delicate glasses will bewashed frequently, connect the dish-washer to cold, rather than hot water.
– Clouding or etching may occur onglasses after frequent washing.
– When purchasing new dishes,glasses and cutlery, make sure theyare dishwasher safe.
Silver and aluminum:
– Silver or aluminum items may tarnish.
– Silverware previously cleaned with asilver polish may be damp or spottedat the end of a program where waterhas adhered to the polish. This canbe rubbed off with a soft, dry cloth.Silver that has been cleaned in animmersion dip is usually dry at theend of a program, but may tarnish.
– If left to dry, foods containing sulfurcan discolor silver. These includeegg yolk, onions, mayonnaise, mus-tard, legumes, fish, fish brine andmarinades.
– Silverware may tarnish or pit ifwashed next to stainless steel.Leave space between these metals.
Loading the dishwasher
21

Cutlery tray (SC units)
The removable cutlery tray makes un-loading flatware easy. Simply carry thecutlery tray to where the flatware isstored and put the entire basket awayin one trip.
For easier unloading cutlery should begrouped in zones, one for knives, onefor forks, one for spoons, etc.
Place knives with the cutting edge andforks with the prongs between the hold-ers. Spoons should be placed in theopposite direction with the handles be-tween the holders.
Longer items such as soup ladles, cakeslices, mixing spoons and long knivesshould be placed lengthwise in the in-dentation of the cutlery tray.
Spoon heads should be placed in con-tact with at least one of the serrated re-tainers of the cutlery tray to ensure thatwater runs off freely.
Spoons with thick handles may have tobe placed as knives and forks with theirheads in the holders.
Loading the dishwasher
22

Upper basket
Adjusting the upper basket
On select models, the upper basketcan be raised or lowered to accommo-date tall items.
^ Slide out the upper basket.
^ Pull up the levers at the sides of theupper basket and adjust the basketheight.
^ Release the levers and the basket willlock in place.
The basket can also be angled to fit tallitems in both, the lower and upper bas-kets. The angles should not be set toopposite extremes. This will block themiddle spray arm. Take care when slid-ing the basket in and out in this posi-tion.
Load the upper basket with small, light-weight, or delicate items such as cups,saucers, glasses, dessert bowls andflat pans.
Long items such as soup ladles, mixingspoons and knives can be set acrossthe front of the upper basket.
Loading the dishwasher
23

Adjustable cup racks
Raise the rack to make room for tallglasses. Lower it to double stacksmaller pieces.
Coffee bar
To allow water to run off the bottom ofcoffee mugs, place slanted on top ofthe coffee bar. The bar can also beused to separate two rows of glasses.To stack wide items, flip the bar to theright.
Loading the dishwasher
24

Lower basketFor larger and heavier items such asplates, serving platters, sauce pans,bowls.
Dishwasher with cutlery tray
Height limit
The guide at the front of the upper bas-ket determines the maximum height foritems placed in the lower basket so thatthe middle spray arm is not blocked.
Loading the dishwasher
25

Various removable inserts are available for the lower basket to accomodate spe-cial items to be washed.
Removing an insert
^ To remove an insert, gently pull up onthe handle.
Inserting an insert
^ Slid the hitches of the inset under thevertical struts of the lower basket.
^ Push down on the handle to snap theinsert into position.
26
Lower basket inserts

Foldable spike insert
A highly flexible design holds tablewaresecurely. It can be folded out of the wayfor pots, pans and other large items.This insert secures plates and platters.
Foldable spikes
Two rows of spikes can be foldeddown, to create more room for largerdishware e.g. pots, pans and bowls.
^ Press on the yellow levers, a, to folddown the spikes, b.
^ Hook the foldable spike insert into theback right corner of the lower basket,the area marked in white.
Lower basket inserts
27

PlateGuard Plus insert
A unique design cradles plates at 3points and can be used for washingcups, glasses, plates, bowls and pots.
^ Hook the PlateGuard Plus insert intothe left half of the lower basket, thearea marked in white.
Bottle holder
The bottle holder e.g. for milk or babybottles, can be inserted into the bottombasket in more than one place. Positionin any area marked white in the illustra-tion. Do not place the insert in the cor-ners of the lower basket, water cannotproperly cover bottles in these areas.
Lower basket inserts
28

Additional inserts for the upper and lower baskets may be purchased from yourMiele dealer or the Miele Technical Service Department.
Bottle holderpart # 03 857 850
to wash milk or baby bottles
Glassware insertfor the lower basketpart # 01 145 642
to wash a large number of glasses
Glassware insertfor the upper basketpart # 03 636 034
to wash long stemmed glassware
PlateGuard insertpart # 02 244 870
to wash plates with a diameterup to 12 1/2" (32 cm)
Cup rack for thePlateGuard insertpart # 03 859 730
to wash cups and stemwarein the lower basket
Small cutlery basketfor the lower basketpart # 02 372 335
to wash additional cutlery
Basket accessories
29

Adding detergent
,Dishwasher detergents containirritant and corrosive ingredients.Keep children away from detergent.Do not fill the detergent dispenseruntil you are ready to start the dish-washer.
Only use powder detergents or tab-lets formulated for residential dish-washers. The use of gel or liquid de-tergent is not recommended.Never fill the detergent dispenser tocapacity.Do not use more than the recom-mended amount of detergent. Con-tinued use of too much detergentmay cause machine damage.
^ To open, press the latch on the deter-gent dispenser.
The horizontal marks in Compartment IIindicate levels of approximately 1 1/4,1 3/4 and 2 tablespoons (20, 25 and30 ml) respectively.
^ With the dishwasher door fully openfill compartment II with 2 tablespoon(30 ml) of powder detergent, or onedetergent tablet.
^ Close the cover. The cover will al-ways open at the end of a wash pro-gram except in "Rinse & Hold".
2 tablespoon (30 ml) of detergent isenough for most normally soiled loads.For heavily soiled loads, or if food hasdried on the dishes, a program contain-ing a prewash cycle should be se-lected. Add an extra tablespoon (15 ml)of detergent to compartment I.
Less detergent is needed in homes withvery soft water and when washinglightly soiled dishes.
Operation
30

Running the dishwasher^ Open the door.
^ Make sure the spray arms are notblocked.
^ Turn on the dishwasher using the"On" button (15).
^ Select a wash program using the pro-gram selection buttons (22). Refer tothe "Program guide" for details.
The selected program indicator willlight.
^ Select "Top Solo" or "Delay Start" ifdesired. See "Additional features".
^ Close the door.
The red optic indicator will come on.
The program will begin.
Do not end a program prematurely!Important program steps could beomitted (e. g. reactivating the watersoftener).
Waterproof SystemAll Miele dishwashers are specially de-signed to shut off the water intake anddrain the wash cabinet in the rare eventof an internal water valve failure.
For this feature to be active, the ma-chine must be "On" (not necessarilyrunning), and the door must be closed.
At the end of a programAt the end of a program the optic indi-cator will flash.
The optic indicator will go out after anhour, or sooner if the door is opened.
After a program has ended:
^ Open the door.
The optic indicator and the program in-dicator will go out.
^ Press the "Off" button (16).
Allow dishes to cool before unloading.
It is advisable to turn off the watersupply if the dishwasher will not beused for a period of time (e.g. whilevacationing).
Operation
31

Interrupting a programA program is interrupted as soon as thedoor is opened.If the door is closed, the program willcontinue from where it was interrupted.
,Water in the dishwasher may behot. There is a danger of beingburned! Only open the door if abso-lutely necessary.
Changing a programIf the door has not been closed yet:
^ Press the program button of the newprogram.
^ Close the door.
The program will begin.
If the door has already been closedand the program is running:
^ Open the door.
^ Press the "Off" button (16).
^ Press the "On" button (15).
^ Select a new program using the pro-gram selection buttons (22).
^ Close the door.
The new program will begin.
Operation
32

Program guide
Program When to use Program cyclePre-wash1 2
Mainwash
Interimrinse1 2
Finalrinse
Dry-ing
Pots & Pans for heavily soiled pots and pans with dried on foodMain wash temperature 170 °F (75 °C)Run-time 142 min
X X X X - X X
Sani Wash extended wash timefor sanitizing normally soiled dishware with driedon foodMain wash temperature 150 °F (65 °C)Run-time 147 min
- X X X X X X
Normal Plus higher wash temperature helps to cleannormally soiled dishware with stubborn dried onfood or greasy residuesMain wash temperature 150 °F (65 °C)Run-time 145 min
X X X X - X X
Normal 1) for normal soiled dishwareMain wash temperature 130 °F (55 °C)Run-time 143 min
X X X X - X X
China &Crystal o
"Gentle program"for lightly soiled and heat sensitive tablewareMain wash temperature 115 °F (45 °C)Run-time 82 min
- X X X - X X
Rinse & Hold for rinsing dishes when a complete cycle is not neededRun-time 11 min
- X
1) Standard for Energy Label
When washing a full load in Pots & Pans, Sani Wash and the Normal programs use at least 2 table-spoons (30 ml) of detergent.For the Pots & Pans program add an additional teaspoon (5 ml) to compartment I.If "Top Solo" is selected, reduce the amount of detergent to 1 1/4 tablespoons (20 ml).
Program times are based on a hot water connection. If the unit is connected to cold water, programtimes will increase by approximately 25 minutes.
Usage:Electric 0.06 - 2.4 (kWh)Water 1.3 - 6.3 US gallons (5 - 24 L)
Operation
33

Additional features
"Top Solo" (2)
Using "Top Solo" will save water andenergy.
This program is recommended whenthere is only a small load to clean. "TopSolo" can be selected with all pro-grams.
With this feature, water is directed onlyto the top and middle spray arms. Thismeans that the water jets are onlyaimed at items in the upper basket andthe cutlery tray.
The middle spray arm also directswater downwards, so lightly soiledplates or platters can be placed in thelower basket.When using this program, do not placebowls or other hollow containers in thelower basket.
Because a smaller load is beingwashed the amount of detergent usedcan be reduced to 1 1/4 tablespoons.
^ Press the "On" button (15).
The "On" indicator (15) will light.
^ Select a program using the programselection buttons (22).
The selected program indicator willlight.
^ Press the 2 (19) button.
The 2 (19) indicator will light.
^ "Delay Start" may also be selected atthis time (see next page).
^ Close the door.
The optic indicator will come on.
The program will begin.
Operation
34

Delay start (d)
The start time of a program can be de-layed from 1 to 9 hours.
The delay start is set in one hour steps.
When using delay start, make surethe detergent compartment is drybefore adding detergent. Wipe dry ifnecessary.
^ Press the "On" button (15).
^ Select a program using the programselection buttons (22).
The selected program indicator willlight.
^ Press the d (18) button.
1 will appear in the delay start display(17). A delayed start time of one hour isset.
^ Press the d button (18) until the de-sired delayed start time appears inthe time display (17).
The delay start is set in one hour stepsup to 9 hours. If the "Delay Start" d (18)button is pressed after the 9 hour markthe delay start feature will be cancelledand must be reselected.
^ The "Top Solo" feature may also beselected at this time (see previouspage).
^ Close the door.
Once the delay start period haselapsed, the selected program will be-gin automatically.
Operation
35

To start a program before the delaystart period has elapsed:
^ Open the door.
^ Press the "Off" button (16).
^ Press the "On" button (15).
^ Select a program using the programselection buttons.
^ Select "Top Solo", if needed.
^ Close the door.
The optic indicator will come on.
The program will start.
Operation
36

With the aid of the following guide, minor problems can be fixed without a servicecall.
,Repairs should only be carried out by a qualified and trained person in ac-cordance with local and national safety regulations. Unauthorized repairs couldcause personal injury or machine damage.
What if … Possible fault Fixthe dishwasher does notstart?
The door is not properlyclosed.
Close the door firmly.
The machine is notplugged in.
Insert the plug.
The fuse is defective orthe breaker has tripped.
Reset the circuit breaker.Make sure it is a 15 A cir-cuit breaker.
The dishwasher is notturned on.
Press "On", select pro-gram.
No program is selected. Select a program withthe program selectionbuttons.
the dishwasher stopsduring a program?
The fuse or breaker hastripped.
Reset the circuit breaker.Make sure it is a 15 A cir-cuit breaker.
the dishwasher stopsrunning, shortly afterstarting a program andthe optic indicatorflashes?
Water intake error.The "Drain" indicatorflashes / lights.
– Turn off the dishwasher.
– Open the water valve.
– Clean the water inlet fil-ter, see maintenance in-structions.
The waterproof systemhas activated.– Call the Miele Technical
Service Department.
Frequently asked questions
37

What if … Possible fault Fixshortly after starting aprogram, the dishwasherstops running andthe optic indicatorflashes?
Water intake error.The "Drain" indicatorflashes.
The water pressure is lessthan 4.5 psi (0.3 bar).Contact a plumber.
Drain error, water remainsin the wash cabinet.The "Drain" indicatorflashes.
– Turn off the dishwasher.– Clean the triple filter.
See maintenance in-structions.
– Clean the drain pumpand the non-returnvalve, see maintenanceinstructions.
– Remove any kinks inthe drain hose.
Frequently asked questions
38

What if … Possible fault Fixafter a program hasended, the optic indica-tor and the program in-dicators flash?
There may be a technicalfault.
– Turn the dishwasher off.
Despite the problem thedishwasher can be used.If the indicators flashagain after the next pro-gram cycle, call the MieleTechnical Service Depart-ment.
there is a knockingnoise in the wash cabi-net?
The spray arm is hittingan item in the basket.
Interrupt the program, re-arrange items blockingthe spray arms.
there is a rattling noise? Items are not secure inthe wash cabinet.
Interrupt the program andrearrange loose pieces.
there is a knockingnoise in the waterpipes?
This may be caused bythe installation or the di-ameter of pipe.
This has no effect on thedishwasher. If in doubtcontact a plumber.
dishes are not dry,glasses and cutlery arespotted?
The rinse aid setting maybe too low, or the rinse aidreservoir is empty.
Increase the dosage orrefill the reservoir, see "Be-fore using for the firsttime".
Dishes were taken out toosoon.
Leave dishes in longer.
Frequently asked questions
39

What if … Possible fault Fixdishes are not clean? The dishes were not
loaded correctly.See "Loading the dish-washer".
The program was notpowerful enough.
Select a more intensiveprogram, see "Programguide".
Not enough detergentwas used.
Use more detergent, see"Adding detergent".
The spray arm jets areclogged.
Clean the spray arm jets,see maintenance instruc-tions.
The triple filter is cloggedor not correctly seated.
Clean and reseat the filter,see maintenance instruc-tions.
The drain pump or thenon-return valve isblocked.
Clean the drain pump andthe non-return valve, seemaintenance instructions.
Frequently asked questions
40

What if … Possible fault Fixtea or lipstick stainshave not been com-pletely removed?
The wash temperature ofthe selected program wastoo low.
Select a program with ahigher temperature.
Not enough detergentwas used.
Use more detergent.
white residue is visibleon cutlery and dishes,clouding occurs onglassware and film canbe wiped off?
Not enough rinse aid wasused.
Increase the dosage,see "Before using for thefirst time".
The salt reservoir isempty.
Add reactivation salt,see "Before using for thefirst time".
The salt reservoir cap wasnot correctly screwed on.
Reseat it making sure itscrews back on correctly.
The programmed settingof the water softener is toolow.
Adjust the setting of thewater softener , see "Be-fore using for the firsttime".
there are smears onglasses and cutlery, blu-ish sheen on the surfaceof glasses and film canbe wiped off?
The rinse aid dosage isset too high.
Reduce the dosage, see"Before using for the firsttime".
glasses are dull and dis-colored and film cannotbe wiped off?
Glasses are not dish-washer safe.
There is no remedy.Only wash dishwashersafe glasses.
Frequently asked questions
41

What if … Possible fault Fixplastics are discolored? Natural dyes e. g. from
vegetables may be thecause. Not enough deter-gent was used to breakdown natural dyes.
Use more detergent, see"Adding detergent".Discoloration is perma-nent.
there are rust stains oncutlery?
The salt reservoir cap wasnot screwed on properly.
Reseat and screw the capon firmly.
The affected items are notcorrosion resistant.
There is no remedy.Only wash dishwashersafe cutlery.
the detergent dispenserlid can not be closedproperly?
Detergent residue isblocking the catch.
Remove the residue.
detergent is left in thedispenser at the end of aprogram?
The dispenser was dampwhen detergent wasadded.
Dry the dispenser beforeadding detergent.
water remains in thewash cabinet at the endof a program?
The triple filter in the washcabinet is clogged.
Clean the filter, see main-tenance instructions.
The drain pump or thenon-return valve may beblocked.
Clean the drain pump andthe non-return valve,see maintenance instruc-tions.
The drain hose is kinked. Remove the kink.
Frequently asked questions
42

In the event of a fault which you cannotcorrect yourself please contact:
– Your Miele Dealer
or
– The Miele Technical Service Depart-ment.
When contacting the Miele TechnicalService Department, please quote themodel and serial number of your appli-ance.
These can be found on the data plateon the upper inside edge of the dish-washer door.
Program update function - PC
The Program Correction (PC) allows atechnician to update the dishwasher tomake use of new technology.
For example, if a detergent with goodwash results using only cold water be-
comes available, the wash programscan be modified to take advantage ofthis.
After sales service
43

To transport the dishwasher, e. g. whenmoving to a new home, note the follow-ing:
– Empty the dishwasher.
– Secure any loose parts, e. g. hoses,cables, cutlery baskets.
– Transport the dishwasher in the up-right position.If unavoidable it may be transportedon its back.Do not transport it on its side or onthe door. Residual water in the ma-chine could leak and cause electricaldamage.
Transport
44

User Maintenance Instructions
To prevent accidentsand machine damage,read these instructionsbeforeinstallation or use.

Triple filter systemThe triple filter system in the base of thewash cabinet prevents food from beingredeposited on dishes. It also protectsthe circulation pump from damagecaused by foreign objects (e.g. brokenglass, bones).
The filter system should be cleaned ev-ery 4 - 6 months or whenever a foreignobject is trapped.
Cleaning the filter in the washcabinet
^ Turn off the dishwasher before clean-ing.
^ Turn the handle counterclockwise torelease the triple filter system.
^ Lift the filter out of the machine. Re-move any solid particles and rinseunder running water. Scrub with a ny-lon brush if necessary.
46

To clean the underside of the filter, theflap must be opened:
^ Pull back the yellow clip.
^ Rinse all parts under running water.Scrub with a nylon brush if neces-sary.
^ Close the flap so that the clip en-gages.
^ Return the filter so it lies flat in thebase of the wash cabinet.
^ Lock the filter by turning the handleclockwise.
,The dishwasher must not beused without the filter locked inplace.
47
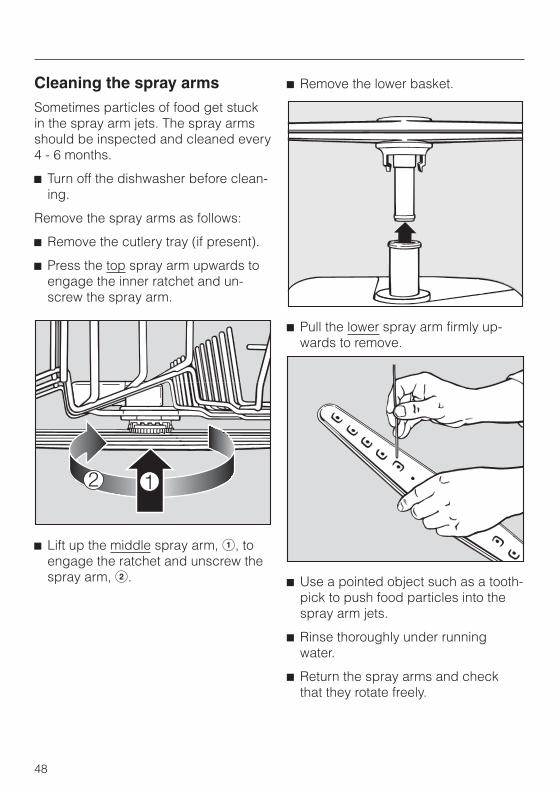
Cleaning the spray armsSometimes particles of food get stuckin the spray arm jets. The spray armsshould be inspected and cleaned every4 - 6 months.
^ Turn off the dishwasher before clean-ing.
Remove the spray arms as follows:
^ Remove the cutlery tray (if present).
^ Press the top spray arm upwards toengage the inner ratchet and un-screw the spray arm.
^ Lift up the middle spray arm, a, toengage the ratchet and unscrew thespray arm, b.
^ Remove the lower basket.
^ Pull the lower spray arm firmly up-wards to remove.
^ Use a pointed object such as a tooth-pick to push food particles into thespray arm jets.
^ Rinse thoroughly under runningwater.
^ Return the spray arms and checkthat they rotate freely.
48

Cleaning the wash cabinetGenerally, the wash cabinet is selfcleaning if the correct amount of dish-washer detergent is used.
The wash cabinet can be cleaned witha dishwasher cleaner such as DisCleaner available from your Mieledealer or the Miele Technical ServiceDepartment.
Cleaning the door and doorseal^ Wipe the door seal with a damp cloth
to remove any food particles.
^ Food residue and spilt liquids shouldbe wiped from the sides of the dish-washer door. These are outside of thewash cabinet and are not cleaned bywater from the spray arms.
Cleaning the exterior
,Never use abrasive cleaners,scouring pads, steel wool or caustic(oven) cleaners on the dishwasher.They will damage the surface.
Plastic
All plastic surfaces and the controlpanel can be cleaned with warm waterand liquid dish soap applied with a softsponge.
Wipe dry using a soft cloth.
,Do not use too much water whencleaning the controls. Water couldpenetrate into the electronics andcause damage.
Stainless steel
Stainless steel surfaces can be cleanedusing a non-abrasive stainless steelcleaner.
To help prevent resoiling, a conditionerfor stainless steel can also be used.Apply sparingly with even pressure.
Stainless steel colored controls
These controls may become discoloredor damaged if not cleaned regularly.Do not use a stainless steel cleaner onthe knobs or buttons.
Wood
Panels made from wood should becleaned using a soft damp cloth and anappropriate wood cleaner.
49
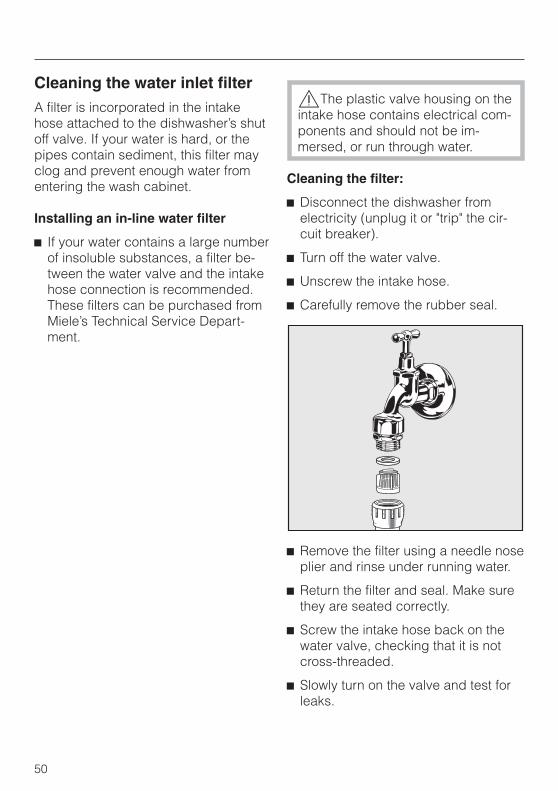
Cleaning the water inlet filterA filter is incorporated in the intakehose attached to the dishwasher’s shutoff valve. If your water is hard, or thepipes contain sediment, this filter mayclog and prevent enough water fromentering the wash cabinet.
Installing an in-line water filter
^ If your water contains a large numberof insoluble substances, a filter be-tween the water valve and the intakehose connection is recommended.These filters can be purchased fromMiele’s Technical Service Depart-ment.
,The plastic valve housing on theintake hose contains electrical com-ponents and should not be im-mersed, or run through water.
Cleaning the filter:
^ Disconnect the dishwasher fromelectricity (unplug it or "trip" the cir-cuit breaker).
^ Turn off the water valve.
^ Unscrew the intake hose.
^ Carefully remove the rubber seal.
^ Remove the filter using a needle noseplier and rinse under running water.
^ Return the filter and seal. Make surethey are seated correctly.
^ Screw the intake hose back on thewater valve, checking that it is notcross-threaded.
^ Slowly turn on the valve and test forleaks.
50

Cleaning the drain pump andnon-return valveIf the dishwasher is not completelydrained at the end of a program, thedrain pump or non-return valve may beblocked.
^ Turn off the dishwasher.
^ Remove the triple filter (see "Cleaningthe filter in the wash cabinet").
^ Use a jug or bowl to scoop water outof the wash cabinet.
^ Tilt the locking clamp to the side.
^ Pull out the non-return valve andrinse well under running water.
The drain pump is beneath the non-re-turn valve (see arrow).
^ Before returning the non-return valve,check that the drain pump is notblocked. Spin the propeller severaltimes in both directions to check forobstructions.
^ Carefully refit the non-return valveand secure it with the locking clamp.
^ Refit and lock the filter in place.
51

Alterations rights reserved (G 658 / G858 Plus) / 000 2501
This bio-friendly paper was bleached without the use of chlorine.