operating instructions -...
TRANSCRIPT
Operating Instructions
Ceramic CooktopKM 400KM 412
To prevent accidents andmachine damage,read the Operating Manualbefore installation or use.
UV
M.-Nr. 05 060 850

2
IMPORTANT SAFETY INSTRUCTIONS . . . . . . . . . . . . . . . . . . . . . . . . . . . . . . . . . 4
Guide to the cooktop . . . . . . . . . . . . . . . . . . . . . . . . . . . . . . . . . . . . . . . . . . . . . . . 8
Before using for the first time . . . . . . . . . . . . . . . . . . . . . . . . . . . . . . . . . . . . . . . 10General notes . . . . . . . . . . . . . . . . . . . . . . . . . . . . . . . . . . . . . . . . . . . . . . . . . . . . 10Disposal of packing materials . . . . . . . . . . . . . . . . . . . . . . . . . . . . . . . . . . . . . . . . 11Disposal of an appliance . . . . . . . . . . . . . . . . . . . . . . . . . . . . . . . . . . . . . . . . . . . . 11Cleaning and heating for the first time. . . . . . . . . . . . . . . . . . . . . . . . . . . . . . . . . . 12
Using the cooktop . . . . . . . . . . . . . . . . . . . . . . . . . . . . . . . . . . . . . . . . . . . . . . . . 13Turning on and off, residual heat indicator . . . . . . . . . . . . . . . . . . . . . . . . . . . . . . 13Description of the settings . . . . . . . . . . . . . . . . . . . . . . . . . . . . . . . . . . . . . . . . . . . 14Turning on the outer zone . . . . . . . . . . . . . . . . . . . . . . . . . . . . . . . . . . . . . . . . . . . 15Overheating protection . . . . . . . . . . . . . . . . . . . . . . . . . . . . . . . . . . . . . . . . . . . . . 16Tips on saving energy . . . . . . . . . . . . . . . . . . . . . . . . . . . . . . . . . . . . . . . . . . . . . . 17
Cleaning and care . . . . . . . . . . . . . . . . . . . . . . . . . . . . . . . . . . . . . . . . . . . . . . . . 18
Frequently asked questions . . . . . . . . . . . . . . . . . . . . . . . . . . . . . . . . . . . . . . . . 19
Electrical connection . . . . . . . . . . . . . . . . . . . . . . . . . . . . . . . . . . . . . . . . . . . . . . 20
After sales service . . . . . . . . . . . . . . . . . . . . . . . . . . . . . . . . . . . . . . . . . . . . . . . . 21
Contents
3

Installation and connection
When using your appliance, followbasic safety precautions includingthe following:
Read all instructions before usingfor the first time.
Be certain your appliance isproperly installed and grounded by
a qualified technician.
To guarantee the electrical safetyof this appliance, continuity must
exist between the appliance and aneffective grounding system. It isimperative that this basic safetyrequirement be met. If there is anydoubt, have the electrical system of thehouse checked by a qualifiedelectrician. The manufacturer cannot beheld responsible for damages causedby the lack, or inadequacy of, aneffective grounding system.
Do not connect the appliance tothe main electrical supply using an
extension cord. Extension cords do notmeet the safety requirements of thisappliance.
Before servicing, disconnect thepower supply by either removing
the fuse, unplugging the unit ormanually "tripping" the circuit breaker.
Correct usageDo not operate the appliance untilproperly installed in the countertop.
This appliance is intended forresidential use only.
Use the appliance only for itsintended purpose. The
manufacturer cannot be heldresponsible for damages caused byimproper use of the cooktop.
Never use the appliance to warmor heat the room.
This appliance must not be set upor operated outdoors.
IMPORTANT SAFETY INSTRUCTIONS
4
Protection from damageDo not drop anything on theceramic surface of the cooktop.
Although the ceramic glass is shockand scratch resistant, it is not shock orscratch proof.
Do not use pots or pans with baseswith pronounced edges or ridges
on the ceramic cooktop. These couldpermanently scratch or scour thecooktop. Grains of salt and sand canalso scratch the surface.
Do not allow either solid or liquidsugar, pieces of plastic or
aluminium foil to get on the cookingzones when they are hot. If theseresidues are allowed to cool on theceramic surface, pitting or crackingcould occur. Should sugar, plastic oraluminium fall on to the cooktop, firstturn the appliance off, then immediatelyscrape off the remains with a shieldedblade scraper while the surface is stillhot. Take care not to burn yourself onthe hot surface. Clean the cooktoponce it has cooled.
Do not use a steam cleaner toclean the appliance. Steam could
penetrate electrical components andcause a short circuit.
In areas subject to infestation bycockroaches or other vermin, keep
the appliance and its surroundingsclean at all times. Any damage causedby pests will not be covered under thewarranty.
IMPORTANT SAFETY INSTRUCTIONS
5
Protection from burnsDo not allow children to operate orplay with or near the cooktop.
Use only dry, heat-resistantpotholders. Moist or damp
potholders used on hot surfaces canresult in steam burns. Do not let thepotholder touch the hot heatingelement. Do not use towels or otherbulky items near the appliance.
Loose fitting or hanging garmentsshould never be worn while using
the appliance.
Do not heat unopened foodcontainers. Built-up pressure may
cause the container to burst and resultin injury.
Do not store items on theappliance when not in use.
Do not let cooking grease or otherflammable materials accumulate
on the appliance.
Do not leave the cooktopunattended while in use.
Overheated food can ignite.
Do not use water on grease fires.Smother any fire or flame, or use a
dry chemical or foam-type extinguisher.
Do not flambé under an exhausthood. Flames could be drawn up
into the hood by the suction or thegrease filters may ignite.
If there is a drawer directlyunderneath the appliance without
any wooden base in between, ensurethat no aerosols, combustible liquids orother easily flammable materials arekept in it. If cutlery inserts are to beplaced in the drawer, these must bemade of heat-resistant material.
IMPORTANT SAFETY INSTRUCTIONS
6
Damage to the applianceIn the event of any damage to theappliance, it must be turned off
immediately and disconnected from theelectricity supply by either removing thefuse, unplugging the unit or manually"tripping" the circuit breaker.Contact the Miele Technical ServiceDepartment.Do not use the appliance until it hasbeen repaired.Ensure power is not supplied to theappliance while repair work is beingcarried out.
Any breakages or cracks in theceramic surface of the appliance
are defects and must be treated assuch. Do not use the appliance until ithas been repaired.
Repairs should only be performedby qualified technicians to ensure
safety. Repairs and other work byunqualified persons could bedangerous. Under no circumstancesshould the outer casing of theappliance be opened.
While the appliance is underwarranty, repairs should only be
performed by a Miele authorizedservice technician. Otherwise, thewarranty is void.
When using a portable appliance,make sure that its power cord does
not come into contact with the cooktop.
Before discarding an oldappliance, remove the power cord
and any doors to prevent hazards.
SAVE THESE INSTRUCTIONS
IMPORTANT SAFETY INSTRUCTIONS
7
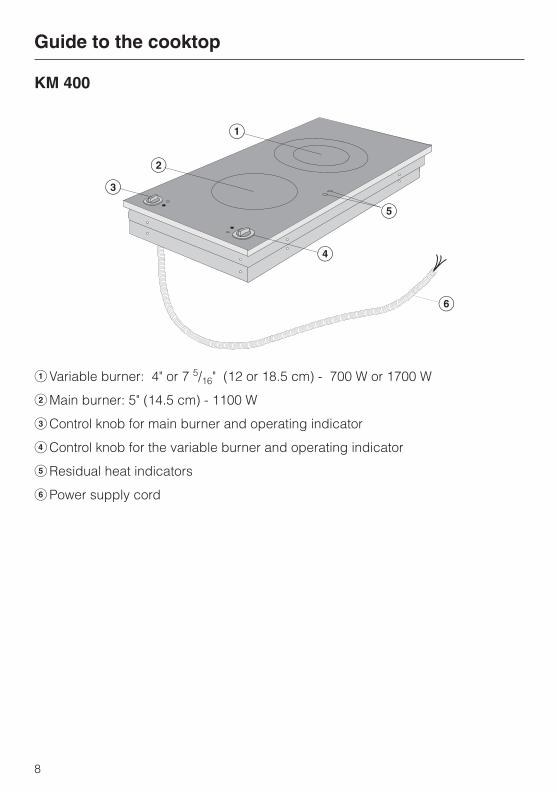
KM 400
aVariable burner: 4" or 7 5/16" (12 or 18.5 cm) - 700 W or 1700 W
bMain burner: 5" (14.5 cm) - 1100 W
cControl knob for main burner and operating indicator
dControl knob for the variable burner and operating indicator
eResidual heat indicators
fPower supply cord
Guide to the cooktop
8
g
b
c
d
f
e
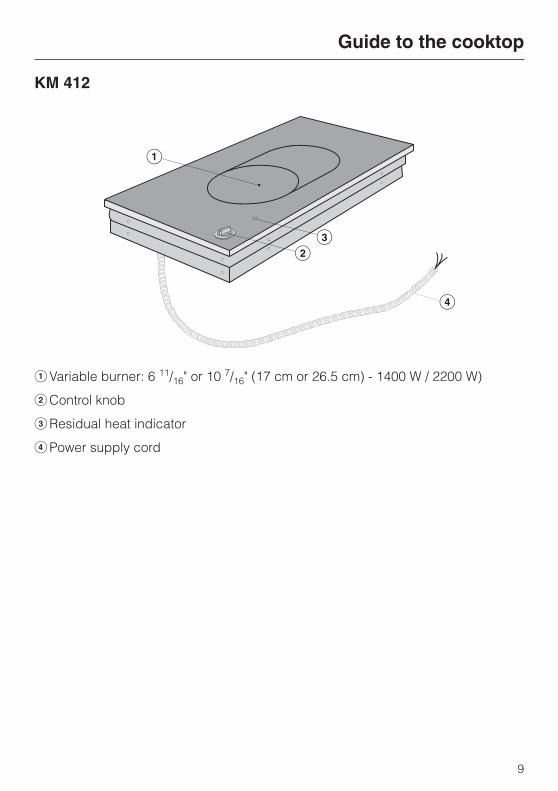
KM 412
aVariable burner: 6 11/16" or 10 7/16" (17 cm or 26.5 cm) - 1400 W / 2200 W)
bControl knob
cResidual heat indicator
dPower supply cord
Guide to the cooktop
9
c
b
d
e
General notesA copy of the data plate for yourappliance is included with this manual.It should be placed in the spaceprovided at the back of this book.
The address of the nearest MieleTechnical Service Department can befound on the back cover. If it becomesnecessary to contact the TechnicalService Department, please have themodel and serial number of theappliance available. Both are listed onthe data plate.
Keep these instructions in a safe placefor reference, and pass them on to anyfuture user.
Before using for the first time
10
Disposal of packing materialsThe cardboard box and packingmaterials protect the appliance duringshipping. They have been designed tobe biodegradable and recyclable.Please dispose of these materials asyou would any other recyclableproducts.
Disposal of an applianceOld appliances contain materials thatcan be recycled. Please contact yourlocal recycling center about thepossibility of recycling these materials.
Before discarding an old appliance,remove the power cord and anydoors to prevent it from becoming ahazard.
Before using for the first time
11
Cleaning and heating for thefirst timeBefore using the appliance for the firsttime, clean it with a damp cloth andthen dry with a soft cloth.
Do not use liquid dish soap. Thiscan leave a permanent blue sheenon the ceramic surface.
Metal components have a protectivecoating which may give off a slight odorthe first time your new appliance isheated.
The odor and any vapors will dissipateafter a short time and do not indicate afaulty connection or appliance defect.
Before using for the first time
12
Turning on and off, residualheat indicator
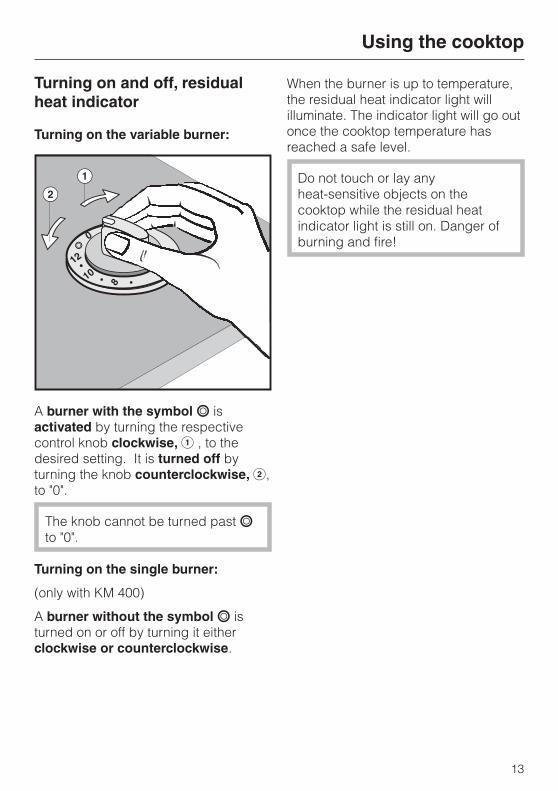
Turning on the variable burner:
A burner with the symbol n isactivated by turning the respectivecontrol knob clockwise, a , to thedesired setting. It is turned off byturning the knob counterclockwise, b,to "0".
The knob cannot be turned past nto "0".
Turning on the single burner:
(only with KM 400)
A burner without the symbol n isturned on or off by turning it eitherclockwise or counterclockwise.
When the burner is up to temperature,the residual heat indicator light willilluminate. The indicator light will go outonce the cooktop temperature hasreached a safe level.
Do not touch or lay anyheat-sensitive objects on thecooktop while the residual heatindicator light is still on. Danger ofburning and fire!
Using the cooktop
13
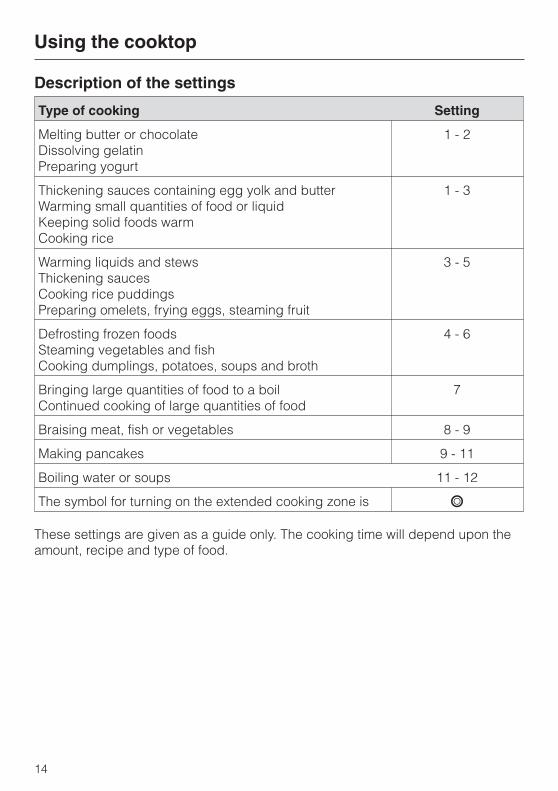
Description of the settings
Type of cooking Setting
Melting butter or chocolateDissolving gelatinPreparing yogurt
1 - 2
Thickening sauces containing egg yolk and butterWarming small quantities of food or liquidKeeping solid foods warmCooking rice
1 - 3
Warming liquids and stewsThickening saucesCooking rice puddingsPreparing omelets, frying eggs, steaming fruit
3 - 5
Defrosting frozen foodsSteaming vegetables and fishCooking dumplings, potatoes, soups and broth
4 - 6
Bringing large quantities of food to a boilContinued cooking of large quantities of food
7
Braising meat, fish or vegetables 8 - 9
Making pancakes 9 - 11
Boiling water or soups 11 - 12
The symbol for turning on the extended cooking zone is n
These settings are given as a guide only. The cooking time will depend upon theamount, recipe and type of food.
Using the cooktop
14
Turning on the outer zoneWhen using large pots or pans, theouter/extended zone can be turned on.
Proceed as follows:
^ Turn the knob clockwise past "12" tothe n position.
^ Turn the knob counterclockwise tothe desired setting.
To turn off the outer/extended zone, turnthe knob counter clockwise to "0".
Using the cooktop
15
Overheating protectionEach cooking zone is equipped withoverheating protection (internaltemperature limiter). This turns off theheating elements in the cooking zone ifthe ceramic surface becomes too hot.Once the ceramic has cooled down toa safe level, the heat will automaticallyturn back on.
The heating elements cycle on and offto maintain a constant temperature.
Using the cooktop
16
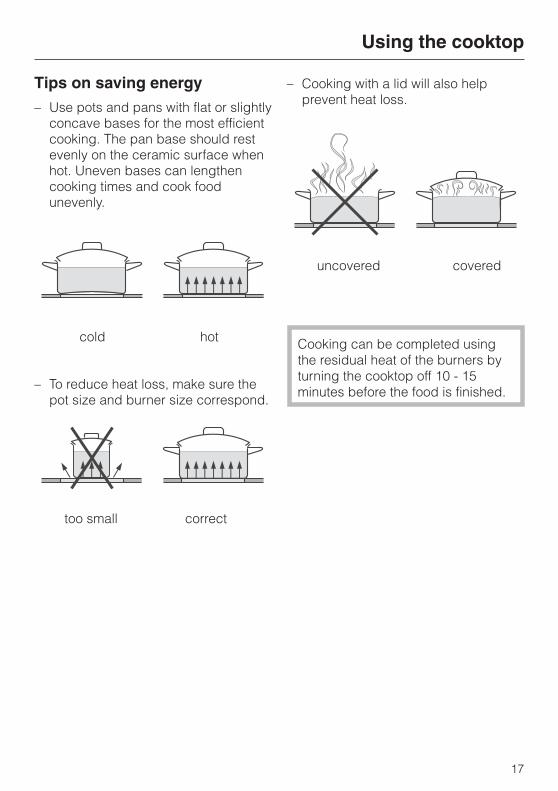
Tips on saving energy– Use pots and pans with flat or slightly
concave bases for the most efficientcooking. The pan base should restevenly on the ceramic surface whenhot. Uneven bases can lengthencooking times and cook foodunevenly.
cold hot
– To reduce heat loss, make sure thepot size and burner size correspond.
too small correct
– Cooking with a lid will also helpprevent heat loss.
uncovered covered
Cooking can be completed usingthe residual heat of the burners byturning the cooktop off 10 - 15minutes before the food is finished.
Using the cooktop
17

Under no circumstances should asteam cleaner be used to clean thisappliance. Pressurized steam couldcause permanent damage to thesurface and to components forwhich the manufacturer cannotaccept responsibility.
Do not use any sharp pointedobjects which could damage theseal between the ceramic surface,the surrounding frame and the frameand the countertop.
Never use scouring agents, pads,abrasive cleaning agents or strongcleaners, e.g. oven sprays, stain orrust removers, as these coulddamage the surface of theappliance.
Do not use liquid dish soap on theceramic surface, as it can leave ablue sheen on the surface whichmay be difficult to remove.
The ceramic surface can be cleanedusing a cleaner for ceramicsurfaces. Follow the manufacturer’sinstructions on the packaging.
Make sure that no cleaner residueremains on the ceramic surface bycarefully wiping the cooktop with adamp cloth. Cleaner residues coulddamage the cooktop when heated.
After cleaning, thoroughly dry theceramic surface with a soft cloth toprevent a build up of limescaledeposits.
The ceramic surface should be cleanedregularly, preferably after each use.
Allow the cooktop to cool down beforecleaning. Wipe spills off using a dampcloth. Stubborn spills are best removedwith a shielded scraper blade. Apply acleaner for ceramic surfaces using asoft cloth or paper towel. This willremove any limescale deposits andmetallic marks (aluminium deposits). Acleaner with a special additive toprevent water marks and smears on theceramic surface can be used. Wipe thecooktop surface with a damp cloth anddry with a clean soft cloth.
Should any sugar, plastic oraluminium foil spill or fall onto thecooktop while it is in use, use ashielded scraper blade to scrape it offwhile the surface is still hot. Take carenot to burn yourself. Allow the cooktopto cool down and then clean with asuitable ceramic cooktop cleaner.
Cleaning and care
18
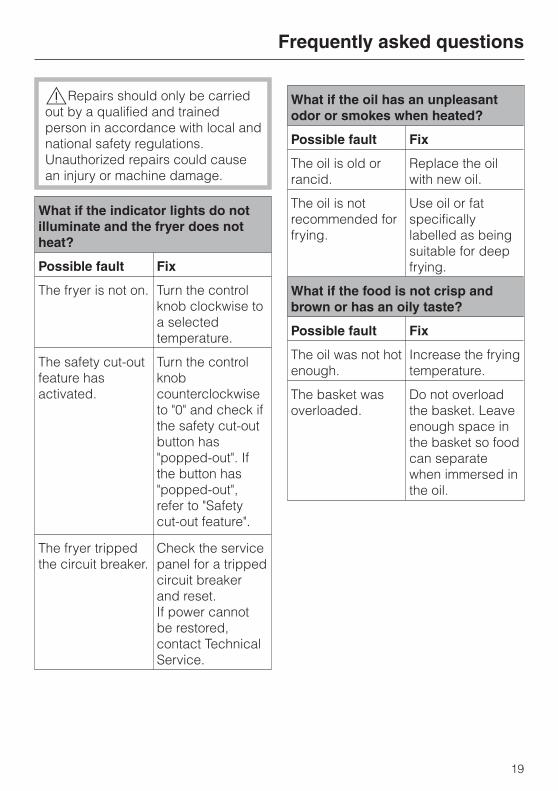
,Repairs should only be carriedout by a qualified and trainedperson in accordance with local andnational safety regulations.Unauthorized repairs could causean injury or machine damage.
What if the indicator lights do notilluminate and the fryer does notheat?
Possible fault Fix
The fryer is not on. Turn the controlknob clockwise toa selectedtemperature.
The safety cut-outfeature hasactivated.
Turn the controlknobcounterclockwiseto "0" and check ifthe safety cut-outbutton has"popped-out". Ifthe button has"popped-out",refer to "Safetycut-out feature".
The fryer trippedthe circuit breaker.
Check the servicepanel for a trippedcircuit breakerand reset.If power cannotbe restored,contact TechnicalService.
What if the oil has an unpleasantodor or smokes when heated?
Possible fault Fix
The oil is old orrancid.
Replace the oilwith new oil.
The oil is notrecommended forfrying.
Use oil or fatspecificallylabelled as beingsuitable for deepfrying.
What if the food is not crisp andbrown or has an oily taste?
Possible fault Fix
The oil was not hotenough.
Increase the fryingtemperature.
The basket wasoverloaded.
Do not overloadthe basket. Leaveenough space inthe basket so foodcan separatewhen immersed inthe oil.
Frequently asked questions
19
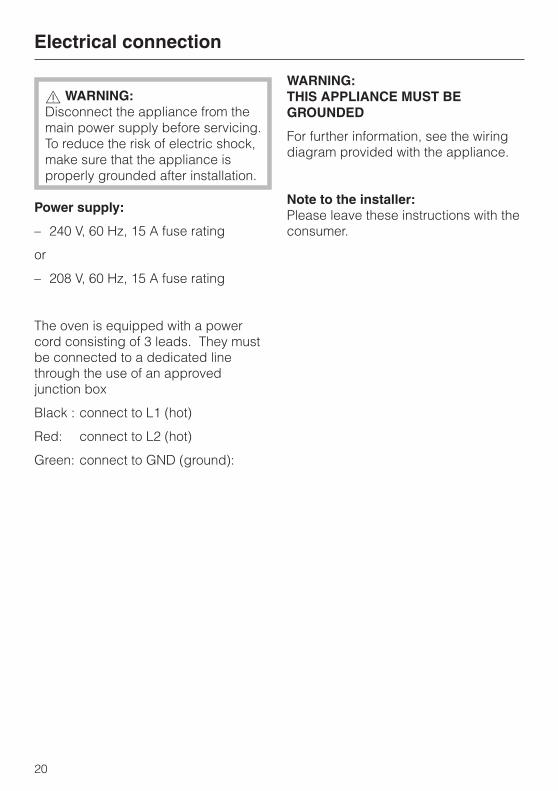
, WARNING:Disconnect the appliance from themain power supply before servicing.To reduce the risk of electric shock,make sure that the appliance isproperly grounded after installation.
Power supply:
– 240 V, 60 Hz, 15 A fuse rating
or
– 208 V, 60 Hz, 15 A fuse rating
The oven is equipped with a powercord consisting of 3 leads. They mustbe connected to a dedicated linethrough the use of an approvedjunction box
Black : connect to L1 (hot)
Red: connect to L2 (hot)
Green: connect to GND (ground):
WARNING:THIS APPLIANCE MUST BEGROUNDED
For further information, see the wiringdiagram provided with the appliance.
Note to the installer:Please leave these instructions with theconsumer.
Electrical connection
20
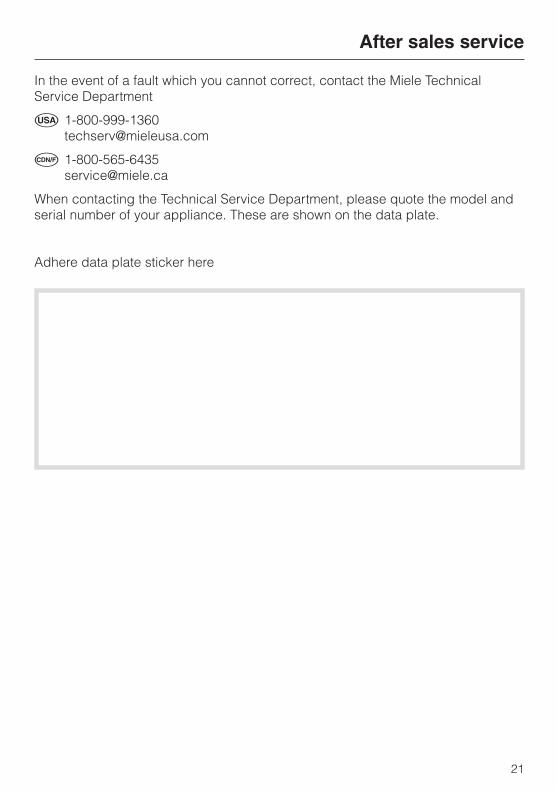
In the event of a fault which you cannot correct, contact the Miele TechnicalService Department
When contacting the Technical Service Department, please quote the model andserial number of your appliance. These are shown on the data plate.
Adhere data plate sticker here
After sales service
21

22

23
M.-Nr. 05 060 850 / 02Alteration rights reserved / 0304
This paper is made from cellulose bleached without the use of chlorine.