new athlete training guide - crossfit...
TRANSCRIPT
New Athlete Training Guide
Strive for progress, not perfection

Program Overview
2
Methodology OnRamp Training Guide
The CrossFit Mudtown New Athlete Training Guide is a collection of CrossFit material and images of the foundational
movements and methodology of CrossFit.
The OnRamp Course provides those completely new to CrossFit the knowledge and skills to begin their health and
fitness journey in CrossFit. This Guide is designed to be used in conjunction with the OnRamp Course to develop the
participant’s knowledge and athlete skills.
This is an essential but not an exhaustive resource. As participants transition into regular group classes, they will
continue to learn and progress.

What is CrossFit?
• Greg Glassman set out to define fitness
• Started CrossFit in 2001
• Measurable & Repeatable
• Increased work capacity across broad times and modal domains
• Constantly Varied
• Functional Fitness
• Relatively High Intensity*
• Universal Scalability – Our needs vary by degree, not kind. CF Games, 12,000 gyms worldwide
• Virtuosity – “Do the common uncommonly well.”
• Community
• Nutrition – “You can’t out train a bad diet.”
3
Methodology OnRamp Training Guide

Health Continuum
4
Methodology OnRamp Training Guide
CrossFit in 100 Words
Eat meat and vegetables, nuts and seeds, some fruit,
little starch and no sugar. Keep intake to levels that
will support exercise but not body fat. Practice and
train major lifts: Deadlift, clean, squat, presses, C&J,
and snatch. Similarly, master the basics of
gymnastics: pull-ups, dips, rope climb, push-ups, sit-
ups, presses to handstand, pirouettes, flips, splits,
and holds. Bike, run, swim, row, etc, hard and fast.
Five or six days per week mix these elements in as
many combinations and patterns as creativity will
allow. Routine is the enemy. Keep workouts short
and intense. Regularly learn and play new sports.
5
Methodology OnRamp Training Guide

Four Stages of Learning
6
Methodology OnRamp Training Guide
Acronyms & Abbreviations
7
Methodology OnRamp Training Guide
AMRAP As many rounds/reps as possible PJ Push Jerk
BP Bench Press PP Push Press
BS Back Squat PR Personal Record
BW Body Weight PU Push Up
C2B Chest to bar pullups PLU Pull Up
C&J Clean & Jerk RND Round
CFT CrossFit Total Rep Repetition, one performance of an exercise
DL Deadlift RFT Round for Time
DNF Did not finish RX As prescribed – no modification
DU Double Under RM Repetition maximum – 1RM = max lift for 1 rep. Your 10RM is the most you can lift 10 times
EMOTM Every minute on the minutes S2O Shoulder to Overhead
G2O Ground to overhead SDHP Sumo deadlift high pull
GHD Glute-Hamstring Developer Set A number of repetitions. Ex: 3 sets of 5 reps (3x5), means do 5 reps, rest, 5 reps, rest, 5 reps.
GPP General Physical Preparedness Subbed Substituted. Ex: regular push-ups in place of HSPU
HSPU Handstand push-up T2B Toes to bar
KBS Kettlebell Swing TGU Turkish Getup
KTE Knees to elbows Tabata 8 intervals of 20 seconds all-out intensity exercise followed by 10 seconds of rest
Metcon Metabolic Conditioning WOD Workout of the day
MU Muscle Up 5x5 5 sets of 5 reps at the same weight
OHS Overhead Squat 5-5-5-5-5 5 sets of increasing the weight each set
Pood Russian unit of weight, usually for kettlebells (1 pood = 16kg or 35#)

Co
mm
on
Fau
lts
SquatThe squat is essential to human movement, a proven performance enhancer and a gateway movement to the best exercise in strength and conditioning.
Setup
1. Stance – feet under hips or slightly outside of hips, toes turned out
2. Neutral spine
3. Chest up
4. Belly and back tight
5. Apply torque on your hips (rotate them out while keeping feet firming planted to the floor)
Performing the Squat
1. Keeping a neutral spine position, drive hips back and down (don’t over extend the lumbar)
2. Lower hips keeping shins as vertical as possible
3. Knees track out over your toes, not in
4. Bottom position is just below parallel –hip crease drops below knee depth
5. To help maintain tension and maximize torque think about pulling yourself into the bottom instead of dropping into the bottom position.
8
The Movements | Class 1 OnRamp Training Guide
Knees in, head not neutral
Rounded shoulders and butt wink
Knees forward, weight on toes.
Co
mm
on
Fau
lts
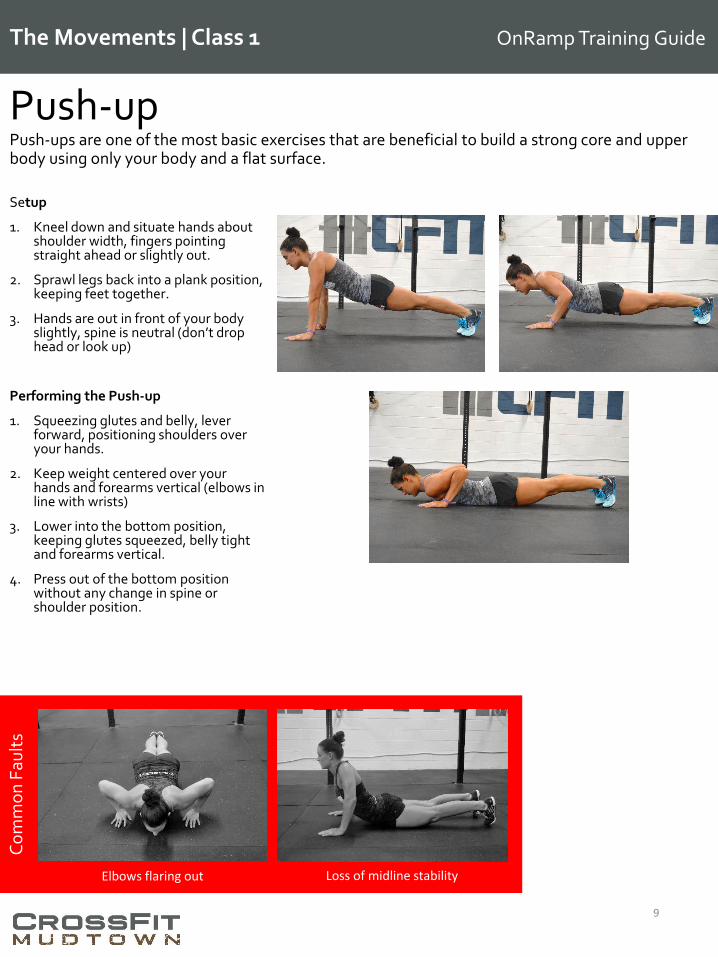
Push-upPush-ups are one of the most basic exercises that are beneficial to build a strong core and upper body using only your body and a flat surface.
Setup
1. Kneel down and situate hands about shoulder width, fingers pointing straight ahead or slightly out.
2. Sprawl legs back into a plank position, keeping feet together.
3. Hands are out in front of your body slightly, spine is neutral (don’t drop head or look up)
Performing the Push-up
1. Squeezing glutes and belly, lever forward, positioning shoulders over your hands.
2. Keep weight centered over your hands and forearms vertical (elbows in line with wrists)
3. Lower into the bottom position, keeping glutes squeezed, belly tight and forearms vertical.
4. Press out of the bottom position without any change in spine or shoulder position.
9
Elbows flaring out Loss of midline stability
The Movements | Class 1 OnRamp Training Guide

Ab Mat Sit-upStrong core, simple as that. The AbMat, when placed under the lumbar spine with the higher portion towards your bum creates this beautiful environment for the abdominals to move through their full and available range of motion.
Setup:
1. Sit on the floor with the ab mat placed beneath your lower back, higher part under your lumbar.
2. Legs are bent with feet on the floor.
3. Sit tall.
Performing the sit-up:
1. Lay back over the ab mat reaching hands over head
2. Reach to touch the floor overhead, extending your core over the ab mat
3. Drive up leading with your arms, engaging your core.
4. Touch your heels or the floor by your feet.
10
The Movements | Class 1 OnRamp Training Guide
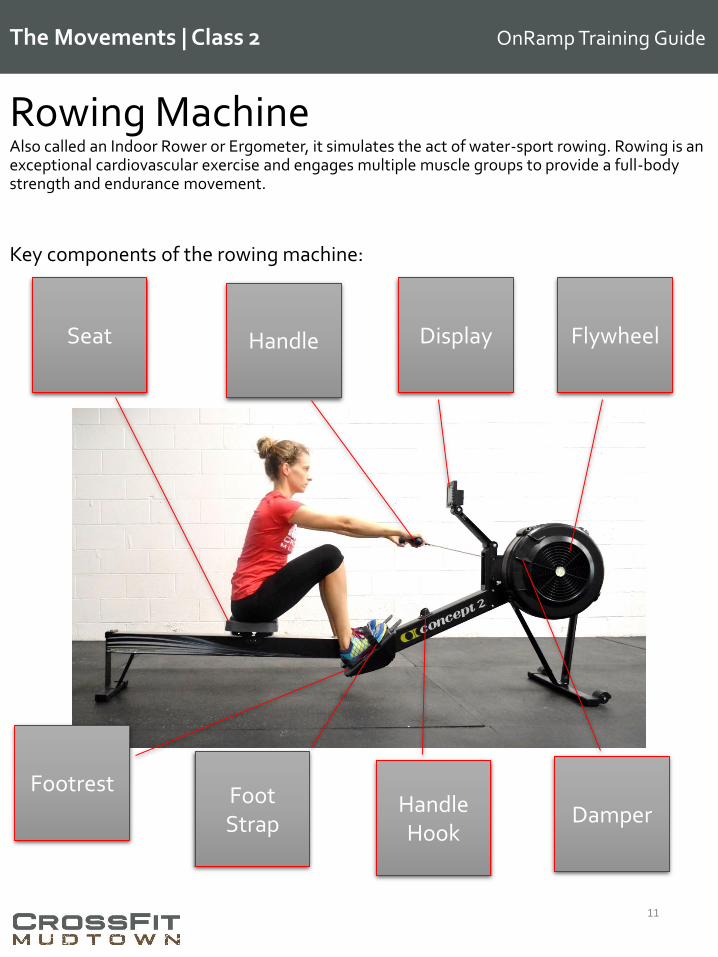
Rowing MachineAlso called an Indoor Rower or Ergometer, it simulates the act of water-sport rowing. Rowing is an exceptional cardiovascular exercise and engages multiple muscle groups to provide a full-body strength and endurance movement.
11
The Movements | Class 2 OnRamp Training Guide
Seat Handle Display
Damper
Flywheel
Footrest Foot Strap
Key components of the rowing machine:
Handle Hook

Rowing Machine, cont.
12
The Movements | Class 2 OnRamp Training Guide
Set-up:1. Sit centered on the seat. Place feet under the foot straps on the foot rest. The top of your shoe should
come about ½ inch over the foot ramp. The foot rests are adjustable and numbered to make setting up your feet simple each time you row. Pull the foot straps tight.
2. Turn on the display and set it to the desired data measurement (meters, calories or watts) and view.3. Set the damper to desired number – typically 3-5 for beginners. Higher damper settings allow more air
into the flywheel housing. The more air, the more work it takes to spin the flywheel against the air. More air also slows the flywheel down faster on the recovery, requiring more work to accelerate it on the next stroke. Lower damper settings allow less air into the flywheel housing, making it easier to spin the flywheel.
4. Pull the handle out of the handle hook and set your grip. Hands should be even on each side. Extend your arms straight toward the flywheel, and keep your wrists flat.
5. Spine should be neutral and tilted forward slightly at the hips. Shins vertical and feet firmly planted in the foot rests.
Performing the Row:
Catch• Extend your arms
straight toward the flywheel and keep your wrists flat.
• Slide forward on the seat until your shins are vertical.
• Lean forward slightly at the hips.
• You are ready to take the first/next stroke.
Drive• Begin the drive by
extending your legs and pushing off against the foot pads.
• Keep your core tight, arms straight and back firm as you transfer power to the handles.
• As your knees straighten, gradually bend your arms and lean your upper body back.
Finish• Bend your elbows and
pull the handle into your sternum.
• Extend your legs.• Lean back slightly at
the hips.
Recovery• Extend your arms by
straightening your elbows and returning the handle toward the flywheel.
• Lean your upper body forward at the hips to follow the arms.
• Gradually bend your knees and slide forward on the seat to the start (or catch) position.
Focus on consistent steady movement – You are the master of the numbers on the display, not the victim of them. Steady consistent movement will be more efficient. Remember you are on the “water” – smooth movement is rewarded. Smooth movement is fast and efficient. Jerky movements make waves and flip boats.
Rowing Machine, cont.
13
The Movements | Class 2 OnRamp Training Guide
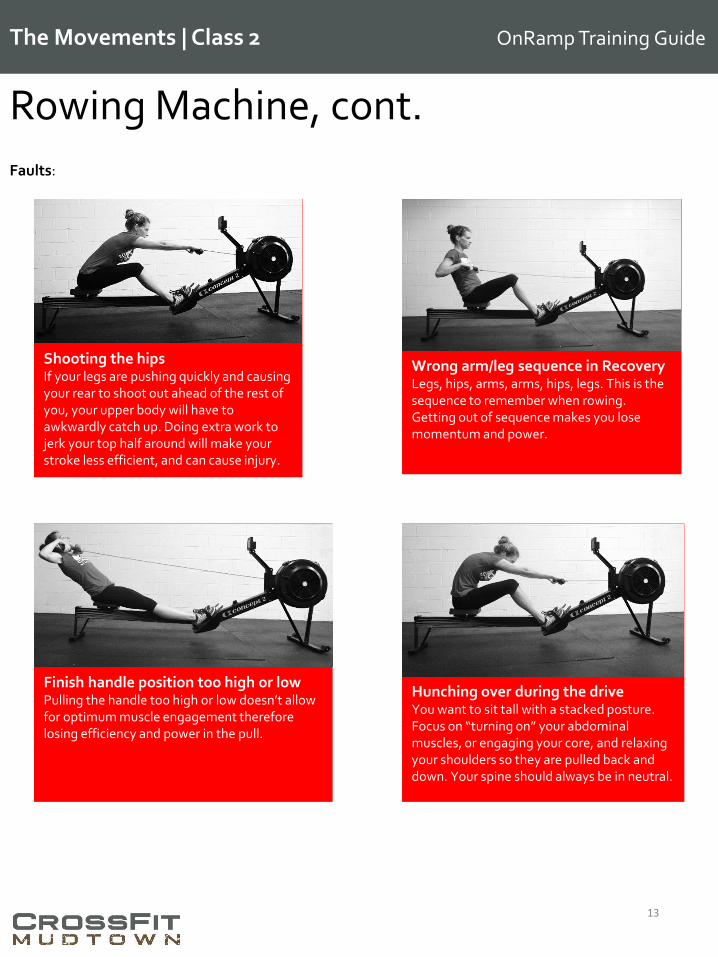
Faults:
Shooting the hipsIf your legs are pushing quickly and causing your rear to shoot out ahead of the rest of you, your upper body will have to awkwardly catch up. Doing extra work to jerk your top half around will make your stroke less efficient, and can cause injury.
Finish handle position too high or lowPulling the handle too high or low doesn’t allow for optimum muscle engagement therefore losing efficiency and power in the pull.
Wrong arm/leg sequence in RecoveryLegs, hips, arms, arms, hips, legs. This is the sequence to remember when rowing. Getting out of sequence makes you lose momentum and power.
Hunching over during the driveYou want to sit tall with a stacked posture. Focus on “turning on” your abdominal muscles, or engaging your core, and relaxing your shoulders so they are pulled back and down. Your spine should always be in neutral.
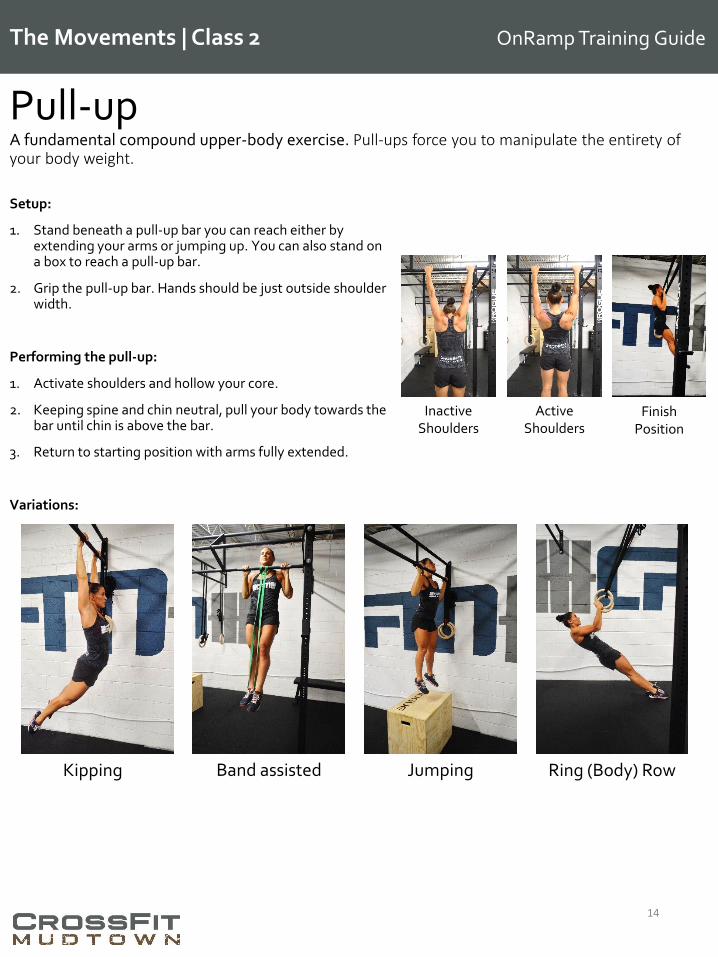
Pull-upA fundamental compound upper-body exercise. Pull-ups force you to manipulate the entirety of your body weight.
Setup:
1. Stand beneath a pull-up bar you can reach either by extending your arms or jumping up. You can also stand on a box to reach a pull-up bar.
2. Grip the pull-up bar. Hands should be just outside shoulder width.
Performing the pull-up:
1. Activate shoulders and hollow your core.
2. Keeping spine and chin neutral, pull your body towards the bar until chin is above the bar.
3. Return to starting position with arms fully extended.
Variations:
14
The Movements | Class 2 OnRamp Training Guide
Kipping Band assisted Jumping Ring (Body) Row
Inactive Shoulders
Active Shoulders
Finish Position

Toes to BarA dynamic core movement where the primary mover is the hip flexion, but also requires you to hang from a bar to include an element of grip strength and greater flexibility.
Setup:
1. Stand beneath a pull-up bar you can reach either by extending your arms or jumping up. You can also stand on a box to reach a pull-up bar.
2. Grip the pull-up bar. Hands should be just outside shoulder width.
Performing toes to bar:
1. Activate shoulders and hollow your core.
2. Keeping spine and chin neutral, start the kip, bend your legs and pull them toward the bar.
3. When your knees reach your elbows, kick quickly touching your toes to the bar between your hands.
4. Return to starting position with legs down and arms fully extended.
Variations:
15
The Movements | Class 3 OnRamp Training Guide
Knees to elbows Knee raises

Back Squat“There is simply no other exercise, and certainly no machine, that produces the level of central nervous system activity, improved balance and coordination, skeletal loading and bone density enhancement, muscular stimulation and growth, connective tissue stress and strength, psychological demand and toughness, and overall systemic conditioning than the correctly performed full squat.” –Starting Strength
Setup:
1. Set your grip with thumbs over the bar and wrists straight.
2. Dip under the bar. Position the bar to sit on your rear deltoids (just above the shoulder blades). Drive elbows up to “lock” the bar in place on your back.
3. Step up and out from the rack with torso tilted forward slightly making sure the bar is over the middle of your feet.
4. Set your stance, feet under hips or just outside, toes pointed out slightly.
Performing the Back Squat:
1. Take a deep breath in and push it into your belly.
2. Begin the back squat by driving your hips back and down. Think about elongating the hamstrings.
3. Knees track out over toes not in. Keep chest out and elbows up locking bar in place. Spine is neutral.
4. Continue pulling (not dropping) your hips back and down, keeping shins as vertical as possible until hips drop just below parallel.
5. Push out of the bottom position, driving hips up. Chest comes up at the same time.
6. Finish with hips fully extended at the top.
16
The Movements | Class 3 OnRamp Training GuideC
om
mo
n F
ault
s
Chin up Knees in Shooting the hipsTorso too vertical

Jump RopeAn excellent conditioning exercise that challenges coordination and stamina.
Setup:
1. Make sure your rope is the proper length. To do this, grip the handles and stand on the middle of the rope. Pull the handles up. They should reach between your sternum and armpits.
2. Grip the handles and position your hands. Your arms should be comfortably bent, hands placed about a foot from your sides and about waist level.
3. Rope is behind you.
Performing the Jump Rope:
1. Start the rope’s rotation by turning your arms. Once the rope is moving don’t swing your arms or shoulders too much. Jumping rope is all in the wrists.
2. Try to softly jump up and down on the balls of your feet. Your heels should never touch the ground. And don’t jump too high.
3. Keep your gaze straight ahead.
4. Get in a rhythm. Think jump, wrist, jump, wrist, jump…
17
The Movements | Class 4 OnRamp Training GuideF
ault
s
Jumping too high/donkey kick
Using arms/shoulders instead of wrists

PressA compound movement that is great for developing upper body strength and midline stability.
Setup:
1. Set your grip on the barbell which is placed in the rack. Dip under the bar and bring to a front rack position with the bar resting on your shoulders. Elbows are down, almost vertical.
2. Set your feet under your hips. Legs are straight and stay that way through the duration of the lift. Create torque on your hips and squeeze your glutes.
Performing the Press:
1. Set your breath, keeping chest tall and expanded. Press the bar over head.
2. Slightly move head back out of the way to allow bar to move straight up, staying over the middle of the foot.
3. Keep elbows in, do not flair them out.
4. Finish with arms fully extended at the top.
18
The Movements | Class 4 OnRamp Training GuideC
om
mo
n F
ault
s
Muted hip Pushing the bar out instead of up
Over extending
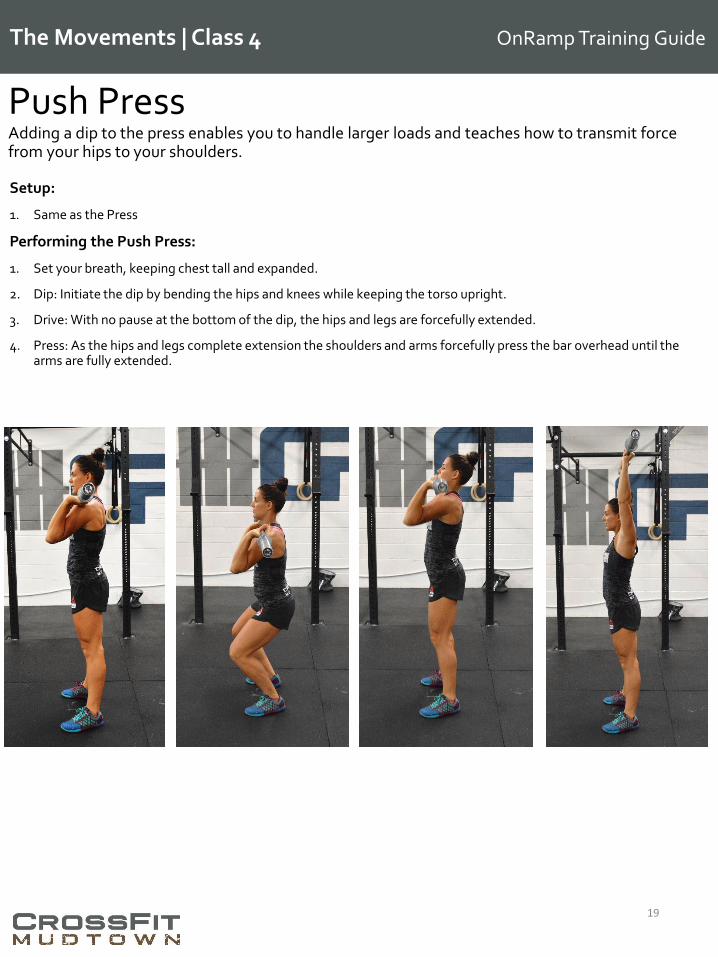
Push PressAdding a dip to the press enables you to handle larger loads and teaches how to transmit force from your hips to your shoulders.
Setup:
1. Same as the Press
Performing the Push Press:
1. Set your breath, keeping chest tall and expanded.
2. Dip: Initiate the dip by bending the hips and knees while keeping the torso upright.
3. Drive: With no pause at the bottom of the dip, the hips and legs are forcefully extended.
4. Press: As the hips and legs complete extension the shoulders and arms forcefully press the bar overhead until the arms are fully extended.
19
The Movements | Class 4 OnRamp Training Guide

Push JerkFrom press to push press to push jerk the movements become increasingly more athletic, functional, and suited to heavier loads. The progression also increasingly relies on the power zone (hips & core). In the shoulder press the power zone is used for stabilization only. In the push press the power zone provides not only stability, but also the primary stimulus in both the dip and drive. In the push jerk the hips are called on for the dip, drive, second dip, and squat. The role of the hip is increased in each exercise.
Setup:
1. Same as the Press & Push Press
Performing the Push Press:
1. Set your breath, keeping chest tall and expanded.
2. Dip: Initiate the dip by bending the hips and knees while keeping the torso upright.
3. Drive: With no pause at the bottom of the dip, the hips and legs are forcefully extended.
4. Press and Dip: This time instead of just pressing, you press and dip a second time simultaneously, catching the bar in a partial squat with the arms fully extended overhead.
5. Finish by standing straight up knees locked with the bar straight overhead
20
The Movements | Class 4 OnRamp Training Guide
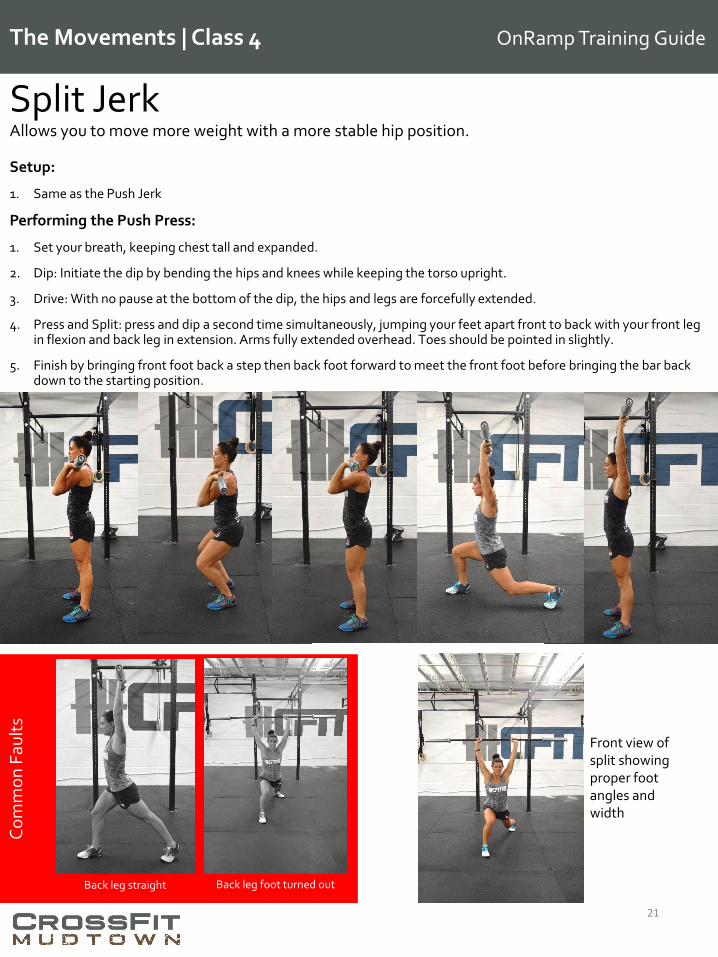
Split JerkAllows you to move more weight with a more stable hip position.
Setup:
1. Same as the Push Jerk
Performing the Push Press:
1. Set your breath, keeping chest tall and expanded.
2. Dip: Initiate the dip by bending the hips and knees while keeping the torso upright.
3. Drive: With no pause at the bottom of the dip, the hips and legs are forcefully extended.
4. Press and Split: press and dip a second time simultaneously, jumping your feet apart front to back with your front leg in flexion and back leg in extension. Arms fully extended overhead. Toes should be pointed in slightly.
5. Finish by bringing front foot back a step then back foot forward to meet the front foot before bringing the bar back down to the starting position.
21
The Movements | Class 4 OnRamp Training GuideC
om
mo
n F
ault
s
Back leg straight Back leg foot turned out
Front view of split showing proper foot angles and width

Front SquatA variant of the weighted squat that requires the barbell to be stabilized in a front rack position. The mechanics of a front squat place a greater demand on the quadriceps, abdominals and knees, and alleviate stress off of the glutes and hips.
Set-up:
1. Start with the barbell on a squat rack. Make sure that the bar is racked about an inch or two below the clavicles while in a full standing position. This ensures both an aggressive primer for the kinetic chain when un-racking the barbell as well as an easy and safe re-racking of the barbell once the set is finished.
2. Choose a hand position on the barbell close to or mirroring the grip you use for a press. Do not fully grip the bar, but rather just hook the fingers around the bar.
3. Meet the bar and place it above the clavicles while rotating your elbows upward to create as much of a horizontal angle with your arms. This creates the “shelf” across the clavicles and anterior deltoids.
4. After un-racking, stay tight and position your feet about shoulder-width apart, point your toes 30-45 degrees outward (aligned with knee direction), and pull the hips back slightly to place majority of the resistance onto the heels.
Performing the Front Squat:
1. Take a deep breath and focus a majority of the pressure to the abdominal area to stabilize the entire torso and spine. Hold your breath through the descent and stand of the front squat to maintain midline stability.
2. Begin lowering yourself into the bottom position, which requires the crease of the hip to fall below the knees, while remembering these cues: chest up, sit back, knees out; and elbows straight forward/high.
3. Drive out of the bottom position by forcing the hips open. Keeping the torso upright finish the movement with hips fully open at the top.
22
The Movements | Class 5 OnRamp Training Guide
Common Faults
Knees forward, weight on toes
Torso not upright, elbows down

ThrusterA strength and conditioning movement that combines the front squat and push press.
Set-up:
1. See Front Squat set-up
Performing the Thruster:
1. Perform a Front Squat (see Performing the Front Squat)
2. Drive out of the bottom position by forcing the hips to open keeping torso upright. As the hips fully open, simultaneously press the bar overhead into a fully locked position. Remember to be aggressive when opening the hips. The more “pop” you have, the more power that gets transferred to the press.
3. Finish by bringing the bar back to the front rack position.
23
The Movements | Class 5 OnRamp Training Guide

Wall Ball ShotsThe wall-ball drill comprises two highly functional classical weightlifting movements (front squat and push-press) brought together at light loads and extended duration to create a super potent metabolic conditioning tool with an enormous potential for increasing athletic performance. – CrossFit Journal, 2003
Set-up:
1. With a medicine ball, find a spot in front of a wall with a target overhead. Typical targets range from 8-10’. Face the wall and stretch the ball straight out. Move forward until the ball touches the wall. This is your starting distance from the wall (the distance can be adjusted in/out to comfort/ability).
2. Set your squat stance. Feet just outside the hips, toes slightly turned out.
3. Place the ball in a front rack position with forearms parallel to the wall. The ball should be just underneath your chin.
Performing the Wall Ball:
1. The movement begins as a front squat and follows through to a push press/throw that sends the ball up and forward to the target from which it rebounds back to the throwers outstretched arms where it is “absorbed” back into the squat.
2. Remember to be aggressive when opening the hips coming up from the squat. The more “pop” you have when opening the hips, the more power that is transferred to the throw. Torso stay tall and core is tight.
24
The Movements | Class 5 OnRamp Training GuideF
ault
s
Not using hands evenlyNot squatting below
parallel, torso not upright. Ball too low

5 Step Set-upEvery time the barbell is lifted from the floor for any movement, we always start with our 5 step set-up. A proper barbell set-up that is dialed-in and consistent allows the lifter to execute the movement more efficiently and with more power.
1. Bar over the middle of the footSet your feet under the bar so when looking down, the bar is over the middle of your foot. Stance is hip width.
25
The Movements | Class 6 OnRamp Training Guide
2. GripSet your grip for the appropriate lift (more narrow for Cleans and wider for Snatch). Hook grip (seen above) is used most often when lifting the bar from the floor. Place fingers around the bar and over the thumb.
3. Shins to the barAfter feet and grip are set, bring your shins to the bar. Don’t worry about setting your torso yet.
4. Squeeze chest upPuff your chest out, tighten the core, create a nice lumbar curve, but don’t over extend. Spine is neutral. Shoulders are pinned back and down.
5. Set your breathTake a deep breath and put it in your gut –hold your breath through the duration of the lift.
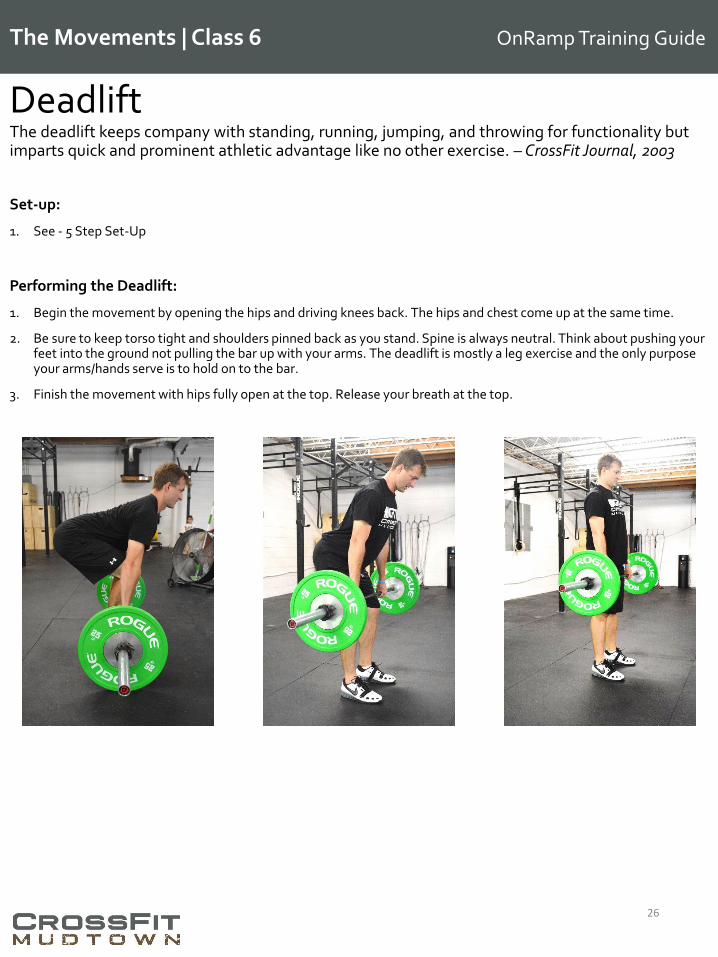
DeadliftThe deadlift keeps company with standing, running, jumping, and throwing for functionality but imparts quick and prominent athletic advantage like no other exercise. – CrossFit Journal, 2003
Set-up:
1. See - 5 Step Set-Up
Performing the Deadlift:
1. Begin the movement by opening the hips and driving knees back. The hips and chest come up at the same time.
2. Be sure to keep torso tight and shoulders pinned back as you stand. Spine is always neutral. Think about pushing your feet into the ground not pulling the bar up with your arms. The deadlift is mostly a leg exercise and the only purpose your arms/hands serve is to hold on to the bar.
3. Finish the movement with hips fully open at the top. Release your breath at the top.
26
The Movements | Class 6 OnRamp Training Guide

BurpeeAn intense, full body exercise that has tremendous impact on endurance and conditioning.
Set-up:
1. Begin in a standing position with feet under the hips.
Performing the Burpee:
1. Squat down and place hands on the floor in front of you.
2. Kick your feet back into a push-up position and immediately drop your chest to the floor.
3. Raise your chest back up and jump your feet back underneath your hips with a wide stance.
4. Stand and jump with a clap overhead to finish.
27
The Movements | Class 6 OnRamp Training Guide

Box JumpPlyometrics (jumping exercises) work on hip explosiveness and leg drive, and can immensely improve flexibility in the hamstrings and lower back.
Set-up:
1. Place a box in front of you at the desired height. Typical heights range from 20-30”.
2. Face the box in a jumping stance (feet under the hips).
3. You should be standing close to the box (within 12”). This allows you to exert more energy jumping up instead of up AND out.
Performing the Box Jump:
1. Begin the jump by performing a partial squat to load the legs and drive the arms back.
2. Swing the arms forward and up jumping simultaneously. The arms help provide momentum to the jump.
3. Land as softly as possible on the balls of your feet in a partial squat position on top of the box.
4. Stand and open the hips fully to finish the jump.
5. Return to the starting position by stepping down or for more advanced athletes, jumping down.
28
The Movements | Class 6 OnRamp Training Guide

CleanOlympic lifts like the Clean build muscle and power by training your body to explode upward. When the Clean is performed correctly, it will improve your vertical jump and speed.
Set-up:
1. See 5 Step Set-Up
Performing the Clean:
1. Begin the movement similar to a deadlift. Hips raise, knees go back. There should be no change in spinal position meaning the chest raises at the same rate as your hips.
2. Once the bar reaches mid-thigh (aka power or jumping position), jump. Hips and knees are unlocked, elbows are straight, and the jump will take the bar straight up.
3. As you reach full hip extension after the jump, slide your feet into your landing position and quickly turn your elbows under the bar with the bar landing in the rack position. Your legs and hips will be in a partial or full squat position. This step is fast and aggressive.
4. Finish the clean by standing up straight, fully opening your hips with the bar still in the rack position.
29
The Movements | Class 7 OnRamp Training GuideF
ault
s
Not opening the hips on the jump, curling the bar up
Elbows too low in the rack position.
Receiving the bar with too wide of a stance
Receiving the bar with a muted hip

Ring DipThe ring dip exercise is the standard dip, performed on gymnastics rings, and has long been a staple compound exercise in many gymnasts’ routines. Ring dips are quite a bit more challenging than bar dips because rings are extremely unstable, thus demanding the utilization of numerous stabilizer muscles in your core and shoulders.
Set-up:
1. Set the rings to the appropriate height. Stand facing the rings, the top of the ring should be at the bottom of your shoulder.
2. Set your grip placing hands on the inside, bottom portion of the ring.
Performing the Ring Dip:
1. Jump up to a support position with elbows locked out, hands turned out, long neck and hollow body position.
2. Initiate the dip by sending the chest forward and down.
3. Always keeping the elbow directly over the wrist and forearms vertical. Reach the bottom of the dip with your shoulder below elbow.
4. Press back up and finish in the same strong support position you started.
Variations:
30
The Movements | Class 7 OnRamp Training Guide
Matador Box/benchBand assisted

SnatchThe Snatch is the most technical movement you’ll see in our gym, but similar to the other Olympic lift the Clean, it supports your overall efforts in power, speed and neural pathway development.
Set-up:
1. See 5 Step Set-Up
2. Grip is wide. To determine your grip, stand in a high hang position with a wide grip. The bar should be at the crease of your hips (or if you bend forward the bar doesn’t move.
Performing the Snatch:
1. Begin by lifting the bar off the ground-hips raise, knees go back. There should be no change in spinal position meaning the chest raises at the same rate as your hips.
2. Once the bar reaches mid-thigh (aka power or jumping position), jump. Hips and knees are unlocked, elbows are straight, and the jump will take the bar straight up.
3. As you reach full hip extension after the jump, slide your feet into your landing position and pull yourself underneath the bar with the bar landing in an overhead partial or full squat position. This step is fast and aggressive.
4. Finish the snatch by standing up straight, fully opening your hips with the bar still overhead.
31
The Movements | Class 8 OnRamp Training GuideF
ault
s
Knees too far forward. Arms over-extended.
Elbows not locked out overhead. Shoulders inactive.

Overhead SquatAnother variation of the weighted squat. This one focuses on the finish position of the snatch.
Set-up:
1. Stand with a barbell in the hang position. Your grip width should be the same width as your snatch grip.
2. Hang snatch the barbell overhead into the finish snatch position.
3. Elbows are locked, shoulders active holding the bar straight overhead. The bar should be over the middle of your feet.
Performing the Overhead Squat:
1. Tighten your core and set your breath into your stomach.
2. Begin the squat by pushing hips back and bending the knees. This squat is more up-right and requires more focus to stabilize the bar overhead. Don’t drop your chest or the bar will come crashing down in front.
3. Continue lowering into a full squat position with the crease of the hips below the knee. Focus on a tight core and actively pushing the bar up with your shoulders.
4. Drive out of the bottom and finish the squat by standing and fully extending the hips at the top.
32
The Movements | Class 8 OnRamp Training GuideF
ault
s
Knees too far forward. Arms over-extended.
Elbows not locked out overhead. Shoulders inactive.

LungeAn effective lower-body exercise that effectively works your glutes and quadriceps and also engages your hamstrings. They also help improve flexibility and core strength.
Set-up:
1. Stand with feet under the hips.
2. Hands can hang at your sides or placed on your hips.
3. Keep your upper body straight, with your shoulders back and relaxed and chin up (pick a point to stare at in front of you so you don't look down). Always engage your core.
Performing the Lunge:
1. Step forward with one leg, lowering your hips until both knees are bent at about a 90-degree angle. Make sure your front knee is directly above your ankle, not pushed out too far, and make sure your other knee doesn't touch the floor.
2. Keep the weight in your heels as you push back up to the starting position.
Variations:
33
The Movements | Class 8 OnRamp Training Guide
Matador Box/benchBand assistedWeighted lunge
Fau
lts
Stance too narrowChest dropping forward

Kettlebell SwingA full body exercise that helps train explosive hip power and builds aerobic capacity. The kettlebell swing targets your shoulders, back, abdominals, hips, glutes, legs and also increases grip strength.
Set-up:
1. Stand with feet under the hips. Kettlebell is on the ground between your feet.
2. Lower yourself to the bell, positioning the hips down and back, set your grip on the kettlebell and pull your shoulders back. This is very similar to the deadlift set-up.
Performing the Kettlebell Swing:
1. Now simply hike the bell back hard. Make sure to keep the alignment of the body and not crumple as the weight of the bell pulls you back. Keep the weight in your heels as you push back up to the starting position.
2. Swing the kettlebell forward; powerfully extend your hips and send the kettlebell up finishing straight overhead.
3. For continuous swinging, bring the kettlebell back down to the hike position in a controlled manner and perform the swing again.
4. Focus on breathing during the swings: inhale sharply at the bottom of the swing and exhale forcefully at the top to contract the diaphragm and create tension in the core
34
The Movements | Class 9 OnRamp Training Guide
Matador
Band assisted
Fau
lts
Chest dropping forward Rounded shoulders Neck out of alignment
General Information
Arriving to classIt’s a good idea to arrive about 10 minutes before class. This allows you time to use the restroom, change clothes if needed and prepare stuff you need for class.
ParkingParking is located near our building along the driveway hill. Overflow parking is down at the bottom of the hill in the adjacent business lots. Please do not park in front of our ramp, dumpster or anywhere in front of the Universal Door building.
Storage cubbies/use of upstairsWe have some storage cubbies in the upper level for you to store belongings during class. Please only bring down necessary items for your workout and leave everything else (bags, clothes, etc.) upstairs in the storage cubbies.
The upstairs is available for skill and mobility work during regular gym hours. Please feel free to use the mobility and workout equipment before or after your class.
WaterCold, filtered water is always available downstairs in the workout facility near the jump ropes. We encourage you to bring your own water bottle, but we always have cups on hand if you need one.
Body TowelsAvailable anytime you need them. They’re the white/yellow towels on the shelf under the speaker.
Cleaning EquipmentGym members are responsible for cleaning any equipment used at the end of class. Spray bottles with cleaner and blue towels are located on the shelf under the speaker for cleaning purposes.
ChildcareThe childcare service is available to regular class gym members. There is a small fee to use the service in addition to monthly membership dues. Parents must stay on site at all times while using the service and sign their child in before class.
Contact Information
www.crossfitmudtown.com
205-790-2019
35
Gym Procedures OnRamp Training Guide

ZenPlannerOnline member management
Registering for class - Please register for class in advance:
1. Login to our member connect site: https://crossfitmudtown.sites.zenplanner.com/login.cfm. Your login is your email. You should have received a temporary password after signing up for your membership. On the login page on the member connect site, you can reset your password if needed.
2. After logging in, click on Calendar
3. Click on the class time you would like to attend
4. Click on the Reserve button on the right
5. Then you’re all set!
Mobile AppThe mobile app includes several major features that you can use from any mobile device, such as...
• Book and reserve classes from your phone
• Digitally sign contracts and event waivers
• Check into classes in real-time
• Upload a photo to your profile
• Record and share workout results
**Member Connect requires the use of a modern web browser (e.g., Internet Explorer 8 or above, Mozilla Firefox, Google Chrome or Safari for Apple devices.)
ACCESSING THE MOBILE APP LINK ON AN IPHONEWhen you launch the member connect link (https://crossfitmudtown.sites.zenplanner.com) on an iPhone, a prompt will appear to bookmark the site to your home screen in the browser. Once bookmarked, Member Connect will appear as an app on your home screen with our branded mobile app icon. Clicking on the icon will open Member Connect on your iPhone. Now you can login to reserve and check in to class, sign and view online forms with digital signatures, track workout results, view and pay bills, upload profile photo and much more.
ACCESSING THE MOBILE APP LINK ON AN ANDROID PHONEWhen you launch the member connect link on an Android phone, the browser will launch and load your page. You will need to open the toolbar menu and select "Add to Homescreen" from the menu. The shortcut with our CFM icon will now appear on your home screen. Clicking on the icon will open your Member Connect site on your Android phone. Now you can login to reserve and check in to class, sign and view online forms with digital signatures, track workout results, view and pay bills, upload profile photo and much more.
36
Gym Procedures OnRamp Training Guide

Gym Etiquette We’re a community. These are some things we practice daily to foster a team spirit and unite us in our fitness goals.
• Arrive a little early and be prepared for class.
• Don’t be afraid to ask questions or talk to a coach about movements. They’re there not only teach, but to ensure you have a safe and effective workout.
• Wait until everyone is done with the workout before cleaning or putting away equipment. Everyone finishes workouts at different times and it’s disheartening for those not yet done to see their fellow gym mates putting away equipment. If you are done before others, please cheer on the rest! If class is running behind and you really need to go, just leave your equipment where it is and we’ll put it away for you.
• Accurately count reps and complete full movements. Don’t sacrifice quality for quantity or speed.
• Do not drop empty barbells (or barbells loaded with 10lb plates) to the floor! It’s bad on the bar and the plates can bend/break.
• Clean your equipment after each workout. This includes barbells, pull-up bars, kettlebells, rowers, abmats, etc.
• Be honest about your abilities – coaches will facilitate, but we’re both responsible.
• Focus on progress not perfection. It takes daily effort and focus to reach your long term goals.
37
Gym Procedures OnRamp Training Guide