propex - dentsply sirona · propex must be stored in normal temperature ... português, holandês,...
TRANSCRIPT

ProPex APEX LOCATOR
User Manual
TM

3
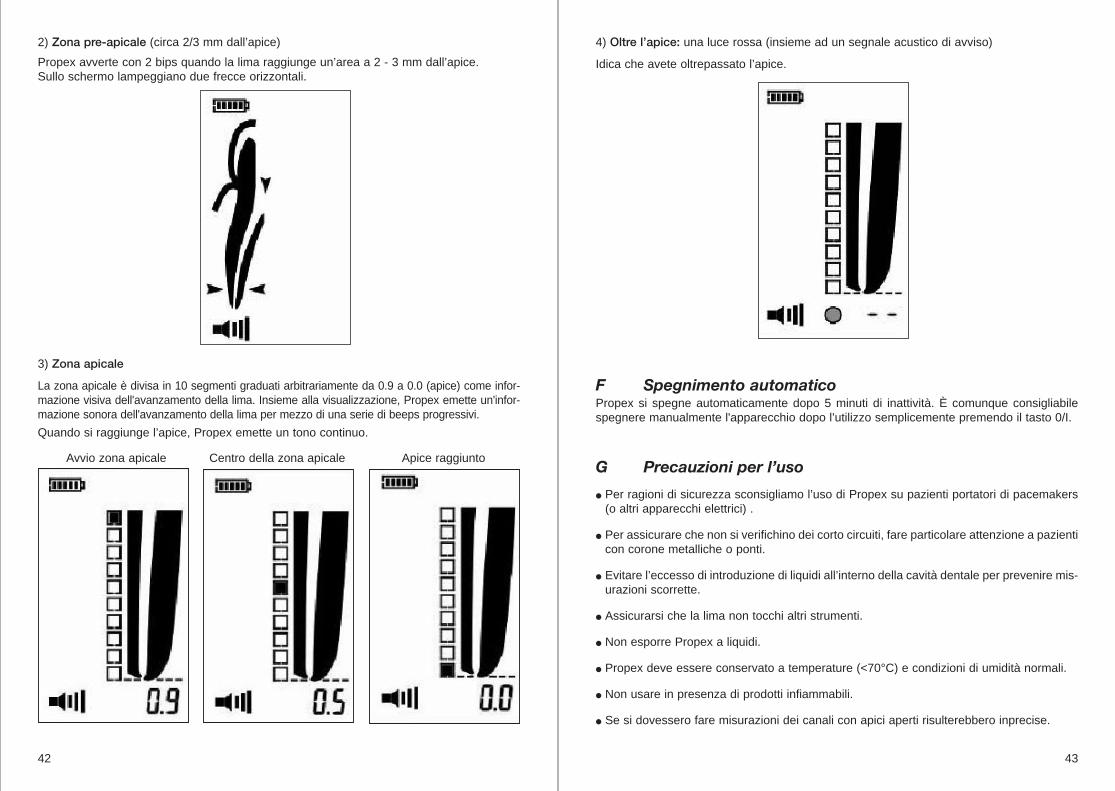
IntroductionCongratulations on the purchase of Propex, an apex locator which is precise,ergonomic, and able to determine the exact working length in seconds.
The measurement of the apex is made at the cemento-dental junction (Foramen Apex), bythe Propex apex locator.
Indications
Propex is an electronic device used for apex location determination.
Contraindications
In case where a patient has been fitted with an implanted heart pacemaker (or other elec-trical equipment) and has been cautioned against the use of small electrical appliances(such as electric shavers, hair dryers etc.) it is recommended that the Propex not be used.
Warnings
See above.
Precautions
In cases where a patient has been fitted with an implanted heart pacemaker (or other elec-trical equipment) and has been cautioned against use of small electrical appliances (suchas electrical shavers, hair dryers, etc.) it is recommended that the Propex not be used.To ensure that short circuits do not impair the measurements, be particularly careful withpatients fitted with metal crowns or bridges.
● Make sure that the canal is wet enough to ensure reliability of the measurement.● Ensure that the file does not touch another instrument.● Do not expose Propex to any liquid.● Propex must be stored in normal temperature (< 70°C) and humidity conditions.● Do not use in the presence of flammable products.● Teeth with open apices will give imprecise results.
Measuring wire connection
Sound control
Switch on/off
2
. . . . . . . . . . . . . . . . . . . . . . . . . . . . . . . . . . . . . . . . . . . . . . . . . . . . . . . . . . . . . . . . . . . . . . . . 3
. . . . . . . . . . . . . . . . . . . . . . . . . . . . . . . . . . . . . . . . . . . . . . . . . . . . . . . . . . . . . . . . . . . . . . . 12
. . . . . . . . . . . . . . . . . . . . . . . . . . . . . . . . . . . . . . . . . . . . . . . . . . . . . . . . . . . . . . . . . . . . . . . . 21
. . . . . . . . . . . . . . . . . . . . . . . . . . . . . . . . . . . . . . . . . . . . . . . . . . . . . . . . . . . . . . . . . . . . . . . . 30
. . . . . . . . . . . . . . . . . . . . . . . . . . . . . . . . . . . . . . . . . . . . . . . . . . . . . . . . . . . . . . . . . . . . . . . . 39
CONTENTS
2
Este manual de utilização está também disponível, quando requisitado,nas seguintes línguas: português, holandês, dinamarquês, sueco, finlan-dês e grego.
Deze gebruiksaanwijzing is, op aanvraag, eveneens verkrijgbaar indevolgende talen: Portugees, Nedelands, Deens, Zweeds, Fins enGrieks.
Käyttöohje on saatavana myös seuraavilla kielillä: portugali, hollanti,tanska, ruotsi, suomi ja kreikka.
Denna bruksanvisning finns även att tillgå på följande språk:portugi-siska, tyska, danska, svenska, finska och grekiska.
Denne brugsanvisning kan også rekvireres på følgende sprog: portugi-sisk, hollandsk, dansk, svensk, finsk og græsk.
Visit our website: www.maillefer.ch

54
Adverse Reactions: none known
A ContentsBefore use, please check the exact contents of the new equipment:
– one Propex apex locator– one charger– one measurement cable including 2 lip clips, 2 connection hooks and 2 connec-
tion forks.
B Recharging the Battery
The Propex is delivered with a rechargeable battery.
The Propex screen has an indicator showing the level of charge of the battery. When thisis flashing, the battery requires recharging. However, it is still functional for 3 or 4 treatmentsbefore the battery dies.
Procedure for recharging the battery:
1) Disconnect the measurement cable2) Connect the charger cable to the equipment (connection on the right side
of the Propex)3) Connect the charger to the mains
An orange light indicates that the battery is charging.A green light indicates that charging is complete.
Duration of charging: 12 hours (24 hours after long periods without use).
Note: Propex cannot be used while charging.
C Getting Started
1) Disconnect the charger from the device if connected2) Connect the measurement cable and switch on the device3) Link the lip clip to the patient4) Insert the file into the canal5) Connect the hook to the file
A green light (coupled with a 2-beep signal) indicates that the Propex is ready for useA red light (and no sound signal) indicates a faulty connection. Check your connections,clean your hook connection and lip clip, moisten the canal if necessary and start again.
No other specific adjustment is necessary before commencing measurement. Propexworks with all types of canal instruments.
One tone audio signal is emitted when the unit is turned on.
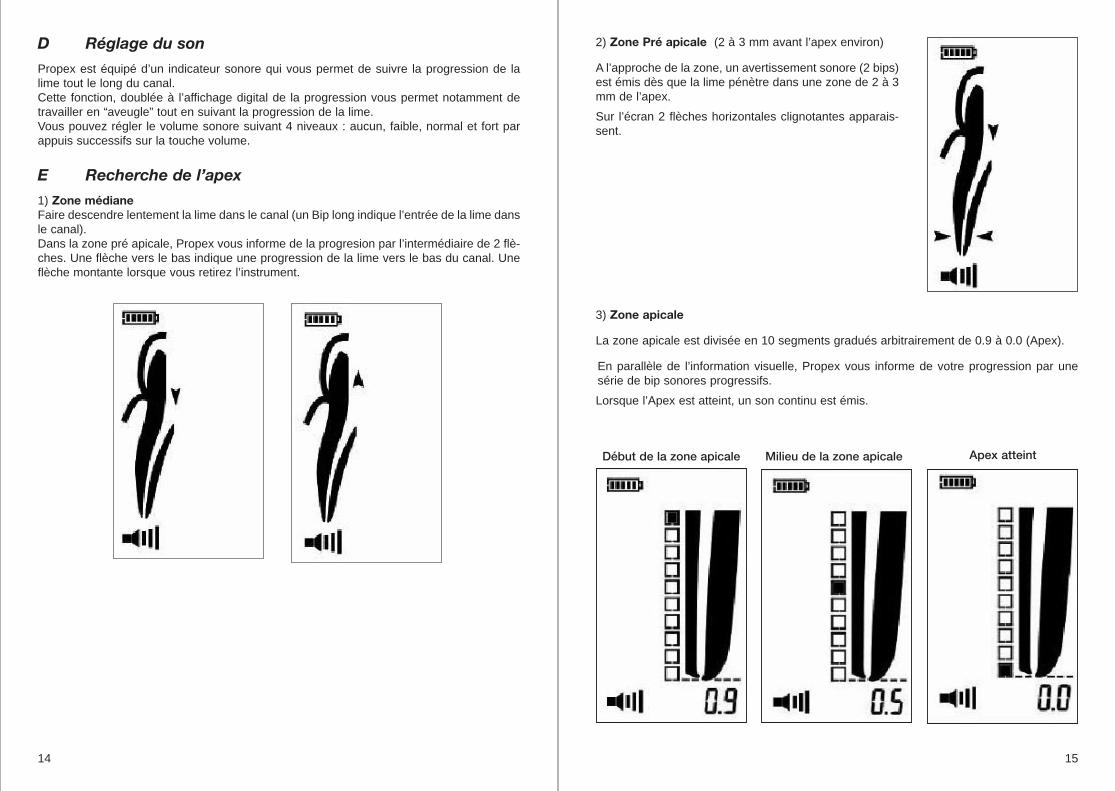
D Sound Adjustment
Propex is equipped with a sonic indicator which enables monitoring of the progression of thefile within the canal.This function, in conjunction with the digital display of progression, enables working "blind"while still monitoring the progression of the file.The volume can be adjusted to one of four levels: mute, low, normal and high, by succes-sive presses on the . volume key.Visual of different volumes to be included.
E Search for the Apex
1) Median Zone
Slowly introduce the file into the canal.
In the pre-apical zone, Propex indicates the progression of the file via two vertical arrows.A downward pointing arrow appears when the file descends into the canal, and a upwardpointing arrow when the instrument is withdrawn.

76
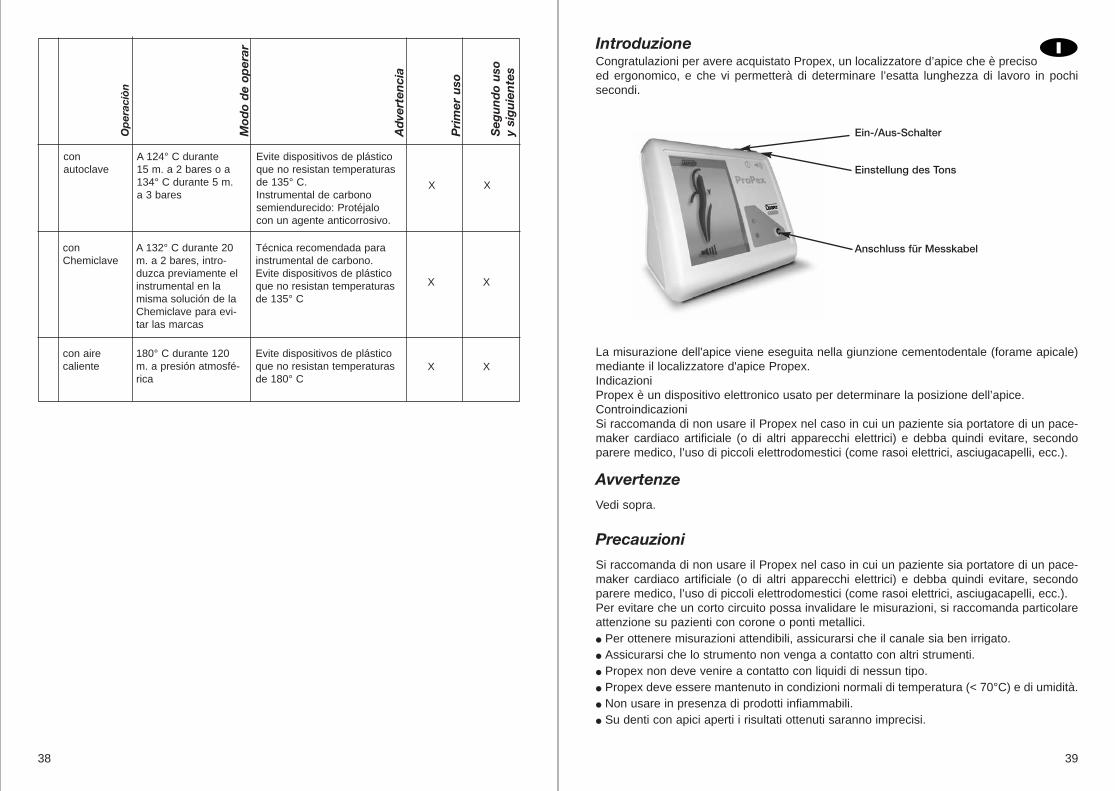
3) Apical Zone
The apical zone is divided into 10 segments graduated arbitrarily from 0.9 to 0.0 (apex) asvisual information of file progression. In conjunction with the visual information, Propexemits audible information of file progression via a series of progressive beeps.
When the apex is reached, Propex emits a solid tone.
Apical Zone start Middle of apical zone Apex reached
4) Beyond the Apex
A red light (in conjunction with a warning signal) indicates that you have passed the Apex.
2) Pre-apical Zone (approx. 2 to 3 mm before the apex)
When the file reaches an area 2 to 3 mm from the apex, Propex emits an audible tone (2 tones).
On the screen, two blinking horizontal arrows appear.
F Automatic Shutdown
Propex automatically shuts down after 5 minutes without use. It is advisable, however, tomanually switch off equipment after measurement by simply pressing the 0/I key.
G Precautions for Use
● We do not advise the use of Propex on patients fitted with pacemakers (or other electrical equipment) for safety reasons.
● To ensure that short circuits do not impair the measurements, be particularly careful withpatients fitted with metal crowns or bridges.
● Avoid excessive liquids inside the tooth cavity to prevent overflow and incorrect measurements.
● Ensure that the file does not touch another instrument.
● Do not expose Propex to any liquid.
● Propex must be stored in normal temperature (< 70°C) and humidity conditions.
● Do not use in the presence of inflammable products.
● Measurements in canals with open apex may provide results with reduced precision.

8
K Standard symbols
On the device label appear standard symbols as follows:
Propex electronic apex locator belongs to following category of medical devices:
– Internally powered equipment (3.6 V NiMH rechargeable battery)
– Type LF (Low Frequency) applied parts
– Not suitable for use in the presence of flammable anaesthetic mixtures with air orwith oxygen or nitrous oxide
– Continuous operation
– Ingress of liquids – not protected
– Environmental conditions during transportation: temperature: –20ºC to +60ºC(0 to 140ºF); relative humidity: 10% to 90%, non-condensing
Technical specifications
Type of screen: liquid crystalSupply: NiMH 3.6 V batteryExternal charger: 120 V/50 Hz or 220V /50 Hz input– 6V DC output
Warning: The charger should comply with the requirements of IEC 60950 standard
Area of application
Cutting instruments, manual or mechanical such as:Root canal files and broaches, manual or mechanical;Diamond burs, made of tungsten carbide, stainless steel or carbon steel;Reamers, drills;Condensation and filling instruments.Supports, kits and systems of instrumental organization.Hand instruments.
Exclusion
Paper points
Standard and Regulation References
ISO 9001, EN 46001, Quality SystemEuropean Medical device directive for CE marking, 93/42 EEC of 14th June 1993ISO 1942-3 Dental vocabularyISO/DIS 17664, Sterilization of medical devices.
Class II equipment Type BF applied part
Attention, consult accompanying documents
Direct current
Disinfection, cleaning and sterilization procedure for dentalinstruments and their supports
Foreword
For hygiene and sanitary safety purposes, all medical devices commercialised by DentsplyMaillefer owe to be disinfected, cleaned or yet sterilized before using them into the mouth.Some devices are considered as one usage instruments , anyhow they must follow thesame procedure.
9
H Maintenance of your Propex.
The device doesn’t contain user serviceable parts. The service and repair should be provi-ded by trained service personnel only.The equipment may be cleaned with a cloth impregnated with soap and water. Use of che-mical agents may cause damage to the equipment.The accessories (lip clip, connection hook) must be sterilized between treatments (by auto-clave at 134 °C). The measuring cable can’t be autoclaved.
I Guarantee
Propex is guaranteed for 24 months from the date of purchase. The accessories (cables,battery etc.) are guaranteed for 6 months.
The guarantee is valid for normal usage conditions. Any modification or accidental damagewill render the guarantee void.
J Technical Specifications
Propex complies to IEC60601-1 safety standard and the requirement of CE Marking ofConformity.

1110
Manual cleaning
Automatic CleaningSet the instruments inthe kit, and put themin: A) an ultrasonic washing device orB) a washingmachine.
Follow instructions and obs-erve concentrations given bythe manufacturer. After 5cycles, degradation of mar-king may appear. Do not clean the instrumentsin bulk with an ultrasonicdevice. Instruments in aluminium : Do not use caustic soda norsolutions with mercury saltnor acid (pH < 6) or alkaline(pH > 8) solutions. If dentine
tissues are not totally remo-ved, use an Air-Flow device.
Op
erat
ion
Op
erat
ing
mod
e
War
nin
g
Firs
t u
sag
e
Sec
ond
u
sag
e an
dfo
llow
ing
on
es
Op
erat
ion
Op
erat
ing
mod
e
War
nin
g
Firs
t u
sag
e
Sec
ond
u
sag
e an
dfo
llow
ing
on
es
2b.
XX
Inspection Sort out and controlthe instruments, dis-card those whichshow any deforma-tion, damage or markaffecting the resis-tance or performanceof the instrument.
4
X
Rinsing Rinse the instrumentsthoroughly with clean,demineralised or dis-tilled water and thendry them.
Instruments made of carbonsteel: Must be protected byan anticorrosion agent
3
XX
Sterilization Sterilize the instru-ments with their sup-port, protected fromthe environment ( inbags).
The instruments and theplastic supports may be steri-lized according to the packa-ging labelling. After 5 cycles,degradation on marking mayappear.
5
XX
with autoclave
124°C during 15 minat 2 bars or 134°Cduring 5 min at 3 bars
Avoid plastic devices whichare not resistant to a tempe-rature of 135°C.Instruments made of carbonsteel: Protect them with ananticorrosion agent.
6
XX
with hot air 180°C during 120 minat atmospheric pressure
Avoid plastic devices whichare not resistant to a conti-nuous temperature of 180°C
8XX
withChemiclave
132°C during 20 minat 2 bars, soak befo-rehand instruments onthe same solution ofChemiclave in orderto avoid any marks
Recommended technique forcarbon steel instruments.Avoid plastic devices whichare not resistant to a tempe-rature of 135°C
7
XX
DisinfectionDisinfection
Manual cleaning
Manually brush theinstruments in order toeliminate any dentinaldebris. Place them ina support or in a kit.
In the case any dentine tis-sues are still present on theinstrument, use an Air-Flow-device.
Soak all instrumentsin a disinfectant solu-tion and then discardbroken and bentinstruments.
Follow instructions and obs-erve concentrations given bythe manufacturer (an exces-sive concentration may causecracks on instruments).Observe time of immersion.Do not use products contai-ning Phenol.Instruments made of NiTi: Do not soak more than 5minutes in a solution ofNaOCI at more than 5%.
1
2a
X
X
Procedure

1312
Introduction
Félicitations pour l’acquisition de Propex, un localisateur d’apex précis et ergonomique quivous permettra de déterminer en quelques secondes votre exacte longueur de travail.Principe de la mesure Propex localise le foramen apical.
Indications
Propex est un appareil électronique utilisé pour déterminer la localisation de l’apex.
Contre indications
Dans le cas où un patient porte un pacemaker (ou tout autre type d’équipement électrique)et qu’il a été mis en garde contre l’utilisation d’appareils électriques (tels que rasoir élec-trique, sèche cheveux,…), il est recommandé de ne pas utiliser Propex.
Mises en Garde
Voir ci-dessus.
Precautions d’utilisation
Il convient d’être particulièrement attentif dans le cas de patients porteurs d’une couronneou d’un bridge en métal ; en effet, ceux ci peuvent créer des courts circuits et déteriorer lamesure.
● Pour que la mesure soit efficace, toujours s’assurer que le canal soit suffisamment humide.● L’instrument utilisé pour la mesure ne doit pas être en contact avec un autre instrument.● Ne pas exposer Propex à un quelconque liquide.● Propex doit être stocké dans des conditions normales de température (< 70°C) et d’humidité.● Ne pas utiliser en présence de produits inflammables.● Les dents à apex ouvert peuvent donner de mauvais résultats.
Connexion pour le câble de mesure
Contrôle su son
Marche/arrêt
Réactions adverses : Inconnues
A Contenu
Avant toute utilisation, nous vous invitons à vérifier le contenu précis de votre nouvel appa-reil:
– un localisateur d’apex Propex– un chargeur– un câble de mesure comprenant 2 clips à lèvre, 2 crochets de connexion, 2 griffes de connexion
B Rechargement de l’accumulateur
Votre Propex fonctionne avec une batterie rechargeable.
L’écran de Propex dispose d’un indicateur représentatif du niveau de charge de la batterie.Lorsque celui-ci clignote, vous de vez envisager de recharger l’accumulateur. Néanmoins,vous pouvez encore réaliser au moins 3 ou 4 traitements avant que le niveau de batterie nesoit trop faible.
Procédure pour recharger l’accumulateur:
1) Déconnecter le cable de mesure2) Connecter le cable du chargeur sur l’appareil (connection sur le côté droit de
votre Propex)3) Brancher le chargeur
Une diode jaune orange indique que le chargement est en cours.Une diode verte indique que le chargement est terminé.
Durée de chargement : 12 heures (24 heures après une longue période sans utilisation)
Nota: pendant le chargement, il n’est pas possible d’utiliser Propex.
C Mise en route
1) Déconnecter le chargeur de l’appareil2) Connecter le câble de mesure et allumer l'appareil3) Relier le clip à lèvre au patient4) Insérer la lime dans le canal 5) Connecter le crochet à la lime
Une diode verte (couplée à un signal acoustique de 2 bips) indique que Propex est prêt pourla mesure
Une diode jaune orange (et absence de signal sonore) indique une mauvaise connection.Vérifier vos connexions, nettoyer votre prise crochet ainsi que votre clip lèvre, humidifier lecanal si nécessaire et recommencer.
Aucun autre réglage spécifique n’est nécessaire avant de commencer la mesure, Propexfonctionne avec tous types de solutions canalaires.
Lors de la mise en marche et de l’arrêt de l’appareil, un bip court est émis.
1514
D Réglage du son
Propex est équipé d’un indicateur sonore qui vous permet de suivre la progression de lalime tout le long du canal.Cette fonction, doublée à l’affichage digital de la progression vous permet notamment detravailler en “aveugle” tout en suivant la progression de la lime.Vous pouvez régler le volume sonore suivant 4 niveaux : aucun, faible, normal et fort parappuis successifs sur la touche volume.
E Recherche de l’apex
1) Zone médianeFaire descendre lentement la lime dans le canal (un Bip long indique l’entrée de la lime dansle canal).Dans la zone pré apicale, Propex vous informe de la progresion par l’intermédiaire de 2 flè-ches. Une flèche vers le bas indique une progression de la lime vers le bas du canal. Uneflèche montante lorsque vous retirez l’instrument.
2) Zone Pré apicale (2 à 3 mm avant l’apex environ)
A l’approche de la zone, un avertissement sonore (2 bips)est émis dès que la lime pénètre dans une zone de 2 à 3mm de l’apex.
Sur l’écran 2 flèches horizontales clignotantes apparais-sent.
3) Zone apicale
La zone apicale est divisée en 10 segments gradués arbitrairement de 0.9 à 0.0 (Apex).
En parallèle de l’information visuelle, Propex vous informe de votre progression par unesérie de bip sonores progressifs.
Lorsque l’Apex est atteint, un son continu est émis.
Début de la zone apicale Milieu de la zone apicale Apex atteint

1716
4) Au delà de l’Apex:
Une diode rouge (doublée d’un signal sonore d’alerte) indique que vous avez dépassél’Apex.
F Arrêt de l’appareil
Propex s’arrête automatiquement après 5 minutes environ de non utilisation. Il est néan-moins conseillé d’arrêter manuellement votre appareil après la mesure par un simple appuisur la touche 0/I. Lors de l’arrêt de l’appareil, Propex emet un signal sonore (un bip).
G Précautions d’emploi
Nous déconseillons l’utilisation de Propex sur des patients munis de pace makers (ou d’au-tres appareils électroniques) pour des raisons de sécurité.
S’assurer qu’aucun court circuit n’altère les mesures, veiller particulièrement aux patientsmunis de couronnes ou ponts métalliques.
Un excès de liquide dans la cavité peu engendrer des erreurs de mesure.
S’assurer que la lime ne touche pas un autre instrument.
Ne pas exposer Propex à un liquide quel qu’il soit.
Propex doit être stocké dans des conditions normales de température (< 70°C) et d’hygro-métrie.
Ne pas utiliser en présence de produits inflammables.
Une mesure dans un canal à apex ouvert peut engendrer des résultats moins précis.
H Entretien de votre Propex.
L’appareil peut être nettoyé à d’un chiffon imprégné de savon et d’eau. L’emploi d’agentschimiques peut causer des dommages à l’appareil.Les accessoires (clip lèvre, câble avec pince crochet) doivent être stérilisés entre 2 traite-ments (par autoclave à 134 °C).La révision ou maintenance de l’appareil doit être effectué par une personne formée.Aucune pièce de rechange n’est incluse avec l’appareil.
I Garantie
Propex est garanti 24 mois à dater de la date d’acquisition. Les accessoires (câbles, batte-rie etc.) sont eux garantis 6 mois.
La garantie s’applique pour des conditions normales d’utilisation. Toute modification nonautorisée ou tout dommage par accident entraîne une suppression de la dite garantie.
J Caractéristiques Techniques
Propex est conforme à la norme IEC60601-1 ainsi qu’aux exigences du marquage CE.
Propex appartient à la catégorie des appareils médicaux suivante :
– fonctionnement sur batterie rechargeable (3,6 V NiMH)– appareil BF (basses fréquences)– ne pas utiliser en présence de mélange anesthésiant inflammable– fonctionnement en continu– non protégé contre les intrusions liquides– conditions de transport : température de –20°C à + 60 °C ; humidité relative de
10% à 90% sans condensation.
Caractéristiques techniques
– écran à cristaux liquides– batterie NiMH 3,6 V rechargeable– chargeur externe : 120 V / 50 Hz ou 220 V / 50 Hz en entrée – 6V DC en sortie
Attention: le chargeur doit être conforme avec les exigences de la norme IEC 60950.

19
K Symboles
Sur l’appareil, les symboles suivants apparaissent :
Class II Type basses fréquences
Attention, veuillez consulter les documents ci-joints
Courant direct
Procédé de désinfection, de nettoyage et de stérilisation desinstruments dentaires et supports y relatifs en cabinet
Préambule
Dans un but d’hygiène et de sûreté sanitaire, tous les instruments dentaires commercialiséspar Dentsply Maillefer doivent être désinfectés, nettoyés et stérilisés avant leur utilisation enbouche. Certains d’entre eux sont considérés comme instrument mono-usage, toutefois ilsdoivent suivre la même procédure.
Champ d’application.
Les instruments de coupe, manuels ou mécanisés, comme:les limes et broches dentaires, manuelles ou mécanisées;les fraises diamantées, en carbure de tungstène, en acier inoxydable ou en acier au car-bone;les alésoirs, mèches de forage.Les instruments d’obturation et de condensation.Les supports, kits et systèmes d’organisation instrumentale.Les instruments à main.
Exclusion.
Pointes de papier.
Références normatives et réglementaires.
ISO 9001, EN 46001, systèmes qualitésDirective européenne du marquage CE , 93/42 EEC du 14 juin 1993ISO/WD 21532, reprocessing dental devicesISO 1942-3, Vocabulaire dentaireISO/DIS 17664, Sterilization of medical devices
18
Instructions
Op
éra
tio
n
mo
de
op
éra
toir
e
Mis
e e
n g
ard
e
Pre
miè
reu
tili
sa
tio
nD
eu
xiè
me
uti
lis
ati
on
et
su
iva
nte
rs
1. Désinfection Eliminer lesinstruments cassés,tordus et les placerdans une solution dedésinfection.
Respecter les instructions et lesconcentrations fournies par lefabricant (une concentrationexcessive peut provoquer desfissures dna les matériaux).
Respecter les tempsd’immersion.
Ne pas utiliser des produitscontenant de phénol.
Instruments NTi :Ne pas plonger plus de 5 min.dans une solutions de NaOCL àplus de 5%
X
2a. Nettoyagemanuel
Brosser manuellementles instruments defaçon à éliminer lesdébris de bouesdentaires. Les placerdans un support oudans un kit.
Au cas où des tissus dentinairesseraient encore présents surl’instrument, utiliser un dispositifà air comprimé. X
2b. Nettoyageautomatique
Disposer lesinstruments dans un kitou un séquenceur. Lesplaces ensuite dans :
A) un dispositifde lavage auxultra-sonsou
B) une machine àlaver.
Respecter les instructions et lesconcentrations fournies par lefabricant de lessive.Après 5 cycles, desdégradations de marquagessont possibles.
Ne pas nettoyer lesinstruments en vrac avec undispositif ultra-sons.Instruments en aluminium :Ne pas utiliser de la soudecaustique, des solutions au sel demercure, des solutions acides(ph<6) ou alcalines(ph>8). Au casoù des tissus dentinaires seraientencore présents sur l’instrument,utiliser un dispositif à aircomprimé.
X X

212
3. Rinçage Rincer abondammentles instruments à l’eaudéminéralisée oudistillée puis les sécher.
Instruments en acier au carbone :Ils doivent être protégés par unagent anticorrosion. X X
4. Contrôle Trier et contrôler lesinstruments, éliminerceux qui présententdes déformations, desdommages ou desmarques pouvantaffecter la résistanceou la performance del’instrument
X
5. Stérilisation Stériliser lesinstruments sur leursupport, protégés deleur environnement (ensachet) et les placerdans le stérilisateur.
Les instruments ainsi que lessupports en plastique peuventêtre stérilisés ; se référer alors àleur emballage.Une dégradation du marquageou des manches plastiques peutintervenir après 5 cycles
X X
à l’autoclave 124°C durant 15 min à2 bars ou 134°Cdurant 5 min à 3 bars.
Eviter les dispositifs en plastiquequi ne résistent pas à unetempérature de 135° C.Instruments en acier aucarbone :les protéger par un agentanticorrosion.
X X
auchemiclave
132°C durant 20 min à2 bars,Tremper au préalableles instruments dans lamême solution duchemiclave afin d’évitertoutes taches.
Technique conseillée pour lesinstruments en acier au carbone.Eviter les dispositifs en plastiquequi ne résistent pas à unetempérature de 135°C.
X X
à l’air chaud 180°C durant 120 min àpressionatmosphérique
Eviter les dispositifs en plastiquequi ne résistent pas à unetempérature de 180°C encontinu.
X X
Einführung
Herzlichen Glückwunsch zum Kauf von ProPex, einem präzisen und ergonomischen ApexLocator, mit dem Sie in Sekundenschnelle die exakte Arbeitslänge bestimmen können.
Das ProPex-Gerät lokalisiert den Apex an der Zement-Dentin-Grenze (Foramen apicale).IndikationenProPex ist ein Apex Locator zur endometrischen Längenbestimmung.
Kontraindikationen
Wir raten davon ab, ProPex bei Patienten anzuwenden, die mit einem implantiertenHerzschrittmacher (oder einer anderen elektrischen Vorrichtung) ausgestattet sind und vordem Gebrauch elektrischer Kleingeräte (z.B. elektrische Rasierer, Haartrockner usw.)gewarnt wurden.
WarnhinweiseSiehe oben.
Vorsichtsmaßnahmen
Wir raten davon ab, ProPex bei Patienten anzuwenden, die mit einem implantiertenHerzschrittmacher (oder einer anderen elektrischen Vorrichtung) ausgestattet sind und vordem Gebrauch elektrischer Kleingeräte (z.B. elektrische Rasierer, Haartrockner usw.)gewarnt wurden.
Bei Patienten mit metallischen Restaurationen ist sehr sorgfältig darauf zu achten, dass dieMessung nicht durch Kurzschlüsse beeinträchtigt wird.
Anschluss für Messkabel
Einstellung des Tons
Ein-/Aus-Schalter
20

2322
● Darauf achten, dass der Wurzelkanal feucht genug ist, um eine verlässliche Messung zugewährleisten.
● Es ist sicherzustellen, dass die Feile kein anderes Instrument berührt.● Das ProPex-Gerät darf keinen Flüssigkeiten ausgesetzt werden.● ProPex ist unter normalen Temperatur- (< 70°C) und Feuchtigkeitsbedingungen zu lagern.● Nicht in Gegenwart entzündlicher Substanzen verwenden.● Messungen in Kanälen mit einem offenen Apex liefern unpräzise Ergebnisse.
Unerwünschte Wirkungen
Keine bekannt.
A Lieferumfang
Prüfen Sie bitte vor der Inbetriebnahme des neuen Geräts die Lieferung auf Vollständigkeit:
– ein ProPex Apex Locator
– ein Ladegerät
– ein Messkabel mit 2 Lippen-Clips, 2 Anschlusshaken und 2 Anschlussgabeln
B Aufladen des Akkus
Das ProPex-Gerät wird mit einem Akku geliefert.
Auf dem ProPex-Display sehen Sie eine Anzeige für den Ladezustand des Akkus. Wenndas Symbol blinkt, muss der Akku wieder aufgeladen werden. Es sind dann allerdings noch3 bis 4 Behandlungen möglich, bevor der Akku wirklich leer ist.
Vorgehen beim Aufladen des Akkus:
1) Messkabelstecker herausziehen.2) Kabel des Ladegeräts an ProPex anschließen (Anschluss auf der rechten Seite
desProPex-Geräts).3) Ladegerät an Stromnetz anschließen.
Ein orangefarbenes Licht zeigt an, dass der Akku gerade aufgeladen wird.Ein grünes Licht zeigt an, dass der Ladevorgang abgeschlossen ist.
Dauer des Ladevorgangs: 12 Stunden (bzw. 24 Stunden, wenn das Gerät längere Zeit nichtbenutzt wurde).
Hinweis: Während des Wiederaufladens kann ProPex nicht verwendet werden.
C Inbetriebnahme
1) Ladegerät von ProPex trennen, falls bereits angeschlossen. 2) Messkabel anschließen und ProPex einschalten.3) Lippen-Clip am Patienten anbringen.4) Feile in den Wurzelkanal einführen.5) Haken an die Feile anschließen.
Ein grünes Licht (zusammen mit 2 Signaltönen) zeigt an, dass ProPex betriebsbereit ist.Ein orangefarbenes Licht (ohne Signalton) zeigt eine fehlerhafte Verbindung an. Prüfen Siedie Anschlüsse, reinigen Sie Anschlusshaken und Lippen-Clip, feuchten Sie den Kanal an,falls nötig, und starten Sie nochmals.
Ansonsten sind vor Beginn des Messvorgangs keine speziellen Einstellungen erforderlich.ProPex ist mit allen Arten von Wurzelkanalinstrumenten verwendbar.
Beim Einschalten ertönt ein Signalton.
D Einstellung des Tons
ProPex gibt akustische Signale ab, mit deren Hilfe Sie die Bewegung der Feile im Kanalkontrollieren können.
Diese Funktion ermöglicht in Verbindung mit der digitalen Sichtanzeige der Bewegung ein«blindes» Arbeiten, bei dem die Position der Feile jederzeit mitverfolgt werden kann.
Die Lautstärke ist auf vier Stufen (stumm, niedrig, normal und hoch) einstellbar, und zwardurch sukzessives Drücken der Lautstärke-Taste. (Bild der Taste)
(Anzeige der verschiedenen Lautstärken einfügen)
E Auffinden des Apex
1) Mittlerer Bereich
Führen Sie die Feile langsam in den Kanal ein.
Im präapikalen Bereich zeigt ProPex die Bewegung des Instruments durch zwei vertikalePfeile an. Ein nach apikal gerichteter Pfeil erscheint, wenn die Feile in den Kanal eingeführtwird; ein nach koronal gerichteter Pfeil erscheint, wenn die Feile herausgezogen wird.

2524
3) Apikaler Bereich
Der apikale Bereich ist zur visuellen Kontrolle der Bewegung der Feile in 10 Segmenteunterteilt, die willkürlich von 0.9 bis 0.0 (Apex) durchnumeriert sind. Zusätzlich zurSichtanzeige informiert ProPex auch akustisch durch eine Reihe aufeinanderfolgenderSignaltöne über die Position des Instruments im Kanal.Bei Erreichen des Apex gibt das Gerät einen Dauerton ab.
4) Überschreitung des Apex
Ein rotes Licht (in Verbindung mit einem akustischen Warnsignal) zeigt an, dass Sie denApex überschritten haben.
Beginn des apikalen Bereichs Mitte des apikalen Bereichs Erreichen des Apex
2) Präapikaler Bereich (ca. 2 bis 3 mm vor dem Apex)
Wenn die Feile in einen 2 bis 3 mm vor dem Apex liegendenBereich gelangt, gibt ProPex ein akustisches Warnsignal ab(2 Signaltöne).
Auf dem Display erscheinen zwei blinkende horizontalePfeile.
F. Automatische Abschaltung
ProPex schaltet sich automatisch ab, wenn das Gerät länger als 5 Minuten nicht benutztwird. Es ist jedoch ratsam, das Gerät nach der Messung einfach durch Drücken der 0/I-Taste manuell abzuschalten.
G. Vorsichtsmaßnahmen● Aus Sicherheitsgründen raten wir davon ab, ProPex bei Patienten anzuwenden, die mit
einem Herzschrittmacher (oder einer anderen elektrischen Vorrichtung) ausgestattetsind.
● Bei Patienten mit metallischen Restaurationen ist sehr sorgfältig darauf zu achten, dassdie Messung nicht durch Kurzschlüsse beeinträchtigt wird.
● Übermäßige Flüssigkeitsmengen in der Kavität sind zu vermeiden, da dies ein Über-fließen und unkorrekte Messungen zur Folge haben kann.
● Es ist sicherzustellen, dass die Feile kein anderes Instrument berührt.● Das ProPex-Gerät darf keinen Flüssigkeiten ausgesetzt werden.● ProPex ist unter normalen Temperatur- (< 70°C) und Feuchtigkeitsbedingungen zu lagern.● Nicht in Gegenwart entzündlicher Substanzen verwenden.● Messungen in Kanälen mit einem offenen Apex können Ergebnisse von geringerer
Präzision liefern.

2726
J. Technische Merkmale
ProPex erfüllt den Sicherheitsstandard IEC 60601-1 und die Anforderungen für das CE-Konformitätskennzeichen.
Das elektronische Apex-Lokalisationsgerät ProPex gehört zur folgenden Kategorie vonMedizingeräten:
– Gerät mit interner Stromversorgung (NiMH-Akku, 3,6 V)
– Anwendungsteile vom Typ Niederfrequenz
– Nicht geeignet zur Anwendung in Gegenwart von entzündlichen Anästhetikum-Gemischen mit Luft oder mit Sauerstoff oder Distickstoffmonoxid
– Dauerbetrieb
– Kein Schutz gegen das Eindringen von Flüssigkeiten
– Umgebungsbedingungen beim Transport: Temperatur -20°C bis +60°C, relativeLuftfeuchtigkeit 10 % bis 90 %, nicht-kondensierend
Technische DatenArt der Sichtanzeige: FlüssigkristallStromversorgung: NiMH-Akku, 3,6 VExternes Ladegerät: Eingang 120 V / 50 Hz oder 220 V / 50 Hz – Ausgang 6 V Gleichstrom
Warnhinweis: Das Ladegerät sollte die Anforderungen des Standards IEC 60950 erfüllen.
H. Wartung des Geräts
Das Gerät enthält keine vom Benutzer zu wartenden Teile. Wartungs- undReparaturarbeiten sollten nur von qualifiziertem Servicepersonal durchgeführt werden.Das Gerät kann mit Wasser und Seife getränkten Tuch gereinigt werden. ChemischeReinigungsmittel können das Gerät beschädigen.Das Zubehör (Lippen-Clip, Anschlusshaken) muss zwischen den Behandlungen sterilisiertwerden (im Autoklav bei 134°C).Das Messkabel kann nicht autoklaviert werden.
I. Garantie
Für ProPex übernehmen wir eine 24-monatige Garantie ab dem Kaufdatum. Für dasZubehör (Kabel, Akku usw.) beträgt die Garantiefrist 6 Monate.
Die Garantie gilt für normale Verwendungsbedingungen. Bei unautorisierten Eingriffen oderZufallsschäden verliert die Garantie ihre Gültigkeit.
K. Standardsymbole
Auf dem Etikett des Geräts befinden sich die folgenden Standardsymbole:
Gerät der Schutzklasse II Anwendungsteil vom TypNiederfrequenz
Achtung, in Begleitdokumenten
Gleichstrom
Desinfektions-, Reinigungs- und Sterilisationsverfahren fürzahnärztliche Instrumente und Instrumentenständer
Vorbemerkung
Aus Gründen der Hygiene und der sanitären Sicherheit müssen alle von Dentsply Maillefervertriebenen Medizinprodukte vor der intraoralen Verwendung desinfiziert, gereinigt odersterilisiert werden. Auch die zur einmaligen Anwendung vorgesehenen Produkte sind,entsprechend guter zahnärztlicher Praxis, nach denselben Verfahren zu behandeln.
Anwendungsbereich
Schneidinstrumente, manuell oder maschinell, wie:Wurzelkanalfeilen und -nadeln, manuell oder maschinell;Diamantbohrer aus Hartmetall, Edelstahl oder Kohlenstoffstahl;Räumer, sonstige Bohrer;Kondensations- und Füllungsinstrumente.Instrumentenständer, Behältnisse und Organisationssysteme für diese Instrumente.Handinstrumente.
Ausnahmen
Papierspitzen.
Bezugnahme auf Normen und Vorschriften
ISO 9001, EN 46001, QualitätssicherungssystemEuropäische Richtlinie 93/42 EWG vom 14. Juni 1993 zur CE-Kennzeichnung vonMedizinproduktenISO/WD 21532, Wiederverarbeitung zahnärztlicher ProdukteISO 1942-3, Zahnärztliche TerminologieISO/DIS 17664, Sterilisation von Medizinprodukten

29
Vorg
ang
Ver
fah
ren
War
nh
inw
eis
Ers
ter
Geb
rau
ch
Zw
eite
r u
nd
w
eite
re
Geb
rau
ch
5XX
mitChemiklav
20 Min. bei 132°Cund 2 bar.Instrumente vorher inder Chemiklav-Lösung einweichen,um Flecken zu ver-meiden.
Empfohlene Technik fürInstrumente ausKohlenstoffstahl.Ungeeignet fürKunststoffteile, die einerTemperatur von 135°C nichtstandhalten.
XX
mit Heißluft 120 Min. bei 180°Cund normalemLuftdruck
Ungeeignet fürKunststoffteile, die einerTemperatur von 180°C nichtdauerhaft standhalten.
XX
mit Autoklav 15 Min. bei 124°Cund 2 bar oder5 Min. bei 134°C und 3 bar
Ungeeignet fürKunststoffteile, die einerTemperatur von 135°C nichtstandhalten.Instrumente ausKohlenstoffstahl:Müssen durchAntikorrosionsmittel ges-chützt werden.
XX
Kontrolle Instrumente sortierenund kontrollieren;Instrumente mitVerformungen,Beschädigungen oderanderweitigerMinderung derWiderstands- oderLeistungsfähigkeit ver-werfen.
4
X
28
Vorg
ang
Ver
fah
ren
War
nh
inw
eis
Ers
ter
Geb
rau
ch
Zw
eite
r u
nd
w
eite
re
Geb
rau
ch
Desinfektion
ManuelleReinigung
Instrumente von Handabbürsten, um anhaf-tende Dentinspäne zuentfernen. InInstrumentenständeroder Behältnis geben.
Schadhafte und ver-bogene Instrumenteverwerfen. FehlerfreieInstrumente inDesinfektionslösunggeben.
Anleitungen undKonzentrationsangaben desHerstellers einhalten (eine zuhohe Konzentration kann beiInstrumenten zu Rissbildungführen). Eintauchzeit beach-ten. Keine phenolhaltigenProdukte verwenden.NiTi-Instrumente:Nicht länger als 5 Min. inüber 5 %iger NaOCl-Lösungeinweichen.
1
2a
X
X
Vorgehensweise
Spülen Instrumente gründlichmit sauberem, vol-lentsalztem oder des-tilliertem Wasser spü-len und anschließendtrocknen.
Instrumente ausKohlenstoffstahl:Müssen durchAntikorrosionsmittel ges-chützt werden.
3XX
Automatische Reinigung
Instrumentensystemein zugehörigesBehältnis legen undmit diesem inA) Ultraschall-ReinigungsgerätoderB) Waschgerätgeben.
Anleitungen undKonzentrationsangaben desReinigungsmittel-Herstellerseinhalten. Nach 5 Zyklenkann dieKennzeichnungsqualitätgemindert sein. Instrumentenicht in großen Mengen mitUltraschall-Gerät reinigen.Aluminium-Instrumente:Natriumhydrooxid,Quecksilbersalz-Lösungen,sowie saure (PH < 6) oderalkalische (PH > 8) Lösungendürfen nicht verwendet wer-den.
2b.
XX
Instrumente und Plastik-Instrumentenständer könnengemäß den Angaben auf demVerpackungsetikett sterilisiertwerden. Nach 5 Zyklen kanndie Kennzeichnungsqualitätgemindert sein.
Instrumente mit ihrenInstrumentenständer,von der Umgebungabgeschlossen (inBeuteln), in dasSterilisationsgerätgeben.
Sterilisation

3130
IntroducciónFelicidades por elegir Propex, un localizador de ápice preciso y ergonómico, que permite determinar la longitud de trabajo exacta en segundos.
La medida del ápice se realiza en la unión cemento-dentinaria (foramen apical), con el loca-lizador de ápices Propex.
Indicaciones
Propex es un aparato electrónico para determinar la localización del ápice.ContraindicacionesEn caso de que el paciente sea portador de marcapasos (u otro equipamiento eléctrico) yhaya sido advertido de no usar pequeños aparatos eléctricos ( como máquinas de afeitar,secadores de pelo, etc.), se recomienda no usar el Propex.
Advertencias
Mirar arriba.
Precauciones
Para asegurarse que ningún cortocircuito alterará las mediciones, usarlo con cuidado enpacientes portadores de coronas o puentes metálicos.
● Asegurarse que el conducto esta suficientemente húmedo para que la medida sea fiable.● Asegurarse que la lima no toca otro instrumento.● No exponer el Propex a ningún líquido.
● Propex se debe guardar en condiciones de temperatura (< 70°C) y humedad normales.● No usarlo en presencia de productos inflamables.● Los dientes con ápices abiertos darán resultados imprecisos.
???
Control de sonido
Botòn encendido/apagado
Reacciones Adversas: ninguna conocida
A ContenidosAntes del uso, por favor comprobar todos los componentes del nuevo equipamiento:
– Un localizador de ápice Propex – Un cargador– Un cable de medida, incluidos 2 pinzas de labio, 2 ganchos de conexión y 2 horquillas
de conexión
B Recargando la bateríaEl Propex se distribuye con una batería recargable.
La pantalla del Propex tiene un indiador de carga de la batería. Cuando parpadea, es nece-sario recargar la batería. Sin embargo, aún es operativa para 3 ó 4 tratamientos antes deque la bateríase acabe completamente.
Procedimiento de recarga de la batería:
1) Desconectar el cable de medida2) Conectar el cargador al aparato (conexión en el lado derecho del Propex)3) Conectar el cargador a la red
Una luz amarilla-naranja indica que se está cargando.Una luz verde indica que la carga ha finalizado.La duración de carga es de 12 horas (24 horas si no se ha usado durante mucho tiempo).
Nota: Propex no se puede utilizar durante la carga.
C Comienzo
1) Desconectar el alimentador del dispositivo, si está conectado.2) Conectar el cable de medida y poner en marcha el dispositivo.3) Conectar la pinza de labio al paciente4) Insertar la lima en el canal5) Conectar el gancho a la lima
Una luz verde (a la vez que una señal auditiva de 2 “beep”) indica que el Propex está listopara usar.Una luz roja (sin sonido) indica error de conexión. Comprobar las conexiones, limpiar lapinza- electrodo y el clip de labio, humedecer el conducto si fuera necesario y empezar otrovez.
Ningún otro ajuste es necesario antes de empezar a medir. Propex funciona con todos lostipos de instrumentos y bajo cualquier situación del conducto.
Un «Bip» se escucha al encender el aparato.
D Ajuste de Sonido
Propex está equipado con un indicador sónico que permite monitorizar la progresión de lalima a lo largo del conducto.Esta función, junto con la pantalla digital de progresión, permite trabajar perfectamentemientras se monitoriza la progresión de la lima.Se puede ajustar el volumen entre cuatro niveles: mudo, bajo, normal y alto, presionandosucesivamente en el botón de volumen. El volumen seleccionado aparece en la pantalla.

3332
E Busqueda del Ápice
1) Zona MediaIntroducir lentamente la lima por el conducto.En la zona pre-apical, Propex indica la progresión de la lima mediante dos flechas vertica-les. Una flecha hacia bajo aparece cuando la lima desciende hacia el ápice, y una flechahacia arriba cuando se saca el instrumento.
2) Zona Pre-apical (approx. 2 a 3 mm antes del ápice)
Cuando la lima llega a 2-3 mm del ápice, Propex emiteun sonido audible (2 tonos).
En la pantalla, aparecen dos flechas horizontales inter-mitentes.
3) Zona Apical La zona apical se divide en 10 segmentos graduados arbitrariamente de 0.9 a 0.0 (ápice).A la vez que la información visual, Propex muestra información audible de la progresión dela lima por la emisión progresiva de varias series de “beeps”.
Cuando se alcanza el ápice, Propex emite un único sonido.
4) Si pasamos el ápice: una luz roja (a la vez que una señal acústica de alarma) indica quese ha traspasado el ápice.
Comienzo Zona Apical Mitad Zona Apical Ápice

3534
F Apagado Automático
Propex automáticamente se apaga después de 5 minutos de no uso. Es recomendable, sinembargo, apagarlo manualmente después del uso apretando el botón de encendido/apa-gado.
G Precauciones de Uso
Se recomienda no usarlo en pacientes portadores de marcapasos (u otro aparataje eléc-trico) por razones de seguridad.
Para asegurarse que no se producen corto-circuitos, utilizarlo con cuidado en pacientes concoronas y puentes.
Evitar excesiva cantidad de líquido dentro de la cámara pulpar para evitar desbordamientodel mismo y medidas incorrectas.
Asegurarse que la lima no toca otro instrumento.
No exponer el aparato a ningún líquido.
Propex se debe almacenar en condiciones de temperatura normal (< 70°C) y humedad.
No usarlo en presencia de productos inflamables.
Las mediciones en conductos con ápice abierto serán poco fiables.
H Mantenimiento del Propex.
El aparato no contiene componentes que pueda reparar el usuario. El servicio y reparaciónsólo lo puede realizar personal cualificado.
El equipo debe limpiarse con un trapo impregnado con agua y jabón. El uso de agentes quí-micos puede causar daños.
Loa accesorios (clip de labio, cable con pinza) se deben esterilizar entre tratamientos (auto-clave a 134 °C).
I Garantía
Propex está garantizado durante dos años desde la fecha de compra. Los accesorios(cables, batería, etc.) tienen una garantía de 6 meses.
La garantía es válida en condiciones normales de uso. Cualquier modificación no autori-zada o daño accidental invalidará la garantía.
Clase II Baja frecuencia
Advertencia! Consultor los documentos adjuntos
Coriente directa
J Especificaciones Técnicas
Propex cumple la IEC60601-1 estándar de seguridad y los requisitos de marcaje de confor-midad de la CE.
El localizador de ápice Propex pertenece a la siguiente categoría de equipos médicos:– Equipamiento potenciado internamente (batería de 3.6 V NiMH recargable)– Partes utilizadas tipo BF – No se puede usar en presencia de mezclas inflamables anestésicas con aire u
oxígeno u óxido nitroso– Operación continua– Introducción de líquidos – no protegido– Condiciones ambientales durante el transporte: temperatura: –20ºC a +60ºC(0 a 140ºF); humedad relativa: 10% a 90%, sin condensación
Especificaciones técnicas
Tipo de pantalla: cristal líquidoSuministro: batería de NiMH 3.6 V Cargador externo: 120 V/50 Hz o 220V /50 Hz entrada– 6V DC salidaPrecaución: El cargador debe cumplir los requisitros estándar IEC 60950
K Símbolos Estándar.
En la etiqueta del aparato aparecen los siguientes símbolos:
Técnica de desinfección, limpieza y esterilización para instrumental dental y sus soportes
IntroducciónPor imperativos de higiene y sanitarios, cualquier dispositivo médico que comercialiceDentsply Maillefer, precisa ser desinfectado, limpiado o incluso esterilizado antes de utili-zarlos en la cavidad bucal. Algunos de ellos, considerados como instrumental que no se vaa usar, también deben seguir el mismo proceso, según las normas de la buena práctica deldentista profesional.

3736
Área de aplicaciónInstrumentos cortantes, manuales o mecánicos como:Limas y fresas para el conducto radicular, manuales o mecánicos;Fresas diamantadas, de carburo de tungsteno, acero inoxidable o acero semiendurecido;Ensanchadores, taladros;Instrumental para condensación y relleno.Soportes, kits y sistemas de organización del instrumental.Instrumentos manuales.
Exclusión
Puntos de papel
Estándares y Referencias sobre Regulación
ISO 9001, EN 46001, Sistema de CalidadDirectiva Europea sobre Dispositivos Médicos para marcado CE, 93/42 EEC del 14 de juniode 1993ISO/WD 21532, Dispositivos de reconstrucción dentalISO 1942-3 Vocabulario DentalISO/DIS 17664, Esterilización de dispositivos médicos.
Op
erac
iòn
Mod
o d
e op
erar
Ad
vert
enci
a
Pri
mer
uso
Seg
un
do
uso
y
sig
uie
nte
s
Desinfección
Limpiezamanual
Cepille a mano elinstrumental para eli-minar cualquier restode dentina deposi-tada. Póngalo en unsoporte o en un kit.
Si aun quedan restos dedentina en el instrumental,utilice un dispositivo de airecomprimido
Sumerja el instrumen-tal en una solucióndesinfectante y, acontinuación, des-carte todo instru-mento roto o doblado.
Siga las instrucciones yrespete las concentracionesrecomendadas por el fabri-cante (concentraciones exce-sivas pueden dañar elequipo). Respete el tiempode inmersión. No use produc-tos con Fenol. Instrumentos fabricados conNiTi: No los sumerja más de5 minutos en una solución deNaOCI superior al 5%.
1
2a
X
X
Técnica
Op
erac
iòn
Mod
o d
e op
erar
Ad
vert
enci
a
Pri
mer
uso
Seg
un
do
uso
y
sig
uie
nte
s
Limpiezaautomática
Coloque el instrumen-tal en el kit, y a conti-nuación introdúzcalosen:A) Un aparato de lim-pieza por ultrasonidoso B) una lavadora.
Siga las instrucciones yrespete las concentracionesrecomendadas por el fabri-cante. Después de 5 ciclos,el marcado puede aparecerdegradado. No limpie el instrumental degolpe en un aparato de ultra-sonidos. Instrumental de aluminio: Nouse sosa cáustica ni solucio-nes con sales de mercurio niácidas (pH < 6) o alcalinas(pH > 8). Si no han desapa-recido totalmente los restosde dentina, utilice un disposi-tivo de aire comprimido
2b.
XX
Enjuagues Enjuague a fondo elinstrumental conagua limpia, desmine-ralizada o destilada yséquelos a continua-ción.
Instrumental de acerosemiendurecido: Debe prote-gerlo con un agente anticor-rosivo
3XX
Inspección Ordene y controle elinstrumental, des-carte todo el quemuestre alguna defor-mación, daño omarca que afecte laresistencia o el fun-cionamiento delinstrumento.
4
X
Esterilización Esterilice el instru-mental con sus sopor-tes, empaquetándolos(en bolsas).
El instrumental y los soportesde plástico pueden esterili-zarse según las instruccionesdel etiquetado presente en elenvase. Después de 5 ciclos,el marcado puede aparecerdegradado.
5X
3938
Op
erac
iòn
Mod
o d
e op
erar
Ad
vert
enci
a
Pri
mer
uso
Seg
un
do
uso
y
sig
uie
nte
s
conChemiclave
A 132° C durante 20m. a 2 bares, intro-duzca previamente elinstrumental en lamisma solución de laChemiclave para evi-tar las marcas
Técnica recomendada parainstrumental de carbono.Evite dispositivos de plásticoque no resistan temperaturasde 135° C
XX
con airecaliente
180° C durante 120m. a presión atmosfé-rica
Evite dispositivos de plásticoque no resistan temperaturasde 180° C
XX
con autoclave
A 124° C durante 15 m. a 2 bares o a134° C durante 5 m. a 3 bares
Evite dispositivos de plásticoque no resistan temperaturasde 135° C.Instrumental de carbonosemiendurecido: Protéjalocon un agente anticorrosivo.
XX
IntroduzioneCongratulazioni per avere acquistato Propex, un localizzatore d’apice che è precisoed ergonomico, e che vi permetterà di determinare l’esatta lunghezza di lavoro in pochisecondi.
La misurazione dell'apice viene eseguita nella giunzione cementodentale (forame apicale)mediante il localizzatore d'apice Propex.IndicazioniPropex è un dispositivo elettronico usato per determinare la posizione dell’apice.ControindicazioniSi raccomanda di non usare il Propex nel caso in cui un paziente sia portatore di un pace-maker cardiaco artificiale (o di altri apparecchi elettrici) e debba quindi evitare, secondoparere medico, l’uso di piccoli elettrodomestici (come rasoi elettrici, asciugacapelli, ecc.).
Avvertenze
Vedi sopra.
Precauzioni
Si raccomanda di non usare il Propex nel caso in cui un paziente sia portatore di un pace-maker cardiaco artificiale (o di altri apparecchi elettrici) e debba quindi evitare, secondoparere medico, l’uso di piccoli elettrodomestici (come rasoi elettrici, asciugacapelli, ecc.).Per evitare che un corto circuito possa invalidare le misurazioni, si raccomanda particolareattenzione su pazienti con corone o ponti metallici.● Per ottenere misurazioni attendibili, assicurarsi che il canale sia ben irrigato.● Assicurarsi che lo strumento non venga a contatto con altri strumenti.● Propex non deve venire a contatto con liquidi di nessun tipo.● Propex deve essere mantenuto in condizioni normali di temperatura (< 70°C) e di umidità.● Non usare in presenza di prodotti infiammabili.● Su denti con apici aperti i risultati ottenuti saranno imprecisi.
Anschluss für Messkabel
Einstellung des Tons
Ein-/Aus-Schalter

4140
Reazioni allergiche: nessuna nota
A Contenuto
Prima dell’uso, si prega di controllare l’esatto contenuto del nuovo apparecchio:– un localizzatore d’apice Propex– un caricabatterie– un cavo di misurazione, completo di un clip buccale, 2 ganci di connessione e 2
forcelle di connessione.
B Ricaricare la batteria
Il Propex viene fornito con una batteria ricaricabile.
Lo schermo Propex ha una spia che mostra il livello di carica della batteria. Quando questalampeggia, la batteria ha bisogno di essere ricaricata. Comunque, potete essere ancora ingrado di portare a termine almeno dai 3 ai 4 trattamenti prima che si scarichi del tutto la bat-teria.
Procedura per ricaricare la batteria:1. Scollegare il cavo di misurazione2. Collegare il cavo di ricarica all’apparecchio (sul lato destro del Propex)3. Collegare il caricabatterie alla rete (corrente elettrica)
Una luce arancione indica che la batteria viene caricata.Una luce verde indica che la batteria ha finito la ricarica.
Durata della carica: 12 ore (24 ore dopo lunghi periodi di inattività).
Attenzione: non si può usare Propex quando è in carica.
C Avvio
1) Scollegare il caricabatterie dall’apparecchio se collegato2) Collegare il cavo di misurazione sulla parte anteriore del Propex e avviare l’apparecchio3) Attaccare il clip buccale al paziente 4) Inserire la lima nel canale5) Collegare il gancio alla lima
Una luce verde (accompagnata da un segnale di 2 beeps) indica che il Propex è pronto peressere usato.Una spia rossa (senza alcun segnale acustico) indica una connessione errata. Controllate ivostri collegamenti, pulite la vostra spina a gancio e la clip buccale, inumidite il canale senecessario e ricominciate.
Non si richiede un’altra regolazione specifica prima di cominciare la misurazione. Propexlavora con tutti i tipi di strumenti canalari.
All’accensione dello strumento verrà emesso un segnale acustico.
D Regolazione del suono
Propex è provvisto di un segnale acustico che permette di monitorare l’avanzamento dellalima all'interno del canale.
Questa funzione, insieme al display digitale, consente di lavorare “ad occhi chiusi” mentreviene ancora monitorato l’avanzamento della lima.
Potete regolare il volume ad uno dei quattro livelli: muto, basso, normale ed alto, con pres-sioni successive sul tasto del volume xxxx (simbolo del tasto). Il volume corrente viene indi-cato sullo schermo.
E Ricerca dell’apice
1) Zona mediale
Introdurre lentamente la lima dentro il canale.Nella zona pre-apicale, Propex indica l’avanzamento della lima per mezzo di due frecce ver-ticali. Una freccia discendente appare quando la lima ridiscende dentro il canale ed unafreccia ascendente quando si ritira lo strumento.
4342
4) Oltre l’apice: una luce rossa (insieme ad un segnale acustico di avviso)
Idica che avete oltrepassato l’apice.
F Spegnimento automaticoPropex si spegne automaticamente dopo 5 minuti di inattività. È comunque consigliabilespegnere manualmente l'apparecchio dopo l’utilizzo semplicemente premendo il tasto 0/I.
G Precauzioni per l’uso
● Per ragioni di sicurezza sconsigliamo l’uso di Propex su pazienti portatori di pacemakers(o altri apparecchi elettrici) .
● Per assicurare che non si verifichino dei corto circuiti, fare particolare attenzione a pazienticon corone metalliche o ponti.
● Evitare l’eccesso di introduzione di liquidi all’interno della cavità dentale per prevenire mis-urazioni scorrette.
● Assicurarsi che la lima non tocchi altri strumenti.
● Non esporre Propex a liquidi.
● Propex deve essere conservato a temperature (<70°C) e condizioni di umidità normali.
● Non usare in presenza di prodotti infiammabili.
● Se si dovessero fare misurazioni dei canali con apici aperti risulterebbero inprecise.
2) Zona pre-apicale (circa 2/3 mm dall’apice)
Propex avverte con 2 bips quando la lima raggiunge un’area a 2 - 3 mm dall’apice.Sullo schermo lampeggiano due frecce orizzontali.
3) Zona apicale
La zona apicale è divisa in 10 segmenti graduati arbitrariamente da 0.9 a 0.0 (apice) come infor-mazione visiva dell'avanzamento della lima. Insieme alla visualizzazione, Propex emette un'infor-mazione sonora dell'avanzamento della lima per mezzo di una serie di beeps progressivi.
Quando si raggiunge l’apice, Propex emette un tono continuo.
Avvio zona apicale Centro della zona apicale Apice raggiunto

4544
H Manutenzione del Propex
L'apparecchio non contiene parti richiedenti interventi di manutenzione da parte dell'utente.La manutenzione e la riparazione dovrebbero essere eseguite solo da personale di assis-tenza tecnica qualificato.L’apparecchio può essere pulito con un panno imbevuto in acqua e sapone.L’uso di agenti chimici può danneggiare l’apparecchio.
Gli accessori (clip buccale, cavo con gancio) devono essere sterilizzati tra un trattamentoed un altro (in autoclave a 134°C). Il cavo di misurazione non si può trattare in autoclave.
I GaranziaPropex ha una garanzia di 24 mesi dalla data di acquisto. Gli accessori (cavetti, batterieetc.) hanno una garanzia di 6 mesi.La garanzia vale per una utilizzazione normale. Tutte modifiche non autorizzate o danni perincidente implicano l'annullamento della garanzia.
J Caratteristiche tecniche
Propex è conforme alle direttive standard di sicurezza CEI 60601-1 e ai requisiti imposti dalmarchio di conformità CE.
Propex localizzatore elettronico appartiene alle seguenti categorie di apparecchi medici:– Apparecchio con alimentazione interna (batteria ricaricabile 3.6 V NiMH)
– Apparecchio BF (basse frequenze)
– Non adatto all’uso in presenza di miscele anestetiche infiammabili con aria o conossigeno o ossido di azoto
– Funzionamento continuo
– Non protetto dall'ingresso di liquidi
– Condizioni ambientali durante il trasporto: temperatura: da -20°C a +60°C;
umidità relativa: dal 10 al 90%, non condensante
Caratteristiche tecniche:
Tipo di schermo: a cristalli liquidi
Alimentazione: batteria NiMH 3.6V ricaricabile
Caricabatterie: 120V/50 Hz o 220V/50 Hz in entrata, 6V DC in uscita
Avvertenza: il caricabatterie deve essere conforme alle direttive standard CEI 60950
K Simboli standardSull’etichetta dell’apparecchio appaiono i seguenti simboli standard:
Procedimento di disinfezione e sterilizzazione per gli strumenti odontoiatrici ed i loro supporti
Premessa Ai fini dell’igiene e della sicurezza sanitaria, tutti i dispositivi medici commercializzati daDenstply Maillefer devono essere disinfettati, puliti o anche sterilizzati prima di essere uti-lizzati. Alcuni di loro sono considerati strumenti monouso che devono seguire la stessa pro-cedura, secondo un esercizio corretto della professione dentistica.
Area di applicazione
Strumenti taglienti, manuali o meccanici come :Lime e brocce per canali radicolari, manuali o meccaniche;Frese diamantate, in carburo di tungsteno, acciaio inossidabile o acciaio al carbonio;Reamer, trapani;Strumenti di condensazione e otturazione.
Supporti, kit e sistemi di organizzazione strumentale.Strumenti manuali.
Eccezioni
Punte di carta
Riferimenti Normativi e Regolamentari
ISO 9001, EN 46001, Sistema QualitàDirettiva Europea sui dispositivi medici per la marchiatura CE, 93/42 EEC del 14 giugno1993ISO/WD 21532, Trattamento dei dispositivi odontoiatriciISO 1942-3 Vocabolario odontoiatrico ISO/DIS 17664, Sterilizzazione dei dispositivi medici.
Clase II Tipo BF (basse frequenze)
Attenzione: leggere il libretto di istruzioni
Corrente continua

4746
Op
eraz
ion
e
Mod
alit
à op
erat
iva
Avv
erte
nza
Pri
mo
uti
lizzo
Sec
ond
o u
tiliz
zo
e se
gu
enti
Ispezione Riordinare e control-lare gli strumenti, get-tare quelli che mos-trano deformazioni,danni o segni chepossono influenzarela resistenza o leprestazione dellostrumento
4
X
Sterilizzazione Sterilizzare gli stru-menti con il loro sup-porto, protetti dall’am-biente (in sacchetti)
Gli strumenti ed i supporti inplastica possono essere ste-rilizzati secondo quanto indi-cato sull’etichetta dell’imballo.Dopo 5 cicli può apparire undeterioramento della marca-tura.
5
XX
con autoclave
124°C per 15 min a 2 bar o 134°C per 5 min a 3 bar
Evitare dispositivi in plasticache non resistono a tempera-ture di 135°C.Strumenti in acciaio al carbonio:Proteggerli con un anticorro-sivo.
XX
XconChemiclave
132°C per 20 min a 2bar, immergere primagli strumenti nellastessa soluzione diChemiclave in mododa evitare qualsiasisegno
Tecnica consigliata per glistrumenti in acciaio al carbo-nio che non resistono a tem-perature di 135°C
X
Xcon ariacalda
180°C per 120 min apressione atmosferica
Evitate dispositivi in plasticache non resistono a tempera-ture continue di 180°C
X
Op
eraz
ion
e
Mod
alit
à op
erat
iva
Avv
erte
nza
Pri
mo
uti
lizzo
Sec
ond
o u
tiliz
zo
e se
gu
enti
Disinfezione Immergere tutti glistrumenti in una solu-zione disinfettate epoi gettare gli stru-menti rotti e piegati
Seguire le istruzioni e rispet-tare le concentrazioni fornitedal fabbricante (una concen-trazione eccessiva può pro-vocare cricche sugli stru-menti). Rispettare i tempi diimmersione. Non usare pro-dotti che contengono Fenolo. Strumenti in NiTi: Non immergere per più di 5minuti in una soluzione diNaOCI a più del 5%.
1a.
X
Puliziamanuale
Spazzolare a manogli strumenti per eli-minare qualsiasiframmento di mate-riale dentinale. Porlisu un supporto o inun kit.
Nel caso in cui fosse ancorapresente del tessuto denti-nale sullo strumento, utiliz-zare un dispositivo a gettod’aria
2a.
X
PuliziaAutomatica
Collocare gli stru-menti nel kit, e porliin: A) un dispositivo dilavaggio agli ultra-suoni oppure B) una lavatrice.
Seguire le istruzioni e rispet-tare le concentrazioni indi-cate dal fabbricante. Dopo 5cicli, può apparire un deterio-ramento della marcatura.Non pulire gli strumenti allarinfusa con un dispositivo agliultrasuoni . Strumenti in alluminio: Non usare soda caustica, nésoluzioni con sale di mercurioo soluzioni acide (pH < 6) oalcaline(pH > 8). Se il tessuto denti-
nale non è stato completa-mente rimosso, utilizzare undispositivo a getto d’aria.
2b.
XX
XRisciacquo Sciacquare accurata-
mente gli strumenticon acqua pulita,demineralizzata o dis-tillata e poi asciugarli.
Strumenti in acciaio al carbo-nio: Devono essere protetticon un anticorrosivo
3X

ISO 3483 8 (( aa)a
European Mandatory :Dentsply France SAS
17, rue Michel FaradayF-78180 Montigny le Bretonneux