men’s briefs - pdf pattern - learn to sew at home · 2017-12-21 · symbols and pattern lines as...
TRANSCRIPT

To make your own Men’s Briefs you will need:
0.4m Cotton fabric (150cm wide)1cm elastic (2x Legs)4cm elastic (1x waist)
Instructions:
Print off pattern pieces and join as per enclosed instructions.
Cut out of main fabric:1x Back on fold2x Crotch1x Elastic binding
Men’s Briefs - PDF Pattern- Size 4-22
Comfortable with good sizing is achieved by using a two way stretch fabric.
ALL seams are sewn with Ball Point Needles and are 6mm unless indicated.
An overlocker is recommended, but not essential to put together.
(c) J
oAnn
e Adr
ian
jo ‘n
’ sew
(c) J
oAnn
e Adr
ian
jo ‘n
’ sew
PDF Sewing Patterns
(c) JoAnne Adrian 2017Director: Jo ‘n’ Sew Learn to Sew at Home
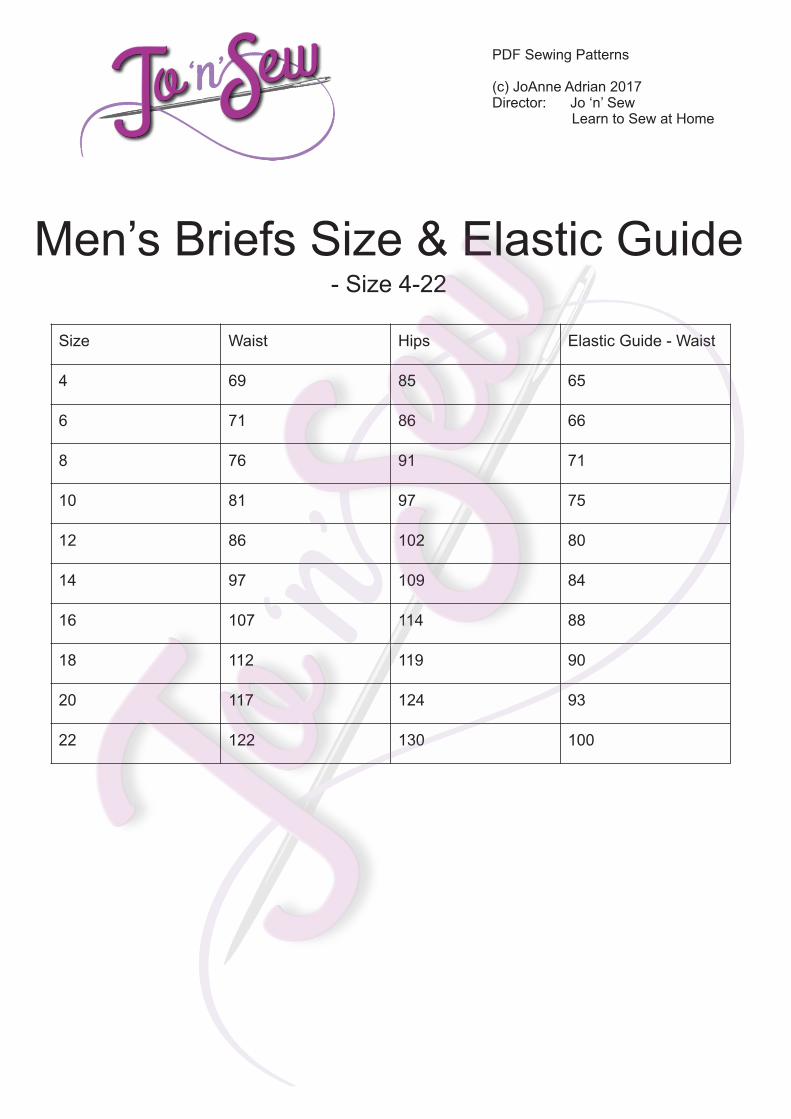
Men’s Briefs Size & Elastic Guide- Size 4-22
Size Waist Hips Elastic Guide - Waist
4 69 85 65
6 71 86 66
8 76 91 71
10 81 97 75
12 86 102 80
14 97 109 84
16 107 114 88
18 112 119 90
20 117 124 93
22 122 130 100
PDF Sewing Patterns
(c) JoAnne Adrian 2017Director: Jo ‘n’ Sew Learn to Sew at Home

How to Assemble a PDF Sewing Pattern Print using A4 Paper
Printer settings: Confirm that your settings are set at 100% scale/size or “Actual size” DO NOT resize, zoom, fit to page or adjust to paper size
Always print a test page: Find the page with the test Square and print to confirm sizing, by measuring the square, BEFORE printing the entire pattern. IF, for some reason your test square is too small or too big, THEN, you can adjust the scale (99% or 101%) until the correct size is achieved. Remembering - you can save on paper by printing the pattern pieces only and viewing the instructions online.
Assembling the PDF Pattern Following the enclosed diagram of the pattern layout, fold or cut the pages using the symbols and pattern lines as guides. Tape together to form pattern pieces. Once your pattern is assembles, either trace or cut your pieces, noting that you can reprint your pattern at anytime, once saved you your computer.
1" Test Square
Men’s Briefs - PDF Assembly- Size 4-22
PDF Sewing Patterns
(c) JoAnne Adrian 2017Director: Jo ‘n’ Sew Learn to Sew at Home

Men’s Briefs - Instructions- Size 4-22
Fabric - Right Side
Fabric - Wrong Side
Elastic - Right Side
Elastic- Wrong Side
Although an overlocker is recommended, it not essential to put together.
If you are not using an overlocker, finish off the seams as follows:
Followed by a 6mm seam using your smallest zigzag to prevent your seam breaking
Using a full width zigzag stitch right on the edge of the fabric joining seams together.
v
v
v
v
v v v v
Start by folding pouch in half, RST (right sides together), pin and sew with a 6mm seam.
Do this for both pouch pieces.
Pin right side of the pouch to the right side of the briefs at the crotch seam and baste with a zigzag stitch.
Fold pouches, and stitch with RST.
Attach pouch to the frontcrotch seam of briefs andbaste with zigzag only.
PDF Sewing Patterns
(c) JoAnne Adrian 2017Director: Jo ‘n’ Sew Learn to Sew at Home

Pin the right side of the other pouch to the wrong side of the briefs at the crotch seam and stitch, encasing the front crotch edge between them.
Attach sides seam notch to Pouch notch, enclosing the entire briefs between the two seams.
Pin wrong side of briefs to the right side of one of the pouch pieces matching the notches and stitch using a 6mm seam.
Pin right side of briefs to right side of the other pouch piece with the entire fabric enclosed in the centre to avoid catching any of the garment in the seam as you do so.
Match notches Pin and stitch to enclose the seam in the Pouch
After stitching both sides of the Pouch to the side seam, turn through to the right side of the briefs to attach the elastic.
Attaching the Leg Binding
Measure and cut 2 x 1cm elastic for legs and 1 x 2cm elastic for waist band, using the attached guide.
Pin the elastic to the wrong side of the binding and sew using a zigzag along the edge of the elastic without stretching, making sure the elastic is the same length as the binding.
Stitch the two ends of the binding together to form a loop.
Elastic
Zigzag elastic to edge of fabric band Join the two ends with RST
Fabric Band
Fabric Band
Men’s Briefs - Instructions- Size 4-22 Cont.,
PDF Sewing Patterns
(c) JoAnne Adrian 2017Director: Jo ‘n’ Sew Learn to Sew at Home

Divide leg opening into fourths with pins.
Divide the binding into fourths with pins.
Attach to the right side of the binding to the wrong side of the leg opening and stitch.
Divide leg opening into fourths with pins.
Match pins to attach binding to leg opening
Fold the elastic to the wrong side of the binding and bring the wrapped elastic over the right side of the briefs.
Top stitch from the right side, with a zigzag, twin needles or cover stitch.
1 2 3
4 5
Wrong side Right side Right side
Right sideRight side
Men’s Briefs - Instructions- Size 4-22 Cont.,
PDF Sewing Patterns
(c) JoAnne Adrian 2017Director: Jo ‘n’ Sew Learn to Sew at Home

Attach Elastic at the Waist
Stitch the ends of the elastic with RST, 6mm from the edge, to form a loop.
Open the seam allowance and top stitch each side.
Stitch ends with 6mm seam to form loop
Open seam allowance, top stitch each side
6mm guide seam Match elastic seam with centre back
Divide elastic into fourths with pins.
Sew a guide seam around the waist 6mm from the edge of the seam.
Divide the waist into fourths with pins.
Pin the wrong side of the elastic to the right side of the briefs along the guide seam, matching pins, and aligning the elastic seam with the centre back.
Sew using a zigzag stitch, twin needles or coverstich, along the bottom, edge of the elastic, stretching it between the pins.
Men’s Briefs - Instructions- Size 4-22 Cont.,
PDF Sewing Patterns
(c) JoAnne Adrian 2017Director: Jo ‘n’ Sew Learn to Sew at Home

PLA
CE
ON
FO
LD
4 6 810121416182022
MensBriefsBACKCut 1
A
PDF Sewing Patterns
(c) JoAnne Adrian 2017Director: Jo ‘n’ Sew Learn to Sew at Home

4 6 8 10
A B
PDF Sewing Patterns
(c) JoAnne Adrian 2017Director: Jo ‘n’ Sew Learn to Sew at Home
PDF Sewing Patterns
(c) JoAnne Adrian 2017Director: Jo ‘n’ Sew Learn to Sew at Home

STRAIGHT GRAIN
Me
ns
Brie
fsL
EG
BIN
DIN
GC
ut 2
14 16 18 20 22
B
PD
F S
ew
ing
Pa
tte
rns
(c)
JoA
nn
e A
dria
n 2
01
7D
ire
cto
r:
Jo ‘n
’ Se
w
L
ea
rn t
o S
ew
at
Ho
me
PD
F S
ew
ing
Pa
tte
rns
(c)
JoA
nn
e A
dria
n 2
01
7D
ire
cto
r:
Jo ‘n
’ Se
w
L
ea
rn t
o S
ew
at
Ho
me

4
6
8
10
12
14
16
18
20
22
APDF Sewing Patterns
(c) JoAnne Adrian 2017Director: Jo ‘n’ Sew Learn to Sew at Home

46
8
101
2141
618202
2
A BP
DF
Se
win
g P
atte
rns
(c) JoA
nn
e A
dria
n 2
01
7D
irecto
r: Jo ‘n
’ Se
w L
ea
rn to
Se
w a
t Ho
me

Mens
Brie
fsP
OU
CH
Cut 2
222018161
41210864
46
810
12
14
16
18
20
22
B