manual de instrucciones instruction manual ventilador ... · no conectar el motor del ventilador a...
TRANSCRIPT

MANUAL DE INSTRUCCIONES – INSTRUCTION MANUAL
VENTILADOR TECHO 130CM – 52” CEILIGN FAN
65W
REF IMP50250BH
230V 50Hz
Lote/Lot: 1122-2016 Año/Year: 2016
LEA Y GUARDE ESTAS INSTRUCCIONES - ATENCION: EL GANCHO DE SOPORTE PARA TECHO NO ESTA
INCLUIDO EN LA COMPRA DE ESTE VENTILADOR
READ AND SAVE THESE INSTRUCTIONS - WARNING: CEILING HOOK HANGER IS NOT INCLUDED IN
THIS PRODUCT

SEGURIDAD
Lea todas las instrucciones con cuidado aunque esté familiarizado con este aparato.
Para reducir el riesgo de incendio, choque eléctrico y / o lesiones, debe tener en cuenta las siguientes
precauciones básicas de seguridad:
1. El ventilador debe ser instalado por un electricista cualificado de acuerdo con las normas locales,
regionales y estatales de electricidad. Cualquier modificación o adición del circuito eléctrico de la
salsa donde se instalará el ventilador, debe ser certificado por un eléctrico con autorización
administrativa.
2. El ventilador debe estar conectado a un suministro eléctrico de 230 V CA 50Hz.
3. Todo trabajo eléctrico debe llevarse a cabo tras desconectar la corriente eléctrica retirando los
fusibles o apagando el interruptor.
4. El ventilador debe estar conectado a tierra.
5. El ventilador debe instalarse de modo que las aspas estén al menos 2.3metres por encima del suelo.
6. El ventilador debe colgarse de una estructura capaz de soportar un peso de al menos 45 kg. La
fijación debe ser capaz de soportar el peso del ventilador en movimiento y no debe bambolear o
soltarse.
7. Asegúrese de que en el lugar de instalación las aspas no entren en contacto con cualquier objeto.
Dejar siempre un espacio libre mínimo de 150 mm (6 ") de la punta de las aspas a la pared o el techo.
Tenga en cuenta que cuanto mayor sea este espacio mejor será el flujo de aire del ventilador.
8. No usar en un espacio abierto ni donde pueda ser expuesto al agua o la humedad.
9. No conectar el motor del ventilador a un regulador de intensidad. Podría dar un rendimiento
insatisfactorio (zumbido del motor) y causar daños al motor.
10. Los niños menores de 3 años deben mantenerse fuera del alcance del aparato a menos que sean
continuamente supervisados.
Los niños desde 3 años y menores de 8 años deben sólo encender/apagar el aparato siempre que éste
haya sido colocado o instalado en su posición de funcionamiento normal previstas que sean
supervisados o hayan recibido instrucciones relativas al uso del aparato de una forma segura y
entiendan los riesgos que el aparato tiene. Los niños desde 3 años y menores de 8 años no deben
enchufar, regular y limpiar el aparato o realizar operaciones de mantenimiento.
Este aparato pueden utilizarlo niños con edad de 8 años y superior y personas con capacidades físicas,
sensoriales o mentales reducidas o falta de experiencia y conocimiento, si se les ha dado la
supervisión o formación apropiados respecto al uso del aparato de una manera segura y comprenden
los peligros que implica. La limpieza y el mantenimiento por el usuario no deben realizarlos los niños
sin supervisión.
11. No deje que nadie juegue con este aparato.
12. El ventilador no puede ponerse en marcha en una habitación con un aparato de gas en
funcionamiento al mismo tiempo.
13. Antes e invertir la dirección del giro de las aspas parar el ventilador por completo. Esto evitará

cualquier daño en el motor del ventilador o el controlador (si está instalada).
14. No introduzca ningún objeto en las aspas del ventilador mientras están girando. Esto puede
dañarlas y alterar el equilibrio del ventilador hasta tumbarlo.
15. Después de que el ventilador esté completamente instalado asegúrese de que todas las fijaciones
están bien sujetas para evitar cualquier tambaleo o caída de la máquina.
16. Debido al movimiento natural del ventilador, algunas conexiones podrías aflojarse. Comprobar las
conexiones de soporte, los agarres y las aspas dos veces al año para asegurarse de que siguen siendo
seguras. Apretar si están flojos.
17. Este producto presenta sujetacables tipo “Y”. Si el cordón de alimentación está dañado, este debe
ser reemplazado por el fabricante o su agente de servicio o por personal calificado para evitar el
riesgo.
18. Con el fin de evitar peligro, toda reparación del aparato debe ser realizada por un servicio técnico
profesional. Nunca por usted mismo.
19. Antes de acceder a los bornes todos los circuitos de alimentación deben estar desconectados.
20. Limpiar con un paño seco humedecido en agua y jabón. Secar bien. Desenchufar de la corriente
antes de limpiar. No permita que entre agua en el interior.
MONTAJE

Sacar el ventilador cuidadosamente de la caja y retirar todas las piezas y componentes.
Colocar todo sobre un paño o una superficie suave para evitar daños. No sacar el motor de la carcasa
porque podría dañarse.
Antes de comenzar la instalación, comprobar que todas las piezas estén incluidas. Nota: Mire bien
dentro del material de embalaje de espuma para asegurarse de que no quedado ningún componente.
INSTALACION Y MONTAJE
Antes de instalar el ventilador asegurarse que el aparato está desenchufado de la corriente eléctrica.
1. DONDE INSTALAR
1.1 Asegurarse que el lugar de instalación no permitirá que las aspas en rotación entren en contacto
con cualquier objeto y de que hay un espacio libre mínimo de 150 mm (6 ") desde la punta de la aspa
hasta la pared o el techo. Cuanto mayor sea este espacio mejor flujo de aire del ventilador.
1.2 No colocar en un espacio abierto, n donde haya exposición al agua y la humedad.
1.3 Si la ubicación elegida no tiene una viga de soporte adecuado capaz de 45Kg de soporte, instalar
un soporte de 2"x4" entre las vigas del techo como medio de soporte.
1.4 Asegure el soporte para colgar a la vigueta de techo u otra
estructura adecuada que sea capaz de cargar al menos 45Kg, con
los dos tornillos de fijación largos incluidos. Asegúrese de que al
menos 30 mm del tornillo se enroscan en el soporte.
Nota: Los tornillos de fijación incluidos están diseñados para su
uso con el ventilador y ser fijados en vigas de madera. Para el
resto de superficies, utilizar tornillos de fijación adicionales y
adecuados (estos tornillos no se suministran con este equipo).
2. MONTAJE ASPAS
2.1 Retire los tornillos de la bolsa de accesorios.
2.2 Inserte las aspas a través de las ranuras de alrededor del motor. Alinear las aspas con los dos
agujeros y apretar con los dos tornillos suministrados. La aspa está diseñada para ajustarse
perfectamente. Los tornillos deben estar en vertical respecto a la aspa.
2.3 Ajustar todos los tornillos a las aspas (6 en total) uniformemente para evitar el balanceo del
ventilador.

3. INSTALACIÓN VENTILADOR
Colocar el ventilador ensamblado en el soporte asegurando las conexiones eléctricas.
4. AJUSTE CAMPANA
Montar la campana en el soporte alineando con los tornillos y apretar.
CONEXIONES ELECTRICAS
Para su facilidad el ventilador se suministra con las conexiones eléctricas interiores ya realizada.
El voltaje y la corriente del motor son 75W/0.31A
COLOCACION BOMBILLA
El ventilador utiliza una bombilla E27 de 1x60W. No se incluye en el pack de compra.
Cuando se coloque la bombilla asegurarse que no toca al vidrio ni al soporte de la lámpara.
CAMBIO GIRO ASPAS
Para que las aspas giren hacia delante o hacia atrás colocar el botón de giro en posición de verano
(summer) o invierno (winter). En la función verano el ventilador gira en sentido horario y el aire se
distribuye por la parte inferior del ventilador. En la función invierno el ventilador gira en sentido
sentido inverso a las agujas del reloj y el aire se distribuye por la parte superior del ventilador.

LIMPIEZA Y MANTENIMIENTO
Periódicamente hacer una limpieza general del ventilador pasando un trapo suave humedecido en
agua y jabón (no usar detergentes líquidos agresivos). Antes de limpiar desenchufar el ventilador de la
corriente eléctrica.
No aplicar agua sobre el ventilador. Podría producirse un corto circuito.
El motor se suministra lubricado. Es un motor de libre mantenimiento.
MANDO A DISTANCIA
Para hacer funcionar apunte siempre con el mando a distancia hacia el ventilador.
OFF: Ventilador parado.
HI: Ventilador girando a la máxima velocidad.
MED: Ventilador girando a la velocidad media.
LOW: Ventilador girando a la mínima velocidad.
LIGHT ON / OFF: Presione y suelte para encender o apagar la luz.
1H: Configuración para que el ventilador se apague automáticamente tras una hora de
funcionamiento.
2H: Configuración para que el ventilador se apague automáticamente tras dos horas de
funcionamiento.
4H: Configuración para que el ventilador se apague automáticamente tras tres horas de
funcionamiento.
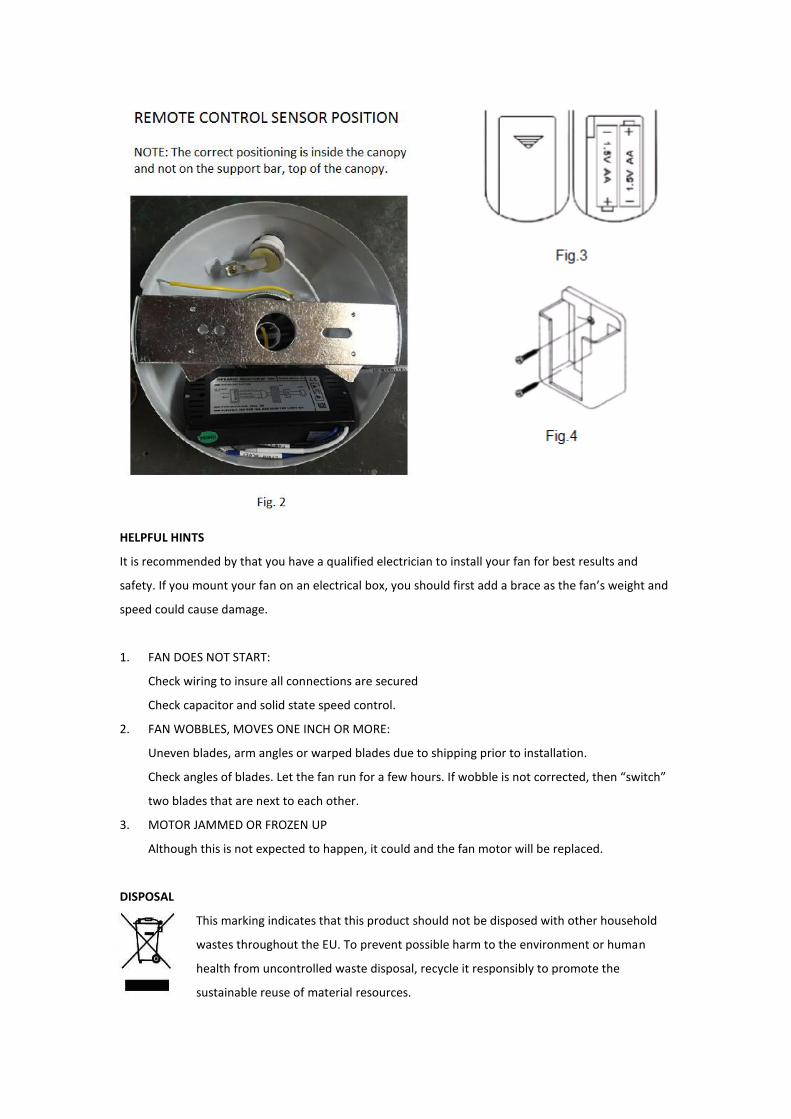
INSTALACIÓN DEL EMISOR-RECEPTOR MANDO DISTANCIA
PRECAUCION: La conexión de cable incorrecto podría dañar el receptor.
1. Instalar el receptor del control remoto en el interior de la copa superior.
2. Conectar los cables del control remoto con los del ventilador y la corriente tal.
3. Para cambiar las pilas del mando a distancia hay que deslizar la cubierta situada en la parte
posterior hacia abajo presionando sobre las flechas marcadas. Colocar dos pilas de 1,5V AA (Fig. 3). Si
desea puede instalar el soporte para mando a distancia en la pared mediante tornillos (Fig.4)


CONSEJOS ÚTILES
Para un mejor resultado y mayor seguridad se recomienda que la instalación y colocación del
ventilador sea realizada por un electricista. Si piensa colgarlo en una caja eléctrica previamente
realice pruebas peso para asegurar la velocidad y la resistencia.
Si el ventilador gira a una velocidad lenta se produce un leve sonido debido a la condensación por la
baja potencia de vatios.
1. EL VENTILADOR NO ARRANCA:
Revise el cableado para asegurar que todas las conexiones están aseguradas
Compruebe el capacitador y el control de velocidad.
2. EL VENTILADOR TAMBALEA:
Las aspas son desiguales. El ángulo es incorrecto debido al montaje.
Compruebe los ángulos de las hojas. Deje funcionar el ventilador durante un par de horas. Si la
oscilación no se corrige, a continuación, "cambiar" dos hojas que están al lado una de la otra.
3. MOTOR ATASCADO O FRIO:
Aunque esto no se espera que suceda llegado el caso hay que sustituir el motor.
MEDIO AMBIENTE
No tire aparatos eléctricos en la basura doméstica. Utilice instalaciones de recogida
selectiva. Infórmese en su ayuntamiento para obtener más información. Si los
aparatos eléctricos se depositan en vertederos los componentes peligrosos pueden
filtrarse en las aguas subterráneas y entrar en la cadena alimentaria, dañando su
salud y bienestar.
SAFEGUARDS
Read all instructions carefully, even if you feel you are quite familiar with this type of appliance.
When using electrical appliances, in order to reduce the risk of fire, electric shock, and/or injury,
these basic safety precautions should always be followed:
1. This appliance must be installed by a Qualified Electrical Contractor in accordance with the local
regulations, and all local, state and national electrical codes. Any alterations or additions to building
wiring must be completed by a licensed electrical mechanic, or person authorized by legislation to
work on the fixed wiring of any electrical installation.
2. The ceiling fan must be connected to a 230V AC 50Hz power supply.
3. All electrical work must only be undertaken after disconnection of the power by removing fuses or
turning off the circuit breaker, to ensure all pole isolation of the electrical supply.
4. The fan must be earthed.
5. The fan must be installed so that the blades are at least 2.3metres above the floor.
6. The structure that the ceiling fan is connected to must be capable of supporting a weight of at least
45kg. The fixing must be able to support the moving weight of the fan and must not twist or work
loose.
7. Make sure that the installation site will not allow the rotating fan blades to come into contact with
any object and that there is a minimum clearance of 150mm (6”) from the blade tip to the wall or
ceiling. Please note that the bigger this clearance is the better the airflow from your fan will be.
8. Do not use outdoors. Installing the fan in a position where it could be exposed to water or moisture
is dangerous.
9. Do not connect the fan motor to a dimmer switch. This may give an unsatisfactory performance
(motor hum) and cause damage to the motor.
10. Children of less than 3 years should be kept away unless continuously supervised.
Children aged from 3 years and less than 8 years shall only switch on/off the appliance provided that
it has been placed or installed in its intended normal operating position and they have been given
supervision or instruction concerning use of the appliance in a safe way and understand the hazards
involved. Children aged from 3 years and less than 8 years shall not plug in, regulate and clean the
appliance or perform user maintenance.
This appliance can be used by children aged from 8 years and above and persons with reduced
physical, sensory or mental capabilities or lack of experience and knowledge if they have been given
supervision or instruction concerning use of the appliance in a safe way and understand the hazards
involved. Children shall not play with the appliance.
Cleaning and user maintenance shall not be made by children without supervision.
11. Young children should be supervised to ensure that they do not play with the appliance.
12. It is not recommended that ceiling fans and gas appliances be operated in the same room at the
same time.
13. The fan must be turned off and stopped completely before reversing the fan direction. This will

prevent any damage to the motor of the fan or controller (if installed).
14. Do not insert anything into the fan blades whilst they are spinning. This will damage the blades
and upset the balance of the fan causing the unit to wobble.
15. After the fan is completely installed make sure that all base and fan blade fixings are secured and
tightened to prevent any problems.
16. Because of the fan’s natural movement, some connections may loosen. Check the support
connections, brackets and blade attachments twice a year to make sure they remain secured. If any
are loose, tighten.
17. This product has tie type "Y". If the cord is damaged, it must be replaced by the manufacturer or
its service agent or qualified personnel to avoid risk.
18. Danger: You should not repair the appliance by yourself. It must be done just by qualified
specialists. Only original spare parts may be used for repair.
19. To unplug before to touch the sockets.
20. Wipe with a dry cloth moistened with soap and water. Dry thoroughly. Unplug the power before
cleaning. Do not allow water inside.
REPARATION

Unpack your ceiling fan carefully, then remove all parts and components, and lay on a cloth or soft
surface to avoid damage. Do not lay the motor housing on its side, the housing may get damaged.
Before commencing installation, check that all parts are included. NB: You may need to remove all
foam packaging material to ensure there are no missing components
INSTALLATION AND ASSEMBLY
Before installing the fan make sure you have turned OFF the electricity supply.
1. SELECTING A LOCATION
1.1 Make sure that the installation site will not allow the rotating fan blades to come into contact with
any object and that there is a minimum clearance of 150mm (6”) from the blade tip to the wall or
ceiling. Please note that the bigger this clearance is the better the airflow from your fan will be.
1.2 DO NOT use outdoors. Installing the fan in a position where it could be exposed to water or
moisture is dangerous.
1.3 If the location you have chosen does not have a suitable support beam capable of supporting 45Kg,
install a brace 2” x 4” between the ceiling joists as a support medium.
1.4 Secure the hanging bracket to the ceiling joist or suitable
structure that is capable of carrying a load of at least 45Kg,
with the two long fixing screws provided. Ensure that at least
30mm of the screw is threaded into the support.
NB: The fixing screws included are designed for use when
ceiling fan is secured onto timber joists. For all other surfaces,
additional and suitable fixing screws for that surface will need
to be purchased.
2. BLADE ATTACHMENT
2.1 Take out the screws from the accessory bag.
2.2 Insert the blade through the slots around the motor. Align the blade with the two holes and
secure blade by tightening the two screws provided. The blade is designed to fit snugly; the screws
should be vertical to the blade.
2.3 Tighten all blade screws (6 in total provided) evenly and securely to ensure quiet, wobble free
operation of the fan.

3. MOUNTING THE FAN
3.1 Place the assembled fan into the bracket and make the wiring connection
4 FITTING THE CANOPY
4.1 Place the canopy over the bracket, align the canopy holes with the screws and tighten.
ELECTRICAL CONNECTIONS
For your convenience, and to assist in easy installation & cleaning, the ceiling fan is connected
The wattage and the current of the motor is 75W/0.31A
INSTALLING GLOBES
The ceiling fan can used with E27 globe Max 1x60W. No included whith the selling pack.
Ensure the selected globes do not touch each other, the diffuser glass or the lampholder plate.
REVERSE SWITCH
The “Summer / Winter” reverse switch should be in the forward position to make the fan rotate in an
counter-clockwise direction during summer and air fresh moves down. In winter, this switch should
be reversed and air fresh moves up, so that the blades now move in a clockwise direction . Check the
label on Reverse Switch.

CARE & CLEANING
Periodic cleaning of your ceiling fan is the only maintenance required.
Use a soft brush or lint free cloth to avoid scratching the finish. Please turn off electricity when you do
so.
Do not use water when cleaning your ceiling fan. It could damage the motor or the plastic blades and
create the possibility of an electrical shock.
The motor has a permanently lubricated ball bearing, and as such is maintenance free.
Functions Transmitter
When you would like to operate ceiling fan by remote controller, you
should the transmitter pointing to I. R. Sensor
OFF: Turn off ceiling fan.
HI: Turn on ceiling fan at high speed.
MED: Turn on ceiling fan at medium speed.
LOW: Turn on ceiling fan at low speed.
LIGHT: ON/OFF-Press and release immediately to turn on or off the
light
1H: Setting up that the ceiling fan will off power after 1 hours
automatically
2H: Setting up that the ceiling fan will off power after 2 hours automatically
4H: Setting up that the ceiling fan will off power after 4 hours automatically
INSTALLATION INSTRUCTIONS
CAUTION: Incorrect wire connection would damage this receiver.
1. Ceiling fan must be set at High speed by pulling the “Pull Switch” after installation.
2. For fans that are not drop rod style (i.e. Flush Mount styles) the appropriate conversion kit
should be used. The fan should be installed and hanging from the ceiling.
3. Make the wiring connection as shown in Fig.1.1.IR senor must be stuck outside canopy.

4. Once the connection has been made, the receiver inserts into the drop rod hanging bracket. The
canopy comes up to cover the receiver and bracket.
5. To change the batteries is to open the battery housing cover by sliding out the cover downward
to the arrow shown direction while pressing down the cover with thumb.(1.5V/AA.2pcs) (Fig.3)
holder for transmitter: if desired, install onto the wall with screws. (Fig.4)
HELPFUL HINTS
It is recommended by that you have a qualified electrician to install your fan for best results and
safety. If you mount your fan on an electrical box, you should first add a brace as the fan’s weight and
speed could cause damage.
1. FAN DOES NOT START:
Check wiring to insure all connections are secured
Check capacitor and solid state speed control.
2. FAN WOBBLES, MOVES ONE INCH OR MORE:
Uneven blades, arm angles or warped blades due to shipping prior to installation.
Check angles of blades. Let the fan run for a few hours. If wobble is not corrected, then “switch”
two blades that are next to each other.
3. MOTOR JAMMED OR FROZEN UP
Although this is not expected to happen, it could and the fan motor will be replaced.
DISPOSAL
This marking indicates that this product should not be disposed with other household
wastes throughout the EU. To prevent possible harm to the environment or human
health from uncontrolled waste disposal, recycle it responsibly to promote the
sustainable reuse of material resources.