insideview installation guide for sap crmdocshare02.docshare.tips/files/19004/190045371.pdf ·...
TRANSCRIPT

InsideView Installation Guide for SAP CRM
This guide helps you install InsideView for SAP CRM on your SAP CRM 7.0 server.
The installation process involves the following steps:
1. Installing InsideView as an Add-On
2. Configuring InsdieView as an Add-On
3. Embedding InsideView in your SAP CRM objects (Accounts, Contacts, Leads, and Opportunities)
Installation Pre-requisites Before you start the installation process, you must ensure you have the following:
InsideView installation package (.SAR file) from your Administrator
Administrator login to install and Developer login to embed InsideView for Enhanced Account, Lead, and
Opportunities applications.
SAP CRM version 7.0, with Support Package 8 and SPAM level 33 and above.
Your Developer access key to SAP CRM.
Installing InsideView as an Add-On Installing InsideView as an Add-On comprises three procedures:
Install InsideView as an Add-On
Install Support Packages for InsideView upgrades
Generate Package Code
Install InsideView as an Add-On Important: You must be an SAP CRM administrator to install InsideView as an add-on.
The following procedure describes how to install the InsideView add-on package in your SAP CRM.
1. Log in to Client 000 in your SAP CRM as an Administrator.
2. Execute transaction /nSAINT.
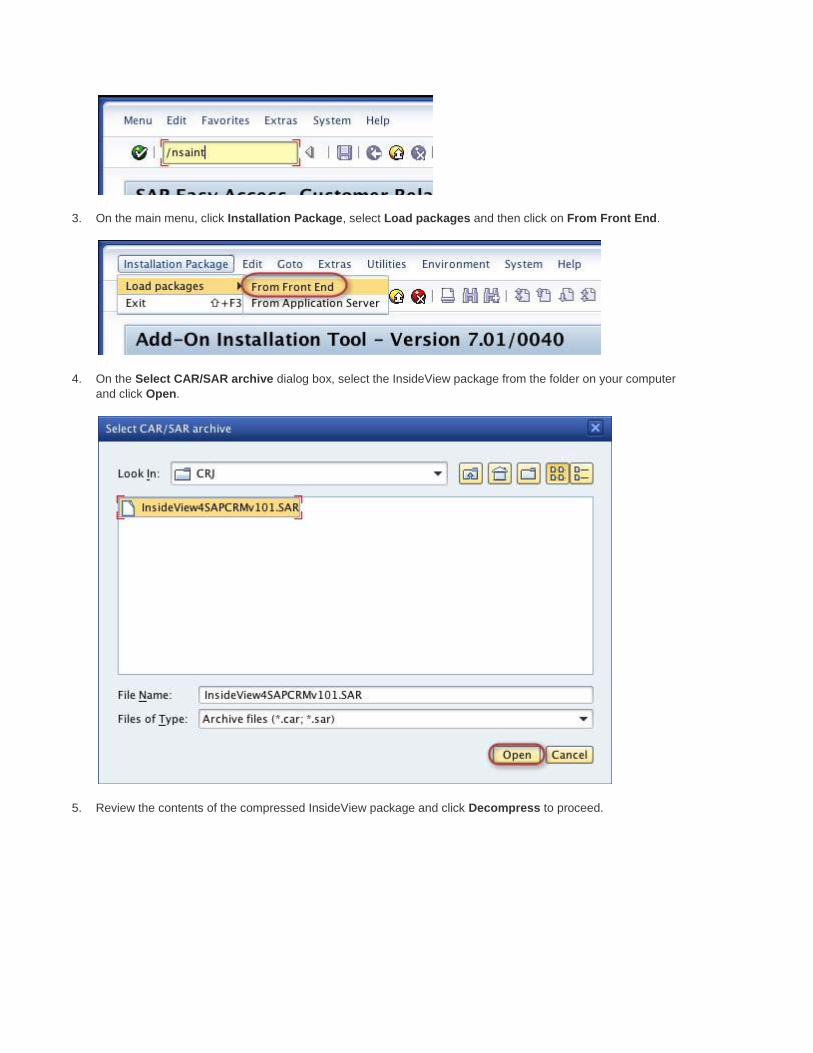
3. On the main menu, click Installation Package, select Load packages and then click on From Front End.
4. On the Select CAR/SAR archive dialog box, select the InsideView package from the folder on your computer
and click Open.
5. Review the contents of the compressed InsideView package and click Decompress to proceed.

This process takes a while to complete.
6. When the files decompression is complete, click Environment on the main menu and select Add-on Manager
for EBP/CRM.
7. The CRM Add-on Manager tool starts. Click Continue.

8. SAP detects the InsideView package and lists it under Add-on Package. Click on the package to select it and
then click Continue.

9. You can choose to install this package in dialog or batch from the Start Options. By default, the package installs
in dialog. Click Enter to start installation.

This process takes a while to complete.
10. Review the steps performed during the installation and their results and click Continue to proceed.

11. Once the support package is successfully installed, click Complete to finish.

Install Support Packages Important: You must login as Administrator in client 000 to execute these steps.
Install Support Packages to automatically upgrade InsideView to the latest version.
To install support packages, follow the steps below.
1. Execute transaction /nSPAM.
2. From the Environment menu, select Support Package Manager for EBP/CRM.

3. The CRM Support Package Manager starts. Click Continue.
4. From the Software Components list select INVIEW and click Continue.
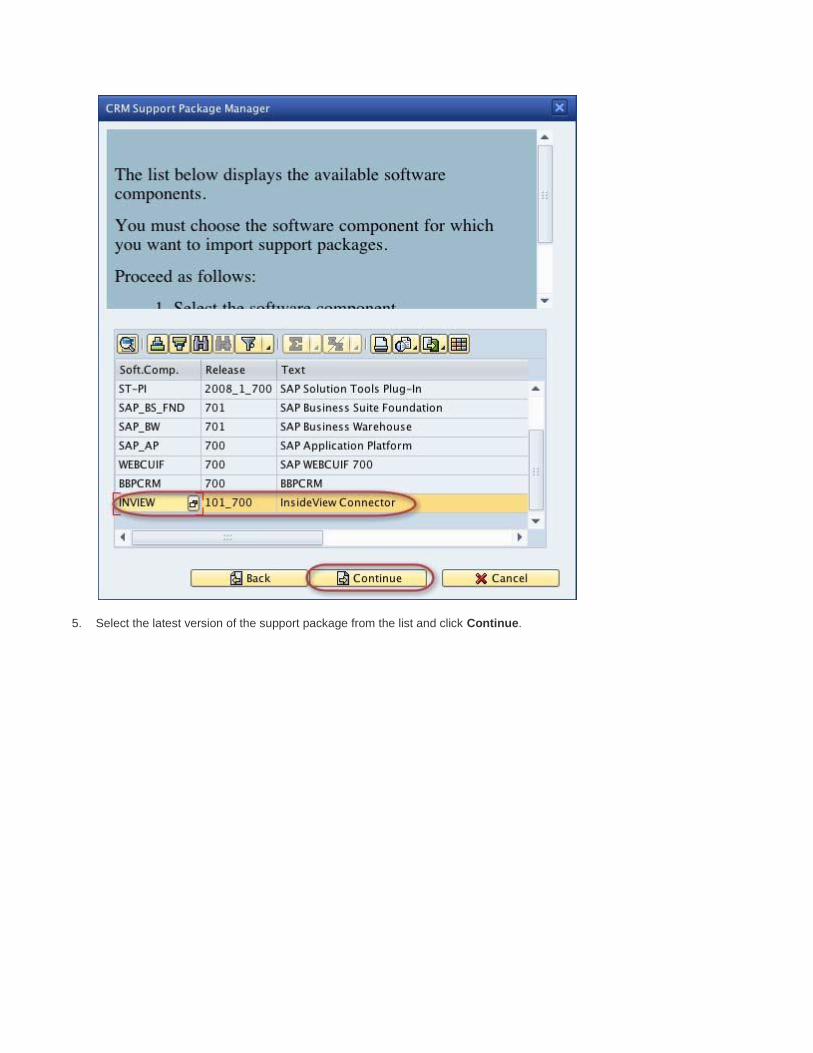
5. Select the latest version of the support package from the list and click Continue.

6. A list of packages dependent on the selected support package is displayed. Click Continue.

7. You can choose to install this package in dialog or batch from the Start Options. By default, the package installs
in dialog. Click Enter to start installation.

8. Review the steps performed during the installation and their results. Click Continue to proceed.
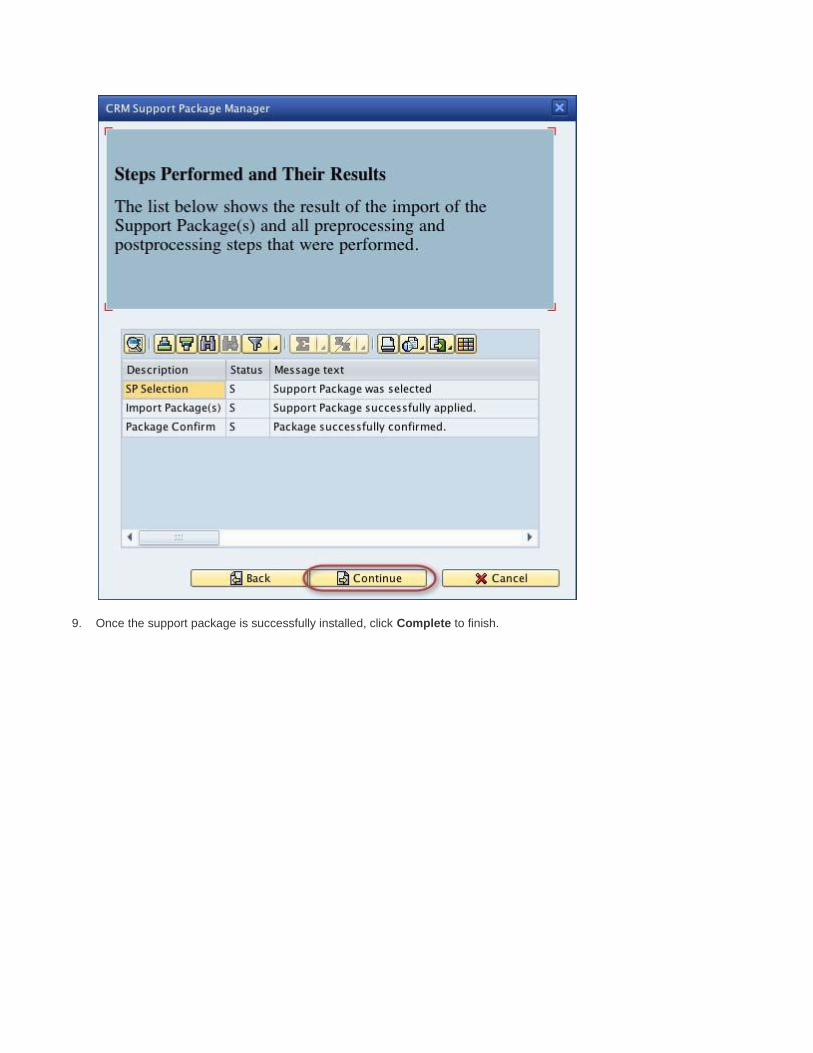
9. Once the support package is successfully installed, click Complete to finish.

This process will take a while to complete.
Generate Package Code
When the source code in the package is accessed the first time, it takes a while to compile resulting in your session
timing out. To avoid this, you can generate and pre-compile the source code by performing the following steps.
Important: You must login as Administrator in client 000 to execute these steps.
1. Execute transaction /nSGEN.
2. Select Generate All Objects of Selected Software Components and click Continue.

3. Select software component INVIEW from the list and click Continue.

4. If you use multiple servers, select the server where you want to execute the package code generation from
the list and click Continue.

This process will take a while to complete.
5. The Job Monitor starts defining all objects that need to be generated. Once this is done, you can either:
Start the job directly by clicking Start Job Directly. (Recommended)
Schedule the job for another day and time.

1. The SAP Load Generator - Job Monitor displays the progress. This process takes a while to complete.
ClickRefresh to refresh the current status of code generation.
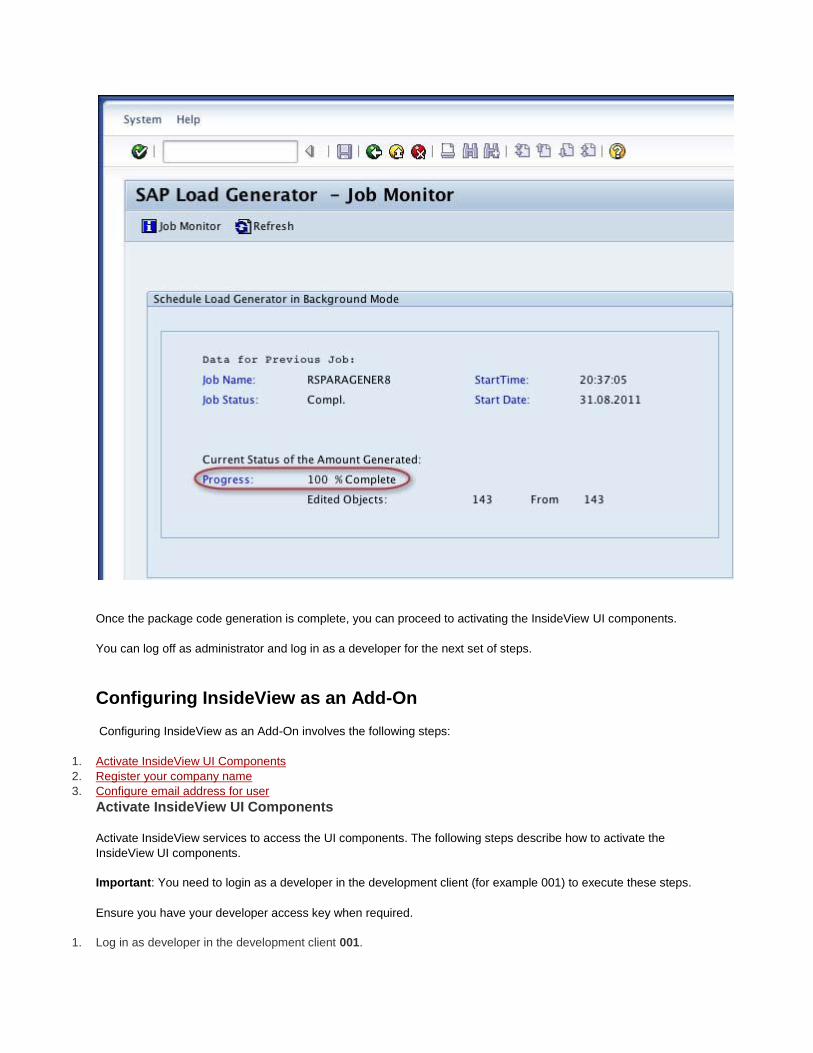
Once the package code generation is complete, you can proceed to activating the InsideView UI components.
You can log off as administrator and log in as a developer for the next set of steps.
Configuring InsideView as an Add-On
Configuring InsideView as an Add-On involves the following steps:
1. Activate InsideView UI Components
2. Register your company name
3. Configure email address for user
Activate InsideView UI Components
Activate InsideView services to access the UI components. The following steps describe how to activate the
InsideView UI components.
Important: You need to login as a developer in the development client (for example 001) to execute these steps.
Ensure you have your developer access key when required.
1. Log in as developer in the development client 001.

2. Execute transaction /nSICF.
3. On the Maintain Services form, select Service in the Hierarchy Typebox.
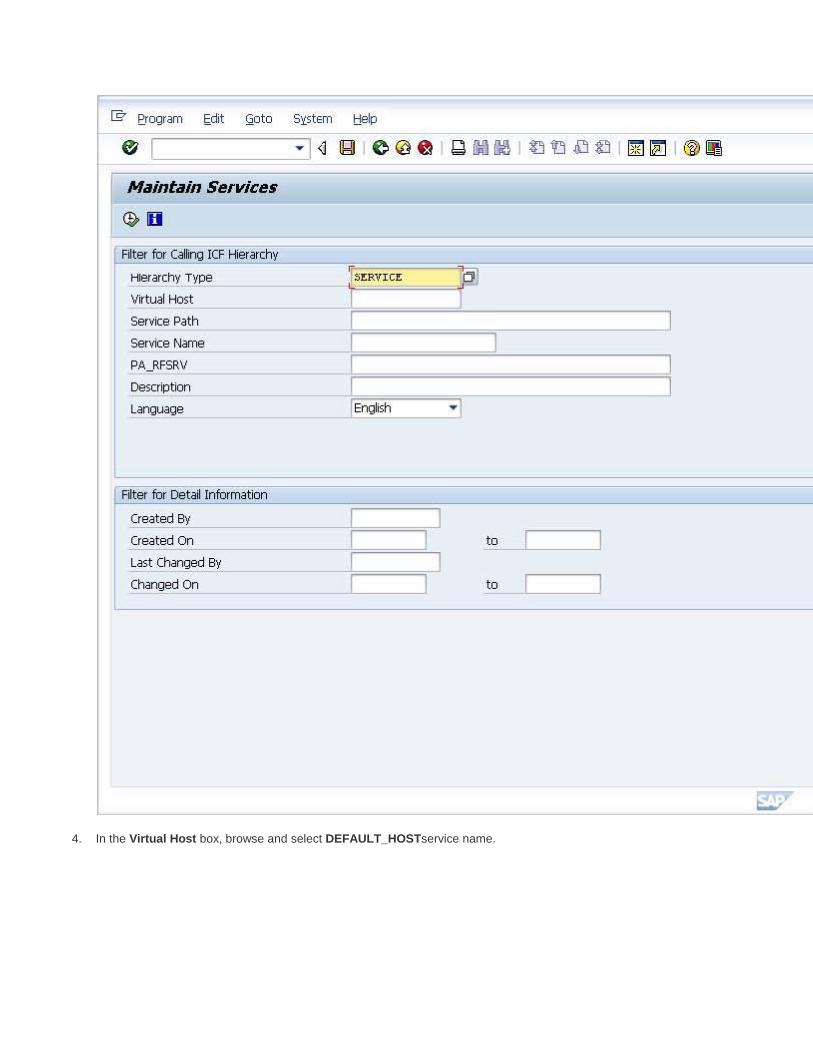
4. In the Virtual Host box, browse and select DEFAULT_HOSTservice name.
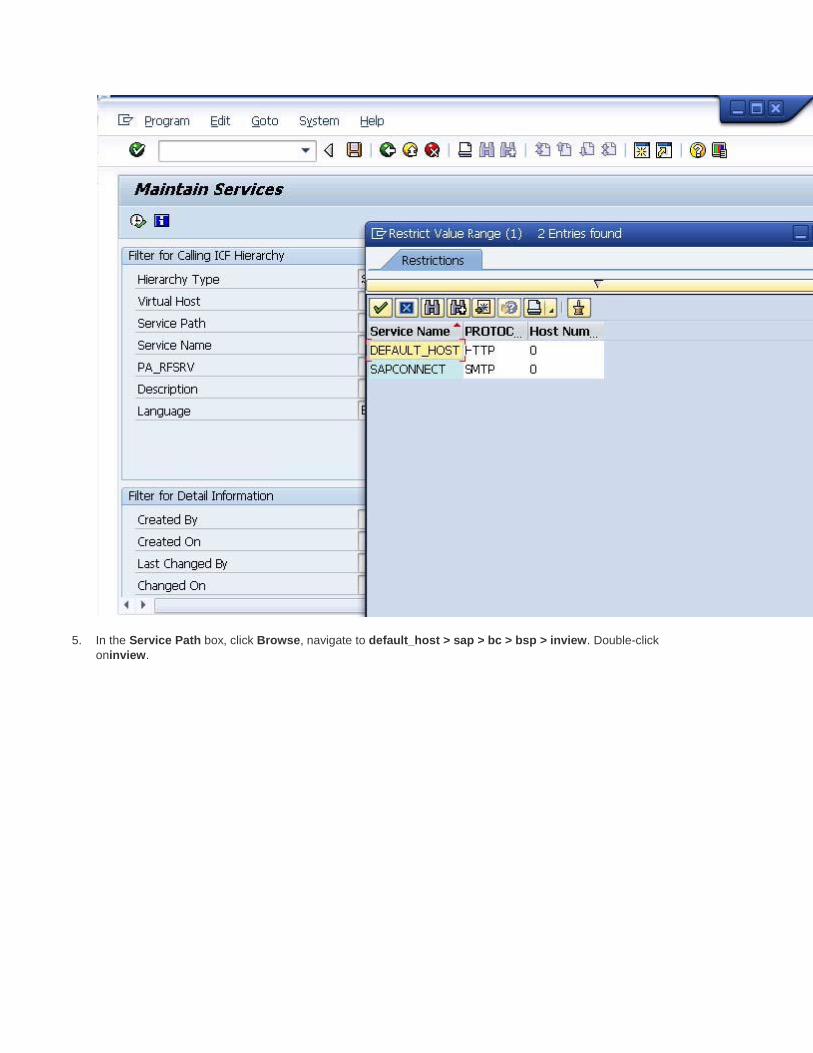
5. In the Service Path box, click Browse, navigate to default_host > sap > bc > bsp > inview. Double-click
oninview.

6. Click Execute on the Maintain Services page.

7. In the Virtuelle Hosts/Services list that displays, navigate to default_host > sap > bc > bsp > inview.

8. Right-click on inview in the list and select Activate Service.
9. Click on the second Yes option to activate all nodes under inview.
Register your company name
Before you start using InsideView, you must register your company name. The following steps describe how to
register your company name.
Important: You need to login as a developer in the development client (for example 001) to execute these steps.
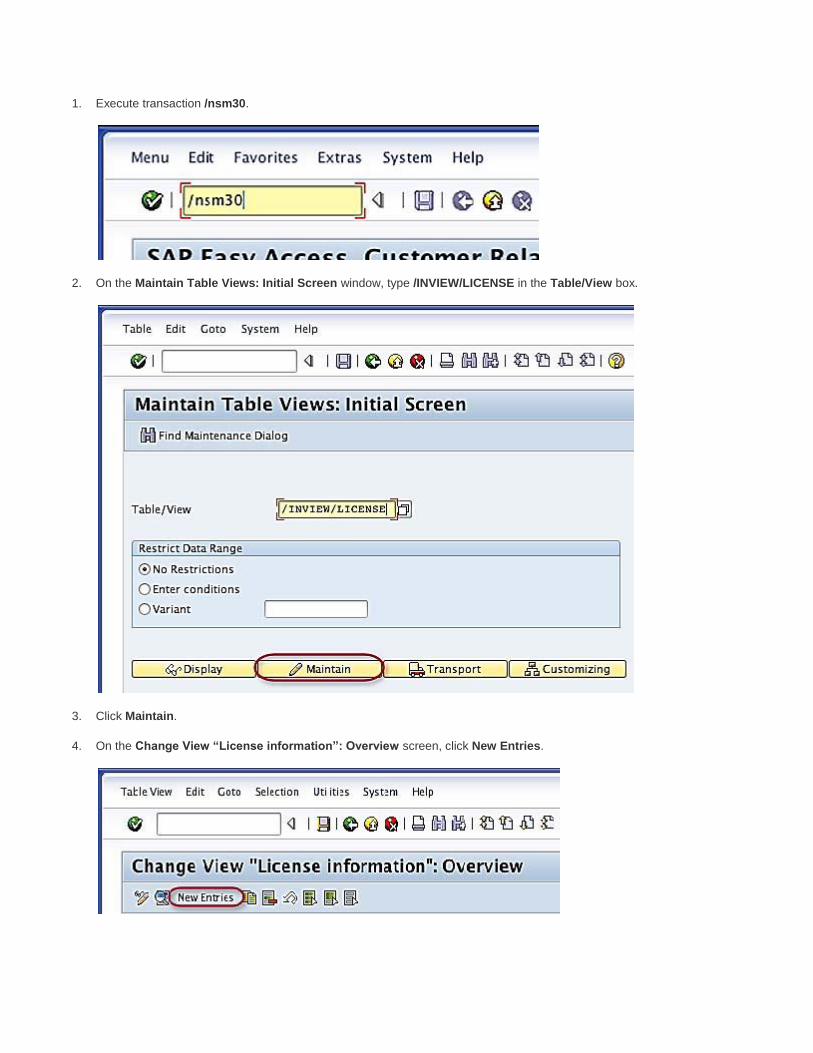
1. Execute transaction /nsm30.
2. On the Maintain Table Views: Initial Screen window, type /INVIEW/LICENSE in the Table/View box.
3. Click Maintain.
4. On the Change View “License information”: Overview screen, click New Entries.

5. On the New Entries: Details of Added Entries screen, enter the name of your company in
the Organizationname box.
6. Click Save.
7. If prompted for a Workbench request, select one in the Request box, and click Enter.
Configure email address for user
Configure user email addresses for InsideView in the employee associated with the users.
Important: You need to login as an Administrator or super user in the development client (for example 001) to
execute these steps.
1. Execute transaction /nbp.
2. Search for the employee entry associated with the user on the Find tab. For example, find Persons by Name (as
shown in the figure below) and enter the first and last name for the person and click Start.

3. Double-click on the employee entry in the results to select it.

4. Click Display/Change.
5. If the employee does not have an email address configured, enter one either in the Communication section or
the Address-Independent Communication section and click Save.

6. Click Exit Transaction.
Embedding InsideView in your SAP CRM Objects (Accounts, Leads,
Opportunities, and Contacts)
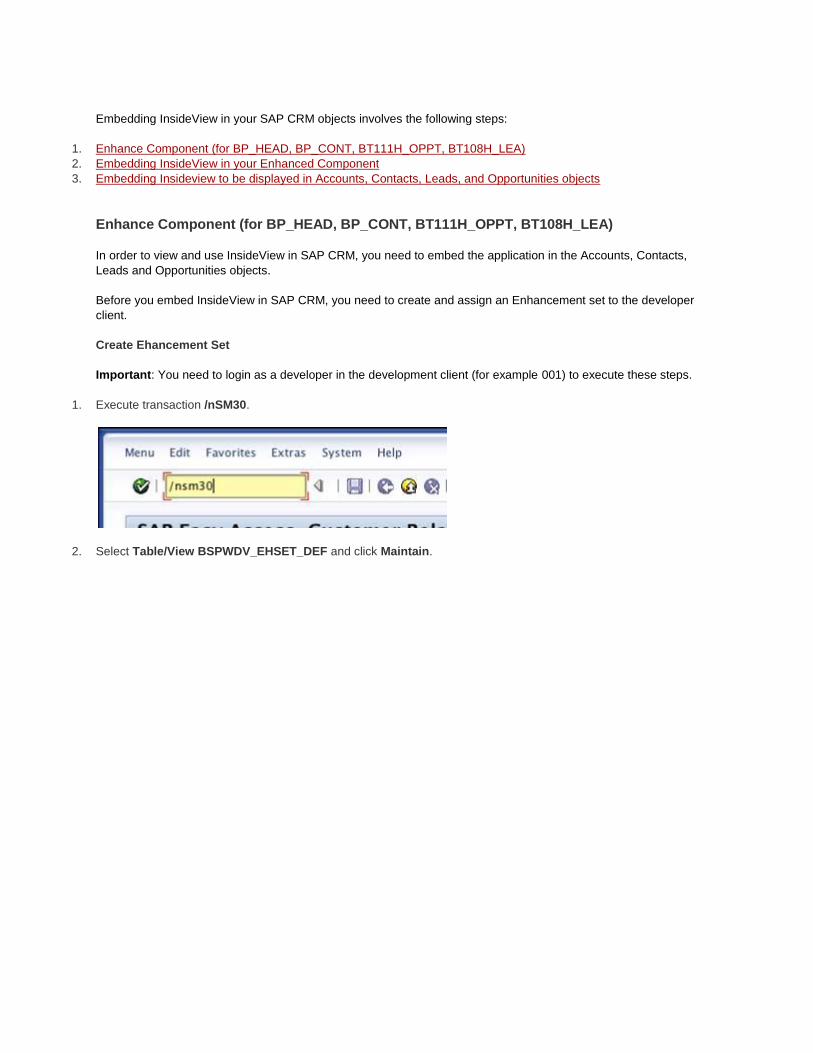
Embedding InsideView in your SAP CRM objects involves the following steps:
1. Enhance Component (for BP_HEAD, BP_CONT, BT111H_OPPT, BT108H_LEA)
2. Embedding InsideView in your Enhanced Component
3. Embedding Insideview to be displayed in Accounts, Contacts, Leads, and Opportunities objects
Enhance Component (for BP_HEAD, BP_CONT, BT111H_OPPT, BT108H_LEA)
In order to view and use InsideView in SAP CRM, you need to embed the application in the Accounts, Contacts,
Leads and Opportunities objects.
Before you embed InsideView in SAP CRM, you need to create and assign an Enhancement set to the developer
client.
Create Ehancement Set
Important: You need to login as a developer in the development client (for example 001) to execute these steps.
1. Execute transaction /nSM30.
2. Select Table/View BSPWDV_EHSET_DEF and click Maintain.

3. If the Maintenance View for Definition of Enhancement Setslist is empty, you must create an enhancement
set. If not, skip to Verify assignment of Enhancement Set to client.

4. Click on New Entries.
5. Enter an Enhancement Set name and description (for example ZMY_ENH and My Enhancement) and clickSave.

Next, assign enhancement set to your developer client.
Assign Enhancement Set to client
Important: You need to login as a developer in the development client (for example 001) to execute these steps.
1. Execute transaction /nSM30.
2. Select Table/View BSPWDV_EHSET_ASG and click Maintain.

3. If the Maintenance View for Enhancement Set Assignments list is empty you must create an assignment. If
not, skip to Enhance Component (for BP_HEAD, BP_CONT, BT111H_OPPT, BT108H_LEA).

4. Click on New Entries.

5. On the New Entries: Details of Added Entries section, type “001” in the Client box and the name of the
enhancement set you just created in the Enhancement Set box, and click Save.
Once you have assigned your Enhancement Set, you can proceed to enhancing the UI components for InsideView.
Enhance Component (for BP_HEAD, BP_CONT, BT111H_OPPT, BT108H_LEA)
The following steps describe how you can enhance your UI component for InsideView.
Important: You need to login as a developer in the development client (for example 001) to execute these steps.
1. Execute transaction /nBSP_WD_CMPWB.
2. In the Componentbox, type one of the following:
BP_HEAD for Accounts object
BP_CONT for Contacts object

BT108H_LEA for Leads object
BT111H_OPPT for Opportunities object
Press Enter on your keyboard or click Display on the screen.
3. Click Enhance Component.
4. Enter the enhancement set you had created in the Create Enhancement Set section and click Enter.
5. Type in a name for the application, such as ZBP_HEAD for Accounts, ZBP_CONT for Contacts, ZBT111H_OPPT
for Opportunities, ZBT108H_LEA for Leads, and click Enter. It is important that you enter a name that does not
already exist in the SAP CRM.

6. Since the BSP component does not exist as yet, you will be prompted to create one. Click Yes.
7. Click Enter on the Input of Runtime Repository Storage Locationdialog box without changing the default
repository value.
8. In the Create Object Directory Entry dialog box, select a package (for example $tmp) if available and
clickSave or click Local Object. You can also edit the Person Responsible here.
If prompted for a Workbench request, select one and click Enter.

9. Check if the component has been enhanced.
10. Repeat steps 2-10 to enhance the Contacts, Leads, and Opportunities components.
Once you complete these, follow the steps below.
For Contacts:
1. Execute transaction /nBSP_WD_CMPWB.
2. On the UI Component Workbench, type BP_CONT in the Component box and click Display.
3. Click Component Structure Browser, expand Component, and expand Views.
4. Right-click on BP_CONT/BPCONTOverview and click Enhance.
5. On the View Structure tab and select BP_CONT/BPCONTOverview > BP_CONT/BPCONTOverview >
View Controller > BPCONTOVERVIEW.do and double click on Implementation Class
ZL_BP_CONT_BPCONTOVERVIEW_IMPL.

6. The Class Builder for the Display Class ZL_BP_CONT_BPCONTOVERVIEW_IMPL opens. On the Class
Builder window, click Methods tab, and select DETACH_STATIC_OVW_VIEWS in the Methodcolumn.
7. Click Edit and then click Redefine.
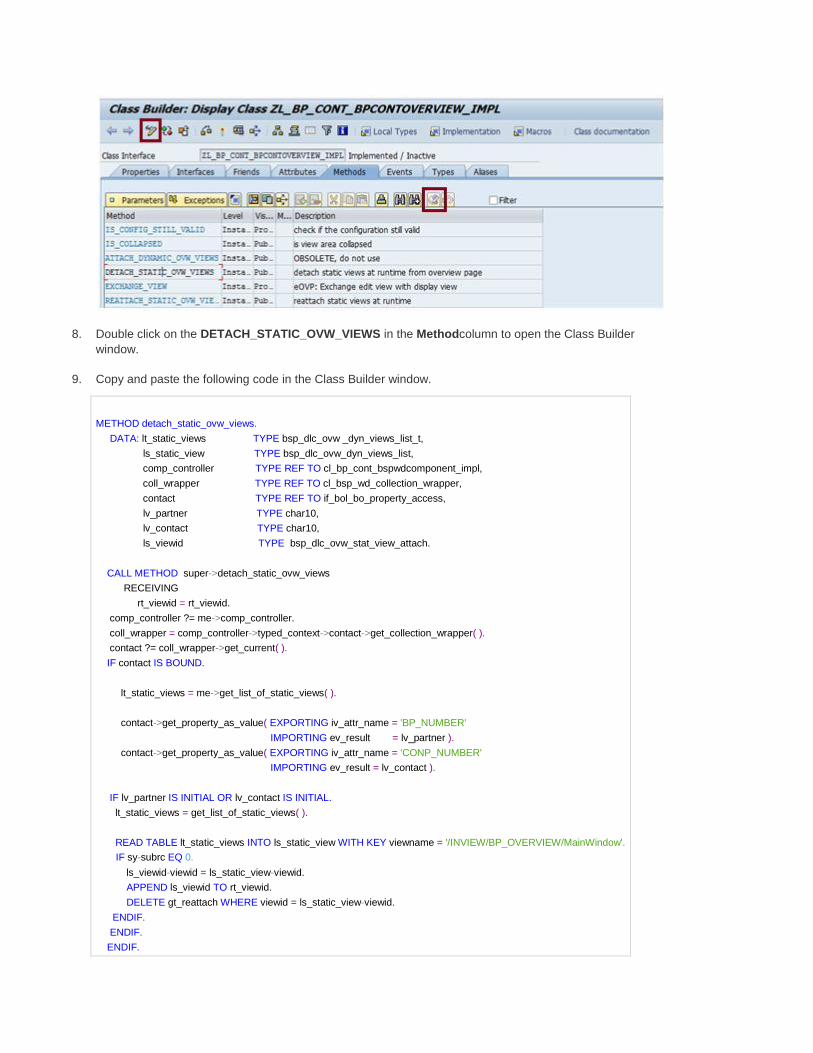
8. Double click on the DETACH_STATIC_OVW_VIEWS in the Methodcolumn to open the Class Builder
window.
9. Copy and paste the following code in the Class Builder window.
METHOD detach_static_ovw_views.
DATA: lt_static_views TYPE bsp_dlc_ovw _dyn_views_list_t,
ls_static_view TYPE bsp_dlc_ovw_dyn_views_list,
comp_controller TYPE REF TO cl_bp_cont_bspwdcomponent_impl,
coll_wrapper TYPE REF TO cl_bsp_wd_collection_wrapper,
contact TYPE REF TO if_bol_bo_property_access,
lv_partner TYPE char10,
lv_contact TYPE char10,
ls_viewid TYPE bsp_dlc_ovw_stat_view_attach.
CALL METHOD super->detach_static_ovw_views
RECEIVING
rt_viewid = rt_viewid.
comp_controller ?= me->comp_controller.
coll_wrapper = comp_controller->typed_context->contact->get_collection_wrapper( ).
contact ?= coll_wrapper->get_current( ).
IF contact IS BOUND.
lt_static_views = me->get_list_of_static_views( ).
contact->get_property_as_value( EXPORTING iv_attr_name = 'BP_NUMBER'
IMPORTING ev_result = lv_partner ).
contact->get_property_as_value( EXPORTING iv_attr_name = 'CONP_NUMBER'
IMPORTING ev_result = lv_contact ).
IF lv_partner IS INITIAL OR lv_contact IS INITIAL.
lt_static_views = get_list_of_static_views( ).
READ TABLE lt_static_views INTO ls_static_view WITH KEY viewname = '/INVIEW/BP_OVERVIEW/MainWindow'.
IF sy-subrc EQ 0.
ls_viewid-viewid = ls_static_view-viewid.
APPEND ls_viewid TO rt_viewid.
DELETE gt_reattach WHERE viewid = ls_static_view-viewid.
ENDIF.
ENDIF.
ENDIF.

ENDMETHOD.
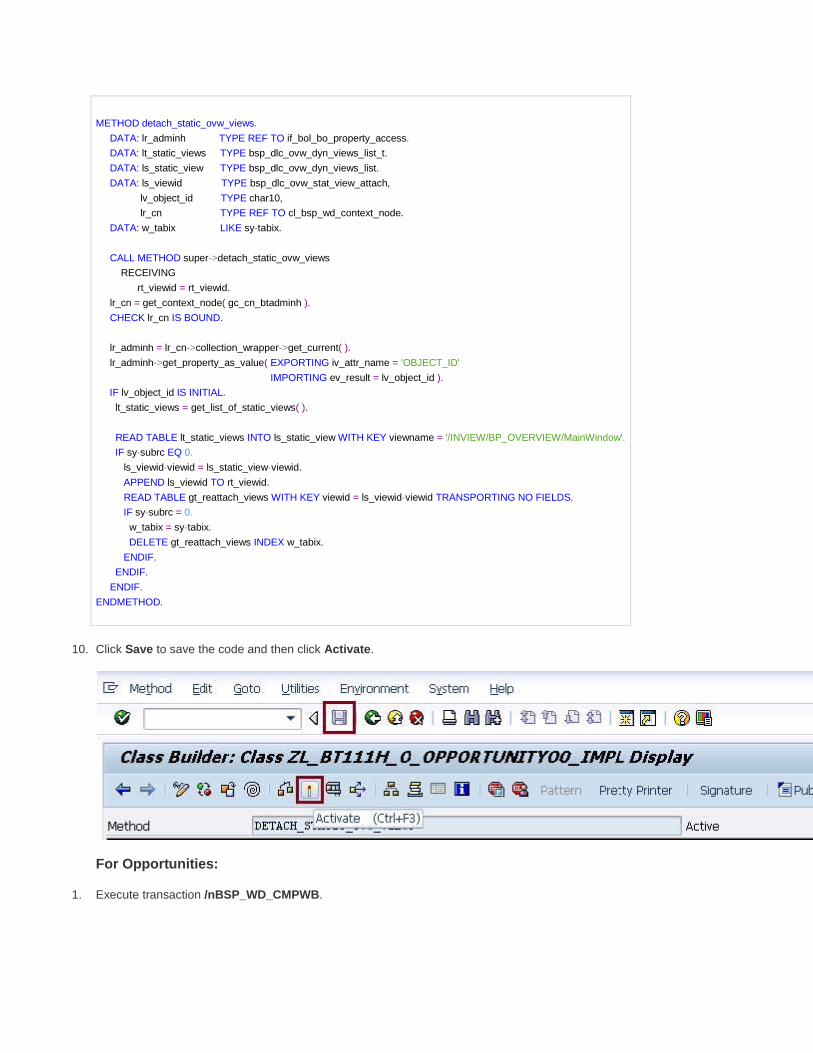
10.
11. Click Save to save the code and then click Activate.
For Leads:
1. Execute transaction /nBSP_WD_CMPWB.
2. On the UI Component Workbench, type BT108H_LEA in the Component box and click Display.
3. Click Component Structure Browser, expand Component, and expand Views.
4. Right-click on BT108H_LEA/LeadOVViewSet and click Enhance.
5. On the View Structure tab and select BT108H_LEA/LeadOVViewSet > BT108H_LEA/LeadOVViewSet > View
Controller > LeadOVViewSet.do and double-click on Implementation Class
ZL_BT108H_L_LeadOVViewSet_IMPL.

6. On the Class Builder window, click Methods tab, and select DETACH_STATIC_OVW_VIEWS in
the Methodcolumn.
7. Click Edit and then click Redefine.
8. Double click on the DETACH_STATIC_OVW_VIEWS in the Method column to open the Class Builder window.
9. Copy and paste the following code in the Class Builder window.
METHOD detach_static_ovw_views.
DATA: lr_adminh TYPE REF TO if_bol_bo_property_access.
DATA: lt_static_views TYPE bsp_dlc_ovw_dyn_views_list_t.
DATA: ls_static_view TYPE bsp_dlc_ovw_dyn_views_list.
DATA: ls_viewid TYPE bsp_dlc_ovw_stat_view_attach,
lv_object_id TYPE char10,
lr_cn TYPE REF TO cl_bsp_wd_context_node.
DATA: w_tabix LIKE sy-tabix.
CALL METHOD super->detach_static_ovw_views
RECEIVING
rt_viewid = rt_viewid.
lr_cn = get_context_node( gc_cn_btadminh ).
CHECK lr_cn IS BOUND.
lr_adminh = lr_cn->collection_wrapper->get_current( ).
lr_adminh->get_property_as_value( EXPORTING iv_attr_name = 'OBJECT_ID'
IMPORTING ev_result = lv_object_id ).
IF lv_object_id IS INITIAL.
lt_static_views = get_list_of_static_views( ).
READ TABLE lt_static_views INTO ls_static_view WITH KEY viewname = '/INVIEW/BP_OVERVIEW/MainWindow'.
IF sy-subrc EQ 0.
ls_viewid-viewid = ls_static_view-viewid.
APPEND ls_viewid TO rt_viewid.
READ TABLE gt_reattach_views WITH KEY viewid = ls_viewid-viewid TRANSPORTING NO FIELDS.
IF sy-subrc = 0.
w_tabix = sy-tabix.
DELETE gt_reattach_views INDEX w_tabix.
ENDIF.
ENDIF.
ENDIF.
ENDMETHOD.
10. Click Save to save the code and then click Activate.
For Opportunities:
1. Execute transaction /nBSP_WD_CMPWB.

2. On the UI Component Workbench, type BT111H_OPPT in the Component box and click Display.
3. Click Component Structure Browser, expand Component, and expand Views.
4. Right-click on BT111H_OPPT/OpportunityOVViewSet and click Enhance.
5. On the View Structure tab and select BT111H_OPPT/OpportunityOVViewSet >
BT111H_OPPT/OpportunityOVViewSet > View Controller > OpportunityOVViewSet.do and double-click
onImplementation Class ZL_BT111H_O_OpportunityOVViewSet_IMPL.
6. On the Class Builder window, click Methods tab, and select DETACH_STATIC_OVW_VIEWS in
the Methodcolumn.

7. Click Edit and then click Redefine.
8. Double click on the DETACH_STATIC_OVW_VIEWS in the Method column to open the Class Builder window.
9. Copy and paste the following code in the Class Builder window.
METHOD detach_static_ovw_views.
DATA: ls_viewid TYPE bsp_dlc_ovw_stat_view_attach.
DATA: lr_adminh TYPE REF TO cl_crm_bol_entity,
lv_object_id TYPE char10.
DATA: lt_static_views TYPE bsp_dlc_ovw_dyn_views_list_t.
DATA: ls_static_view TYPE bsp_dlc_ovw_dyn_views_list.
CALL METHOD super->detach_static_ovw_views
RECEIVING rt_viewid = rt_viewid.
lr_adminh ?= me->typed_context->btadminh->collection_wrapper->get_current( ).
lr_adminh->get_property_as_value( EXPORTING iv_attr_name = 'OBJECT_ID'
IMPORTING ev_result = lv_object_id ).

* Inside overview
IF lv_object_id IS INITIAL.
lt_static_views = get_list_of_static_views( ).
READ TABLE lt_static_views INTO ls_static_view WITH KEY viewname = '/INVIEW/BP_OVERVIEW/MainWindow'.
IF sy-subrc EQ 0.
ls_viewid-viewid = ls_static_view-viewid.
INSERT ls_viewid INTO TABLE rt_viewid.
ENDIF.
ENDIF.
ENDIF.
ENDMETHOD.
10. Click Save to save the code and then click Activate.
11. Next, select REATTACH_STATIC_OVW_VIEWS in the Method column and click Redefine.
12. Copy and paste the following code in the Class Builder window, and then click Save and Activate.
METHOD reattach_static_ovw_views.
DATA: ls_viewid TYPE bsp_dlc_ovw_stat_view_attach.
DATA: lr_adminh TYPE REF TO cl_crm_bol_entity,
lv_object_id TYPE char10.
DATA: lt_static_views TYPE bsp_dlc_ovw_dyn_views_list_t.
DATA: ls_static_view TYPE bsp_dlc_ovw_dyn_views_list.
CALL METHOD super->reattach_static_ovw_views
RECEIVING rt_return = rt_return.
lr_adminh ?= me->typed_context->btadminh->collection_wrapper->get_current( ).
lr_adminh->get_property_as_value( EXPORTING iv_attr_name = 'OBJECT_ID'
IMPORTING ev_result = lv_object_id ).
* Inside overview
IF lv_object_id IS INITIAL.
lt_static_views = get_list_of_static_views( ).
READ TABLE lt_static_views INTO ls_static_view WITH KEY viewname = '/INVIEW/BP_OVERVIEW/MainWindow'.
IF sy-subrc EQ 0.
ls_viewid-viewid = ls_static_view-viewid.
INSERT ls_viewid INTO TABLE rt_return.

ENDIF.
ENDIF.
ENDMETHOD.
Embedding InsideView in your Enhanced Component
Embed InsideView in the enhanced component of the Accounts, Contacts, Leads and Opportunities in SAP CRM to
view and use the application from within these objects.
The following procedure describes how to embed InsideView.
Important: You need to login as a developer in the development client (for example 001) to execute these steps.
1. Execute transaction /nBSP_WD_CMPWB.
2. In the Component box, type one of the following :
BP_HEAD for Accounts object
BP_CONT for Contacts object
BT108H_LEA for Leads object
BT111H_OPPT for Opportunities object
Press Enter on your keyboard or click Display on the screen
3. On the left panel of the Structure of Component window, click Runtime Repository Editor to open the editor.

4. On the editor panel, click Edit.
5. In the Component list, right-click on ComponentUsages and select Add Component Usage.

6. On the Create Component Usage dialog box, enter the following information: Note: These values are case-
sensitive.
ID: insideview
Used Component: /INVIEW/BP_OVERVIEW
Interface View: /INVIEW/BP_OVERVIEW/MainWindow
Click Enter.
7. Under Component, expand the ViewSets node and click to expand one of the following:
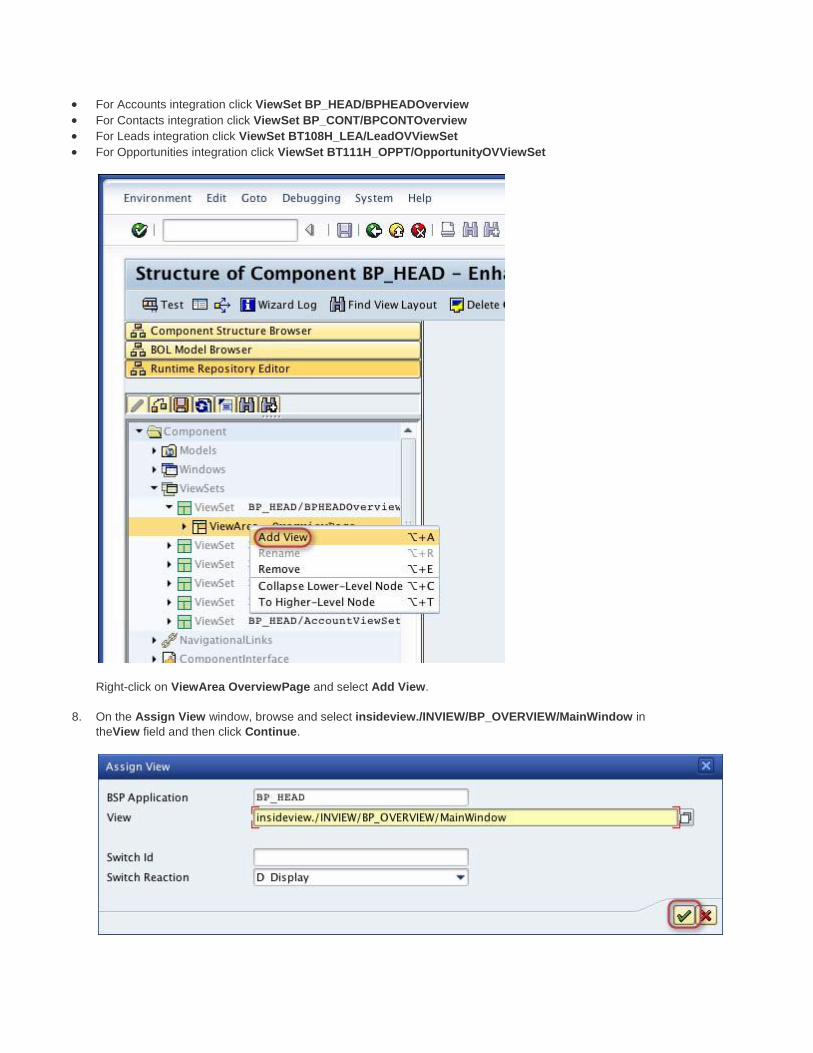
For Accounts integration click ViewSet BP_HEAD/BPHEADOverview
For Contacts integration click ViewSet BP_CONT/BPCONTOverview
For Leads integration click ViewSet BT108H_LEA/LeadOVViewSet
For Opportunities integration click ViewSet BT111H_OPPT/OpportunityOVViewSet
Right-click on ViewArea OverviewPage and select Add View.
8. On the Assign View window, browse and select insideview./INVIEW/BP_OVERVIEW/MainWindow in
theView field and then click Continue.

9. Click Save on the editor.
10. A pop-up window appears displaying results of the Runtime Repository syntax check. Click Enter.
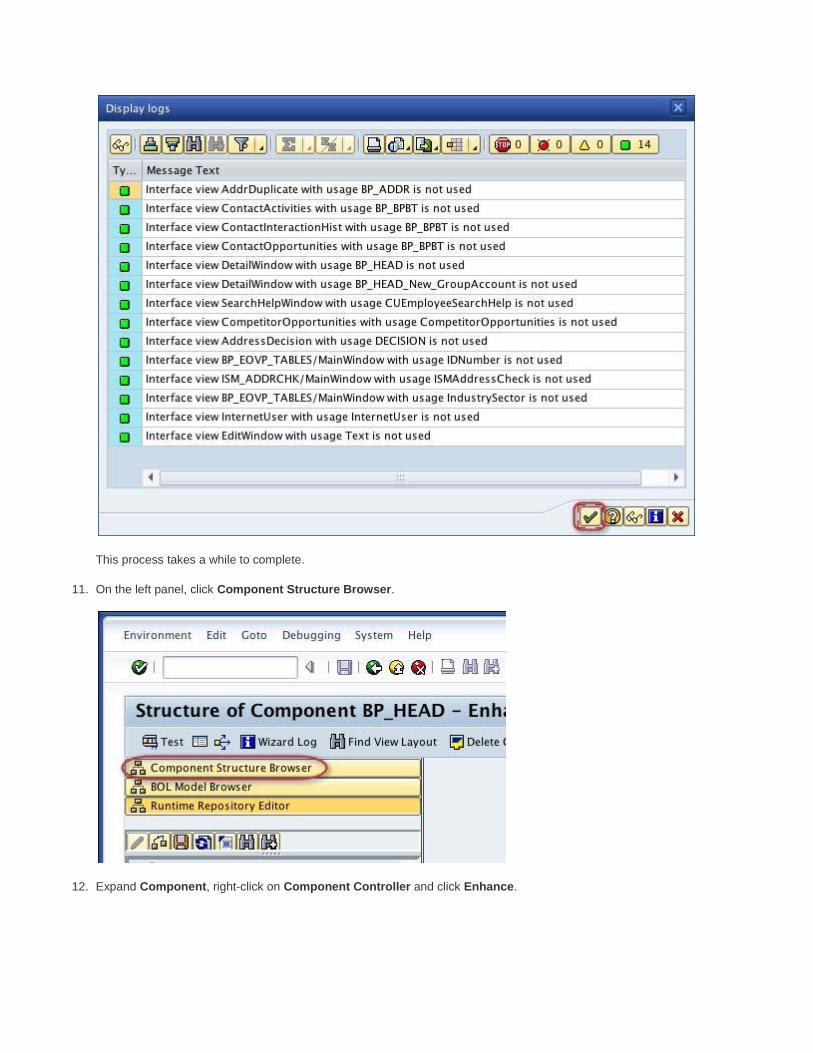
This process takes a while to complete.
11. On the left panel, click Component Structure Browser.
12. Expand Component, right-click on Component Controller and click Enhance.

13. If you are prompted to select a workbench request, select one and click Continue.
14. In the Create Object Directory Entry dialog box, select a package (for example $tmp) if available and
clickSave or click Local Object. You can also edit the Person Responsible here.
15. On the Controller Structure tab, click Sub Component Handling to view methods. Right-click on
theWD_USAGE_INITIALIZE method and click on Redefine.

16. Double-click on WD_USAGE_INITIALIZE to open the Class Builder window.

17. On the Class Builder window, click Edit.
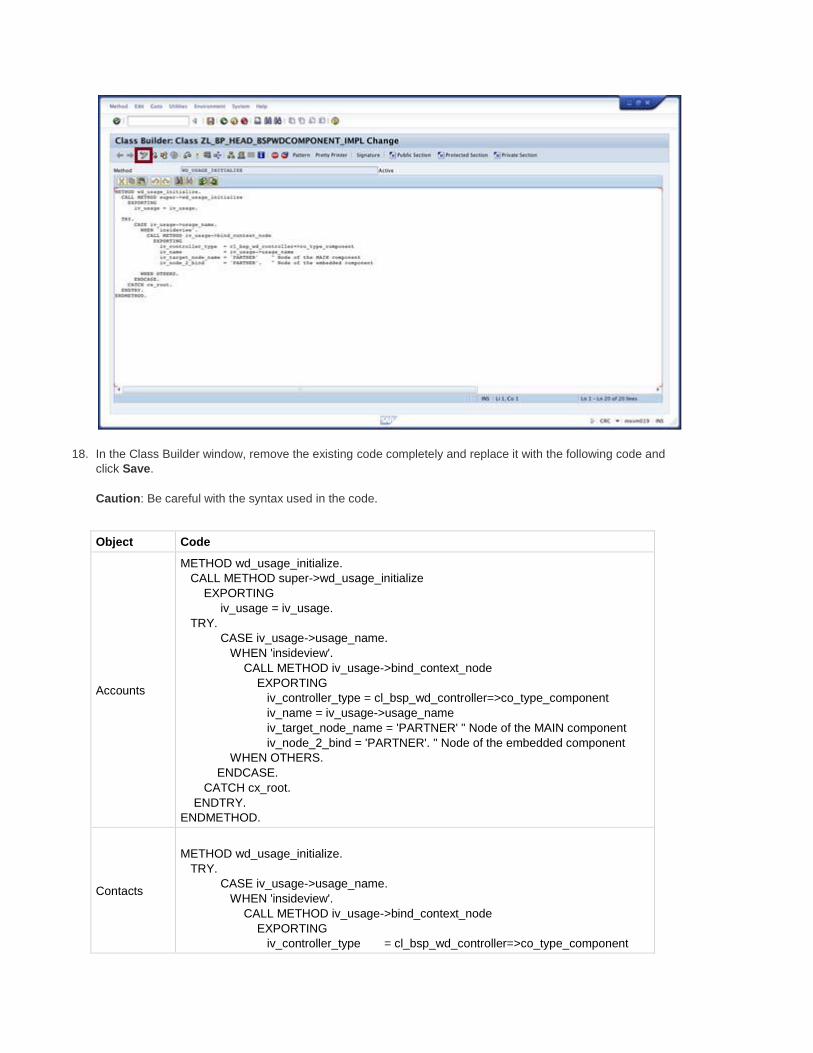
18. In the Class Builder window, remove the existing code completely and replace it with the following code and
click Save.
Caution: Be careful with the syntax used in the code.
Object Code
Accounts
METHOD wd_usage_initialize.
CALL METHOD super->wd_usage_initialize
EXPORTING
iv_usage = iv_usage.
TRY.
CASE iv_usage->usage_name.
WHEN 'insideview'.
CALL METHOD iv_usage->bind_context_node
EXPORTING
iv_controller_type = cl_bsp_wd_controller=>co_type_component
iv_name = iv_usage->usage_name
iv_target_node_name = 'PARTNER' " Node of the MAIN component
iv_node_2_bind = 'PARTNER'. " Node of the embedded component
WHEN OTHERS.
ENDCASE.
CATCH cx_root.
ENDTRY.
ENDMETHOD.
Contacts
METHOD wd_usage_initialize.
TRY.
CASE iv_usage->usage_name.
WHEN 'insideview'.
CALL METHOD iv_usage->bind_context_node
EXPORTING
iv_controller_type = cl_bsp_wd_controller=>co_type_component

iv_name = iv_usage->usage_name
iv target node name = 'PARTNER' " Node of the MAIN component
iv_node_2_bind = 'PARTNER'. " Node of the embedded component
WHEN OTHERS.
CALL METHOD super->wd usage initialize
EXPORTING
iv_usage = iv_usage.
ENDCASE.
CATCH cx_root.
ENDTRY.
ENDMETHOD.
Leads
METHOD wd_usage_initialize.
CASE iv_usage->usage_name.
WHEN 'insideview'. "#EC NOTEXT
CALL METHOD iv_usage->bind_context_node
EXPORTING
iv_controller_type = cl_bsp_wd_controller=>co_type_component
iv target node name = 'BTORDER'
iv node 2 bind = 'BTORDER'. "#EC NOTEXT
WHEN OTHERS.
CALL METHOD super->wd usage initialize
EXPORTING
iv_usage = iv_usage.
ENDCASE.
ENDMETHOD.
Opportunities
METHOD wd_usage_initialize.
CASE iv_usage->usage_name.
WHEN 'insideview'. "#EC NOTEXT
CALL METHOD iv_usage->bind_context_node
EXPORTING
iv_controller_type = cl bsp wd controller=>co type component
iv target node name = 'BTORDER'
iv node 2 bind = 'BTORDER'. "#EC NOTEXT
WHEN OTHERS.
CALL METHOD super->wd usage initialize
EXPORTING
iv_usage = iv_usage.
ENDCASE.
ENDMETHOD.
19. Click Activate.
Repeat these steps for the Leads, Contacts, and Opportunities components.
Once you have embedded the Accounts, Contacts, Leads, and Opportunities components, you can proceed to
embedding InsideView in the Accounts, Contacts, Leads, and Opportunities objects.
Embedding Insideview to be displayed in Accounts, Contacts, Leads, and Opportunities
objects
The following procedure describes how to enable the InsideView component to be displayed in the Accounts,
Opportunities and Lead objects.

Important: You need to login as a developer in the development client (for example 001) to execute these steps.
1. Execute transaction /nbsp_wd_cmpwb.
2. In the Component box, type one of the following:
BP_HEAD for Accounts object
BP_CONT for Contacts object
BT108H_LEA for Leads object
BT111H_OPPT for Opportunities object
Press Enter on your keyboard or click Display on the screen.
3. On the left panel of the Structure of Component window, click Component Structure Browser.
4. On the Component Structure Browser, expand the Views node and double-click on:
BP_HEAD/BPHEADOverview for Account
BP_CONT/BPCONTOverviewfor Contacts
BT111H_OPPT/OpportunityOVViewSet for Opportunities
BT108H_LEA/LeadOVViewSet for Leads
Important: When enhancing the Account component, right click on BP_HEAD/BPHEADOverview and
click on Enhance before you proceed to the next step.

5. Select the Configuration tab.

6. Click Choose Configuration on the menu.

7. On the Configuration Selection dialog box, click to select a configuration where you want to embed
InsideView. Click Copy.
8. The InsideView component is included as a new component under Available Assignment Blocks
/INVIEW/BP_OVERVIEW. Click Edit on the menu. If you’re prompted for a Customizing request, select
one and click Continue.
9. Click on the check box against the InsideView component /INVIEW/BP_OVERVIEW on the Available
Assignment Blocks to select it. Transfer it to the Displayed Assignment Block on the right by clicking
on the transfer button highlighted in the figure below.

10. Ensure that the /INVIEW/BP_OVERVIEW component is added to the right column. Double click
theTitle column for this entry to edit and rename it as InsideView.

11. Click Save and close.