event notices - rumpus: the premier ftp and web file … notices.pdf · · 2017-08-16using event...
TRANSCRIPT
Event Notices
Contents
Defining Event Notices 2
Creating An E-Mail Event Notice 3
Creating An AppleScript Or Shell Script Event Notice 6
Creating A Growl Notice 8
Administrator Notices 10
Folder Triggers 11
© Maxum Development Corp.
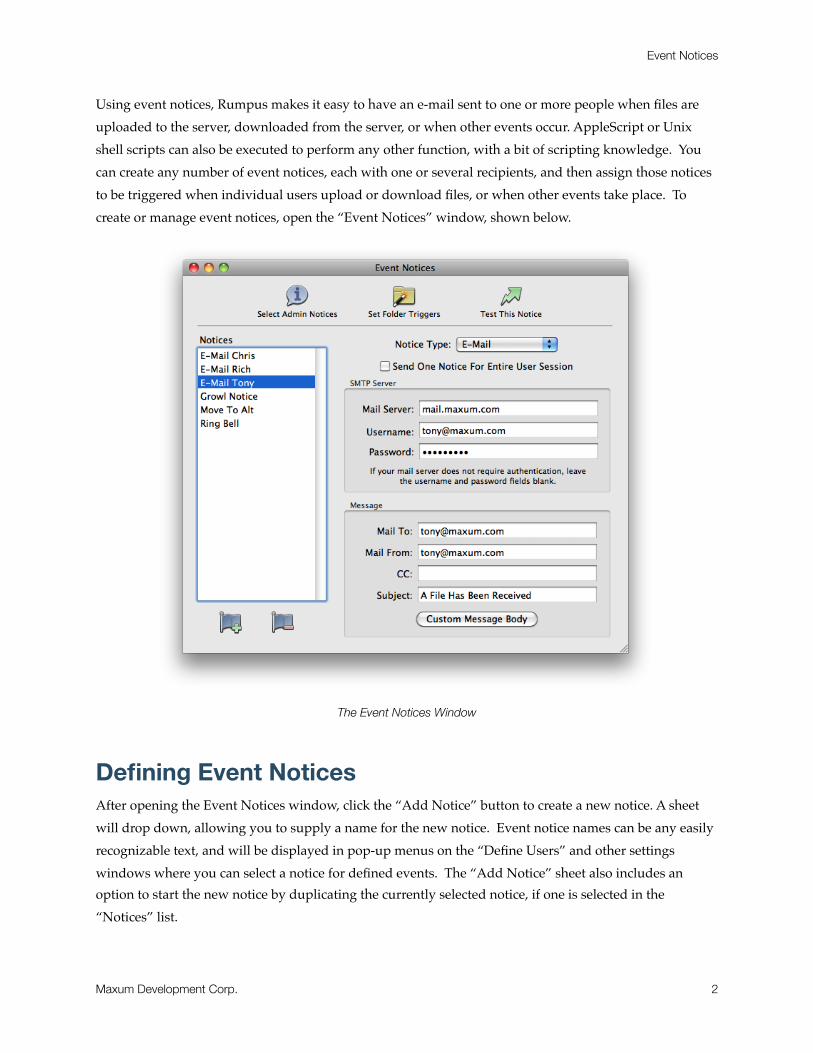
Using event notices, Rumpus makes it easy to have an e-mail sent to one or more people when files are uploaded to the server, downloaded from the server, or when other events occur. AppleScript or Unix shell scripts can also be executed to perform any other function, with a bit of scripting knowledge. You can create any number of event notices, each with one or several recipients, and then assign those notices to be triggered when individual users upload or download files, or when other events take place. To create or manage event notices, open the “Event Notices” window, shown below.
The Event Notices Window
Defining Event NoticesAfter opening the Event Notices window, click the “Add Notice” button to create a new notice. A sheet will drop down, allowing you to supply a name for the new notice. Event notice names can be any easily recognizable text, and will be displayed in pop-up menus on the “Define Users” and other settings windows where you can select a notice for defined events. The “Add Notice” sheet also includes an option to start the new notice by duplicating the currently selected notice, if one is selected in the “Notices” list.
Event Notices
Maxum Development Corp. 2
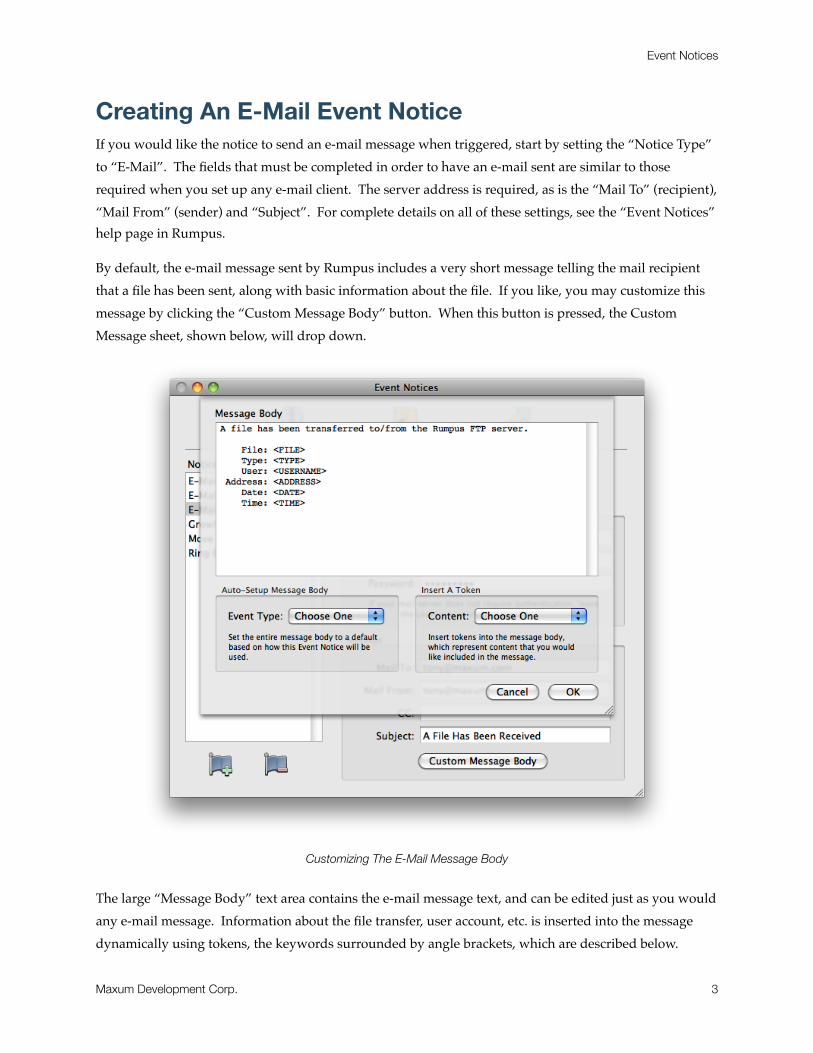
Creating An E-Mail Event NoticeIf you would like the notice to send an e-mail message when triggered, start by setting the “Notice Type” to “E-Mail”. The fields that must be completed in order to have an e-mail sent are similar to those required when you set up any e-mail client. The server address is required, as is the “Mail To” (recipient), “Mail From” (sender) and “Subject”. For complete details on all of these settings, see the “Event Notices” help page in Rumpus.
By default, the e-mail message sent by Rumpus includes a very short message telling the mail recipient that a file has been sent, along with basic information about the file. If you like, you may customize this message by clicking the “Custom Message Body” button. When this button is pressed, the Custom Message sheet, shown below, will drop down.
Customizing The E-Mail Message Body
The large “Message Body” text area contains the e-mail message text, and can be edited just as you would any e-mail message. Information about the file transfer, user account, etc. is inserted into the message dynamically using tokens, the keywords surrounded by angle brackets, which are described below.
Event Notices
Maxum Development Corp. 3
Automatic Message Bodies
The e-mail Event Notice message body defaults to a simple note describing a generic file transfer. However, since Event Notices can be used for a variety of purposes, other default messages can be generated for you automatically. In the “Auto-Setup Message Body” box, simply select the purpose of the Event Notice from the “Event Type” pop-up menu, and the existing message body will be replaced with a pre-formatted template.
Of course, the message body templates created using the “Auto-Setup” function can also be edited to suit your needs.
Dynamic Content Tokens
Within the message body, tokens are used to insert specific information about the file that was transferred. The easiest way to insert tokens is to place the cursor at the point in the message body where the file information should be included and then select the appropriate token from the “Content” pop-up menu.
The available tokens are:
<FILE>! Insert the name and path of the file transferred.
<FILENAME>! Insert only the name of file transferred.
<FILEURL UserAccount>! Insert the file path, relative to the user account specified. This token is useful when including URLs to files in the e-mail message. Since the path to any particular file may be different depending on the Home Folder of the person accessing the file, the “UserAccount” parameter allows you to specify the account that will be used so that the URL generated will be correct for that user.
<FILESIZE>! Insert the size of the file transferred.
<TYPE>! Insert whether the transfer was performed via FTP or Web File Manager, and whether the file was uploaded or downloaded.
<USERNAME>! Insert the username of the account being used to transfer the file.
<PASSWORD>! Insert the user’s password. Use of this token is not recommended for notices which will be used for authenticated user file transfers. It is provided exclusively for use with anonymous file uploads and downloads, where an e-mail address or other nonsecure password is supplied by the user for login.
Event Notices
Maxum Development Corp. 4

<EMAILADDR>! Insert the e-mail address of the active user account, if it has been supplied on the “Define Users” window in Rumpus.
<HOMEPATH UserAccount>! Insert the Home Folder path of the specified user account. This token is primarily useful in scripts that perform some action within a user account folder. Note that if the “UserAccount” parameter is omitted, the token inserts the path to the active user account Home Folder.
<PARENTFOLDER>! Insert the path to the folder in which the file was transferred.
<ADDRESS>! Insert the TCP/IP address of the client computer.
<HOSTNAME>! Insert the DNS name of the client computer. Rumpus performs a reverse-DNS lookup of the client IP address to determine the client hostname.
<TIME>! Insert the time the notice is sent (roughly the time the file transfer completes).
<DATE>! Insert the date on which the notice is sent.
<FORMVAR VariableName>! Insert the contents of a field included on the file upload form. This requires that you modify the WFM file upload form to include additional input fields. The “FormVar” token should then be edited so that “VariableName” matches the name of the input field on the form. This token is relevant only for Web File Manager file uploads.
<USERNOTES>! Inserts the user account notes as defined for the user account in question, on the Define Users window. This token allows you to include user-specific text in e-mail messages, without having to define a unique Event Notice for every user.
Be sure to use the “Test Notice” button to send a test message. Rumpus will send the e-mail with sample values set for the filename, username, and so on and report any errors. If a known error occurs, Rumpus will suggest how to correct the problem, so be sure to read the error message carefully. If Rumpus reports no error, look for the e-mail in your usual mail program to confirm delivery.
When multiple files are uploaded but a single e-mail notice is sent, each file name and/or path will be reflected in the message. Any line in the message body that contains one or more of the tokens “File”, “Filename”, “FileURL” or “Filesize” will automatically be repeated for each file transferred.
Event Notices
Maxum Development Corp. 5
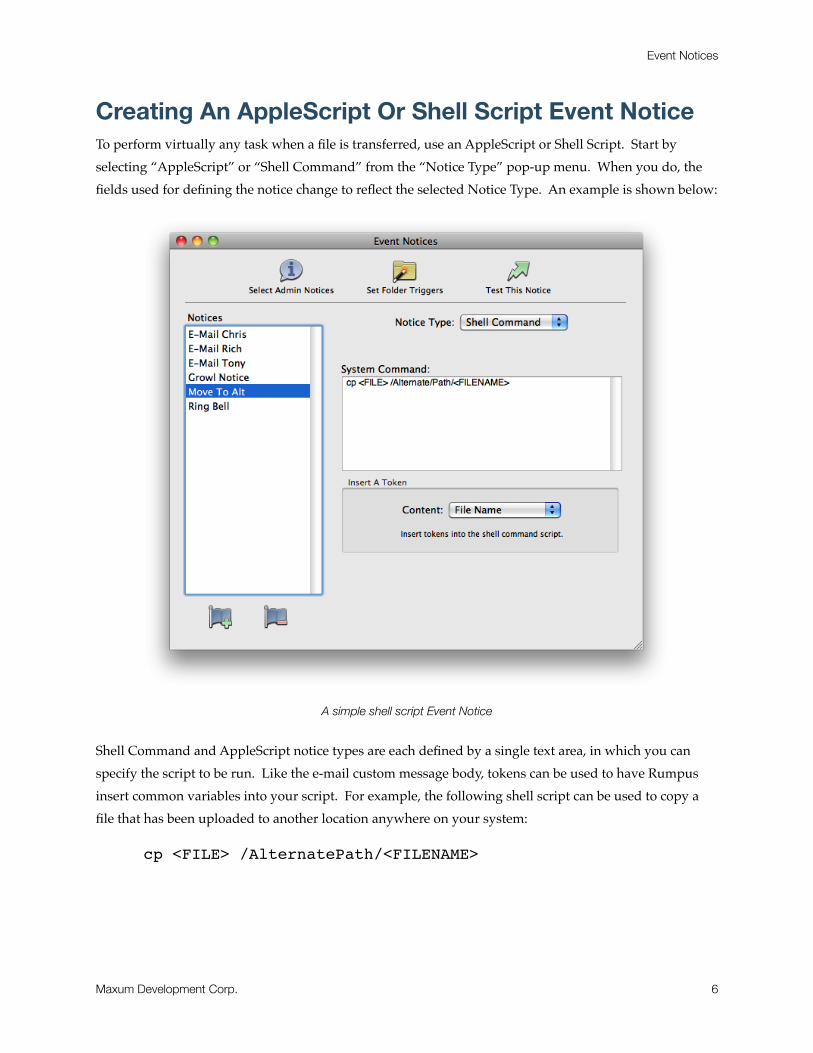
Creating An AppleScript Or Shell Script Event NoticeTo perform virtually any task when a file is transferred, use an AppleScript or Shell Script. Start by selecting “AppleScript” or “Shell Command” from the “Notice Type” pop-up menu. When you do, the fields used for defining the notice change to reflect the selected Notice Type. An example is shown below:
A simple shell script Event Notice
Shell Command and AppleScript notice types are each defined by a single text area, in which you can specify the script to be run. Like the e-mail custom message body, tokens can be used to have Rumpus insert common variables into your script. For example, the following shell script can be used to copy a file that has been uploaded to another location anywhere on your system:
cp <FILE> /AlternatePath/<FILENAME>
Event Notices
Maxum Development Corp. 6

In this example, the “<FILE>” token will be replaced with the full path to the uploaded file, while the “<FILENAME>” token will be replaced by the filename. For example, if the file uploaded had a full path of “/Users/Shared/Test.pdf”, the resulting shell script would look like this:
cp /Users/Shared/Test.pdf /AlternatePath/Test.pdf
Simple AppleScripts can be created in a similar fashion. AppleScripts may be multiple lines, though long or complicated scripts should be created in the Script Editor application, saved as applets, and triggered by a simple script run by Rumpus.
A very simple AppleScript can be use to cause the system to beep when the event notice is triggered. This script would simply be:
beep
AppleScripts are actually run using the “osascript” system utility. Rumpus automatically parses each line of the script for variable tokens, and breaks up the script into the correct format for the osascript function.
It is important to note that both shell scripts and AppleScripts may not be able to be adequately tested using the “Test Notice” function, since test values used for the variable tokens won’t match actual files, user account information, etc. In addition, the script will be run in the context of the Rumpus control application, not the server daemon, which may also effect how the script is executed.
Let’s look at two more AppleScript based Event Notices. For example, if you want to display a message on the server itself, you could create an Event Notice to be triggered by file uploads that will tell the Finder to display a dialog box announcing the transfer. One problem with this is that the Finder will only display one at a time, and will hang notice processing while it waits for a user to accept the dialog. If your server doesn’t accept many files, this might not be a problem, so here's the script:
tell application "Finder"
! activate
! display dialog "File Upload: <FILE>"
end tell
Event Notices
Maxum Development Corp. 7

Another way to do something similar is to use the Stickies application to show uploads:
tell application "System Events"
tell application "Stickies" to activate
tell process "Stickies" to keystroke "n" using command down
tell process "Stickies" to keystroke "File Upload: <FILE>"
end tell
These sample scripts will work fine with only minor changes, or can be extended to create more extensive server-side processes. As noted above, if your scripts become significantly more complicated, it is best to create stand-alone applets that are triggered by a one-line Event Notice script.
Creating A Growl NoticeGrowl is a free (donations accepted) program that lets Mac OS X applications unintrusively tell you when things happen. In other words, Growl is a notification system which can be used by many Mac OS X applications, including Rumpus.
http://growl.info/
Here is an example Growl notification, triggered by Rumpus:
Notice of a file upload, as displayed by Growl
To use Growl, it must first be downloaded from the Growl Web site and installed on the Rumpus server. Growl notifications can be sent across a network, so you can also install a copy of Growl on your desktop Mac to receive Rumpus Event Notices on your own desktop. For complete details on installing and setting up Growl, see the excellent Growl Web site and instructions.
Event Notices
Maxum Development Corp. 8

Defining a Growl Event Notice
When the Event Notice “Notice Type” is set to “Growl”, the Growl notification options are displayed, as shown above.
Rumpus allows you to select from among 4 different Notifications, which can be configured individually within Growl. The notice Title and Description define the text that will be shown in the Growl notification window. The Growl Priority and “Sticky” option (which determines whether or not a notice is automatically removed a few seconds after it is displayed on screen) can also be selected.
While the setup of Growl is well described in the Growl documentation, one option in particular notes attention. The Notification, set in Rumpus, is not displayed as part of the notice, but it can be used to process different Event Notices in different ways. In the Growl Preferences window, you have the option of configuring notices for each application. Select the Rumpus application setup, and you can further define notice settings for each of the available Notifications defined in Rumpus, as shown below.
Event Notices
Maxum Development Corp. 9
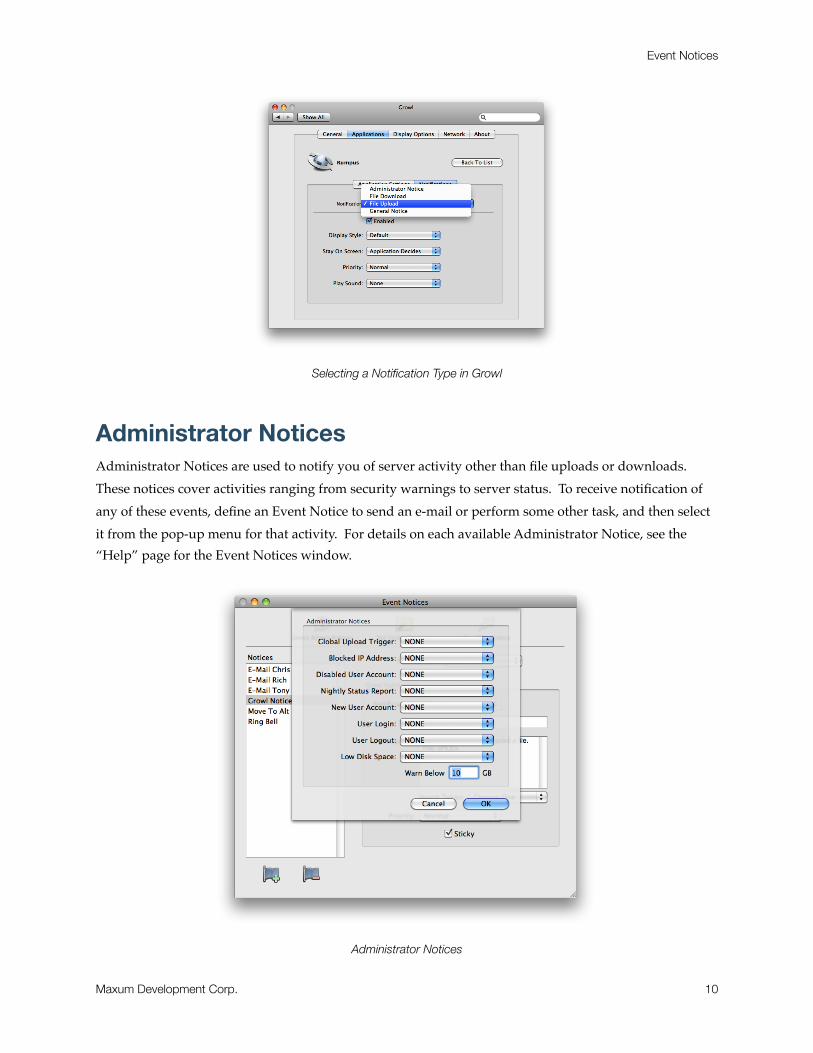
Selecting a Notification Type in Growl
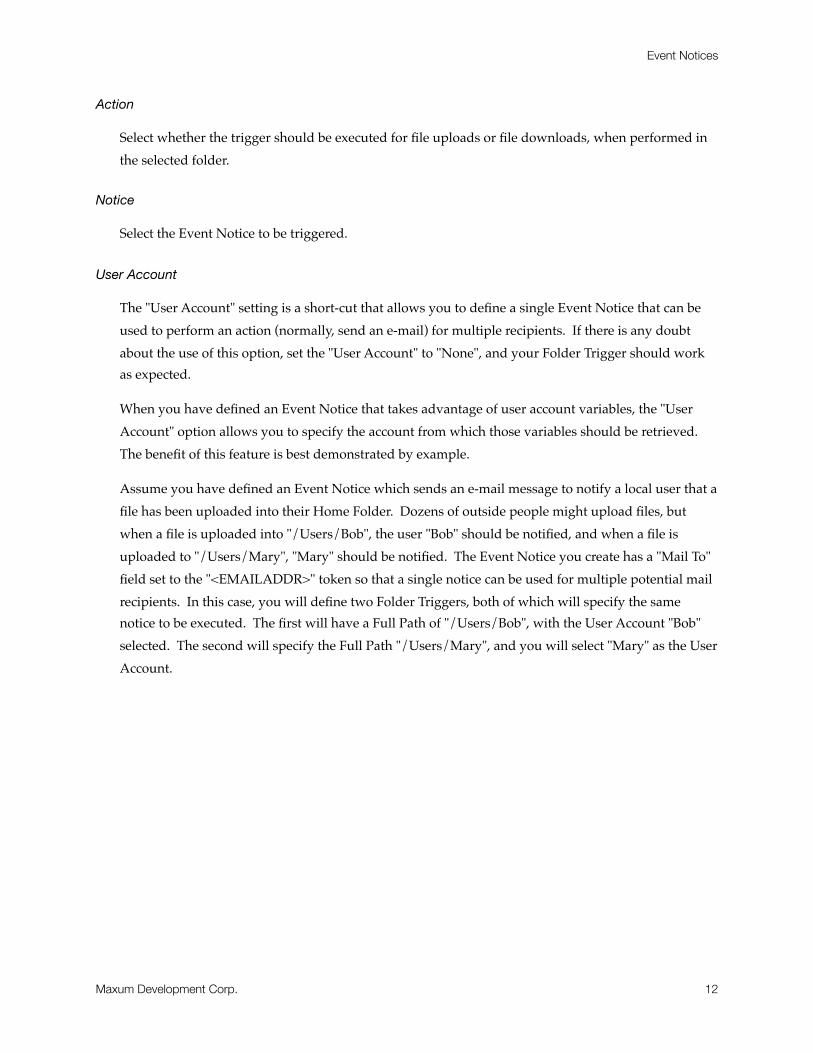
Administrator NoticesAdministrator Notices are used to notify you of server activity other than file uploads or downloads. These notices cover activities ranging from security warnings to server status. To receive notification of any of these events, define an Event Notice to send an e-mail or perform some other task, and then select it from the pop-up menu for that activity. For details on each available Administrator Notice, see the “Help” page for the Event Notices window.
Administrator Notices
Event Notices
Maxum Development Corp. 10

Folder TriggersFolder Triggers allow you to define actions which will execute an Event Notice based on the folder a file is uploaded into or downloaded from, rather than the user account used to transfer the file. Like many other Rumpus features, a list of Folder Triggers is maintained at the left side of the sheet. New triggers can be created by clicking the "Add Trigger" button below the list, and each trigger is defined by selecting the trigger name in the list and editing it's settings, at the right.
The Folder Trigger sheet
Trigger Name
Assign each Folder Trigger an easily identifiable name of your choosing.
Full Path
Specify the path of the folder you would like to have monitored for activity. The Event Notice will be executed when a user transfers a file to or from the selected folder path. To use the standard OS X folder selection dialog to set the folder, click the small folder button next to the path field.
Event Notices
Maxum Development Corp. 11
Action
Select whether the trigger should be executed for file uploads or file downloads, when performed in the selected folder.
Notice
Select the Event Notice to be triggered.
User Account
The "User Account" setting is a short-cut that allows you to define a single Event Notice that can be used to perform an action (normally, send an e-mail) for multiple recipients. If there is any doubt about the use of this option, set the "User Account" to "None", and your Folder Trigger should work as expected.
When you have defined an Event Notice that takes advantage of user account variables, the "User Account" option allows you to specify the account from which those variables should be retrieved. The benefit of this feature is best demonstrated by example.
Assume you have defined an Event Notice which sends an e-mail message to notify a local user that a file has been uploaded into their Home Folder. Dozens of outside people might upload files, but when a file is uploaded into "/Users/Bob", the user "Bob" should be notified, and when a file is uploaded to "/Users/Mary", "Mary" should be notified. The Event Notice you create has a "Mail To" field set to the "<EMAILADDR>" token so that a single notice can be used for multiple potential mail recipients. In this case, you will define two Folder Triggers, both of which will specify the same notice to be executed. The first will have a Full Path of "/Users/Bob", with the User Account "Bob" selected. The second will specify the Full Path "/Users/Mary", and you will select "Mary" as the User Account.
Event Notices
Maxum Development Corp. 12