account payables - rediker software · finacs – account payables page 7 of 32 • if the vendor...
TRANSCRIPT

ACCOUNT PAYABLES
TABLE OF CONTENTS
1. VENDOR INVOICES.......................................................................................2
2. VENDOR INVOICES LISTING ........................................................................10
3. VENDOR DEBITS ........................................................................................12
4. VENDOR DEBITS LISTING............................................................................17
5. PAY VENDOR INVOICES - INDIVIDUAL ..........................................................18
6. PAY VENDOR INVOICES - MULTIPLE .............................................................25
7. ADJUST VENDOR PAYMENTS/DEBITS ............................................................28
8. VENDOR PAYMENTS LISTING .......................................................................31
9. TRANSACTION SUMMARY - VENDORS ...........................................................32
(Note: Compiled for FINACS v 2.12.002)

FINACS – ACCOUNT PAYABLES Page 2 of 32
1. VENDOR INVOICES
A Vendor Bill is a recorded transaction that authorizes the delivery of specified merchandise from a vendor. Invoices received from vendors are recorded here. This is reflected in your Book of Accounts by crediting the vendor account and debiting the corresponding expense accounts. You can create vendor bills from open purchase orders or can also be raised directly against the vendor.
Creating Vendor Bills Finding Vendor Bills Editing Vendor Invoices Voiding Vendor Bills
Creating Vendor Bills:
1. Open the 'Enter Vendor Bills' screen from the Account Payables menu.
2. The screen will open in NEW mode with the focus in the VENDOR NAME field, allowing
you to directly add invoices. 3. Select a vendor from the VENDOR drop-down list.
FINACS – ACCOUNT PAYABLES Page 3 of 32
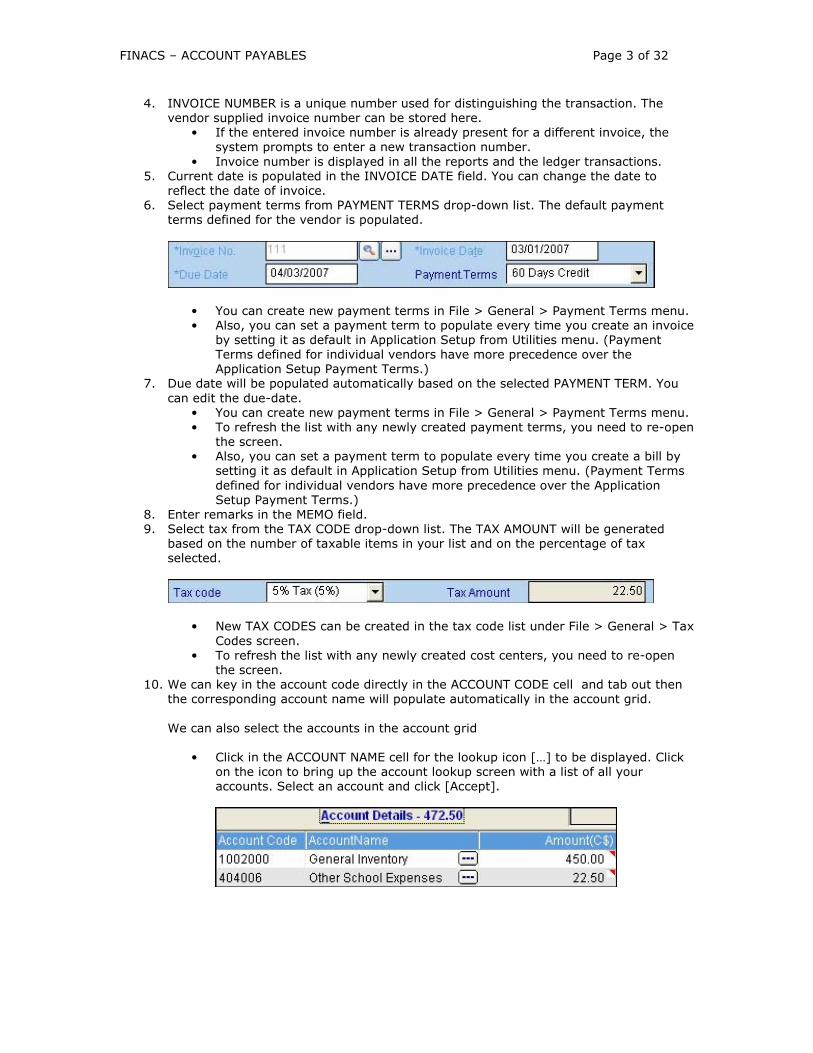
4. INVOICE NUMBER is a unique number used for distinguishing the transaction. The vendor supplied invoice number can be stored here.
• If the entered invoice number is already present for a different invoice, the system prompts to enter a new transaction number.
• Invoice number is displayed in all the reports and the ledger transactions. 5. Current date is populated in the INVOICE DATE field. You can change the date to
reflect the date of invoice. 6. Select payment terms from PAYMENT TERMS drop-down list. The default payment
terms defined for the vendor is populated.
• You can create new payment terms in File > General > Payment Terms menu. • Also, you can set a payment term to populate every time you create an invoice
by setting it as default in Application Setup from Utilities menu. (Payment Terms defined for individual vendors have more precedence over the Application Setup Payment Terms.)
7. Due date will be populated automatically based on the selected PAYMENT TERM. You
can edit the due-date. • You can create new payment terms in File > General > Payment Terms menu. • To refresh the list with any newly created payment terms, you need to re-open
the screen. • Also, you can set a payment term to populate every time you create a bill by
setting it as default in Application Setup from Utilities menu. (Payment Terms
defined for individual vendors have more precedence over the Application Setup Payment Terms.)
8. Enter remarks in the MEMO field. 9. Select tax from the TAX CODE drop-down list. The TAX AMOUNT will be generated
based on the number of taxable items in your list and on the percentage of tax selected.
• New TAX CODES can be created in the tax code list under File > General > Tax
Codes screen. • To refresh the list with any newly created cost centers, you need to re-open
the screen. 10. We can key in the account code directly in the ACCOUNT CODE cell and tab out then
the corresponding account name will populate automatically in the account grid.
We can also select the accounts in the account grid • Click in the ACCOUNT NAME cell for the lookup icon […] to be displayed. Click
on the icon to bring up the account lookup screen with a list of all your accounts. Select an account and click [Accept].

FINACS – ACCOUNT PAYABLES Page 4 of 32
• You can create new accounts in General Ledger > Setup Accounts > Chart of
Accounts. • Or, click [Add] in the Account Code - Lookup screen to directly add new
accounts. 11. The total of the amounts in the ACCOUNTS tab is displayed in the INVOICE AMOUNT
field. 12. Or, you can create a vendor bill by selecting the items to be invoiced. Items can be
selected in the ITEM DETAILS tab. We can key in the item code directly in ITEM CODE cell and tab out then the corresponding cells will populate automatically in item grid.
• Click in the ITEM cell for the lookup icon […] to be displayed. Click on the icon to bring up the item lookup screen with a list of all your items. Select an item and click [Accept].
Note: The ‘Red Tab’ that is visible in the AMOUNT (C$) field is to indicate the dollar currency conversion for that column since the amount is calculated in local currency. You can view the dollar currency conversion of the amounts by placing your mouse on the ‘Red Tab’.

FINACS – ACCOUNT PAYABLES Page 5 of 32
• You can create new items File > General > Items screen. • Or, click [Add] in the Item - Lookup screen to directly add new accounts.
Select the item and click [Accept]. 13. The respective accounts defined for the selected items are displayed in the ACCOUNT
DETAILS tab. If Budget is defined and the budgeted amount for the selected accounts exceed the user is notified based on the selected budget validations. Refer ‘Budget
Management’ and ‘Budget Validations’ for more details. 14. You can also change the account information by selecting the necessary accounts and
entering the amounts. You can also add additional accounts and distribute the amount. 15. The total of the amounts in the ACCOUNTS tab is displayed in the INVOICE AMOUNT
field. Make sure the sum of the amounts in the ITEMS tab and the tax amount is equal to the total amount in the ACCOUNTS tab.
16. Any modifications to the items, prices, quantities or taxes will update the INVOICE
AMOUNT automatically. 17. Click [Save] to record the information. 18. Click [Cancel] to abort the creation of vendor invoice or [Close] to close the screen. 19. Once saved, the [Print Invoice] button is enabled allowing you print the invoice. 20. The printed transaction displays all the accounts that are involved in the vendor bill.
The report header and footer details can be set using ‘Report Header’ under Utilities menu.
21. Use the [Change Fund] button to change the FUND or COST CENTER for the current transaction. You can set the required fund and cost center to populate every time you open the screen by defining them in the Application Setup screen from the Utilities
menu. The selected fund for the transaction can also be viewed on the title bar of the screen.
To create a vendor bill from purchase orders:
1. Select a vendor from the VENDOR drop-down list. 2. Follow step 2 – step 9 as mentioned above in the ‘Creating Vendor Bills’ section. 3. The application, Finacs auto populates a list of all open purchase orders present
against the selected vendor. 4. Or, Click on the ITEM DETAILS Tab. Click on the [Select PO] button present on the tab
header. A pop up screen with a list of all the purchase orders present against the selected vendor is displayed. The status of the purchase orders is also displayed against each PO.

FINACS – ACCOUNT PAYABLES Page 6 of 32
5. Select all the purchase orders to be billed and click [OK]. Fully invoiced purchase orders cannot be invoiced again.
6. The ITEM DETAILS tab lists all the items from the selected purchase orders. Tax, discount and quantity details are displayed accordingly and can be edited.
7. The TAX AMOUNT is generated based on the number of taxable items the percentage of tax selected in the purchase order(s).
• If many purchase orders are selected to create a single invoice, then the
combined TAX AMOUNT is calculated. • However, you can override the individual purchase order tax percentages by
selecting the tax code from the TAX CODE combo. This new tax is then applied to all the items in the list.
8. Click [Save] to record the information. 9. Click [Cancel] to abort the creation of vendor invoice or [Close] to close the form.
Finding Vendor Bills:
1. Display 'Enter Vendor Bills' screen from the Account Payables menu. 2. The screen will open in NEW mode for directly creating new vendor bills. Click [Cancel]
for VIEW mode.
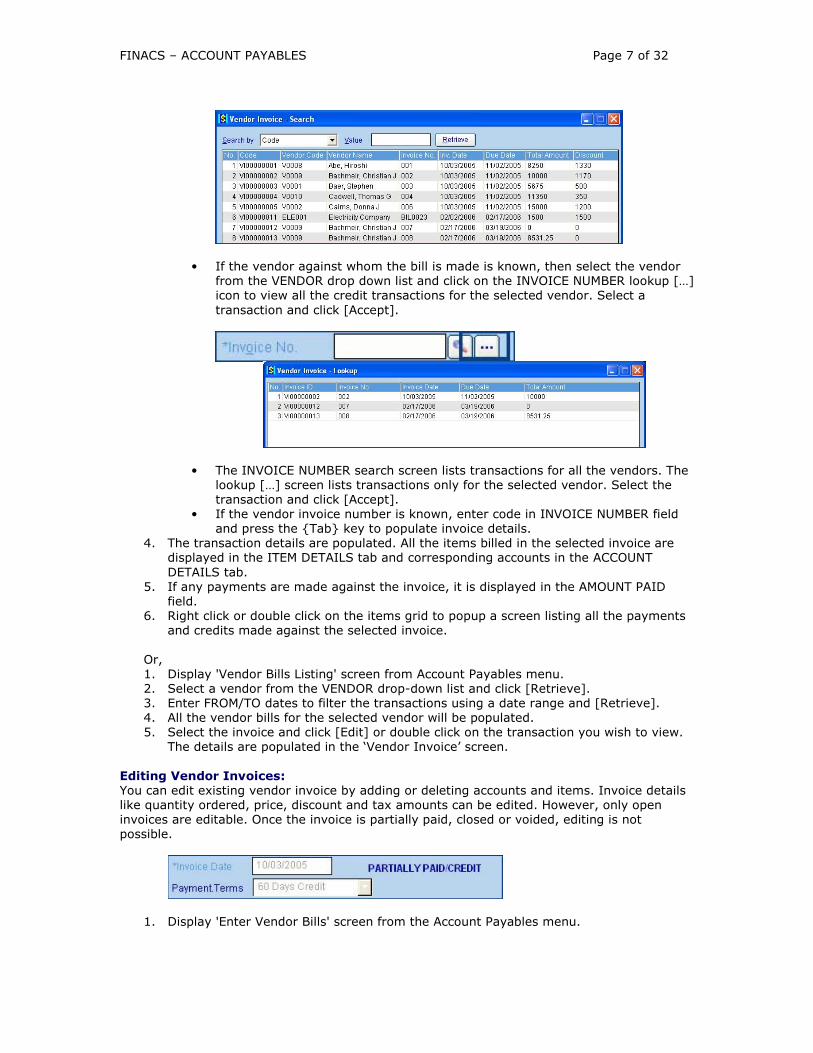
3. You can find a vendor invoice in any of the following methods: • Click the INVOICE NUMBER search icon to bring up a search screen. Click
[Retrieve] without using any filters to list all the existing vendor bills. Select a transaction and click [Accept].
FINACS – ACCOUNT PAYABLES Page 7 of 32
• If the vendor against whom the bill is made is known, then select the vendor from the VENDOR drop down list and click on the INVOICE NUMBER lookup […] icon to view all the credit transactions for the selected vendor. Select a
transaction and click [Accept].
• The INVOICE NUMBER search screen lists transactions for all the vendors. The lookup […] screen lists transactions only for the selected vendor. Select the transaction and click [Accept].
• If the vendor invoice number is known, enter code in INVOICE NUMBER field and press the {Tab} key to populate invoice details.
4. The transaction details are populated. All the items billed in the selected invoice are displayed in the ITEM DETAILS tab and corresponding accounts in the ACCOUNT
DETAILS tab. 5. If any payments are made against the invoice, it is displayed in the AMOUNT PAID
field. 6. Right click or double click on the items grid to popup a screen listing all the payments
and credits made against the selected invoice.
Or, 1. Display 'Vendor Bills Listing' screen from Account Payables menu. 2. Select a vendor from the VENDOR drop-down list and click [Retrieve]. 3. Enter FROM/TO dates to filter the transactions using a date range and [Retrieve]. 4. All the vendor bills for the selected vendor will be populated. 5. Select the invoice and click [Edit] or double click on the transaction you wish to view.
The details are populated in the ‘Vendor Invoice’ screen.
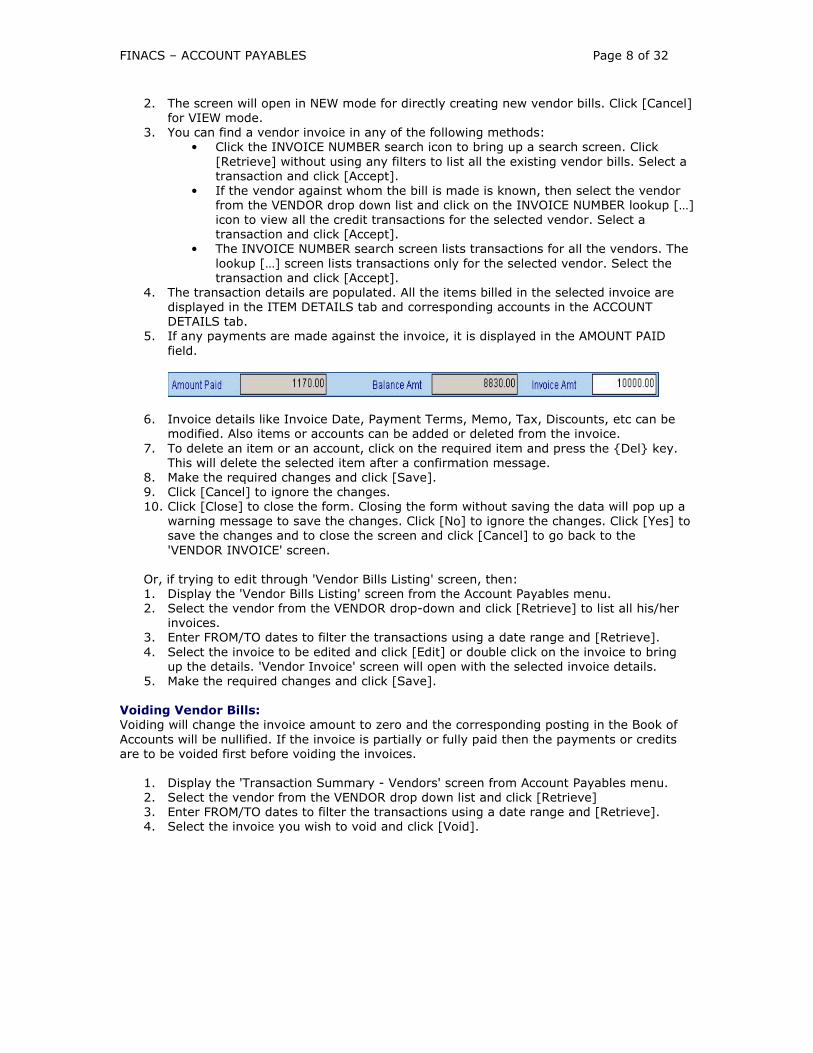
Editing Vendor Invoices: You can edit existing vendor invoice by adding or deleting accounts and items. Invoice details like quantity ordered, price, discount and tax amounts can be edited. However, only open invoices are editable. Once the invoice is partially paid, closed or voided, editing is not possible.
1. Display 'Enter Vendor Bills' screen from the Account Payables menu.
FINACS – ACCOUNT PAYABLES Page 8 of 32
2. The screen will open in NEW mode for directly creating new vendor bills. Click [Cancel] for VIEW mode.
3. You can find a vendor invoice in any of the following methods: • Click the INVOICE NUMBER search icon to bring up a search screen. Click
[Retrieve] without using any filters to list all the existing vendor bills. Select a transaction and click [Accept].
• If the vendor against whom the bill is made is known, then select the vendor from the VENDOR drop down list and click on the INVOICE NUMBER lookup […] icon to view all the credit transactions for the selected vendor. Select a transaction and click [Accept].
• The INVOICE NUMBER search screen lists transactions for all the vendors. The
lookup […] screen lists transactions only for the selected vendor. Select the transaction and click [Accept].
4. The transaction details are populated. All the items billed in the selected invoice are displayed in the ITEM DETAILS tab and corresponding accounts in the ACCOUNT DETAILS tab.
5. If any payments are made against the invoice, it is displayed in the AMOUNT PAID
field.
6. Invoice details like Invoice Date, Payment Terms, Memo, Tax, Discounts, etc can be modified. Also items or accounts can be added or deleted from the invoice.
7. To delete an item or an account, click on the required item and press the {Del} key. This will delete the selected item after a confirmation message.
8. Make the required changes and click [Save]. 9. Click [Cancel] to ignore the changes. 10. Click [Close] to close the form. Closing the form without saving the data will pop up a
warning message to save the changes. Click [No] to ignore the changes. Click [Yes] to save the changes and to close the screen and click [Cancel] to go back to the
'VENDOR INVOICE' screen. Or, if trying to edit through 'Vendor Bills Listing' screen, then: 1. Display the 'Vendor Bills Listing' screen from the Account Payables menu. 2. Select the vendor from the VENDOR drop-down and click [Retrieve] to list all his/her
invoices. 3. Enter FROM/TO dates to filter the transactions using a date range and [Retrieve].
4. Select the invoice to be edited and click [Edit] or double click on the invoice to bring up the details. 'Vendor Invoice' screen will open with the selected invoice details.
5. Make the required changes and click [Save].
Voiding Vendor Bills: Voiding will change the invoice amount to zero and the corresponding posting in the Book of
Accounts will be nullified. If the invoice is partially or fully paid then the payments or credits are to be voided first before voiding the invoices.
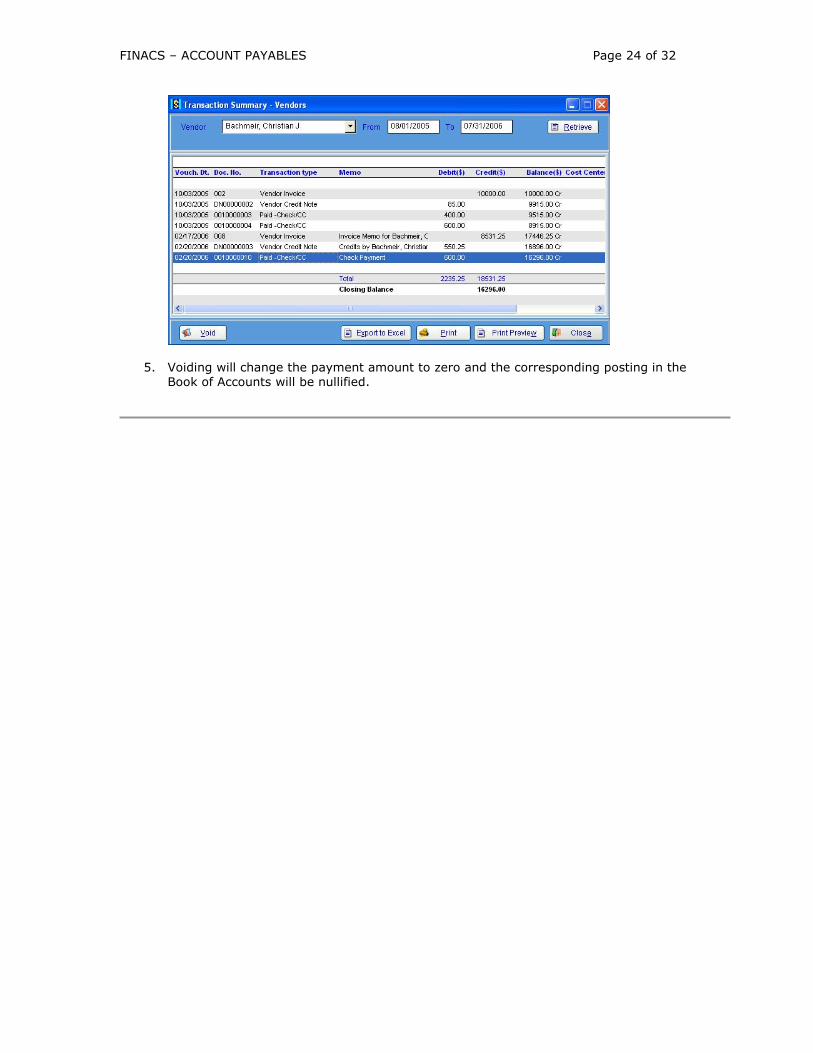
1. Display the 'Transaction Summary - Vendors' screen from Account Payables menu. 2. Select the vendor from the VENDOR drop down list and click [Retrieve] 3. Enter FROM/TO dates to filter the transactions using a date range and [Retrieve]. 4. Select the invoice you wish to void and click [Void].

FINACS – ACCOUNT PAYABLES Page 9 of 32
5. Voiding will change the invoice amount to zero and the corresponding posting in the Book of Accounts will be nullified.
Tip: You can set default PAYMENT TERMS in Utilities > Application Setup. Once set here, all your vendor transactions will auto populate the DUE DATE based on the default payment term. Payment Terms defined for individual vendors have precedence over the Application Setup Payment Terms.

FINACS – ACCOUNT PAYABLES Page 10 of 32
2. VENDOR INVOICES LISTING
You can view all the bills for the selected vendor here. Transaction details like Invoice Number, Invoiced Amount, Amount Due, Created Date, Due Date & Status are displayed. Click on the respective column headers to sort the list according to any of the above fields. By default the list is sorted by invoice numbers.
To view invoices: • Open the 'Vendor Bills Listing' screen from the Account Payables menu.
• Select a vendor from the VENDOR drop-down combo. • Enter the FROM and TO dates to list invoices in a date range. • Click [Retrieve] to list the invoices for the vendor in the entered date range.
To create a new invoice: • Select a vendor from the VENDOR drop-down combo. • Click [New]. This opens the 'Create Vendor Invoice' screen with the selected
vendor in the VENDOR NAME combo. • The screen is opened in new mode with all the user entry fields enabled and the
focus will be in the INVOICE NUMBER. • Enter all details and click [Save].
To edit an invoice: • Select a vendor from the VENDOR drop-down list.
• Click [Retrieve] button to list the invoices for the selected vendor. • Select the required invoice from the list and click [Edit]. • This opens the ‘Create Vendor Invoice’ screen with the selected invoice details. • Make the required changes. • Click [Save] to record your changes.
To make payments: • Select a vendor from the VENDOR drop-down list. • Click [Retrieve] button to list the invoices for the selected vendor. • Select the required invoice(s) from the list by clicking of the corresponding
checkboxes. • Click [Make Payments] button to create a payment voucher against the invoice.
Also, you can select many invoices and make a single payment.
To enter vender credits: • Select a vendor from the VENDOR drop-down list. • Click [Retrieve] button to list the invoices for the selected vendor. • Select the required invoice from the list. • Click [Enter Vendor Debits] to enter vendor debits against the selected invoice.
Also, you can select many invoices and enter credits in a single credit entry.

FINACS – ACCOUNT PAYABLES Page 11 of 32
• 'Vendor Debits' screen will be opened with the selected vendor and invoice. Enter the details and [Save].
Tip:
From the 'Vendor Invoice Listing', you can directly edit the invoice, by double-clicking on it.
FINACS – ACCOUNT PAYABLES Page 12 of 32
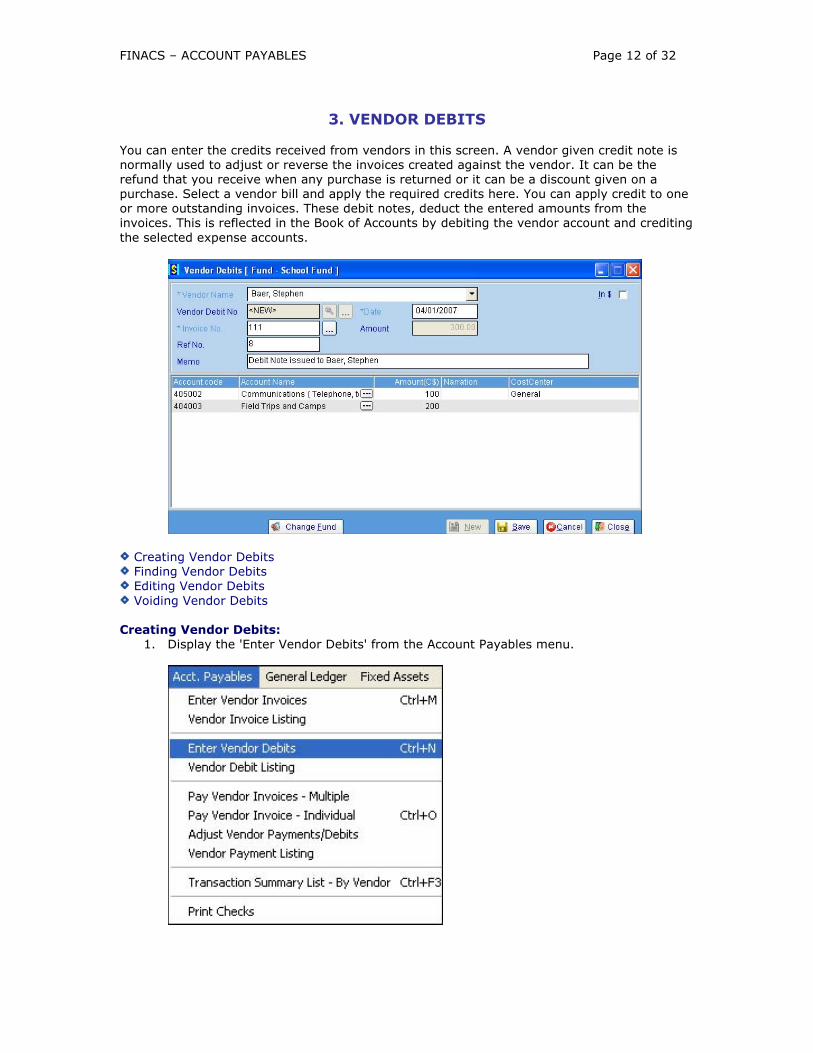
3. VENDOR DEBITS
You can enter the credits received from vendors in this screen. A vendor given credit note is normally used to adjust or reverse the invoices created against the vendor. It can be the refund that you receive when any purchase is returned or it can be a discount given on a purchase. Select a vendor bill and apply the required credits here. You can apply credit to one or more outstanding invoices. These debit notes, deduct the entered amounts from the invoices. This is reflected in the Book of Accounts by debiting the vendor account and crediting
the selected expense accounts.
Creating Vendor Debits Finding Vendor Debits Editing Vendor Debits
Voiding Vendor Debits Creating Vendor Debits:
1. Display the 'Enter Vendor Debits' from the Account Payables menu.
FINACS – ACCOUNT PAYABLES Page 13 of 32
2. The screen will open in NEW mode with the focus in the vendor Name field, allowing you to directly create credit notes.
3. Select a vendor from the VENDOR drop-down list. 4. DEBIT NUMBER is a system generated unique number used of distinguishing the
transaction. It is created once the transaction is saved. Debit number is displayed in all the reports and the ledger transactions.
5. The TRANSACTION DATE displays the current date. This can be changed to reflect the actual date of credit received.
6. Enter remarks in the MEMO field. 7. Vendor Debits should be made against invoices. Maximum credit received against an
invoice can be less than or equal to the amount due.
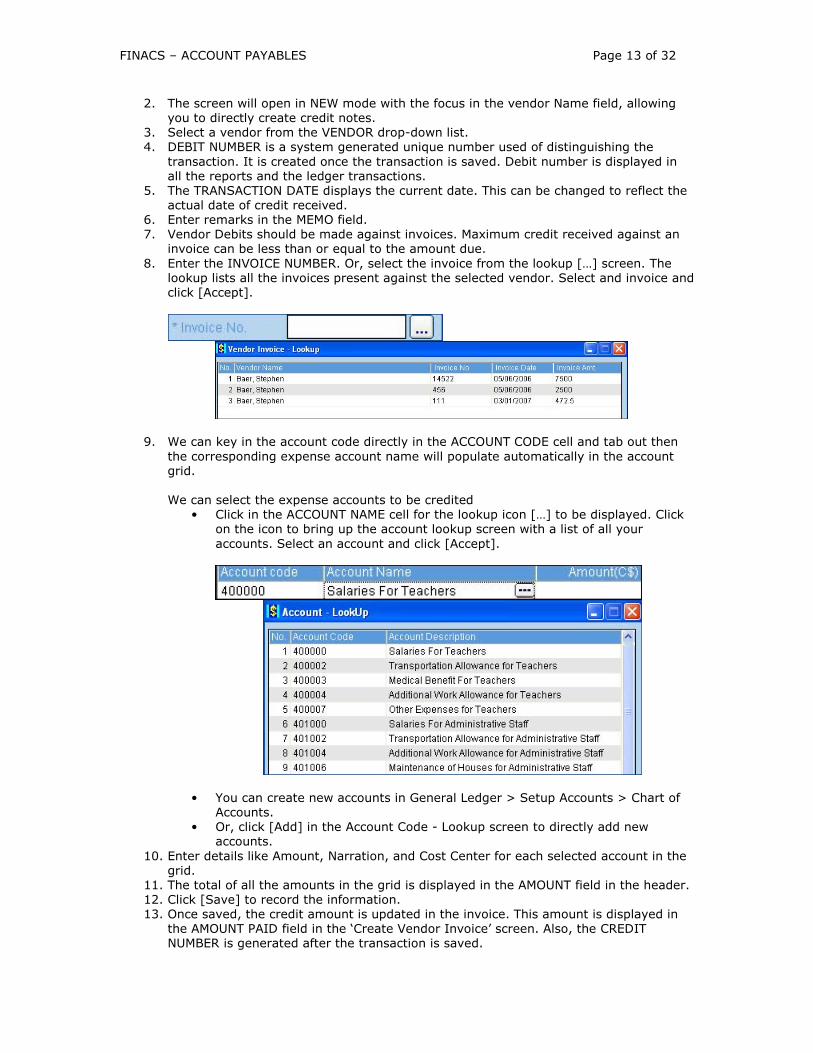
8. Enter the INVOICE NUMBER. Or, select the invoice from the lookup […] screen. The lookup lists all the invoices present against the selected vendor. Select and invoice and click [Accept].
9. We can key in the account code directly in the ACCOUNT CODE cell and tab out then
the corresponding expense account name will populate automatically in the account grid. We can select the expense accounts to be credited
• Click in the ACCOUNT NAME cell for the lookup icon […] to be displayed. Click on the icon to bring up the account lookup screen with a list of all your
accounts. Select an account and click [Accept].
• You can create new accounts in General Ledger > Setup Accounts > Chart of Accounts.
• Or, click [Add] in the Account Code - Lookup screen to directly add new accounts.
10. Enter details like Amount, Narration, and Cost Center for each selected account in the grid.
11. The total of all the amounts in the grid is displayed in the AMOUNT field in the header. 12. Click [Save] to record the information. 13. Once saved, the credit amount is updated in the invoice. This amount is displayed in
the AMOUNT PAID field in the ‘Create Vendor Invoice’ screen. Also, the CREDIT NUMBER is generated after the transaction is saved.

FINACS – ACCOUNT PAYABLES Page 14 of 32
14. Use the [Change Fund] button to change the FUND or COST CENTER for the current transaction. You can set the required fund and cost center to populate every time you open the screen by defining them in the Application Setup screen from the Utilities menu. The selected fund for the transaction can also be viewed on the title bar of the
screen. Finding Vendor Debits:
1. Display 'Enter Vendor Debits' screen from the Account Payables menu. 2. The screen will open in NEW mode for directly creating new vendor debits. Click
[Cancel] for VIEW mode.
3. You can find a vendor debit transaction in any of the following methods: • Click the VENDOR DEBIT NUMBER search icon to bring up a search screen.
Click [Retrieve] without using any filters to list all the existing credits given by all your vendors. Select a transaction and click [Accept].
• If the vendor against whom the bill is made is known, then select the vendor from the VENDOR drop down list and click on the VENDOR DEBIT NUMBER lookup […] icon to view all the credits given by the selected vendor. Select a
transaction and click [Accept].
• The VENDOR DEBIT NUMBER search screen lists transactions for all the vendors. The lookup […] screen lists transactions only for the selected vendor. Select the transaction and click [Accept].
• If the vendor debit number is known, enter code in VENDOR DEBIT NUMBER field and press the {Tab} key to populate invoice details.
4. The transaction details are populated. The invoice against which the selected debit is
applied and the corresponding accounts are displayed. Or, 1. Display 'Vendor Debits Listing' screen from Account Payables. 2. Select the vendor from the VENDOR drop-down and click [Retrieve]. 3. Enter FROM/TO dates to filter the transactions using a date range and [Retrieve]. 4. All the vendor debits for the selected vendor will be populated.
5. Double click on the vendor credit you wish to view. The details are populated in the ‘Enter Vendor Debits’ screen.
Editing Vendor Debits:
1. Display 'Enter Vendor Debits' screen from the Account Payables menu. 2. The screen will open in NEW mode for directly creating new vendor credit. Click
[Cancel] for VIEW mode.

FINACS – ACCOUNT PAYABLES Page 15 of 32
3. You can find a vendor debit transaction in any of the following methods: • Click the VENDOR DEBIT NUMBER search icon to bring up a search screen.
Click [Retrieve] without using any filters to list all the existing credits given by all your vendors. Select a transaction and click [Accept].
• If the vendor against whom the bill is made is known, then select the vendor from the VENDOR drop down list and click on the VENDOR DEBIT NUMBER lookup […] icon to view all the credits given by the selected vendor. Select a transaction and click [Accept].
• The VENDOR DEBIT NUMBER search screen lists transactions for all the vendors. The lookup […] screen lists transactions only for the selected vendor. Select the transaction and click [Accept].
4. The selected debit transaction details are populated. The invoice against which the selected debit is applied and the corresponding accounts are displayed.
5. You can modify the amounts for the accounts. Also, existing accounts can be deleted and new accounts can be added.
6. To delete an account, select the account and press {Del} key. This deletes the account after a confirmation message.
7. To add new accounts, click in the ACCOUNT NAME cell for the lookup icon […] to be displayed. Click on the icon to bring up the account lookup screen with a list of all your accounts. Select an account and click [Accept].
8. The AMOUNT field in the header gets updated accordingly based on the total of all the amounts in the grid.
9. Click [Save] to record the information. 10. Click [Cancel] to ignore the changes.
11. Click [Close] to close the form. Closing the form without saving the data will pop up a warning message to save the changes. Click [No] to ignore the changes. Click [Yes] to save the changes and to close the screen and click [Cancel] to go back to the ‘Enter Vendor Debits' screen.
Voiding Vendor Debits: Voiding will change the transaction amount to zero and the corresponding posting in the Book
of Accounts will be nullified. Note: If you wish to void a vendor bill that is partially or fully paid. Then the payments or credits should be voided first before voiding the invoice.
1. Display the 'Transaction Summary - Vendors ' screen from Account Payables menu.

FINACS – ACCOUNT PAYABLES Page 16 of 32
2. Select the vendor from the VENDOR drop down list. 3. Enter the FROM and TO dates to list transactions in a date range and click [Retrieve]. 4. All the transactions for the selected vendor are populated.
5. Select the debit transaction to be voided and click [Void]. 6. Voiding will change the debit amount to zero and the corresponding posting in the
Book of Accounts will be nullified.

FINACS – ACCOUNT PAYABLES Page 17 of 32
4. VENDOR DEBITS LISTING
You can view credits given by a vendor here. Transaction details like Vendor Credit Number, Credit Amount, Created Date, Memo and the Invoice against which the credit is applied are displayed. Click on the respective column headers to sort the list according to any of the above fields. By default the list is sorted by vendor credit numbers.
To view credit transactions: • Display ‘Vendor Debits Listing’ screen from Account Payables menu. • Select a vendor from the VENDOR drop-down list. • Enter FROM/TO dates to filter the transactions using a date range. • Click [Retrieve] button to list the credits given by the selected vendor in the specified date
range. • Double click on the credit transaction you wish to view. The details are populated in the
‘Create Vendor Debits’ screen. To make a new credit transaction: • Select a vendor from the VENDOR drop-down list. • Click [New]. This opens the ‘Enter Vendor Debits' screen with the selected vendor details.
• The screen is opened in new mode allowing you to create a new credit transaction. Select the corresponding accounts and the invoice being given credit.
• Enter remaining details and click [Save]. To edit a credit transaction: • Select the Vendor and click [Retrieve]. All the credits are listed.
• Select the credit transaction to be edited from the list. • Click [Edit]. The transaction details are populated in the ‘Enter Vendor Debits' screen. • Make the required changes. Refer ‘Editing Vendor Debits’ section for a detailed
explanation. • Click [Save] to record your changes. Tip:
You can directly edit a vendor debit by double clicking on the credit transaction in the Listing screen.

FINACS – ACCOUNT PAYABLES Page 18 of 32
5. PAY VENDOR INVOICES - INDIVIDUAL
You can view bills and make payments here. The payment grid lists all your unpaid bills against the selected vendor as of date. Mode of payment can be through cash, check or through credit card. You can apply the payment to one or more outstanding bills. The payment transaction indicates that the payment is made to the vendor and the paid amount is reflected in the vendor’s balance. This is reflected in your Book of Accounts by debiting the vendor’s account and crediting the corresponding cash/bank/credit card accounts.
Payments can be made against outstanding bills or can be advance payments. Finacs allows you to make advance payments against all your vendors. These payments can later be adjusted against outstanding invoices using the ‘Adjust Vendor Payments/Debits’ screen. Also, multiple accounts having debits and credits can be added for more flexibility and to make the transaction reflect in all the selected accounts.
Making Vendor Payments Finding Vendor Payments Editing Vendor Payments
Voiding Vendor Payments
Making Vendor Payments: 1. Display the 'Pay Vendor Invoices - Individual' screen from Account Payables menu.

FINACS – ACCOUNT PAYABLES Page 19 of 32
2. The screen will open in NEW mode allowing you to directly make payments. 3. Choose CASH as your mode of payment for cash payments, CHECK for check
payments & CREDIT CARD for credit card payments. By default mode of payment is CHECK.
4. Based on the payment method, the accounts in the ACCOUNTS combo are populated. • If cash option is selected then only accounts those are defined, as CASH are
listed. For check option, accounts that are defined as CHECK or whose control type is CHECK are listed. Similarly for credit card option, accounts defined as CREDIT CARD are listed.
• You can create new accounts in General Ledger > Setup Accounts > Chart of Accounts.
• To refresh the list with any newly created accounts, re-open the screen. • Also, you can define default accounts to populate every time a mode of
payment is selected by setting them as default in Application Setup from Utilities menu. (Select the appropriate accounts for the fields – Cash On Hand, Checks on Hand and Credit Card Receipt for the default settings.)
5. Select the account from the PAY FROM drop-down list. This cash / bank / credit card account is credited once the transaction is saved.
6. For Cash and Credit Card payments, TRANSACTION NUMBER is a system generated unique number used of distinguishing the transaction. It is created once the transaction is saved. Transaction number is displayed in all the reports and ledger transactions.
7. For Check payments, CHECK NUMBER is generated once the check is printed. Reference number is displayed in all the reports and the ledger transactions.
8. The TRANSACTION DATE will display current date. This can be changed to reflect the actual date of payment.
9. Select a vendor from the VENDOR drop-down list. You can pay only vendors present in your vendor list. If you do not find a vendor's name in the drop-down list, you can quickly add the vendor to your company's list by clicking [Add New] button.
10. All the outstanding bills for the selected vendor are listed in the BILL DETAILS tab. Also, opening balances and JVs (vendor credits) are listed in the details tab.

FINACS – ACCOUNT PAYABLES Page 20 of 32
11. Enter the amount of payment in the AMOUNT field. (This field is enabled only for Advance Payments.)
12. Select one or more bills you wish to pay. The selection will assume that you are clearing the whole Amount Due and will populate the full amount in the Amount Paid
column. If you wish to edit the payment amount, change the amount in the AMOUNT PAID column.
13. The total of all the AMOUNT PAID columns is displayed in the AMOUNT field. The AMOUNT IN WORDS is populated based on AMOUNT field.
14. For check payments, the amount being credited from the bank is displayed in the CHECK AMOUNT field. In this case, the AMOUNT IN WORDS reflects the CHECK
AMOUNT.
15. The ACCOUNT DETAILS tab displays the accounts that are affected in the current
transaction.
• By default the selected cash/bank/credit card account that is being credited and the vendor account that is being debited is displayed.
• The DEBIT and CREDIT amounts are displayed based on the selected bills in the BILL DETAILS tab. (The total of the AMOUNT PAID columns is displayed.)
• The debit amount against the vendor cannot be edited in the ACCOUNT
DETAILS tab. To change this amount, make the necessary changes in the BILL DETAILS tab.
• The credit amount from the cash/bank/credit card account can be edited. For bank payments, this amount is displayed in the CHECK AMOUNT field and is the actual amount that is being credited.
16. Multiple accounts with the corresponding debit and credit amounts can be selected in the ACCOUNTS TAB. The total debits and credits should match before saving the
transaction. • To add accounts, click in the ACCOUNT NAME cell for the lookup icon […] to be
displayed. Click on the icon to bring up the account lookup screen with a list of all your accounts. Select an account and click [Accept].
• You can create new accounts in General Ledger > Setup Accounts > Chart of Accounts.
• Or, click [Add] in the Account Code - Lookup screen to directly add new accounts.

FINACS – ACCOUNT PAYABLES Page 21 of 32
17. If you wish to make advance payments or payments that are not made against any invoices, then click the ADVANCE PAYMENT checkbox.
18. This disables the BILL DETAILS tab and allows you to directly enter the payment amount in the AMOUNT field.
19. The ACCOUNT DETAILS tab displays the accounts that are affected in the current transaction. Multiple accounts can be added or the debit/credit amounts can be edited
to reflect the required transaction accordingly. If Budget is defined and the budgeted amount for the selected accounts exceed the user is notified based on the selected budget validations. Refer ‘Budget Management’ and ‘Budget Validations’ for more details.
20. Click [Save] to record the information. 21. Once saved, for cash /credit card transactions, the TRANSACTION NUMBER is
generated and the [Print Receipt] button is enabled allowing you print the payment
receipt. 22. For check payments, the check number still says <To Be Printed>. To print the check,
click the [Print Check] button. The check will be printed with the next available check number for the selected bank account.
23. You can print and reprint all your issued checks later from the 'Print Check' screen. Refer ‘Printing Issued Checks’ section for more details.
24. Use the [Change Fund] button to change the FUND or COST CENTER for the current transaction. You can set the required fund and cost center to populate every time you open the screen by defining them in the Application Setup screen from the Utilities menu. The selected fund for the transaction can also be viewed on the title bar of the screen.
25. Click [Cancel] to abort and [Close] to close the form.
Finding Vendor Payments: 1. Display 'Pay Vendor Invoices - Individual' screen from the Account Payables menu. 2. The screen will open in NEW mode for directly making new vendor payments. Click
[Cancel] for VIEW mode.
3. You can find a vendor payment transaction in any of the following methods: • Click on the TRANSACTION NUMBER search icon to bring up a search screen. Click
[Retrieve] without using any filters to list all the existing payment transactions. Select the transaction and click [Accept].

FINACS – ACCOUNT PAYABLES Page 22 of 32
• If the transaction number is known, enter code in TRANSACTION NUMBER field and press the {Tab} key to populate transaction details.
4. The invoices that are paid in the selected transaction are displayed. The accounts
affected in the selected transaction are listed in the Account Details tab. Or, if you are trying to find out the payment transaction from the ‘Payment Listing’ screen: 1. Display 'Vendor Payments Listing' screen from Account Payables. 2. Select a vendor from the VENDOR drop-down list. 3. Enter FROM/TO dates to filter the payments using a date range. 4. Click [Retrieve] button to list the payments made to the selected vendor in the
specified date range. 5. Double click on the payment you want to view. The payment details are populated.
Editing Vendor Payments: You can edit existing payment transactions by adding or deleting accounts that are affected by the transaction. However, the header section details like the transaction
DATE, AMOUNT and CHECK AMOUNT cannot be edited. You can void the transaction and create new if any of the above mentioned header section details are to be modified.
1. Display 'Pay Vendor Invoices - Individual' screen from the Account Payables menu. 2. The screen will open in NEW mode for directly making new vendor payments. Click
[Cancel] for VIEW mode.
3. Click on the TRANSACTION NUMBER search icon to bring up a search screen. Click [Retrieve] without using any filters to list all the existing payment transactions. Select the transaction and click [Accept].

FINACS – ACCOUNT PAYABLES Page 23 of 32
4. The TRANSACTION NUMBER, DATE, AMOUNT, PAYMENT METHOD, etc., are displayed in the header section and the invoices against which the payment is made are displayed in the BILL DETAILS tab. The accounts affected in the selected transaction are listed in the ACCOUNT DETAILS tab.
5. You cannot change the mode of payment. However, the account details can be changed.
6. Multiple accounts with the corresponding debit and credit amounts can be selected in the ACCOUNTS TAB. The total debits and credits should match before saving the transaction.
• To add accounts, click in the ACCOUNT NAME cell for the lookup icon […] to be displayed. Click on the icon to bring up the account lookup screen with a list of
all your accounts. Select an account and click [Accept].
• You can create new accounts in General Ledger > Setup Accounts > Chart of Accounts.
• Or, click [Add] in the Account Code - Lookup screen to directly add new accounts.
7. Make the required changed and click [Save] to record the information. 8. Click [Close] to close the form. Closing the form without saving the data will pop up a
warning message to save the changes. Click [No] to ignore the changes. Click [Yes] to save the changes and to close the screen and click [Cancel] to go back to the ‘Pay Vendor Invoices - Individual' screen.
Voiding Vendor Payments: Voiding will change the payment amount to zero and the corresponding posting in the Book of Accounts will be nullified. If you wish to void and invoice that is partially or fully paid. Then the
payments or credits should be voided first before voiding the invoice.
1. Display the 'Transaction Summary – Vendors’ screen from Account Payables menu. 2. Select the vendor from the VENDOR drop down list. 3. Enter FROM/TO dates to filter the invoices in a date range.
4. Select the payment to be voided and click [Void].
FINACS – ACCOUNT PAYABLES Page 24 of 32
5. Voiding will change the payment amount to zero and the corresponding posting in the Book of Accounts will be nullified.
FINACS – ACCOUNT PAYABLES Page 25 of 32
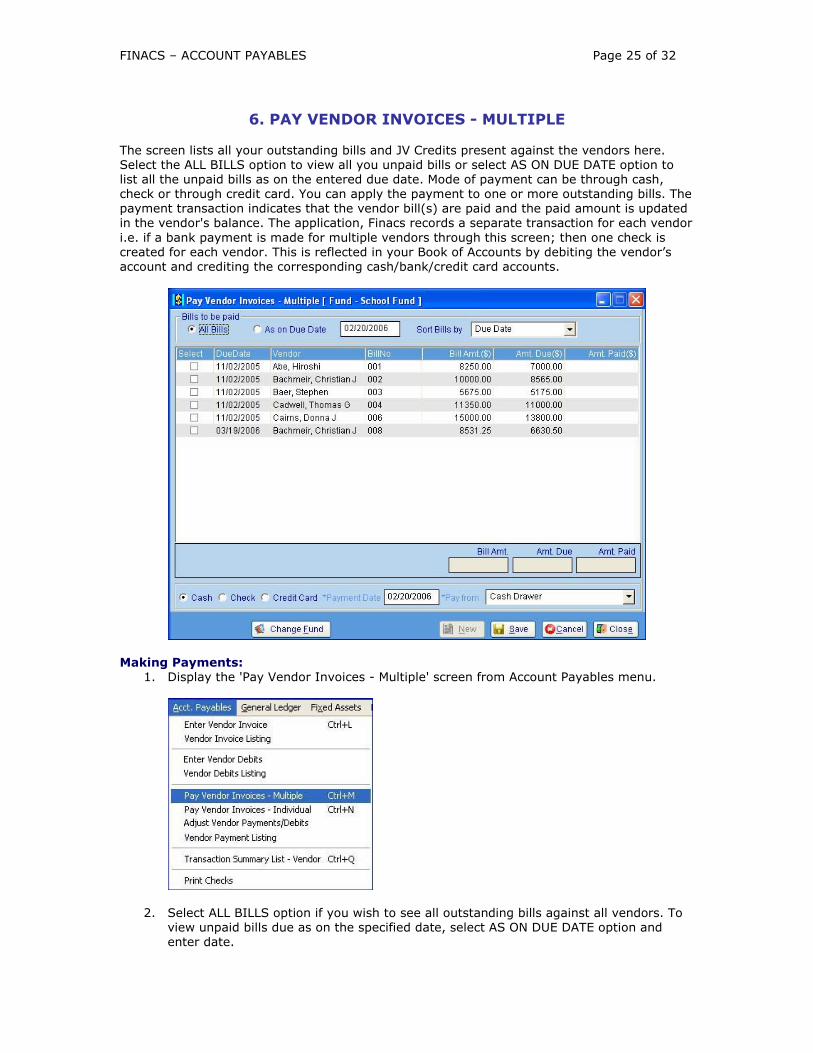
6. PAY VENDOR INVOICES - MULTIPLE
The screen lists all your outstanding bills and JV Credits present against the vendors here. Select the ALL BILLS option to view all you unpaid bills or select AS ON DUE DATE option to list all the unpaid bills as on the entered due date. Mode of payment can be through cash, check or through credit card. You can apply the payment to one or more outstanding bills. The payment transaction indicates that the vendor bill(s) are paid and the paid amount is updated in the vendor's balance. The application, Finacs records a separate transaction for each vendor
i.e. if a bank payment is made for multiple vendors through this screen; then one check is created for each vendor. This is reflected in your Book of Accounts by debiting the vendor’s account and crediting the corresponding cash/bank/credit card accounts.
Making Payments: 1. Display the 'Pay Vendor Invoices - Multiple' screen from Account Payables menu.
2. Select ALL BILLS option if you wish to see all outstanding bills against all vendors. To view unpaid bills due as on the specified date, select AS ON DUE DATE option and enter date.

FINACS – ACCOUNT PAYABLES Page 26 of 32
3. All your unpaid bills and JV Credits present against the vendors are listed in the grid. 4. You can select the various filters from the SORT BILLS BY drop-down sort the bills
accordingly or click on the respective grid headers. 5. Select one or more bills by clicking on the checkboxes. The selection assumes that the
complete AMOUNT DUE is being cleared and populates the full amount in the AMOUNT
PAID column. 6. If you wish to edit the payment amount for any bill, change the amount in the
AMOUNT PAID column.
7. The BILL AMOUNT field displays the total outstanding amount for all the invoices. The
AMOUNT DUE field displays the total amount due for all the displayed invoices. The AMOUNT PAID field displays the total amount being paid in the current transaction.
8. One transaction voucher is created for each vendor. The application, Finacs considers different bills for the same vendor as a single payment transaction.
9. Select your mode of payment from the CASH/CHECK/CREDIT CARD options. By default mode of payment is CHECK.
10. Based on the selection, the accounts in the PAY FROM combo are populated.
• If cash option is selected then only accounts that are designated, as CASH will be listed.
• If check option is selected then only accounts that are designated, as CHECK will be listed.
• If credit card option is selected then only accounts that are designated, as CREDIT CARD will be listed.
• If the account you are looking for is not listed then make sure that the account type is correct.
• You can create new accounts in General Ledger > Setup Accounts > Chart of Accounts.
11. Current date is populated in the PAYMENT DATE field. This can be edited to reflect the actual date of payment.
12. Click [Save] to record the information.

FINACS – ACCOUNT PAYABLES Page 27 of 32
13. Once the payments are saved, then the application, Finacs creates vouchers based on the number of vendor bills being paid. All these transactions can be viewed individual from the ‘Pay Vendor Invoices - Individual’ screen.
14. Use the [Change Fund] button to change the FUND or COST CENTER for the current
transaction. You can set the required fund and cost center to populate every time you open the screen by defining them in the Application Setup screen from the Utilities menu. The selected fund for the transaction can also be viewed on the title bar of the screen.
15. Click [Cancel] to abort and [Close] to close the form.

FINACS – ACCOUNT PAYABLES Page 28 of 32
7. ADJUST VENDOR PAYMENTS/DEBITS You can adjust existing Advance Payments, JV Vendor Debits and Opening Balances against outstanding bills and other credits for the selected vendor in this screen. For example, consider that an advance payment is made to a vendor. Later this payment can be adjusted/knocked off against his/her pending invoices using this screen. Also, a JV Vendor Debit transaction or a debit opening balance can be adjusted against pending bills or credits. Adjustments do not create new transactions and doesn’t affect financial records. The actual
transactions are already created when the advance payments or JVs are made from the individual screens.
To Adjust Vendor Payments/ Debits / Opening Balance Editing Saved Adjustments
To Adjust Vendor Payments/Debits/Opening:
1. Display the ‘Adjust Vendor Payments/Debits’ screen from Account Payables menu.
2. Select the type of transaction that is being adjusted. ADVANCE PAYMENTS, JV DEBITS and OPENING BALANCES can be adjusted from this screen.
3. The payment or the journal transaction can be opened in any one of the following
methods: • Click on the PAYMENT ID/ JOURNAL VOUCHER NUMBER search icon to bring up
a search screen. A search screen with various filter conditions is opened. Click

FINACS – ACCOUNT PAYABLES Page 29 of 32
[Retrieve] with empty filter conditions – to populate all the advance payments or JV debits or opening balance (based on the selection). Select the required voucher and click [Accept] to populate the related details.
• Select a vendor from the VENDOR drop-down list. Click on the PAYMENT ID/ JOURNAL VOUCHER NUMBER lookup icon […] to bring up a list of all the vouchers (advance payments or JV debits or opening balance based on the selection) to be adjusted for the selected vendor. Select the required voucher and click [Accept] to populate the related details.
• The search screen lists vouchers to be adjusted for all the vendors. The lookup […] screens lists vouchers only for the selected vendor.
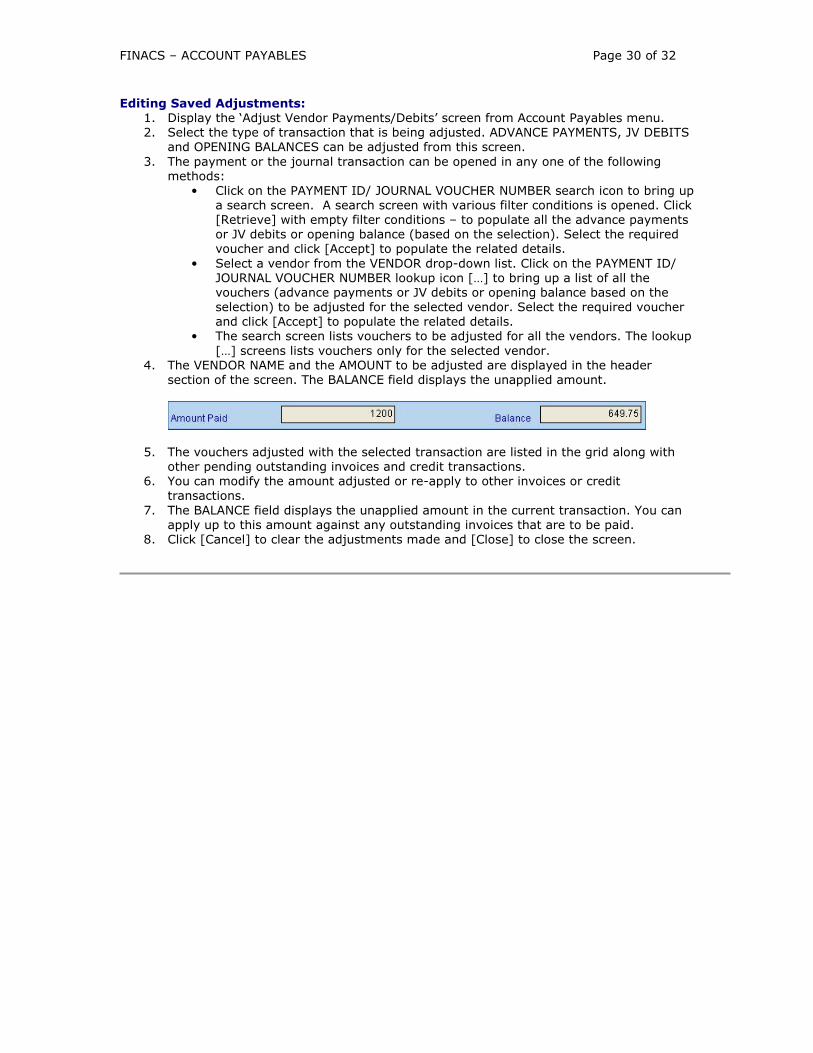
4. The VENDOR NAME and the AMOUNT to be adjusted are displayed in the header section of the screen. The BALANCE field displays the unapplied amount.
5. All the outstanding invoices and other credits present against the vendor are listed in the payment grid. The BALANCE amount can be matched against any of these outstanding bills.
6. Select the invoices or credits against which you wish to adjust by clicking on the checkboxes present against each listed transaction. The selection assumes that you
are clearing the whole AMOUNT DUE and will populate the full amount or the BALANCE AMOUNT in the AMOUNT ADJUSTED column for each invoice.
7. If you wish to edit the adjusted amount, change the amount in the AMOUNT ADJUSTED column. The BALANCE field amount in the header gets updated accordingly.
8. Click [Adjust Payment]. The Advance Payment / JV Debit / Opening Balance is
adjusted against the selected bills. 9. Click [Cancel] to clear the adjustments made and [Close] to close the screen. 10. Also, you can select a vendor and view all the outstanding invoices and credits present
against the selected vendor.
FINACS – ACCOUNT PAYABLES Page 30 of 32
Editing Saved Adjustments:
1. Display the ‘Adjust Vendor Payments/Debits’ screen from Account Payables menu. 2. Select the type of transaction that is being adjusted. ADVANCE PAYMENTS, JV DEBITS
and OPENING BALANCES can be adjusted from this screen.
3. The payment or the journal transaction can be opened in any one of the following methods:
• Click on the PAYMENT ID/ JOURNAL VOUCHER NUMBER search icon to bring up a search screen. A search screen with various filter conditions is opened. Click [Retrieve] with empty filter conditions – to populate all the advance payments or JV debits or opening balance (based on the selection). Select the required voucher and click [Accept] to populate the related details.
• Select a vendor from the VENDOR drop-down list. Click on the PAYMENT ID/ JOURNAL VOUCHER NUMBER lookup icon […] to bring up a list of all the vouchers (advance payments or JV debits or opening balance based on the selection) to be adjusted for the selected vendor. Select the required voucher and click [Accept] to populate the related details.
• The search screen lists vouchers to be adjusted for all the vendors. The lookup
[…] screens lists vouchers only for the selected vendor. 4. The VENDOR NAME and the AMOUNT to be adjusted are displayed in the header
section of the screen. The BALANCE field displays the unapplied amount.
5. The vouchers adjusted with the selected transaction are listed in the grid along with other pending outstanding invoices and credit transactions.
6. You can modify the amount adjusted or re-apply to other invoices or credit transactions.
7. The BALANCE field displays the unapplied amount in the current transaction. You can apply up to this amount against any outstanding invoices that are to be paid.
8. Click [Cancel] to clear the adjustments made and [Close] to close the screen.
FINACS – ACCOUNT PAYABLES Page 31 of 32
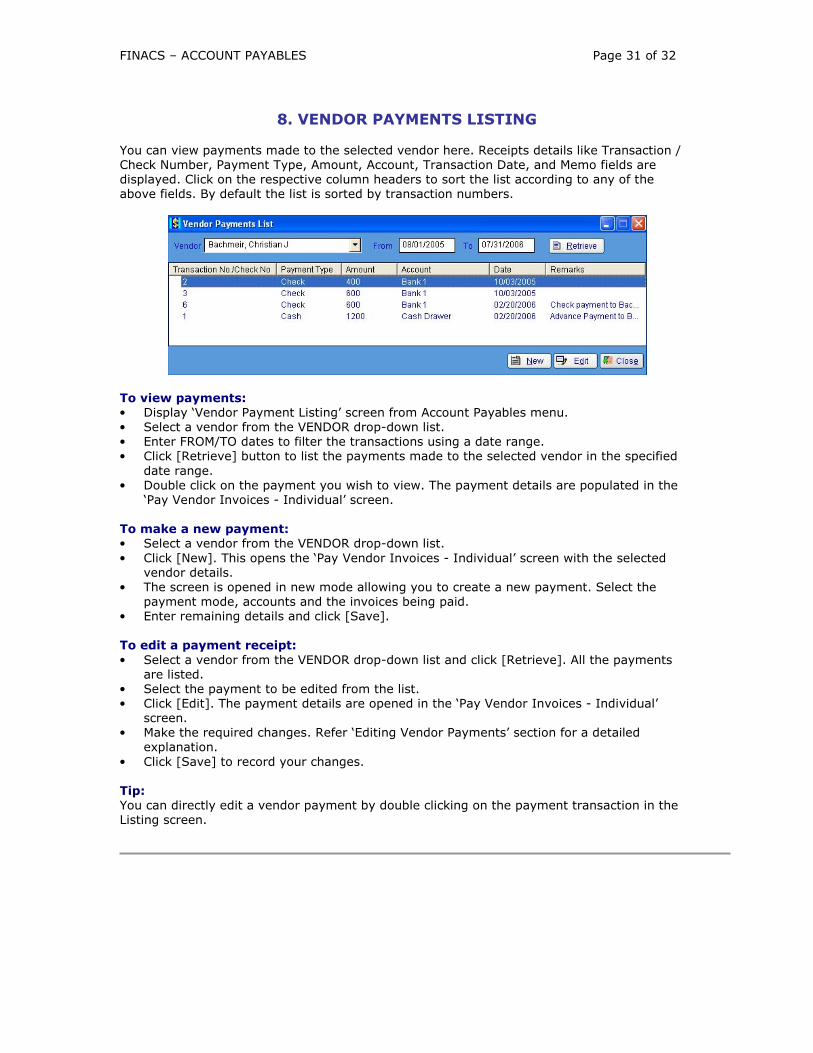
8. VENDOR PAYMENTS LISTING
You can view payments made to the selected vendor here. Receipts details like Transaction / Check Number, Payment Type, Amount, Account, Transaction Date, and Memo fields are displayed. Click on the respective column headers to sort the list according to any of the above fields. By default the list is sorted by transaction numbers.
To view payments: • Display ‘Vendor Payment Listing’ screen from Account Payables menu. • Select a vendor from the VENDOR drop-down list. • Enter FROM/TO dates to filter the transactions using a date range. • Click [Retrieve] button to list the payments made to the selected vendor in the specified
date range. • Double click on the payment you wish to view. The payment details are populated in the
‘Pay Vendor Invoices - Individual’ screen.
To make a new payment: • Select a vendor from the VENDOR drop-down list.
• Click [New]. This opens the ‘Pay Vendor Invoices - Individual’ screen with the selected vendor details.
• The screen is opened in new mode allowing you to create a new payment. Select the payment mode, accounts and the invoices being paid.
• Enter remaining details and click [Save]. To edit a payment receipt:
• Select a vendor from the VENDOR drop-down list and click [Retrieve]. All the payments are listed.
• Select the payment to be edited from the list. • Click [Edit]. The payment details are opened in the ‘Pay Vendor Invoices - Individual’
screen. • Make the required changes. Refer ‘Editing Vendor Payments’ section for a detailed
explanation.
• Click [Save] to record your changes.
Tip: You can directly edit a vendor payment by double clicking on the payment transaction in the Listing screen.
FINACS – ACCOUNT PAYABLES Page 32 of 32
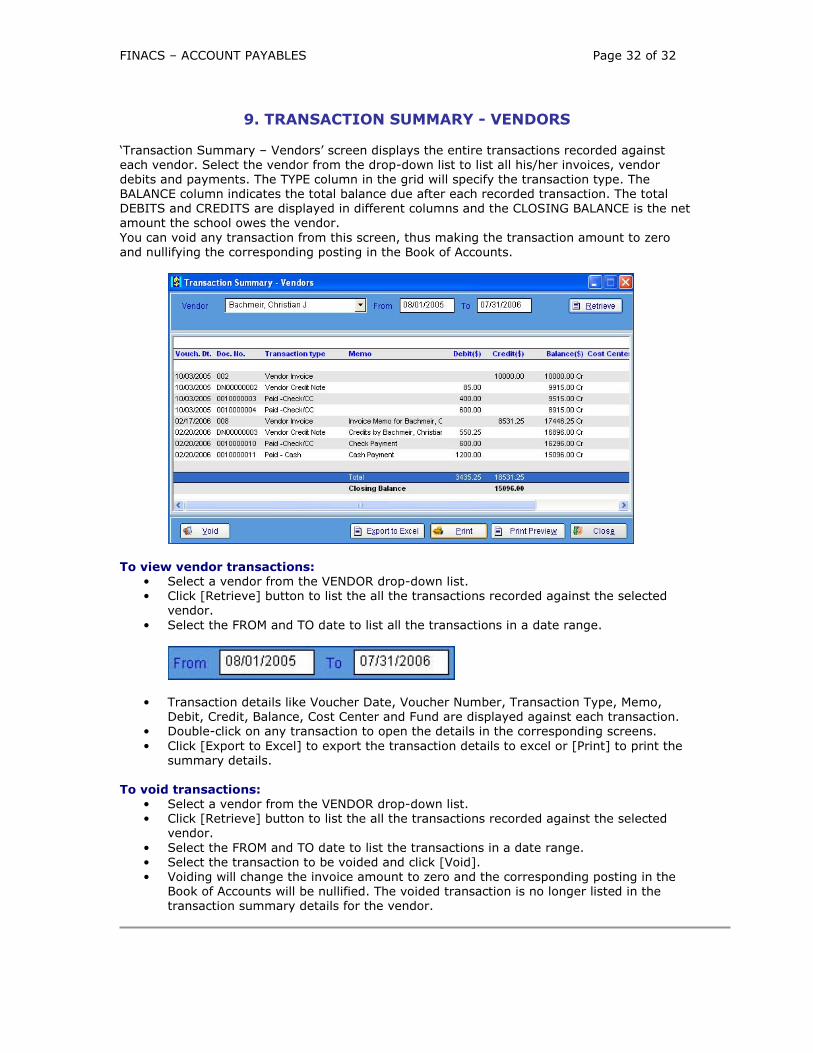
9. TRANSACTION SUMMARY - VENDORS
‘Transaction Summary – Vendors’ screen displays the entire transactions recorded against each vendor. Select the vendor from the drop-down list to list all his/her invoices, vendor debits and payments. The TYPE column in the grid will specify the transaction type. The BALANCE column indicates the total balance due after each recorded transaction. The total DEBITS and CREDITS are displayed in different columns and the CLOSING BALANCE is the net amount the school owes the vendor.
You can void any transaction from this screen, thus making the transaction amount to zero and nullifying the corresponding posting in the Book of Accounts.
To view vendor transactions:
• Select a vendor from the VENDOR drop-down list. • Click [Retrieve] button to list the all the transactions recorded against the selected
vendor.
• Select the FROM and TO date to list all the transactions in a date range.
• Transaction details like Voucher Date, Voucher Number, Transaction Type, Memo,
Debit, Credit, Balance, Cost Center and Fund are displayed against each transaction. • Double-click on any transaction to open the details in the corresponding screens.
• Click [Export to Excel] to export the transaction details to excel or [Print] to print the summary details.
To void transactions:
• Select a vendor from the VENDOR drop-down list. • Click [Retrieve] button to list the all the transactions recorded against the selected
vendor.
• Select the FROM and TO date to list the transactions in a date range. • Select the transaction to be voided and click [Void]. • Voiding will change the invoice amount to zero and the corresponding posting in the
Book of Accounts will be nullified. The voided transaction is no longer listed in the transaction summary details for the vendor.