world space week teacher activity guide · world space week teacher activity guide for use in...
TRANSCRIPT
World Space Week
Teacher Activity Guide For use in grades K-12 during annual
World Space Week, October 4-10
Note to Middle School English & Science Teachers Please also see the World Space Week Heinlein Activities Guide,
available for free at www.worldspaceweek.org
Page 2
Table of Contents
INTRODUCTION ..................................................................................................................................................................... 3
GETTING STARTED ............................................................................................................................................................... 4
ADDITIONAL RESOURCES .................................................................................................................................................. 5
STUDENT ACTIVITIES .......................................................................................................................................................... 6
LANCE’S LAB ....................................................................................................................................................................... 6
SPACE WEB PAGE DESIGN ................................................................................................................................................ 7
EGGNAUT…OR… HOUSTON WE MAY HAVE AN OMELET! ...................................................................................... 7
MAKE A CRITTER ................................................................................................................................................................ 9
―ZERO-G‖ GAME OR SPORT ............................................................................................................................................ 11
STAR WATCH ..................................................................................................................................................................... 11
OBSERVATION INCLINOMETER .................................................................................................................................... 12
SPACE ART .......................................................................................................................................................................... 12
TIMELINE ............................................................................................................................................................................ 12
BOARD GAME .................................................................................................................................................................... 12
GREAT SCIENTISTS........................................................................................................................................................... 12
SUNDIAL.............................................................................................................................................................................. 13
POPULAR MEDIA ............................................................................................................................................................... 14
SUPER QUIZ ........................................................................................................................................................................ 14
ASTRONOMY AND SOCCER ............................................................................................................................................ 15
PHOTOGRAPHING THE NIGHT SKY .............................................................................................................................. 16
SOLAR RADIATION ........................................................................................................................................................... 16
THE CROSS STAFF FOR DATA COLLECTING .............................................................................................................. 17
THE GREEN HOUSE EFFECT ON EARTH AND IN SPACE .......................................................................................... 18
SATURN, ―JEWEL OF THE SOLAR SYSTEM‖ ................................................................................................................ 18
ESTIMATING CLOUD COVER .......................................................................................................................................... 20
OBSERVING VISIBILITY AND SKY COLOR .................................................................................................................. 21
Page 3
Introduction
World Space Week: A Tool for Teachers
The United Nations has declared World Space Week
as October 4-10 annually. World Space Week is now
celebrated in some 50 nations. This week is thus the
ideal time each year to use space to excite students
about learning. Today’s youth have so much to
benefit from space. Space has changed their world
and offers even greater excitement for their future.
This guide helps science and math teachers use this
natural attraction of youth to space.
What is World Space Week?
World Space Week is an international celebration of
the contribution that space science and technology
makes to the betterment of the human condition.
During World Space Week, events and educational
programs related to space are held globally. By
synchronizing many events, a news story is created
that attracts media coverage. This efficiently educates
people throughout the world about space and
demonstrates widespread public interest in space. For
a list of locations and planned events, please see
www.worldspaceweek.org.
When is World Space Week?
The dates of World Space Week, October 4-10
annually, commemorate key milestones in space:
October 4, 1957 was the launch date of Sputnik I, the
first human-made Earth satellite. The first
international space treaty, the Outer Space Treaty,
went into effect on October 10, 1967.
How to Use this Activity Book
To help you use World Space Week in the classroom,
enclosed are a variety of stimulating K-12 science and
math activities. These activities were designed by
teachers to use space to motivate children while
teaching essential science and math knowledge and
skills. The activities require little or no teacher
preparation time and most can be easily tailored for
use at all grade levels.
World Space Week Theme
Each year, there is a theme for World Space Week.
You can find out this year’s theme at
www.worldspaceweek.org. You are encouraged to
ask your students to explore, develop, and apply this
theme throughout World Space Week.
World Space Week Teacher Activity Guide published by
World Space Week Association 957 NASA Parkway, Suite 350
Houston, TX 77058, USA Phone 1.866.440.7137 Fax 1.713.481.8846
Email: [email protected] Web: www.worldspaceweek.org
World Space Week Association, a non-profit organization,
supports the United Nations in the global coordination of
World Space Week. Founded in 1981, the Association
helps the UN expand World Space Week and serve
participants. The Association does not advocate any space
programs or policies, but encourages worldwide
participation in World Space Week. It is led by volunteer
Directors and Officers from around the world and is
supported by voluntary contributions. For more
information, please see www.worldspaceweek.org.
Copyright © 2012 World Space Week Association. Permission is
hereby given for unlimited reproduction for use by teachers.
This guide can be downloaded for free from
www.worldspaceweek.org

Page 4
Getting Started
Teacher’s Quick Start Guide
To participate in World Space Week, here’s what you
should do:
Before World Space Week
Select activities to use during World Space Week
(starting on page 6) and collect any materials.
If you received this guide as part of the Teacher
Kit:
Post the large color posters in your classroom
and or hallway.
Make copies of the Student Certificate.
Optional Preparation
Tell other teachers about World Space Week and
make them copies of this Guide.
Design your own activities – Space can be used to
teach virtually any academic subject!
Plan an event during World Space Week to involve
parents or the community (see ―Going Beyond the
Classroom‖ on this page).
Add your classroom’s or school’s World Space
Week plans to the global calendar at
During World Space Week – October 4-10
Use space as a theme throughout the week to excite
your students about learning.
Conduct other selected activities
Document what you do – Take photographs!
After World Space Week
Teachers are encouraged to provide feedback on
these materials using the on-line form at
www.worldspaceweek.org/feedback.html or the
paper form on the next page.
Going Beyond the Classroom
If you want to involve parents or your community,
consider holding an event during World Space Week.
Many teachers have even received media coverage!
Here are some ideas:
Competition and/or exhibition of student space
projects Student award event for projects
Concert with space-related music Oral reading
of space stories Films about space Guest
speakers on space Model rocket launch
Planetarium or science museum field trip Space
art exhibit Telescope “Star Party”
For more event ideas, please see
www.worldspaceweek.org
Page 5
Additional Resources
Leading Space Organizations
Astronomical Society of the Pacific http://www.astrosociety.org/
Canadian Space Agency http://www.space.gc.ca/
Centre National d’Études Spatiales http://www.cnes.fr/
Challenger Center http://www.challenger.org/
China National Space Administration http://www.cnsa.gov.cn/
DLR http://www.dlr.de/DLR-Homepage
European Space Agency http://www.esa.int/
GLOBE Program http://www.globe.gov
International Astronautical Federation http://www.iafastro.com/
Japan Aerospace Exploration Agency http://www.jaxa.jp/
Mars Society http://www.marssociety.org/
NASA http://www.nasa.gov/
National Science Teachers Association http://www.nsta.org/
National Space Society http://www.nss.org/
Planetary Society http://www.planetary.org/
Russian Federal Space Agency http://www.federalspace.ru/
Space Camp http://www.spacecamp.com/
Space Link http://spacelink.nasa.gov/.index.html
Space Foundation http://www.ussf.org/
Space Frontier Foundation http://www.space-frontier.org/
Students for Exploration & Development of Space http://www.seds.org/
United Nations Office for Outer Space Affairs http://www.oosa.unvienna.org/index.html
Young Astronauts http://www.youngastronauts.org/yac/
Other Space Education Web Sites
See SIA Links Page http://www.worldspaceweek.org/links.html
Local Resources
For local assistance with World Space Week, you
might also try to contact any of the following in
your area:
Science museums
Planetariums
Astronomy clubs
Model rocket clubs
Observatories
Government space centers
Aerospace companies
Astronomy departments at universities
Page 6
Student Activities
L A N C E ’ S L A B
Note to Teachers: This activity is written for
students at various grade levels. During World
Space Week, students design a laboratory for the
International Space Station.
Objective
Imagine that pop star Lance Bass is going to live on
the International Space Station (ISS) for 3 months.
There is only one problem: he needs a place to live!
Your mission is to design a Space Station module
where Lance can live, record music, do experiments
for educational purposes, and communicate with
people back on Earth. Some things you may want to
consider:
1. How will Lance carry out the day-to-day tasks
of living: eating, sleeping, washing, etc.?
2. How will he record music?
3. How will he communicate with his friends and
family and take care of business on Earth?
4. How will he relax and have fun?
5. Why should Lance go into space? How could
he use his time in space to contribute to the
exploration and utilization of space?
Activity
Design Lance’s Lab during World Space Week,
October 4-10. Students may (and are encouraged to)
work on teams of up to 5 people.
Grades K-5
Draw one picture of the inside of Lance’s Lab and
one picture of the outside of Lance’s Lab. Pictures
must be on 8.5 x 11 paper and may be drawn in
pencil, ink, marker, crayon, or colored pencil only
(nothing that needs to be glued on).
Grades 6-8
Write a report (2000 words maximum, double-
spaced, 12-point, Times New Roman font)
describing the features you would design into
Lance’s Lab and the justification for your designs.
Include an abstract, introduction, conclusion and
bibliography. The bibliography will not be counted
against the word limit. You may include two pages
of drawings. Lance’s Lab must have the same
dimensions as the Destiny Lab module currently
attached to the ISS—8.5 meters (28 feet) long and
4.3 meters (14 feet) in diameter—and you must
show this in your diagrams.
You are also required to present your design and
justifications for the design to 10 or more people.
The presentation should take approximately 15
minutes and include a question and answer period.
You are encouraged to prepare slides, practice, and
dress professionally for your presentation.
Grades 9-12
Write a report (5000 words maximum, double-
spaced, 12-point, Times New Roman font)
describing the features you would design into
Lance’s Lab and the justification for your designs.
Include an abstract, introduction, conclusion and
bibliography. The bibliography will not be counted
against the word limit. You are encouraged to
include drawings and diagrams. Lance’s Lab must
have the same dimensions as the Destiny Lab
module currently attached to the ISS—8.5 meters
(28 feet) long and 4.3 meters (14 feet) in diameter—
and you must show this in your diagrams. You must
also decide where to attach Lance’s Lab to the ISS
(Assembly Complete) and show this in a diagram.
Include a schedule of activities for Lance to perform
daily and a list of objectives for him to accomplish
by the end of his 3-month mission. You are
encouraged to relate Lance’s activities to those of
the astronauts currently living on the ISS and
discuss how Lance’s presence and activities would
contribute to daily ISS operations and to the
exploration and utilization of space.
You should present your design and justifications
for the design to 10 or more people. The
presentation should take approximately 15 minutes
and include a question and answer period. You are
encouraged to prepare slides, practice, and dress
professionally for your presentation.
Research
In addition to visiting the Lance's Lab section of the
World Space Week website
(www.worldspaceweek.org), designers are
encouraged to use the following resources (and
Page 7
more) to learn more about the International Space
Station: http://spaceflight.nasa.gov/station/
http://www.nasa.gov/
http://www.cnn.com/SPECIALS/multimedia/vrml/iss/
http://www.hq.nasa.gov/office/pao/History/SP-
483/contents.htm
Designers are also encouraged to visit their public
library to find books and newspaper articles about
ISS.
S P A C E W E B P A G E D E S I G N
Objectives
The objectives of the Space Web Page Design
Competition are to:
Promote mastery of the Internet by students and
build their confidence in web technology
Encourage students to explore space-related
resources on the web and be inspired by space
Overview
This is a fun, exciting activity that can be done by
any grade level with access to computers and the
Internet.
During World Space Week, students create web
pages about space that relate to an academic area
selected by the teacher. This uses space to excite
students about learning.
Students can work individually, in teams, or as a
class. Software such as Word or PowerPoint can be
used to create basic web pages. Students are
encouraged to incorporate modern web technology
into their pages to learn how the Internet works.
Content Guidelines
Teachers should pick a specific class topic that is
exciting and reinforces academic objectives. For
example, a class topic could include:
Grades K-5 – The planets, space art, space
movies, the future in space, etc.
Grades 6-8 – Celestial navigation, what
satellites tell us about Earth, secrets
revealed by the Hubble Telescope, space as
the next frontier, international cooperation
in space, etc.
Grades 9-12 – New materials made in space,
impacts of astronomy on religion, space in
modern cinema, science fiction and science
fact, the space race and the Cold War, etc.
The activity should start with a class discussion of
the selected topic. Teachers should then describe
the Web Page Design Activity, briefly discuss how
to build a web page, and review the available
resources (computers, software, books, etc.).
How to Build a Web Page
Teachers, if you have never built a web page, ask
your students! Today’s technology-savvy youth
know much about computers and are fast learners.
The simplest way is to use a word processor that can
save a document in web format. Students can use a
program like Microsoft Word to design a page with
a title, pictures, text, and links. To save as a web
page using Word, click File, Save As, and select
―Web Page‖ in the ―Save as Type‖ field.
Students can also try simple web-authoring
software, some of which can be downloaded for free
(for more information, see www.knopfler.com/pc or
www.cnet.com). Students should be encouraged to
try these tools and learn how easy and fun designing
a web page can be.
Space Resources on the Web
To explore space resources on the web, students
should start with the links on page 5. Many of these
sites then link to other exciting places to explore.
Web sites with space-inspired music, art, and poetry,
etc. include:
www.spacestory.com – By Astronaut Story Musgrave
www.novaspace.com – Novaspace Galleries
Sites with space images include:
http://oposite.stsci.edu/pubinfo – Hubble Telescope
images.jsc.nasa.gov – Human Space Flight
Students can incorporate photos, other multimedia
elements, and interaction to communicate and tell a
story. They could even have a quiz, puzzle, game,
or slide show to make their page fun.
E G G N A U T … O R … H O U S T O N W E M A Y H A V E A N O M E L E T !
Grade Level: Primary and Middle School
The Problem: Your mission, should you choose to
accept it, is to design and build a vehicle that will

Page 8
protect your Eggnaut from the perils of reentry. The
objective is to have your Eggnaut survive the fall
with out a crack.
Grades
K-5
Grades
6-8
Materials
4 2 8.5‖ x 11‖ sheets of standard
copy or typing paper
25 20 Drinking straws of any size
with at least a 5‖length
25 20 Popsicle or craft sticks/wood
splints/tongue depressors
150 cm 100 cm String of any size
150 cm 100 cm Masking tape of any size
5 5 Rubber bands any size
1 1 RAW grade A egg
1 1 Pair of scissors
The Rules:
1) The reentry system must fit inside
Primary - a space of 30 cm x 30 cm x 30 cm
Middle - a space of 20 cm x 20 cm x 20 cm
2) Parachutes or helicopters are allowed.
3) A plumb line can be used to target the reentry
vehicle onto the recovery zone.
4) All parts of the reentry system must be above the
reentry orbital height of
Primary - 2 to 3 meters
Middle – 3 to 5 meters
5) The reentry system’s mass must not exceed
Primary - 400 grams
Middle – 300 grams
6) It must land as close as possible to the center of
the reentry zone.
7) You do not have to use all of the materials listed.
Questions to Consider:
1) How can I design my reentry system (capsule) to
protect the eggnaut?
2) What can I design into my reentry system to make
sure it lands in the center of the target area?
3) How am I going to slow it down?
4) Which of Newton’s Laws of Motion are at work
on the capsule and eggnaut?
5) Draw a plan of your system and explain how it is
going to work and why?
6) Report your test results and
Primary - why they happened and how you
would fix them.
Middle - why you think they occurred and what
you could do to improve your design.
Grade Level: High School
The Problem: Your design team is to design and
build a scale landing pad to be used in case of an
emergency extraction from the new eggnaut orbital
system. The landing pad must prevent a raw
eggnaut from breaking after it has accelerated under
the force of gravity for a distance of one meter or
more.
Materials:
10, 8.5‖ x 11‖ sheets of notebook or copy paper
30 cm of masking tape
A RAW eggnaut (grade A large egg)
Plumb line for aiming (meter stick)
Modeling clay (50 to 60 g. lump as a practice
egg; dents = cracks)
Triple beam balance
Specifications:
1) You may use only the materials listed; you do not
have to use all of them.
2) Egg landing pads must stand by themselves.
They cannot be taped to anything or held by
anyone.
3) A cracked egg is a broken egg. If the egg
bounces off the landing pad or the landing pad
falls over allowing the egg to touch the floor,
the egg is considered broken.
4) No parachutes or wings are allowed.
5) Use any technique that you may have learned in
any science or mathematics class that will aid
you in constructing the pad.
6) When you have completed the task, you will hand
in a report that will have a drawing with a
written description of your design with a
prediction of how it will function. Repeat the
results of the tests. Make suggestions on how to
improve your design and explain exactly how
these changes will function. You will also
calculate the speed at which the egg is hitting
the landing pad and the force of the impact of
the egg on the landing pad. Show your work
and include the formulas.

Page 9
7) Your design will be scored on how successful
you are in the egg drop and your report.
M A K E A C R I T T E R
The Challenge
Imagine that a new planet has been discovered –
Betelgoose - your job is to design an animal to live
there. Its a chance to let your imagination run wild
…or maybe we should say ―run wildlife.‖
Instructions
Read about what kind of world Betelgoose is and a
few of the strange life forms already living there.
Don’t forget: the whole idea is to use your
imaginations but still make good ecological sense
with your decisions. The creature should have
adaptations that prepare it especially well in body
and behavior to thrive in one or more of
Betelgoose’s habitats.
For example, the gravitational pull on Betelgoose is
stronger than that on Earth. Would your creature
need special adaptations to handle that? If your
creature lived in the tropics of Betelgoose, would it
need a defense against swarms of O’Malley’s Snips?
As you read about Betelgoose you’ll find examples
of creatures that prey on your creature or be preyed
on by it. How will your critter cope?
The Rules
1) Only one entry from each student or team.
2) You must describe the main habitat and climate
in which your critter lives (for example, tropical
forest floor). Use an 8-line paragraph minimum.
3) How does it move? Include both the form of
locomotion and its organs for moving (for
example, leaps on powerful hind legs). Use an
8-line paragraph minimum.
4) Is it a herbivore, carnivore, omnivore or other?
What, specifically, is its main food and how
does it get it? Use an 8-line paragraph
minimum.
5) What other creatures does it prey on, if any?
How does it defend itself against predators?
Use an 8-line paragraph minimum.
6) How does it cope with Betelgoose’s extreme
seasonal changes? Use an 8-line paragraph
minimum.
7) Is it solitary? Does it live in large groups?
Describe its social behaviors. Use an 8-line
paragraph minimum.
8) What else would you like us to know about your
critter? Use an 8 line paragraph minimum.
9) You must include a drawing of your critter. Put
in as much detail as possible but not a micro
drawing.
10) No magical powers are allowed.
11) Everything on the planet Betelgoose must obey
the know Laws of Nature.
Information about the imaginary planet
Betelgoose
Planetary Location:
Sub sector: Span 175 located on the core ward edge
of the spiral arm.
Regina Loran Star system. H-R White main
sequence star with average surface temperature
of 12,000 degrees C.
Diameter: 2,073,600 km.
Sun spins on its axis from left to right. 12 planets
and 2 asteroid belts in system.
The Third, Fourth, and Fifth planets have conditions
favorable to Earth based life forms .
Planetary Conditions:
Planetary diameter 11200 km. Gravity is 1.2 times
Earth’s gravity. Strong magnetic field. Nickel
Iron Core. Some volcanic activity on the planet.
Average distance from its sun is 298,000,000
km. Betelgoose circles its sun every 690 Earth
days. Betelgoose length of day is 27 hours 25
minutes. Betelgoose tilts 25.25 degrees on its
axis, causing seasonal changes. Betelgoose has
both a northern and southern polar ice cap. The
mountain range planet has 7 continents and is
covered by 7 systems. Betelgoose also has its
own version of Van Allen Radiation Belts and
an atmospheric composition of 78% Nitrogen,
19% Oxygen, 1% Carbon Dioxide, 1% trace
gases (similar to Earth), and 1% Argon.
Atmospheric pressure is 1.05 times that of earth.
Hydrographic percentage of coverage is 65%
(surface covered by water). Overall average
temperature is 3 degrees C cooler than the
Earth’s average temperature.
Page 10
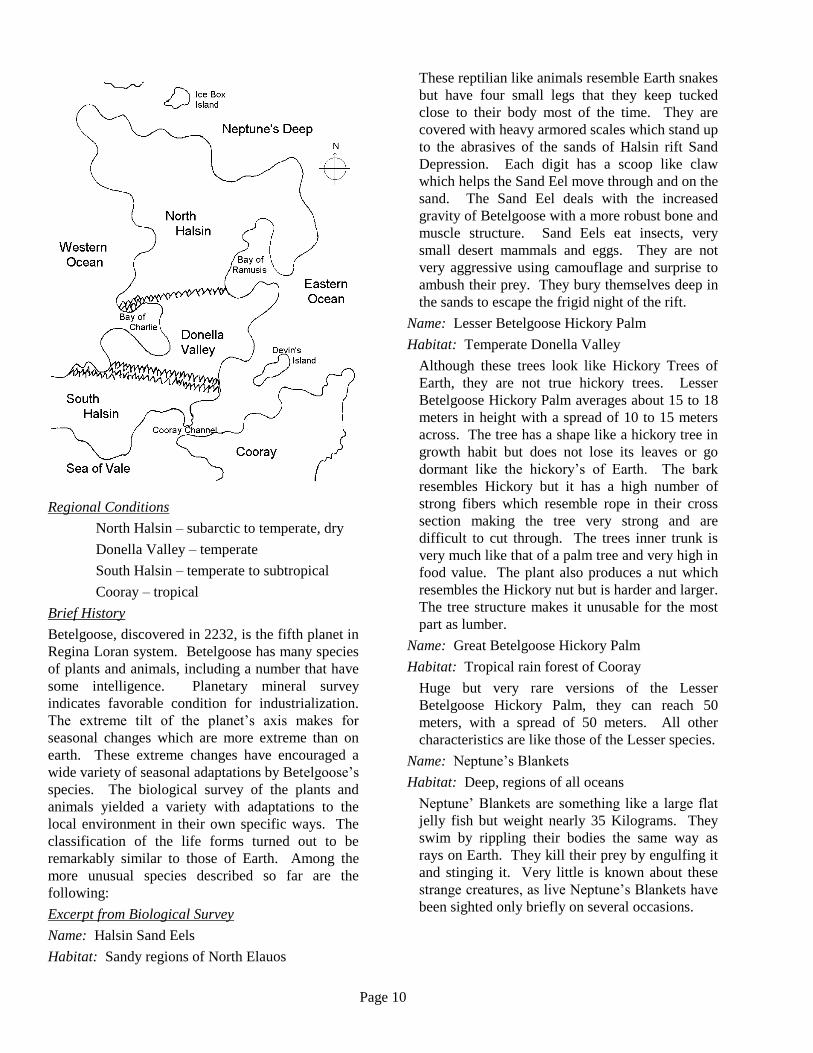
Regional Conditions
North Halsin – subarctic to temperate, dry
Donella Valley – temperate
South Halsin – temperate to subtropical
Cooray – tropical
Brief History
Betelgoose, discovered in 2232, is the fifth planet in
Regina Loran system. Betelgoose has many species
of plants and animals, including a number that have
some intelligence. Planetary mineral survey
indicates favorable condition for industrialization.
The extreme tilt of the planet’s axis makes for
seasonal changes which are more extreme than on
earth. These extreme changes have encouraged a
wide variety of seasonal adaptations by Betelgoose’s
species. The biological survey of the plants and
animals yielded a variety with adaptations to the
local environment in their own specific ways. The
classification of the life forms turned out to be
remarkably similar to those of Earth. Among the
more unusual species described so far are the
following:
Excerpt from Biological Survey
Name: Halsin Sand Eels
Habitat: Sandy regions of North Elauos
These reptilian like animals resemble Earth snakes
but have four small legs that they keep tucked
close to their body most of the time. They are
covered with heavy armored scales which stand up
to the abrasives of the sands of Halsin rift Sand
Depression. Each digit has a scoop like claw
which helps the Sand Eel move through and on the
sand. The Sand Eel deals with the increased
gravity of Betelgoose with a more robust bone and
muscle structure. Sand Eels eat insects, very
small desert mammals and eggs. They are not
very aggressive using camouflage and surprise to
ambush their prey. They bury themselves deep in
the sands to escape the frigid night of the rift.
Name: Lesser Betelgoose Hickory Palm
Habitat: Temperate Donella Valley
Although these trees look like Hickory Trees of
Earth, they are not true hickory trees. Lesser
Betelgoose Hickory Palm averages about 15 to 18
meters in height with a spread of 10 to 15 meters
across. The tree has a shape like a hickory tree in
growth habit but does not lose its leaves or go
dormant like the hickory’s of Earth. The bark
resembles Hickory but it has a high number of
strong fibers which resemble rope in their cross
section making the tree very strong and are
difficult to cut through. The trees inner trunk is
very much like that of a palm tree and very high in
food value. The plant also produces a nut which
resembles the Hickory nut but is harder and larger.
The tree structure makes it unusable for the most
part as lumber.
Name: Great Betelgoose Hickory Palm
Habitat: Tropical rain forest of Cooray
Huge but very rare versions of the Lesser
Betelgoose Hickory Palm, they can reach 50
meters, with a spread of 50 meters. All other
characteristics are like those of the Lesser species.
Name: Neptune’s Blankets
Habitat: Deep, regions of all oceans
Neptune’ Blankets are something like a large flat
jelly fish but weight nearly 35 Kilograms. They
swim by rippling their bodies the same way as
rays on Earth. They kill their prey by engulfing it
and stinging it. Very little is known about these
strange creatures, as live Neptune’s Blankets have
been sighted only briefly on several occasions.

Page 11
Name: O’Malley’s Snip
Habitat: Subtropical South Halsin and Cooray
The O’Malley’s Snips are small insect like
creatures no more than 1 cm in length with a wing
span of 1.5 cm. They often appear from the brush
in swarms of several hundred to thousands of
individuals. They feed on the blood of mammals,
birds and plants juices. They resemble a biting
fly. Further study is needed to determine if they
can transmit disease. They also migrate north
during the long summer months.
Name: Golden Bell
Habitat: Forested and open areas of South Halsin,
Donella Valley, Cooray
Golden Bell is the major ground cover on
Betelgoose. There are large tracts of the little
plant known as the Golden Bell. They are a
brilliant golden yellow in color with the plants
about the size of a softball, and a very tough skin
and bell shaped base. They extract their nutrients
and water from the soil and also use
photosynthesis. Inside the bell shaped stems are
soft fibrous tissues. Below ground the root system
is entangled forming a mat.
Name: Snorks
Habitat: Exclusive to Donella Valley
Snorks are about the size and shape of a large
prairie dog. They can walk upright, on their
powerful hind legs, and have well developed
grasping hands on their forelimbs. They are very
rare and shy, so that they have not been well
studied yet. Early observations show them to be
as intelligent as a chimpanzee. With the climate
of Betelgoose being cool, even in summer
temperate zones, Snorks spend much of their time
in large underground nests. These are heavily
insulated with at least one emergency escape exit.
Snorks have been observed using simple tools
shaping them with their teeth. They have also
been seen working together to drive off predators
from the nest. Further study is called for to
understand them.
“ Z E R O - G ” G A M E O R S P O R T
This activity is to invent a game or sport that can
only be played in Zero-G. This allows students to
apply their love of sports while learning physics.
Their game or sport must not work in a gravity field.
The Challenge
Your mission is to create a sport or game that people
in space can play which will be interesting, exciting
and fun. Your proposal for the new sport protocol
must have the following:
b) A basic description of your activity and its rules
and an explanation of how it meets the basics
for a sport (exercise, interesting, fun).
c) A comparison of the playing of your sport on
the Earth and in space. Describing the changes
needed to play it anywhere (rule changes and
equipment differences)
d) How the lack of any gravity affects the rules and
equipment.
e) A mathematical analysis of the sport
(middle/high school) along with or a qualitative
analysis for the lower grades.
f) Investigations of sports protocols that would not
be suited to space, with reasons and supporting
information why they were rejected.
g) A fictitious news article describing the solar
system’s ―Championship‖ match for your sport
or game.
h) A drawing of the equipment and field with size
or dimensions, etc.
S T A R W A T C H
This can be an exciting event for students and
families. Pick a date during World Space Week in
advance and notify parents. Be sure to cover
enough basic information on astronomy so that
information learned can be applied during the event.
Have students bring binoculars or small telescopes
and try to involve a local Astronomy Club. Have
star charts available which show star positions
relative to your latitude and local time.
Select some distinct objects such as the Orion
Nebula. Students can make an inclinometer (see
below) and use it to locate these objects. Have
contests for the first star seen, first planet seen,
brightest star, constellations, or lunar features if
visible.
Try to connect the following items to the activity:
time, observations, coordinates, ecliptic, etc., or for

Page 12
daytime activities: sunspots, time calculations, and
ratios of shadow effects.
If you have access to the Internet, you can view
current images from the sun while staying in the
classroom, e.g.: http://umbra.gsfc.nasa.gov/images/latest.html
Safety Note: All students should be warned about
looking directly at the sun without the aid of a solar
viewing device that has been specifically made for
solar observations.
O B S E R V A T I O N I N C L I N O M E T E R
Students build and use an inclinometer to find stars
in the night sky. Students should sight along the
dowel. The counter weight will hang such that the
angle to the object can be determined on the
protractor. A bearing reading can be taken such that
the angle to the object and its bearing can be used to
locate the object on the star map.
Materials needed:
1 watch
1 plastic protractor
1 star map
1 piece of twine or string (30 cm)
1 compass
1 counter weight (fishing weight)
1 flashlight with small red lens
1 dowel 40 cm in length
Students should glue the dowel along the straight
edge of the protractor so that one end is flush with
the end of the protractor and the rest of the dowel
extends along the length of the straight edge. The
string should be tied through the hole of the
protractor’s zero-point. Tie the counter weight to
the other end of the string.
Note: Students should take timed interval
measurements for determination of relative motion
and change. Be sure to have students check their
inclinometer and practice taking measurements of
inclination to sighted objects.
S P A C E A R T
Students will be given the opportunity to develop a
mural, picture, flip book, cartoon book, or sculpture
that would relate to this year’s World Space Week
theme. Refer to art work that has an astronomical
relationship. Suggested evaluation for art projects
would be in originality, creativity, and knowledge.
T I M E L I N E
Using the Internet and/or other resources, students
will explore information from the earliest records on
astronomy and develop a timeline that is current
through today. Use pictorial or artwork when
appropriate to enhance the timeline.
B O A R D G A M E
Students will adapt or develop a board game which
uses space exploration or space fact/knowledge as a
framework. Students will establish rules for game.
Games could be judged based on originality,
creativity, knowledge, and structure. Students may
participate in competition, both in development and
playing the game. The game format could be
developed for play on computer.
G R E A T S C I E N T I S T S
Objective: To provide a framework in which
students can develop an understanding, appreciation,
and application of the history of science that has
influenced space programs and our daily lives.
Page 13
Task: Research key figures such as Galileo,
Newton, Kepler, Einstein, Tsiolkovsky, Goddard,
Von Braun, etc. relative to period in which they
lived, what they discovered, how it is applied to
space exploration.
Elementary
Dress in costume and demonstrate basic knowledge
of their character. Could be done on the final day to
culminate World Space Week activities. Students
would present something about the person and their
significance in space exploration. For example:
Galileo: Could be done at a star party in honor
of the telescope
Newton: Could demonstrate the effect of gravity
in the classic setting of the tree.
Goddard: Could demonstrate rocketry by
launching model rockets
Middle School
Students could write and perform a play where the
characters above were brought to future. As an
alternative, they could write for the school
newspaper ―interviews‖ with their characters, or
broadcast a live ―interview‖ across the school. They
should emphasize the difference between now and
then (how far we have come).
High School
Students would work in teams to develop an in-
depth profile of the above characters and then
present synthesis in the following possible formats.
Conduct a debate on issues of science that the
group as a whole would not have experienced.
Teams will choose debater for their historical
character. This would be most applicable in a
large student body presentation.
Develop and write a play which would bring the
characters together in some type of setting with
the purpose of exposing their thoughts and
theories.
Students could structure a special edition of the
school newspaper framed around space and its
benefits to society, and the roles of great
scientists and engineers.
S U N D I A L
Materials needed:
1 piece of thick poster board
1 piece of plywood (1 meter square)
1 measured dowel (1/2 meter)
Students can make their own sundial by using a 1
meter square piece of plywood and thick poster
board with a measured dowel. When the plywood
has been cut to size, place the poster board on top of
the plywood. Along one side of the board, measure
50 cm. and mark for the drilling of a hole the size of
the dowel. The dowel should be placed in the
appropriate size hole in the plywood. Using a
compass, align the board edge with the dowel along
the east/west line established with the compass.
Have students take hourly readings, beginning in the
morning and mark the poster board along the
shadow cast by the dowel. Be sure to mark the time
of the measurement. Students should continue to
take observations all during the school day or over a
period of days. Be sure to keep the sundial in the
exact same location while all observations are being
made. Once initial readings have been taken and
marked, continue daily observations.
Have students try to answer the following based on
their observations:
1) Was the sundial effective for keeping daily time?
2) What limits the sundial in keeping time?
3) What can the sundial tell us about the motion of
the Sun relative to the Earth?
4) What can the sundial tell us about the motion of
the Earth relative to the Sun?
5) What can this tell us about ancient cultures’
attempts to measure time?
Math Connection
Explain why the shadow cast by the dowel can be
used to determine the height of a tree or some other
tall object of an unknown height?
Length of dowel = height of object (x)
length of dowel shadow length of object shadow
(Be sure to use a calibrated chronometer or clock to
determine the measured marks for sundial.)

Page 14
P O P U L A R M E D I A
An activity could unite both Science and English
classes in a survey of science fiction literature from
the 19th and 20
th century that has inspired people
about space. Example of such authors are Jules
Verne, Isaac Asimov, Ben Bova, Robert Heinlein,
Ray Bradbury, Arthur C. Clark, Jerry Pournelle, etc.
Students could review space-related film and/or
television and determine their impact on public
perceptions about space. Students can also
determine if science is being used correctly.
Examples are ET, 2001 A Space Oddesy,
Independence Day, Apollo 13, Close Encounters,
Star Wars, Star Trek, Contact, Lost in Space,
Mission to Mars, Space Cowboys, etc.
Students could review news coverage of space and
determine impacts on society. Does the coverage
treat successes and failures equally? Does it balance
coverage of government and non-government space
activity? Does it fairly cover national vs.
international space news? How does the amount
and type of news coverage about space impact
public opinion about space?
S U P E R Q U I Z
This can be a team- or group-based school-wide
activity. The students will research and gather
information as teams or groups based on the
suggestions below or other appropriate categories
related to space or this year’s World Space Week
theme. The group will then choose a format in
which to display information and learning from (but
not exclusive to) the list below. Review games
format in order to ensure familiarity with games
concept.
Students make or adapt a game
Quiz Show game
Strategy/Simulation Game
Guessing Game (pantomime, charades)
Expedition Game (what would you do if, or what
would you need if)
An online collaborative game of any of the above
suggestions or a World Space Week Online
Trivia Game.
Students help collect data and prepare questions for
either a school-wide or class-oriented quiz. If
conducted in an auditorium, the super quiz could be
conducted as a ―Jeopardy‖ or similar team-game
format.
“Extra Credit”
Students can ―televise‖ the game using pictures
and sounds to enhance the production. As an
alternative students can produce a game that
could be played on the Internet.

Page 15
Categories of Information
Constants Missions Impacts
Universe Comm Sats Material s
Gravity Apollo Medicine
Time Shuttle Technology
Space Space Station Agriculture
Terrestrial Hubble Weather
Extraterrestrial Mars Mission Economy
Planetary
Probes
Communication
Education
A S T R O N O M Y A N D S O C C E R
Soccer is one of the most loved sports in the world.
A 100-yard soccer field could serve as a venue to
compare distances in our Solar System. Hopefully,
this exercise will add perspective to the vastness of
our part of the Universe and to the learning of
astronomy.
The first step in this exercise is to scale a soccer
field (100 yards or meters) onto an 11‖ x 14‖ sheet
of paper, e.g. let 2.50 cm equal to every 10 yards or
meters Before plotting on your 11‖ x 14‖ soccer
field, make two copies for future use. Next, locate
the Sun on one goal line and Pluto on the other goal
line. You can represent each planet as a small
circle. The planet size does not have to be to scale,
however feel free to use relative sizes to represent
each planet, e.g. the circle for Jupiter will obviously
be larger than the one for Mars. If you choose to
represent the planets with relative size, plot the
center of the planet at your calculated values. You
may choose to color or highlight each planet with its
individual characteristics, e.g. red for Mars,
definitive rings for Saturn, and the belts and zones
of Jupiter. Using the information and equation
below, calculate the average distance of each planet
from the Sun scaled to the soccer field on your 11‖ x
14‖ paper. Plot each calculation as accurately as
possible. Show all your calculations for each planet
on a separate sheet of paper. You will be solving
for x in the equation.
Distance of Pluto Distance of each planet
from Sun ( in A.U.) from the Sun (in A.U.)
100 yards or meters x
Planet Average Distance (AU)
Mercury 0.39
Venus 0.72
Earth 1.00
Mars 1.52
Jupiter 5.20
Saturn 9.54
Uranus 19.18
Neptune 30.06
Pluto 39.44
Extending Your Knowledge
1. If a hypothetical planet were located halfway
between Uranus and Neptune, where would it be
located on your scaled soccer field? Show your
calculations.
2. How much farther is Neptune from the Sun than
Uranus? Express your answer as a percentage.
3. The closest stars to Earth, besides the Sun, are
Alpha, Beta and Proxima Centauri. They are
4.3 light years away. (a) How many miles away
from Earth are these stars? Express your answer
in scientific notation. (b) If this star system
were a planet orbiting the Sun, what would be
its period? For (b) use Kepler’s Third Law, P 2
= R 3
where P is the orbital period expressed in
years and R is the semi-major axis expressed in
astronomical units (AU). Your answer in (a) is
the semi-major axis. It needs to be converted to
AU.
4. The Titus-Bode Law is an empirical formulation
used by early modern astronomers to
approximate a planet’s distance from the Sun
even if the planet was undiscovered. The
empirical formulation works as follows:
consider the sequence (0, 0.30, 0.60, 1.20,....).
Add to each number in the geometrical sequence
the number 0.40 A.U. to get the planet’s
distance from the Sun. For Mercury, add 0.40
A.U. to 0, i.e. 0 + 0.40 A.U. = 0.40 A.U. This is
the distance of Mercury from the Sun rounded
off. For Venus add 0.30 to 0.40 A.U. to get 0.70
A.U., the rounded off distance of Venus from
the Sun.
a) Using the Titus-Bode Law predict where
you would find the nine planets in our Solar
System by completing the geometrical
sequence and the addition.
b) Using the two extra copies of your scaled
soccer field, cut and tape them together so
=

Page 16
that the goal lines overlap. Plot on this two
soccer field paper the calculations from the
Titus-Bode formulation of the planet
distances from the Sun. You will have to
convert these values to yards or meters
before plotting. Again, feel free to use color
and relative sizes on this plot. Lay this plot
alongside your first plot. Comment on any
similarities and differences. Can you see
how early modern astronomers used this
empirical tool to hunt for new planets?
c) Where would you expect to find the tenth
planet using the Titus-Bode formulation?
P H O T O G R A P H I N G T H E N I G H T S K Y
Challenge
Conduct a study of celestial objects, such as
constellations, bright comets, meteor showers,
planets and aurorae, by photographing the objects
with a 35mm camera. Prepare a slide show to
present your findings about the celestial objects in
your study.
(Caution: Do not include the sun in your
observations without approved eye protection.)
Instructions
1. Place a 35mm camera with a standard lens on a
tripod. (No telephoto lens, telescope or motor
drive is necessary.)
2. Take photographs of the celestial objects using
films such as Ektachrome 200 or Ektachrome
400. This will produce positive color slides that
can be viewed easily with an inexpensive color
slide viewer. Experiment with your exposures
until satisfactory slides are obtained. (See the
information section for helpful hints.)
3. Collect data for your study of celestial objects
by preparing a series of slides on a topic. Four
examples are: (a) planetary motion against a
background of stars, (b) life history (age and
color) of stars in a given constellation or area of
the sky, (c) comet motion against a background
of stars or (d) meteor activity for a specified
time and period.
4. Keep accurate records of dates, times and other
information that will enhance your study.
5. Use multimedia and technology resources to add
to your knowledge and understanding of these
celestial objects.
6. Prepare a slide show that will present your
findings to an audience, such as your science
class. Your slide show will be evaluated by how
completely and accurately you meet your
challenge.
Information
1. Take photographs of constellations, planets,
bright comets and aurorae with a setting of f/2.5
for 20 seconds with film, such as Ektachrome
200 or 400.
2. Take photographs of meteor showers with a
setting of f/8 for several minutes with film, such
as Ektachrome 200 or 400.
Using a 35mm camera, as described above, will
produce little distortion from the earth’s rotations.
The colored slides will allow you to detect blue,
white and red stars that your eye cannot easily
detect. With the colored slide film, you can project
these stars on a screen.
S O L A R R A D I A T I O N
Challenge
Determine the insolation (incoming solar radiation)
received at your latitude for each of the seasons of
the year and design a house that will effectively use
the insolation.
Instructions
1. Use multimedia and technology resources to
determine the tilt of the earth and therefore, the
angle of the incoming solar radiation for each
season of the year, your precise latitude and
sunrise and sunset times. (The tilt of the earth is
built into most globes.)
2. Complete an investigation, using a light source,
such as a 300 watt spot light, 300 watt flood
lamp, or the lamp of an overhead projector, a
globe of the earth, and a light meter with a flat
voltaic sensor to quantitatively measure
insolation at each of the seasons. Place the flat
voltaic sensor at your latitude on the globe. (A
black background behind the globe will prevent
scattered light and give more accurate results.)
Adjust the light meter or move the light source
until you get a full-scale deflection on the light

Page 17
meter. This will simulate a reading found in
nature.
3. Rotate the globe and take a reading at every
hour between sunrise and sunset. (If this is not
possible, the data will need to be taken at the
same ―time‖ each day, such as noon.) This
procedure must be repeated with the globe
oriented to represent each season of the year.
4. Prepare a graph to portray the data obtained
about the insolation at each of the seasons. Use
a key to specify the season represented in each
set of data.
5. Design a solar house that will effectively use the
insolation at all seasons of the year. You may
want to include other scientific principles such
as the green house effect or insulation
components.
T H E C R O S S S T A F F F O R D A T A
C O L L E C T I N G
Challenge
Build and use a cross staff to collect data about the
location of celestial objects. Use the data to prepare
scaled drawings to share with an audience.
Instructions
1. Observe and sketch from memory a group of
celestial objects, such as the circumpolar
constellations.
2. Build a cross staff (See: Building Specification.)
and observe the same group of celestial objects
that you used in your original sketch. Take
measurements to determine the angular
separation that occurs between objects in the
group (See: Calculating Angular Separation.).
Each object must be included in at least two
separate measurements to make a scaled
drawing.
3. Make a scaled drawing of the celestial objects.
4. Compare the sketch and scaled drawing for
accuracy and usefulness. (Caution: Do no
include the sun as a celestial object. Irreparable
harm to the eyes can occur.)
5. Prepare a set of scaled drawings for use by
younger children (lower grade level) to use for
their study of constellations.
Option
Make a study using a scaled drawing of angular
separation where objects in a group are changing
their relative locations over rather brief periods,
such as the moon or planets found within a
constellation. Include the time on each scaled
drawing and prepare a sequence of the drawings for
a period of time appropriate for the group of
celestial objects studied. Share the sequence of
scaled drawings with an audience, such as your
science class. Your product will be evaluated by
how accurately you build and use the cross staff and
how neatly and accurately you complete your scaled
drawings.
Building Specification
1. Obtain two pieces of wood, such as half round
(White pine is a better material), one piece
60cm long and the other 10cm long; one rubber
band (short and wide); and four push pins with
white spherical tops.
2. Join the two pieces of half round with a rubber
band so their flat sides are together and the short
piece is on top. Place them at right angles to one
another. (See below.)
3. At each end of the short piece, place a pin at an
angle so that the head of the pin is precisely
over the end of the piece. The third pin is placed
in the center of the small piece and the fourth
pin is placed halfway between the center pin and
one of the outer pins. (See below.)
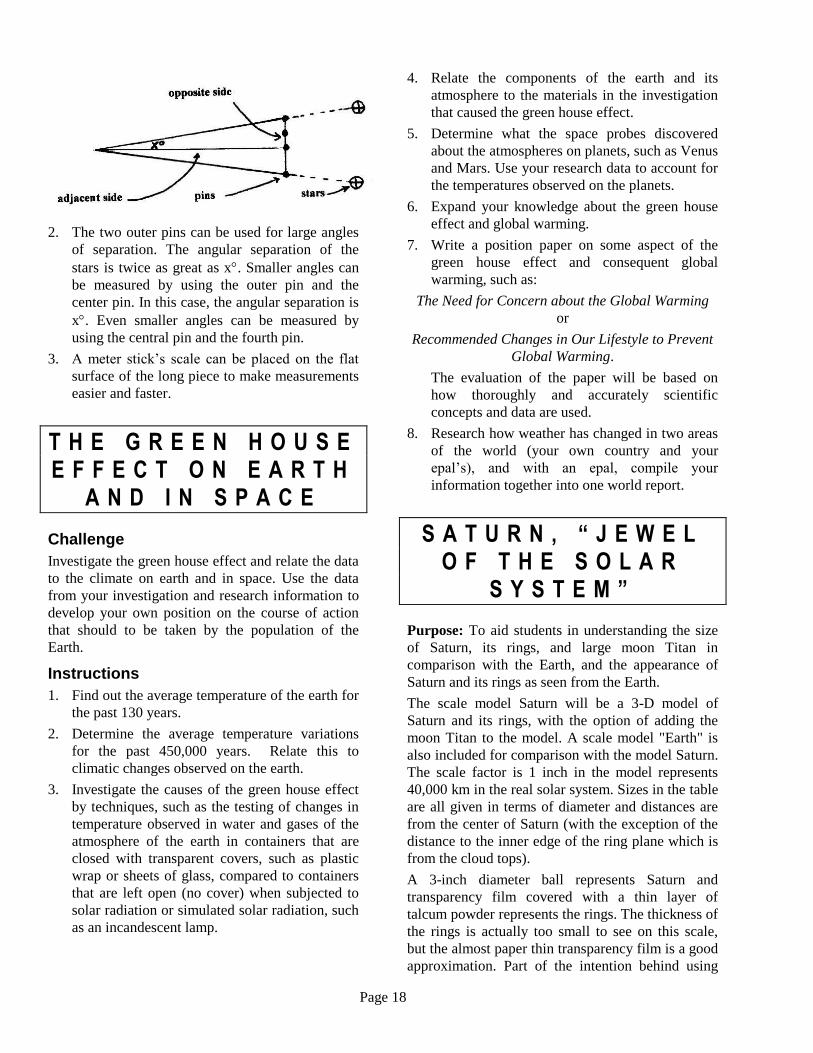
Calculating Angular Separation
1. Sight along the long piece and slide the short
piece until two of the pinheads cover two stars.
Use trigonometry to calculate the separation.
(See below.)
Page 18
2. The two outer pins can be used for large angles
of separation. The angular separation of the
stars is twice as great as x. Smaller angles can
be measured by using the outer pin and the
center pin. In this case, the angular separation is
x. Even smaller angles can be measured by
using the central pin and the fourth pin.
3. A meter stick’s scale can be placed on the flat
surface of the long piece to make measurements
easier and faster.
T H E G R E E N H O U S E E F F E C T O N E A R T H
A N D I N S P A C E
Challenge
Investigate the green house effect and relate the data
to the climate on earth and in space. Use the data
from your investigation and research information to
develop your own position on the course of action
that should to be taken by the population of the
Earth.
Instructions
1. Find out the average temperature of the earth for
the past 130 years.
2. Determine the average temperature variations
for the past 450,000 years. Relate this to
climatic changes observed on the earth.
3. Investigate the causes of the green house effect
by techniques, such as the testing of changes in
temperature observed in water and gases of the
atmosphere of the earth in containers that are
closed with transparent covers, such as plastic
wrap or sheets of glass, compared to containers
that are left open (no cover) when subjected to
solar radiation or simulated solar radiation, such
as an incandescent lamp.
4. Relate the components of the earth and its
atmosphere to the materials in the investigation
that caused the green house effect.
5. Determine what the space probes discovered
about the atmospheres on planets, such as Venus
and Mars. Use your research data to account for
the temperatures observed on the planets.
6. Expand your knowledge about the green house
effect and global warming.
7. Write a position paper on some aspect of the
green house effect and consequent global
warming, such as:
The Need for Concern about the Global Warming
or
Recommended Changes in Our Lifestyle to Prevent
Global Warming.
The evaluation of the paper will be based on
how thoroughly and accurately scientific
concepts and data are used.
8. Research how weather has changed in two areas
of the world (your own country and your
epal’s), and with an epal, compile your
information together into one world report.
S A T U R N , “ J E W E L O F T H E S O L A R
S Y S T E M ”
Purpose: To aid students in understanding the size
of Saturn, its rings, and large moon Titan in
comparison with the Earth, and the appearance of
Saturn and its rings as seen from the Earth.
The scale model Saturn will be a 3-D model of
Saturn and its rings, with the option of adding the
moon Titan to the model. A scale model "Earth" is
also included for comparison with the model Saturn.
The scale factor is 1 inch in the model represents
40,000 km in the real solar system. Sizes in the table
are all given in terms of diameter and distances are
from the center of Saturn (with the exception of the
distance to the inner edge of the ring plane which is
from the cloud tops).
A 3-inch diameter ball represents Saturn and
transparency film covered with a thin layer of
talcum powder represents the rings. The thickness of
the rings is actually too small to see on this scale,
but the almost paper thin transparency film is a good
approximation. Part of the intention behind using

Page 19
the transparency film is that it can represent empty
space. The talc represents the actual particles out of
which the rings are made. "Gaps" in the rings can
also be shown on the film by removing the talc from
portions of the film in circles. In addition, a
flashlight can be used to show how well the "rings"
reflect light when it shines on them. The relative
appearance of the rings of Saturn at different
viewing geometries can also be easily demonstrated
by placing the model in front of an overhead
projector, tilting it at different angles, and observing
its shadow.
You will need (for each model Saturn):
1. a copy of the Table of Sizes and Distances
2. 3 inch Styrofoam ball
3. 1 sheet of transparency film
4. orange and yellow markers
5. tooth picks
6. small candy about 1/3 inch in diameter. An
M&M is close enough.
7. talcum powder
8. ruler
9. scissors
10. transparent tape
11. exact-o knife (1 for the teacher to use)
12. a compass for drawing circles
13. an overhead projector and/or flashlight
14. a peppercorn (optional)
15. string (optional)
Time requirement: 1 to 1 1/2 hours. At least 2 for
older students making their own calculations.
Instructions
1) Using the compass (replace the pencil with a
narrow tipped marker or felt tip pen) centered
on the transparency film draw an inner circle
with a radius of 1 2/3 inches (3 1/3 inches in
diameter). Next draw an outer circle also
centered on the transparency film 3.5 inches in
radius (7 inches in diameter). For younger
students you may wish to use a template and
photocopy the rings onto the transparency for
the student prior to the lab, or have the students
trace the template.
2) Cut out the center and the outer edge leaving
only a ring of transparency film between your
two circles. (Here a teacher may need to make a
small cut with the exact-o knife into the center
of the transparency film so that the student can
use scissors to cut out the center circle without
cutting into the ring.)
3) Take the Styrofoam ball and make sure it will fit
inside the ring, If not, cut away additional
material from the inside of the ring until the ball
will fit with a small gap all around.
4) Take the talcum powder and sprinkle it on the
ring.
5) Smooth the talcum powder over one side of the
ring with fingertips or a paper towel. Talc can
also be removed with a fingertip and/or a paper
towel to show the major observed gap in the
rings (the Cassini division). Older students can
be asked to make the Cassini division to scale
with the model in both location and width.
6) Now using the yellow and orange markers color
the Styrofoam ball to look like Saturn. Try to
have an image of Saturn available for the
students to refer to.
7) Put toothpicks (4 to 6 equally spaced) around
the "equator" of your Model Saturn. The placing
of the toothpicks is very critical; they all must
be in the same plane or a "warped" ring will be
produced. I recommend lightly drawing the
equator in, or that marks are made on the ball
showing the student where to place the
toothpicks.
8) Place the ring on the toothpicks. Make sure all
of the toothpicks are in the same plane (or at
least close). Tape the ring onto the toothpicks
with transparent tape on the side without the
talcum powder. The talc may need to be re-
applied after this step.
9) The small candy (a blue M&M will do nicely)
represents the Earth. Compare the size of this
scale Earth with the scale model Saturn.
10) Turn down the lights and point a flashlight at
the model Saturn. Turn the model so the rings
are on edge to the students, and are facing the
students. Discuss why the rings of Saturn are
sometimes very visible from the Earth and why
they seem to disappear at other times.
(Alternatively, an overhead projector can be
used to project a silhouette of the model on the
wall or a screen. The effect will be very visible
for the entire class.)
11) Titan, the largest moon of Saturn, is about the
size of a peppercorn on this scale. (Titan is
bigger than the planet Mercury). Use a
peppercorn to represent Titan. A red or pink
peppercorn can be used to approximate the
orange color of Titan. (Red peppercorns can be
very fragile, so plan to have extra available.)

Page 20
12) Measure the string to 30 inches. Titan is 30
inches from the center of the scale model Saturn
and orbits in the same plane as the rings. You
can attach one end of the string to the inner edge
of the ring plane, but be sure to cut off the 1 2/3
inches that represent the distance from the
center of Saturn to the inner edge of the rings.
Alternatively, place the string on a table and Put
the model Saturn on one end of string. This is
easier, but may give the misconception that the
orbital plane of Titan is not in the same plane as
the rings.
13) Now stretch out the string until it is straight and
place the peppercorn on the other end. You now
have a scale model of Saturn AND its largest
satellite. For reference, the tiny moon Mimas is
about 1 inch farther away from Saturn than the
outer edge of the rings and is 1/100th of an inch
across on this scale (smaller than a grain of salt).
Suggestions for teaching this activity
Younger students
Use the measuring as a math activity. Have
students make their own measurements. You
may also wish to have the students make
relative size determinations. (Saturn is about
10 times wider (diameter) than the Earth, the
rings are about half as wide as Saturn, and so
forth.)
Let each student make their own scale model
Saturn to take home and show their parents,
but still have them work together in small
groups to make their models.
Display the Saturn models in your classroom.
The real Saturn is less dense than water, which
means that if you had a tank of water big
enough (which is of course impossible) Saturn
would float. Try floating one of the Styrofoam
balls in water (or a completed model, but the
talc will wash off the ring) and tell your
students about this fun fact.
If you use M&M's or other candy for the scale
Earth(s), pre-sort the candies for the color you
wish to use before the activity. Otherwise, the
students may pay more attention to the candy
than the activity.
Older Students
Give the students the table in this activity with
only the first two columns filled out and the
scale factor. (Alternatively, you can give them
the 3 inch measurement for the model Saturn
and have them determine the scale factor.)
Have the students fill out the rest of the table.
You can have them suggest items that can be
used to represent the Earth and Titan in this
activity instead of telling them the items I have
suggested.
Let the students examine the model Saturn
with the flashlight in small groups. Have them
determine in their groups why the rings
sometimes seem to disappear when viewed
from the Earth.
Have the students look up the particle sizes in
the rings. For their scale model are the talc
particles a reasonable size? You might have
the students compare the size of ring particles
with the Saturn's moon Mimas (the size of a
speck of dust in the model).
Saturn is 1,400,000,000 km away from the
Sun. Have your students figure out how far
away the Sun would be in their model.
It probably isn't necessary for each student to make
his or her own model Saturn. If you separate your
students into small groups to calculate the scale
factors, you can then have each group work together
to build their own scale models based on their
calculations. You can even make it a 2-day activity
and have them bring something from home to
represent the size of Earth and Titan.
E S T I M A T I N G C L O U D C O V E R
This activity is from the GLOBE Program. To learn
more about GLOBE and how to join the program,
visit the web site www.globe.gov.
Background
Even experienced observers have difficulty
estimating cloud cover. This seems to derive, in
part, from our tendency to underestimate the open
space between objects in comparison to the space
occupied by the objects themselves, in this case the
clouds. Students have an opportunity to experience
this perceptual bias themselves, to reflect on its
consequences for their scientific work, and to devise
strategies to improve their ability to estimate cloud
cover.
Page 21
What To Do and How To Do It
Introduce students to the idea of observing and
quantifying cloud cover. Explain that they will
simulate cloud cover using construction paper and
estimate the amount of cloud cover represented by
white scraps of paper on a blue background.
Demonstrate the procedures covered in steps 3 - 6
below so that students understand how to proceed.
You may review the Cloud Cover Protocol with
students before doing this learning activity or use
the activity as a first step in presenting the protocol
to students. Step 7 below requires you to explain the
classification categories that are used – no clouds,
clear, isolated, scattered, broken, and overcast.
1. Organize students into pairs.
2. Provide each pair with the necessary materials:
one sheet of light blue construction paper
one sheet of white construction paper divided
into 10 equal segments
GLOBE Science Log
glue stick, glue, or tape
3. Have each student pair choose a percentage of
cloud cover that they wish to represent. They must
choose a multiple of 10% (i.e. 20%, 30%, 60%, etc.
not 5% or 95%). They should not reveal the
percentage they have chosen to anyone else.
4. Have each pair cut their white paper so that it
represents the percentage of cloud cover they have
chosen. For example, if they have chosen 30%, they
should cut out 30% of their white piece of paper and
recycle the remaining 70%. Students should then
tear their white paper into irregular shapes to
represent clouds.
5. Have students paste or tape the cloud pieces onto
the blue paper, taking care not to overlap the pieces
of white paper. On the back of the blue paper,
record the percentage of cloud cover.
6. Have students take turns visiting each others'
simulations and estimating the percentage of cloud
cover. For each simulation they should classify the
sky as clear (0-10%), isolated (10-25%), scattered
(25-50%), broken (50-90%), or overcast (>90%).
They should then record their estimates in their
notebooks, using a table similar to that shown
below.
Name Estimated % Classification
Juan and Alice 40% scattered
Jon and Jose 70% broken
7. When students complete their estimates of cloud
cover, create a table on the board to compare their
estimates with the actual percentages and
classifications
8. Discuss with the students the accuracy of their
estimates and consider the following questions:
Which were more accurate -- the percentage
estimates or the classifications?
Where did the greatest errors occur?
Can students come up with a quantitative
measure of their collective accuracy?
Does the class have a tendency to overestimate
or underestimate cloud cover?
What factors influenced the accuracy of the
estimates (e.g. size of the clouds, clustering of
the clouds in one part of the sky, the percentage
of sky that was covered)?
Do students feel that making these estimates is
something they have a knack for, or is it
something that they can learn?
Where else might such spatial estimation skills
be valuable?
Which cloud classifications were the easiest and
most difficult to identify?
What strategies enabled students to succeed?
What strategies might produce more accurate
classifications?
O B S E R V I N G V I S I B I L I T Y A N D
S K Y C O L O R
This activity is from the GLOBE Program. To learn
more about GLOBE and how to join the program,
visit the web site www.globe.gov.
Background
Why is a clear sky blue? The atmosphere consists
primarily of molecules of oxygen and nitrogen.
Sunlight bounces off these molecules, a process
called scattering. Light with shorter wavelengths, at
the blue end of the visible light spectrum, is
scattered more efficiently than longer wavelengths.
To an observer on the ground, this scattered light
fills the entire sky and a clear sky appears blue.
However, there are also liquid and solid particles
called aerosols suspended in the atmosphere. When
there are relatively few aerosols, the sky appears
clear. For example, a distant building or mountain
peak appears clearly defined, with colors similar to
what you would see if you were much closer to that

Page 22
distant object. On a very clear day, you would
report the sky color as blue or deep blue and the sky
condition as clear or unusually clear. Aerosols
come from natural sources such as condensation and
freezing water vapor, volcanoes, dust storms, and
salt crystals evaporated from sea spray. They also
come from human activities such as burning fossil
fuels and biomass (e.g., wood, dung, dried leaves)
and plowing or digging up soil. Aerosols are much
bigger than gas molecules (they range in size from
about 10-6 m (1 micron) to 10-7 m) and they scatter
light from all visible wavelengths. Individual
aerosols are too small to be visible to the human
eye, but their presence affects the sky's appearance.
As the aerosol concentration, and therefore
scattering of sunlight, increases, the sky appears less
blue. Haze is the visible effect of aerosols on the
atmosphere; it is a qualitative condition you can
observe. When aerosol concentrations are high, we
say that the sky looks hazy. Aerosol concentrations
can also be measured quantitatively.
Hazy skies appear pale blue or almost white.
Depending on the type of aerosols present in the
atmosphere, the sky may also appear brownish or
yellowish. Scattering of visible light through a hazy
sky affects horizontal visibility, so distant objects
appear less distinct, with washed-out or distorted
colors. Distant objects that are visible on a clear day
may actually disappear on a hazy day. Aerosols,
probably produced by urban smog, cause the haze
evident in this picture of the Empire State Building
in New York City.
Photograph © Forrest M. Mims III. Used by permission. May
be freely reproduced with acknowledgement.
Over the past few decades, horizontal visibility has
declined around the globe, on average, due to
increasing aerosol concentrations. As a result, scenic
vistas throughout the world have been obscured.
Teacher Preparation
In this activity, your students will carefully observe
the atmosphere over a period of days and record
their observations. Through these direct
observations they will develop an understanding that
visibility and sky color are related and that both are
due to the relative presence or absence of aerosols.
The students will classify the sky color using
standard categories and will represent the sky color
using paints or colored pencils. They also will
record the visibility based on observation of a
distant object such as a mountain or a building. It is
not important that they observe every day, but they
should try to sample a wide range of the visibility
and sky conditions that occur at your location. They
should try to observe on some very clear days, on
some hazy days, and on some intermediate days.
After they have observed and recorded examples of
very clear days, very hazy days, and various
conditions in between, the class will record their
observations in a summary table and see whether or
not a pattern emerges that relates visibility to sky
color.
Visibility
By "visibility," we mean the clarity with which
objects can be viewed through the intervening
atmosphere. In order to judge visibility or the clarity
of the atmosphere, students need to be able to look
out at a distant scene, such as a distant building or a
mountain or hillside. By looking at the same scene
or object every day students will gradually develop
a sense of whether the day is unusually clear, clear,
somewhat hazy, very hazy, or extremely hazy. Only
practice, lots of different examples, and discussion
will make these categories clear. (No pun
intended!)
Sky Color
Students are also asked to observe, classify, and
represent the sky color. They will classify the sky
color using the categories listed at the bottom of the
data sheet. They represent the sky color in a
drawing using paints or colored pencils. They could
also try using photographs or color paint chips. As
they make more observations, the students will
become more confident of their classifications and
more skillful in drawing the sky color.
Students may notice that the sky is often a different
color in different parts of the sky. Near the horizon

Page 23
it is typically lighter due to the presence of aerosols.
The darkest part of sky can often be seen about half
way between the horizon and directly overhead, in
the "anti- sun" direction - that is, when you look at
the sky with your shadow in front of you. Students
should try to locate the darkest (bluest) color of the
sky and record it.
Correlation Between Visibility and Sky Color
One of the purposes of this activity is for students to
realize that on the clearest days with the highest
visibility the sky is a deep blue color, while on hazy
days it appears milky. Changes in visibility and sky
color are both due to changes in aerosol
concentrations in the atmosphere. Because aerosols
scatter sunlight, high aerosol concentrations make it
harder to see distant objects and make the sky
appear lighter. On clear days when aerosols are
low, visibility is high and the sky is deep blue. But
do not TELL students this; let them discover it by
pooling the class observations in the Visibility and
Sky Color Summary Chart. It should be the case
that most of their observations will tend to fall along
the main diagonal from upper left to lower right.
What To Do and How To Do It
1. Lead students through a discussion of aerosols,
visibility, and sky color. Begin by asking them what
they recall about times when the sky was very hazy.
How was the visibility? How did they recognize
that visibility was low? What color was the sky?
When did this occur? What do they think caused it?
2. Continue by asking them to recall a time when
the sky was very clear. What did it look like? What
color? How was the visibility through the
atmosphere? When did this very clear event occur?
What was the weather like at that time? What do
they think caused the air to be so clear at that time?
3. If it has not already come up in discussion,
discuss the role of aerosols in the creation of haze.
Discuss local and regional sources of aerosols.
Discuss, also, how aerosols such as dust can be
transported from long distances and affect local
conditions.
4. Explain that they will undertake an investigation
of sky color and visibility. Introduce the Visibility
and Sky Color Data Sheet and discuss how to use it.
Take observations for as many days as necessary to
obtain a full range of sky conditions in the data.
5. After the class has made a large number of
observations, covering the entire range of sky
conditions that occur in your area, bring the class
together for a group discussion of the data. Engage
the students in a discussion of the conditions that
existed when they observed the clearest and their
haziest skies. What was the weather like? What do
they think accounted for the clearest and the haziest
skies? When they had hazy skies, was the haze
created by local, regional, or long-distance factors?
6. On the blackboard or on chart paper, create a
chart similar to the Visibility and Sky Color
Summary Chart shown. Invite students to contribute
their data to the chart by placing a mark in the
appropriate cross-classification cell to represent
each of their observations.
7. When the chart has been populated with all of
the student observations you should observe a
diagonal trend in the data, from upper left to lower
right. Ask students to explain why this trend exists.
What is the common element that causes both low
visibility and milky skies?
8. (Optional) Have each student or team create a
"key" to help them make future observations. Select
one sky color example for each level of
visibility/sky color from "unusually clear" to
"extremely hazy." Use these keys to standardize
your observations of haze conditions. Students can
continue to take observations throughout the year
and note relationships to season, storms, time of
day, temperature, wind direction and other
conditions. Depending on students' ages, these color
keys can be sky paintings, photographs, or paint
color chips that can be obtained from stores that sell
interior paint.
Student Preparation for Observing Visibility and
Sky Color
Make these observations only on days when you can
see the sky. Do not attempt to observe visibility and
sky color on days that are overcast. For each day
that you make an observation, record the date, the
local time, your estimate of the visibility and your
estimate of the sky color.
Both visibility and sky color are subjective
classifications. That means you should expect some
variation among observers and changes in your own
classifications as you gain experience. As you gain
experience in observing the atmosphere and the sky
you may change your mind about some of your
initial classifications. You may decide that what
you originally classified as a deep blue sky you now
consider to be merely "blue." Or, you may decide
that what you thought was "somewhat hazy" was
really "very hazy." Do not worry about this and do
Page 24
not go back and change your original observations.
You can expect your skill in classifying to evolve
and change. Gradually, you should gain confidence
in your ability to classify consistently.
1. Estimate the Visibility – Select some distant
object - a mountain range, a building, or other object
several kilometers away. Use this object as your
"reference object" to judge visibility every day you
make an observation. Take note of how distinctly
you can see it and select one of the visibility
categories below and record it on the Visibility and
Sky Color Data Sheet.
Unusually clear
Clear
Somewhat hazy
Very hazy
Extremely hazy
2. Observe the Sky Color – Now look at the sky and
find the part of it that is the darkest color. When
you do this activity, be sure not to look directly at
the sun even if it is partially obscured by clouds.
Select a category for the sky color from the list
below and record it on the Visibility and Sky Color
Data Sheet.
Deep blue
Blue
Light blue
Pale blue
Milky
3. Paint or draw with colored pencils your best
representation of the sky color in the "picture" box.
You can also use paint color chips or photographs to
represent sky color.
Questions for Understanding
1. When you see blue skies, what other weather
conditions are likely to exist? What else would you
observe on very clear days?
2. Are you aware of any daily patterns in sky color
and visibility in your location? Is it usually hazier at
certain times of day? What causes this?
3. How are sky color and haze related to weather?
4. Are sky color and haze at your location related
to the amount of wind and the wind direction? If so,
why?
4. Are sky color and haze at your location related
to the time of the year? That is, are there
seasonal patterns in your data?
Thank you for using the
World Space Week Teacher
Activity Guide
Use Space to Excite Students About Learning!
Celebrate
W o r l d S p a c e W e e k In Your Classroom October 4 -10 Annually
www.worldspaceweek.org

Page 25