vantage 7.1 system administration guide - · pdf filevantage system administration 1 ......
TRANSCRIPT
Vantage System Administration
7.1
System Administration
March 2018 243184
2
Copyrights and Trademark NoticesCopyright 2018. All rights reserved worldwide. No part of this publication may be reproduced, transmitted, transcribed, altered, or translated into any languages without the written permission of Telestream. Information and specifications in this document are subject to change without notice and do not represent a commitment on the part of Telestream.
Telestream, CaptionMaker, Episode, Flip4Mac, FlipFactory, Flip Player, Lightspeed, ScreenFlow, Switch, Vantage, Wirecast, Gameshow, GraphicsFactory, MetaFlip, and Split-and-Stitch are registered trademarks and MacCaption, e-Captioning, Pipeline, Post Producer, Tempo, TrafficManager, VidChecker, and VOD Producer are trademarks of Telestream, LLC. All other trademarks are the property of their respective owners.
3
Contents
Vantage System Administration 1
Copyrights and Trademark Notices 2
Using the Vantage Management Console 7
Introduction 8Starting the Vantage Management Console 9
Selecting a Domain 9Entering a Username and Password 10
Managing the Vantage Domain Connection 12Identifying the Selected Domain 12Selecting a Different Domain 13
Using the Vantage Management Console Workspace 14Components Panel 14Details Panel 14
Managing Tips and Warnings 15Using the Help System 15
Context-Sensitive Help 15The Vantage Domain Management Guide 16Tool Tips 16Online Help 16
Displaying Software and Database Versions 17Vantage Management Console Reference 18
Vantage Management Console Menus 18Vantage Component Descriptions 19
Settings and Options 22
Managing the Vantage Domain 25
Managing Settings and Options 26Making General Settings 27Configuring Vantage Email Notifications 28Specifying Authorization Credentials for Remote Folder Access 30
Understanding Authorization Settings 30
Contents4
Displaying the Authorization Settings 31Refreshing the Authorization Record List 32Adding an Authorization Record 32Modifying an Authorization Credentials Record 33Deleting an Authorization Credentials Record 33Exporting and Importing Authorization Records 33
Assigning Mapped Drives 35Configuring a Signiant Connection 37
Signiant CA Certificate Instructions 38Use a Web Page to Get a Certificate 38Use the Command Line to Get a Certificate 38Deleting a Signiant Agent 38Exporting and Importing Signiant Agents 39
Configuring an Agility ECS Connection 40Configuring Telestream Cloud Settings 42
Deleting a Telestream Cloud Account 43Exporting and Importing Telestream Cloud Settings 43
Configuring an Elastic Domain Billing Account 44Configuring and Testing Billing 44Checking Billing Log Information 45Reactivating a Suspended Elastic Domain 46
Configuring Interplay Settings 47Exporting and Importing Interplay Settings 48Deleting an Interplay Account 48
Creating Dashboard Links 49Exporting and Importing Dashboard Links 49Deleting Dashboard Links 50
Managing Vantage File Storage 51Understanding Vantage Storage 51Understanding Path Specifications for Vantage Storage 52Managing Vantage Stores 53
Adding and Configuring Vantage Stores 54Creating a Live Store 55Viewing Files in a Vantage Store 55Modifying a Vantage Store 55Moving a Store Online or Offline 56Identifying Workflows that Use a Store 57Setting the Block Size 58Duplicating a Vantage Store 59Exporting and Importing Vantage Stores 59Deleting a Vantage Store 59
Managing Vantage Folder Addresses 60Adding Vantage Folder Addresses 61Refreshing the List of Folders 62Modifying Vantage Folder Addresses 62Identifying Workflows that Use a Vantage Folder 63Deleting a Vantage Folder Address 63Setting the Block Size 63

Contents 5
Duplicating a Vantage Folder Address 64Exporting and Importing Folder Addresses 64
Managing Services 65Using the Services Details Panel 66Grouping Services 68Adding a Service to the Domain 68Removing a Service from the Domain 68Entering and Exiting Service Maintenance Mode 69Resetting the Service Metrics History 69Restarting a Service 69Changing a Service Logon 70Viewing Average Time Spent Waiting 70Generating Reports 71
Time of Day Report Example 72Historical Report Example 72
Configuring Vantage Services 73Setup 73Storage 75Variables 76Qualification Rules 77
Managing Licenses 80Viewing Vantage Licenses 80Adding a License 81Deactivating a License 81Searching Licenses 82Portal Sessions 82Cloud Billing 82
Enabling Open Workflows 83Viewing Status 84
Viewing Active Actions 85Viewing Active Actions for a Service 85Viewing Active Actions by Machine 85
Viewing Machine Metrics 86Pre-Shutdown Notification 86
Viewing the Active Workflows in a Domain 87Monitoring Utilization 88
Utilization Display Details 90Using Support Utilities 91
Using the Data Collection Utility 91Using the Change Log 92Using the Error Log 94Listing Actions By Service 96Displaying Plug-in Versions 97Displaying Software Versions by Machine 98
Managing Task Scheduling and Load Balancing 99Enabling Task Scheduling/Load Balancing 99Overview of Session and Cost Based (Legacy) Load Balancing 100
Session-Based Load Balancing 100
Contents6
Cost Based Load Balancing (Legacy) 101Examples of Cost Based Load Balancing (Legacy) 102Overview of Task Based Load Balancing 103Configuring Task Based Load Balancing 104
Task Scheduling Rules Panel 105Task Capacity Manager Panel 106Action Task Scheduling 107Action Defaults for Task Scheduling 108Checking Task Status 109
Managing Vantage Users 111Enabling and Disabling User Administration 111Managing Users with Vantage Management Console 112
Adding Users 113Setting Passwords 114Removing Users 114Importing and Exporting Users 114
Managing Domains 115Backing Up and Restoring the Vantage Domain Database 115Understanding Domain Backup and Restore 115Backing Up the Domain 116Restoring the Domain 117Shrinking a Full Database 117Renaming a Vantage Domain 118Renaming a Vantage Server 119
Managing ComponentPacs 122Using the ComponentPac Management Panel 123
Installing ComponentPacs 124Uninstalling ComponentPacs 126
7
Using the Vantage Management Console
This chapter describes how to use the Vantage Management Console (VMC), which enables Vantage system administrators to configure their Vantage domain and to scale Vantage services across multiple servers (creating a Vantage array) to meet their operating requirements.
Note: Features in products for which you don't have a license are disabled and indicate that you need a license to use them.
The following topics describe how to use the Vantage Management Console:
■ Introduction
■ Starting the Vantage Management Console
■ Managing the Vantage Domain Connection
■ Using the Vantage Management Console Workspace
■ Managing Tips and Warnings
■ Using the Help System
■ Displaying Software and Database Versions
■ Vantage Management Console Reference
Using the Vantage Management ConsoleIntroduction
8
IntroductionThe Vantage Management Console is designed to facilitate centralized management of the software components and resources that comprise a Vantage domain, including settings and options, Vantage catalogs, Vantage stores, Vantage services, licenses, workflow design items, and client application configurations. The Vantage Management Console also provides real-time status details for services, machines, and the domain at large, plus a domain backup/restore utility and other support utilities.
The Vantage Management Console manages a single Vantage domain at a time.
CAUTION: Although the Vantage Management Console is a multi-user application, modifying a domain is intended to be done by one user on one domain at a time. Connecting multiple consoles to the same Vantage domain for any other purpose than viewing status and configuration details is not recommended and can lead to domain configuration problems.
Each Vantage domain includes a single Vantage domain database, which consists of a Microsoft SQL Server instance, Vantage domain database software, and database files. All configurations that you create with the Vantage Management Console are stored in the Vantage domain database.
Many organizations implement Vantage as a single domain. However, in large facilities, you may have several separate and independent Vantage domains for scaling to high-volume workflow processing or for specialization and departmentalization purposes.
In a facility with multiple Vantage domains, you can connect to any Vantage domain in the network from any Management Console in the network.

Using the Vantage Management Console Starting the Vantage Management Console
9
Starting the Vantage Management ConsoleTo start the Management Console, do one of the following:
• Select Start > Programs > Telestream > Vantage > Vantage Management Console
• Double-click the Vantage Management Console shortcut on your desktop:
After you start the Vantage Management Console, your domain configuration may prompt you for additional information, which is described in the following topics:
■ Selecting a Domain
■ Entering a Username and Password
Selecting a DomainEach time you start the Vantage Management Console, the program connects to the last domain to which it was connected. If you are starting the program for the first time, the Vantage Management Console polls the network for domains in the same subnet, and displays the domains that responded in a list, as depicted in this figure.
The name for each Vantage domain is the name of the computer that hosts the Vantage domain database. If you do not know which domain you should connect to, see your Vantage domain administrator.
To select a domain, do the following:
1. Click Search. Select the desired domain if it appears in the list (as shown in the figure above).
Using the Vantage Management ConsoleStarting the Vantage Management Console
10
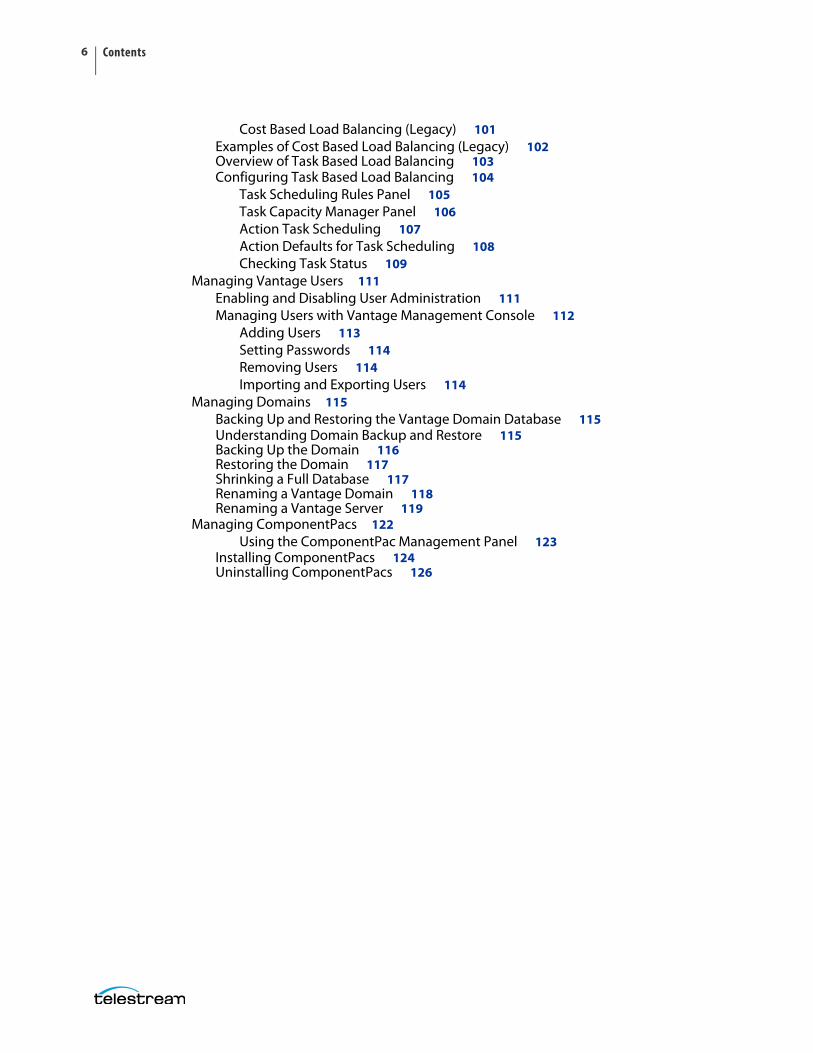
2. If the Vantage domain’s SQL database default username and password were changed during installation, do the following:
a. Click Connection Settings to display a dialog that you can use to specify the correct username and password for the MS SQL Server (see the figure, below).
b. Enter the Vantage domain database SQL Server account username and password (obtained from your Vantage administrator).
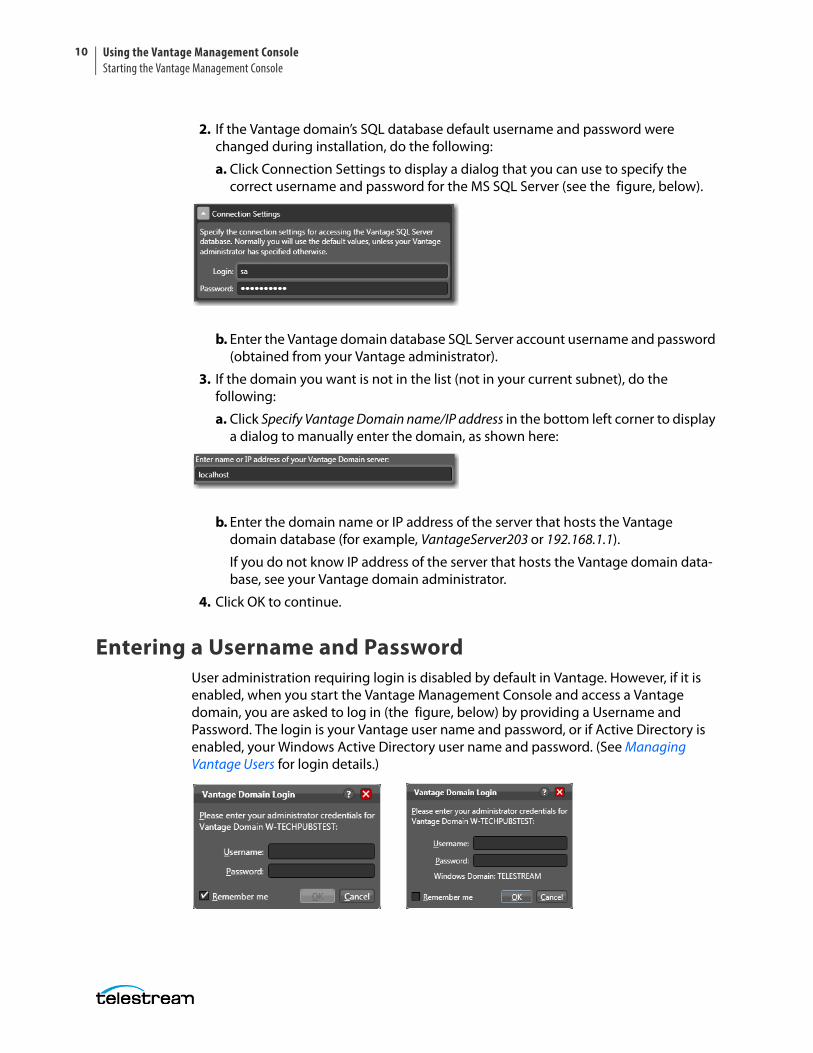
3. If the domain you want is not in the list (not in your current subnet), do the following:
a. Click Specify Vantage Domain name/IP address in the bottom left corner to display a dialog to manually enter the domain, as shown here:
b. Enter the domain name or IP address of the server that hosts the Vantage domain database (for example, VantageServer203 or 192.168.1.1).
If you do not know IP address of the server that hosts the Vantage domain data-base, see your Vantage domain administrator.
4. Click OK to continue.
Entering a Username and PasswordUser administration requiring login is disabled by default in Vantage. However, if it is enabled, when you start the Vantage Management Console and access a Vantage domain, you are asked to log in (the figure, below) by providing a Username and Password. The login is your Vantage user name and password, or if Active Directory is enabled, your Windows Active Directory user name and password. (See Managing Vantage Users for login details.)
Using the Vantage Management Console Starting the Vantage Management Console
11
If the dialog prompts for credentials to a domain you cannot or do not want to access, click Cancel and select the domain to which you want to connect as described in Selecting a Different Domain.
When the dialog displays the correct domain name, enter your username, and password, if required, and click OK to connect.
The default Vantage user is Administrator, with no password assigned, and this user has Administrator privileges. Only Vantage users who are administrators can log into the Vantage Management Console.
Note: All user passwords are encrypted in the Vantage domain database.
Using the Vantage Management ConsoleManaging the Vantage Domain Connection
12
Managing the Vantage Domain ConnectionVantage Management Console connects to one domain at a time. You must connect to a domain before you can use the Vantage Management Console to manage that domain. In an environment where more than one Vantage domain is operating, you can use the same Management Console to connect to any single domain.
The following topics describe tasks for managing your domain connection:
■ Identifying the Selected Domain
■ Selecting a Different Domain
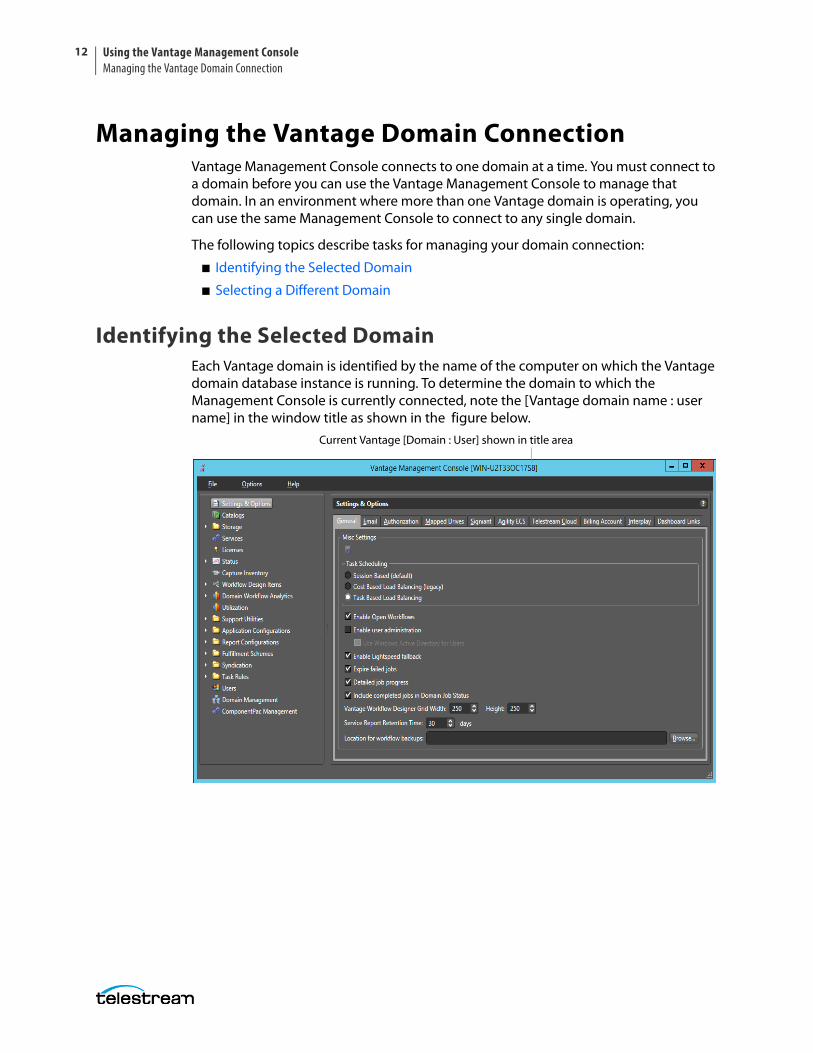
Identifying the Selected DomainEach Vantage domain is identified by the name of the computer on which the Vantage domain database instance is running. To determine the domain to which the Management Console is currently connected, note the [Vantage domain name : user name] in the window title as shown in the figure below.
Current Vantage [Domain : User] shown in title area
Using the Vantage Management Console Managing the Vantage Domain Connection
13
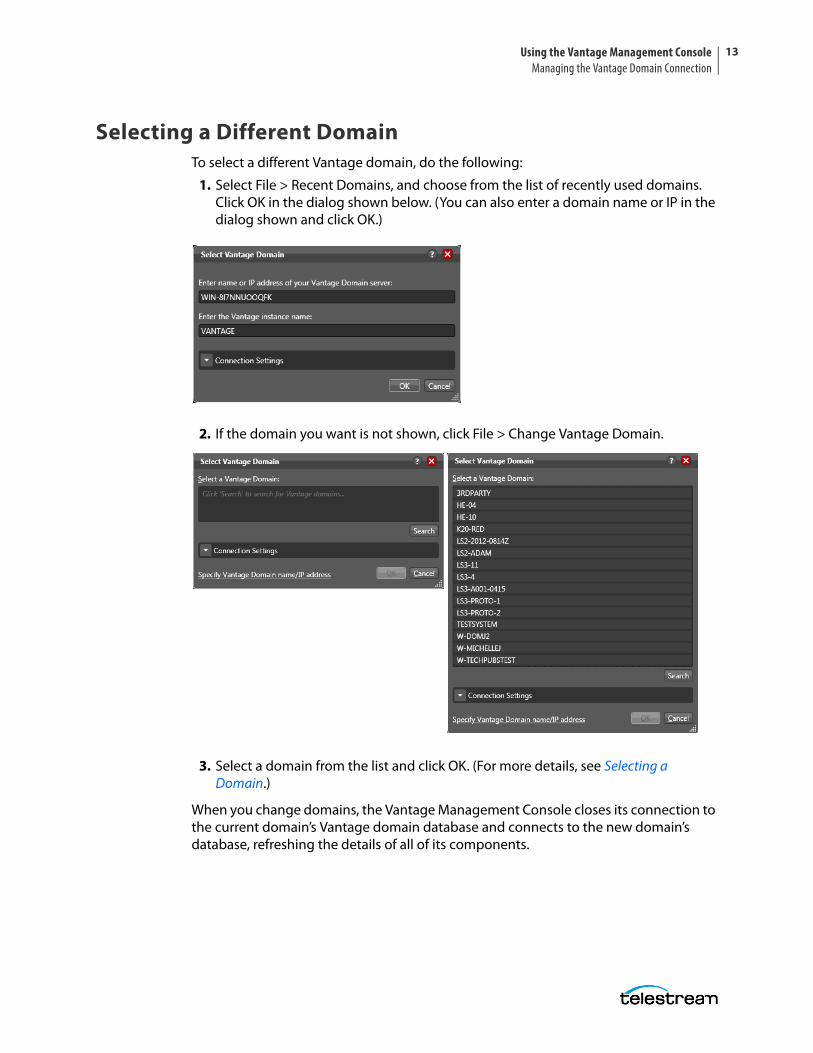
Selecting a Different DomainTo select a different Vantage domain, do the following:
1. Select File > Recent Domains, and choose from the list of recently used domains. Click OK in the dialog shown below. (You can also enter a domain name or IP in the dialog shown and click OK.)
2. If the domain you want is not shown, click File > Change Vantage Domain.
3. Select a domain from the list and click OK. (For more details, see Selecting a Domain.)
When you change domains, the Vantage Management Console closes its connection to the current domain’s Vantage domain database and connects to the new domain’s database, refreshing the details of all of its components.

Using the Vantage Management ConsoleUsing the Vantage Management Console Workspace
14
Using the Vantage Management Console Workspace
The Vantage Management Console window displays two panels that show Vantage configuration components and configuration settings as shown in this figure:
Components PanelOn the left is the Vantage components panel, which lists Vantage configuration components.
Details PanelTo the right of the components panel is the details panel, which lists the configuration settings for the Vantage component selected in the components panel.
For example, when you select the Settings & Options component, the details panel displays all the configuration options for this component as shown in the figure above. For the Settings and Options component, the details panel options are divided into four tabs. The details panel for other components is further divided into subpanels. These tabs and subpanels help to organize the configuration options.
Details panelComponents panel
Using the Vantage Management Console Managing Tips and Warnings
15
Managing Tips and WarningsTo restore tip and warning messages that were previously disabled by clicking Don’t show me this again, select Options > Restore Tips & Warnings. When tips and warnings are restored, these tips and warnings display as you interact with the Vantage Management Console.
To disable all tip and warning messages select Options > Hide Tips & Warnings. These messages can also be individually disabled by clicking Don’t show me this again when they appear.
Using the Help SystemThe Vantage Management Console provides the following help documentation:
■ Context-Sensitive Help
■ The Vantage Domain Management Guide
■ Tool Tips
■ Online Help
Context-Sensitive HelpWhen you are using the Vantage Management Console, context-sensitive help displays the appropriate section of the Vantage Domain Management Guide (which is this guide). For example, if you select the Storage component in the components panel and open context-sensitive help, Vantage displays the Managing Vantage File Storage section of this guide. To start context-sensitive help, press F1 or click the ? button.
Using the Vantage Management ConsoleUsing the Help System
16
The Vantage Domain Management GuideThe Vantage Domain Management Guide is available in PDF and program help formats. When you use context-sensitive help, you are opening the program help version of this guide to a section appropriate for the configuration settings you are viewing. You can also open this guide by selecting one of the following:
• Help > Contents—Displays the table of contents of this guide.
• Help > Index—Displays an index for this guide.
• Help > Search—Displays a search panel that you can use to search for information.
The Favorites tab in the help program can be used to save and display topics you want to quickly access. While viewing a help topic, click the Add button to add the current topic to the favorites list. To remove a topic, select the topic and click Remove.
Tool TipsTool tips display information about buttons and configuration options in the Vantage Management Console. To display the tool tip for a button or option, hover the cursor over the button or option.
Online HelpThe latest documentation is posted on the Telestream.net Web site. To quickly access the Telestream online documentation from within Vantage Management Console, select Help > Online Help.
Note: Access to the Vantage Online Help requires an Internet connection.
Using the Vantage Management Console Displaying Software and Database Versions
17
Displaying Software and Database VersionsThe Vantage software version is listed in the Help menu of Vantage programs. To view the software version of a Vantage program, select Help > About....
The Vantage database version is listed in the Help menu of the Vantage Management Console and the Vantage Workflow Designer. To view the Vantage database version in those programs, select Help > Database Version.
You can also find versions listed in the Vantage Management Console > Support Utilities > Software Versions by Machine folder. Click on a machine name in the folder to display the Vantage version and Vantage services versions installed on that machine.
Using the Vantage Management ConsoleVantage Management Console Reference
18
Vantage Management Console ReferenceThe following topics provide descriptions of Vantage Management Console controls:
■ Vantage Management Console Menus
■ Vantage Component Descriptions
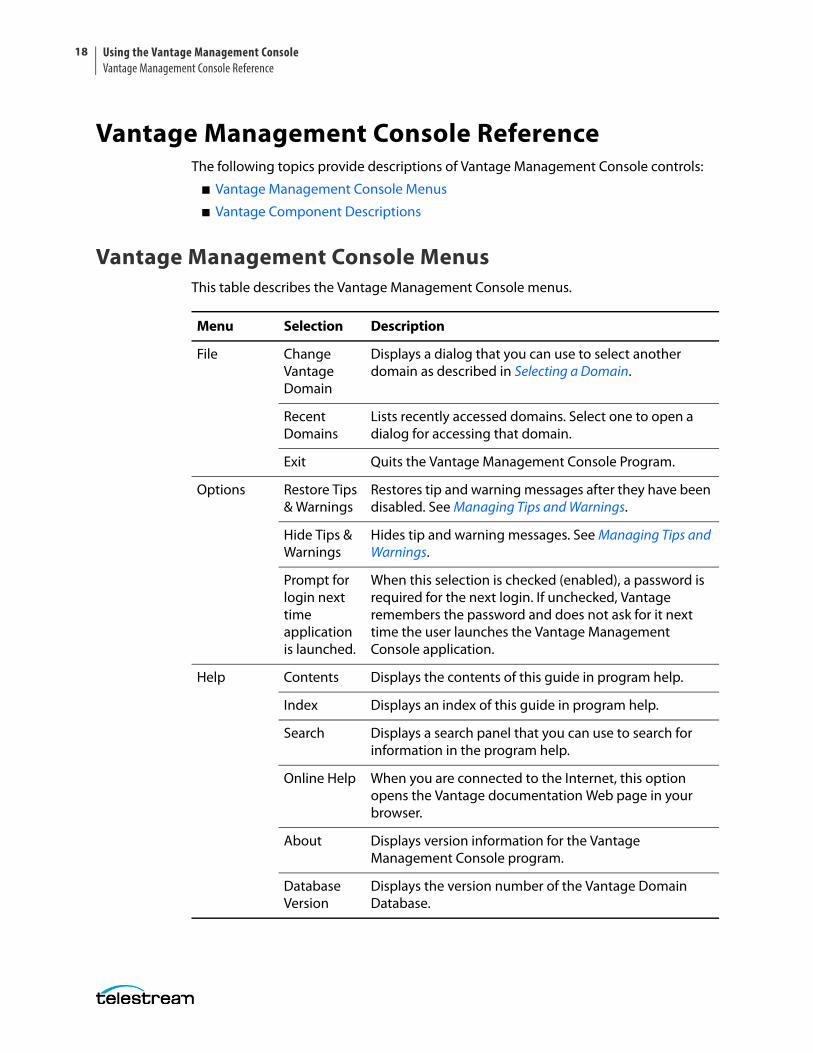
Vantage Management Console MenusThis table describes the Vantage Management Console menus.
Menu Selection Description
File Change Vantage Domain
Displays a dialog that you can use to select another domain as described in Selecting a Domain.
Recent Domains
Lists recently accessed domains. Select one to open a dialog for accessing that domain.
Exit Quits the Vantage Management Console Program.
Options Restore Tips & Warnings
Restores tip and warning messages after they have been disabled. See Managing Tips and Warnings.
Hide Tips & Warnings
Hides tip and warning messages. See Managing Tips and Warnings.
Prompt for login next time application is launched.
When this selection is checked (enabled), a password is required for the next login. If unchecked, Vantage remembers the password and does not ask for it next time the user launches the Vantage Management Console application.
Help Contents Displays the contents of this guide in program help.
Index Displays an index of this guide in program help.
Search Displays a search panel that you can use to search for information in the program help.
Online Help When you are connected to the Internet, this option opens the Vantage documentation Web page in your browser.
About Displays version information for the Vantage Management Console program.
Database Version
Displays the version number of the Vantage Domain Database.
Using the Vantage Management Console Vantage Management Console Reference
19
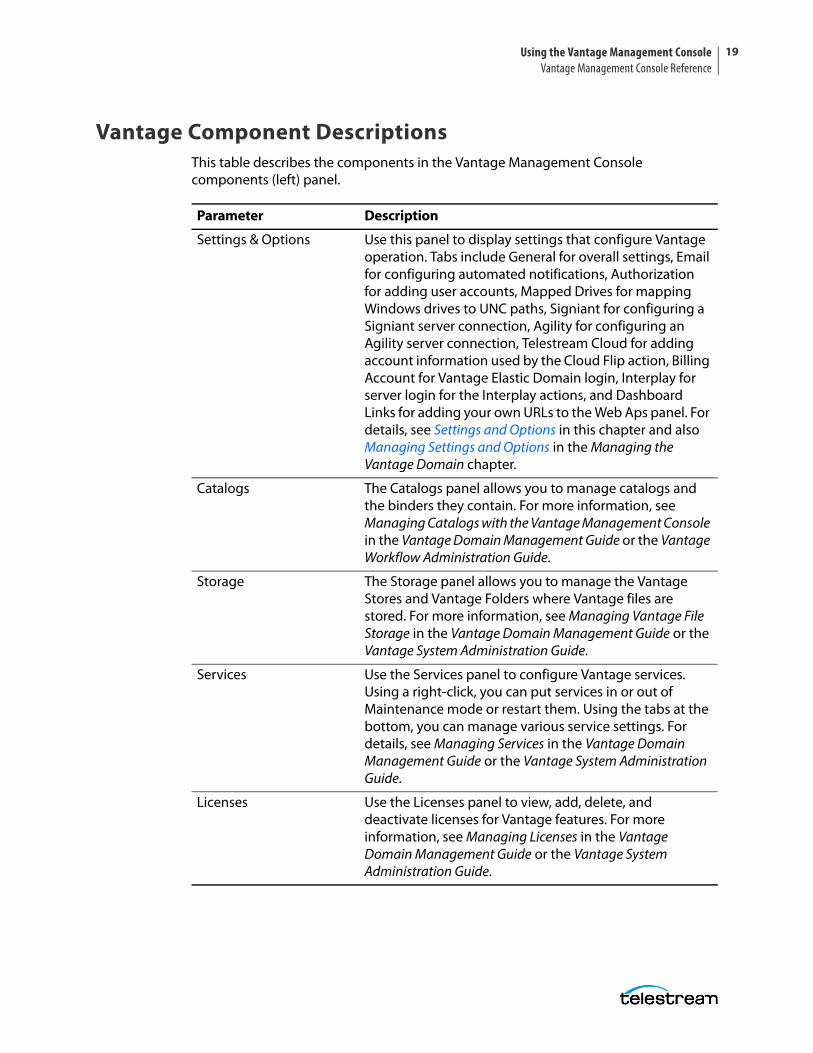
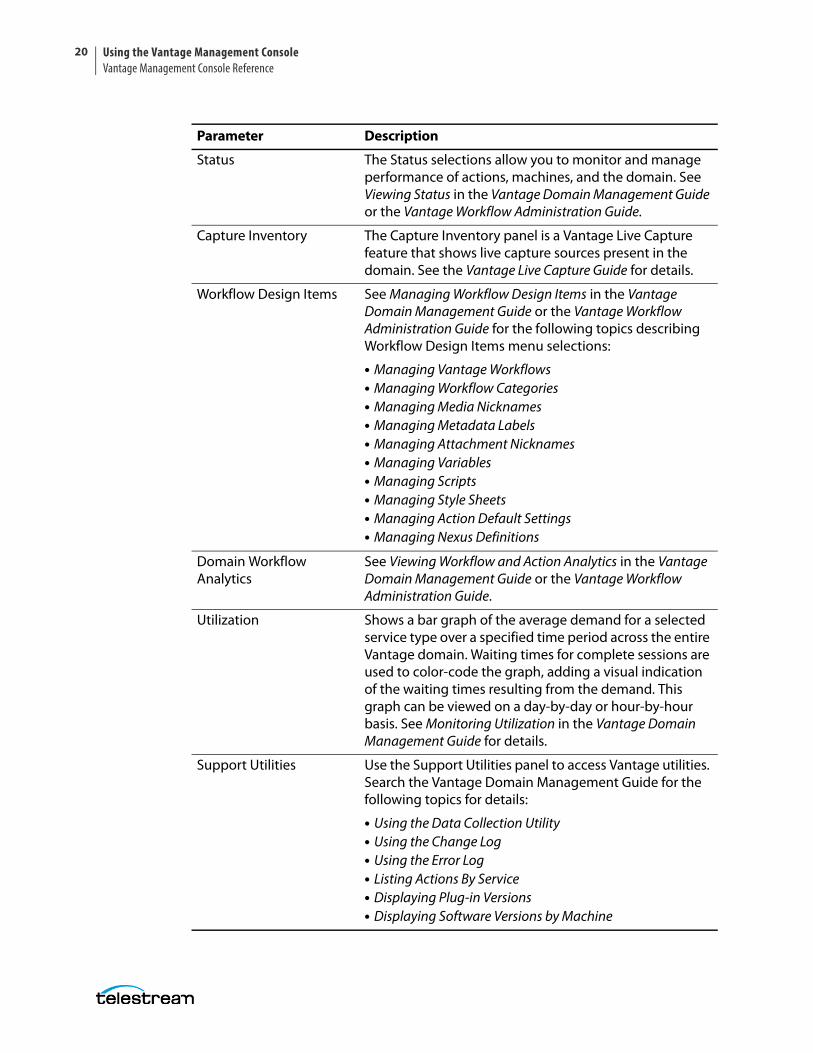
Vantage Component DescriptionsThis table describes the components in the Vantage Management Console components (left) panel.
Parameter Description
Settings & Options Use this panel to display settings that configure Vantage operation. Tabs include General for overall settings, Email for configuring automated notifications, Authorization for adding user accounts, Mapped Drives for mapping Windows drives to UNC paths, Signiant for configuring a Signiant server connection, Agility for configuring an Agility server connection, Telestream Cloud for adding account information used by the Cloud Flip action, Billing Account for Vantage Elastic Domain login, Interplay for server login for the Interplay actions, and Dashboard Links for adding your own URLs to the Web Aps panel. For details, see Settings and Options in this chapter and also Managing Settings and Options in the Managing the Vantage Domain chapter.
Catalogs The Catalogs panel allows you to manage catalogs and the binders they contain. For more information, see Managing Catalogs with the Vantage Management Console in the Vantage Domain Management Guide or the Vantage Workflow Administration Guide.
Storage The Storage panel allows you to manage the Vantage Stores and Vantage Folders where Vantage files are stored. For more information, see Managing Vantage File Storage in the Vantage Domain Management Guide or the Vantage System Administration Guide.
Services Use the Services panel to configure Vantage services. Using a right-click, you can put services in or out of Maintenance mode or restart them. Using the tabs at the bottom, you can manage various service settings. For details, see Managing Services in the Vantage Domain Management Guide or the Vantage System Administration Guide.
Licenses Use the Licenses panel to view, add, delete, and deactivate licenses for Vantage features. For more information, see Managing Licenses in the Vantage Domain Management Guide or the Vantage System Administration Guide.
Using the Vantage Management ConsoleVantage Management Console Reference
20
Status The Status selections allow you to monitor and manage performance of actions, machines, and the domain. See Viewing Status in the Vantage Domain Management Guide or the Vantage Workflow Administration Guide.
Capture Inventory The Capture Inventory panel is a Vantage Live Capture feature that shows live capture sources present in the domain. See the Vantage Live Capture Guide for details.
Workflow Design Items See Managing Workflow Design Items in the Vantage Domain Management Guide or the Vantage Workflow Administration Guide for the following topics describing Workflow Design Items menu selections:
• Managing Vantage Workflows• Managing Workflow Categories• Managing Media Nicknames• Managing Metadata Labels• Managing Attachment Nicknames• Managing Variables• Managing Scripts• Managing Style Sheets• Managing Action Default Settings• Managing Nexus Definitions
Domain Workflow Analytics
See Viewing Workflow and Action Analytics in the Vantage Domain Management Guide or the Vantage Workflow Administration Guide.
Utilization Shows a bar graph of the average demand for a selected service type over a specified time period across the entire Vantage domain. Waiting times for complete sessions are used to color-code the graph, adding a visual indication of the waiting times resulting from the demand. This graph can be viewed on a day-by-day or hour-by-hour basis. See Monitoring Utilization in the Vantage Domain Management Guide for details.
Support Utilities Use the Support Utilities panel to access Vantage utilities. Search the Vantage Domain Management Guide for the following topics for details:
• Using the Data Collection Utility• Using the Change Log• Using the Error Log• Listing Actions By Service• Displaying Plug-in Versions• Displaying Software Versions by Machine
Parameter Description
Using the Vantage Management Console Vantage Management Console Reference
21
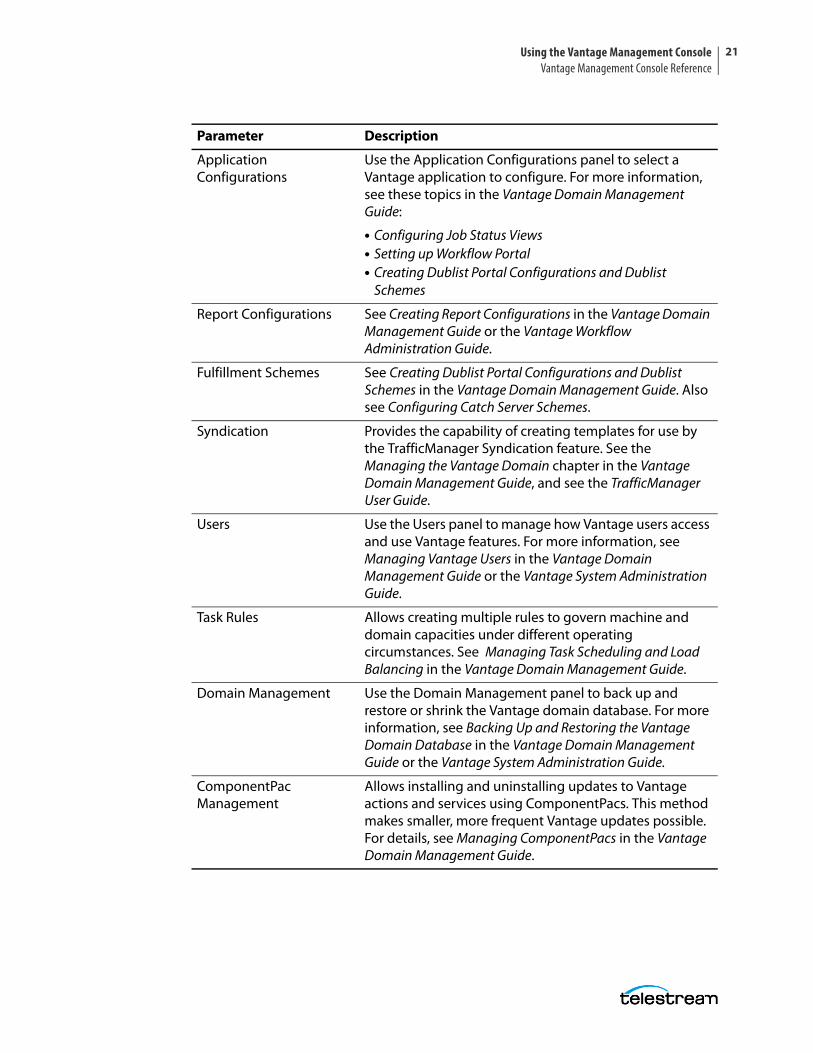
Application Configurations
Use the Application Configurations panel to select a Vantage application to configure. For more information, see these topics in the Vantage Domain Management Guide:
• Configuring Job Status Views• Setting up Workflow Portal• Creating Dublist Portal Configurations and Dublist
Schemes
Report Configurations See Creating Report Configurations in the Vantage Domain Management Guide or the Vantage Workflow Administration Guide.
Fulfillment Schemes See Creating Dublist Portal Configurations and Dublist Schemes in the Vantage Domain Management Guide. Also see Configuring Catch Server Schemes.
Syndication Provides the capability of creating templates for use by the TrafficManager Syndication feature. See the Managing the Vantage Domain chapter in the Vantage Domain Management Guide, and see the TrafficManager User Guide.
Users Use the Users panel to manage how Vantage users access and use Vantage features. For more information, see Managing Vantage Users in the Vantage Domain Management Guide or the Vantage System Administration Guide.
Task Rules Allows creating multiple rules to govern machine and domain capacities under different operating circumstances. See Managing Task Scheduling and Load Balancing in the Vantage Domain Management Guide.
Domain Management Use the Domain Management panel to back up and restore or shrink the Vantage domain database. For more information, see Backing Up and Restoring the Vantage Domain Database in the Vantage Domain Management Guide or the Vantage System Administration Guide.
ComponentPac Management
Allows installing and uninstalling updates to Vantage actions and services using ComponentPacs. This method makes smaller, more frequent Vantage updates possible. For details, see Managing ComponentPacs in the Vantage Domain Management Guide.
Parameter Description
Using the Vantage Management ConsoleVantage Management Console Reference
22
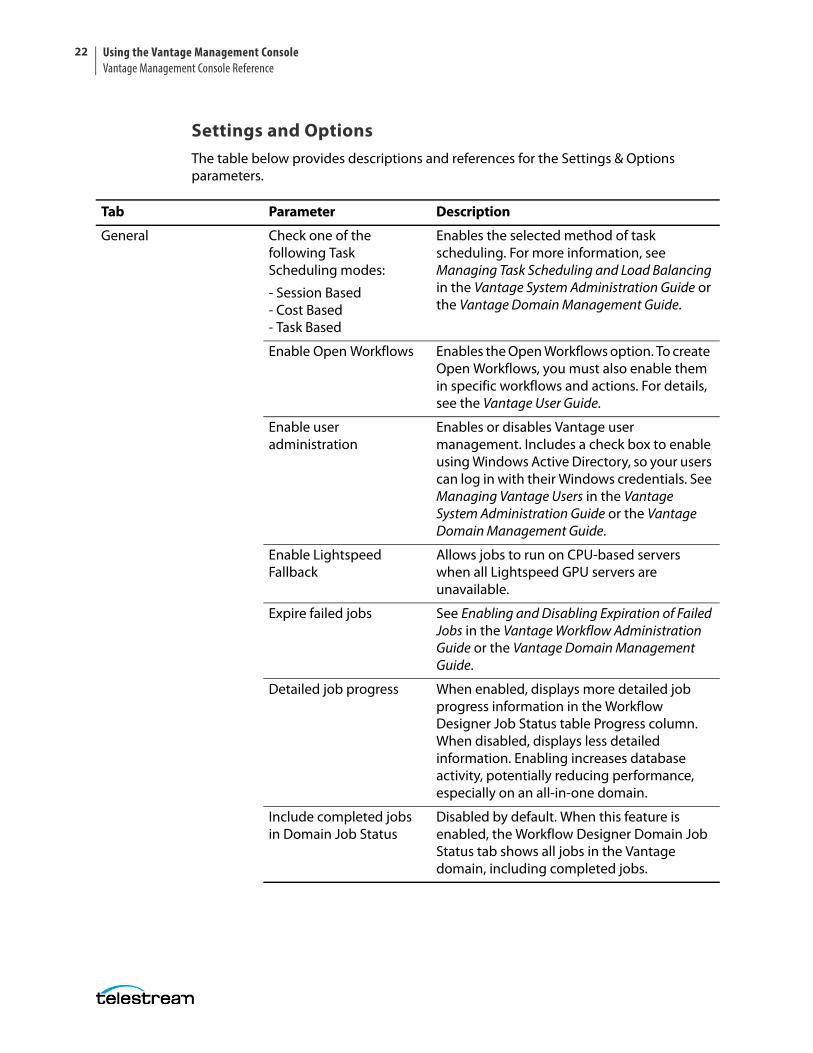
Settings and OptionsThe table below provides descriptions and references for the Settings & Options parameters.
Tab Parameter Description
General Check one of the following Task Scheduling modes:
- Session Based- Cost Based- Task Based
Enables the selected method of task scheduling. For more information, see Managing Task Scheduling and Load Balancing in the Vantage System Administration Guide or the Vantage Domain Management Guide.
Enable Open Workflows Enables the Open Workflows option. To create Open Workflows, you must also enable them in specific workflows and actions. For details, see the Vantage User Guide.
Enable user administration
Enables or disables Vantage user management. Includes a check box to enable using Windows Active Directory, so your users can log in with their Windows credentials. See Managing Vantage Users in the Vantage System Administration Guide or the Vantage Domain Management Guide.
Enable Lightspeed Fallback
Allows jobs to run on CPU-based servers when all Lightspeed GPU servers are unavailable.
Expire failed jobs See Enabling and Disabling Expiration of Failed Jobs in the Vantage Workflow Administration Guide or the Vantage Domain Management Guide.
Detailed job progress When enabled, displays more detailed job progress information in the Workflow Designer Job Status table Progress column. When disabled, displays less detailed information. Enabling increases database activity, potentially reducing performance, especially on an all-in-one domain.
Include completed jobs in Domain Job Status
Disabled by default. When this feature is enabled, the Workflow Designer Domain Job Status tab shows all jobs in the Vantage domain, including completed jobs.
Using the Vantage Management Console Vantage Management Console Reference
23
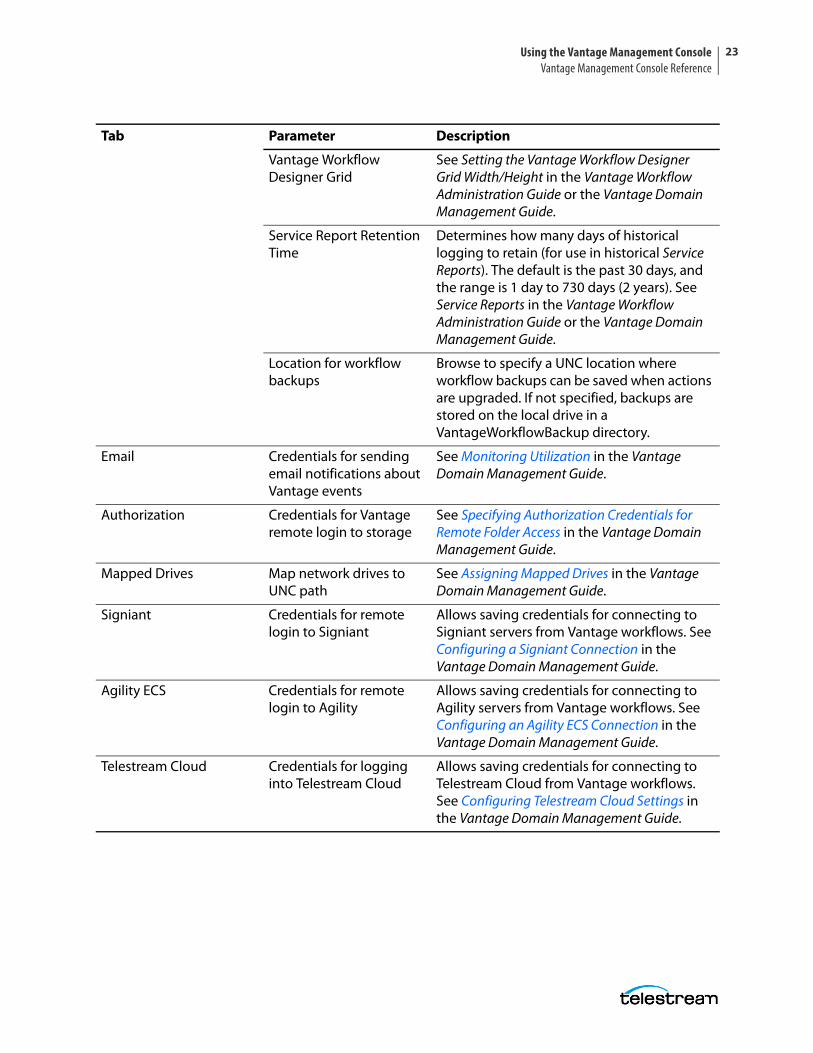
Vantage Workflow Designer Grid
See Setting the Vantage Workflow Designer Grid Width/Height in the Vantage Workflow Administration Guide or the Vantage Domain Management Guide.
Service Report Retention Time
Determines how many days of historical logging to retain (for use in historical Service Reports). The default is the past 30 days, and the range is 1 day to 730 days (2 years). See Service Reports in the Vantage Workflow Administration Guide or the Vantage Domain Management Guide.
Location for workflow backups
Browse to specify a UNC location where workflow backups can be saved when actions are upgraded. If not specified, backups are stored on the local drive in a VantageWorkflowBackup directory.
Email Credentials for sending email notifications about Vantage events
See Monitoring Utilization in the Vantage Domain Management Guide.
Authorization Credentials for Vantage remote login to storage
See Specifying Authorization Credentials for Remote Folder Access in the Vantage Domain Management Guide.
Mapped Drives Map network drives to UNC path
See Assigning Mapped Drives in the Vantage Domain Management Guide.
Signiant Credentials for remote login to Signiant
Allows saving credentials for connecting to Signiant servers from Vantage workflows. See Configuring a Signiant Connection in the Vantage Domain Management Guide.
Agility ECS Credentials for remote login to Agility
Allows saving credentials for connecting to Agility servers from Vantage workflows. See Configuring an Agility ECS Connection in the Vantage Domain Management Guide.
Telestream Cloud Credentials for logging into Telestream Cloud
Allows saving credentials for connecting to Telestream Cloud from Vantage workflows. See Configuring Telestream Cloud Settings in the Vantage Domain Management Guide.
Tab Parameter Description
Using the Vantage Management ConsoleVantage Management Console Reference
24
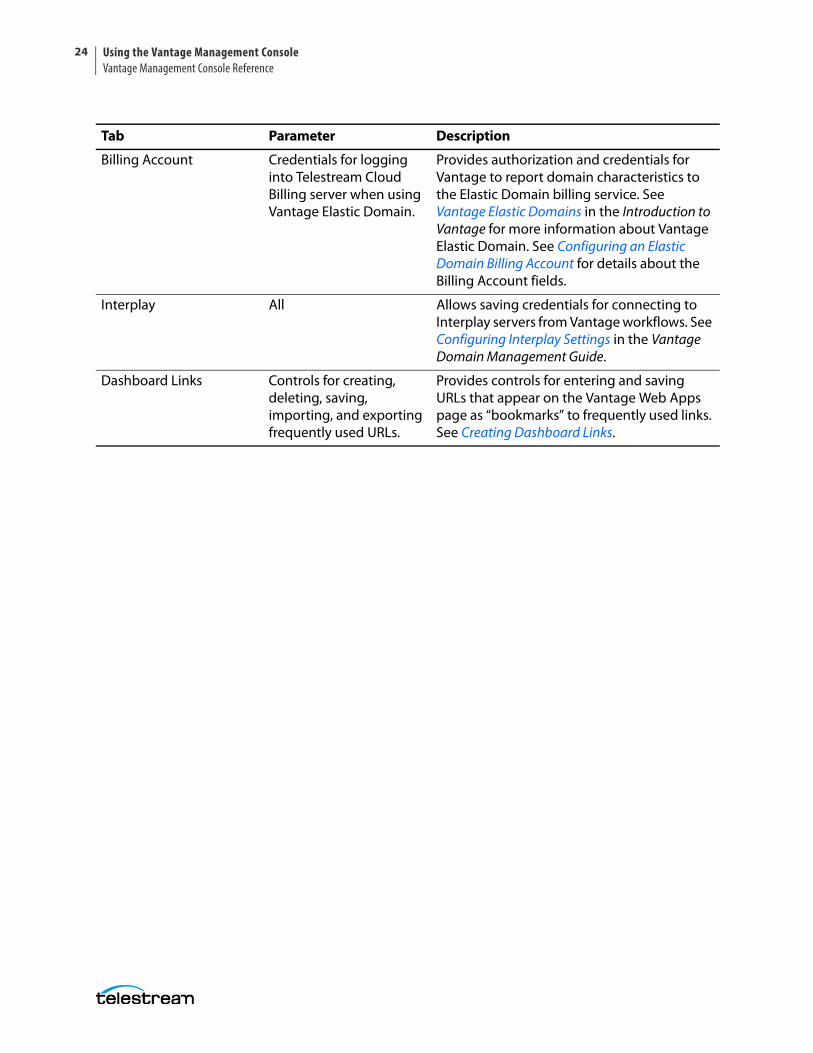
Billing Account Credentials for logging into Telestream Cloud Billing server when using Vantage Elastic Domain.
Provides authorization and credentials for Vantage to report domain characteristics to the Elastic Domain billing service. See Vantage Elastic Domains in the Introduction to Vantage for more information about Vantage Elastic Domain. See Configuring an Elastic Domain Billing Account for details about the Billing Account fields.
Interplay All Allows saving credentials for connecting to Interplay servers from Vantage workflows. See Configuring Interplay Settings in the Vantage Domain Management Guide.
Dashboard Links Controls for creating, deleting, saving, importing, and exporting frequently used URLs.
Provides controls for entering and saving URLs that appear on the Vantage Web Apps page as “bookmarks” to frequently used links. See Creating Dashboard Links.
Tab Parameter Description
Managing the Vantage Domain 25
Managing the Vantage Domain
This chapter describes how to manage a Vantage domain. Topics are arranged in the order of the Management Console left panel.
Some topics are covered in the Vantage Workflow Components chapter of the Domain Management Guide because they are more closely related to workflow design than system administration. These include Catalogs, Workflow Design Items, Domain Workflow Analytics, Application Configurations, Report Configurations, and Fulfillment Schemes.
Note: Features in products for which you don't have a license are disabled and indicate that you need a license to use them.
The following topics describe how to manage a Vantage domain:
■ Managing Settings and Options
■ Managing Vantage File Storage
■ Managing Services
■ Managing Licenses
■ Viewing Status
■ Monitoring Utilization
■ Using Support Utilities
■ Managing Task Scheduling and Load Balancing
■ Managing Vantage Users
■ Managing Domains
■ Managing ComponentPacs
Managing the Vantage DomainManaging Settings and Options
26
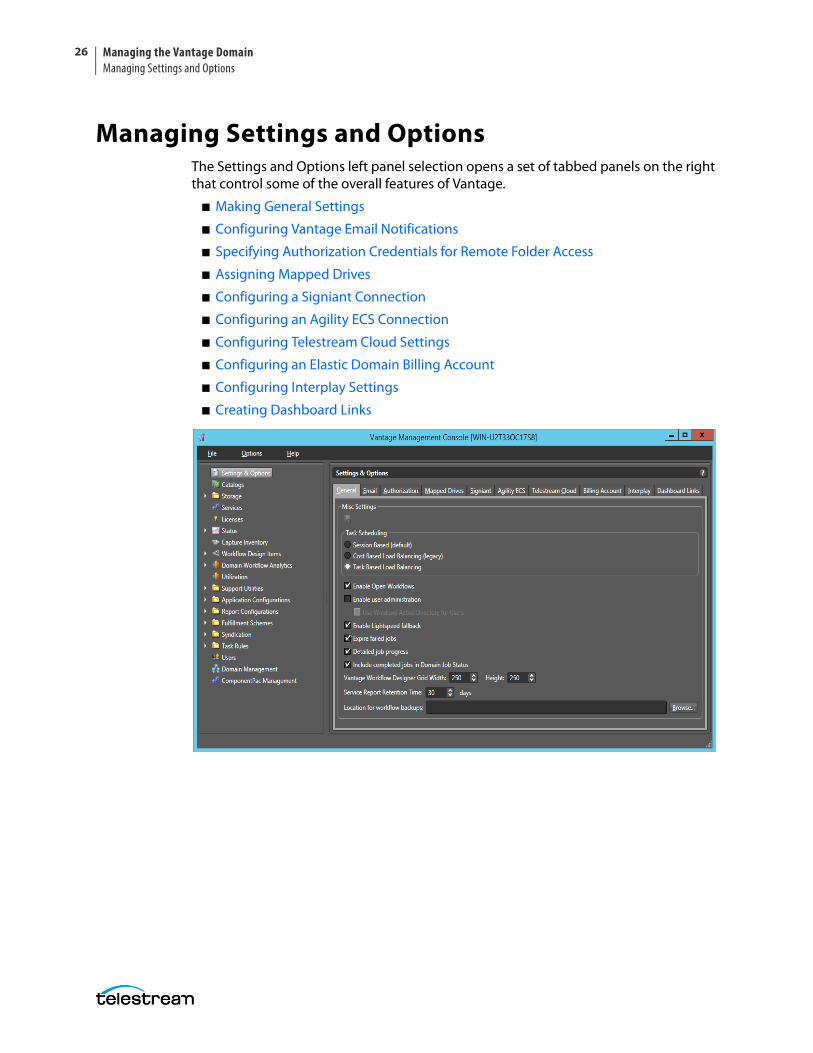
Managing Settings and OptionsThe Settings and Options left panel selection opens a set of tabbed panels on the right that control some of the overall features of Vantage.
■ Making General Settings
■ Configuring Vantage Email Notifications
■ Specifying Authorization Credentials for Remote Folder Access
■ Assigning Mapped Drives
■ Configuring a Signiant Connection
■ Configuring an Agility ECS Connection
■ Configuring Telestream Cloud Settings
■ Configuring an Elastic Domain Billing Account
■ Configuring Interplay Settings
■ Creating Dashboard Links

Managing the Vantage Domain Managing Settings and Options
27
Making General SettingsThe Settings and Options General panel includes the following selections:
• Task Scheduling—Enables task scheduling and load balancing. See Monitoring Utili-zation for details.
• Open Workflows—Enables the Open Workflows feature. This must be enabled and licensed before open workflows can be used in Workflow Designer. Refer to the Vantage User Guide for details about what open workflows are and how to use them.
• User Administration—Enables user administration, which allows an administrator to create user accounts and passwords for logging into Vantage clients. When dis-abled, no login is required to use the clients. If Active Directory is enabled, existing Windows user accounts are enabled, but the administrator still needs to add the specific users. To add users, select Users near the bottom of the left panel (see Man-aging Vantage Users for details about how to add users).
• Enable Lightspeed fallback—Check to allow Lightspeed actions to execute on a multicore server if a Lightspeed GPU server is not available when the action is ready to execute. Also see Enabling Lightspeed Fallback in the Vantage Domain Manage-ment Guide.
• Expire failed jobs—Check to allow failed jobs to be expired with other jobs. If dis-abled, failed jobs must be manually deleted. See also Enabling and Disabling Expira-tion of Failed Jobs in the Vantage Domain Management Guide.
• Detailed job progress—Check to include more details in job progress reporting. This feature may slow down overall system performance.
• Include completed jobs in Domain Job Status—Check to include completed jobs in the Workflow Designer Domain Job Status panel. Uncheck to exclude completed jobs.
• Workflow Designer grid size (visible only if Show Grid Lines is enabled in the WFD). See also Setting the Vantage Workflow Designer Grid Width/Height in the Vantage Domain Management Guide.
• Service Report Retention Time—deletes service report historical data after the number of days specified. See also Generating Reports later in this chapter.
• Location for workflow backups—Browse to specify a UNC path to the location where you want to store your workflow backups. See also Backing Up and Restoring the Vantage Domain Database later in this chapter.
Managing the Vantage DomainManaging Settings and Options
28
Configuring Vantage Email NotificationsVantage can send email messages to announce workflow and service events.
Message actions in Vantage workflows can be configured to send email messages for workflow events. The configured email destination address can be for an individual, a system, or an alias for a group of Vantage users or administrators.
Note: Until you configure these settings, you will not be able to execute Message actions that utilize email in your workflows.
If a Vantage Service starts or stops running, or if a service fails, an email is sent to the administrator email address.
Note: An email is not sent when a Vantage Service enters or exits Maintenance Mode.
To manage email notifications, do the following:
1. Start the Vantage Management Console as described in Starting the Vantage Management Console in the Vantage Domain Management Guide.
2. In the components panel, select Settings & Options.
3. In the Settings & Options details panel, select the Email tab.
4. Configure the email parameters, which are described in the table below.
5. Click the Save button .
Option Description
Hostname or IP Address Supply the computer’s host name or IP address of the SMTP server.
SMTP Port Supply the port number of the SMTP server.
SMTP Host Requires Authentication
Check if the SMTP server is configured to require authentication.
Username and Password Supply the user name and password if SMTP Host Requires Authentication is checked.
This server requires an encrypted connection (SSL)
Check this checkbox if SMTP server requires an encrypted connection.
Administrator Email Address
Supply the email address of the Vantage administrator. The email specified for this account can be an alias for a larger group, maintained by your IT department.
Send Test Email Click to test your settings by sending an email to the administrator email address.

Managing the Vantage Domain Managing Settings and Options
29
Email administrator upon service starting
Check to email the administrator when a service starts. For example, if a Vantage machine hosting an Analysis and a Monitor service is started without any problems, two emails are sent reporting the starting of each service.
Email administrator upon service stopping
Check this checkbox to email the administrator when a service stops.
Email administrator upon service failure
Check to email the administrator when this service fails (crashes or otherwise stops unexpectedly). For example, if a Vantage Analysis service is stopped from the Task Manager (forced termination), an email is sent to the administrator. Or, if a Vantage Analysis service crashes during start-up, an email is also sent to the administrator.
Option Description
Managing the Vantage DomainManaging Settings and Options
30
Specifying Authorization Credentials for Remote Folder Access
This feature allows you to specify credentials (username and password) for a folder that is not located in the Windows domain or workgroup for which the Vantage application is authorized. For example, if Vantage services are configured with a username and password for Domain A or Workgroup A, but output files must be saved to a folder in Domain B or Workgroup B, you can use this feature to specify the credentials to access the remote folder.
The following topics provide information on managing authorization settings:
■ Understanding Authorization Settings
■ Displaying the Authorization Settings
■ Refreshing the Authorization Record List
■ Adding an Authorization Record
■ Modifying an Authorization Credentials Record
■ Deleting an Authorization Credentials Record
■ Exporting and Importing Authorization Records
Understanding Authorization SettingsAuthorization settings are considered supplemental to Windows account and share settings, which should be your primary means of providing access and authentication to required storage for Vantage services. When accessing computers in workgroups, Vantage administrators should make sure that Vantage services are running under an account that has access to the locations that will be referenced. If this is done, then authorization records are unnecessary unless some computers must have unique accounts.
Use the Authorization Settings tab when Vantage services must access shares using an account different from the Vantage Windows logon account. Authorization Settings allow you to create, test, and manage multiple credentials for various Windows shares (on Windows computers) or UNC paths.
When each service starts, it reads all authorization records and stores them for use at runtime, as necessary. For example, the transport service may be called to execute a Copy action, which needs to write a file to a share or a non-domain server and directory, where the service is not authorized by its own account. The transport service will process the authorization records based on the path supplied, to determine if it can gain authority via one of its authorization records.
Note: Authorization settings should only be used when the normal Windows account and share settings do not provide access to necessary shares: for example, shares on other Windows domains, or on workgroups.
Managing the Vantage Domain Managing Settings and Options
31
The purpose of entering authorization records is to enable Vantage to maintain this information for network locations—independent of the authentication inherent with the logon account of a specific service—the Vantage Monitor Service, for example. If you know that a specific service does not have the authorization to utilize a given network location, you can create an authorization record to provide credentials.
When you provide authorization records for a network location, any service in the domain can utilize it.
It is important to understand that when you access network locations via Workflow Designer, the locations you navigate to are accessed with Workflow Designer’s logon account permissions—which may be different than the logon account for Vantage services.
However, these locations will ultimately be accessed by Vantage services during execution of your workflow—services which may have different users and permissions. Therefore, you need to take the extra step of ensuring that the service, which will be accessing this share at workflow runtime, has authenticated access to the location.
Additionally, authentication does not control sharing and security permissions (for example, access, and read/modify/delete/write permissions). Make sure that when you set up network locations, you have set each location with the proper permissions for the user accounts that will access it.
After you add, modify, or delete a record, click the Save button to update the records in the Vantage domain database as encrypted data.
Displaying the Authorization SettingsTo display the authorization settings, do the following:
1. Start the Vantage Management Console as described in Starting the Vantage Management Console.
2. In the components panel, select Settings & Options.
3. In the Settings & Options details panel, select the Authorization tab.

Managing the Vantage DomainManaging Settings and Options
32
Vantage displays the Authorization tab shown in this figure.
Refreshing the Authorization Record ListTo refresh the list of authorization records, move a Vantage service in and out of maintenance mode as follows:
1. In the Vantage Management Console, click on Services in the details panel.
2. Right-click the target service and select Enter Maintenance Mode.
3. Right-click the service again and select Exit Maintenance Mode.
Adding an Authorization RecordClick the Add new credentials button in the toolbar (or right-click and select Add new credentials or Import credentials), and supply the details. Click Test to validate the record, and click the Save button to add this validated authorization record to the database for use by all Vantage services in the domain.
Managing the Vantage Domain Managing Settings and Options
33
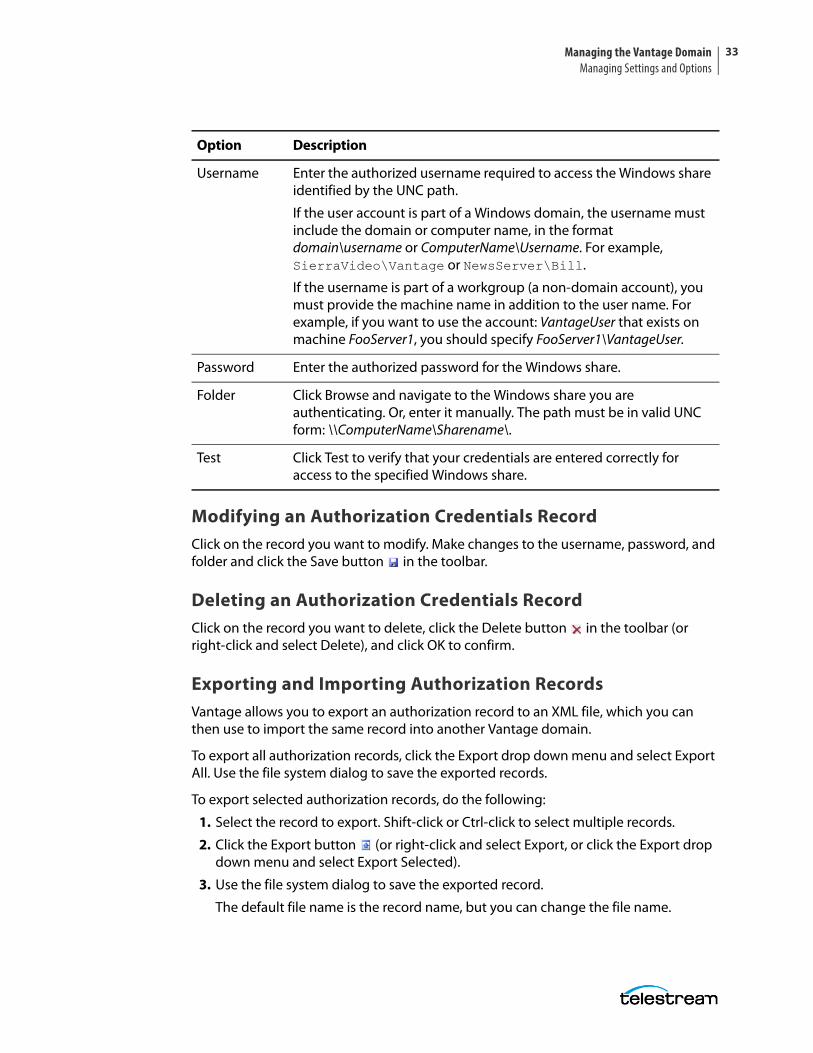
Modifying an Authorization Credentials RecordClick on the record you want to modify. Make changes to the username, password, and folder and click the Save button in the toolbar.
Deleting an Authorization Credentials RecordClick on the record you want to delete, click the Delete button in the toolbar (or right-click and select Delete), and click OK to confirm.
Exporting and Importing Authorization RecordsVantage allows you to export an authorization record to an XML file, which you can then use to import the same record into another Vantage domain.
To export all authorization records, click the Export drop down menu and select Export All. Use the file system dialog to save the exported records.
To export selected authorization records, do the following:
1. Select the record to export. Shift-click or Ctrl-click to select multiple records.
2. Click the Export button (or right-click and select Export, or click the Export drop down menu and select Export Selected).
3. Use the file system dialog to save the exported record.
The default file name is the record name, but you can change the file name.
Option Description
Username Enter the authorized username required to access the Windows share identified by the UNC path.
If the user account is part of a Windows domain, the username must include the domain or computer name, in the format domain\username or ComputerName\Username. For example, SierraVideo\Vantage or NewsServer\Bill.
If the username is part of a workgroup (a non-domain account), you must provide the machine name in addition to the user name. For example, if you want to use the account: VantageUser that exists on machine FooServer1, you should specify FooServer1\VantageUser.
Password Enter the authorized password for the Windows share.
Folder Click Browse and navigate to the Windows share you are authenticating. Or, enter it manually. The path must be in valid UNC form: \\ComputerName\Sharename\.
Test Click Test to verify that your credentials are entered correctly for access to the specified Windows share.
Managing the Vantage DomainManaging Settings and Options
34
Note: Changing the name of the XML file does not change the name of the record in the XML file.
To import an authorization record, do the following:
1. Click the Import button (or right-click and select Import credentials).
2. Use the file system dialog to locate and select the record to import, then click Open.
Note: If you try to import an authorization record that is already in this Vantage domain, Vantage prompts you to overwrite the record (click Yes) or cancel the import (click No).
Managing the Vantage Domain Managing Settings and Options
35
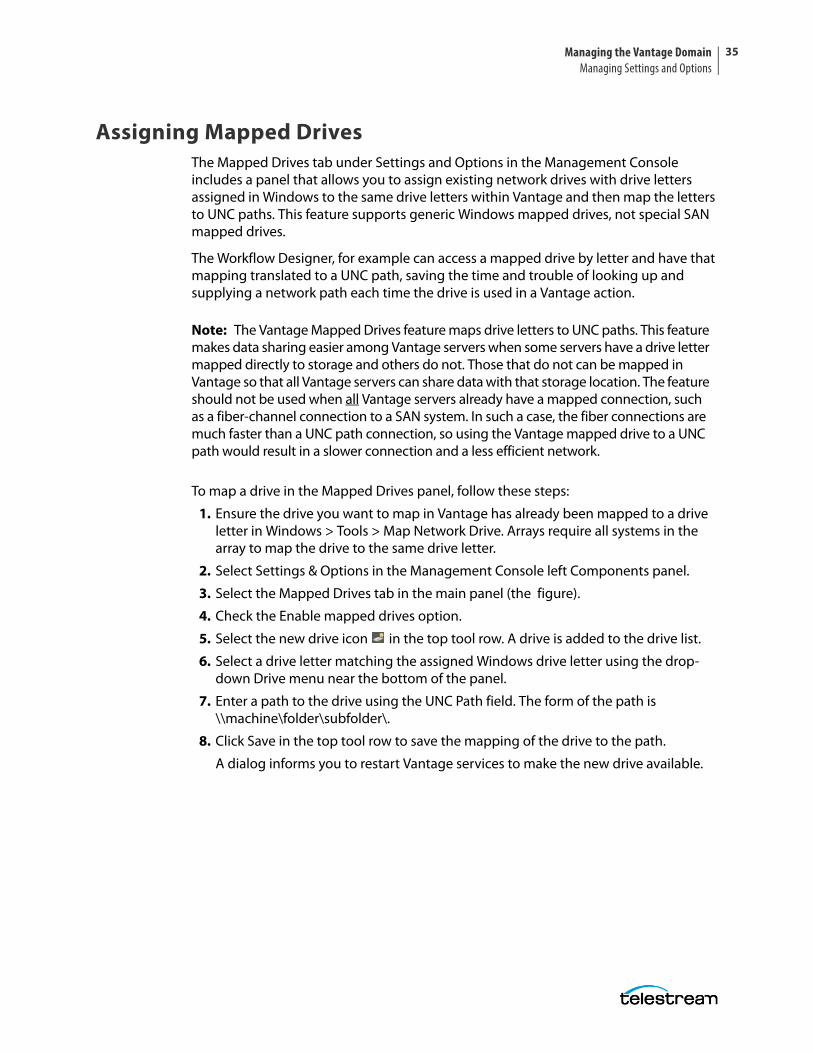
Assigning Mapped DrivesThe Mapped Drives tab under Settings and Options in the Management Console includes a panel that allows you to assign existing network drives with drive letters assigned in Windows to the same drive letters within Vantage and then map the letters to UNC paths. This feature supports generic Windows mapped drives, not special SAN mapped drives.
The Workflow Designer, for example can access a mapped drive by letter and have that mapping translated to a UNC path, saving the time and trouble of looking up and supplying a network path each time the drive is used in a Vantage action.
Note: The Vantage Mapped Drives feature maps drive letters to UNC paths. This feature makes data sharing easier among Vantage servers when some servers have a drive letter mapped directly to storage and others do not. Those that do not can be mapped in Vantage so that all Vantage servers can share data with that storage location. The feature should not be used when all Vantage servers already have a mapped connection, such as a fiber-channel connection to a SAN system. In such a case, the fiber connections are much faster than a UNC path connection, so using the Vantage mapped drive to a UNC path would result in a slower connection and a less efficient network.
To map a drive in the Mapped Drives panel, follow these steps:
1. Ensure the drive you want to map in Vantage has already been mapped to a drive letter in Windows > Tools > Map Network Drive. Arrays require all systems in the array to map the drive to the same drive letter.
2. Select Settings & Options in the Management Console left Components panel.
3. Select the Mapped Drives tab in the main panel (the figure).
4. Check the Enable mapped drives option.
5. Select the new drive icon in the top tool row. A drive is added to the drive list.
6. Select a drive letter matching the assigned Windows drive letter using the drop-down Drive menu near the bottom of the panel.
7. Enter a path to the drive using the UNC Path field. The form of the path is \\machine\folder\subfolder\.
8. Click Save in the top tool row to save the mapping of the drive to the path.
A dialog informs you to restart Vantage services to make the new drive available.
Managing the Vantage DomainManaging Settings and Options
36
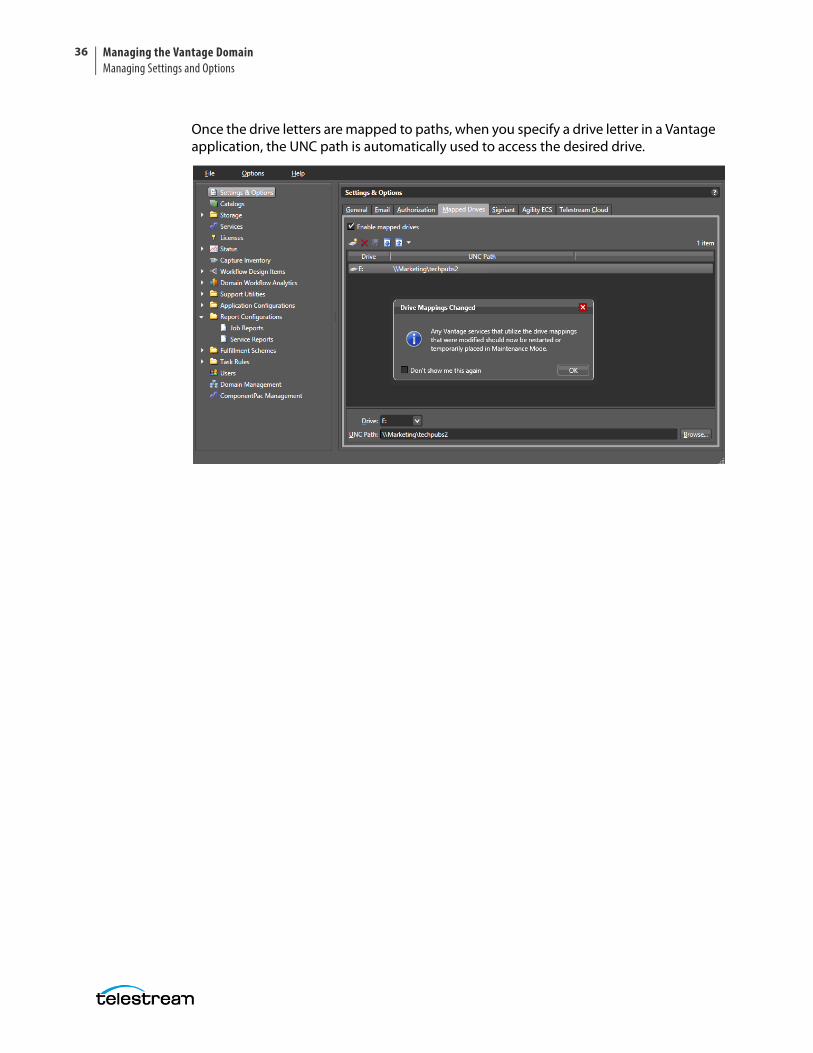
Once the drive letters are mapped to paths, when you specify a drive letter in a Vantage application, the UNC path is automatically used to access the desired drive.

Managing the Vantage Domain Managing Settings and Options
37
Configuring a Signiant ConnectionWhen you configure a Signiant connection, you enable the Vantage domain to communicate with the Signiant server by supplying required credentials. The optional Signiant Delivery action can then be used to deliver files to Signiant-enabled servers. The Vantage Signiant Delivery action uses the Signiant feature, which must be licensed on the Signiant server. A Signiant Agent must be configured in the Management Console before it can be used in a Vantage workflow.
To configure a Signiant Agent in Vantage and test its connection, do the following:
1. Start the Vantage Management Console as described in Starting the Vantage Management Console.
2. In the components panel, select Settings & Options.
3. In the Settings & Options details panel, select the Signiant tab.
Vantage displays the Signiant agent configuration panel.
4. Click the Add New Setting button in the toolbar (or right-click in the empty space below the button and select Add new setting).
5. In the Name field, enter a practical name for the Signiant server (for example, Signiant-Vantage Server).
6. In the Address field, enter the IP address or domain name of the Signiant server.
7. In the Certificate field, paste the CA Certificate text copied from the Signiant server. For instructions on obtaining a CA Certificate, see the following Signiant CA Certificate Instructions.
8. Click the Save icon to save the new agent.
9. To test the Vantage-Signiant connection, click Test at the bottom of the window.
You can add Agents as needed for each Signiant server.
Managing the Vantage DomainManaging Settings and Options
38
Signiant CA Certificate Instructions To get a CA Certificate to enable a Vantage-Signiant connection, follow the steps in either one of the two procedures that follow:
Use a Web Page to Get a Certificate1. Use a Web browser to log into the Signiant server (e.g. signiant.sierrapost.com).
2. Navigate to Developer > CTE Test Configurations and click Add Configuration.
3. Enter a configuration name and configure settings for your system.
4. In the CA Certificate field (under Advanced Transfer Settings), select the certificate text and copy it (including the -----BEGIN CERTIFICATE----- and -----END CERTIFICATE----- lines).
5. Click Save at the bottom and close your Web browser.
6. Paste the certificate text into the Vantage Management Console > Settings and Options > Signiant > Certificate field as explained in the previous procedure (Configuring a Signiant Connection).
Use the Command Line to Get a Certificate1. Log into the Signiant Manager host as an administrator.
2. In a terminal window, navigate to the Signiant bin directory.
3. Enter the command dds_cert extract to extract a certificate from the credentials store.
4. Open the text file named ddsCA_Cert.pem and copy the entire text (including the -----BEGIN CERTIFICATE----- and -----END CERTIFICATE----- lines).
5. Paste the certificate text into the Vantage Management Console > Settings and Options > Signiant > Certificate field as explained in the previous procedure (Configuring a Signiant Connection).
Deleting a Signiant AgentTo delete a configuration, do the following:
1. Display the Signiant configuration window.
2. Select the configuration to delete. (Ctrl-click or Shift-click to select multiple configurations.)
3. Click the Delete button (or right-click and select Delete).
4. When the confirmation dialog appears, click OK.
Managing the Vantage Domain Managing Settings and Options
39
Exporting and Importing Signiant AgentsVantage allows you to export Signiant agents to files, which you can then use to import the same agents into another Vantage domain.
To export agents, do the following:
1. Select the agents to export. (Ctrl-click or Shift-click to select multiple views.)
2. Click the Export button to export selected agents (or right-click and select Export, or select Export all from the Export button drop down menu).
3. Use the file system dialog to save the exported agents.
The default file name is the agent name, but you can change the file name.
Note: Changing the file name does not change the name of the agent in the file.
To import agents, do the following:
1. Click the Import button .
2. Use the file system dialog to locate and select the agent file to import, then click Open.
Note: If you try to import an agent that is already in this Vantage domain, Vantage prompts you to cancel or confirm replacement.

Managing the Vantage DomainManaging Settings and Options
40
Configuring an Agility ECS ConnectionWhen you configure an Agility ECS connection (requires the Agility ECS Connector license), you enable Vantage domain support for the following:
• Vantage client communications with Agility through the Agility service.
• Vantage Dashboard monitoring of Agility ECS server status and statistics.
To identify the Agility ECS server and test its connection, do the following:
1. Start the Vantage Management Console as described in Starting the Vantage Management Console.
2. In the components panel, select Settings & Options.
3. In the Settings & Options details panel, select the Agility ECS tab.
Vantage displays the Agility ECS tab shown below.
4. Enter the Agility server’s host name or IP address.
5. If the default HTTP port value (80), is not correct, enter a new port number.
Note: If the Agility IIS server is using a port other than 80, enter that port number here.
6. To test the connection to the specified Agility ECS server, click Test Connection.
Managing the Vantage Domain Managing Settings and Options
41
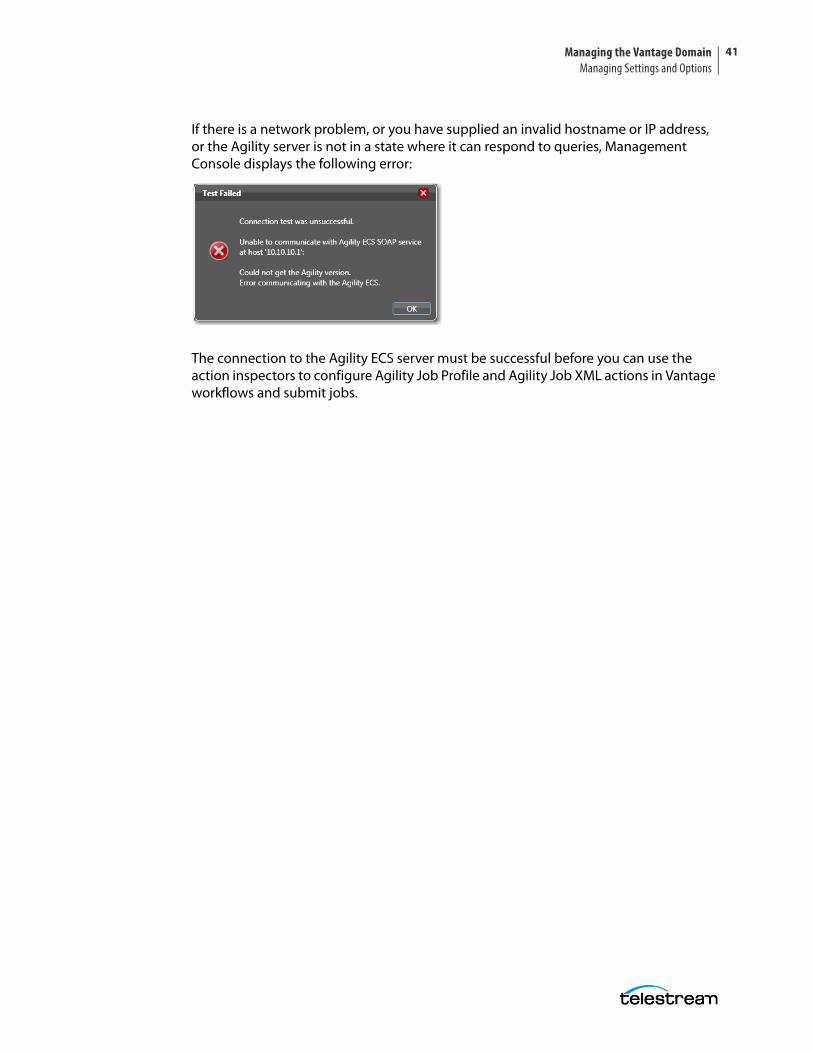
If there is a network problem, or you have supplied an invalid hostname or IP address, or the Agility server is not in a state where it can respond to queries, Management Console displays the following error:
The connection to the Agility ECS server must be successful before you can use the action inspectors to configure Agility Job Profile and Agility Job XML actions in Vantage workflows and submit jobs.
Managing the Vantage DomainManaging Settings and Options
42
Configuring Telestream Cloud SettingsThe Telestream Cloud settings panel allows you to save Telestream Cloud account settings for use by the Cloud Flip action, which sends media to the cloud for transcoding using the credentials you enter here to gain access. Before you can enter account settings in this panel, you must create an account on the Telestream Cloud web site.
To create an account on the Telestream Cloud web site, point your browser to this URL: https://cloud.telestream.net/. You will be prompted to log in or create an account. When you create an account, the Cloud web site provides you with an Access Key and a Secret Access Key to use for logging in. Once logged in, you will need to set up your account for transcoding, including creating and configuring a “factory” for transcoding and storage. See the Telestream Cloud online documentation, tooltips, and live chat feature if you need help.
After your account is fully configured, you can enter your credentials in the Telestream Cloud panel. The Cloud Flip action in Vantage workflows uses the credentials to automate logging into the Cloud and sending media to your account for transcoding:
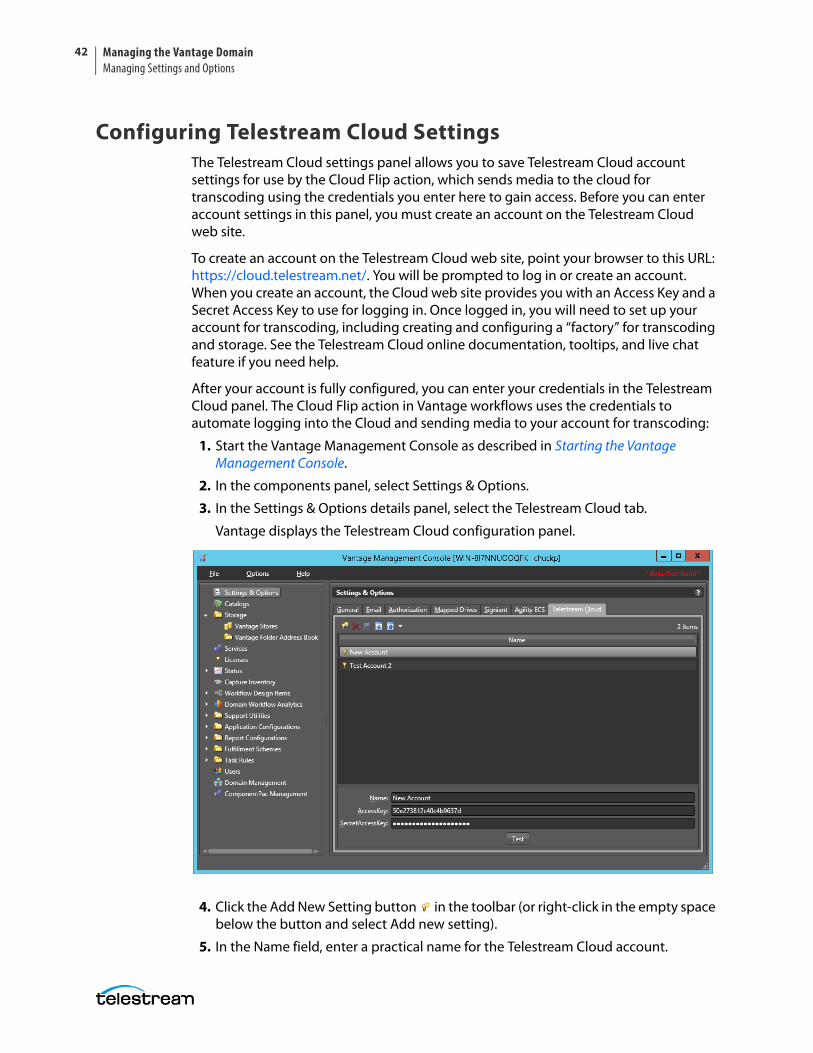
1. Start the Vantage Management Console as described in Starting the Vantage Management Console.
2. In the components panel, select Settings & Options.
3. In the Settings & Options details panel, select the Telestream Cloud tab.
Vantage displays the Telestream Cloud configuration panel.
4. Click the Add New Setting button in the toolbar (or right-click in the empty space below the button and select Add new setting).
5. In the Name field, enter a practical name for the Telestream Cloud account.
Managing the Vantage Domain Managing Settings and Options
43
6. In the AccessKey field, enter the AccessKey you received when you signed up for an account at the Telestream Cloud web site.
7. In the SecretAccessKey field, enter the SecretAccessKey from the Cloud web site.
8. Click the Save icon to save the new account
9. To test the Vantage-Telestream Cloud connection, click Test at the bottom of the window. A dialog pops up to confirm test success or failure at logging into the Cloud account.
You can add Accounts as needed for each Telestream Cloud account you create.
Deleting a Telestream Cloud AccountTo delete a configuration, do the following:
1. Display the Telestream Cloud panel.
2. Select the account to delete. (Ctrl-click or Shift-click to select multiple accounts.)
3. Click the Delete button (or right-click and select Delete).
4. When the confirmation dialog appears, click OK.
Note that deleting an account in Vantage does not delete the account on the Telestream Cloud web site.
Exporting and Importing Telestream Cloud SettingsVantage allows you to export your Telestream Cloud settings to files, which you can then use to import the same accounts into the same or another Vantage domain.
To export, do the following:
1. Select the accounts to export. (Ctrl-click or Shift-click to select multiple views.)
2. Click the Export button to export selected accounts (or right-click and select Export, or select Export all from the Export button drop down menu).
3. Use the file system dialog to save the exported accounts.
The default file name is the account name, but you can change the file name.
Note: Changing the file name does not change the name of the account in the file.
To import accounts from a previously exported file, do the following:
1. Click the Import button .
2. Use the file system dialog to locate and select the file to import, then click Open.
Note: If you try to import an account that is already in this Vantage domain, Vantage prompts you to cancel or confirm replacement.
Managing the Vantage DomainManaging Settings and Options
44
Configuring an Elastic Domain Billing AccountThe Billing Account panel enables you to set up billing for a Vantage Elastic Domain, which allows rapid scaling of a Vantage array. With an Elastic Domain system, you license and deploy a Vantage Array containing the number of nodes required to handle your average daily workload.
During periods of peak demand, the system capacity is expanded by spinning-up additional nodes. These additional nodes are typically powered by virtual machines or cloud IaaS (Infrastructure as a Service) instances, and their services join the Vantage domain as Transient Services. Your installed license specifies which features can be accessed by these additional nodes.
The Elastic Domain billing framework is created by linking to an Elastic Domain enabled Telestream Cloud Billing Account and entering the credentials in the Billing Account tab of the Vantage Management Console Settings and Options section.
Domain nodes and services are reported to the Telestream Cloud Elastic Domain billing service, which reconciles your actual domain scale against the scale allowed by your perpetual license to determine any additional license rental charges.
For more information about installing and operating an Elastic Domain, refer to the Vantage Elastic Domain Guide.
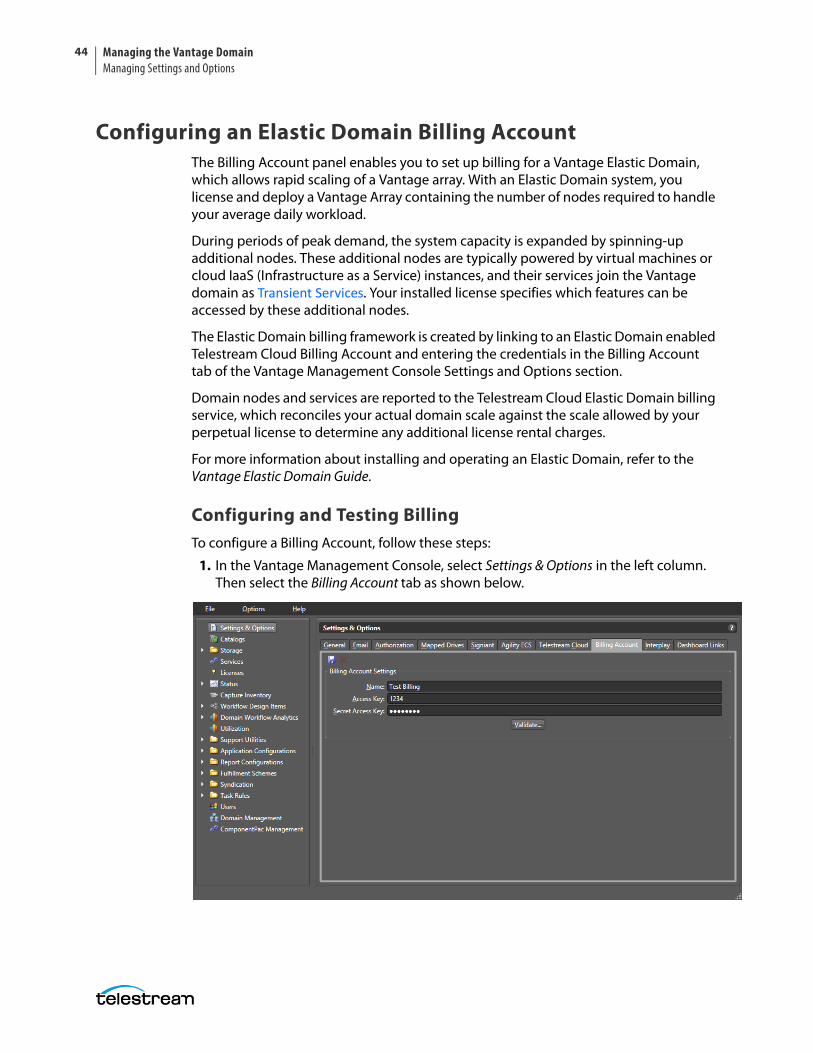
Configuring and Testing BillingTo configure a Billing Account, follow these steps:
1. In the Vantage Management Console, select Settings & Options in the left column. Then select the Billing Account tab as shown below.
Managing the Vantage Domain Managing Settings and Options
45
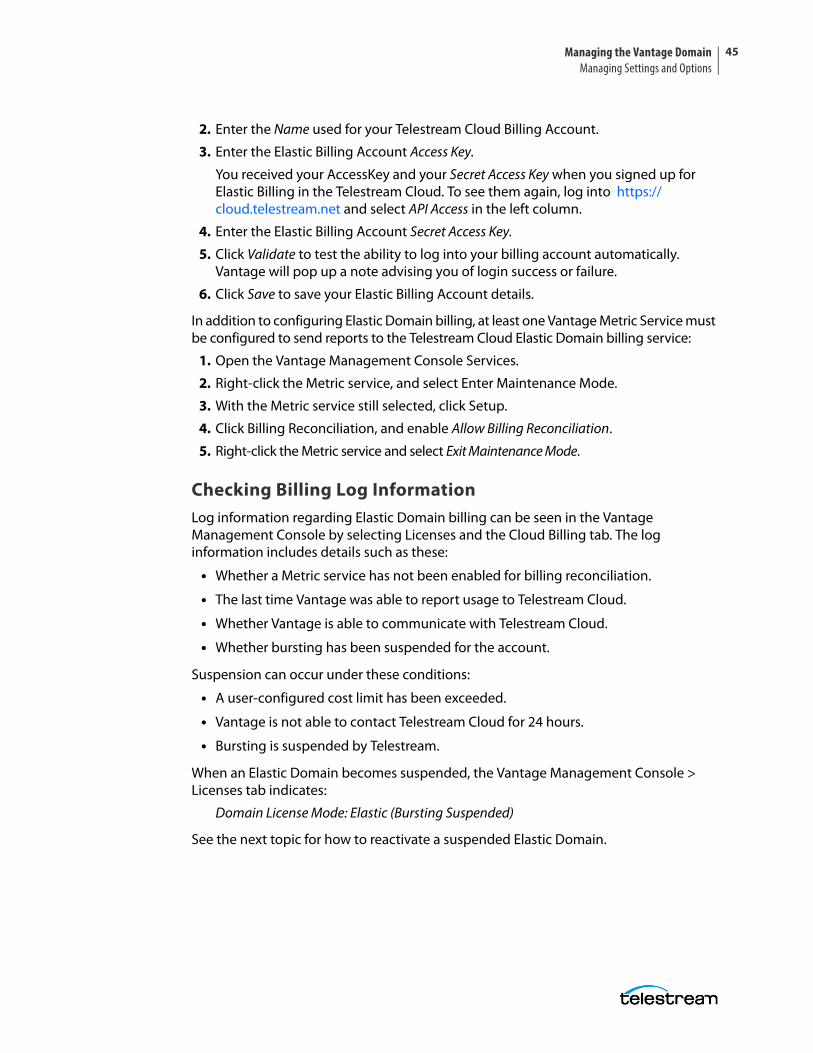
2. Enter the Name used for your Telestream Cloud Billing Account.
3. Enter the Elastic Billing Account Access Key.
You received your AccessKey and your Secret Access Key when you signed up for Elastic Billing in the Telestream Cloud. To see them again, log into https://cloud.telestream.net and select API Access in the left column.
4. Enter the Elastic Billing Account Secret Access Key.
5. Click Validate to test the ability to log into your billing account automatically. Vantage will pop up a note advising you of login success or failure.
6. Click Save to save your Elastic Billing Account details.
In addition to configuring Elastic Domain billing, at least one Vantage Metric Service must be configured to send reports to the Telestream Cloud Elastic Domain billing service:
1. Open the Vantage Management Console Services.
2. Right-click the Metric service, and select Enter Maintenance Mode.
3. With the Metric service still selected, click Setup.
4. Click Billing Reconciliation, and enable Allow Billing Reconciliation.
5. Right-click the Metric service and select Exit Maintenance Mode.
Checking Billing Log InformationLog information regarding Elastic Domain billing can be seen in the Vantage Management Console by selecting Licenses and the Cloud Billing tab. The log information includes details such as these:
• Whether a Metric service has not been enabled for billing reconciliation.
• The last time Vantage was able to report usage to Telestream Cloud.
• Whether Vantage is able to communicate with Telestream Cloud.
• Whether bursting has been suspended for the account.
Suspension can occur under these conditions:
• A user-configured cost limit has been exceeded.
• Vantage is not able to contact Telestream Cloud for 24 hours.
• Bursting is suspended by Telestream.
When an Elastic Domain becomes suspended, the Vantage Management Console > Licenses tab indicates:
Domain License Mode: Elastic (Bursting Suspended)
See the next topic for how to reactivate a suspended Elastic Domain.
Managing the Vantage DomainManaging Settings and Options
46
Reactivating a Suspended Elastic DomainTo reactivate a suspended Elastic Domain:
• If bursting was suspended because of an exceeded cost limit, the domain will reac-tivate when the cost limit expires. If you’d like to reactivate the domain sooner, you can delete the cost limit.
• If bursting was suspended because the Vantage Metric service was unable to com-municate with Telestream Cloud for 24 hours, the domain will reactivate itself once connectivity is restored.
• If bursting was suspended by Telestream, a Telestream Support representative must re-activate the domain. While bursting is suspended, Vantage will only enable the number of nodes specified in the perpetual license Fallback notations. For example, if the number of fallback nodes is 1, Vantage will only process jobs on one node at a time.
After bursting is reactivated for the Vantage Elastic Domain, the Licenses tab of the Vantage Management Console will indicate:
Domain License Mode: Elastic
If bursting becomes suspended and then reactivated, waiting jobs at the time of reactivation may not use services licensed through bursting. Any new jobs will properly load balance across all services. Stopping and then restarting waiting jobs (via the Workflow Designer Job Status view) will enable those jobs to use all services.

Managing the Vantage Domain Managing Settings and Options
47
Configuring Interplay SettingsThe Settings & Options Interplay panel lets you create, save, export, delete and import Avid Interplay server connection settings. When you configure an Interplay connection, you enable the Vantage domain to communicate with the Interplay server by supplying required credentials. An Interplay connection must be configured in the Management Console before it can be used in a Vantage workflow.
To configure an Interplay account in Vantage and test its connection, follow these steps:
1. Start the Vantage Management Console as described in Starting the Vantage Management Console.
2. In the components panel, select Settings & Options.
3. In the Settings & Options details panel, select the Interplay tab.
Vantage displays the Interplay configuration panel.
4. Click the Add New Setting button in the toolbar (or right-click in the empty space below the button and select Add new setting).
5. In the Name field, enter a practical name for the Interplay server (for example, Interplay-Vantage Server).
6. In the Interplay Web Services Host field, enter the domain name of the Interplay server.
7. In the Interplay Web Services Port field, select or enter a port number (default 80).
8. In the Interplay Workgroup field, enter the work group name.
9. In the Interplay Username field, enter the user name expected by the Interplay server.
10. In the Interplay Password field, enter the Interplay user’s password.
11. Click the Save icon to save the new agent.
12. To test the Vantage-Interplay connection, click Test at the bottom of the window.
Managing the Vantage DomainManaging Settings and Options
48
Exporting and Importing Interplay SettingsVantage allows you to export your Interplay settings to files, which you can then use to import the same accounts into the same or another Vantage domain.
To export, do the following:
1. Select the accounts to export. (Ctrl-click or Shift-click to select multiple views.)
2. Click the Export button to export selected accounts (or right-click and select Export, or select Export all from the Export button drop down menu).
3. Use the file system dialog to save the exported accounts.
The default file name is the account name, but you can change the file name.
Note: Changing the file name does not change the name of the account in the file.
To import accounts from a previously exported file, do the following:
1. Click the Import button .
2. Use the file system dialog to locate and select the file to import, then click Open.
Note: If you try to import an account that is already in this Vantage domain, Vantage prompts you to cancel or confirm replacement.
Deleting an Interplay AccountTo delete an Interplay settings configuration, do the following:
1. Display the Interplay panel.
2. Select the account to delete. (Ctrl-click or Shift-click to select multiple accounts.)
3. Click the Delete button (or right-click and select Delete).
4. When the confirmation dialog appears, click OK.
Note that deleting an account in Vantage does not delete the account on the Inter-play server but only deletes the account settings from Vantage.
Managing the Vantage Domain Managing Settings and Options
49
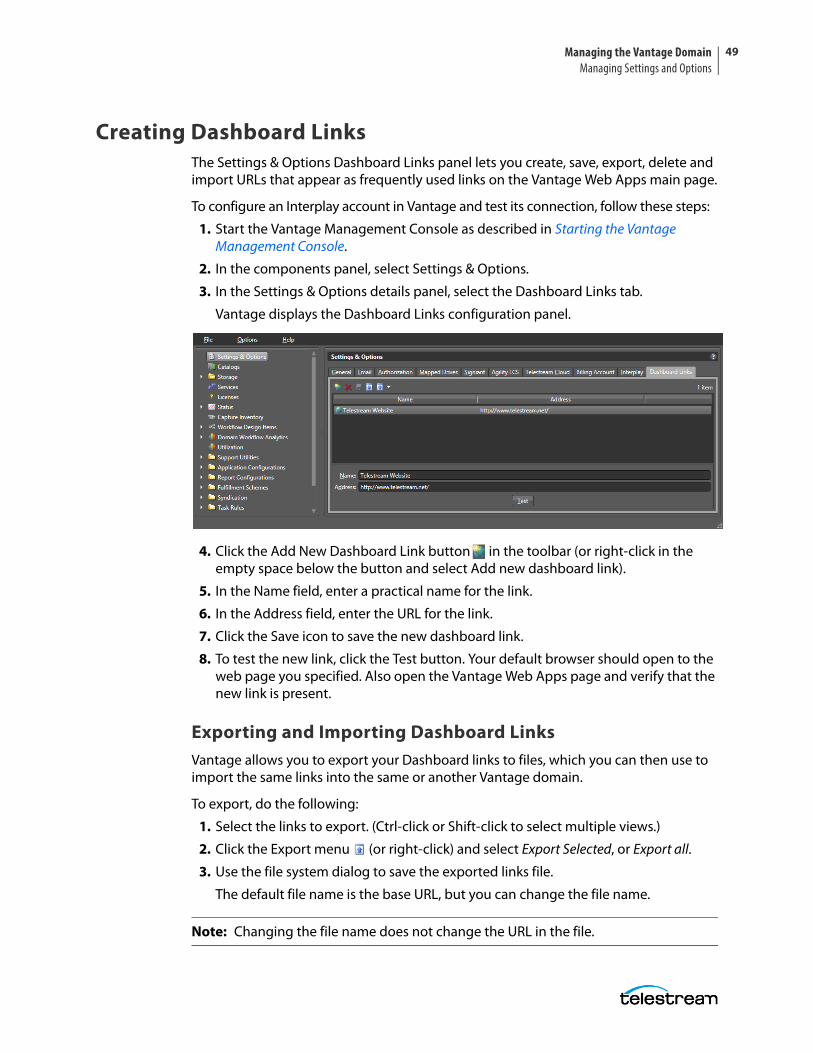
Creating Dashboard LinksThe Settings & Options Dashboard Links panel lets you create, save, export, delete and import URLs that appear as frequently used links on the Vantage Web Apps main page.
To configure an Interplay account in Vantage and test its connection, follow these steps:
1. Start the Vantage Management Console as described in Starting the Vantage Management Console.
2. In the components panel, select Settings & Options.
3. In the Settings & Options details panel, select the Dashboard Links tab.
Vantage displays the Dashboard Links configuration panel.
4. Click the Add New Dashboard Link button in the toolbar (or right-click in the empty space below the button and select Add new dashboard link).
5. In the Name field, enter a practical name for the link.
6. In the Address field, enter the URL for the link.
7. Click the Save icon to save the new dashboard link.
8. To test the new link, click the Test button. Your default browser should open to the web page you specified. Also open the Vantage Web Apps page and verify that the new link is present.
Exporting and Importing Dashboard LinksVantage allows you to export your Dashboard links to files, which you can then use to import the same links into the same or another Vantage domain.
To export, do the following:
1. Select the links to export. (Ctrl-click or Shift-click to select multiple views.)
2. Click the Export menu (or right-click) and select Export Selected, or Export all.
3. Use the file system dialog to save the exported links file.
The default file name is the base URL, but you can change the file name.
Note: Changing the file name does not change the URL in the file.
Managing the Vantage DomainManaging Settings and Options
50
To import a previously exported file, do the following:
1. Click the Import button .
2. Use the file system dialog to locate and select the file to import, then click Open.
Note: If you try to import a set of links that is already in this Vantage domain, Vantage prompts you to cancel or confirm replacement.
Deleting Dashboard LinksTo delete Dashboard links, do the following:
1. Display the Dashboard Links panel.
2. Select the link to delete. (Ctrl-click or Shift-click to select multiple accounts.)
3. Click the Delete button (or right-click and select Delete).
4. When the confirmation dialog appears, click OK.
Managing the Vantage Domain Managing Vantage File Storage
51
Managing Vantage File StorageVantage storage is disk space that can be used to store files for Vantage processing. The following topics provide information on Vantage storage:
■ Understanding Vantage Storage
■ Understanding Path Specifications for Vantage Storage
■ Managing Vantage Stores
■ Managing Vantage Folder Addresses
Understanding Vantage StorageVantage storage is disk space that Vantage can use to store media files and attachments. Vantage storage is different from database storage, which stores data for Vantage configuration, job/binder status, and system status.
Vantage uses storage for purposes:
• Vantage stores—Managed disk space where media files and attachments are tem-porarily stored and automatically deleted when they are no longer referenced by a binder.
• Vantage folder addresses—Unmanaged disk space to which media files and attach-ments can be delivered, but from which files are not automatically deleted.
Vantage stores are defined in the Management Console. There are two types of stores that may be selected when created: Live Store and File Store. The two types are completely separate and cannot be used interchangeably. LIve Stores are used by the Live Capture action for capture storage. File stores can be used in workflow actions that perform file operations (file stores).
Vantage file stores can also be associated with Vantage services for temporary storage (such as the location for a file that is being created during transcoding). Managed files remain in a Vantage store while either of the following is true:
• The files are referenced by a binder during job processing.
• The files are referenced by a binder that has been registered in a catalog, and the binder expiration date has not yet passed.
Vantage folders can be created in the console or in Vantage Workflow Designer. Like stores, Vantage folders can then can be used in workflow actions that perform file operations.
Transport actions that are responsible for saving files can use both stores and folders as file access and delivery points.

Managing the Vantage DomainManaging Vantage File Storage
52
Understanding Path Specifications for Vantage StorageVantage stores and folders can be specified using the following path forms:
• UNC form: \\ComputerName\Sharename
• Physical drive-letter form: C:\folder\folder
• Mapped drive managed by SAN client software (for example, StorNext)
Note: Vantage cannot access network locations defined using a Windows mapped drive unless you specifically enable mapped drives and map each drive to a UNC path using the Settings & Options/Mapped Drives panel. For all network locations other than properly configured SAN locations, you must use a UNC path to define network locations for Vantage use.
If all your Vantage services, clients, and storage are on the same server, you can use either path form. However, Telestream recommends always using the UNC path form.
The disadvantage to using the drive-letter path form is that the drive letter is defined on the local machine, and the drive letter does not identify the computer that hosts the drive. For example, if you specify a Vantage store on drive C: using the drive-letter path form and a Vantage Workflow Portal operator tries to view files in that store on a different computer, the Vantage Workflow Portal will search for those files on drive C: on the operator’s computer, not on the Vantage server.
When any Vantage service or client program uses Vantage storage from a different computer, you must specify the path using the UNC form. You should also use the UNC form if you think you might ever support Vantage services or clients on another computer. You can change the path form later, but it is easier to use the UNC path form now, and it can prevent troubleshooting issues in the future.
Note: When services or clients will access Vantage storage from another computer, the Vantage storage location must be published as a share, and access must be granted to the appropriate Windows users. For more information, see Windows Authentication Guidelines in the Vantage Domain Management Guide.
When you want to use a SAN system, be aware that some SAN systems expose the shared drive as a letter (mapped) drive (for example, X:) that is visible on any client of the SAN. You can utilize SAN drives via a letter drive reference, provided that each Vantage server is a client of the SAN and that all mount points use the same letter.
Note: When creating a store to hold proxy files viewed in Vantage Workflow Portal, reference the store with a UNC path. Some SAN clients do not allow frame-accurate representation of proxies using shared drives.
Note: The Microsoft User Account Control (UAC) feature may deny access to Vantage stores or folders that are placed in protected locations. If Vantage users report that access to a store or folder is denied, place the store or folder in a directory that is not protected by UAC on the machine where the store or folder resides.
Managing the Vantage Domain Managing Vantage File Storage
53
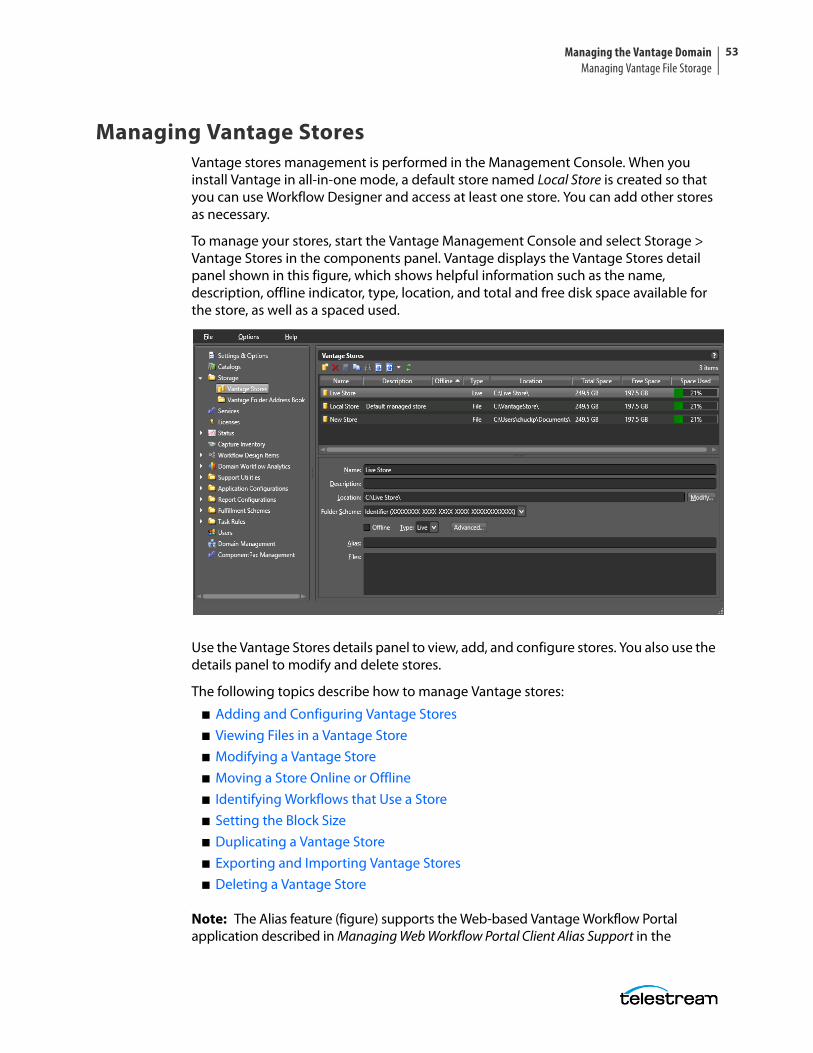
Managing Vantage StoresVantage stores management is performed in the Management Console. When you install Vantage in all-in-one mode, a default store named Local Store is created so that you can use Workflow Designer and access at least one store. You can add other stores as necessary.
To manage your stores, start the Vantage Management Console and select Storage > Vantage Stores in the components panel. Vantage displays the Vantage Stores detail panel shown in this figure, which shows helpful information such as the name, description, offline indicator, type, location, and total and free disk space available for the store, as well as a spaced used.
Use the Vantage Stores details panel to view, add, and configure stores. You also use the details panel to modify and delete stores.
The following topics describe how to manage Vantage stores:
■ Adding and Configuring Vantage Stores
■ Viewing Files in a Vantage Store
■ Modifying a Vantage Store
■ Moving a Store Online or Offline
■ Identifying Workflows that Use a Store
■ Setting the Block Size
■ Duplicating a Vantage Store
■ Exporting and Importing Vantage Stores
■ Deleting a Vantage Store
Note: The Alias feature (figure) supports the Web-based Vantage Workflow Portal application described in Managing Web Workflow Portal Client Alias Support in the
Managing the Vantage DomainManaging Vantage File Storage
54
Vantage Domain Management Guide. The Alias field allows entering a path to a virtual Vantage store using this pattern: http://IIShostname/Virtual Directory.
Adding and Configuring Vantage StoresTo add a new Vantage store, do the following:
1. Click the New Vantage Store button in the toolbar to display the Add New Store dialog (or right-click and select New Vantage Store).
2. Type a name for the store in the Name text box.
The name that you enter here is the name that appears in Workflow Designer when an action is configured to access a media file or attachment.
3. To specify the store root directory with a UNC path (recommended), do the following:
a. Click Modify to display the Browse for Folder dialog box.b. Open Network, open the computer name, and then select the root directory for
the store.c. Click OK.
You can also type a UNC path in the Location text box. For example, \\Computer-Name\Sharename.
Note: If the Vantage store is on a different computer, you must publish a share and grant access to the appropriate Windows users before it will appear in the Browse for Folder dialog. For more information, see Windows Authentication Guidelines in the Vantage Domain Management Guide.
4. To specify the store root directory with a drive letter path, do the following:
a. Click Modify to display the Browse for Folder dialog box.b. Select a local folder.c. Click OK.
You can also type a drive letter path in the Location text box. For example, C:\folder\folder.
Note: If you use a physical drive letter to specify a directory, only Vantage services and clients on the same computer can access the store. For more information, see Understanding Path Specifications for Vantage Storage.
5. Click OK.
6. Click the Save button to save the new store.
Managing the Vantage Domain Managing Vantage File Storage
55
Creating a Live StoreTo make a Live Store for Lightspeed Live Capture, set the Type: to Live. For an ordinary Vantage Store to be used for non-Live workflows, set the Type: to File. The two types are completely separate and cannot be used interchangeably.
Viewing Files in a Vantage StoreThe Files text box on the Vantage Stores page displays the files in the Vantage store. You can also use tools in the host file system (Windows Explorer, for example) to view the files in the store. To refresh the display of files, click the refresh button .
Modifying a Vantage StoreTo modify a Vantage store, do the following:
1. Select an existing store in the Vantage Stores list.
2. To change the store name, type a new name in the Name text box.
3. To enter a description for the store, type a description in the Description text box.
4. To specify the store root directory with a UNC path (recommended), do the following:
a. Click Modify to display the Browse for Folder dialog box.b. Open Network, open the computer name, and then select the root directory for
the store.c. Click OK.
You can also type a UNC path in the Location text box. For example, \\Computer-Name\Sharename.
Note: If the Vantage store is on a different computer, you must publish a share and grant access to the appropriate Windows users before it will appear in the Browse for Folder dialog. For more information, see Windows Authentication Guidelines in the Vantage Domain Management Guide.
5. To specify the store root directory with a drive letter path, do the following:
a. Click Modify to display the Browse for Folder dialog box.b. Select a local folder.c. Click OK.
You can also type a drive letter path in the Location field, such as C:\folder\folder.
Note: If you use a local drive letter to specify a directory, only Vantage services and clients on the same computer can access the store. For more information, see Understanding Path Specifications for Vantage Storage.
Managing the Vantage DomainManaging Vantage File Storage
56
6. To specify a folder naming scheme for the store, select the scheme from the Folder Scheme drop down list.
When content is placed in a Vantage Store, Vantage creates a subfolder in the Store location to save the files in. If you select Identifier, the subfolder is named by auto-generating a GUID. Date uses the current time and date stamp, and Name+Date uses the content name plus the time and date. For example, a Name+Date sub-folder for a media file named Butterfly would be named something similar to: But-terfly_2010-09-17_01-59-50-5785.
7. To take a Vantage store offline, check the Offline checkbox. Clear the checkbox to bring the store back online.
For more information, see Moving a Store Online or Offline.
8. To set the block size used for the store access, click the Advanced button and follow the instructions in Setting the Block Size.
9. For information on managing aliases for the store, see Managing Web Workflow Portal Client Alias Support in the Vantage Domain Management Guide.
10. Click the Save button to save the changes.
Moving a Store Online or OfflineThere may be times when you want to move a Vantage store offline to perform maintenance. When a store is offline, the Offline column in the Vantage Stores list displays an X for all stores that are offline.
When you move a store offline, any jobs in progress that are using that store continue to run, but the offline store is no longer available for new jobs. A good practice is to take the store offline, let all jobs in progress for that store complete, and then perform the planned maintenance. If the store becomes inaccessible before the jobs in progress complete, the jobs in progress for that store fail.
To move a Vantage store offline or online, do the following:
1. Select an existing store in the Vantage Stores list.
2. To take a Vantage store offline, check the Offline checkbox. Clear the checkbox to bring the store back online.
The Offline checkbox is disabled if the store is assigned to a Vantage service. To enable the offline checkbox in this situation, identify to which service the store is assigned, and place that service in maintenance mode. You can located which ser-vice is using the store by looking at the Storage tab for each service. For more infor-mation, see Managing Services.
3. Click the Save button to save the changes.

Managing the Vantage Domain Managing Vantage File Storage
57
Identifying Workflows that Use a StoreVantage allows you to search all workflows in a domain to see which workflows are using a store. This is very useful when you need to change or delete a store, and you want to know which workflows might be affected by the change.
To search workflows, do the following:
1. Select the store for which you want to search.
2. Click the Search button in the toolbar.
If the store is used by any workflows, Vantage displays a list of workflows that use the store. Double-click any workflow in the list to open that list in Vantage Work-flow Designer. Click Done to dismiss the list.
If the store is not used by any workflows, Vantage displays a message to that effect. Click OK to dismiss the message.
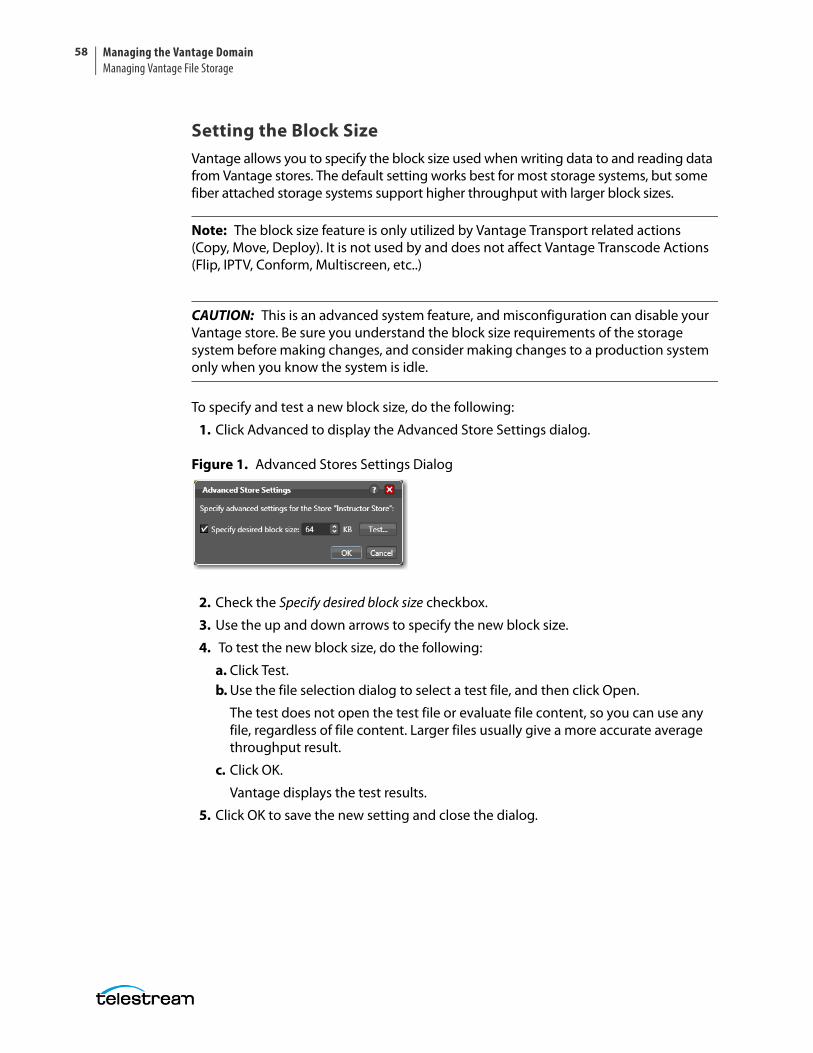
Managing the Vantage DomainManaging Vantage File Storage
58
Setting the Block SizeVantage allows you to specify the block size used when writing data to and reading data from Vantage stores. The default setting works best for most storage systems, but some fiber attached storage systems support higher throughput with larger block sizes.
Note: The block size feature is only utilized by Vantage Transport related actions (Copy, Move, Deploy). It is not used by and does not affect Vantage Transcode Actions (Flip, IPTV, Conform, Multiscreen, etc..)
CAUTION: This is an advanced system feature, and misconfiguration can disable your Vantage store. Be sure you understand the block size requirements of the storage system before making changes, and consider making changes to a production system only when you know the system is idle.
To specify and test a new block size, do the following:
1. Click Advanced to display the Advanced Store Settings dialog.
Figure 1. Advanced Stores Settings Dialog
2. Check the Specify desired block size checkbox.
3. Use the up and down arrows to specify the new block size.
4. To test the new block size, do the following:
a. Click Test.b. Use the file selection dialog to select a test file, and then click Open.
The test does not open the test file or evaluate file content, so you can use any file, regardless of file content. Larger files usually give a more accurate average throughput result.
c. Click OK.
Vantage displays the test results.
5. Click OK to save the new setting and close the dialog.
Managing the Vantage Domain Managing Vantage File Storage
59
Duplicating a Vantage StoreTo duplicate a Vantage store, do the following:
1. Select an existing store in the Vantage Stores list.
2. Click the Duplicate button (or right-click and select Duplicate).
3. Select the new store and customize it as needed (see Modifying a Vantage Store).
Exporting and Importing Vantage StoresVantage allows you to export one or more Vantage stores to XML files, which you can then use to import the same stores into another Vantage domain.
To export all stores in the list, click the Export drop down menu and select Export All. Then use the file system dialog to save the exported stores.
To export selected stores, do the following:
1. Select the store to export. You can Shift-click or Ctrl-click to select multiple stores.
2. Click the Export button (or right-click and select Export, or click the Export drop down menu and choose Export Selected).
3. Use the file system dialog to save the exported stores.
The default file name is the store name, but you can change the file name.
Note: Changing the name of the XML file does not change the name of the store in the XML file. Also note that exporting a Vantage store only exports the store path information, not the contents of the store.
To import a store, do the following:
1. Click the Import button .
2. Use the file system dialog to locate and select the store to import, then click Open.
Note: If you try to import a store that is already in this Vantage domain, Vantage prompts you to either overwrite the existing store (click Yes) or cancel the import (click No).
Deleting a Vantage StoreClick on the store you want to delete, click the Delete button in the toolbar (or right-click and select Delete), and click OK to confirm.
Note: If there are any files in the store that are maintained by Vantage—such as those for unexpired jobs or binders in a catalog, you cannot delete the store. Deleting a store permanently removes the store from the domain. It does not delete directories, shares, or any files in them.
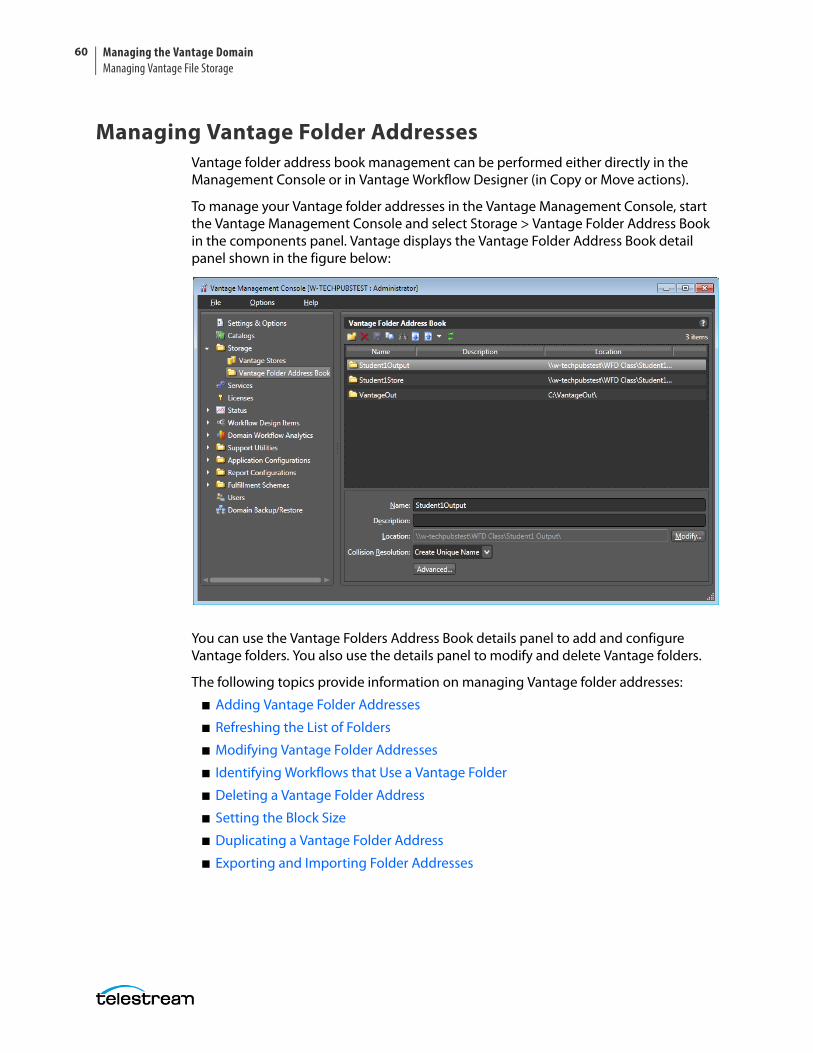
Managing the Vantage DomainManaging Vantage File Storage
60
Managing Vantage Folder AddressesVantage folder address book management can be performed either directly in the Management Console or in Vantage Workflow Designer (in Copy or Move actions).
To manage your Vantage folder addresses in the Vantage Management Console, start the Vantage Management Console and select Storage > Vantage Folder Address Book in the components panel. Vantage displays the Vantage Folder Address Book detail panel shown in the figure below:
You can use the Vantage Folders Address Book details panel to add and configure Vantage folders. You also use the details panel to modify and delete Vantage folders.
The following topics provide information on managing Vantage folder addresses:
■ Adding Vantage Folder Addresses
■ Refreshing the List of Folders
■ Modifying Vantage Folder Addresses
■ Identifying Workflows that Use a Vantage Folder
■ Deleting a Vantage Folder Address
■ Setting the Block Size
■ Duplicating a Vantage Folder Address
■ Exporting and Importing Folder Addresses
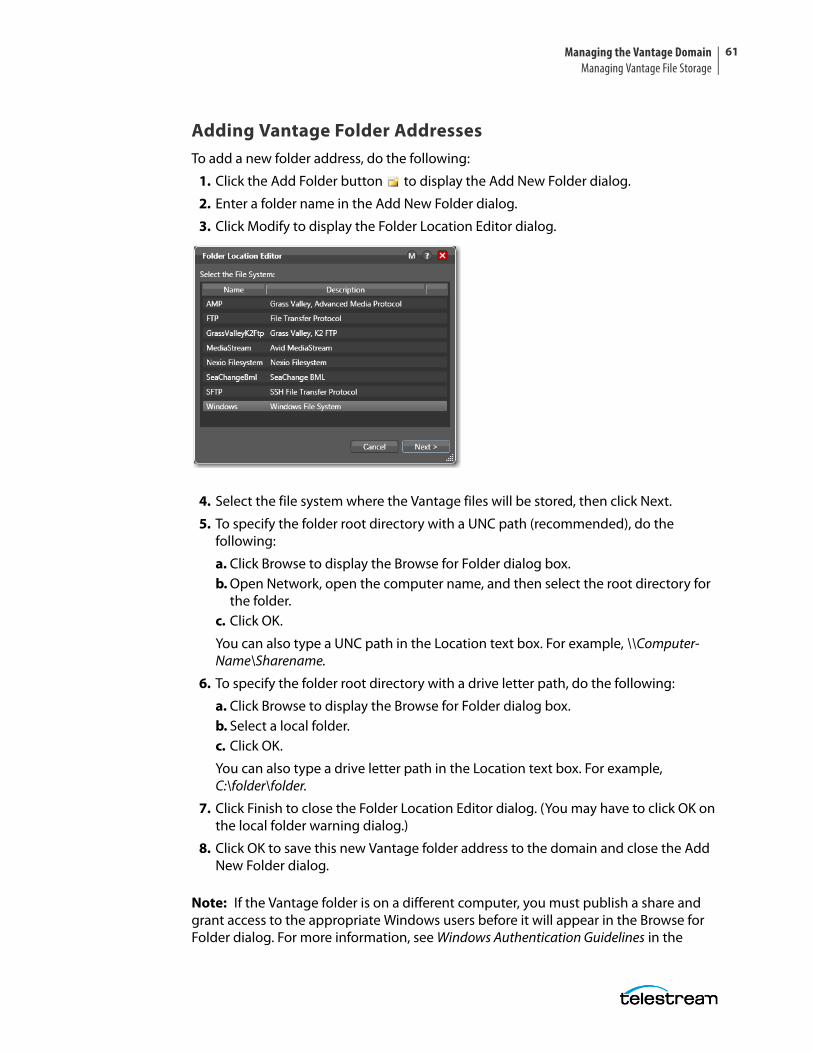
Managing the Vantage Domain Managing Vantage File Storage
61
Adding Vantage Folder AddressesTo add a new folder address, do the following:
1. Click the Add Folder button to display the Add New Folder dialog.
2. Enter a folder name in the Add New Folder dialog.
3. Click Modify to display the Folder Location Editor dialog.
4. Select the file system where the Vantage files will be stored, then click Next.
5. To specify the folder root directory with a UNC path (recommended), do the following:
a. Click Browse to display the Browse for Folder dialog box.b. Open Network, open the computer name, and then select the root directory for
the folder.c. Click OK.
You can also type a UNC path in the Location text box. For example, \\Computer-Name\Sharename.
6. To specify the folder root directory with a drive letter path, do the following:
a. Click Browse to display the Browse for Folder dialog box.b. Select a local folder.c. Click OK.
You can also type a drive letter path in the Location text box. For example, C:\folder\folder.
7. Click Finish to close the Folder Location Editor dialog. (You may have to click OK on the local folder warning dialog.)
8. Click OK to save this new Vantage folder address to the domain and close the Add New Folder dialog.
Note: If the Vantage folder is on a different computer, you must publish a share and grant access to the appropriate Windows users before it will appear in the Browse for Folder dialog. For more information, see Windows Authentication Guidelines in the
Managing the Vantage DomainManaging Vantage File Storage
62
Vantage Domain Management Guide. Also, if you use a drive letter to specify a folder, only Vantage services and clients on the same computer can access the folder. For more information, see Understanding Path Specifications for Vantage Storage.
Note: When using Amazon AWS S3 address locations in the Watch and Associate actions and when specifying a Vantage folder address, you must also configure specific AWS IAM policy settings for S3 access. These are the minimal IAM parameter settings for Vantage 6.x, 7.0, and 7.1:
Updated IAM permissions list for S3 with Vantage:{"Statement": [{ "Effect": "Allow", "Action": [ "s3:DeleteObject", "s3:GetObject", "s3:ListAllMyBuckets", "s3:ListBucket", "s3:PutObject", * "s3.GetBucketLocation"* ], "Resource": [ "*" ] }]}
Refreshing the List of FoldersTo refresh the folder list, click the refresh button .
Modifying Vantage Folder AddressesTo modify a folder address, do the following:
1. Select the folder in the Vantage Folder Address Book.
2. If you want to change the folder name, enter a new name for the Vantage folder.
This name is displayed in Copy and Move action inspectors where you are specify-ing the location in which to save a file.
3. If you want to enter a description, enter the description, purpose, or use of this folder address.
4. To change the folder storage location, click Modify (or right-click the folder name in the list and select Modify) and specify the new location as described in Adding Vantage Folder Addresses.
5. To define what action Vantage takes when it saves a file and a file with the same name exists in the Vantage folder, select an action from the Collision Resolution drop down list:
– Create Unique Name—Vantage creates the file with a unique name, leaving the other file intact.
– Overwrite—Vantage overwrites the old file.
– Set Failure State—Vantage does not save a new file and registers a failure with the action that attempted to create the file.
6. For instructions on using the Advanced features, see Setting the Block Size.
7. Click the Save button .
Managing the Vantage Domain Managing Vantage File Storage
63
Identifying Workflows that Use a Vantage FolderVantage allows you to search all workflows in a domain to see which workflows are using a Vantage folder. This is very useful when you need to change or delete a store, and you want to know which workflows might be affected by the change.
To search workflows, do the following:
1. Select the Vantage folder for which you want to search.
2. Click the Search button in the toolbar (or right-click and select Find Workflows).
If the folder is used by any workflows, Vantage displays a list of workflows that use the folder. Double-click any workflow in the list to open that list in Vantage Work-flow Designer. Click Done to dismiss the list.
If the folder is not used by any workflows, Vantage displays a message to that effect. Click OK to dismiss the message.
Deleting a Vantage Folder AddressClick on the folder you want to delete, click the Delete button in the toolbar (or right-click and select Delete), and click OK to confirm.
Note: Deleting a folder permanently removes the folder from the domain. It does not delete directories, shares, or any files in them.
Setting the Block SizeVantage allows you to specify the block size used when writing data to and reading data from Vantage folders. You can also use Vantage to test the throughput of different settings. The default setting works best for most storage systems, but some fiber attached storage systems support higher throughput with larger block sizes.
Note: The block size feature is only utilized by Vantage Transport related actions (Copy, Move, Deploy). It is not used by and does not affect Vantage Transcode Actions (Flip, IPTV, Conform, Multiscreen, etc..)
CAUTION: This is an advanced system feature, and misconfiguration can disable your Vantage folder. Be sure you understand the block size requirements of the storage system before making changes, and consider making changes to a production system only when you know the system is idle.
To specify and test a new block size, do the following:
1. Click Advanced to display the Advanced Store Settings dialog (see the Advanced Stores Settings Dialog figure).
2. Check the Specify desired block size checkbox.
3. Use the up and down arrows to specify the new block size.
Managing the Vantage DomainManaging Vantage File Storage
64
4. To test the new block size, do the following:
a. Click Test.b. Use the file selection dialog that appears to select a typical media file, and then
click Open.
Larger files will usually give a more accurate average throughput result.
c. Click OK.
Vantage displays the test results.
5. Click OK to keep the save the new setting and close the dialog.
6. Click the Save button .
Duplicating a Vantage Folder AddressSelect the folder you want to duplicate, click the Duplicate button in the toolbar (or right-click and select Duplicate). Select the duplicated folder, make the necessary changes and save it.
Exporting and Importing Folder AddressesVantage allows you to export folder addresses to XML files, which you can then use to import the same addresses into another Vantage domain.
To export all folder addresses, click the Export drop down menu and select Export All. Then use the file system dialog to save the exported folder addresses.
To export selected folder addresses, do the following:
1. Select a folder in the list, or you can Shift-click or Ctrl-click to select multiple folders.
2. Click the Export button , right-click and select Export, or select Export Selected from the Export button drop down menu.
3. Use the file system dialog to save the exported folder addresses.
The default file name is the folder address name, but you can change the file name.
Note: Changing the name of the XML file does not change the name of the folder address in the XML file.
To import a folder address, do the following:
1. Click the Import button .
2. Use the file system dialog to locate and select the folder address file to import, then click Open.
Note: If you try to import a folder address file that is already in this Vantage domain, Vantage prompts you to either overwrite the existing folder address (click Yes) or cancel the import (click No).
Managing the Vantage Domain Managing Services
65
Managing ServicesThe term Services, as used in Vantage, refers to Vantage running as Windows services, which are required to perform a given action in a workflow. The term service refers to the specific instance of the Windows service on a particular computer that is responsible for actually executing the actions specified in a workflow when that workflow is executed as a result of a job submission to process a given media file.
Use the Services component of the Management Console to configure your Vantage services operating on various machines to function according to your requirements.
You can configure each service’s program settings, storage requirements, variables, and qualification rules.
The following topics describe how to manage services:
■ Using the Services Details Panel
■ Grouping Services
■ Adding a Service to the Domain
■ Removing a Service from the Domain
■ Entering and Exiting Service Maintenance Mode
■ Resetting the Service Metrics History
■ Restarting a Service
■ Changing a Service Logon
■ Viewing Average Time Spent Waiting
■ Generating Reports
■ Configuring Vantage Services
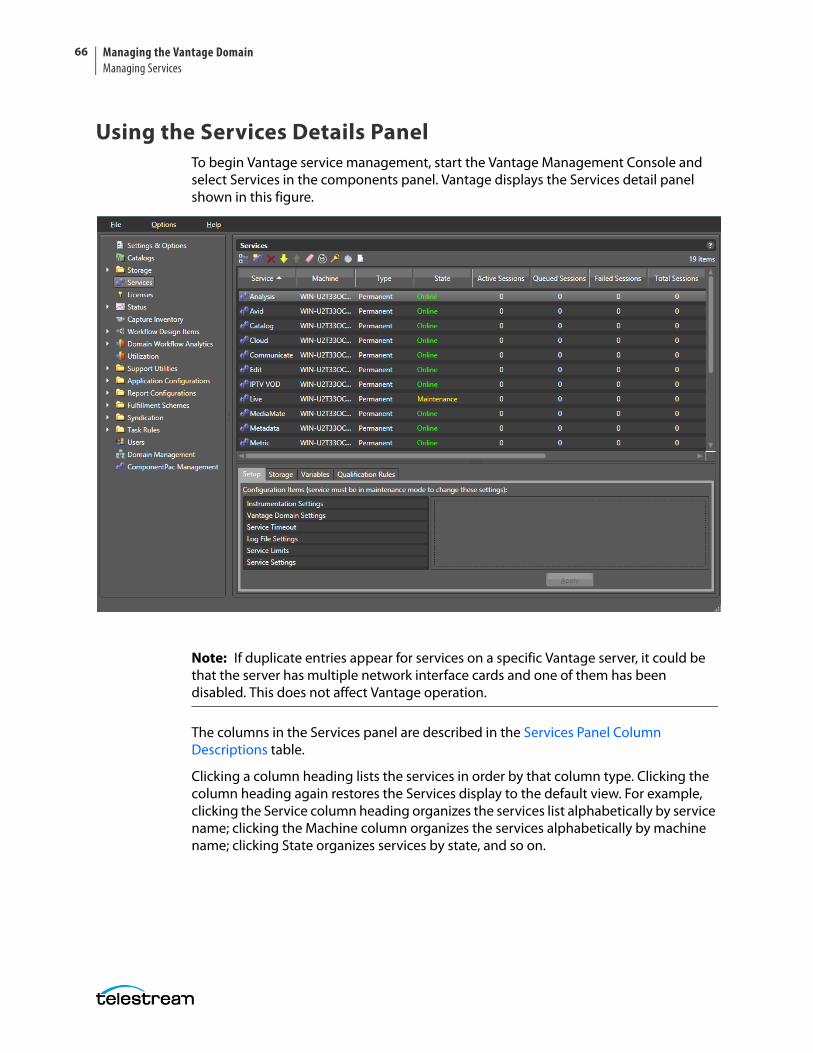
Managing the Vantage DomainManaging Services
66
Using the Services Details PanelTo begin Vantage service management, start the Vantage Management Console and select Services in the components panel. Vantage displays the Services detail panel shown in this figure.
Note: If duplicate entries appear for services on a specific Vantage server, it could be that the server has multiple network interface cards and one of them has been disabled. This does not affect Vantage operation.
The columns in the Services panel are described in the Services Panel Column Descriptions table.
Clicking a column heading lists the services in order by that column type. Clicking the column heading again restores the Services display to the default view. For example, clicking the Service column heading organizes the services list alphabetically by service name; clicking the Machine column organizes the services alphabetically by machine name; clicking State organizes services by state, and so on.
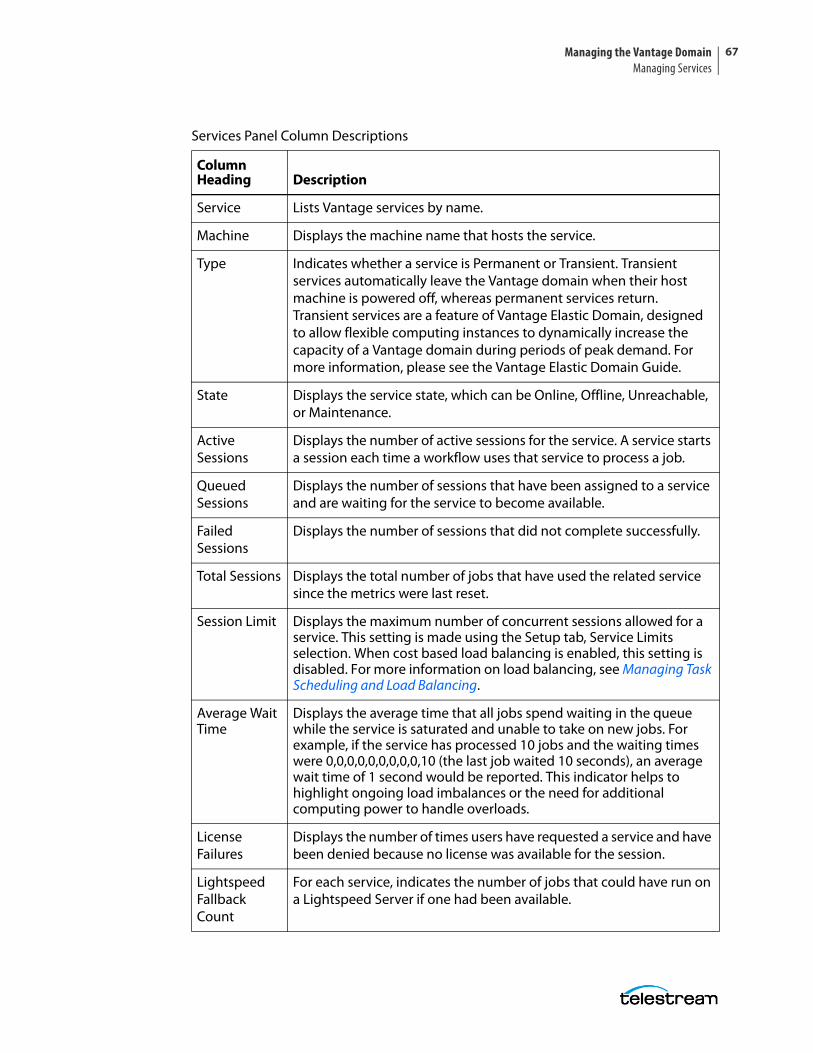
Managing the Vantage Domain Managing Services
67
Services Panel Column Descriptions
Column Heading Description
Service Lists Vantage services by name.
Machine Displays the machine name that hosts the service.
Type Indicates whether a service is Permanent or Transient. Transient services automatically leave the Vantage domain when their host machine is powered off, whereas permanent services return. Transient services are a feature of Vantage Elastic Domain, designed to allow flexible computing instances to dynamically increase the capacity of a Vantage domain during periods of peak demand. For more information, please see the Vantage Elastic Domain Guide.
State Displays the service state, which can be Online, Offline, Unreachable, or Maintenance.
Active Sessions
Displays the number of active sessions for the service. A service starts a session each time a workflow uses that service to process a job.
Queued Sessions
Displays the number of sessions that have been assigned to a service and are waiting for the service to become available.
Failed Sessions
Displays the number of sessions that did not complete successfully.
Total Sessions Displays the total number of jobs that have used the related service since the metrics were last reset.
Session Limit Displays the maximum number of concurrent sessions allowed for a service. This setting is made using the Setup tab, Service Limits selection. When cost based load balancing is enabled, this setting is disabled. For more information on load balancing, see Managing Task Scheduling and Load Balancing.
Average Wait Time
Displays the average time that all jobs spend waiting in the queue while the service is saturated and unable to take on new jobs. For example, if the service has processed 10 jobs and the waiting times were 0,0,0,0,0,0,0,0,0,10 (the last job waited 10 seconds), an average wait time of 1 second would be reported. This indicator helps to highlight ongoing load imbalances or the need for additional computing power to handle overloads.
License Failures
Displays the number of times users have requested a service and have been denied because no license was available for the session.
Lightspeed Fallback Count
For each service, indicates the number of jobs that could have run on a Lightspeed Server if one had been available.
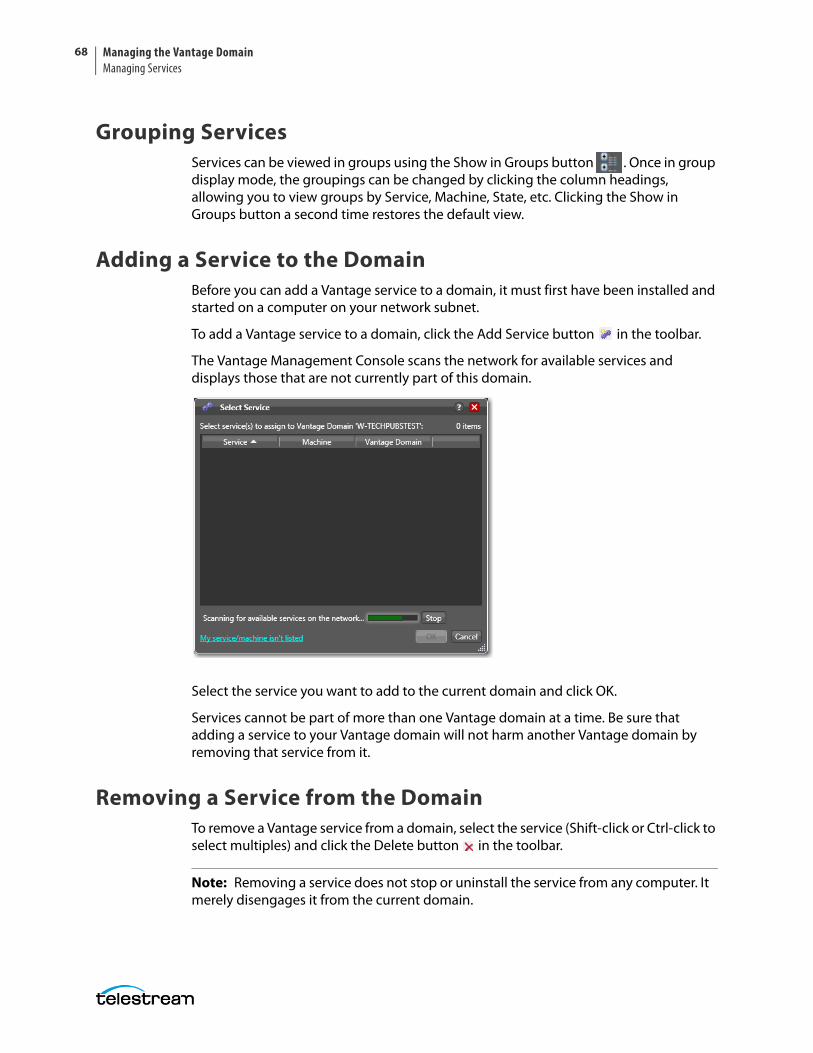
Managing the Vantage DomainManaging Services
68
Grouping ServicesServices can be viewed in groups using the Show in Groups button . Once in group display mode, the groupings can be changed by clicking the column headings, allowing you to view groups by Service, Machine, State, etc. Clicking the Show in Groups button a second time restores the default view.
Adding a Service to the DomainBefore you can add a Vantage service to a domain, it must first have been installed and started on a computer on your network subnet.
To add a Vantage service to a domain, click the Add Service button in the toolbar.
The Vantage Management Console scans the network for available services and displays those that are not currently part of this domain.
Select the service you want to add to the current domain and click OK.
Services cannot be part of more than one Vantage domain at a time. Be sure that adding a service to your Vantage domain will not harm another Vantage domain by removing that service from it.
Removing a Service from the DomainTo remove a Vantage service from a domain, select the service (Shift-click or Ctrl-click to select multiples) and click the Delete button in the toolbar.
Note: Removing a service does not stop or uninstall the service from any computer. It merely disengages it from the current domain.
Managing the Vantage Domain Managing Services
69
Entering and Exiting Service Maintenance ModeYou can enter and exit maintenance mode by selecting a service and clicking the Enter
or Exit button (or right-click the service and select Enter/Exit Maintenance Mode). When a service is in maintenance mode it will not process any transactions. Exit maintenance mode to re-activate the selected service and cause it to reload its resources from the database.
Note: Placing a service in maintenance mode erases the metrics for that service, which affects the Vantage Dashboard bar graphs for that service.
Note: The Tachyon Cinnafilm service is supported only on Lightspeed servers. On all other Vantage servers, this service stays in Maintenance Mode.
To move multiple or all services on a server in and out of maintenance mode, do the following.
1. Display the Services detail panel.
2. Select a service in the list (Shift- click or Ctrl-click to select multiples).
3. Click the Enter button to place the services in maintenance mode.
4. Click the Exit button to restart the services and exit maintenance mode.
Note: Placing all services in maintenance mode erases the metrics for all services, which affects the Vantage Dashboard bar graphs for those services.
Resetting the Service Metrics HistoryClick the Clear button (or right-click and select Clear) to reset the service metrics history. This also resets all failed service metrics for the selected services. You can do this for multiple or all services by Ctrl-clicking or Shift-clicking the services you want.
Restarting a ServiceTo restart one or more services, follow these steps:
1. Display the Services detail panel.
2. Select a service in the list (Shift-click or Ctrl-click to select multiple services).
3. Click the Restart button to restart the services.
Note: Restarting services erases the metrics for those services.
Managing the Vantage DomainManaging Services
70
Changing a Service LogonAs part of a workflow, a Vantage service may need to access network folders shared only with a certain user account. In such cases, you may need to change the logon of that service to the permitted user. To change a service logon, follow these steps:
1. Display the Services detail panel.
2. Select a service in the list (Shift-click or Ctrl-click to select multiple services).
3. Click the Change Service Logon button or right-click and select Change Service Log On. A dialog opens, requesting the logon.
4. Select Local System account to use the account currently accessing Vantage from your local machine, or select This account and fill in the user name and password for the account that has access to the desired network location.
5. Click OK. A message confirms that the logon is changing.
Note: Changing a service logon restarts that service. Also note, when changing the logon for multiple services simultaneously, some services may not restart properly. If this occurs, go to Start > Services on the server, select the affected services, and click (or right-click) Restart to manually restart the services.
Viewing Average Time Spent WaitingThe Average Time Spent Waiting button opens a small dialog box that reports the average time spent waiting by a service, by an array node, or by the domain. This can be helpful in spotting processing bottlenecks at the action, server, and domain levels and helping administrators determine when more servers should be added to increase processing capabilities during peak load times.
To display the average time spent waiting, follow these steps:
1. Display the Services detail panel.
2. Select a service in the list (Shift-click or Ctrl-click to select multiple services).
3. Click the Average Time Spent Waiting button .
4. Select one of the viewing options in the dialog box:
– By service type to see the average wait time for the service selected in the drop-down menu.
– By array node to see the average wait time for the server selected in the drop-down menu.
– Entire domain to see the average wait time for the whole domain.
5. Click Next. The dialog box displays a message showing how much time on average the selected item spent waiting (as opposed to actively processing).
Managing the Vantage Domain Managing Services
71
Generating ReportsThe Generating Report button initiates a report from a report format that you have already created using the Vantage Management Console Report Configurations > Service Reports feature (see the Vantage Domain Management Guide for information).
Note: This feature requires the Reporting & Analytics option.
To generate a report, follow these steps:
1. Display the Services detail panel.
2. Select a service in the list (Shift-click or Ctrl-click to select multiple services).
3. Click the Generate Report button . A Generate Service Report dialog box opens.
4. Select from the options in the dialog box:
– The Report drop-down menu lets you select a report from the list of Service Reports you have created.
– Start lets you specify a starting time (and date for historical reports) for gathering report data. Data that occurred before the Start time (and date) is not included.
– End lets you specify an end time (and date for historical reports) for gathering report data. Data after the specified time (and date) is not included.
In the Start and End fields, you can click on each item, including month, date, year, hours, minutes, seconds, and AM/PM, and use the selection arrows to set each item. You can also click the drop-down arrow to display a calendar and select a date.
Note: For historical reports, the number of days of available historical informa-tion is determined by the Service Report Retention Time setting in the Settings and Options > General tab. This setting retains the past 30 days of information by default, or you can set it for a lesser or greater retention time.
5. Click OK, navigate to the location where you want to save the report file. You can change the report name to anything you prefer, or leave the default name, and then click Save.
A message indicates that the report has been generated, and another message shows the location of the report and includes an Open Folder button providing access to the report.
6. To open the folder and access the report, click Open Folder.
Reports can be opened in a text editor or spreadsheet program. If you use a spreadsheet program, you can not only view the data in columns and rows, but you can also produce charts and graphs using the spreadsheet’s built-in graphing functions.
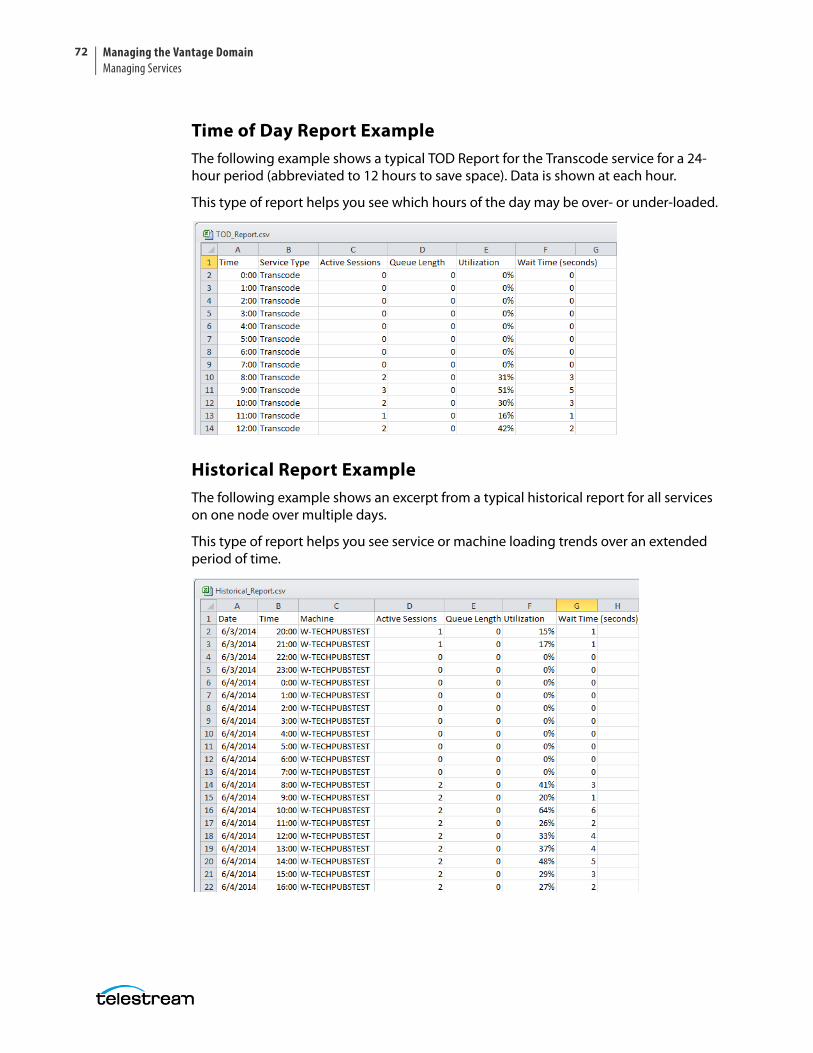
Managing the Vantage DomainManaging Services
72
Time of Day Report ExampleThe following example shows a typical TOD Report for the Transcode service for a 24-hour period (abbreviated to 12 hours to save space). Data is shown at each hour.
This type of report helps you see which hours of the day may be over- or under-loaded.
Historical Report ExampleThe following example shows an excerpt from a typical historical report for all services on one node over multiple days.
This type of report helps you see service or machine loading trends over an extended period of time.
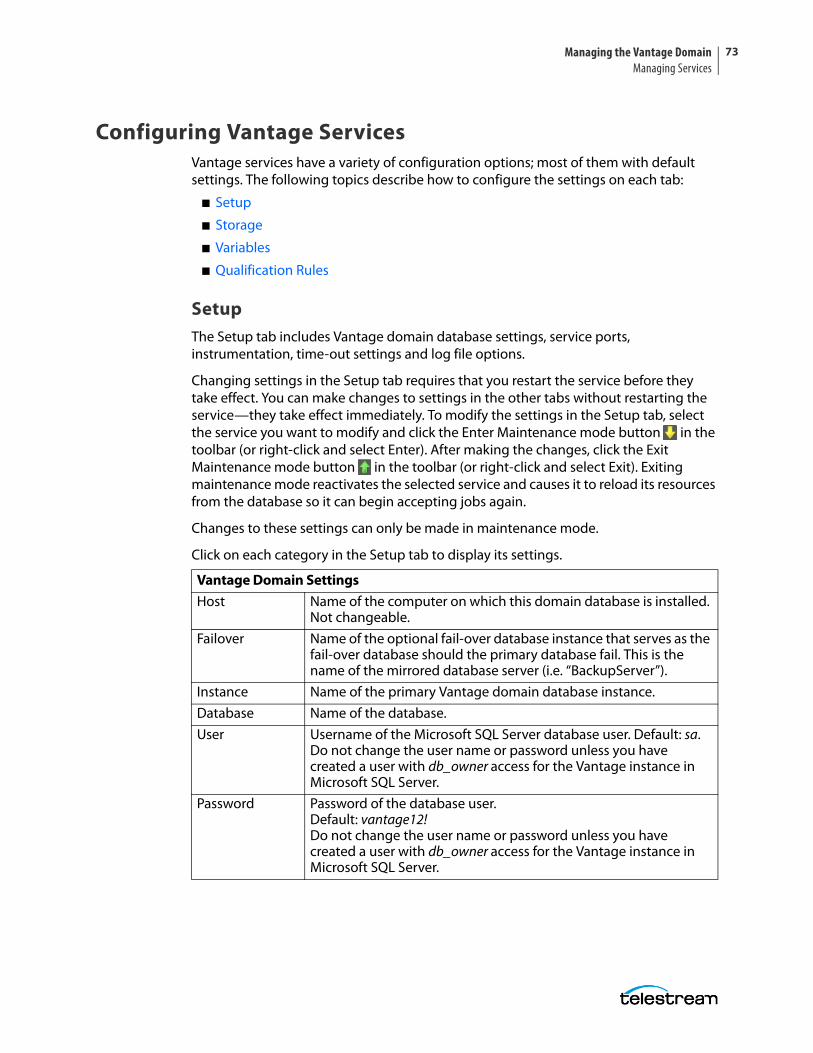
Managing the Vantage Domain Managing Services
73
Configuring Vantage ServicesVantage services have a variety of configuration options; most of them with default settings. The following topics describe how to configure the settings on each tab:
■ Setup
■ Storage
■ Variables
■ Qualification Rules
SetupThe Setup tab includes Vantage domain database settings, service ports, instrumentation, time-out settings and log file options.
Changing settings in the Setup tab requires that you restart the service before they take effect. You can make changes to settings in the other tabs without restarting the service—they take effect immediately. To modify the settings in the Setup tab, select the service you want to modify and click the Enter Maintenance mode button in the toolbar (or right-click and select Enter). After making the changes, click the Exit Maintenance mode button in the toolbar (or right-click and select Exit). Exiting maintenance mode reactivates the selected service and causes it to reload its resources from the database so it can begin accepting jobs again.
Changes to these settings can only be made in maintenance mode.
Click on each category in the Setup tab to display its settings.
Vantage Domain Settings
Host Name of the computer on which this domain database is installed. Not changeable.
Failover Name of the optional fail-over database instance that serves as the fail-over database should the primary database fail. This is the name of the mirrored database server (i.e. “BackupServer”).
Instance Name of the primary Vantage domain database instance.
Database Name of the database.
User Username of the Microsoft SQL Server database user. Default: sa. Do not change the user name or password unless you have created a user with db_owner access for the Vantage instance in Microsoft SQL Server.
Password Password of the database user. Default: vantage12!Do not change the user name or password unless you have created a user with db_owner access for the Vantage instance in Microsoft SQL Server.
Managing the Vantage DomainManaging Services
74
Service Limits
Session Limit In sessions mode (which is the default mode), this configures the maximum number of concurrent sessions for a service. For CPU-intensive services—such the Transcode service—you should gate the maximum number of sessions to the power of the computer. For less demanding services, such as the Monitor service, a higher number is less likely to cause problems.
When cost based load balancing is enabled, this setting is disabled. For more information on load balancing, see Managing Task Scheduling and Load Balancing.
Target Resource Usage
When cost based load balancing is enabled, this setting configures the target resource usage level for this service. Each service has a default value for this setting. If server performance permits, raise this value to support simultaneous processing of additional workflow actions. If the server is having performance issues, lower this value to reduce the number of actions that run at the same time.
For more information on load balancing, see Managing Task Scheduling and Load Balancing.
Service Settings
TCP Port The TCP port is utilized for all intra-service traffic in the domain. If a certain port range is allowed by your IT infrastructure (given constraints such as routers and firewalls) an IT administrator can specify which port to use for intra-service communication to fit their environment. The default port settings are listed in the Before You Install chapter of the Vantage Domain Management Guide.
HTTP Port The HTTP port is utilized for HTTP server traffic in the domain. An IT administrator can specify which port to use for intra-service communication to fit their environment. The default port settings are listed in the Before You Install chapter of the Vantage Domain Management Guide.
Pause Limit
Pause Session Limit
Allows specifying the number of sessions that may be paused for these services: Transcode, Multiscreen, IPTV, and Edit. Users may then pause multiple sessions up to that number. Note that the pause limit is independent of the session limit and may be set higher or lower than the session limit.
Allow Paused Actions
When unchecked, actions may not be paused. When checked, allows actions to be paused. Hierarchical Pausing allows jobs that have paused other jobs to themselves be paused. For example, if a low priority job is paused by a medium priority job, a high priority job may pause the medium job. This feature must be enabled by the administrator and will be set on a service-by-service basis in the session limit category for transcoding services.
Managing the Vantage Domain Managing Services
75
StorageThe Storage tab enables you to specify stores for a service to provide a repository so that their actions can obtain storage if they require it. Certain actions require storage where they can create temporary files or perform other operations that involve writing files to disk.
For example, the Transcode service requires access to a store in order to produce the files that it creates as part of the transcode process.
The process of assigning a specific store to a service is made with performance in mind. If you know you want a particular Transcode service to utilize a specific store, you can assign it here. In the absence of an assigned store for Transcode service, service is free to utilize any Vantage store it chooses for managing temporary files. This may not be optimal based upon your network topology.
Adding Stores
To add a store to the selected service, click the Add Store button , select the store from the Select Storage dialog and click OK.
Note: The Flip actions and other actions can also specify a store for output files. The selection of a store in an action is separate from stores attached to a service.
Removing Stores
To remove a store from the selected service, select the store and click the Delete button in the toolbar.
Instrumentation Settings
Enable Instrumentation
Registers and reports certain internal events as Windows Management instrumentation events.
Service Timeout
Timeout The time (in minutes), that a non-responsive task will run before being terminated and failed.
Log File Settings
Log File Name The base name of the log file generated by this service. Log files are generated by service, and are stored in each service’s folder in <installdrive(C:)>\Program Files\Telestream\<Service Folder>.
Log File Size The maximum file size (in bytes) before the service creates an incrementally-numbered log file for continued logging.
Max Log File Count
The maximum number of log files for this service, before the oldest is deleted when a new one is written.
Managing the Vantage DomainManaging Services
76
VariablesUse the Variables tab to attach variables to a service. Variables attached to a service perform two functions. First, they dictate which services can perform tasks as set up by the Run On Rules in actions executing in the context of a workflow. Run On Rules allow you to target specific services to execute tasks, based upon whether or not a variable is set correctly for a Service.
Note: Run on rules examine service variable values, not job variable values.
Second, variables attached to a service allow workflows to examine their values in the context of a job. Variables (such as service hosts and action priority) can be passed to workflows to provide information about the service, and workflow actions can include this information in the output or make workflow processing decisions based on the variable values.
When you add a variable to a service, you supply a constant (or static) value—one that does not change from job to job. The value is static for the service instance. For example, you may want to implement email generation in the event of a transcode failure in a large domain with 20 concurrent Transcode services, each running on separate servers. This allows a user to receive an email when a transcode fails that identifies the server where the failure occurred.
To implement this, create a text variable named EmailSubject as described in Creating Variables. Next, add the EmailSubject variable to each Transcode service as described in Adding Variables to a Service, and set the value of EmailSubject for each service to a combination of the respective machine name and the service name by typing it in manually in the Value field. For example, one might be named M-ORION-VantageTranscodeService.
Finally, in each workflow, add a Message action and specify the email option, bind the Subject line with the EmailSubject variable, and set the Message action to only run on a Failure state.
Now, if a transcode failure occurs, the user receives an email indicating which server was transcoding the media when the failure occurred.
Adding Variables to a Service
To add a variable to the selected service, click the Add Variable button (or right-click and select Add Variable), select the variable from the Select Variable dialog and click OK. Next, enter the static value for this variable in the Value field. When you click away, the Save Variable dialog displays. Click Yes to save this variable and its value.
Note: If you are using any Lightspeed Server to host Lightspeed-aware services, Vantage automatically assigns a K20 or K80 system variable to that service, set to True. This variable is used for automated load balancing and can be tested by actions in a workflow for Run On rule processing or job reporting. Additionally, all Vantage services have an automatic system variable, VantageMachineName, set to the name of the host on which the service is running.

Managing the Vantage Domain Managing Services
77
Removing Variables from a Service
To remove a variable from the selected service, select the variable and click the Delete button in the toolbar (or right-click and select Delete).
CAUTION: Deleting a variable may render workflows using the variable inoperable. When you delete a variable from a service, make sure that you modify any affected workflows as well.
Qualification RulesQualification rules give you control over which actions a service will process. Using these rules, a service compares variable values set by the workflow against a baseline value, generates a merit value based on the comparison, and uses that value in conjunction with other variables to determine if the service should process the job.
Note: Vantage also supports run on rules, which are defined in a workflow and allow a workflow designer to select a service based on Vantage variable values. Generally, run on rules are easier to configure if you want to specify that parts of a workflow execute on specific services. For more information, see the Vantage User Guide.
Qualification rules can be based on system variables (such as Priority, K20, and K80) and user-defined variables (for example, HD Job or File Size). You can create multiple qualification rules per service to fine-tune each service’s fitness to perform certain tasks and improve over-all domain workflow and performance.
For example, suppose you have a large domain with 20 transcoding services on different machines. Your goal is to divide the transcoding services into groups: those that process the bulk of the jobs—those involving media of less than about 80MB in size. Another group is configured to optimally transcode media up to 2GB, another for long-form files, over 2GB.
To implement this, you create a variable named FileSize (Select Domain > Workflow Design Items > Variables).
Next, you select the service that you want to run short jobs here, in Services > Qualification Rules, and create a qualification rule.
Select the FileSize variable and click OK. Configure the rule to specify operator = less than or equal, merit = 100 (an arbitrary value), qualifier = required, and value = 80,000,000. This rule will pass the merit value of 100 to Vantage when a job being considered for execution has a FileSize variable with a value less than or equal to 80,000,000.
For each other transcode service, add a similar rule (or rules) to qualify it appropriately.
Now, in each workflow, add an Identify action before each Flip action and configure it to update the FileSize variable with the File Size metric.
When a job starts, the Identify action updates the FileSize variable, and each transcode service examines the variable against its comparison value to determine its fitness to
Managing the Vantage DomainManaging Services
78
process the Flip action, and if true, submits its merit value, if false, submits merit value 0 to Vantage for final arbitration on which transcode service is assigned the job.
Adding Qualification Rules
To add a qualification rule to the selected service, click the Add Qualification Rule button (or right-click and select Add Qualification Rules), select the variable from the Select Variable dialog and then configure the rule.
Option Description
Operator Select an operator from the dropdown list to qualify the workflow variable value being compared against the baseline value specified in the rule.
For mathematical operators, if the equation is true, the merit value you supply is passed; if the equation is false, 0 is passed.
For the contains operator, the equation is true if the workflow variable contains the text specified in the baseline value. The merit value you supply is passed if the equation is true, and 0 is passed if the equation is false.
Merit When an action meets the qualification rule requirements for multiple service instances, the action is assigned to the service with the highest merit value. For example, if a Flip action meets the qualification rule requirements for the Transcode service on both Server A and Server B, Vantage assigns action processing to the server that hosts the service qualification rule with the highest merit value.
Merit values should be consistent with a predetermined plan of implementation, so that each service is responding appropriately to influence the distribution of tasks. If you have few services and rules, values from 1 to 10 may provide enough granularity; for lots of services and/or rules, you may need values from 1 to 100 to provide enough granularity.
Qualifier Choose Optional when workflows may or may not provide a value for comparison. If no value is provided, the comparison always is false, and 0 merit is provided. Choose Required when workflows must provide a value for comparison. If no value is provided, the service rejects the request to process the job without further analysis.
Value Enter the baseline value against which the variable’s value is to be compared. (A null value is a valid value.)
Managing the Vantage Domain Managing Services
79
Deleting Qualification Rules
To remove a qualification rule from the selected service, select the rule and click the Delete button in the toolbar (or right-click and select Delete).
Use Wildcards Enables or disables the use of wildcard characters in the Value field. When enabled (checked), you can use a question mark (?) to indicate a single character that can have any value, and you can use an asterisk (*) to indicate a variable number of characters that can have any value. For example, *.mov matches any value that ends in ‘.mov’.
When disabled (unchecked), the * and ? characters are regular characters, not wildcard characters.
Ignore Case Enables or disables case validation in the Value field. When enabled (checked), the case in the Value field is ignored when comparing the value to a value received from an action. For example, TEST1 and test1 are considered a match when the Ignore Case option is checked.
When disabled (unchecked), the case in the Value field must exactly match that received from an action to be considered a match.
Option Description
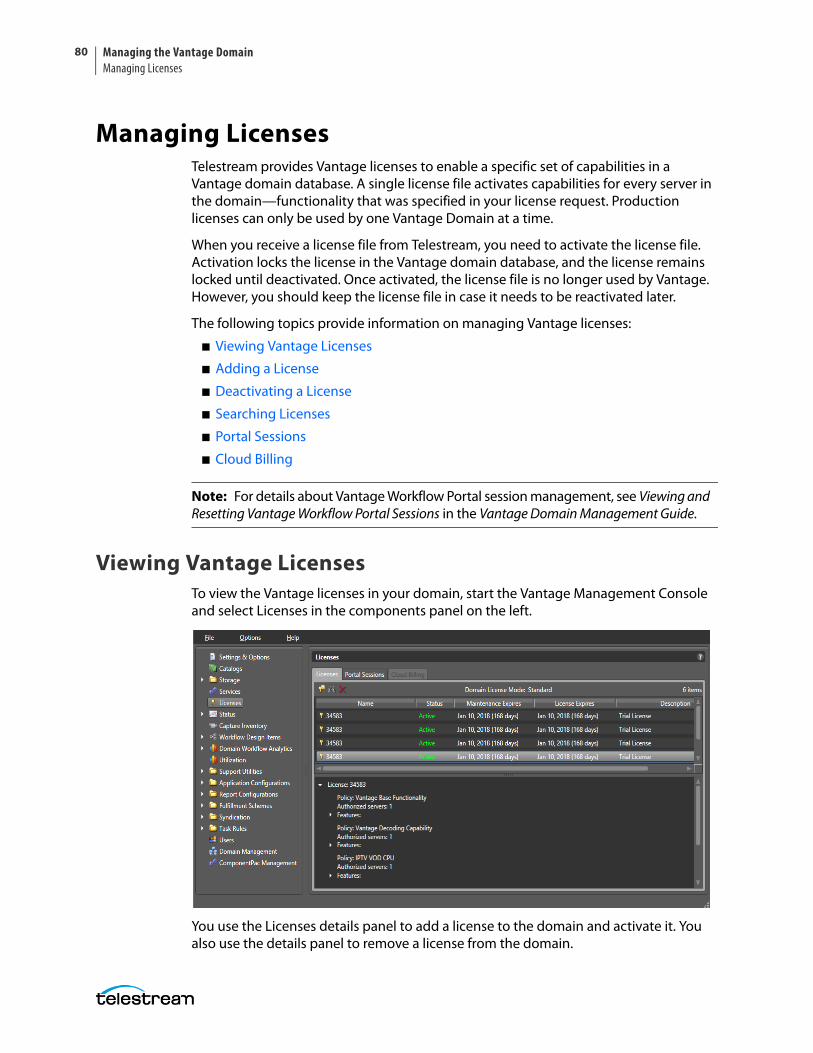
Managing the Vantage DomainManaging Licenses
80
Managing LicensesTelestream provides Vantage licenses to enable a specific set of capabilities in a Vantage domain database. A single license file activates capabilities for every server in the domain—functionality that was specified in your license request. Production licenses can only be used by one Vantage Domain at a time.
When you receive a license file from Telestream, you need to activate the license file. Activation locks the license in the Vantage domain database, and the license remains locked until deactivated. Once activated, the license file is no longer used by Vantage. However, you should keep the license file in case it needs to be reactivated later.
The following topics provide information on managing Vantage licenses:
■ Viewing Vantage Licenses
■ Adding a License
■ Deactivating a License
■ Searching Licenses
■ Portal Sessions
■ Cloud Billing
Note: For details about Vantage Workflow Portal session management, see Viewing and Resetting Vantage Workflow Portal Sessions in the Vantage Domain Management Guide.
Viewing Vantage LicensesTo view the Vantage licenses in your domain, start the Vantage Management Console and select Licenses in the components panel on the left.
You use the Licenses details panel to add a license to the domain and activate it. You also use the details panel to remove a license from the domain.
Managing the Vantage Domain Managing Licenses
81
Select a license to open and view the policies in this license and the associated capabilities it enables.
The tool bar above the license indicates the type of license, such as Standard (a regular license) or Elastic (a license for an Elastic Domain). A license may also indicate status, such as (Elastic: Bursting Suspended); see Cloud Billing later in this section for details about suspended licenses.
Adding a LicenseVantage licenses are normally installed when the domain is installed. For instructions on adding a license, see Enabling Vantage Licenses in the Vantage Domain Management Guide, Installing Vantage chapter.
Deactivating a License
Note: Before deactivating a license, all jobs using the license should be stopped, and all services using the license should be put into Maintenance Mode. Otherwise, the license will report being in use.
To deactivate a license in a domain, select the license and click the Remove license button in the toolbar (or right-click and select Delete). Click Yes to confirm.
When you remove a license, Vantage attempts to deactivate it. A license should only be removed if you intend to install the same license on a different Vantage domain. In this case, the removal process also attempts to deactivate the license. The deactivation process will indicate that the license may be loaded on a different domain. If a license is not deactivated prior to adding it to another Vantage Domain, an error occurs—indicating that the license is currently in use on a different Vantage domain and that it can not be activated a second time.
Managing the Vantage DomainManaging Licenses
82
Searching LicensesYou can search installed licenses for a particular word or feature. For example, if you have forgotten whether you have bought a particular option, such as Aspera, you can enter Aspera in the search field, and any license containing that feature will be listed.
To perform a license search, click the binoculars button to open the search dialog. Then enter the feature you want to search for.
Portal SessionsThe Portal Sessions tab lists Workflow Portal status for any running Workflow Portal clients.
Cloud BillingThe Cloud Billing tab logs information such as if a Metric service has not been enabled for billing reconciliation, the last time Vantage was able to report usage to Telestream Cloud, whether Vantage is able to communicate with Telestream Cloud, and whether bursting has been suspended for the account.
Suspension can occur under these conditions:
• A user-configured cost limit has been exceeded.
• Vantage is not able to contact Telestream Cloud for 24 hours.
• Bursting is suspended by Telestream.
When an Elastic Domain becomes suspended, the Vantage Management Console > Licenses tab indicates:
Domain License Mode: Elastic (Bursting Suspended)
To reactivate a suspended Elastic Domain:
Managing the Vantage Domain Enabling Open Workflows
83
• If bursting was suspended because of an exceeded cost limit, the domain will reac-tivate when the cost limit expires. If you’d like to reactivate the domain sooner, you can delete the cost limit.
• If bursting was suspended because the Vantage Metric service was unable to com-municate with Telestream Cloud for 24 hours, the domain will reactivate itself once connectivity is restored.
• If bursting was suspended by Telestream, a Telestream Support representative must re-activate the domain. While bursting is suspended, Vantage will only enable the number of nodes specified in the perpetual license Fallback notations. For example, if the number of fallback nodes is 1, Vantage will only process jobs on one node at a time.
After bursting is reactivated for the Vantage Elastic Domain, the Licenses tab of the Vantage Management Console will indicate:
Domain License Mode: Elastic
If bursting becomes suspended and then reactivated, waiting jobs at the time of reactivation may not use services licensed through bursting. Any new jobs will properly load balance across all services. Stopping and then restarting waiting jobs (via the Workflow Designer Job Status view) will enable those jobs to use all services.
Enabling Open WorkflowsTo enable or disable the Open Workflows option, do the following:
1. Start the Vantage Management Console as described in Starting the Vantage Management Console in the Vantage Domain Management Guide.
2. In the components panel, select Settings and Options.
3. On the General tab in the details panel, check the Enable Open Workflows checkbox to enable this feature, or clear the checkbox to disable this feature.
4. Click the Save button .
5. Cycle the Vantage services into and out of maintenance mode so the change can take effect.
Note: Enabling Open Workflows requires enabling settings in three locations:
• The Vantage Management Console, Settings & Options, General tab, Enable Open Workflows
• The drop-down menu at the top of each specific workflow in Workflow Designer
• The context (right-click) menu for each action to be used in open mode
You must check to enable Open Workflows in each of the three locations. Additionally, the Open Workflows option license must be purchased and enabled. Not all actions are open-capable. For details, refer to the Tours topic in the Vantage User Guide, which includes an extensive tour of how to use Open Workflows.
Managing the Vantage DomainViewing Status
84
Viewing StatusWhen monitoring Vantage or troubleshooting workflow issues, it can be helpful to see status information (as shown in the following figure) about which workflows and actions are active and view information about those workflows and actions. You can also view machine activity.
The following topics describe how to use Vantage Management Console to get information on the active workflows and actions:
■ Viewing Active Actions
■ Viewing Machine Metrics
■ Viewing the Active Workflows in a Domain
■ Checking Task Status
Managing the Vantage Domain Viewing Status
85
Viewing Active ActionsYou can view the following information about active actions in the Vantage domain:
• Action name
• State
• Host Vantage server (machine)
• Host workflow
• Job name
• Date created
• Date updated
• Description
You can view the active actions for a specific service or a specific Vantage server:
■ Viewing Active Actions for a Service
■ Viewing Active Actions by Machine
Viewing Active Actions for a ServiceTo view the active actions for a service, do the following:
1. Start the Vantage Management Console by double-clicking the desktop icon.
2. In the components panel, select Status > Actions By Service.
3. Select the service that hosts the actions you want to view.
Vantage displays a details panel for the service you selected, which lists all active actions for that service. You can sort action entries in ascending or descending order by clicking a column label.
Note: The Vantage Management Console might not display action list items the first time that the Vantage Management Console is started after installation. To resolve this issue, close and restart the Vantage Management Console.
Viewing Active Actions by MachineTo view the active actions for a Vantage server, do the following:
1. Start the Vantage Management Console by double-clicking the desktop icon.
2. In the components panel, select Status > Actions By Machine.
3. Select the Vantage server that hosts the actions you want to view. Vantage lists all active actions on that server.
You can sort action entries in ascending or descending order by clicking a column label.
Note: The Vantage Management Console might not display action list items the first time it is started after installation. To resolve this issue, close and restart the console.
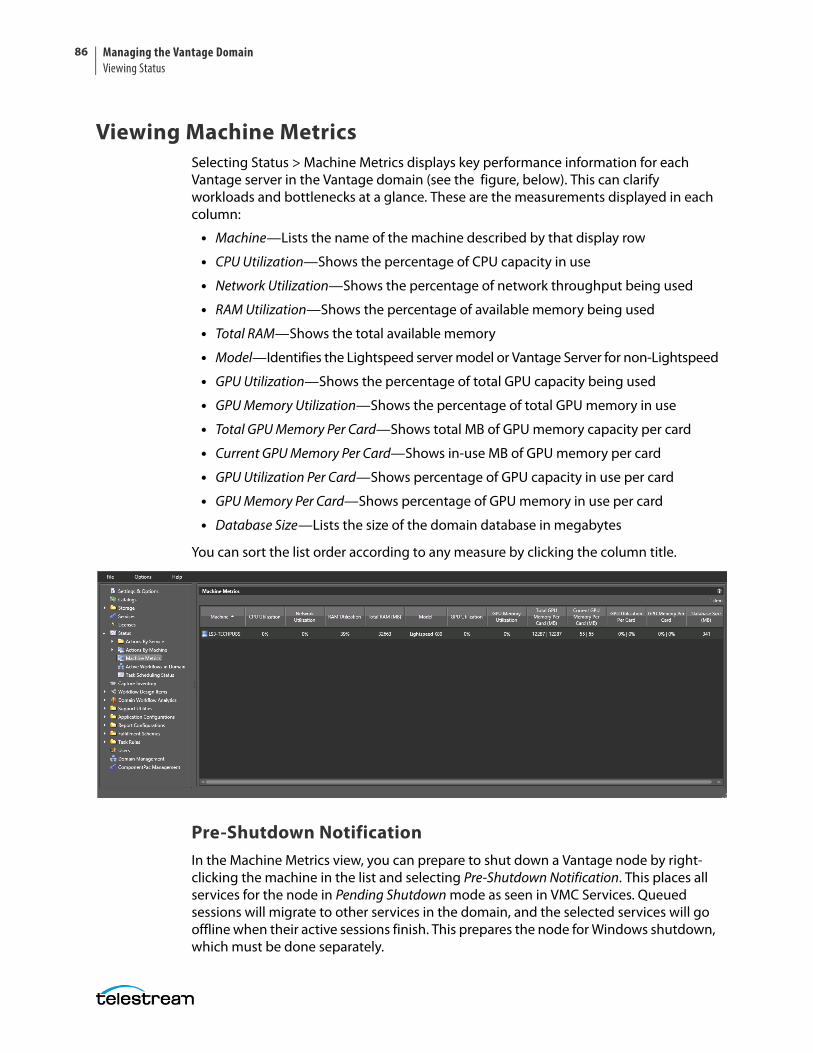
Managing the Vantage DomainViewing Status
86
Viewing Machine MetricsSelecting Status > Machine Metrics displays key performance information for each Vantage server in the Vantage domain (see the figure, below). This can clarify workloads and bottlenecks at a glance. These are the measurements displayed in each column:
• Machine—Lists the name of the machine described by that display row
• CPU Utilization—Shows the percentage of CPU capacity in use
• Network Utilization—Shows the percentage of network throughput being used
• RAM Utilization—Shows the percentage of available memory being used
• Total RAM—Shows the total available memory
• Model—Identifies the Lightspeed server model or Vantage Server for non-Lightspeed
• GPU Utilization—Shows the percentage of total GPU capacity being used
• GPU Memory Utilization—Shows the percentage of total GPU memory in use
• Total GPU Memory Per Card—Shows total MB of GPU memory capacity per card
• Current GPU Memory Per Card—Shows in-use MB of GPU memory per card
• GPU Utilization Per Card—Shows percentage of GPU capacity in use per card
• GPU Memory Per Card—Shows percentage of GPU memory in use per card
• Database Size—Lists the size of the domain database in megabytes
You can sort the list order according to any measure by clicking the column title.
Pre-Shutdown NotificationIn the Machine Metrics view, you can prepare to shut down a Vantage node by right-clicking the machine in the list and selecting Pre-Shutdown Notification. This places all services for the node in Pending Shutdown mode as seen in VMC Services. Queued sessions will migrate to other services in the domain, and the selected services will go offline when their active sessions finish. This prepares the node for Windows shutdown, which must be done separately.
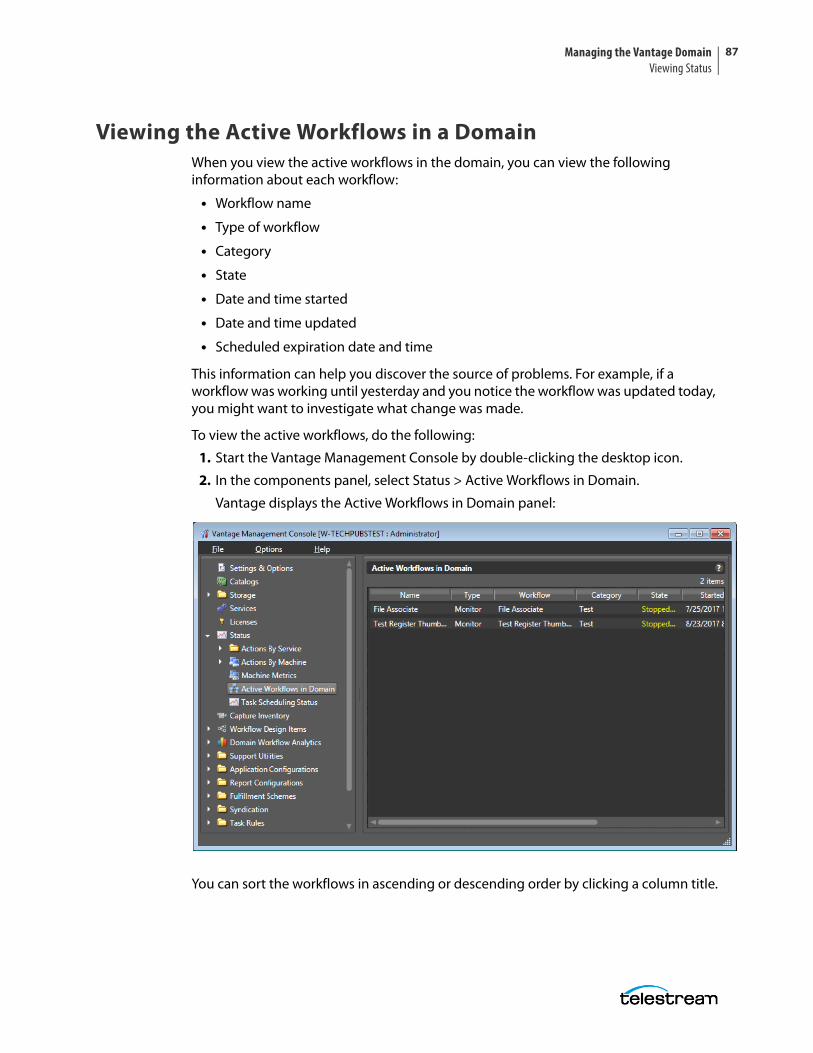
Managing the Vantage Domain Viewing Status
87
Viewing the Active Workflows in a DomainWhen you view the active workflows in the domain, you can view the following information about each workflow:
• Workflow name
• Type of workflow
• Category
• State
• Date and time started
• Date and time updated
• Scheduled expiration date and time
This information can help you discover the source of problems. For example, if a workflow was working until yesterday and you notice the workflow was updated today, you might want to investigate what change was made.
To view the active workflows, do the following:
1. Start the Vantage Management Console by double-clicking the desktop icon.
2. In the components panel, select Status > Active Workflows in Domain.
Vantage displays the Active Workflows in Domain panel:
You can sort the workflows in ascending or descending order by clicking a column title.
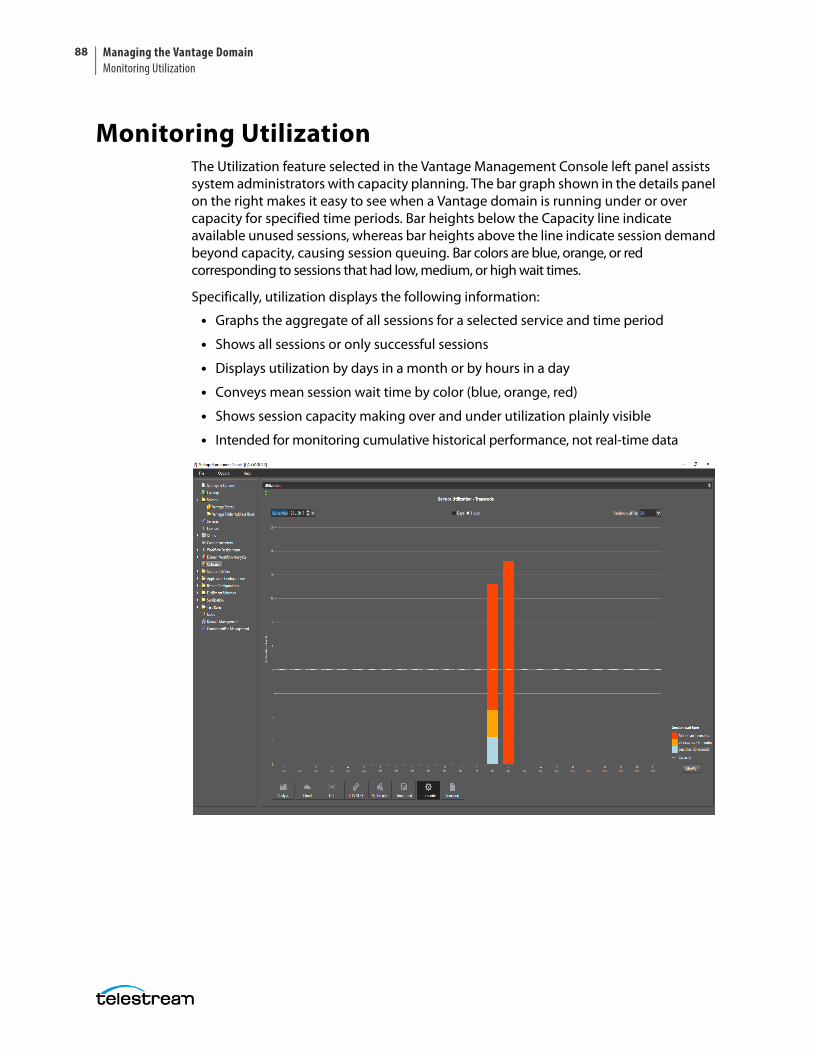
Managing the Vantage DomainMonitoring Utilization
88
Monitoring UtilizationThe Utilization feature selected in the Vantage Management Console left panel assists system administrators with capacity planning. The bar graph shown in the details panel on the right makes it easy to see when a Vantage domain is running under or over capacity for specified time periods. Bar heights below the Capacity line indicate available unused sessions, whereas bar heights above the line indicate session demand beyond capacity, causing session queuing. Bar colors are blue, orange, or red corresponding to sessions that had low, medium, or high wait times.
Specifically, utilization displays the following information:
• Graphs the aggregate of all sessions for a selected service and time period
• Shows all sessions or only successful sessions
• Displays utilization by days in a month or by hours in a day
• Conveys mean session wait time by color (blue, orange, red)
• Shows session capacity making over and under utilization plainly visible
• Intended for monitoring cumulative historical performance, not real-time data

Managing the Vantage Domain Monitoring Utilization
89
Use the Utilization feature as follows:
1. In the top center, select Days or Hours. Days sets the bottom timeline to show all days in the selected month. Hours sets the timeline to show 24 hours in the selected day. Note: For the Utilization feature to work correctly, all Vantage computers must use the same NTP server for synchronized time.
2. In the top left, select a month or day.
3. In the top right, set the session qualifier to display All sessions or only Successful sessions.
4. Scroll the bottom service selector and click a service. The bar graph shows utilization for the selected service.
You can adjust the thresholds indicated by the bar colors as follows:
1. Click Modify in the lower right corner. The Wait Time Thresholds dialog opens.
2. Set the low threshold in seconds indicated by the blue part of the bar.
3. Set the high threshold in seconds indicated by the red part of the bar.
4. Click OK. The units shown in the color legend change to match your settings.
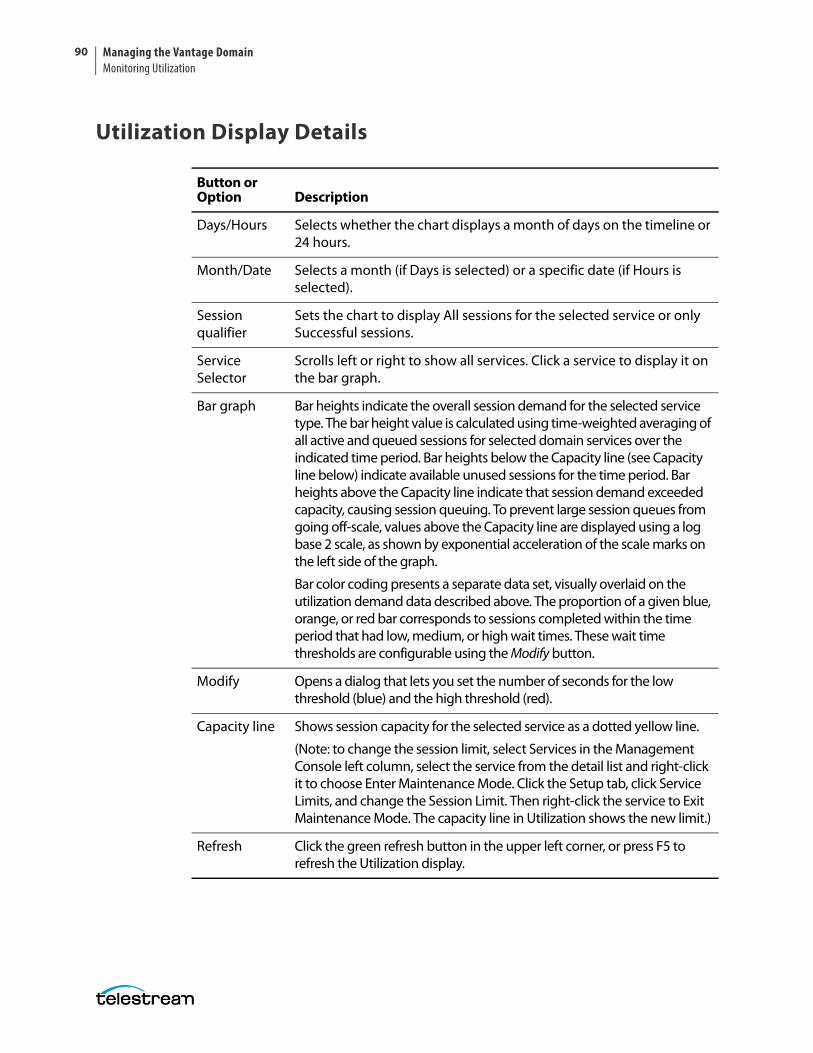
Managing the Vantage DomainMonitoring Utilization
90
Utilization Display Details
Button or Option Description
Days/Hours Selects whether the chart displays a month of days on the timeline or 24 hours.
Month/Date Selects a month (if Days is selected) or a specific date (if Hours is selected).
Session qualifier
Sets the chart to display All sessions for the selected service or only Successful sessions.
Service Selector
Scrolls left or right to show all services. Click a service to display it on the bar graph.
Bar graph Bar heights indicate the overall session demand for the selected service type. The bar height value is calculated using time-weighted averaging of all active and queued sessions for selected domain services over the indicated time period. Bar heights below the Capacity line (see Capacity line below) indicate available unused sessions for the time period. Bar heights above the Capacity line indicate that session demand exceeded capacity, causing session queuing. To prevent large session queues from going off-scale, values above the Capacity line are displayed using a log base 2 scale, as shown by exponential acceleration of the scale marks on the left side of the graph.
Bar color coding presents a separate data set, visually overlaid on the utilization demand data described above. The proportion of a given blue, orange, or red bar corresponds to sessions completed within the time period that had low, medium, or high wait times. These wait time thresholds are configurable using the Modify button.
Modify Opens a dialog that lets you set the number of seconds for the low threshold (blue) and the high threshold (red).
Capacity line Shows session capacity for the selected service as a dotted yellow line.
(Note: to change the session limit, select Services in the Management Console left column, select the service from the detail list and right-click it to choose Enter Maintenance Mode. Click the Setup tab, click Service Limits, and change the Session Limit. Then right-click the service to Exit Maintenance Mode. The capacity line in Utilization shows the new limit.)
Refresh Click the green refresh button in the upper left corner, or press F5 to refresh the Utilization display.
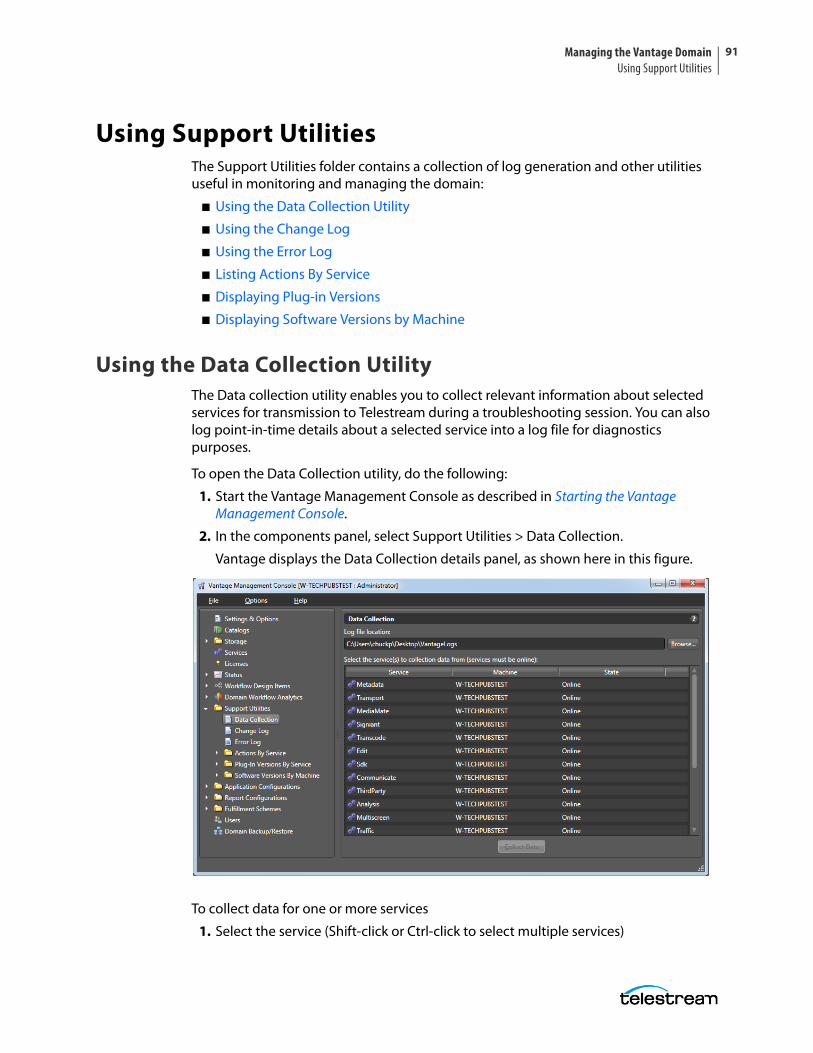
Managing the Vantage Domain Using Support Utilities
91
Using Support UtilitiesThe Support Utilities folder contains a collection of log generation and other utilities useful in monitoring and managing the domain:
■ Using the Data Collection Utility
■ Using the Change Log
■ Using the Error Log
■ Listing Actions By Service
■ Displaying Plug-in Versions
■ Displaying Software Versions by Machine
Using the Data Collection UtilityThe Data collection utility enables you to collect relevant information about selected services for transmission to Telestream during a troubleshooting session. You can also log point-in-time details about a selected service into a log file for diagnostics purposes.
To open the Data Collection utility, do the following:
1. Start the Vantage Management Console as described in Starting the Vantage Management Console.
2. In the components panel, select Support Utilities > Data Collection.
Vantage displays the Data Collection details panel, as shown here in this figure.
To collect data for one or more services
1. Select the service (Shift-click or Ctrl-click to select multiple services)
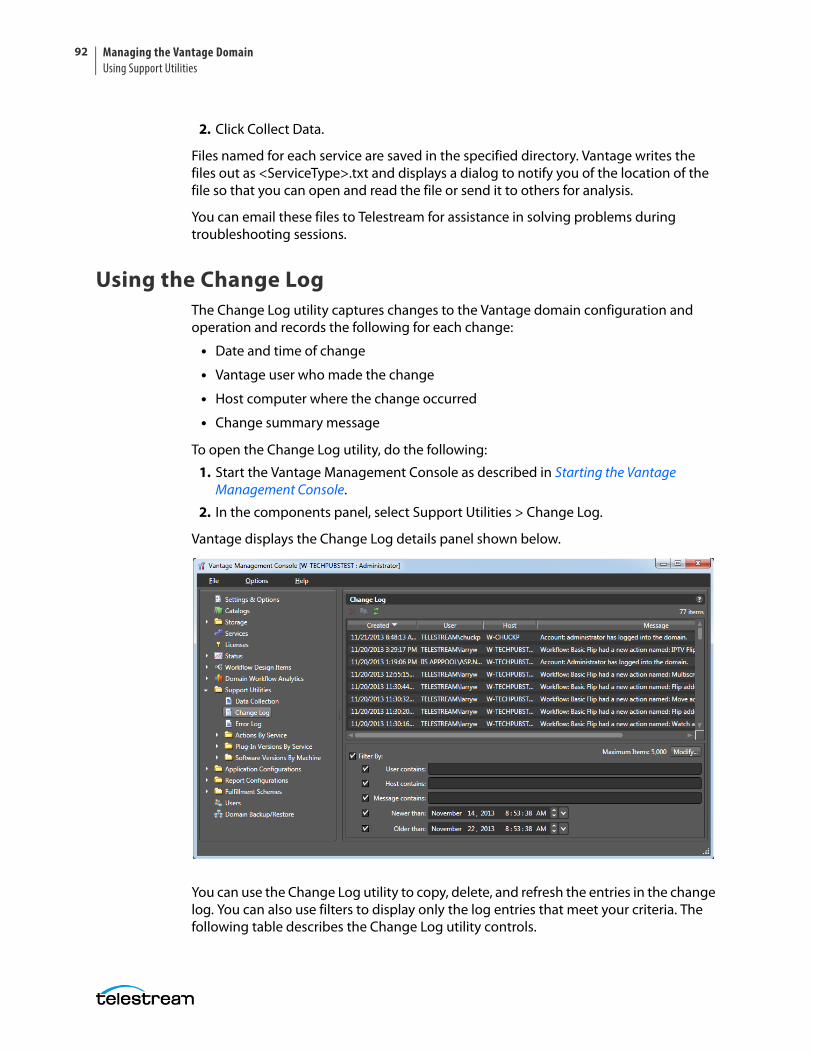
Managing the Vantage DomainUsing Support Utilities
92
2. Click Collect Data.
Files named for each service are saved in the specified directory. Vantage writes the files out as <ServiceType>.txt and displays a dialog to notify you of the location of the file so that you can open and read the file or send it to others for analysis.
You can email these files to Telestream for assistance in solving problems during troubleshooting sessions.
Using the Change LogThe Change Log utility captures changes to the Vantage domain configuration and operation and records the following for each change:
• Date and time of change
• Vantage user who made the change
• Host computer where the change occurred
• Change summary message
To open the Change Log utility, do the following:
1. Start the Vantage Management Console as described in Starting the Vantage Management Console.
2. In the components panel, select Support Utilities > Change Log.
Vantage displays the Change Log details panel shown below.
You can use the Change Log utility to copy, delete, and refresh the entries in the change log. You can also use filters to display only the log entries that meet your criteria. The following table describes the Change Log utility controls.
Managing the Vantage Domain Using Support Utilities
93
Button or Option Description
Delete button To delete one or more change log records, select the records to delete and do one of the following:
• Click the Delete button.• Right-click a selected entry and select Delete.
Copy button To copy one or more change log records to the clipboard, select the records to copy and do one of the following:
• Click the Copy button.• Right-click a selected entry and select Copy.• Press Ctrl-C on the keyboard.
After you copy change log entries, you can paste the records into another application document, such as a spreadsheet or word processing document.
Refresh button
Click to update the table from the database.
Filter By Check Filter by to enable the filtering controls.
Modify Click Modify to display a dialog that enables you to specify the maximum number of log items.
User contains Specifies change log entries that contain the specified text in the User field.
Host contains Specifies change log entries that contain the specified text in the Host field.
Message contains
Specifies change log entries that contain the specified text in the Message field.
Newer than Displays change log entries that are newer than the specified date.
Older than Displays change log entries that are older than the specified date.
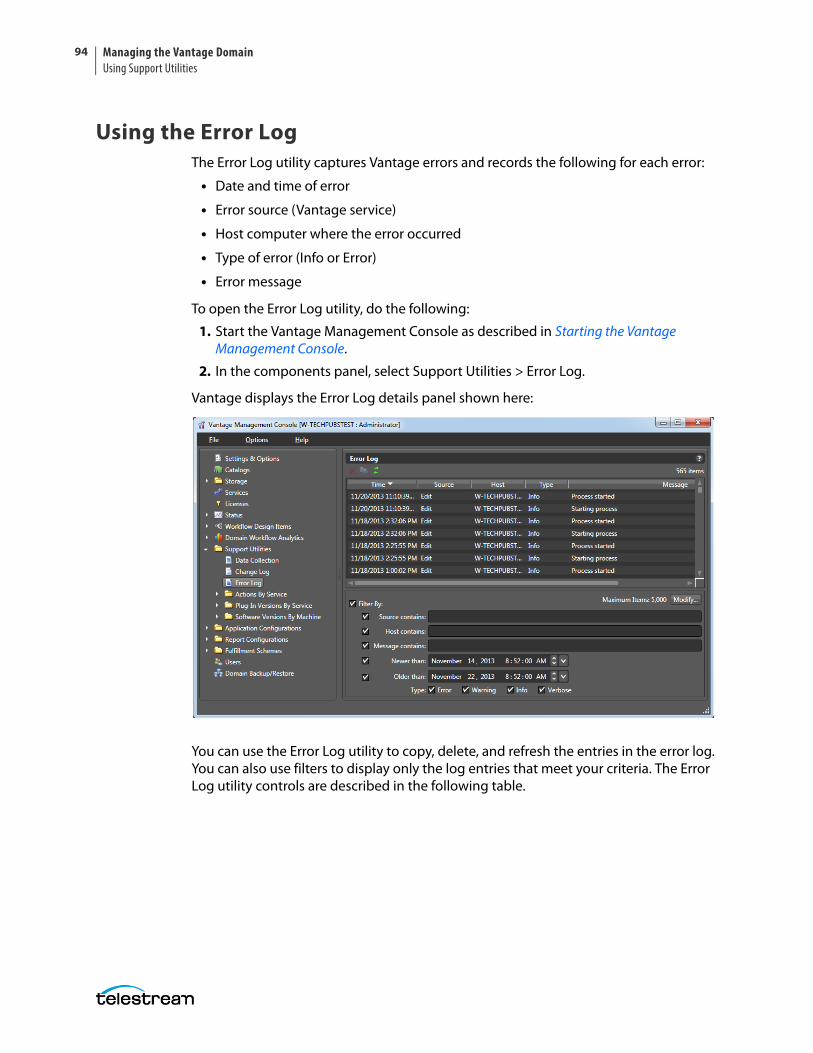
Managing the Vantage DomainUsing Support Utilities
94
Using the Error LogThe Error Log utility captures Vantage errors and records the following for each error:
• Date and time of error
• Error source (Vantage service)
• Host computer where the error occurred
• Type of error (Info or Error)
• Error message
To open the Error Log utility, do the following:
1. Start the Vantage Management Console as described in Starting the Vantage Management Console.
2. In the components panel, select Support Utilities > Error Log.
Vantage displays the Error Log details panel shown here:
You can use the Error Log utility to copy, delete, and refresh the entries in the error log. You can also use filters to display only the log entries that meet your criteria. The Error Log utility controls are described in the following table.
Managing the Vantage Domain Using Support Utilities
95
Button or Option Description
Delete button To delete one or more error log records, select the records to delete and do one of the following:
• Click the Delete button.• Right-click a selected entry and select Delete.
Copy button To copy one or more error log records to the clipboard, select the records to copy and do one of the following:
• Click the Copy button.• Right-click a selected entry and select Copy.• Press Ctrl-C on the keyboard.
After you copy error log entries, you can paste the records into another application document, such as a spreadsheet or word processing document.
Refresh button
Click to update the error log display.
Filter By Check Filter by to enable the filtering controls.
Modify Click Modify to display a dialog that enables you to specify the maximum number of log items.
User contains Specifies error log entries containing the specified text in the User field.
Host contains Specifies error log entries containing the specified text in the Host field.
Message contains
Specifies error log entries containing the specified text in the Message field.
Newer than Displays error log entries that are new than the specified date.
Older than Displays error log entries that are older than the specified date.
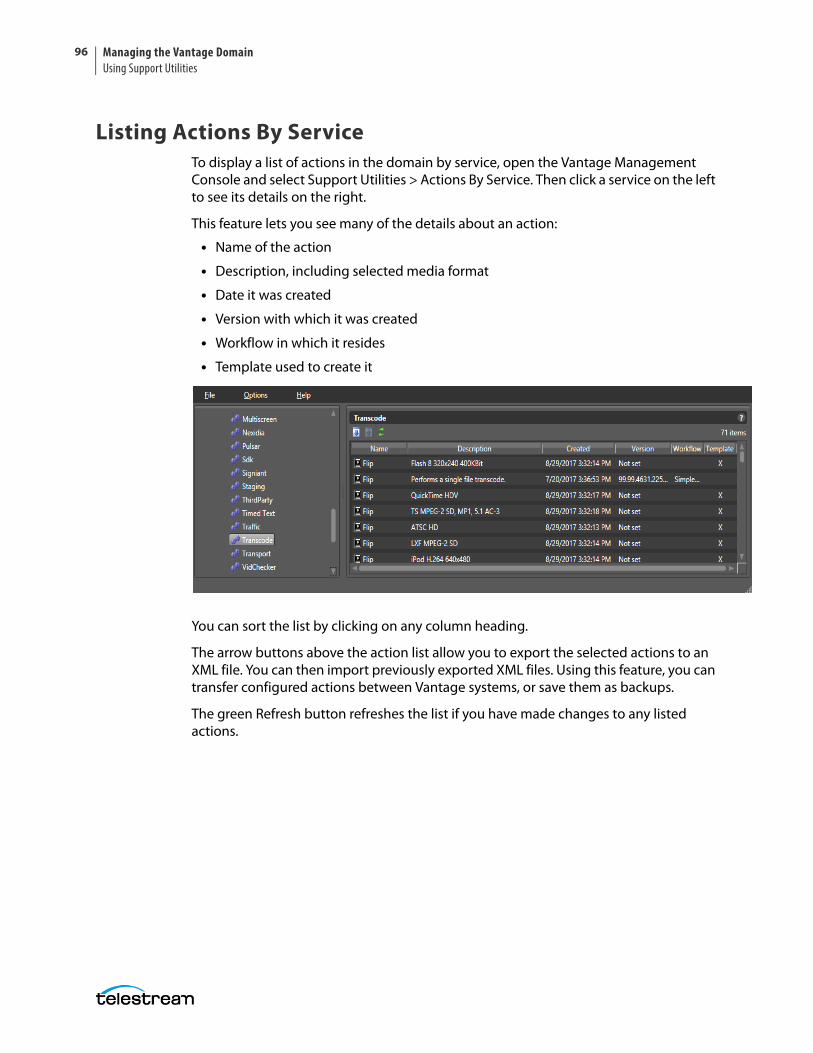
Managing the Vantage DomainUsing Support Utilities
96
Listing Actions By ServiceTo display a list of actions in the domain by service, open the Vantage Management Console and select Support Utilities > Actions By Service. Then click a service on the left to see its details on the right.
This feature lets you see many of the details about an action:
• Name of the action
• Description, including selected media format
• Date it was created
• Version with which it was created
• Workflow in which it resides
• Template used to create it
You can sort the list by clicking on any column heading.
The arrow buttons above the action list allow you to export the selected actions to an XML file. You can then import previously exported XML files. Using this feature, you can transfer configured actions between Vantage systems, or save them as backups.
The green Refresh button refreshes the list if you have made changes to any listed actions.
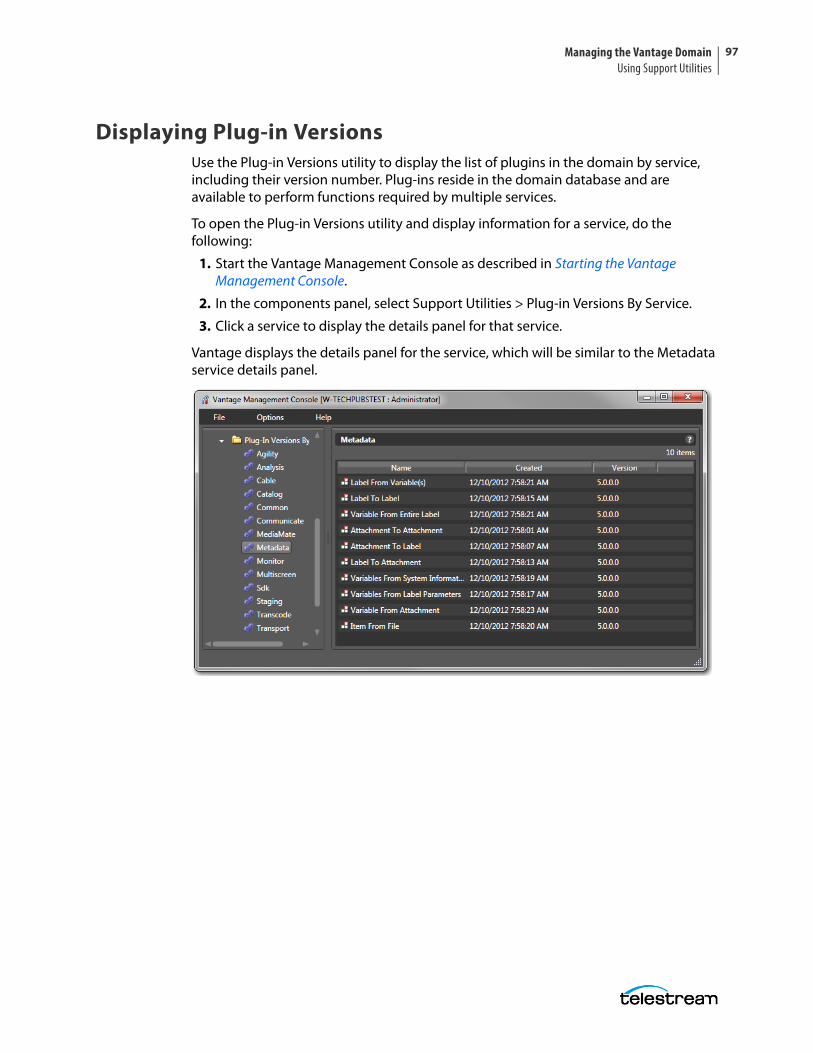
Managing the Vantage Domain Using Support Utilities
97
Displaying Plug-in VersionsUse the Plug-in Versions utility to display the list of plugins in the domain by service, including their version number. Plug-ins reside in the domain database and are available to perform functions required by multiple services.
To open the Plug-in Versions utility and display information for a service, do the following:
1. Start the Vantage Management Console as described in Starting the Vantage Management Console.
2. In the components panel, select Support Utilities > Plug-in Versions By Service.
3. Click a service to display the details panel for that service.
Vantage displays the details panel for the service, which will be similar to the Metadata service details panel.
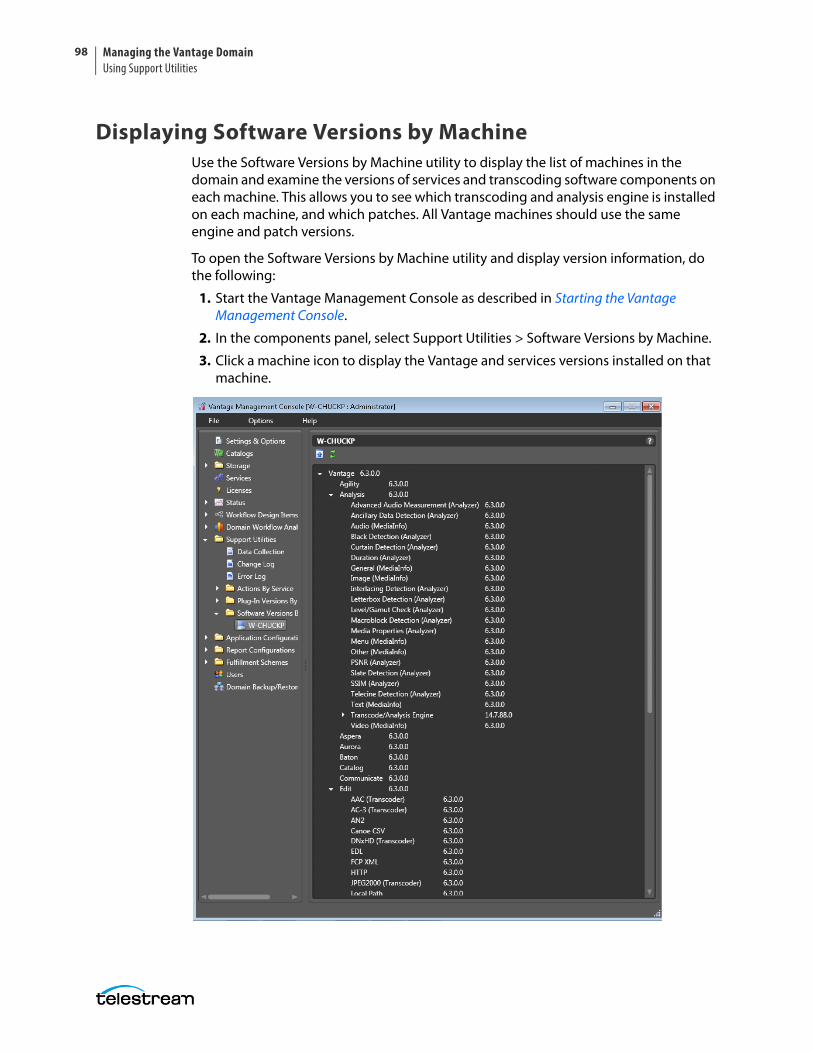
Managing the Vantage DomainUsing Support Utilities
98
Displaying Software Versions by MachineUse the Software Versions by Machine utility to display the list of machines in the domain and examine the versions of services and transcoding software components on each machine. This allows you to see which transcoding and analysis engine is installed on each machine, and which patches. All Vantage machines should use the same engine and patch versions.
To open the Software Versions by Machine utility and display version information, do the following:
1. Start the Vantage Management Console as described in Starting the Vantage Management Console.
2. In the components panel, select Support Utilities > Software Versions by Machine.
3. Click a machine icon to display the Vantage and services versions installed on that machine.
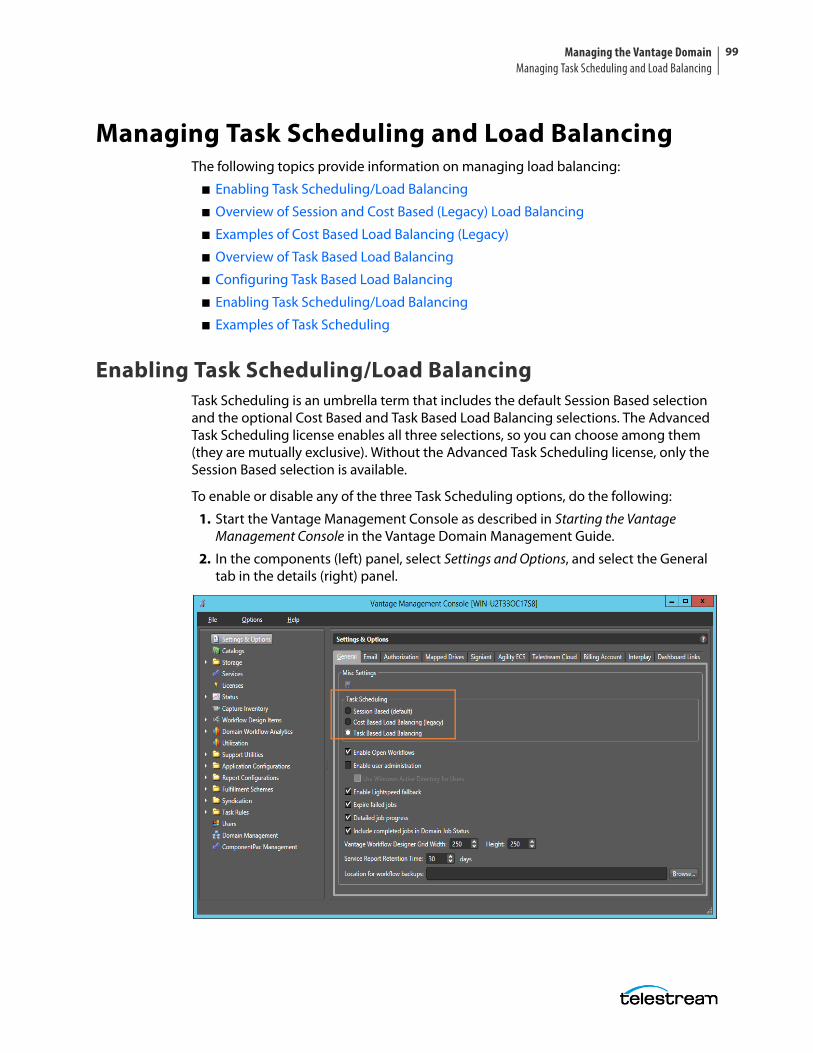
Managing the Vantage Domain Managing Task Scheduling and Load Balancing
99
Managing Task Scheduling and Load BalancingThe following topics provide information on managing load balancing:
■ Enabling Task Scheduling/Load Balancing
■ Overview of Session and Cost Based (Legacy) Load Balancing
■ Examples of Cost Based Load Balancing (Legacy)
■ Overview of Task Based Load Balancing
■ Configuring Task Based Load Balancing
■ Enabling Task Scheduling/Load Balancing
■ Examples of Task Scheduling
Enabling Task Scheduling/Load BalancingTask Scheduling is an umbrella term that includes the default Session Based selection and the optional Cost Based and Task Based Load Balancing selections. The Advanced Task Scheduling license enables all three selections, so you can choose among them (they are mutually exclusive). Without the Advanced Task Scheduling license, only the Session Based selection is available.
To enable or disable any of the three Task Scheduling options, do the following:
1. Start the Vantage Management Console as described in Starting the Vantage Management Console in the Vantage Domain Management Guide.
2. In the components (left) panel, select Settings and Options, and select the General tab in the details (right) panel.
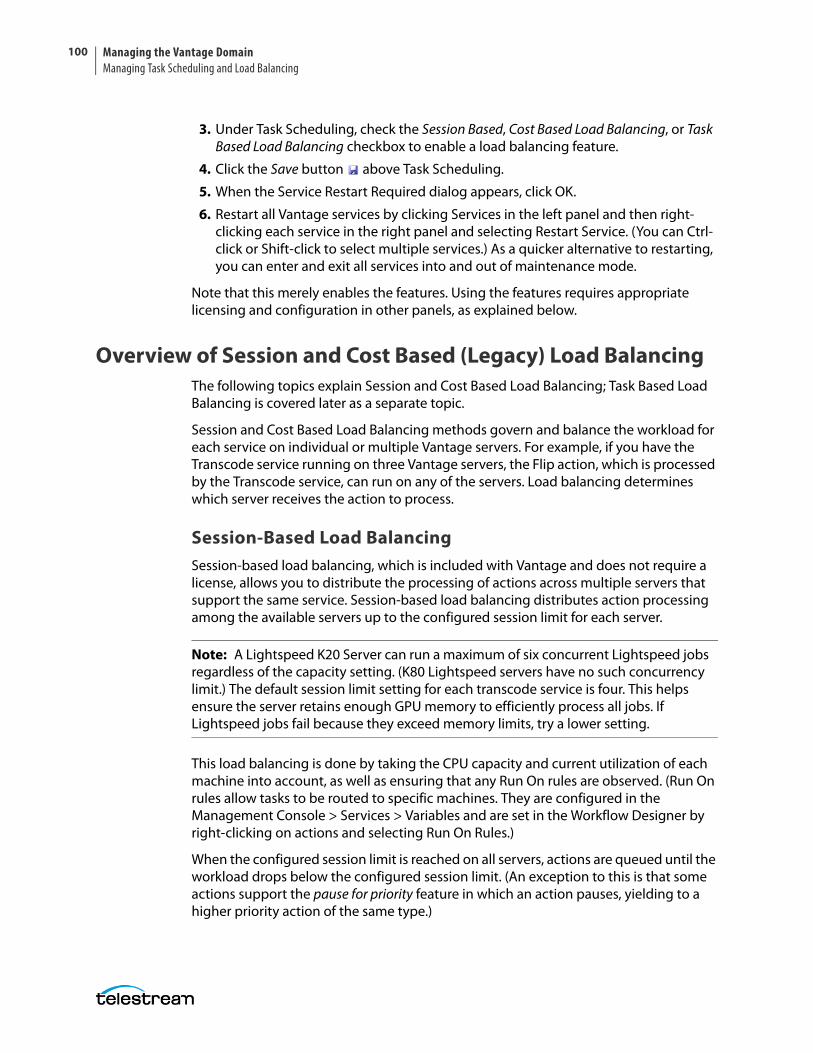
Managing the Vantage DomainManaging Task Scheduling and Load Balancing
100
3. Under Task Scheduling, check the Session Based, Cost Based Load Balancing, or Task Based Load Balancing checkbox to enable a load balancing feature.
4. Click the Save button above Task Scheduling.
5. When the Service Restart Required dialog appears, click OK.
6. Restart all Vantage services by clicking Services in the left panel and then right-clicking each service in the right panel and selecting Restart Service. (You can Ctrl-click or Shift-click to select multiple services.) As a quicker alternative to restarting, you can enter and exit all services into and out of maintenance mode.
Note that this merely enables the features. Using the features requires appropriate licensing and configuration in other panels, as explained below.
Overview of Session and Cost Based (Legacy) Load BalancingThe following topics explain Session and Cost Based Load Balancing; Task Based Load Balancing is covered later as a separate topic.
Session and Cost Based Load Balancing methods govern and balance the workload for each service on individual or multiple Vantage servers. For example, if you have the Transcode service running on three Vantage servers, the Flip action, which is processed by the Transcode service, can run on any of the servers. Load balancing determines which server receives the action to process.
Session-Based Load BalancingSession-based load balancing, which is included with Vantage and does not require a license, allows you to distribute the processing of actions across multiple servers that support the same service. Session-based load balancing distributes action processing among the available servers up to the configured session limit for each server.
Note: A Lightspeed K20 Server can run a maximum of six concurrent Lightspeed jobs regardless of the capacity setting. (K80 Lightspeed servers have no such concurrency limit.) The default session limit setting for each transcode service is four. This helps ensure the server retains enough GPU memory to efficiently process all jobs. If Lightspeed jobs fail because they exceed memory limits, try a lower setting.
This load balancing is done by taking the CPU capacity and current utilization of each machine into account, as well as ensuring that any Run On rules are observed. (Run On rules allow tasks to be routed to specific machines. They are configured in the Management Console > Services > Variables and are set in the Workflow Designer by right-clicking on actions and selecting Run On Rules.)
When the configured session limit is reached on all servers, actions are queued until the workload drops below the configured session limit. (An exception to this is that some actions support the pause for priority feature in which an action pauses, yielding to a higher priority action of the same type.)
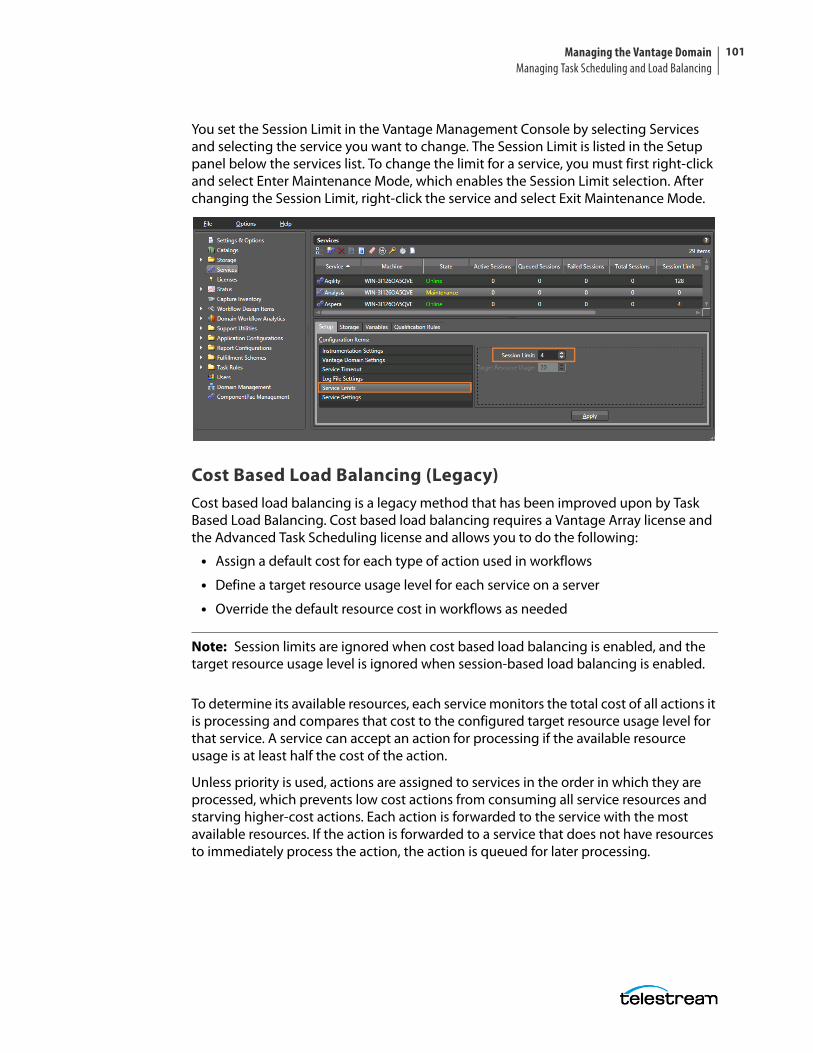
Managing the Vantage Domain Managing Task Scheduling and Load Balancing
101
You set the Session Limit in the Vantage Management Console by selecting Services and selecting the service you want to change. The Session Limit is listed in the Setup panel below the services list. To change the limit for a service, you must first right-click and select Enter Maintenance Mode, which enables the Session Limit selection. After changing the Session Limit, right-click the service and select Exit Maintenance Mode.
Cost Based Load Balancing (Legacy)Cost based load balancing is a legacy method that has been improved upon by Task Based Load Balancing. Cost based load balancing requires a Vantage Array license and the Advanced Task Scheduling license and allows you to do the following:
• Assign a default cost for each type of action used in workflows
• Define a target resource usage level for each service on a server
• Override the default resource cost in workflows as needed
Note: Session limits are ignored when cost based load balancing is enabled, and the target resource usage level is ignored when session-based load balancing is enabled.
To determine its available resources, each service monitors the total cost of all actions it is processing and compares that cost to the configured target resource usage level for that service. A service can accept an action for processing if the available resource usage is at least half the cost of the action.
Unless priority is used, actions are assigned to services in the order in which they are processed, which prevents low cost actions from consuming all service resources and starving higher-cost actions. Each action is forwarded to the service with the most available resources. If the action is forwarded to a service that does not have resources to immediately process the action, the action is queued for later processing.
Managing the Vantage DomainManaging Task Scheduling and Load Balancing
102
To implement cost based load balancing, enable the feature (as described in Enabling Task Scheduling/Load Balancing) and monitor the following:
• The server performance using server monitoring tools.
• The Services panel in the Vantage Management Console, which displays a list of services, including the current and target resource usage levels. For more informa-tion, see Using the Services Details Panel.
If the server is under- or over-loaded, you might adjust the default target resource usage level for each service as described in Configuring Vantage Services.
To adjust the default resource cost of an action, search for Managing Actions in the Domain Management Guide. For information on overriding an action’s default resource cost in a workflow, see the Vantage User Guide.
Examples of Cost Based Load Balancing (Legacy)You can use the target resource usage setting to limit the total action cost that a service will simultaneously process. For example, if you configure the Transcode service for a target resource usage of 16 and you configure the default Flip action resource cost to 4, the Transcode service supports a maximum of 4 simultaneous Flip actions.
Some services support multiple actions, and you can set the action resource cost for each action to a different value to define the relative usage levels. For example, the Transport service supports the Copy, Delete, Deploy, and Move actions, which are assigned default resource costs of 2, 1, 1, and 2, respectively. Based on the default values, a Transport service can support twice as many Delete and Deploy actions as Copy and Move actions.
Different codecs require different levels of processing resources. Using Workflow Designer, you can override the default resource cost for specific actions within a workflow. For example, you might configure a Transcode service to target resource usage of 16, specify a resource cost of 1 for a 3GP Flip action, and a resource cost of 8 for an MPEG-2 HD Flip action. During load balancing, Vantage will ensure that:
• No more than two MPEG-2 HD jobs execute simultaneously
• Up to 16 3GP jobs can execute simultaneously
• One MPEG-2 HD and eight 3GP jobs can execute simultaneously in ideal situations
• MPEG-2 jobs are not starved by 3GP jobs which only require one slot
Note: Resource costs are integer values that have an ordinal relationship. You can implement any scale. Greater scales enable finer-grained control.
Managing the Vantage Domain Managing Task Scheduling and Load Balancing
103
Overview of Task Based Load BalancingVantage Task Based load balancing is Vantage's most advanced load balancing capability and augments the existing Vantage Session Based load balancing and the Vantage Cost Based load balancing. Task Based load balancing ensures that all Vantage servers remain fully utilized, maximizing server efficiency and increasing workflow throughput. Task Based load balancing also helps avoid the situation where some Vantage servers are over utilized and others are under-utilized.
The older session-based and cost based methods discussed previously are limited to a single service on a single machine. These methods can prevent a service from becoming overloaded, but they cannot effectively balance between different types of actions on a single machine, and they do not offer a global way of managing sessions across multiple machines.
Task based load balancing is a separately licensed option that provides a single set of metrics shared across all services for scheduling tasks and balancing workload on a single machine or all the machines in a domain.
These are the key features of task based load balancing:
• Each metric can be edited and has machine scope (across all services on the machine) or global scope (across all services on all machines).
• Each metric has two inputs: Cost (set for each action) and Capacity (set per machine, or globally). You can edit both on a per-machine basis (for per-machine metrics) or for the entire Vantage Domain (for global metrics).
• A default metric called System Resources is pre-configured to provide a per-machine metric. This metric cannot be deleted and must remain per-machine. However, you may set the capacity for this metric on each machine, and you may remove the metric from an individual action.
• You can create and name your own new metrics.
• By default, each metric has machine scope, but you can edit this after creation.
• The default capacity is 100 “units” for each machine, allowing each cost to indicate the resource percentage an action will use. The capacity can be changed.
• You can choose which metrics are relevant to an action, and you can set the cost for each action.
• When executing a task:
– Vantage evaluates all metrics that you attach to the action. If a metric is not attached to an action, it is not considered.
– Vantage tracks the aggregate cost of all executing actions on a machine, across all machine-based metrics, and will track the aggregate cost of executing actions across the entire system for global metrics.
– Vantage only executes an action when the aggregate cost of executing current actions, plus the new task, does not exceed the capacity of any of the metrics attached to the task.
Managing the Vantage DomainManaging Task Scheduling and Load Balancing
104
Vantage will never execute a task when the aggregate cost of executing actions, including the new task, would exceed the capacity of any of the metrics attached to the task.
• When tasks are queued, they may be pre-empted only by higher priority actions:
– Certain high priority tasks will pause an appropriate number of low priority tasks (executing on the same service on the same machine) to free up sufficient resources across all metrics, to allow that high priority task to execute. If doing so would exceed the maximum number of paused jobs specified by the user, then the high priority task will wait until a different set of tasks are present which may be paused. Pauses will not occur across multiple machines; they occur only for actions hosted by the same service.
The new task based load balancing capability allows you to define custom task scheduling rules which allow jobs to be controlled/allocated based on criteria on a given machine or across an entire domain.
Vantage task based load balancing is enabled via the settings panel in the Vantage Management Console. As with other system level settings, when task based load balancing is enabled (or changed), services must be restarted to implement the new settings.
Task based load balancing includes capabilities that replace and extend the Cost based load balancing mode. The new capabilities replace the existing action cost mechanisms, and are used in-conjunction with the existing service capacity to provide more granularity on when and where an action may run.
Configuring Task Based Load BalancingThe following topics explain how to configure task based load balancing. The overall process consists of these steps:
1. Install the Advanced Task Scheduling license via the Vantage Management Console > Licenses panel.
2. Enable Task Based Load Balancing in Vantage Management Console > Settings & Options > General.
3. Put all Vantage services in Maintenance mode
4. .Set Service and Session limits for each service in the Vantage Management Console > Services panel. This limits how many actions can run within a given service to prevent service overload.
5. Take the services out of Maintenance mode to restart them.
6. Create machine and domain rules in the Vantage Management Console > Task Rules > Task Scheduling Rules. You can create multiple rules to govern machine and domain capacities under different operating circumstances.
7. Adjust the capacity of rules for machines and domains using the Vantage Management Console > Task Rules > Task Capacity Manager.
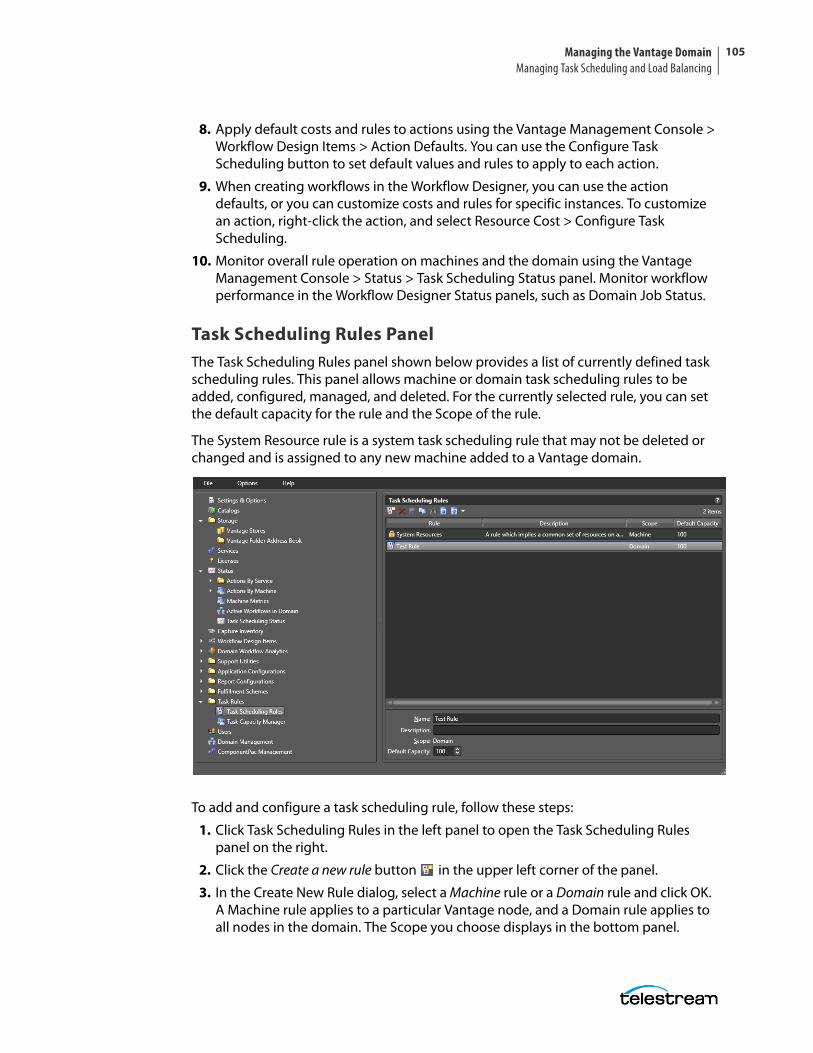
Managing the Vantage Domain Managing Task Scheduling and Load Balancing
105
8. Apply default costs and rules to actions using the Vantage Management Console > Workflow Design Items > Action Defaults. You can use the Configure Task Scheduling button to set default values and rules to apply to each action.
9. When creating workflows in the Workflow Designer, you can use the action defaults, or you can customize costs and rules for specific instances. To customize an action, right-click the action, and select Resource Cost > Configure Task Scheduling.
10. Monitor overall rule operation on machines and the domain using the Vantage Management Console > Status > Task Scheduling Status panel. Monitor workflow performance in the Workflow Designer Status panels, such as Domain Job Status.
Task Scheduling Rules PanelThe Task Scheduling Rules panel shown below provides a list of currently defined task scheduling rules. This panel allows machine or domain task scheduling rules to be added, configured, managed, and deleted. For the currently selected rule, you can set the default capacity for the rule and the Scope of the rule.
The System Resource rule is a system task scheduling rule that may not be deleted or changed and is assigned to any new machine added to a Vantage domain.
To add and configure a task scheduling rule, follow these steps:
1. Click Task Scheduling Rules in the left panel to open the Task Scheduling Rules panel on the right.
2. Click the Create a new rule button in the upper left corner of the panel.
3. In the Create New Rule dialog, select a Machine rule or a Domain rule and click OK. A Machine rule applies to a particular Vantage node, and a Domain rule applies to all nodes in the domain. The Scope you choose displays in the bottom panel.
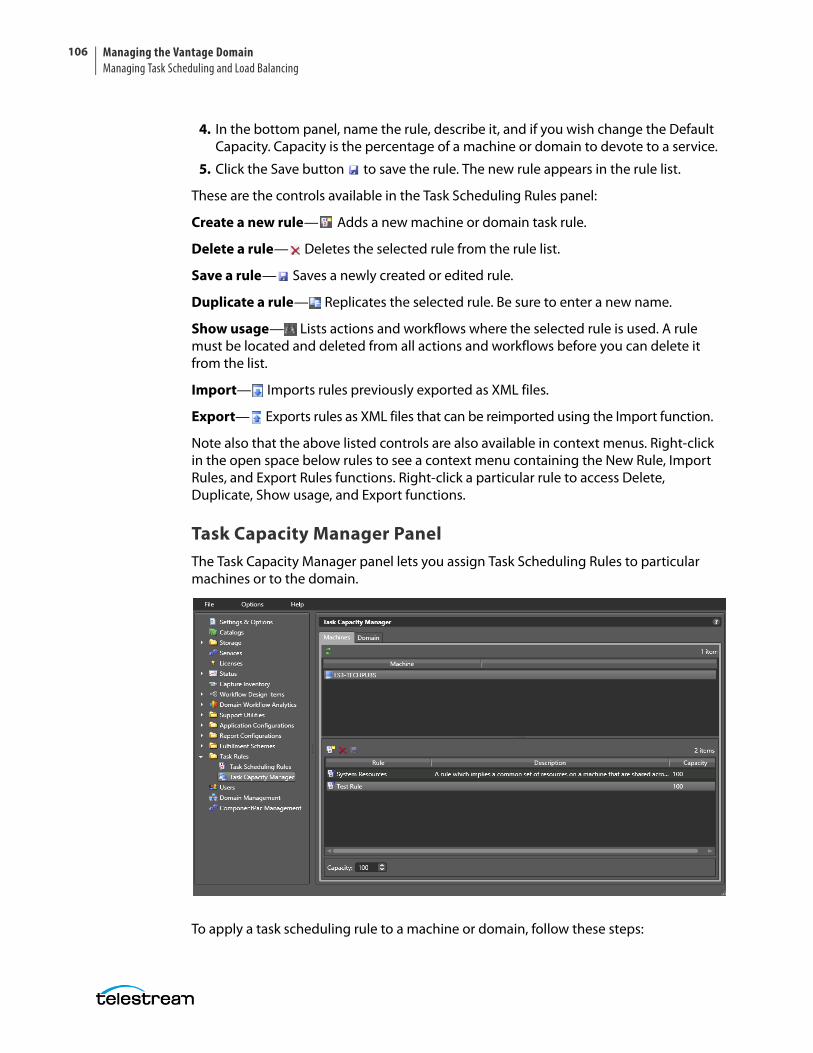
Managing the Vantage DomainManaging Task Scheduling and Load Balancing
106
4. In the bottom panel, name the rule, describe it, and if you wish change the Default Capacity. Capacity is the percentage of a machine or domain to devote to a service.
5. Click the Save button to save the rule. The new rule appears in the rule list.
These are the controls available in the Task Scheduling Rules panel:
Create a new rule— Adds a new machine or domain task rule.
Delete a rule— Deletes the selected rule from the rule list.
Save a rule— Saves a newly created or edited rule.
Duplicate a rule— Replicates the selected rule. Be sure to enter a new name.
Show usage— Lists actions and workflows where the selected rule is used. A rule must be located and deleted from all actions and workflows before you can delete it from the list.
Import— Imports rules previously exported as XML files.
Export— Exports rules as XML files that can be reimported using the Import function.
Note also that the above listed controls are also available in context menus. Right-click in the open space below rules to see a context menu containing the New Rule, Import Rules, and Export Rules functions. Right-click a particular rule to access Delete, Duplicate, Show usage, and Export functions.
Task Capacity Manager PanelThe Task Capacity Manager panel lets you assign Task Scheduling Rules to particular machines or to the domain.
To apply a task scheduling rule to a machine or domain, follow these steps:
Managing the Vantage Domain Managing Task Scheduling and Load Balancing
107
1. Click Task Capacity Manager in the left panel to open the Task Capacity Manager right panel.
2. Click the Machines tab to add rules to a machine, or click the Domain tab to add rules to the domain.
3. For machines, select the machine to which you want to apply a rule; for the domain, no selection is required.
4. Click the Add rule button, and select a rule from the list to apply to the domain or the selected machine.
5. At the bottom of the panel, set the Capacity that you want to apply.
6. Click the Save button to save your changes. Once saved, rules cannot be changed without putting Vantage services into maintenance mode.
These are the controls for the Task Capacity Manager Panel:
Refresh— Refreshes the machine list to detect machines that have come online.
Add a rule— Adds a rule to the selected machine or domain.
Delete a rule— Deletes the selected rule from the rule list.
Save a rule— Saves changes to added rules.
Capacity—Changes the maximum percentage capacity allocated to a rule.
Action Task SchedulingTo add task scheduling rules to actions in a workflow, follow these steps in the Vantage Workflow Designer.
1. Right-click the action, and select Configure Task Scheduling.
2. In the Task Scheduling Rules dialog, select Custom or Default. Use Custom to apply rules you’ve created. Use Default to apply existing system rules.
3. Select the rule you wish to apply to the action from the Rule list.
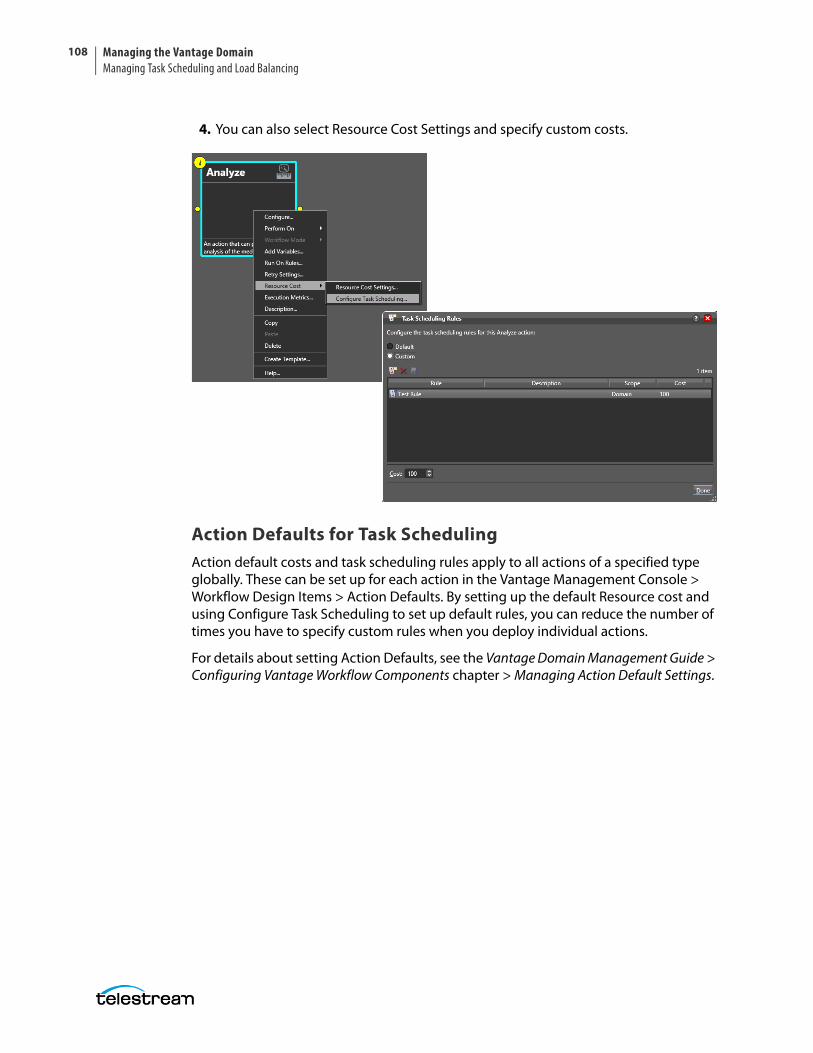
Managing the Vantage DomainManaging Task Scheduling and Load Balancing
108
4. You can also select Resource Cost Settings and specify custom costs.
Action Defaults for Task Scheduling Action default costs and task scheduling rules apply to all actions of a specified type globally. These can be set up for each action in the Vantage Management Console > Workflow Design Items > Action Defaults. By setting up the default Resource cost and using Configure Task Scheduling to set up default rules, you can reduce the number of times you have to specify custom rules when you deploy individual actions.
For details about setting Action Defaults, see the Vantage Domain Management Guide > Configuring Vantage Workflow Components chapter > Managing Action Default Settings.

Managing the Vantage Domain Managing Task Scheduling and Load Balancing
109
Checking Task StatusTo check the status of running task rules, click Task Scheduling Status in the Vantage Management Console left panel. The state of machine and domain rules is displayed.
Examples of Task SchedulingThe following brief examples present scenarios where load balancing may be useful:
Example: The user sets the Transcode Service session limit to 6 and creates a new Rule called Transcode with a capacity of 100 associated with machine #1. The user then defines a Flip action and specifies a cost of 10. The user starts the workflow with this action and submits 10 jobs.
Because the session limit is explicitly set at 6, only 6 jobs execute despite the capacity of of 100 specified in the rule and the fact that only 60 units of cost are used.
If the user stops the transcode service and changes the session limit to 12, restarts the workflow and re-submits 10 jobs, all 10 would execute (since the cost of each job is 10 and the machine has a capacity of 100). If the user submitted 2 additional jobs; these would queue (since the capacity of the machine is limited to 100 and there are 10 actions running (each with a cost of 10).
Example: The user installs Vantage and enables task based load balancing. By default, all Multiscreen and IPTV VOD transcodes have a System Resource cost of 25, and each machine has a capacity of 100. By default, only 4 transcoding jobs of any type will run on each machine.
Example: The user sets the System Resources cost of a Multiscreen action to 100 and the cost of another IPTV VOD action to 50. The capacity of each machine is the default (100). Now only one of the Multiscreen jobs, or two of the IPTV VOD jobs, can execute at a time.
Example: The user creates a machine-level rule called “FTP Sessions” and sets the machine capacity for “FTP Sessions” to 1. The user then adds “FTP Sessions” to a Transport action, and sets the cost to 1. This limits the number of FTP transfers from

Managing the Vantage DomainManaging Task Scheduling and Load Balancing
110
that machine to one at a time, which is useful for FTP sites that can only allow one connection from a machine at a time.
Example: The user creates a rule called “Omneon Sessions” and sets it as a global rule, with a capacity of 1. The user then adds the metric “Omneon Sessions” to a Transport action, and sets the cost to 1. This limits the number of Omneon connections to one at a time across the entire system.
Example: Four tasks are running on one machine, each with a cost of 20. The aggregate cost of those running actions is 80. When a new task arrives with a cost of 25, it will not execute because doing so would exceed the capacity of the machine (100). Any tasks that arrive after that action will be queued behind the action (unless one has a higher priority).
Example: A high priority task (cost 50) pauses two low priority tasks (cost 25 each, total 50) to execute.
Example: A high priority task (cost 50) cannot execute because ten tasks are running, each with a cost of 10, and the pause session limit is set to 3; the high priority task would have to pause too many tasks. In this situation, the high priority task will wait until two jobs complete (so that it can pause three).
Managing the Vantage Domain Managing Vantage Users
111
Managing Vantage UsersThe user management feature determines which users have access to the following:
• Vantage Web Applications
• Vantage Workflow Portal configurations
• Workflow categories in the Vantage Workflow Designer client application
• Vantage Management Console
The Vantage administrator uses the Vantage Management Console to create, remove, and edit user profiles and Active Directory accounts. Vantage users are allowed to change their own passwords.
The following topics describe how to manage Vantage users:
■ Enabling and Disabling User Administration
■ Managing Users with Vantage Management Console
■ Adding Users
■ Setting Passwords
■ Removing Users
■ Importing and Exporting Users
Enabling and Disabling User AdministrationUser administration is disabled by default so a Vantage login is not required to use Vantage. If you enable user administration, Vantage users will be required to log in using a Vantage username and password that is assigned to them by the Vantage administrator or by using their Windows Active Directory login.
To enable or disable user management, do the following:
1. Start the Vantage Management Console as described in Starting the Vantage Management Console.
2. In the components panel, select Settings and Options.
3. On the General tab in the details panel, check the Enable user administration check box to enable this feature, or clear the check box to disable this feature.
4. Also check Use Windows Active Directory for Users if you would like to allow users to use their Windows login for logging into Vantage.
5. See Managing Users with Vantage Management Console for details about adding user accounts if you enabled user administration.
Note: When you disable user management, users do not need to enter a user name and password to log in to Vantage Management Console, Vantage Workflow Designer, or the Vantage Workflow Portal client application. To access most Vantage Web Applications, users must enter a user name and password. The exception for Vantage Web Applications is Job Status Views. When public access is configured for Job Status Views, users do not need to enter a user name and password.

Managing the Vantage DomainManaging Vantage Users
112
Managing Users with Vantage Management ConsoleTo start user management in the Vantage Management Console, do the following:
1. Start the Vantage Management Console as described in Starting the Vantage Management Console.
2. In the Settings & Options > General panel, check Enable user administration, which must be enabled in order to manage users. You can also select Use Windows Active Directory for Users to allow logging in using Windows accounts.
3. In the components panel, select Users.
Vantage displays the Users detail panel shown in this figure:
The default user account is for the administrator. The account’s user name is “administrator” with no password. This account exists even if you do not add any users.
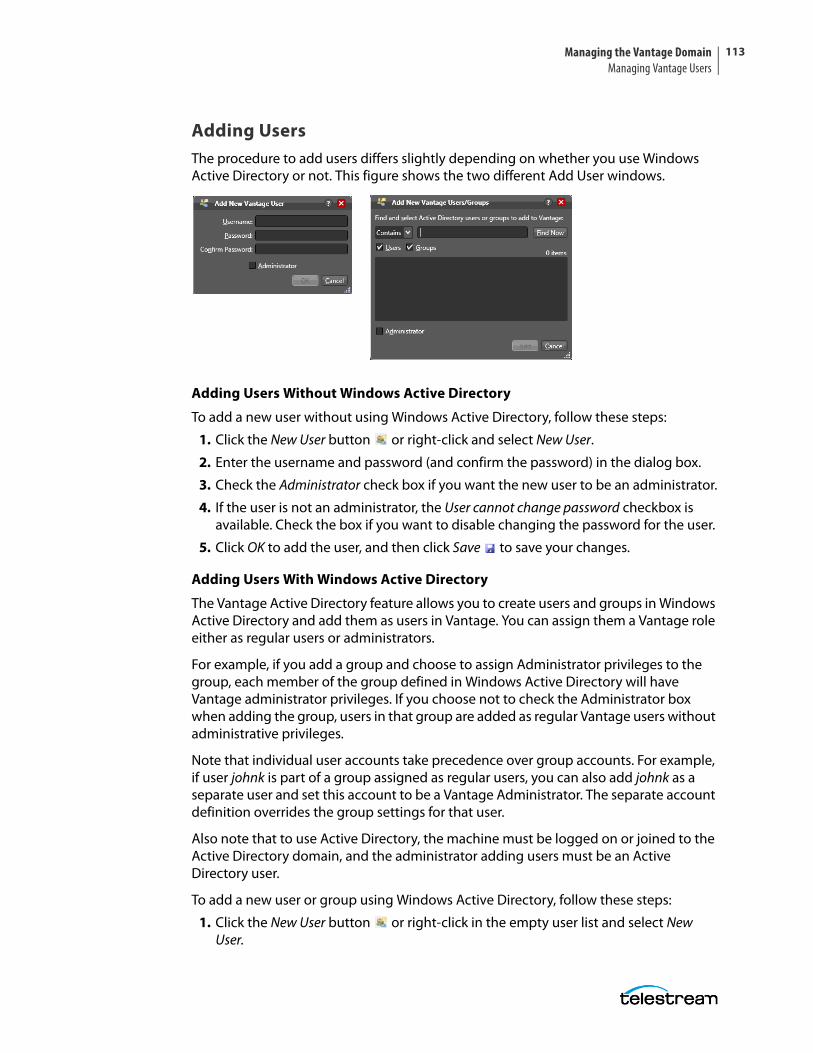
Managing the Vantage Domain Managing Vantage Users
113
Adding UsersThe procedure to add users differs slightly depending on whether you use Windows Active Directory or not. This figure shows the two different Add User windows.
Adding Users Without Windows Active Directory
To add a new user without using Windows Active Directory, follow these steps:
1. Click the New User button or right-click and select New User.
2. Enter the username and password (and confirm the password) in the dialog box.
3. Check the Administrator check box if you want the new user to be an administrator.
4. If the user is not an administrator, the User cannot change password checkbox is available. Check the box if you want to disable changing the password for the user.
5. Click OK to add the user, and then click Save to save your changes.
Adding Users With Windows Active Directory
The Vantage Active Directory feature allows you to create users and groups in Windows Active Directory and add them as users in Vantage. You can assign them a Vantage role either as regular users or administrators.
For example, if you add a group and choose to assign Administrator privileges to the group, each member of the group defined in Windows Active Directory will have Vantage administrator privileges. If you choose not to check the Administrator box when adding the group, users in that group are added as regular Vantage users without administrative privileges.
Note that individual user accounts take precedence over group accounts. For example, if user johnk is part of a group assigned as regular users, you can also add johnk as a separate user and set this account to be a Vantage Administrator. The separate account definition overrides the group settings for that user.
Also note that to use Active Directory, the machine must be logged on or joined to the Active Directory domain, and the administrator adding users must be an Active Directory user.
To add a new user or group using Windows Active Directory, follow these steps:
1. Click the New User button or right-click in the empty user list and select New User.
Managing the Vantage DomainManaging Vantage Users
114
2. Enter part or all of the user name in the blank field and click Find Now to search for and list users whose names match the text you entered.
The drop-down menu lets you select a filter for your search, and the Users and Groups check boxes allow searching for users, groups, or both (default).
3. Select a user in the displayed list.
4. Check the Administrator check box if you want the new user to be an administrator.
5. Click Add to add the user, and then click Save to save your changes.
Setting PasswordsTo set the password of a user, click the Set Password button (or right-click the user in the list and click Set Password). When the dialog box displays, enter the password (and confirm the password) of the user. Click OK to close the dialog box, then click the Save button to save your changes.
Removing UsersUsers can be removed by selecting the user in the Users list and clicking the Delete button at the top of the User Management panel (or right-click the user and select Delete). When requesting the removal of a user, a dialog box will display asking you to confirm this action. You cannot undo the removal of a user, thus to restore a user you must add him again as a new user.
Importing and Exporting UsersUser lists can be imported and exported. To import a list of users, click the Import button , navigate to the XML file containing a list of users, and click the Open button. To export a list of users, click the Export button (or right-click the list and select Export), enter an XML filename for the list of users, and click the Save button.
Managing the Vantage Domain Managing Domains
115
Managing DomainsManaging a Vantage Domain includes backing up and restoring the domain database, shrinking the database, renaming a domain, and renaming a server.
■ Backing Up and Restoring the Vantage Domain Database
■ Understanding Domain Backup and Restore
■ Backing Up the Domain
■ Restoring the Domain
■ Shrinking a Full Database
■ Renaming a Vantage Domain
■ Renaming a Vantage Server
Backing Up and Restoring the Vantage Domain DatabaseThe domain backup feature allows you to save archival copies of the Vantage domain database in a separate file. The domain restore feature allows you to replace your current Vantage domain database with the contents of a previously-backed up domain. The domain backup and restore features are primarily used for the following:
• Returning the database to a previously backed-up state.
• Preparation for database mirroring.
Note: The domain backup and restore features are not designed for use during Vantage upgrades. If you back up the database from a specific version of Vantage, that backup can only be restored to the same Vantage software version. During a Vantage upgrade, the Vantage installers manage any required database updates as described in Upgrading from the Previous Version in the Vantage Domain Management Guide.
The following topics describe domain backup and restore:
■ Understanding Domain Backup and Restore
■ Backing Up the Domain
■ Restoring the Domain
Understanding Domain Backup and RestoreDuring a domain backup, Vantage creates a single backup file that contains all workflows, all services, and all jobs registered in the domain. It is important to remember that the backup file contents reflect the domain contents as of the moment the backup file is created. To capture changes made after a backup, you must create another backup.
When you restore a domain, all services are stopped, the current database contents are irretrievably destroyed, and the backup file you specify is used to create the
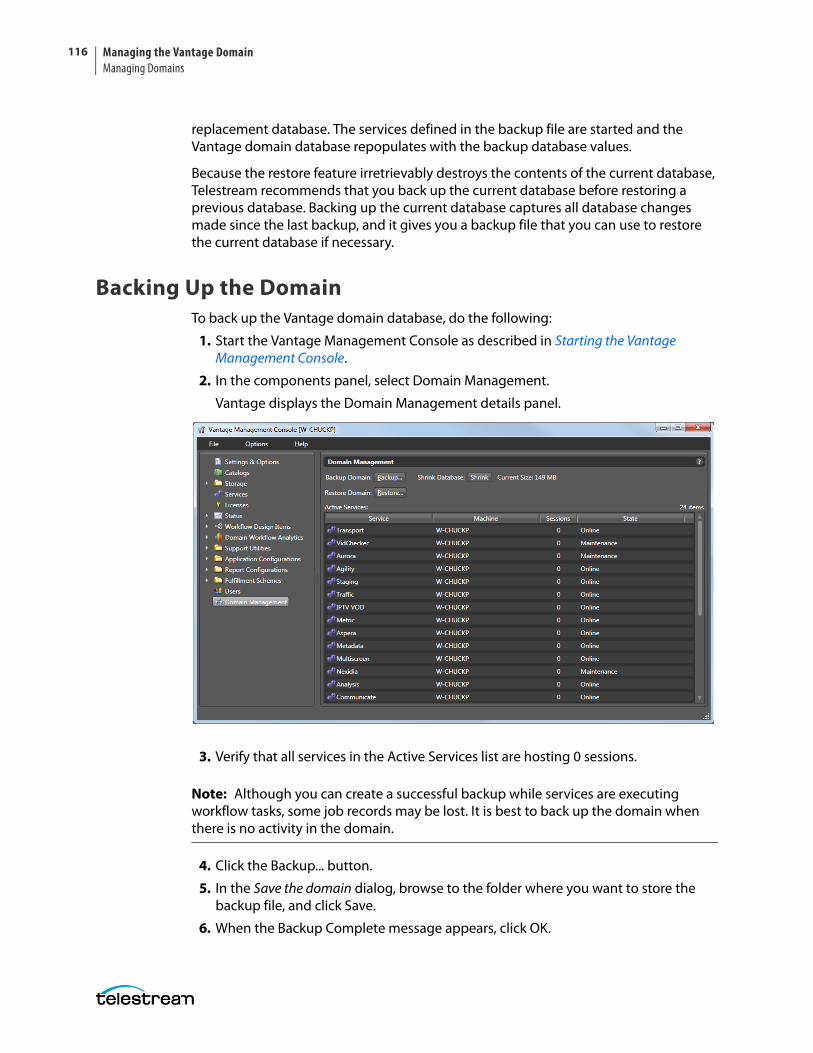
Managing the Vantage DomainManaging Domains
116
replacement database. The services defined in the backup file are started and the Vantage domain database repopulates with the backup database values.
Because the restore feature irretrievably destroys the contents of the current database, Telestream recommends that you back up the current database before restoring a previous database. Backing up the current database captures all database changes made since the last backup, and it gives you a backup file that you can use to restore the current database if necessary.
Backing Up the DomainTo back up the Vantage domain database, do the following:
1. Start the Vantage Management Console as described in Starting the Vantage Management Console.
2. In the components panel, select Domain Management.
Vantage displays the Domain Management details panel.
3. Verify that all services in the Active Services list are hosting 0 sessions.
Note: Although you can create a successful backup while services are executing workflow tasks, some job records may be lost. It is best to back up the domain when there is no activity in the domain.
4. Click the Backup... button.
5. In the Save the domain dialog, browse to the folder where you want to store the backup file, and click Save.
6. When the Backup Complete message appears, click OK.
Managing the Vantage Domain Managing Domains
117
Restoring the Domain
CAUTION: Telestream recommends that you restore a Vantage domain using the same machine that created the backup file. If you restore the domain from another machine, the services defined in the database must match the services installed on the other machine.
To restore a Vantage domain database, do the following:
1. Start the Vantage Management Console as described in Starting the Vantage Management Console.
2. In the components panel, select Domain Management.
Vantage displays the Domain Management details panel.
3. To provide the option to return to the current Vantage domain database later, back up the current domain database as described in Backing Up the Domain.
CAUTION: Always back up your current database before restoring it to an earlier backup. Restoring your Vantage domain database overwrites the entire contents of the current database with the contents of the backup file selected.
4. Verify that all services in the Active Services list are hosting 0 sessions.
Note: When you restore a domain, all services are stopped, and all information related to any jobs in progress is lost. The restored database contains only the domain information captured when the domain was backed up.
5. Click the Restore... button, read the information dialog that appears, and click OK.
6. In the Load the domain dialog, browse to the backup file you want to restore, select the backup file, and click Open.
7. When the Restore Complete message appears, click OK.
Shrinking a Full DatabaseIf a Vantage installation using SQL Express nears the SQL Express database size limit, Vantage stops accepting jobs. Attempts to submit jobs manually launches a warning dialog indicating that the database is at or near capacity.
You may be able to resolve this issue using the Vantage Shrink Database feature, which applies the MS SQL DBCC SHRINKDATABASE command to the existing database to delete unused entries and reduce file size. The shrink process may take some time and may slow database performance, so it should be done only when the Vantage system is not busy.
Use this procedure to shrink the database:
Managing the Vantage DomainManaging Domains
118
1. Start the Vantage Management Console.
2. In the components panel, select Domain Management.
Vantage displays the Domain Management details panel.
3. To protect against potential data loss, use the Backup... button to back up the current domain database as described in Backing Up the Domain.
4. Click the Shrink button to shrink the database.
A dialog pops up to explain that the Shrink command may affect database perfor-mance and should be done only when Vantage is not busy.
A Status message indicates progress.
Current Size displays the database size next to the button, so you can see any changes immediately upon completion of the shrink command.
Multiple presses of the button may shrink the database additionally each time.
Renaming a Vantage DomainEach Vantage domain uses the name assigned to the Windows server that hosts the Vantage domain database. To rename a Vantage domain, you must complete the following tasks (which are described in more detail later in this topic):
• Remove all Vantage services from the Vantage domain.
• Rename the Windows server that hosts the Vantage domain database.
• Restart the renamed server and add all Vantage services to the renamed domain.
Note: If the Vantage domain database is a mirrored database, you must remove any Vantage licenses prior to renaming the Vantage domain. If you do not remove the licenses first, your licenses will become invalid after the rename is complete.
When you remove Vantage services from the domain, the Storage, Variable, and Qualification rule configuration for each service is lost. The rest of the Vantage domain configuration is retained. After the Vantage domain is renamed, all Vantage users and administrators will need to specify the new Vantage domain name when connecting to the domain with Vantage client or web applications.
Note: To complete this procedure, you must have permission in your Windows domain to rename the computer, or you must get assistance from your Windows domain administrator. Be sure to schedule the rename during a maintenance window, as renaming the Vantage domain interrupts all Vantage services in the domain and all Windows services on the server to be renamed.
Use the following procedure to rename a Vantage domain:
1. Start the Vantage Management Console, select the domain to manage, and log in as described in Starting the Vantage Management Console.
2. Select Services in the components panel.
Managing the Vantage Domain Managing Domains
119
3. Take note of any Storage, Variables, and/or Qualification Rules settings for each service.
Write down any Storage, Variable, and/or Qualification Rule settings that you want to reconfigure after the Vantage domain is renamed.
4. Click a service in the Services details panel, and enter Ctrl-A to select all services.
5. Click the Remove Service button in the toolbar.
6. Click Start > Control Panel > System.
7. Click Change Settings in the right panel. The System Properties window opens.
8. Select the Computer Name tab and click Change.
9. Edit the computer name in the Computer Name text box and click OK.
10. If prompted to do so, enter a Windows user name and password for an account that has permission to rename this computer in the Windows domain.
Note: If you do not have the appropriate permissions, contact the administrator for your Windows domain.
11. Restart the server.
12. Start the Vantage Management Console, select the new domain to manage, and log in.
13. Select Services in the components panel.
14. Click the Add Service button in the toolbar.
15. When the Select Service dialog appears, click Machine to sort the services by machine name.
16. To add Vantage services for a specific machine, select the services you want and click OK.
17. If any Storage, Variables, and/or Qualification Rules settings were configured for services, add them now.
18. Send the new Vantage domain name to all Vantage users and administrators so they can reconnect to the Vantage domain.
Renaming a Vantage ServerTo rename a Vantage server, you must complete the following tasks (which are described in more detail later in this topic):
• Remove all Vantage services for the server to be renamed from the Vantage domain.
• Rename the Windows server.
• Restart the renamed server and add all Vantage services on the renamed server to the Vantage domain.
Managing the Vantage DomainManaging Domains
120
Note: Do not use this procedure to rename a server that hosts the Vantage domain database. Instead, see Renaming a Vantage Domain.
When you remove Vantage services from the domain, the Storage, Variable, and Qualification rule configuration for each service is lost. The rest of the server configuration is retained.
Note: To complete this procedure, you must have permission in your Windows domain to rename the computer, or you must get assistance from your Windows domain administrator. Be sure to schedule the rename during a maintenance window, as renaming the Vantage server interrupts all Vantage services and Windows services on the server to be renamed.
Use the following procedure to rename a Vantage server:
1. Start the Vantage Management Console, select the domain to manage, and log in as described in Starting the Vantage Management Console.
2. Select Services in the components panel.
3. Take note of any Storage, Variables, and/or Qualification Rules settings for the service node you want to rename.
Write down any Storage, Variable, and/or Qualification Rule settings that you want to reconfigure after the Vantage domain is renamed.
4. Click a service in the Services details panel, and enter Ctrl-A to select all services. (NOTE: If renaming just a service node and not a domain database server, then only the service node's services need to be unassigned from the domain.)
5. Click the Remove Service button in the toolbar.
6. Click Start > Control Panel > System.
7. Click Change Settings in the right panel. The System Properties window opens.
8. Click Change System Properties in the right panel.
9. Select the Computer Name tab and click Change.
10. Edit the computer name in the Computer Name text box and click OK.
11. If prompted to do so, enter a Windows user name and password for an account that has permission to rename this computer in the Windows domain.
Note: If you do not have the appropriate permissions, contact the administrator for your Windows domain.
12. Restart the server.
13. Start the Vantage Management Console, select the domain to manage, and log in.
14. Select Services in the components panel.
15. Click the Add Service button in the toolbar.

Managing the Vantage Domain Managing Domains
121
16. When the Select Service dialog appears, click Machine to sort the services by machine name.
17. To add Vantage services for the renamed server, select the services you want and click OK.
18. If any Storage, Variables, and/or Qualification Rules settings were configured for services, add them now.
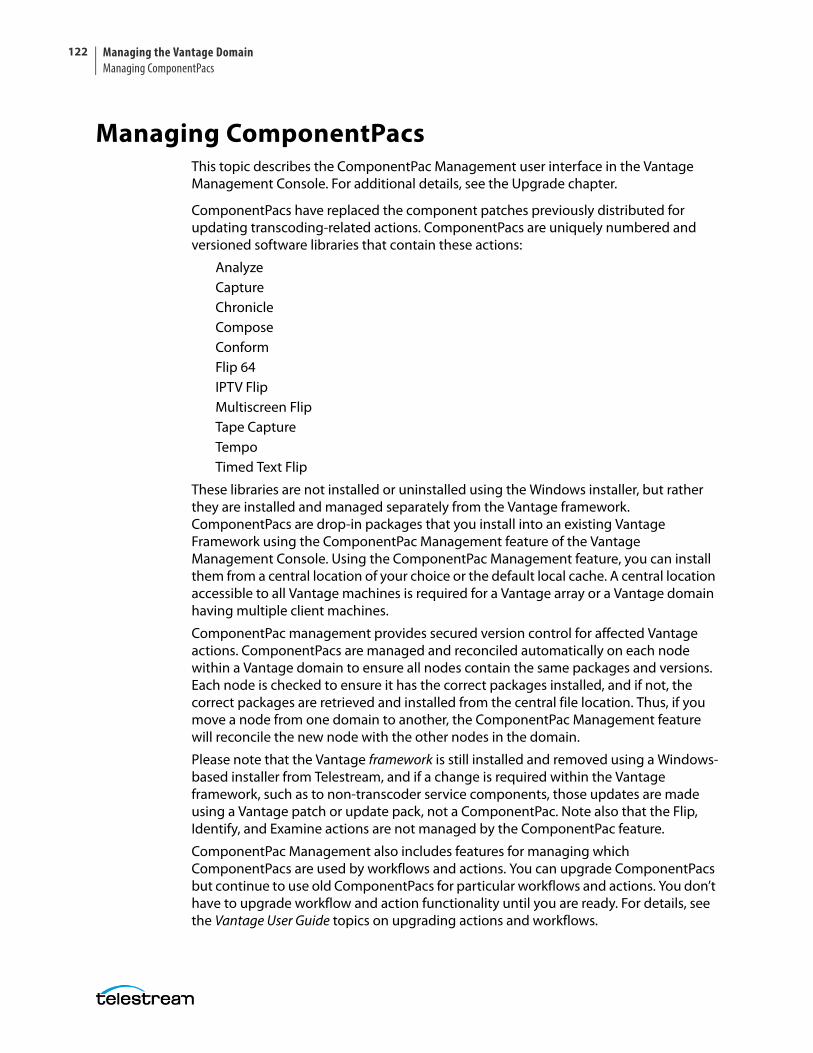
Managing the Vantage DomainManaging ComponentPacs
122
Managing ComponentPacsThis topic describes the ComponentPac Management user interface in the Vantage Management Console. For additional details, see the Upgrade chapter.
ComponentPacs have replaced the component patches previously distributed for updating transcoding-related actions. ComponentPacs are uniquely numbered and versioned software libraries that contain these actions:
AnalyzeCaptureChronicleComposeConformFlip 64IPTV FlipMultiscreen FlipTape CaptureTempoTimed Text Flip
These libraries are not installed or uninstalled using the Windows installer, but rather they are installed and managed separately from the Vantage framework. ComponentPacs are drop-in packages that you install into an existing Vantage Framework using the ComponentPac Management feature of the Vantage Management Console. Using the ComponentPac Management feature, you can install them from a central location of your choice or the default local cache. A central location accessible to all Vantage machines is required for a Vantage array or a Vantage domain having multiple client machines.
ComponentPac management provides secured version control for affected Vantage actions. ComponentPacs are managed and reconciled automatically on each node within a Vantage domain to ensure all nodes contain the same packages and versions. Each node is checked to ensure it has the correct packages installed, and if not, the correct packages are retrieved and installed from the central file location. Thus, if you move a node from one domain to another, the ComponentPac Management feature will reconcile the new node with the other nodes in the domain.
Please note that the Vantage framework is still installed and removed using a Windows-based installer from Telestream, and if a change is required within the Vantage framework, such as to non-transcoder service components, those updates are made using a Vantage patch or update pack, not a ComponentPac. Note also that the Flip, Identify, and Examine actions are not managed by the ComponentPac feature.
ComponentPac Management also includes features for managing which ComponentPacs are used by workflows and actions. You can upgrade ComponentPacs but continue to use old ComponentPacs for particular workflows and actions. You don’t have to upgrade workflow and action functionality until you are ready. For details, see the Vantage User Guide topics on upgrading actions and workflows.
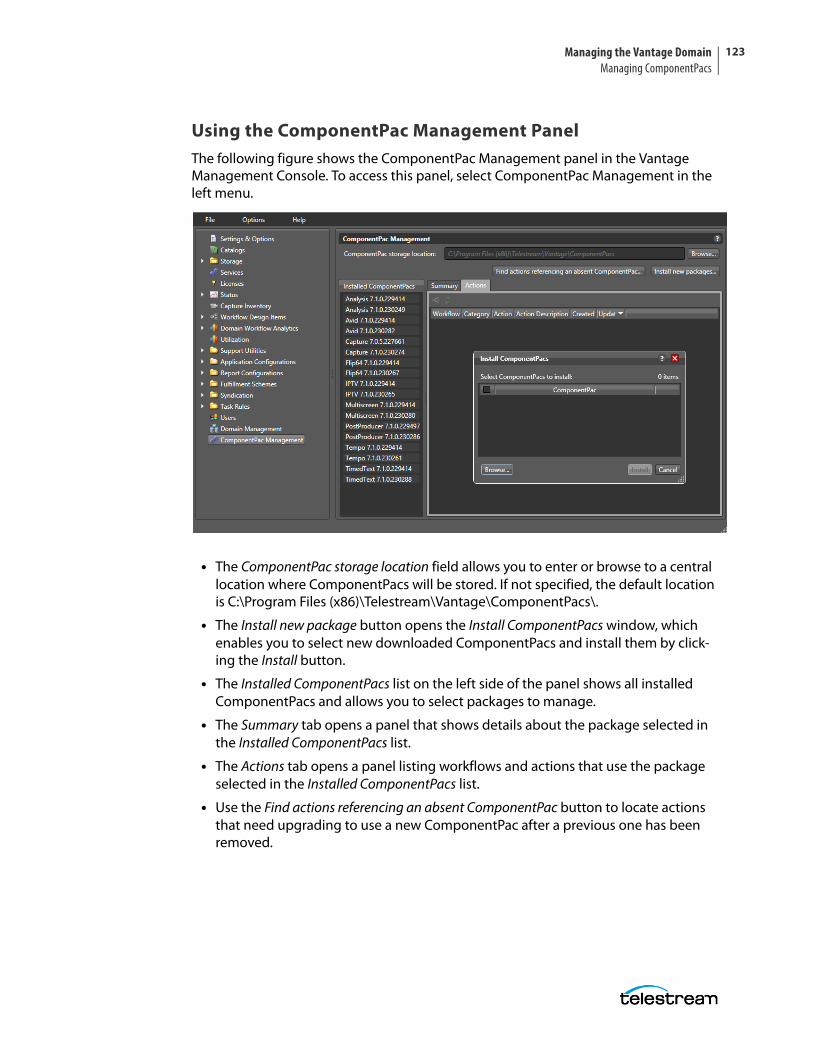
Managing the Vantage Domain Managing ComponentPacs
123
Using the ComponentPac Management PanelThe following figure shows the ComponentPac Management panel in the Vantage Management Console. To access this panel, select ComponentPac Management in the left menu.
• The ComponentPac storage location field allows you to enter or browse to a central location where ComponentPacs will be stored. If not specified, the default location is C:\Program Files (x86)\Telestream\Vantage\ComponentPacs\.
• The Install new package button opens the Install ComponentPacs window, which enables you to select new downloaded ComponentPacs and install them by click-ing the Install button.
• The Installed ComponentPacs list on the left side of the panel shows all installed ComponentPacs and allows you to select packages to manage.
• The Summary tab opens a panel that shows details about the package selected in the Installed ComponentPacs list.
• The Actions tab opens a panel listing workflows and actions that use the package selected in the Installed ComponentPacs list.
• Use the Find actions referencing an absent ComponentPac button to locate actions that need upgrading to use a new ComponentPac after a previous one has been removed.
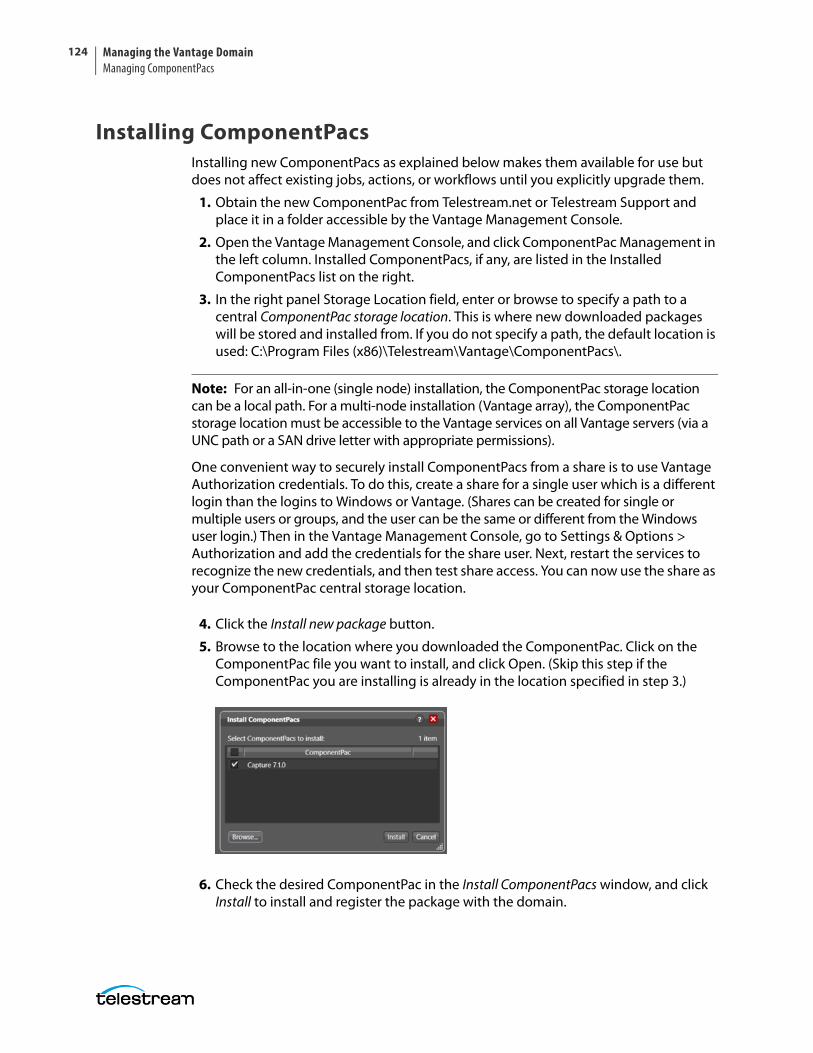
Managing the Vantage DomainManaging ComponentPacs
124
Installing ComponentPacsInstalling new ComponentPacs as explained below makes them available for use but does not affect existing jobs, actions, or workflows until you explicitly upgrade them.
1. Obtain the new ComponentPac from Telestream.net or Telestream Support and place it in a folder accessible by the Vantage Management Console.
2. Open the Vantage Management Console, and click ComponentPac Management in the left column. Installed ComponentPacs, if any, are listed in the Installed ComponentPacs list on the right.
3. In the right panel Storage Location field, enter or browse to specify a path to a central ComponentPac storage location. This is where new downloaded packages will be stored and installed from. If you do not specify a path, the default location is used: C:\Program Files (x86)\Telestream\Vantage\ComponentPacs\.
Note: For an all-in-one (single node) installation, the ComponentPac storage location can be a local path. For a multi-node installation (Vantage array), the ComponentPac storage location must be accessible to the Vantage services on all Vantage servers (via a UNC path or a SAN drive letter with appropriate permissions).
One convenient way to securely install ComponentPacs from a share is to use Vantage Authorization credentials. To do this, create a share for a single user which is a different login than the logins to Windows or Vantage. (Shares can be created for single or multiple users or groups, and the user can be the same or different from the Windows user login.) Then in the Vantage Management Console, go to Settings & Options > Authorization and add the credentials for the share user. Next, restart the services to recognize the new credentials, and then test share access. You can now use the share as your ComponentPac central storage location.
4. Click the Install new package button.
5. Browse to the location where you downloaded the ComponentPac. Click on the ComponentPac file you want to install, and click Open. (Skip this step if the ComponentPac you are installing is already in the location specified in step 3.)
6. Check the desired ComponentPac in the Install ComponentPacs window, and click Install to install and register the package with the domain.
Managing the Vantage Domain Managing ComponentPacs
125
7. When installation finishes and the package appears in the Installed ComponentPacs list, restart all affected services on all nodes to deploy the pacs.
ComponentPacs are unpacked and made ready for use when the Vantage services targeted by the ComponentPac are restarted. Unpacked pacs are stored in C:\Pro-gram Files (x86)\Telestream\Vantage\Components\ on each Vantage service node.
Notes:
1. New actions and workflows created in the Workflow Designer use the latest installed ComponentPac. However, existing actions and workflows must be selected and upgraded to use the latest ComponentPac. If they are not upgraded, they will continue to use the ComponentPac with which they were created. See the Vantage User Guide for detailed action and workflow upgrade instructions.
Once an action is upgraded it can't be directly downgraded. However, you can restore workflows to their pre-upgraded state by importing the automatic backup copy that Vantage places in the C:\VantageWorkflowBackup directory (local to the Workflow Designer client). Beginning with Vantage 7.0 UP1, a log file describing the upgrades is also included in that directory.
If you want to change the location of automatic ComponentPac backups, open the Vantage Management Console, select Settings and Options, and browse for a new Location for workflow backups.
2. In Vantage version 7.0, existing actions and workflows will use the latest installed ComponentPac if the ComponentPac used to create them is no longer present. You may need to recreate the action if the latest ComponentPac does not support the action's outdated settings. If the missing ComponentPac is reinstalled, the actions will resume use of that ComponentPac.
3. Starting with Vantage 7.0 Update Pack 1, workflows created with a previous version of Vantage (such as Vantage 6.3) will use the earliest ComponentPac installed. When you upgrade a workflow created with an older Vantage version to Vantage 7.0 or later, the actions will be tied to the latest ComponentPacs currently installed.
4. The Session Log available in the Workflow Designer Job Status or Domain Job Status panel lists which ComponentPac was used for a completed job.
5. If a Vantage service is unable to unpack a ComponentPac (such as when the Vantage service does not have the appropriate user credentials to access the file location of where the ComponentPac file resides), an entry is added to the service trace log to record the issue.
6. If you convert a single-node Vantage domain to a multi-node Vantage domain and if the installed ComponentPacs reside in a local path, the ComponentPacs must be copied or moved to a shared folder location and re-installed or re-registered.
7. Once workflows and actions have been upgraded to the latest ComponentPac they cannot be reverted back to previous versions.
8. Upgrading Vantage via an update pack, such as 7.0 UP1, may cause ComponentPac actions to be shown as eligible for upgrade even though a new ComponentPac has not been installed. This is normal behavior for update packs. You can upgrade the ComponentPac actions or not, as you prefer.
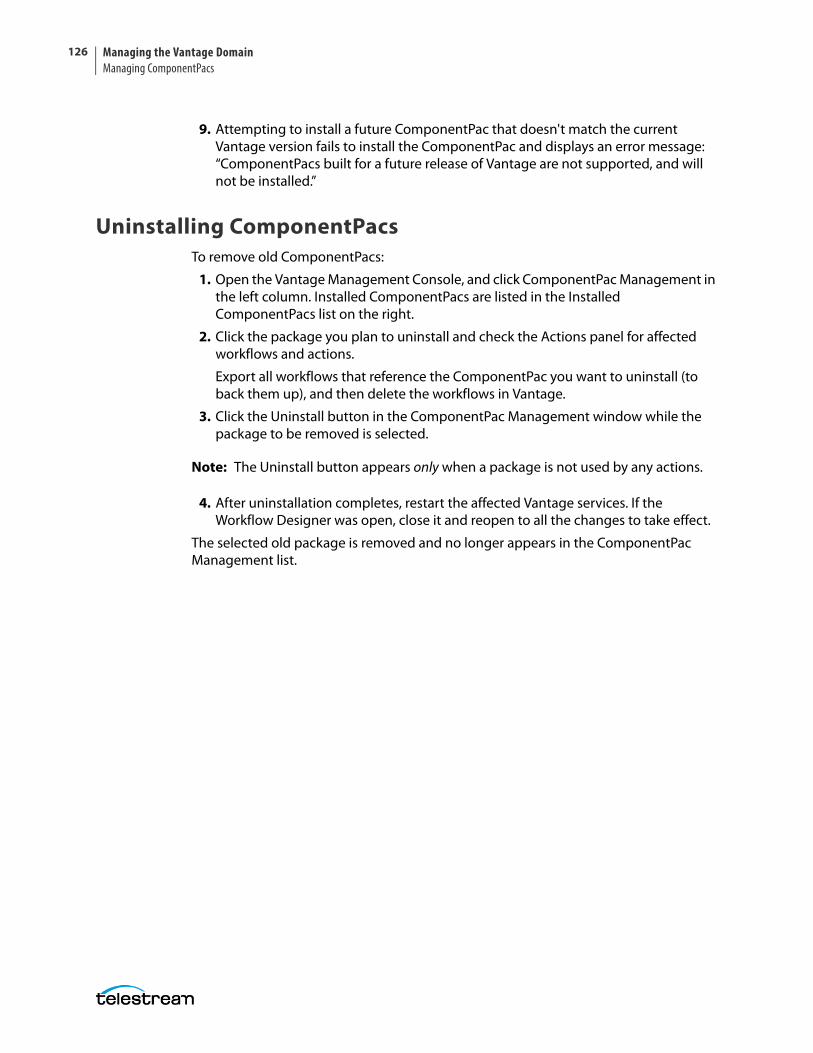
Managing the Vantage DomainManaging ComponentPacs
126
9. Attempting to install a future ComponentPac that doesn't match the current Vantage version fails to install the ComponentPac and displays an error message: “ComponentPacs built for a future release of Vantage are not supported, and will not be installed.”
Uninstalling ComponentPacsTo remove old ComponentPacs:
1. Open the Vantage Management Console, and click ComponentPac Management in the left column. Installed ComponentPacs are listed in the Installed ComponentPacs list on the right.
2. Click the package you plan to uninstall and check the Actions panel for affected workflows and actions.
Export all workflows that reference the ComponentPac you want to uninstall (to back them up), and then delete the workflows in Vantage.
3. Click the Uninstall button in the ComponentPac Management window while the package to be removed is selected.
Note: The Uninstall button appears only when a package is not used by any actions.
4. After uninstallation completes, restart the affected Vantage services. If the Workflow Designer was open, close it and reopen to all the changes to take effect.
The selected old package is removed and no longer appears in the ComponentPac Management list.