ritt kellogg memorial fund registration - colorado … kellogg memorial fund rkmf expedition grant...
TRANSCRIPT
1/6/16, 12:01 PMRegistration
Page 1 of 10https://apps.ideal-logic.com/worker/report/28CD7-DX6C/H9P3-DFPWP_cf931841a25d69cf/p2d377017/abb592f73ff9c/registration.html
Ritt Kellogg Memorial FundRegistrationRegistration No. XVJN-WXKMLSubmitted Jan 4, 2016 5:14pm by Jackson Schrott
Registration
Sep 1, 2015-Aug 31
Ritt Kellogg Memorial FundRKMF Expedition Grant 2015/2016/Group ApplicationThis is the group application for a RKMF Expedition Grant. In this application you will be asked toprovide important details concerning your expedition.
Waiting forApproval
Participant
Jackson SchrottColorado College StudentPlanned Graduation: Summer Break 2019
CC ID Number: 154853
[email protected][email protected](503) 896-0390 (Cell/Text)
Date of Birth: May 17, 1996
Emergency Contacts
Dave Schrott (Father)(503) 939-8288(503) 335-3410 (Alternate)
Medical History
No specific medical history issues reported.
Additional Questions
MedicationsNo current medications
Special Dietary NeedsNo special dietary needs
Last Doctor's VisitDate: Jul 10, 2015Results: All is well!

1/6/16, 12:01 PMRegistration
Page 2 of 10https://apps.ideal-logic.com/worker/report/28CD7-DX6C/H9P3-DFPWP_cf931841a25d69cf/p2d377017/abb592f73ff9c/registration.html
Insurance
Covered by InsuranceYes
Insurance DetailsCarrier: ModaName of Insured: David SchrottRelationship to Jackson: FatherGroup Number: 10005153Policy Number: J62880804Date Effective: Jan 2013Phone Number: (888) 393-2940
Consent
Jackson Schrott Ritt Kellogg Memorial Fund Consent Form (Jul 15, 2013)Recorded (Jan 4, 2016, JS)
Jackson Schrott USE THIS WAIVER (Nov 5, 2013)Recorded (Jan 4, 2016, JS)
I. Expedition Summary
Expedition NameCasual Slabbin’ in the Range of Light
Objectives-Exercising and further improving our safe climbing, backcountry practices, and climbing partnership-Explore the Beautiful Sierra Wilderness-Climb the classic, big Sierra faces (Keeler Needle, Hulk, Whitney, Mt Russell)-Return home having grown both as climbers and as individuals-Work out our stoke muscles
Successful expeditions are always about balancing summit ambitions with attention to good process. The goal is tonot let either one eclipse the other. Summits motivate us to pursue audacious and challenging things, but alsodemand an understanding of climbing systems and an attention to efficiency. By pursuing these challenging summits,we hope to practice and refine our skills in technical systems, judgment, leadership and teamwork.
Location-Lone Pine, Whitney Portal, Sierra Nevadas, California-Mono County, Sawtooths/Sierra Nevadas, California
Departure DateJun 18, 2016
Return DateJul 3, 2016
Days in the Field
1/6/16, 12:01 PMRegistration
Page 3 of 10https://apps.ideal-logic.com/worker/report/28CD7-DX6C/H9P3-DFPWP_cf931841a25d69cf/p2d377017/abb592f73ff9c/registration.html
13
Wilderness CharacterThe Sierra Wilderness is marked by ancient, glacier-born moraines and large granite spires. Rising above 14,000ft attheir highest points, the Sierras offer a world-class opportunity for higher altitude rock climbs in a relatively accessiblebackcountry environment. Generally, the routes in and around the Whitney Portal are reached via large talus or screeslopes making approaches tedious and long. The Sierras are also home to an abundance of wildlife including blackbears and mountain goats, which bring both a sense of true commune with the surrounding nature, and certainlogistical needs.
The season in which we plan to climb features warm temperatures and long days. This might be the most idealclimbing season if it weren’t for the snow that’s leftover from the winter, which tends to be scattered on most of theapproaches. There aren’t any glaciers, and much of the snowfields are short and rarely steep, so we plan on bringingcrampons and ice axes but no other gear for snow travel.
The days are luckily the longest they will be all year and we plan to take advantage of that by beginning all of ourclimbs at dawn or just before. Additionally, the weather is likely some of the most consistent in any alpine rock area. InJune, there are rarely storms (maybe once a month) and these tend to just be thunder and rain. Most storms roll infrom the west, the opposite side of many of the climbs we hope to do, and therefore we won’t be able to see stormscoming. While bad conditions are rare, we still plan to avoid them by frequently checking the most up to date weatherreports available, especially because we may not be able to read the weather ourselves.
II. Participant Qualifications
Participants' Graduation DateJack Schrott - Spring 2019
Carson Fritz - Spring 2019
Medical CertificationsJack Schrott - Wilderness First Responder (expires December 2016)
Carson Fritz - Wilderness First Responder - pending, to be acquired Jan 2016 (expires January 2018)
Does your group have adequate experience?Yes
Training PlanBoth members of the expedition team have extensive experience in the backcountry, leading on trad gear, climbingmulti-pitch, grade IV routes, and climbing on granite, all of which is discussed in more detail in the individual resumes.In addition to these qualifications, both of us learned to climb in the same outdoor club in Portland, OR and haveclimbed together both in high school and at Colorado College. Because of this, the two of us are especially familiarwith each others risk taking habits, climbing habits and preferred technical systems.
However, one of our objectives for the trip is to improve our skills in all of these areas and more, and a big part of thatis practicing these skills prior to the trip itself. While All of our goals are well within our ability, climbing them safely,simply, and efficiently can only add to our enjoyment of the area. For that reason, we intend to put in time prior to thetrip to maximize the ease with which these goals can be accomplished.
Raising our general abilities as climbers is something both of us are already inclined to do. Several sessions duringthe school week at both the Ritt Kellogg climbing gym as well as City Rock downtown are our way of staying in thebest shape possible during the week. The weekends and block breaks are when we put this fitness to the test. For this

1/6/16, 12:01 PMRegistration
Page 4 of 10https://apps.ideal-logic.com/worker/report/28CD7-DX6C/H9P3-DFPWP_cf931841a25d69cf/p2d377017/abb592f73ff9c/registration.html
trip specifically however, this program would cater more specifically to the more challenging aspects of the Sierras. Inpreparation for challenging or unusual crack climbing sections, gym sessions will take place frequently (3-4 times aweek depending on weather) and will focus on building the necessary endurance to climb routes ranging up to 12pitches long. While neither of these indoor venues are ideal for training crack climbing technique, what is available (afew plastic cracks and a crack fitness simulator) will be used as effectively a possible.
While frequenting the gym will improve our climbing fitness, it is our time spent outside on real cracks and real granitethat will allow us to refine the technique required to climb our objectives in the SIerras. For this reason we intend tospend at least one full day nearly every weekend climbing outside, and if possible another day sometime during theweek (after class or the other weekend day). When climbing outdoors, we intend to be improving our multi pitch skills,our route finding skills, our crack climbing skills or our experience on granite, a rock type which requires a very specifictype of technique in order to be climbed with ease. Furthermore, an emphasis will be placed on developing bettertechnique for offwidth crack climbing, an area in which we both need work. We hope to each climb 5 pitches of 5.10offwidth clean prior to the trip. Climbing outside frequently is something both of us already seek to do, so putting in thetime necessary to improve these specific skills should be a natural and enjoyable time.
Knowing the systems necessary for rescue is a critical part of feeling confident on large objectives, Our goal prior tothe trip is to know these systems like the backs of our hands, because we believe in situations where rescue isneeded there will likely be little time for review. We aim to practice the standard rescue systems at least once a week,ideally with each other. We hope that as the semester winds down, the systems will become second nature to us.
Lastly, the Sierras are an area at an unusually high altitude, and it’s all too often that the way this altitude affectsclimbing ability is underestimated and climbers find themselves unprepared for climbing at elevation. For this reason,special attention will be given to gaining the fitness necessary for the difficult approaches and the high altitude rockclimbing. This may include daily runs, frequent hiking and gym sessions, and dreaded but critical leg days. Ideallyadding these exercises on to our frequent gym climbing sessions will allow us to tackle each of the Sierras difficultieswith confidence and ease, as well as provide us with a great inventory of strength for future climbing trips.
III. Expedition Logistics, Gear and Food
Travel PlanOn the morning of June 18th, the two of us will rendezvous at one of our homes in Portland, OR where we’re bothfrom. From there we will drive our own car down from Portland to Bridgeport, CA which is the closest town to our firstobjective, the Incredible Hulk. We will camp here and then early the next morning go to the robinson creek trailhead.This is the beginning of the Hulk approach and climb. After the route has either been successfully topped out anddescended or we’ve rappelled down to the base and hiked back to the Marina, we will get in our car and drive threehours to the Whitney portal where we will camp for the night. From here we will backpack into Iceberg lake where theremainder of our objectives preside. After backpacking out, we will camp at the trailhead one more night and then thenext day we will drive back to Portland.
Expedition ItineraryItenerary.pdf (31KB)Uploaded Jan 4 4:38pm by Jackson Schrott
Re-Ration PlansYes, on June 27th we are transferring from the Whitney Zone Wilderness to the Incredible Hulk 3 hours northwest ofthere. Because we won’t be able to hike out, drive, re-ration and hike back in all in one day, we plan to leave Whitney,drive and re ration on the 27th and begin hiking back in on the 28th. Our re-ration will be acquired from Joseph’s Bi-Rite Market in Whitney Portal, as Twin Lakes does not have a large store to shop at. We will visit the market betweenexiting the Whitney Zone and driving to Twin Lakes.
Food Storage
Appendix A

1/6/16, 12:01 PMRegistration
Page 5 of 10https://apps.ideal-logic.com/worker/report/28CD7-DX6C/H9P3-DFPWP_cf931841a25d69cf/p2d377017/abb592f73ff9c/registration.html
All the food will be contained in 2 BearVault 7-day bear canisters and one BearVault 4-day canister, each rented for 21days from https://www.lowergear.com/product.php?id=160 for $36 and $28 respectively. The canisters will protect thefood from bears at night and during the day. At night they will be kept at least 100 feet from our campsite, but probablymore because bears are scary. While we wish the two 7-day canisters were enough, we feel as though the rationsnecessary for challenging ourselves at our limit at a high altitude in the backcountry should not be sparse, and so wewill use this third bear canister for supplementary snacks and protein. This should last us from the morning of June20th to the morning of June 27th. At that point we will re-ration and refill these canisters to last us from June 29th toJuly 2nd, which will likely only involve a combination of 2 of the 3 canisters.
Food List
Screen Shot 2016-01-04 at....png (84KB, 548x984px)Uploaded Jan 4 4:51pm by Jackson Schrott
Are all expedition members familiar with LNT principles?Yes
Plan for Minimizing ImpactsCarson and I both cut our teeth with a local youth climbing organization that put a great emphasis on LNT ethics. Weintend to adhere tightly to these principles on our trip. Climbing has evolved greatly in this realm since the advent of“clean,” removable gear. Thanks to this equipment, we will not be bringing pitons or other fixed gear options. Beinglow impact climbers requires thought, but poses little disadvantage. Below are the ways in which we will try to meetLNT standards:
1.Plan ahead and prepare - We think reverting to high impact solutions due to lack of preparation is irresponsible andeasily avoidable. We will bring the equipment necessary to store and pack-out food and waste including bearcanisters, trash bags, and wag bags. Disposing of unneeded packaging on food items before heading into thebackcountry is another way to facilitate good pack-out ethics. On route, by knowing where established belays arelocated we can avoid having to leave slings and other gear on the wall in case of a necessary descent.2.Travel and Camp on Durable Surfaces - We will commit ourselves to walking on established trails and camping onrock or compact soil whenever possible. On portions of approaches where we must travel off path, we will favor talusover easily-erodible dirt slopes (talus is often the only option anyways).3.Dispose of Waste Properly - We plan to pack out all solid human waste and trash. The ranger station in Lone Pinecan provide wag bags. Packing out human waste can get tricky while on route, but we plan to carry an empty pringlescontainer and wag bags to do so. If at some of the more remote locations, packing-out human waste turns out to besubstantially inconvenient, we will use proper cat-hole technique. 4.Leave what you find - We have no intention to alter any habitats that we encounter. Our bivys will be low impact,tentless endeavours (so long as weather permits).5.Minimize campfire impacts - We don’t plan on having any campfires.6.Be considerate to other visitors - As advocates of LNT and representatives of the Colorado College community, wewill lead by example. Being courteous to other hikers while on approach trails and climbers while on route is important
Appendix B

1/6/16, 12:01 PMRegistration
Page 6 of 10https://apps.ideal-logic.com/worker/report/28CD7-DX6C/H9P3-DFPWP_cf931841a25d69cf/p2d377017/abb592f73ff9c/registration.html
to maintaining a friendly culture in the Whitney wilderness.
Cultural ConcernsWe have no cultural concerns for the Sierras
Land ManagementPermits are required for the Whitney Portal area as follows:Whitney Portal - $20Twin Lakes - $18Marina Parking - $1Permit for Whitney – $30Permit for Hulk – $25Total – $103
Permits are attainable through the local ranger station, but must be applied for early.
IV. Risk Management
Objective Hazards-Severe Weather-Rock Fall-Altitude
Subjective Hazards-Leader Falls-Human Error-Other Parties-Power dynamics in decision making
Hazard MitigationThe mountains are a great passion not just for what they can give, but also what they can take. They say that true loveonly occurs when we are totally vulnerable to that which we love and vice-versa. This observation is especially fittingfor the backcountry. While our inspiration lies in the hills, we are also profoundly vulnerable to them, and they arelikewise vulnerable to us for our human impact. These will always be the facts of exploring the wilderness, but there isa way to experience the mountains responsibly so as to avoid this unfortunate truth. Although the objective hazards inthe Sierras are relatively mild insofar as alpine territory goes, they are nonetheless serious, high altitude, fifth class,backcountry peaks worthy of all precautions.
Rock Fall - Rock fall is one of the most serious concerns when spending long days on vertical walls. Rock qualityvaries at different geological layers, and climbers are especially vulnerable when tethered to belay anchors or on lead.Communication is key in mitigating this hazard. Alerting the belayer when the leader enters into loose terrain, calling“rock” when holds or items fall, and being cautious about using loose holds are all necessary components of avoidingrock fall injuries. The simplest and most effective way to protect against rock fall accidents is to strategically placebelays out of the way of potential rock fall. Belays should be made under safe block features when possible, and outfrom under “bowling alleys” where rockfall funnels. We both have formal training in safe anchor building and havedealt with loose rock on a variety of stone types.
Severe Weather - The Sierras are graced with relatively predictable California weather patterns, but storms are notinfrequent. Climbers and hikers die nearly every year from weather exposure during afternoon storms. These stormsare generally well anticipated by weather forecasters, but mistakes can still be made. As climbers, we are especially

1/6/16, 12:01 PMRegistration
Page 7 of 10https://apps.ideal-logic.com/worker/report/28CD7-DX6C/H9P3-DFPWP_cf931841a25d69cf/p2d377017/abb592f73ff9c/registration.html
vulnerable to severe weather as we lack the option to find cover when on a long route. Weather hazards include highwinds, precipitation, and, most importantly, electrical storms. Preventative decision making is the best way to avoidthese situations. This means paying close attention to forecasts to choose a quality weather window, and making ourown assessments of cloud patterns while on route. Combined, Carson and I have nearly ten years of experiencereading mountain weather patterns in the Cascades, Canadian Selkirks, Purcells, Rockies, New Zealand, and Alps.We also have access to instruments such as barometers should we decide they are necessary. While thoughtfuldecision making is effective, we still cannot rule out the possibility of getting caught in a sudden storm. In this case, wewill bring adequate layering for a rapid descent. Emergency descent plans will be made for every route mostly relyingon rappels off of bolted anchors.
Cold - While cold injuries are extremely rare in the Sierras in the summer (Average lows on Mt. Whitney in June are60 degrees), large rock faces are especially exposed to the elements. Here wind and rain can exacerbate cold relatedhazards. Perhaps the most common cause of cold injuries on rock routes has to do with constricting rock shoes whichlimit circulation, thereby increasing the risk of frostbite. To account for this risk, we will bring adequate layering andapproach shoes to make a retreat in especially cold, windy conditions. We know how to stay warm and dry in amountain environment and will employ this experience to avoid cold injuries.
Leader Fall - Leader falls are a last resort when climbing long, committing walls in a backcountry environment. Fallsshould only be considered on clean steep walls with good protection and even then be avoided if possible. While weare confident in our ability to navigate ledgy, low angle terrain without falls, and have only chosen routes well withinour grade capacity, we cannot rule out the possibility of a fall. For this reason, attentive belays will be mandatory toprevent the leader from hitting large features or flipping upside down. As lead climbers, we will be diligent aboutplacing the best protection available even in easy terrain to protect for an unexpected fall due to rock breakage orhuman error. We both have many years of experience leading traditionally protected pitches and know proper fallingtechnique on both the climber’s and belayer’s side. Additionally, none of the routes we have selected should requiresimul-climbing for speed purposes.
Benighted - While we are confident in our ability to climb our chosen routes quickly within a day, we are also preparedto change plans if difficulties slow our progress on a route and force us to spend the night. First off we will carryheadlamps on all routes we attempt. If we decide that a safe descent is possible by headlamp, this will be our primaryoption. If descent is made too complicated by dark, we will have the resources to spend the night on a ledge. Most allthe routes we are considering have usable bivy ledges. Information about possible bivy sites is available online and inseveral published guidebooks for the area.
In certain circumstances it can be preferable to continue on even after darkness comes. Many routes have walk offfinishes, in which case climbing a few pitches in the dark to find the walk off can be advantageous. We both haveexperience climbing and descending routes by headlamp. We will use good judgement to decide whether retreat oradvance is the best option.
Altitude - We have both spent considerable time at high altitudes without issue, including climbs up Mont Blanc(15,778ft) and many 14,000ft peaks. This, however, does not secure our safety going forward. While good hydrationand eating can help, the causes of AMS, HACE and HAPE are still mostly unknown, and symptoms can ariseunexpectedly. The best way to avoid altitude problems while on route is to establish a high fitness level before the tripand spend an appropriate amount of time acclimatizing. If a team member begins to show symptoms of AMS, we willstop to rehydrate and eat. If symptoms do not improve, the decision to turn around may be made. If a member startsto show symptoms of HACE or HAPE, we will descend to lower altitude immediately and use our WFR training tomonitor the patient and consider an evac.

1/6/16, 12:01 PMRegistration
Page 8 of 10https://apps.ideal-logic.com/worker/report/28CD7-DX6C/H9P3-DFPWP_cf931841a25d69cf/p2d377017/abb592f73ff9c/registration.html
Human Error/Other Parties - The human factor is both the hazard that results in the most backcountry injuries, and theone we theoretically have the greatest control over. Competence belaying, rappelling, placing gear, and understandingrope systems without fail is absolutely essential to climbing routes safely. Having a mutual understanding of all thesesystems within a partnership is the real challenge in putting one’s training to the test. We are committed to buildingthis mutual understanding by practicing our systems weekly to reinforce proper procedure as second nature. Whilepractice is indispensable it does not reduce the need for diligence and mindfulness on route. Regardless of howcomfortable we are with a certain procedure, we cannot get cavalier about executing that procedure. Safety checkswill be mandatory at all transitions. We will rappel off of extended auto-blocked devices.
Other parties are also a concern when on route. Climbers overhead can drop gear or cause rockfall and aresometimes out of earshot. To mitigate the potential for a rock fall injury from a party above, we will use goodjudgement about how closely to follow and when to pass if appropriate.
Special PreparednessWe will carry a Delorme InReach device with gps mapping, message transmitting, and receiving capabilities. This willbe our S.O.S communication device. I have owned it for over a year now, and know how to use it well. We may bringbear spray, but will communicate with rangers in the area about whether or not it is necessary. We also have rescueinsurance from the American Alpine Club. We have no medical conditions that require other special preparedness.
Emergency PreparednessEvacuations in the Sierras can be long, tedious, and difficult. Rappel descents, large talus slopes, and multi-mile treksall pose substantial challenges to a successful and quick evacuation--especially in the case of an immobile patient.For these reasons, self-sufficiency and good decision making are essential to safe passage through this range. Alldecisions must be made with the understanding that we alone are responsible for our safety. While the Whitney Portaldoes have an active and experienced rescue program by virtue of the high hiking traffic, it is by no means a safetyblanket. Helicopter evacs generally available no sooner than an hour after S.O.S transmissions and can facecomplications from weather and landing locations.In case of an emergency worthy of evac, several options will be considered. Firstly, if an injury is deemed time-sensitive, we will elicit a rescue response with California Search and Rescue and coordinate a rendezvous point nearthe base of our route (we will carry a personal Delorme “InReach” device for rescue communication). From here wewill descend our route to meet SAR. We both have the skills necessary to descend with an immobile patient includingbuddy rappels, and escaping belays. These will be key skills to practice before the trip. At the base of the route, wewill use our WFR training to prepare the patient for evac and remain in contact with rescue teams.If a team member suffers a less critical, non time-sensitive injury, we will descend to our bivvy before making furtherassessments. If the patient is able to walk, our likely plan of action will be to dress, splint, or medicate their injuryaccording to WFR protocol and hike out. If the patient is unable to walk, but can tolerate some time spent at a bivvy,we will coordinate a evac with SAR either via Helicopter or team carry (although this option is unlikely if we are farfrom the trailhead).Part of making wise evacuation decisions is keeping an open dialogue between the patient and caregiver. Doing acomprehensive patient assessment as soon as it is safe to do so is a key step in educating an evac decision. Patientsshould be monitored according to WFR protocol in case circumstances change. We must always be ready to changeevac plans if a patient’s condition becomes more critical.
Emergency ResourcesWhen within cell phone range, 911 can be used to elicit a rescue response.
Inyo Search and Rescue (INYOSAR)
P.O. Box 982
Bishop, CA 93515

1/6/16, 12:01 PMRegistration
Page 9 of 10https://apps.ideal-logic.com/worker/report/28CD7-DX6C/H9P3-DFPWP_cf931841a25d69cf/p2d377017/abb592f73ff9c/registration.html
(760)-878-0383
California Explorer Search and Rescue (Cal-ESAR)
205 DeAnza Blvd., #30
San Mateo, CA 94402
(650)-340-4779
American Alpine Club:
Global Rescue Hotline - (650)-459-4200
INYOSAR and Cal-ESAR are both trained in
-Technical rock rescue
-Avalanche Rescue
-Search and Tracking
V. Budget
Budgetbudget.pdf (49KB)Uploaded Jan 4 4:57pm by Jackson Schrott
Transportation187.6
Food and Fuel392.81
Maps and Books30
Communication Device Rental0
Permits/Fees103
Gear Rentals100
Total Funding Request813.41
Appendix C

1/6/16, 12:01 PMRegistration
Page 10 of 10https://apps.ideal-logic.com/worker/report/28CD7-DX6C/H9P3-DFPWP_cf931841a25d69cf/p2d377017/abb592f73ff9c/registration.html
Cost Minimization Measures-We will being doing all of our food shopping in bulk at Winco Foods-We already own an emergency communication device and own a coverage plan-Commiting to driving to our destination rather than flying
VI. Expedition Agreement
Expedition Agreement
Grant Agreement.jpg (469KB, 2550x3300px)Uploaded Jan 4 5:11pm by Jackson Schrott
Day 1 - June 18th:Rendezvous at one of our homes in Portland, ORDrive from Portland to Whitney Portal, CA (13-14 hrs.) via US-395 SouthArrive in Whitney Portal and drive along Whitney Portal Road until the trailhead at which there is a walk in campground ($10) where we will spend the night. If this campground is full, we will camp at the Whitney Portal Campground for $17-20
Day 2 - June 19th:Wake up at the trailhead and begin hiking along the North Folk Lone Pine Creek Trail until it ends at Iceberg Lake (Map 1)Camp at Iceberg Lake (main camping area for the Whitney zone part of the trip)
Day 3 - June 20th:Warm ourselves up to the area by climbing the East Face of Whitney (5.6, 10 pitches). While it may seem ambitious to go for a ten pitch route right off the bat, much of the rock climbing involved in the route is straightforward and well within both our abilities. (Topo 1/2)
Day 4 - June 21st:Attempt the East Buttress of Mt Whitney (5.7, 11 pitches). Again, considering our familiarity with this level of climbing and having climbed a similar route the day before and now being familiar with the area and descent, this route seems more than plausible. At this point we hope to be comfortable enough to move on to climbs that may challenge us more physically. (Topo 3/4)
Day 5 - June 22nd:Attempt FIshhook Arete on Mt Russell (5.9, 8 pitches). This route is extremely aesthetic and is something we’re both really stoked to get on. Trip reports on mountain project and supertopo show that there are only a few brief sections of actual 5.9 difficulty, with which both of us are very comfortable. The real crux is said to be tricky route finding and incredible exposure, two things which we are excited to test ourselves with. (Topo 5/6)
Day 6 - June 23rd:Attempt Western Front (5.10c, 6 pitches) While this route does take the physical challenge up a notch, it only features two pitches of 5.10 climbing, a grade with which both of us feel comfortable. The route may also prove to be less time-restricted due to our familiarity with Russell from the Fishhook Arete the day before. (Topo 11/12)
Day 7 - June 24th:Rest/hopefully celebrate/prepare for Keeler Needle/potentially scope out base and beginning of Harding Route
Day 8 - June 25th:Initiate Operation Baba Black Sheep - Mission Keel the Needle: Attempt the Harding Route (5.10+, 22 pitches) on Keeler Needle. Hardings Route is definitely a step up in sustained difficulty and length, as it will challenge our physical abilities, our technical efficiency and our mental focus. While the clean ascent is uncertain, the actual summit is a point of confidence. The descent is the same as the East Face of Whitney, which gives us a slightly larger comfort margin in case we were to get stuck at some point. (Topo 9/10)
Day 9 - June 26th:
Appendix A

Attempt Mithril Dihedral (5.9+, 6 pitches) Just like the Fishhook Arete, this route is extremely aesthetic and has made both of our jaws drop on separate occasions. The meat of the route is the first 250 feet, a crazy looking dihedral that can be done in a variety of ways. One of the ways involves breaking the pitch up into three separate pitches, each of which go at 5.9. Because of this, we feel that even if for some reason we weren't able to complete the more challenging way (climbing the dihedral in two 5.10 pitches) we feel confident doing it in the easiest fashion. (Topo 7/8)
Day 10 - June 27th:Wake up early and hike back out to Whitney PortalDrive to Twin LakesCamp at Mono Village Campground ($18/ night at 7,100 ft.)
Day 11 - June 28th:Wake up around 9am, pack upPark at the Mono Village Marina ($10)Approach the Incredible Hulk (More extensive info on the approach can be found in the attached route descriptions)Arrive at the base of The Red Dihedral and camp for the night
Day 12 - June 29th:Attempt Red Dihedral (5.10) This route is almost as physically challenging as the Harding Route, and poses the additional challenges of route finding and figuring out the descent in a new area. However, the route sports only 2 pitches of 5.10 difficulty and the night before the plan is to camp at its base, allowing us to maximize the time necessary to climb and descend the route. (Topo 13/14)
Day 13 - June 30th:Rest/Prepare for the following day
Day 14 - July 1st:Attempt Sunspot Dihedral (5.11b). Sunspot Dihedral is physically the hardest route we intend to try on the trip, as well as the final route. If our skin and muscles don’t fail us, we think this route will be just at the threshold of where we want to be skill-wise by the end of the trip. It features 2 pitches of 5.11a and several more of 5.10. Having hopefully climbed the Hulk 2 days prior and being familiar with the descent, we hope to be comfortable climbing at our limit on this style of climbing and efficient enough with our systems to be able to do this route with confidence. (Topo 14/15)
Day 15 - July 2nd:Hike out from the Hulk to the Mono Village Campground, sleep
Day 16 - July 3rd:Wake up in Mono Village and drive back to PortlandCelebrate in a way that doesn't involve illicit activities

4. Descriptions of each route and its approach and descent
*Note: We plan to get on a schedule of waking up just before dawn in order to maximize our use of the daylight. The last thing we want is to be benighted on any of these routes unprepared. Mt Whitney
Approach
Hike along the North Folk Lone Pine creek trail from its beginning at the Whitney Portal to it’s end at Iceberg Lake (our main camping spot). The only thing separating this sport from the route bases are gentle scree slopes. Descent
The usual descent from the top of Whitney is to hike down the Mountaineers Route, which goes down a 3rd/4th class ridge and leads into a steep but stable gulley that reconnects with the brief approach. East Face of Whitney (5.6, 10 pitches) “From Iceberg Lake, scramble up to the notch just above the First Tower. Gear up. Make the Tower Traverse across the south face of the Second Tower, and climb a short chimney (5.45.5) to the first belay. Scramble or simul climb up three pitches of 4th easy 5th to the top of the Washboard. Climb left up and over a tower/chimney (5.25.5) to a large ledge, and traverse to the base of the Fresh Air Traverse. The Fresh Air Traverse pitch (5.5) climbs easy ground up then left to three fixed pitons. Enter and belay in a chimney. The traverse is exposed and fun. From the ledge, do not traverse directly left. Climb up blocky ground first. Once in the chimney, climb up the Grand Staircase for 3 pitches, to the 5.65.7 offwidth pitch(es). This is the crux, then its easy ground up and right to the summit. One set of cams, 12 sets of nuts. Helmet!!!” Mountain Project This route is 10 pitches, which is definitely not short, but it seems most of the climbing is straightforward and easy relative to our physical abilities. We don’t anticipate this route to challenge us physically, but we do anticipate tricky route finding despite the elaborate topo from SuperTopo. We plan to bring 2 sets of nuts, Cams from .6 3” and a sh*tload of slings.

East Buttress of Whitney (5.7, 11 pitches) “Eleven fairly consistent pitches on excellent rock. The route starts up a scree slope where you head to leftfacing corner on the right side of the "second tower", which is directly on the east buttress. It's pretty easy to stay on route don't stray far from the true buttress. If it's obviously harder than 5.7, look around and get back on route. p1. Easy climbing up the corner. 5.55.6 p2. Nice face climbing. 5.65.7. p35. wander around the buttress taking whatever line looks best. Head for the left side of "the peewee" a huge roof/block that looks rather ominous. 4th5.6 p6. up the left side of the peewee. usually dark and cold. Feels good to get on top of it. 5.6 p711. cracks and blocks that generally trend left. The more left you go, the sooner you'll hit a talus field and start walking to the top. Climbing stays easy right on the buttress, with a few boulder problems to overcome.
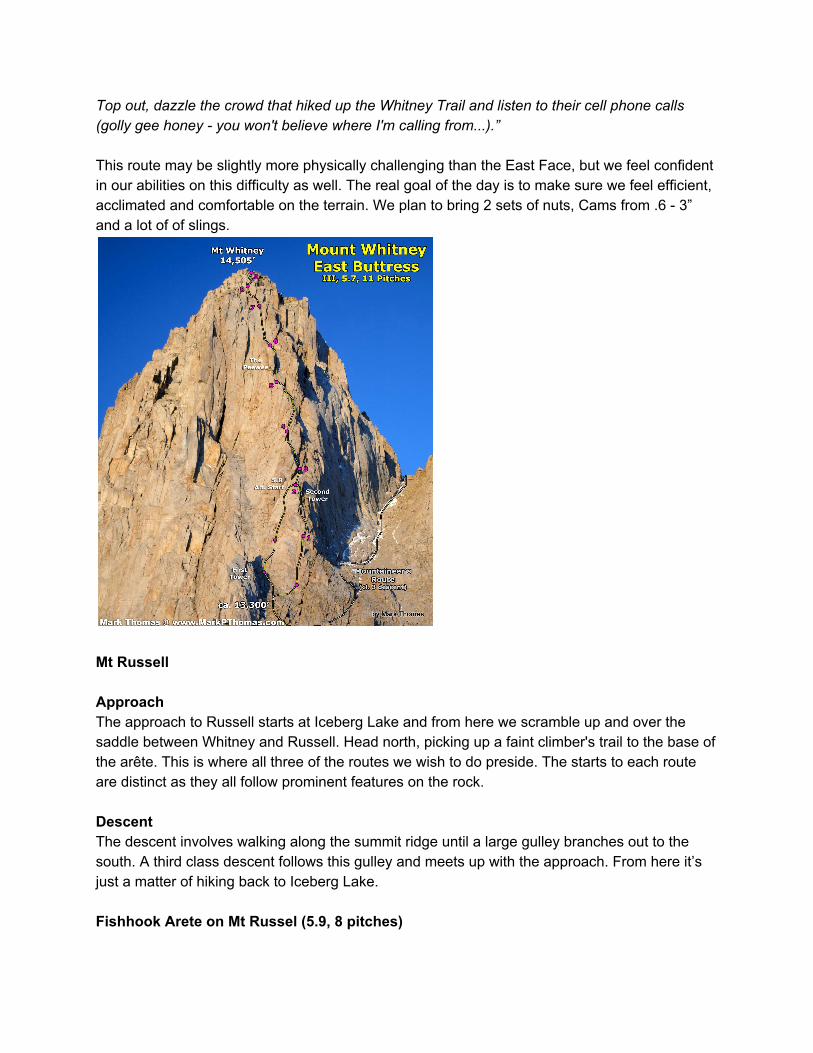
Top out, dazzle the crowd that hiked up the Whitney Trail and listen to their cell phone calls (golly gee honey you won't believe where I'm calling from...).” This route may be slightly more physically challenging than the East Face, but we feel confident in our abilities on this difficulty as well. The real goal of the day is to make sure we feel efficient, acclimated and comfortable on the terrain. We plan to bring 2 sets of nuts, Cams from .6 3” and a lot of of slings.
Mt Russell
Approach
The approach to Russell starts at Iceberg Lake and from here we scramble up and over the saddle between Whitney and Russell. Head north, picking up a faint climber's trail to the base of the arête. This is where all three of the routes we wish to do preside. The starts to each route are distinct as they all follow prominent features on the rock. Descent
The descent involves walking along the summit ridge until a large gulley branches out to the south. A third class descent follows this gulley and meets up with the approach. From here it’s just a matter of hiking back to Iceberg Lake. Fishhook Arete on Mt Russel (5.9, 8 pitches)

The route has many different ways to start, but the SuperTopo guidebook suggests starting outside the arete on the face, and this appeals to us because we feel most comfortable face climbing. Pitch 3 features a route finding crux, but this can be easily avoided by the helpful topo info found in Image 1. From here the climbing is straightforward until pitch 7 where its been emphasized that climbers must stay true to the arete if they wish to stay on route, and this is what we will do. Then the physical crux comes with pitch 8, a 5.9 offhands section which we hope to climb clean. We plan to bring 2 sets of nuts, 2 sets of cams from .6 3” and a LOT of of slings.
Mithril Dihedral on Mt Russel (5.9+, 6 pitches)
“The route starts with a few approach pitches to the stunning 250foot giant dihedral. The climbing is sustained, vertical, and gets harder the higher you climb. If you break this pitch into three of short pitches, its probably 5.9. If you climb it two longer pitches it gets a 5.10b pumpy rating at the top. Bring lots of 12.5inch cams and be prepared for at least one offwidth pod. You then cruise up mostly easy climbing to the summit. Scramble up to ledges. Below is how we did it years ago before real beta, we just knew it had been climbed and that was it. See comments for modern beta. P1 5.7 Follow cracks up to a ledge. P2 5.7 Better rock leads up along a knobby crack to a ramp below the corner proper. P1 and P2 can be combined with a 70m rope P3 5.9 A short pitch. Up the corner steeply to belay in a widening section.

P4 5.9 Up the steepest part of the corner until the angle relents. P3 and P4 are best combined into one pitch. P5 5.9 The corner presents one last obstacle, a steep lieback to exit right onto a ledge. P6 Hundreds of feet of CL4 lead to one of the best summits anywhere.” The above info is actually more extensive than the SuperTopo guidebook oddly enough. Regardless, the info is sparse, and the climbing isn’t easy, but luckily it seems as though the route follows clear features from base to summit which gives us confidence in the route finding department. We probably won’t combine the first two pitches, but may try to combine pitches 3 and 4. We plan to bring 1 set of nuts, doubles in cams from .75 3”, one size 4 cam and a lot of slings.
Western Front on Mt Russel (5.10c, 6 pitches) “P1 easy and about 80 feet to a ledge P2 kicks your butt right off the ledge for about 30 feet of 10c(hard 5.9), then stays sustained 5.9 for about 120 more feet. P3 is 5.9 with a traverse and some funky arete climbing in double/triple flaring cracks. P4 is like P3 but a little harder up the arete. Croft says to back up the loose flake with a purple tcu. We did that. I also found a red camalot placement up the arete about 4 feet higher. The red cam was the only thing that I think made the anchor solid. P5 is long sustained 10a climbing up the dihedral for about 185 feet. Belay takes anything from yellow alien to yellow camalot, so save some gear. We belayed high on the ledge on the right side, after finishing the left facing dihedral. P6 was really fun 5.8 climbing in great hand and finger cracks. P7 was a long simulclimb to the top.
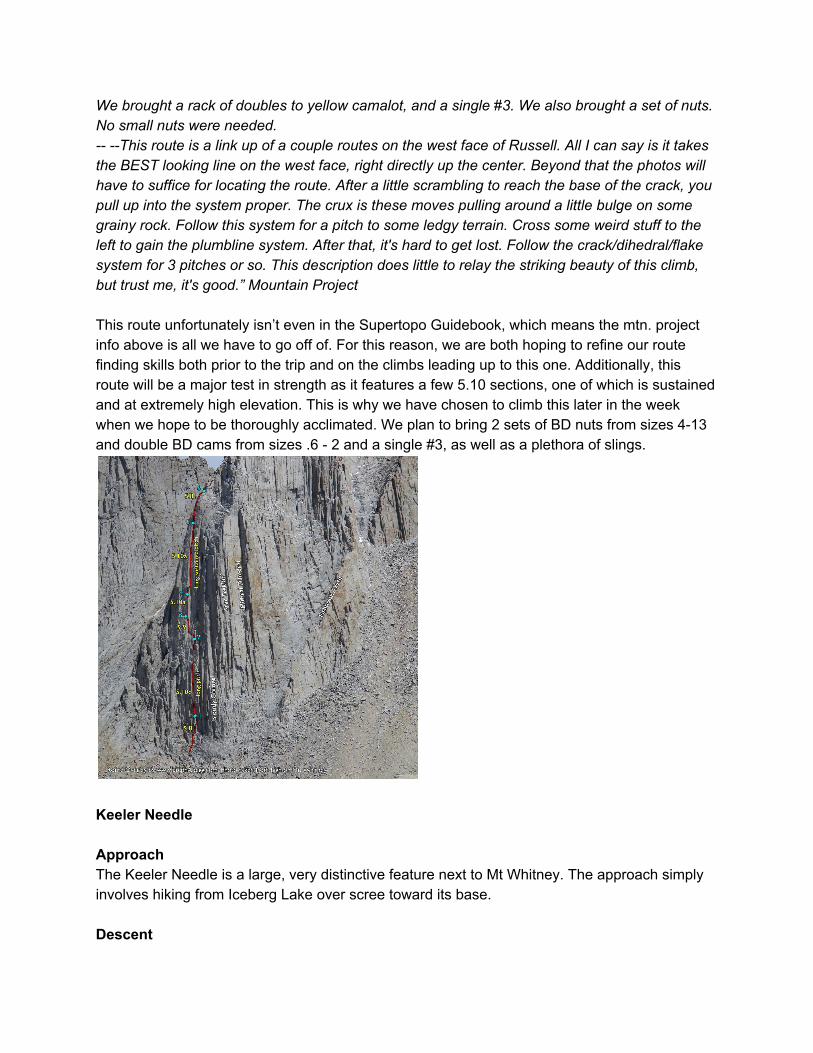
We brought a rack of doubles to yellow camalot, and a single #3. We also brought a set of nuts. No small nuts were needed. This route is a link up of a couple routes on the west face of Russell. All I can say is it takes the BEST looking line on the west face, right directly up the center. Beyond that the photos will have to suffice for locating the route. After a little scrambling to reach the base of the crack, you pull up into the system proper. The crux is these moves pulling around a little bulge on some grainy rock. Follow this system for a pitch to some ledgy terrain. Cross some weird stuff to the left to gain the plumbline system. After that, it's hard to get lost. Follow the crack/dihedral/flake system for 3 pitches or so. This description does little to relay the striking beauty of this climb, but trust me, it's good.” Mountain Project This route unfortunately isn’t even in the Supertopo Guidebook, which means the mtn. project info above is all we have to go off of. For this reason, we are both hoping to refine our route finding skills both prior to the trip and on the climbs leading up to this one. Additionally, this route will be a major test in strength as it features a few 5.10 sections, one of which is sustained and at extremely high elevation. This is why we have chosen to climb this later in the week when we hope to be thoroughly acclimated. We plan to bring 2 sets of BD nuts from sizes 413 and double BD cams from sizes .6 2 and a single #3, as well as a plethora of slings.
Keeler Needle
Approach
The Keeler Needle is a large, very distinctive feature next to Mt Whitney. The approach simply involves hiking from Iceberg Lake over scree toward its base. Descent

The descent involves a long but straightforward hike from the summit of Keeler to the Summit of Whitney, and from here descending the Mountaineers route which hopefully by now we will have already done several times. Harding Route on Keeler Needle (5.10+, 15 pitches) Pitch 1: Start from the sandy ledges on top of the snowfield (see topo). Go up a clean finger/hand crack and traverse left under a small overhang (5.9). There are fixed slings just above the roof. Set the belay here or go left and up (5.7) and set the belay on a good ledge below a wide crack/chimney. Pitch 2: Climb the crack into a steep alcove covered with an overhang (some rotten rock in the crack). Climb the overhang (5.10b, #13 camalots), continue and set up a belay using two old bolts. Pitch 3: Climb the overhanging double cracks (5.10b, #12 camalots), continue up (5.78). Just below the rap slings go right around the arete and up into an uncomfortable alcove below a steep wide crack. Pitch 4: Climb the fun wide crack which eventually turns into a 5.10a offwidth. Pull the crux at the chockstone and end the pitch at a wide ledge. This pitch could be protected with small and medium nuts and cams. Wide gear (#4, #4.5 cams) is useful, though. Pitch 5: Go up and right on a 5.6 terrain and set up belay on the right end of the ledge. You should see the Red Dihedral from here. Pitch 6: Climb initial class 5 ledges and short 5.8 cracks into the sloping ledge at the beginning of Red Dihedral (some fixed gear). Pitch 5 and 6 could be simulclimbed. Pitch 7: Red Dihedral . This is the most spectacular pitch on the climb. Long, sustained, and well protected 5.10a. Climb this pitch all the way to the ledge at the base of a wide flare (great site for bivy). Medium nuts, double on #1, #2 cams. Pitch 8: Crux. Begin in a hand crack to the right and after 20 feet traverse left into a flare. Go up 5.10c offwidth . It's possible to place medium gear inside the flare but the inner cracks are rotten so wide gear (up to #5 cam) is useful and assuring. The difficulties ease off to 5.89 after the three crappy bolts on the right. I would suggest setting a belay just above the flare, in a wide chimney. The rock here is solid. There's a good ledge higher up, on top of the chimney (supertopo indicates a belay there) but the rock quality there is crap. Pitch 9: Climb the right wall of the chimney (5.8 medium cams), step left and finish on top of a curving chimney (5.8, loose). Pitch 10: From here you will see tempting 5.7 cracks that go straight up. Don't go there. Start going diagonally right until you reach a ledge with boulders at the base of the final headwall. If you continue the 5.7 straight up cracks, you'll end up to the left of the ledge and will have to do a risky traverse right in suspect rock and with sparse gear (we did). Pitch 11: Several options (see topo). The cleanest is climbing a distinct vertical 5.10a crack cutting the headwall. The easiest is going right and around the wall and climb loose class 5 up and then left. Set a belay where the 5.10a finishes. Pitch 12: Make a short traverse right until under a system of cracks with a chimney to the right. Pitch 11 and 12 could be compressed to a single pitch by simulclimbing (on the easier option). Pitch 14: Climb the 5.8 cracks to the ledge under the summit blocks.

Pitch 15: Climb or simulclimb the class 45 blocks to the summit. This route will be a test for us in every department: efficiency, strength, mental focus and spiritual mojo. What concerns us most about this climb is the difficult 5.10 offwidth sections that occur in pitches 4 and 8. We’re not necessarily bad at offwidth climbing, but we aren’t really good at it and for that reason we plan to climb at least 5 offwidths each prior to the trip. Additionally, this means we will backpack in two 4’s and one 5, and will likely only bring them on this climb. Currently we don’t plan to simulclimb an of the pitches as this constitutes unsafe practice. The beta suggests simulclimbing the last 45 pitches, but instead we are going to employ standard belay practices. We plan to bring 2 sets of cams from .4” to 5”, 1 set of nuts, a variety of slings and 2 extra large doses of cojones. The Incredible Hulk
Approach (from SuperTopo High Sierra Guidebook) “The approach takes most climbers 34 hours from Twin Lakes to the base of the climb (slightly longer if you are carrying a heavy pack) and involves 2.5 miles on the main trail, 2.5 miles on climbers’ trails and crosscountry travel, and gains about 3,400 feet in elevation. Finding the trailhead is difficult as you must navigate through the mazelike RV campground. (If getting a predawn start, scope out this section the day before.) Follow the main road due west. After a fire hydrant and before a bridge, turn right off the dirt road onto the Barney Lakes Trail that leads along Robinson Creek. If you cross the bridge, then you have gone too far. Walk on this trail for approximately 45 minutes (2.5 miles) until you reach a large pine tree with an equally large boulder sitting in front of it to the left of the trail (see photo.)There may also be cairns marking this turn. This should be few hundred yards before Little Slide Canyon. From this point, turn left and walk crosscountry southwest, angling toward Robinson Creek. After 100 yards, look for an opportunity to cross the creek on downed logs and beaver dams. If you find yourself in a big marsh with tall grass, you should probably reverse your steps and find a crossing farther east. After the crossing, walk along the west shore of Robinson Creek for a few hundred feet, locating a climbers’ trail that enters a prominent grove of pine trees on the east side of Little Slide Canyon. The trail ascends steep dirt switchbacks through these trees for the next few hundred yards. Take the time to find this trail, or you will be bushwhacking forever up the middle of Little Slide Canyon. At times it will be hard to see where you are going because the Hulk itself will not be in view, but from here it is possible to follow a climber’s trail all the way to the final talus field below the Hulk. The switchbacks eventually flatten and, after another few hundred yards, the trail ends in talus. Stay on the left (east) side of the canyon and follow the edge of the talus until you are forced into it. Follow a climber’s trail through the talus, which leads to a creek crossing with a little footbridge. Cross this bridge and continue up the trail on the west (right) side of the creek, picking your way through talus until you reach the base of the Hulk.” There are definitely a lot of ways to go wrong with the approach, but we intend to take every possible measure to avoid screwing up. We plan to scope out trailhead day before to avoid

losing ourselves in the dreaded rv maze. We also will bring a copy of the photo provided with the above description which makes it very obvious where the climbers trail turns off. The river crossing is over a very shallow, nondangerous part of the river that’s very easy to find from the main trail. There is a helpful video located at http://www.csheast.org/blog/2009/08/reddihedralvideo1theapproach/ which show the exact features that need to be found. From here the approach follows prominent natural features and we feel confident we will be able to find our way to the climb. Descent (from SuperTopo High Sierra Guidebook) “There are two ways to get off the Hulk: a walkoff or a rap route. The walkoff is most convienient for routes that top out on the summit proper, such as the Red Dihedral and Falling Dihedral, whereas rappelling the Venturi Effect rap stations is more desirable for routes like Positive Vibes and Sunspot, since it prevents a tedious traverse to the summit. Walkoff: This descent still requires one rappel, takes about 45 minutes to get from the summit to the base of the route, and another 23 hours to get back to Twin Lakes. Only one 50m or 60m rope is required for the one rappel on this descent. From the summit, downclimb the steep 3rd class on the south ridge (opposite direction of the climbing route) for about 300 feet to a rappel anchor (bolts and slings). It helps to locate the rappel anchors when you are about 40 feet below the summit. Make an 80foot rappel to the notch between two gullies: one leads to the north (toward Twin Lakes) one leads to the south (away from Twin Lakes). Take the south gully (the north gully is usually filled with ice and really dangerous). Downclimb 3rd class for a few hundred yards. When the gully opens up, stay left (staying right sends you over a steep cliff). Eventually gain the main talus and scree gully that wraps around to the base of the climbs. Reverse the approach. If you need motivation for the descent, think of the burgers and fries that await at the trailhead grill (open until 9 p.m.).” While the Rap Route is recommended for the Sunspot dihedral, we have chosen to traverse to the proper summit of the hulk for a number of reasons: we will be familiar with the walk off, we want to be on the actual summit, and we don’t plan on bring the necessary 70m rope. The descent is mostly straightforward assuming we can find the single set of rap anchors. If not, we are willing to leave gear behind and perhaps get it back on our rest day in between the two climbs. The Red Dihedral on The Incredible Hulk (5.10b, 12 pitches) “P1 Class 4 ramp/cracks lead to the first stiff bit a 5.8 bulge above a short corner a couple of moves regain easier climbing and a ledge below a steep vee chimney. P2 (long pitch) A technical, steep, and strenuous pitch. The chimney is tricky, follow cracks and vertical flakes up and right, with another cruxy move before the old stance (and a bolt) keep going up enjoyable and technical moves until right underneath the Red Dihedral, stiff final moves lead to a small footledge (small pieces), rappel slings located here. Some sparse protection in places.

P3 (CRUX) Your mates big lead. Steep and sustained 5.10 dihedral with good pro to the best rest beneath the bulge, over the bulge (5.10) to a step right, then big flakes to a belay alcove a superclassic pitch. P4 (long pitch) Around onto the exposed ramp which leads steeply to easier ground, with strenuous steeper bits (5.9), followed by a 5.6 ramp/groove to a ledge below the "Splitter Crack". P5 (200ft) Nice approach to the splitter @ 5.10a (pure and classic), or a dihedral to the left at 5.9 (more varied) it all depends upon what you like. Continue up more steep steps and cracks barely reaching a notch beneath the "Shattered Pillar". P6 Left of the pillar, corner and cracks lead to a fierce lttle lieback and a superfluous bolt. Ledges then to a 5.8 lieback, then a ledge on the left. P7 Up the easy corner/slab, then right beneath an overlap to a steep crack through a horizontal crack with a bulge (5.9) to step right onto a ledge/ramp, go right then up a steep crack, wander then to a ledge below a corner, and a wavy crack. P8 The corner and crack (5.7) lead to a slab and the notch in the north ridge. P9 The Class 3 ledge easily (with a final exposed step) to a chimney jammed with big blocks. P10 The chimney at 5.8, over blocks to a large ledge. P11 (short) The 5.8 corner behind (will it ever end?) and up the sandy ledge (ugh) to the bottom of the final chimney. P12 The chimney (5.6) to the "Keyhole" where you make your final strenuous effort and are finally birthed by the Red Dihedral. Big people will have trouble shed all gear. “ While this climb is long, it isn’t quite as sustained as the Harding Route. The major pitches are 2, 3 and 4, and for these we hope our last week of sierra climbing will assist us, but we also feel confident about doing these regardless of previous experience. We intend to bring 2 sets of nuts and 2 sets of cams from .63”, plus a lot of slings and and a lot of stoke.

Sunspot Dihedral on The Incredible Hulk (5.11b, 9 pitches) “P1&2 Same as Positve Vibrations. These pitches can be linked with a 70m rope or a 60 and some easy simuling. 5.10c P3 Follow the leftmost crack off the big ledge. This is the same as P.V. until just after the roof, where PV goes right and Sunspot goes straight up. Build a belay just below the next set of roofs (up and left). A short pitch, 5.9. P4 Go up and left under the roofs, some wild underclinging here (10c). At the left end of the roof, make a big step left into a splitter crack. Climb this until it pinches down to a seam, and then step back right into the main dihedral. Climb the flared corner (tricky pro, offsets useful, 10b) up to a bolt, then step left onto a ledge. Climb up 20' of easy terrain off the ledge to a 2 bolt anchor. This is the first spectacular pitch! P5 The obvious leftfacing corner above. The crux (11a) comes directly off the belay, with some small stoppers/RPs for pro. The rest of corner is sustained 5.10, mostly fingers. There are two sections where large flakes stick out of the corner, forming minicorners on the left. In both of

these sections I found it easier to stay left, climbing the flakes. This is a long pitch, and it ends at bolts. This is the money pitch! P6 The crux (11b) again come right off the belay. Climb past two bolts (you can get small gear in before the first) in the overhanging corner, using stemming, face climbing, and liebacking. Once past this, you've reaching the eponymous Sunspot, and are rewarded with some spectacular 5.10 finger and hand crack. This is a shorter pitch, maybe 100', and it ends at one bolt (plus good gear). The third stellar pitch! P7 There are two left facing corners above, climb the left of these (11a). Follow parallel corners above, switching back and forth to whichever one seems easiest. (5.10) This is a long pitch, and it ends atop a block/ledge, belay with small gear just below a large chockstone. P8 Tunnel behind the chockstone and climb easy, loose terrain up the ridge, aiming for a large, steep, blank headwall. Belay on a sloping ledge just left of the headwall. 5.8 P9 Climb the short corner above the ledge (5.10), and then wander up ledges with a few more steep corners until you've gained the ridge proper. From here, it's 4th class along the ridge to reach the base of the summit tower. Here you have the option of a 5.8 loose chimney, followed by a tunnel through (I haven't done this), or a good looking 5.10 corner. Climb the corner, which gets wide (4") at its top, and then the striking finger splitter to the very top (5.10) This can be done as one long pitch.” This route is obviously the most physically challenging route we plan to get on. However, after browsing a plethora of trip reports, we feel up to the challenge. The real meat of the route comes in pitches 4, 5, 6, and 7, each with its own 5.11 crux, although each crux seems to be brief with 5.10 climbing following. However, the definite crux is in pitch 6 and is supposedly only difficult because of face moves on okay gear. Both of us feel very confident on difficult face moves as this is where we thrive as climbers, and for this reason we feel confident trying a route like this at our limit. If we fail to climb any of the pitches clean, we plan to bail and leave gear behind. However, we really don’t want to lose any gear, so this will only provide us with further motivation to free the route.
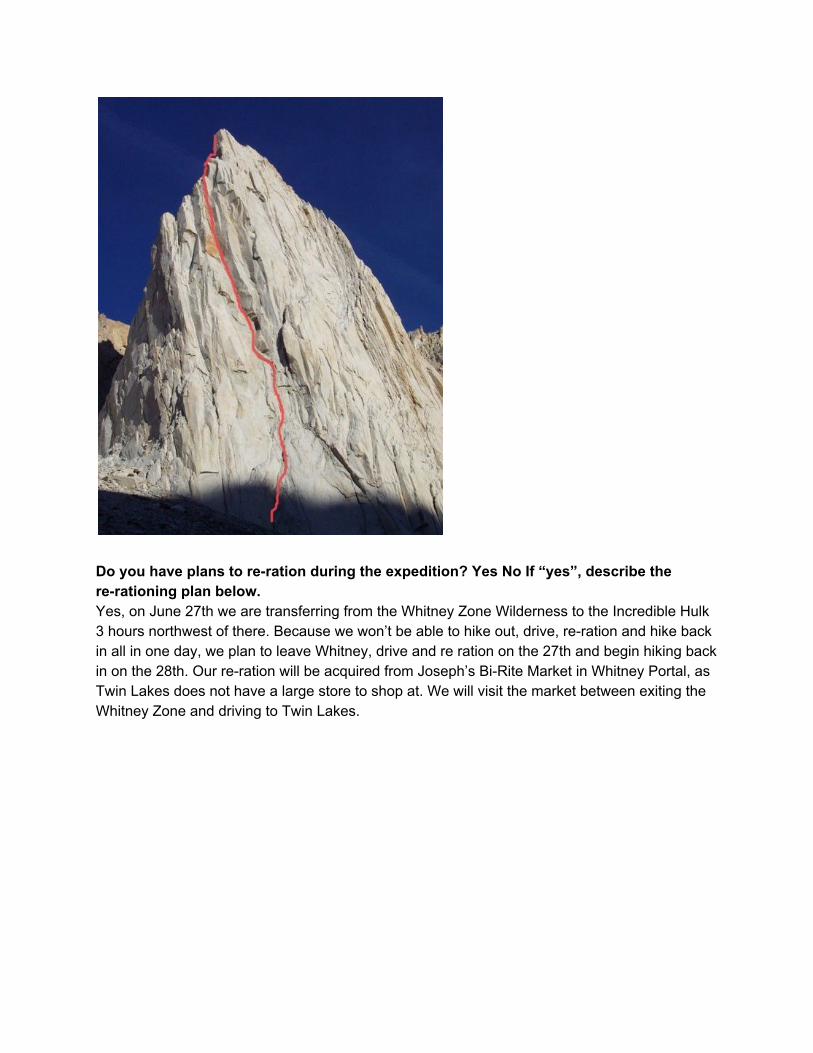
Do you have plans to reration during the expedition? Yes No If “yes”, describe the
rerationing plan below.
Yes, on June 27th we are transferring from the Whitney Zone Wilderness to the Incredible Hulk 3 hours northwest of there. Because we won’t be able to hike out, drive, reration and hike back in all in one day, we plan to leave Whitney, drive and re ration on the 27th and begin hiking back in on the 28th. Our reration will be acquired from Joseph’s BiRite Market in Whitney Portal, as Twin Lakes does not have a large store to shop at. We will visit the market between exiting the Whitney Zone and driving to Twin Lakes.

FOOD POUND PRICE/LB TOTAL($)
Breakfast: Pounds Price/LB Total($)
Granola 4 $5.04 $20.16
Hash Browns 2 $5.33 $10.66
Oatmeal 2 $3.80 $7.60
Powdered Milk 2 $8.50 $17.00
Lunch:
GORP Mix 2 $7.22 $14.44
Dried Apricots 3 $8.41 $25.23
Cashews 1 $8.16 $8.16
Dried Mangoes 3 $7.50 $22.50
Beef Jerky 5 $10.69 $53.45
Chocolate 1 $9.94 $9.94
Summer Sausage 2 $9.40 $18.80
Sharp Cheddar Cheese 2 $22.00 $44.00
Dinner:
Rice 4 $2.70 $10.80
Indian Fare 5.5 $9.70 $53.35
Potato Pearls 2 $3.00 $6.00
Dried Veggies 2 $7.82 $15.64
Pinto Bean Flakes 2 $6.74 $13.48
Pasta 2 $3.00 $6.00
Sauce Mix 1 $4.00 $4.00
Drink Mixes
Coffee 2 $7.50 $15.00
Electrolyte Mix 2 $8.30 $16.60
Appendix B

Totals 51.5 $392.81

Food $392.81 (Breakdown on Food List) Transportation If gas prices remain around 2.8 dollars a gallon: Taking 2003 Honda Odyssey on the Highway = 25 MPG (1623 total miles / 25 miles per gallon) = 65 gallons used 67 gallons X 2.8 dollars per gallon = 187.6 Permits/fees Whitney Portal $20 Twin Lakes $18 Marina Parking $10 Permit for Whitney – $30 Permit for Hulk – $25 Total – $103 Maps/Books Supertopo Guidebook $30 Gear Rentals/Equipment Bear Canisters $36 X 2 + $28 = $100 Total Funding Request: $813.41
Appendix C