ranu srivastava - oracle fusion · ranu srivastava 2 iprocurement introduction empowers any...
TRANSCRIPT

Ranu Srivastava http://apps2fusion.com
1
iProcurement Introduction..........................................................................................................................2 Creating a Catalog Requisition..................................................................................................................2 Creating a non-catalog Requisition...........................................................................................................3 Check out: 3 methods ................................................................................................................................4 Viewing the Requisition in iProcurement ................................................................................................10 iProcurement Features ............................................................................................................................10 Approving a requisition ............................................................................................................................11 Approval delegation..................................................................................................................................12 Receiving and returning under iProcurement.........................................................................................14 Receiving a purchased item against an approved requisition...............................................................14 Part receiving against a requisition .........................................................................................................15 Receiving against a specific item ............................................................................................................16 Receiving against several requisitions....................................................................................................17 Returning a receipted Item under iProcurement ....................................................................................18 My Profile ..................................................................................................................................................20

Ranu Srivastava http://apps2fusion.com
2
iProcurement Introduction empowers any employee to enter and submit a requisition online, eliminate the need for the buyer to re-key data, enforce Company’s requisition approval authority hierarchy, enforce Purchasing Policy, automatically source requisitions from outstanding blanket purchase agreements or quotations received from suppliers, deliver electronic notifications where action or advice to an interested party is required (i.e. Approval or Confirmation of approval / rejection).
Creating Requisitions
Company XYZ Inc purchases both direct items and indirect items: • Direct items are items for re-sale. These items include both tangible and non-tangible products and
services. • Indirect items are non-Company XYZ Inc product items that are not used for re-sale. These items include
operational goods and services such as stationery, consultancy services, fixed assets, sales and marketing material, etc.
A requisition is required to be created for all purchases. There can e afew exceptions to this rule • Company XYZ Inc Inc. Purchase Orders - Purchases of Company XYZ Inc . product do not require
requisitions. Purchase Orders will be created directly from the Company XYZ Inc. invoice • Order Directly from Supplier Web Site - Certain indirect purchases will not require a requisition or
purchase order to be created in Oracle as items are ordered directly on supplier web .The supplier’s invoice is sent to the Company XYZ Inc Operating Unit’s Accounts Payable Dept. This invoice will be uploaded into Oracle AP and paid.
• Self-use items – Internal purchases of items by departments for departmental use may not use Oracle requisitions or purchase orders. ‘Self Use’ orders can be entered in Order Management to perform the issue of these items to internal department location.
Creating a Catalog Requisition SHOP TAB Search main store Enter the product name or part of it. The search engine can search on partial descriptions as well. Press
the “go” button to proceed the search. The search brings up a search results page listing all the items that match the search criteria entered (please refer to next section). The search engine looks through both internal and externally loaded items internal or supplier’s catalogs).
Categories It is possible for the user to search the catalogs by categories, rather than items. (i.e. stationery, computer supplies …). This search method can be used, for example, when the name of an item is unknown.
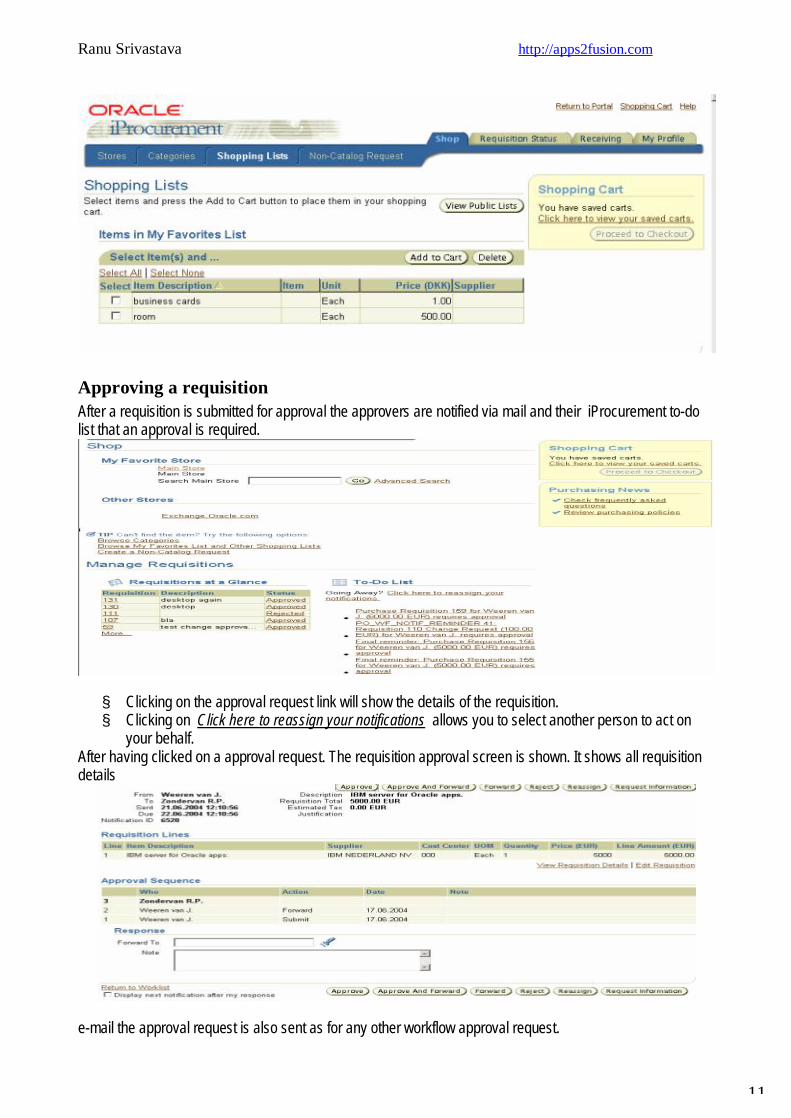
Shopping Lists The user can shop by browsing their “My Favorites” list or a “Public” list of items.

Ranu Srivastava http://apps2fusion.com
3
Other stores If the company has elected to connect to a supplier site, the user can click on the hyperlink and browse through a supplier’s catalog.
The search results are displayed as can be seen from the screenshot below. You can enter the required quantity in the quantity field and next click on Add to Cart to store the in the requisition.
Creating a non-catalog Requisition iProcurement enables the users to make requisitions, on catalog or non-catalog items. A non-catalog requisition can be created for a one time expense request or for a new item that has not been entered into any catalog yet.As for a catalog requisition, there are 3 steps to a non-catalog requisition creation: Product description, Cart management and Checkout. Internet Procurement > Home Page > Create Non-catalog request Internet Procurement > Shop > Non-catalog request
Item type Flag one of the three choices:

Ranu Srivastava http://apps2fusion.com
4
§ Goods billed by quantity (i.e. books, pens…) § Service billed by quantity (i.e. 10 days of consulting) § Goods or services billed as an amount (i.e. 1000 worth of consulting)
Category i.e. stationery, computer supplies … The select button will give you a list of values Item Description Enter a description of the item needed Unit of Measure i.e. unit, box, container, The select button will give you a list of values Quantity Enter the quantity of item needed (in the unit of measure mentioned above) Currency Choose the currency in which the unit price is given Unit Price Price of a unit of the item, in the currency the item has been dealt in. You are supposted to give a
estimated here if you do not know the exact price. Exchange rate type Choose from corporate, spot, user or EMU fixed Exchange rate date Today’s date defaults Describe the supplier (if you know who it is): This section enables you to give information about the supplier you want to buy this
product from, either an existing or new supplier. New Supplier Flag this check box if the information enter regards a non existing supplier Name if entering a new supplier, use the search anyway to prevent from using an already existing supplier Site Enter the supplier’s site name Contact name If known, enter a contact name Phone A phone number can be entered in this field Supplier Item The supplier’s item code can be entered in that field Once all the necessary field have been field in, the item can be add to cart or add to favorites (refer to the module create a catalog requisition). The fields can also be cleared by using the “clear all” button. The process is then the same as for a catalog requisition.
àOnce the requisition details have been entered, the check out needs to be done, detailing the delivery and billing addresses and several points, as follows.
Check out: 3 methods There are three ways to check-out: § Normal check-out § Express checkout § Power checkout
After clicking on the “Proceed to Checkout” button on the shopping cart contents page, the delivery information

Ranu Srivastava http://apps2fusion.com
5
page is displayed. Urgent Requisition Click this checkbox if the requisition is urgent. Using the Normal checkout process Internet Procurement > Shopping Cart > Proceed to Checkout
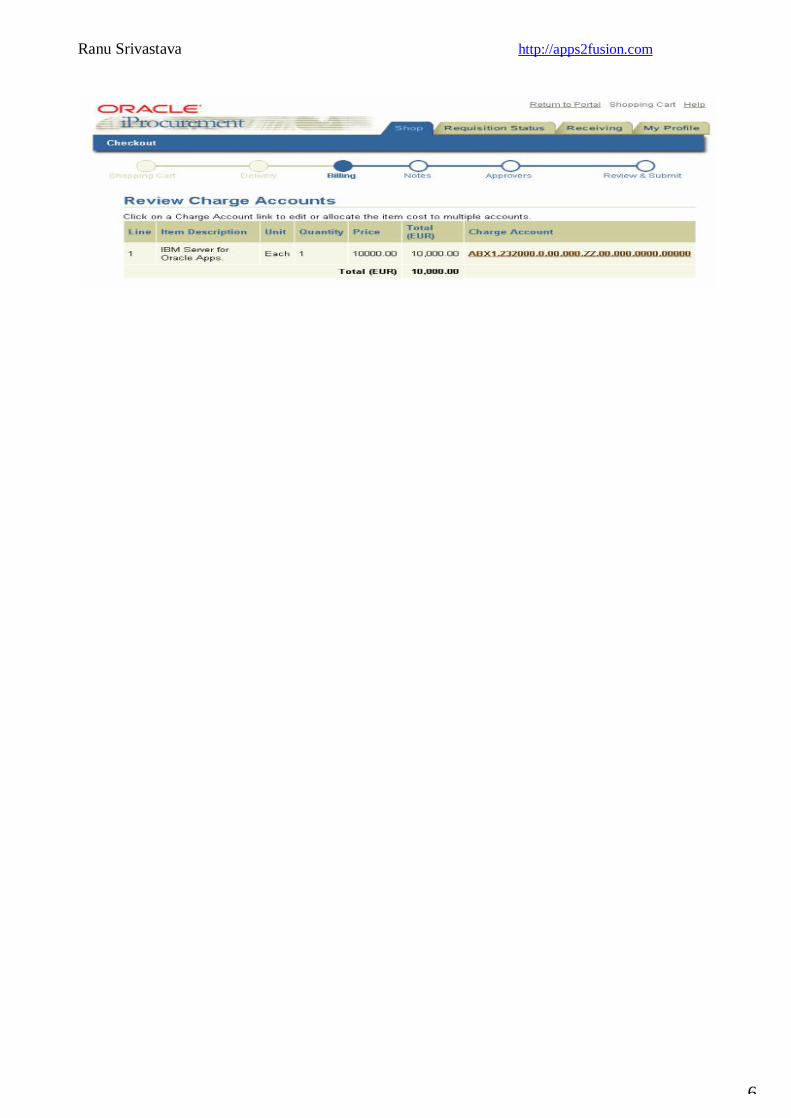
After clicking on the Continue Button, the Billing Information page is displayed.

Ranu Srivastava http://apps2fusion.com
7
Continue Put the user through next step of the process
Submit Requisition A confirmation page is displayed with a Requisition number. The Internet Procurement Requisition creation process is completed.


Ranu Srivastava http://apps2fusion.com
9
Using the Express Checkout Process If the user wants to speed up the checkout process, and checked the set up of their personal profile, they can click on the Express Checkout Button to proceed to a faster checkout after they have filled their shopping cart. Internet Procurement > Shopping Cart > Express checkout
Using Power Checkout If you frequently create large requisitions with different delivery and billing information by item, Power Checkout is a quick way to checkout your shopping cart.After you have completed filling your shopping cart and you are ready to start the checkout process, click on the Power Checkout hyperlink.

Ranu Srivastava http://apps2fusion.com
10
Viewing the Requisition in iProcurement
iProcurement Features Shopping Cart The cart management screen enables the user to view and modify its requisition at any time.The 6 steps the shopping process will go through to complete a requisition are shown at the top of the page: Shopping cart, Delivery, Billing, Notes, Approvers, Review and Submit. These steps are detailed hereafter. Internet Procurement > Shopping Cart
Shop Tab > Shopping Lists >
Ranu Srivastava http://apps2fusion.com
11
Approving a requisition After a requisition is submitted for approval the approvers are notified via mail and their iProcurement to-do list that an approval is required.
§ Clicking on the approval request link will show the details of the requisition. § Clicking on Click here to reassign your notifications allows you to select another person to act on
your behalf. After having clicked on a approval request. The requisition approval screen is shown. It shows all requisition details
e-mail the approval request is also sent as for any other workflow approval request.

Ranu Srivastava http://apps2fusion.com
12
Approval delegation In case of absence you can select another person to act on your behalf. After clicking on Click here to reassign your notifications the following screen s is shown.
Click on create rule.
Select the type of notification to delegate. I.e. PO’s and or requisitions.
§ Select requires approval of if somebody else in your place will approve requisitions. § Select has been approved if you simply will approve all requisition automatically in your absence.
In the case that you select has been approved the screen above appears and you should enter start date, end date and a message, which will be send with each notification.

Ranu Srivastava http://apps2fusion.com
13
Once you have created a routing rule you can re-use it by selecting update.

Ranu Srivastava http://apps2fusion.com
14
Receiving and returning under iProcurement
Receiving a purchased item against an approved requisition The receiving can be made in different ways: against a requisition, against a specific item, or against several requisitions (in the same time). These are detailed in the following parts. I-Procurement > Receiving
If you did receive exactly the correct quantities of all requisition lines you can click submit here and complete the goods receipt for this requisition.

Ranu Srivastava http://apps2fusion.com
15
Part receiving against a requisition When the goods arrived, a requisition number can be stated on the enclosed paperwork, or sometimes, the requisitioner can trace it easily. I-Procurement > Receiving>receive-items.

Ranu Srivastava http://apps2fusion.com
16
A receipt has been created, this window shows the receipt number. Click on the “Return to Receiving” link to create extra receipts.
Receiving against a specific item Items Search and status On the requisition status window, by clicking on the “Receiving” subfolder, all expected receiving items are displayed. This view shows you the all the requisitions that have approved purchase orders and could be received against. Enter the quantity received in the “Receipt Quantity” box for the line item you are receiving against. You can receive partial or complete quantities. I-Procurement > Requisition Status Tab > Receiving subfolder

Ranu Srivastava http://apps2fusion.com
17
Receiving against several requisitions It is also possible, within Oracle iProcurement to receive goods via the requisition-status link. I-Procurement > Requisition Status Tab

Ranu Srivastava http://apps2fusion.com
18
Returning a receipted Item under iProcurement
The following explains how to return items under iProcurement. If the items to return have not been receipted yet, this is not a return but a refusal. This is not handled by the system and has to be dealt directly with the customer. In any case, the customer has to be contacted before returning an item. If the items are refused (not receipted at all in the system), and if the item is not needed anymore (too long delay for example), the Purchase Order has to be closed in the system (please refer to the “Manage Purchasing documentation” module).If the items are returned, the return can be entered by the requester under iProcurement. This is what is explained in this documentation.The first step to return an item is to retrieve it in the system. This can be through a requisition number, order number, or receipt number. Once logged in iProcurement, the user will have to go to the “Receive” Tab and search the system. I-Procurement > Receive Tab
There are two ways to retrieve the items to be returned. One is to use the “search” area on top of this window and is explained here after. The other, clicking on the “return items” link will directly take you to the “return items, select items to return window, which is explained next.

Ranu Srivastava http://apps2fusion.com
19
Once the items to be returned are retrieved, enter the return Quantity in the “return quantity” field and click on the next button.
Enter a reason for return in this window -> Review the return demand and submit it

Ranu Srivastava http://apps2fusion.com
20
My Profile You can use the MY profile page to:
• Set default delivery and billing information;
• Define favorite charts of accounts:
• Set certain user interface preferences:
• Change your password.