raith 150-2 sop - university of alberta
TRANSCRIPT

NanoFab 21 September 2011 A Micro Machining & Nanofabrication Facility Version 1: Mohammad Ali Mohammad
NanoFab, University of Alberta
www.nanofab.ualberta.ca 1
RAITH 150TWO
SOP
Figure 1 The Raith 150
TWO
LOCATION: Raith 150TWO
room, Lithography area, NanoFab
PRIMARY TRAINER:
SECONDARY TRAINER:
1. OVERVIEW
The Raith 150TWO
is an ultra high resolution, low voltage (0.1 – 30 keV), electron beam lithography (EBL)
tool. The tool is capable of writing sub-10 nm features, field stitching of ~ 25 nm, overlay alignment better
than 40 nm, and can pattern structures over a 150 mm diameter wafer. Additionally, the system is also
capable of fixed beam moving stage (FBMS) exposures, handling 7 inch masks, and automatic focus
correction. You must be an advanced user of the LEO 1430 before receiving training on this system.
2. PROCESS COMPONENTS OR FEATURES The Raith 150
TWO EBL tool has a number of associated components and features that its users must be aware
of such as (i) universal sample holder, (ii) front panel controls, and (iii) joystick.
(i) The universal sample holder (USH) contains numerous clips to hold chips in a certain orientation as
shown in fig. 2 (below). This is in order to facilitate exposure and inspection. The bottom of the
USH contains three locations for the piezo-levelers (visible in fig. 2; shown during training) which
connect to the stage. The USH must be handled with great care.

NanoFab 21 September 2011 A Micro Machining & Nanofabrication Facility Version 1: Mohammad Ali Mohammad
NanoFab, University of Alberta
www.nanofab.ualberta.ca 2
Figure 2 Universal Sample Holder (USH)
(ii) The Raith 150TWO
EBL tool is enclosed in an environmentally controlled enclosure. This enclosure
contains panels related to sample loading/unloading, wafer holders, and emergency controls etc., as
shown in fig. 3.
Figure 3 Panels of interest on Raith 150
TWO enclosure
X
Y
Clips for holding
samples flat down
Clip for holding
sample at 45° tilt
Sample loaded
according to internal
co-ordinate system
Touch screen for loading,
unloading, emergency
stop, status check, etc.
Emergency power-off
Wafer holders enclosure Emergency shut down
Access to load lock -
loading/unloading samples

NanoFab 21 September 2011 A Micro Machining & Nanofabrication Facility Version 1: Mohammad Ali Mohammad
NanoFab, University of Alberta
www.nanofab.ualberta.ca 3
(iii) The Raith 150
TWO EBL system includes a joystick which
controls the motion of the stage / sample holder for easy and
efficient navigation as shown in fig. 4.
For your convenience, you may turn on the X, Y, and ‘Speed
High’ buttons as shown.
Fine movements will require the ‘Speed High’ button to be off.
4. OPERATING INSTRUCTIONS
Once the sample holder is properly placed in the load lock, the sample can be loaded. Ensure that the load
lock lid is closed.
1. Click on the Raith 150TWO
icon
2. A pop-up window will prompt the user to login as shown in Fig. 5. The Login button will remain
disabled until the correct password is input. The project drop down loads custom (saved) settings. By
default, the program will use the settings from your previous session.
Figure 5 Raith 150
TWO login window
Figure 4 Raith 150TWO
joystick
NanoFab 21 September 2011 A Micro Machining & Nanofabrication Facility Version 1: Mohammad Ali Mohammad
NanoFab, University of Alberta
www.nanofab.ualberta.ca 4
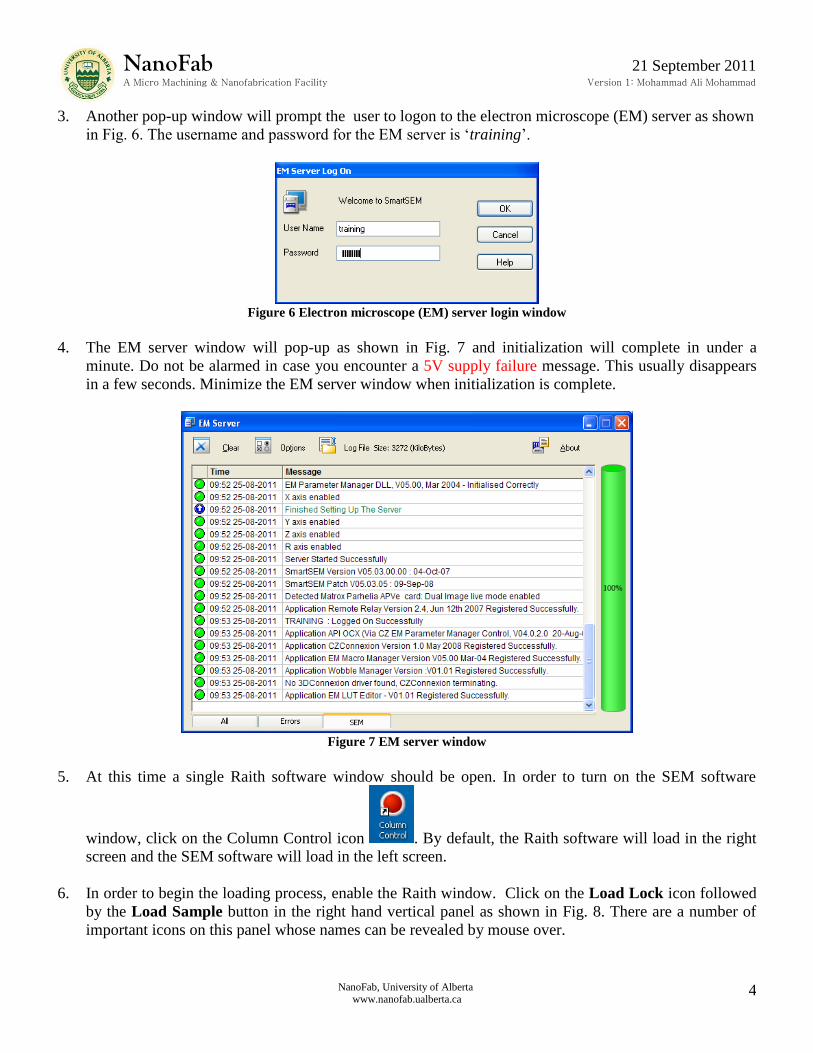
3. Another pop-up window will prompt the user to logon to the electron microscope (EM) server as shown
in Fig. 6. The username and password for the EM server is ‘training’.
Figure 6 Electron microscope (EM) server login window
4. The EM server window will pop-up as shown in Fig. 7 and initialization will complete in under a
minute. Do not be alarmed in case you encounter a 5V supply failure message. This usually disappears
in a few seconds. Minimize the EM server window when initialization is complete.
Figure 7 EM server window
5. At this time a single Raith software window should be open. In order to turn on the SEM software
window, click on the Column Control icon . By default, the Raith software will load in the right
screen and the SEM software will load in the left screen.
6. In order to begin the loading process, enable the Raith window. Click on the Load Lock icon followed
by the Load Sample button in the right hand vertical panel as shown in Fig. 8. There are a number of
important icons on this panel whose names can be revealed by mouse over.
NanoFab 21 September 2011 A Micro Machining & Nanofabrication Facility Version 1: Mohammad Ali Mohammad
NanoFab, University of Alberta
www.nanofab.ualberta.ca 5
Figure 8 Loading / Un-loading samples
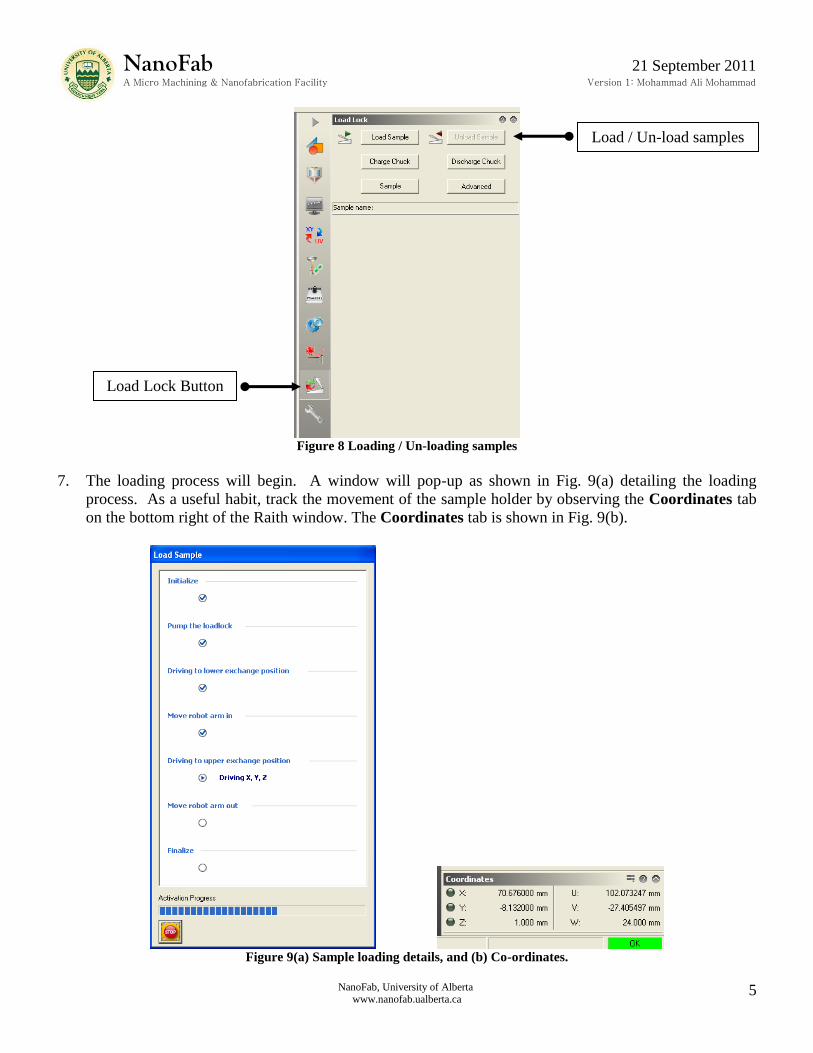
7. The loading process will begin. A window will pop-up as shown in Fig. 9(a) detailing the loading
process. As a useful habit, track the movement of the sample holder by observing the Coordinates tab
on the bottom right of the Raith window. The Coordinates tab is shown in Fig. 9(b).
Figure 9(a) Sample loading details, and (b) Co-ordinates.
Load Lock Button
Load / Un-load samples

NanoFab 21 September 2011 A Micro Machining & Nanofabrication Facility Version 1: Mohammad Ali Mohammad
NanoFab, University of Alberta
www.nanofab.ualberta.ca 6
8. After the loading process has completed, a number of pop-ups will prompt the user for action as shown
in Fig. 10. Enter a sample name of your choice, press OK, press OK, and press Yes.
Figure 10 Pop-ups immediately after the sample loading process
9. At this stage, the sample holder will be visible in the SEM window as shown in Fig. 11.
Figure 11 SEM objective lens and sample holder as viewed by the chamber camera
10. After loading the sample holder, the stage should be raised to Z = 19 mm as shown in Fig. 12. To drive
to your chip, you may either (i) input the XY co-ordinates if known, or (ii) navigate using the joystick.
In addition, make sure the mm, XY, and absolute dialog buttons are selected as shown.
Figure 12 Raising stage and driving to sample position using Stage Control
Adjustments Tab
Selections
Length: ‘mm’
Base: ‘XY’
Position: ‘absolute’
XYZ values
NanoFab 21 September 2011 A Micro Machining & Nanofabrication Facility Version 1: Mohammad Ali Mohammad
NanoFab, University of Alberta
www.nanofab.ualberta.ca 7
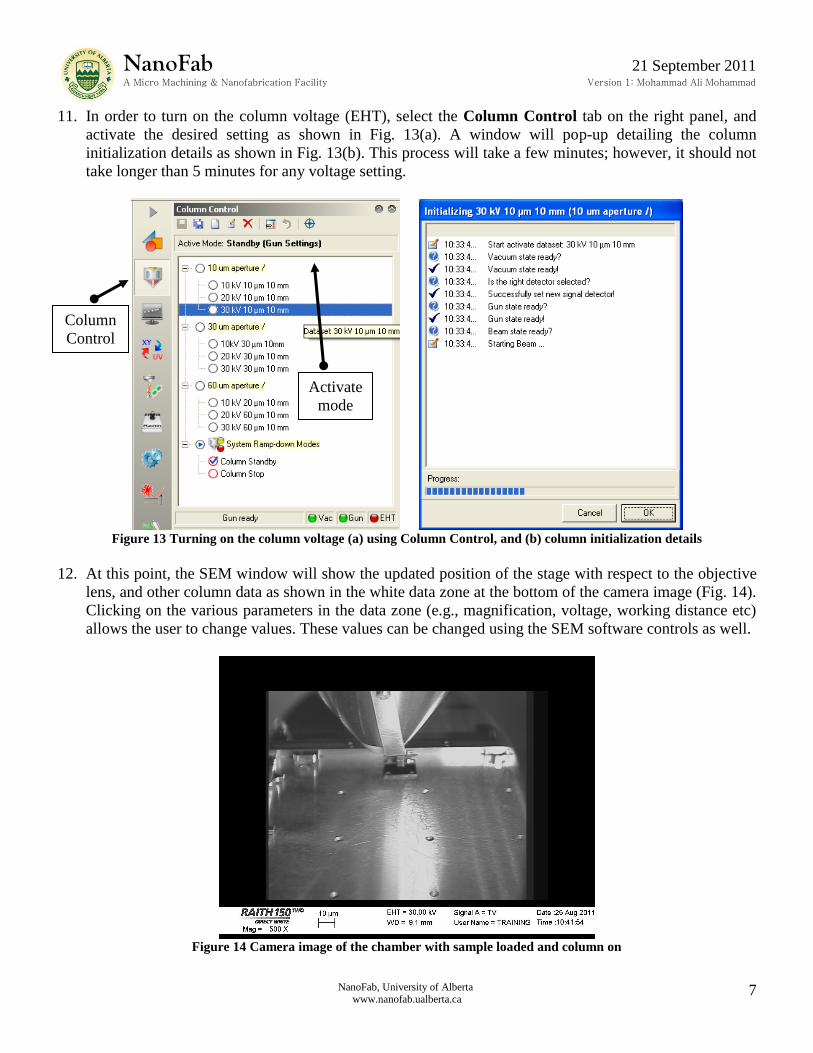
11. In order to turn on the column voltage (EHT), select the Column Control tab on the right panel, and
activate the desired setting as shown in Fig. 13(a). A window will pop-up detailing the column
initialization details as shown in Fig. 13(b). This process will take a few minutes; however, it should not
take longer than 5 minutes for any voltage setting.
Figure 13 Turning on the column voltage (a) using Column Control, and (b) column initialization details
12. At this point, the SEM window will show the updated position of the stage with respect to the objective
lens, and other column data as shown in the white data zone at the bottom of the camera image (Fig. 14).
Clicking on the various parameters in the data zone (e.g., magnification, voltage, working distance etc)
allows the user to change values. These values can be changed using the SEM software controls as well.
Figure 14 Camera image of the chamber with sample loaded and column on
Activate
mode
Column
Control
NanoFab 21 September 2011 A Micro Machining & Nanofabrication Facility Version 1: Mohammad Ali Mohammad
NanoFab, University of Alberta
www.nanofab.ualberta.ca 8
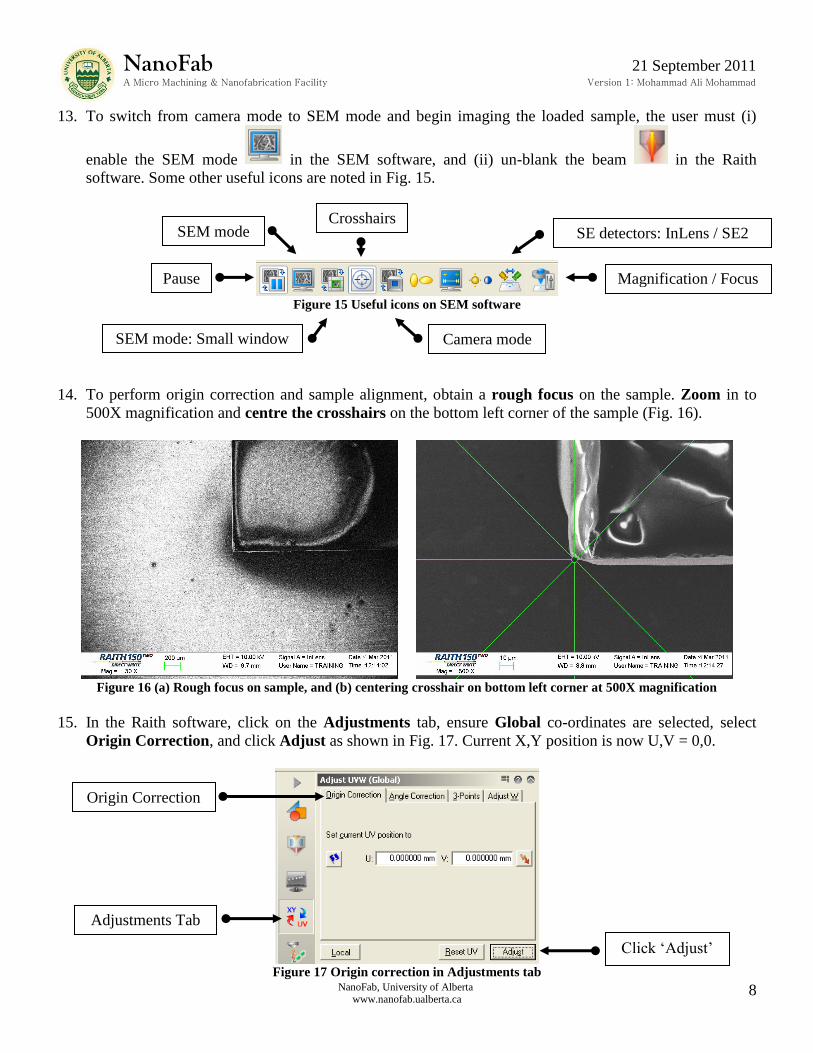
13. To switch from camera mode to SEM mode and begin imaging the loaded sample, the user must (i)
enable the SEM mode in the SEM software, and (ii) un-blank the beam in the Raith
software. Some other useful icons are noted in Fig. 15.
Figure 15 Useful icons on SEM software
14. To perform origin correction and sample alignment, obtain a rough focus on the sample. Zoom in to
500X magnification and centre the crosshairs on the bottom left corner of the sample (Fig. 16).
Figure 16 (a) Rough focus on sample, and (b) centering crosshair on bottom left corner at 500X magnification
15. In the Raith software, click on the Adjustments tab, ensure Global co-ordinates are selected, select
Origin Correction, and click Adjust as shown in Fig. 17. Current X,Y position is now U,V = 0,0.
Figure 17 Origin correction in Adjustments tab
Pause
SEM mode
SEM mode: Small window
Crosshairs
Camera mode
Magnification / Focus
SE detectors: InLens / SE2
Adjustments Tab
Click ‘Adjust’
Origin Correction

NanoFab 21 September 2011 A Micro Machining & Nanofabrication Facility Version 1: Mohammad Ali Mohammad
NanoFab, University of Alberta
www.nanofab.ualberta.ca 9
16. While remaining at the origin (U,V = 0,0), select the Angle Correction tab, and click on the dropper
icon below P1 (point 1). The XY values corresponding to point 1 will be loaded. Using the
joystick move to the bottom right corner of the loaded chip. Centre the crosshairs onto the edge and
click on the dropper icon below P2 (point 2). The angle correction is finalized when the Adjust button is
pressed (confirm color change of the Calculated angle value from red to green). See Fig. 18 for more
details. Note (Optional): If the dimensions of the chip are known, stage movements can be performed
by using the Stage Control tab. Simply input the dimension of interest and click Start. The beam will
be blanked and the stage will accurately move to the desired location. Be cautious of selecting mm, UV,
and absolute. Press Clear to reset form.
Figure 18 Angle correction in Adjustments tab
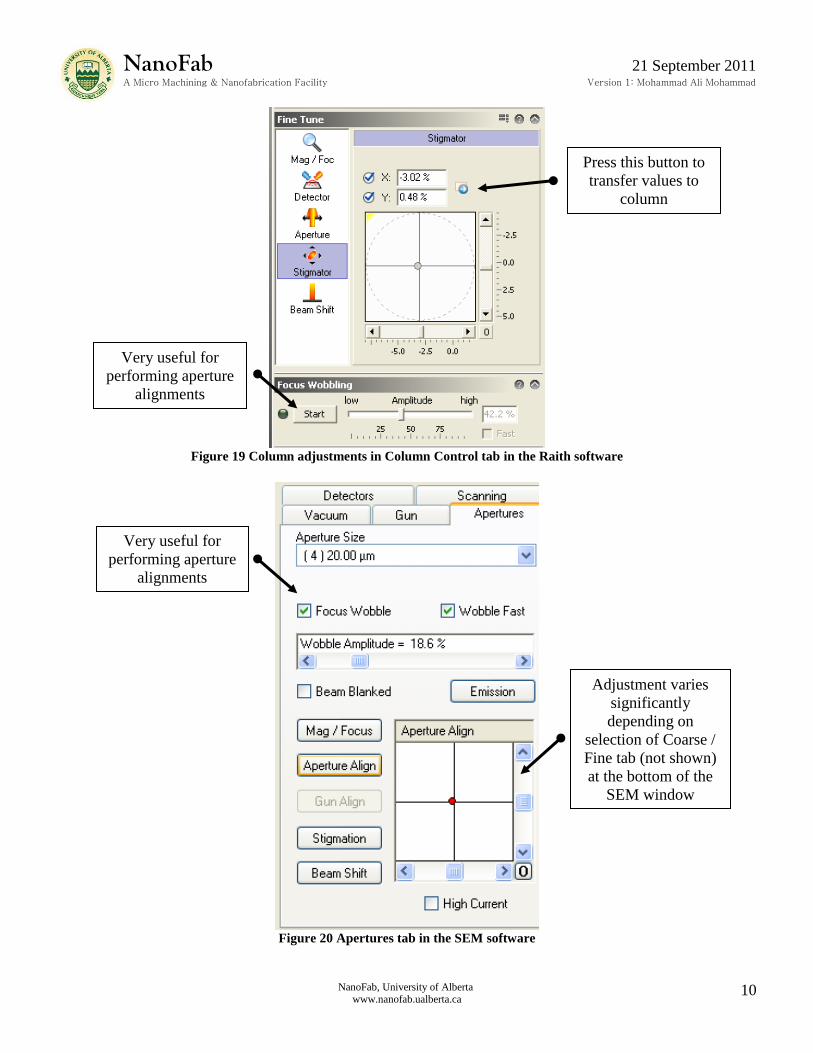
17. Find a particle of interest (approx. 200 – 300 nm wide) to perform column corrections namely focus,
aperture alignment, and stigmation. These column corrections may be performed using either the Raith
software (Fig. 19) or the SEM software (Fig. 20). A suggested sequence of action is provided:
Obtain good focus using the selected particle.
Perform aperture alignment – Test: particle should focus/defocus (wobble) without any lateral
movement.
Perform stigmation correction – Test (1): particle shape should not skew upon changing focus,
and (2) contamination dot should be circular (more on this ahead).
Iterate the above steps for improved results.
Adjustments Tab Click ‘Adjust’ after
selecting P1, P2 and
check color change
Feed coordinate
value
Angle Correction
Input known coor-
dinate & click Start
to move stage
NanoFab 21 September 2011 A Micro Machining & Nanofabrication Facility Version 1: Mohammad Ali Mohammad
NanoFab, University of Alberta
www.nanofab.ualberta.ca 10
Figure 19 Column adjustments in Column Control tab in the Raith software
Figure 20 Apertures tab in the SEM software
Very useful for
performing aperture
alignments
Press this button to
transfer values to
column
Very useful for
performing aperture
alignments
Adjustment varies
significantly
depending on
selection of Coarse /
Fine tab (not shown)
at the bottom of the
SEM window

NanoFab 21 September 2011 A Micro Machining & Nanofabrication Facility Version 1: Mohammad Ali Mohammad
NanoFab, University of Alberta
www.nanofab.ualberta.ca 11
18. A very valuable test of the quality of column/focus corrections performed is burning a contamination
dot. In this process, the user enables the spot mode for a certain duration. In the spot mode, the beam is
un-blanked; however, the sample (resist) is not imaged for the duration of the burn process. Immediately
after the spot mode duration is over, the sample is imaged to assess the quality of the contamination dot.
Suggested steps:
In the SEM window, enable the SEM mode (small screen)
Zoom in until the scale bar is approx. 100 nm wide
Blank the beam (Raith window)
Move to a location previously not imaged
Click the spot mode button in the SEM window. As soon as the spot mode button is clicked, un-
blank the beam in the Raith window. Spot will appear shortly.
If the spot is not circular (see Fig. 21), perform column/focus corrections and iterate.
Note 1: Clicking the left button (spot mode) yields a 3 second burn and clicking the middle
button yields an indefinite burn (disabled upon re-clicking the middle button).
Note 2: After a certain level of proficiency is reached, the beam may not be blanked in order to
burn a contamination dot.
Figure 21 (left) Contamination dot with astigmation, and (right) optimized 30 nm diameter contamination dot
19. Select a particle or a contamination dot of interest to perform writefield (WF) alignments. Centre the
SEM crosshairs on the object and select the magnification and WF size as shown in Fig. 22.
Figure 22 Writefield Manager tab in Writefield Control menu in the Raith window
Writefield Control
Click to enable
selection of WF size
Standard 1000x
mag., 100 µm WF

NanoFab 21 September 2011 A Micro Machining & Nanofabrication Facility Version 1: Mohammad Ali Mohammad
NanoFab, University of Alberta
www.nanofab.ualberta.ca 12
20. In the Raith software, click on File >> New Image to open an empty pop-up window.
21. In the Raith software, click on the Single Scan icon . Note that the scanning has stopped in the
SEM window. The column control has been taken over by the Raith software. The pop-up window from
the previous step is now filled with a single scan of the imaging area from the SEM software.
22. In the Raith software, click on the Writefield Control menu, minimize the Writefield Manager
window, and enable the Scan Manager window. In the current window, select Writefield Alignment
Procedures >> Manual >> 100 um WF – Manual ALWF 25 um marks >> right click >> Execute as
shown in Fig. 23.
Figure 23 Scan Manager tab in the Writefield Control menu in the Raith window
23. The pop-up window from steps 20-21 will refresh and a crosshair and various boxes will appear on the
window (Fig. 24(a)). The user is supposed to select a location of interest, hold down the Ctrl key and
drag the crosshair onto the exact same location of interest three or more times. Each time a pop-up
window (Fig. 24(b)) will prompt the user to confirm accuracy of crosshair alignment.
24. After each alignment procedure is completed, a pop-up will appear (Fig. 25) prompting the user to
confirm WF correction values. The target is to eventually get Zoom U and Zoom V values to read four
zeros or four nines after the decimal place. After the first WF correction is completed, select 100 um
WF – Manual ALWF 5 um marks and perform the steps described in step 23 above, followed by 100
um WF – Manual ALWF 1 um marks to sequentially improve the accuracy of the WF correction.

NanoFab 21 September 2011 A Micro Machining & Nanofabrication Facility Version 1: Mohammad Ali Mohammad
NanoFab, University of Alberta
www.nanofab.ualberta.ca 13
Figure 24 (a) Writefield alignment procedure window, and (b) user prompt to confirm crosshair alignment
Figure 25 Writefield correction values
25. As an optional further correction, the user may choose to perform an automatic WF correction. In the
Scan Manager window, select Writefield Alignment Procedures >> Automatic with Images >> 100
um WF – Auto ALWF 1 um marks >> right click >> Execute after the last manual WF alignment has
been performed. This will begin an automatic WF alignment procedure. The correction values will not
be available in a pop-up window this time. For confirming whether the system has improved the WF
correction values, open the Raith Protocol Tool window >> WF alignments. Notice that the zoom
factors have improved over the previous step (latest alignment listed first) in Fig. 26.

NanoFab 21 September 2011 A Micro Machining & Nanofabrication Facility Version 1: Mohammad Ali Mohammad
NanoFab, University of Alberta
www.nanofab.ualberta.ca 14
Figure 26 WF correction values shown in the Raith Protocol Tool
26. At this stage, all the corrections have completed. It is time to measure the beam current and proceed with
the exposure. To measure the beam current, drive to the Faraday cup (a small device used to measure
small current quantities) as shown in Fig. 27(a). The orifice of the Faraday cup is shown Fig. 27(b).
Figure 27 (a) Stage Control (Positions tab) window in the Adjustments menu, (b) Faraday cup orifice.
27. Ensure that the crosshairs of the SEM image are well centered on the Faraday cup. Zoom in (preferably
all the way) until the opening of the Faraday cup cannot be seen (unlike Fig. 27(b) above). This is to
ensure that all the electrons are collected by the Faraday cup and the system reads a proper current value.
In the Raith software right menu bar, select the Exposure icon and enable the Beam Current
window. Select <current position> in the drop down menu and click Measure. The current will be
displayed in the selected units as shown in Fig. 28.
Figure 28 Beam Current measurement window in Exposure menu

NanoFab 21 September 2011 A Micro Machining & Nanofabrication Facility Version 1: Mohammad Ali Mohammad
NanoFab, University of Alberta
www.nanofab.ualberta.ca 15
28. In the Raith software, select the Design icon and enable the GDSII Database window. Open
the Demo.csf file from your home directory. Your home directory will also have a couple of documents
(provided by Raith GmbH) that describe the demo pattern in detail. Please read these documents.
Figure 29 Open GDSII database files in the Design menu
29. Select the Exposure icon and enable the Exposure Parameter window (Fig. 30).
Figure 30 Exposure Parameter window in Exposure menu
Always enabled
Exposure parameter
calculator Layers button
Enable (if needed)
Enable (if needed)
Enable (if needed)
NanoFab 21 September 2011 A Micro Machining & Nanofabrication Facility Version 1: Mohammad Ali Mohammad
NanoFab, University of Alberta
www.nanofab.ualberta.ca 16
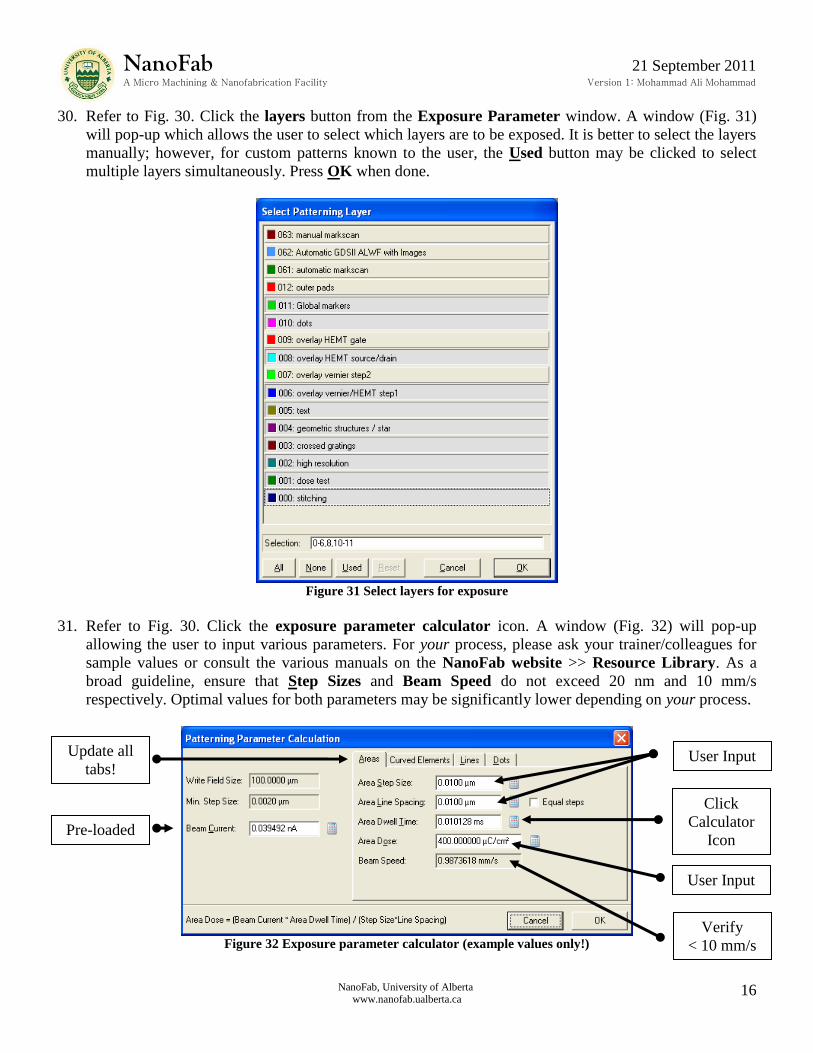
30. Refer to Fig. 30. Click the layers button from the Exposure Parameter window. A window (Fig. 31)
will pop-up which allows the user to select which layers are to be exposed. It is better to select the layers
manually; however, for custom patterns known to the user, the Used button may be clicked to select
multiple layers simultaneously. Press OK when done.
Figure 31 Select layers for exposure
31. Refer to Fig. 30. Click the exposure parameter calculator icon. A window (Fig. 32) will pop-up
allowing the user to input various parameters. For your process, please ask your trainer/colleagues for
sample values or consult the various manuals on the NanoFab website >> Resource Library. As a
broad guideline, ensure that Step Sizes and Beam Speed do not exceed 20 nm and 10 mm/s
respectively. Optimal values for both parameters may be significantly lower depending on your process.
Figure 32 Exposure parameter calculator (example values only!)
Pre-loaded
Update all
tabs! User Input
Verify
< 10 mm/s
User Input
Click
Calculator
Icon

NanoFab 21 September 2011 A Micro Machining & Nanofabrication Facility Version 1: Mohammad Ali Mohammad
NanoFab, University of Alberta
www.nanofab.ualberta.ca 17
32. In the Raith software, click on File >> New Positionlist. A window will pop-up (Fig. 33) in the Raith
software. Drag and drop your design (.csf) files from the Design menu (GDSII Database window) into
the positionlist. You may input multiple designs in the positionlist. Right click anywhere on the inserted
file information bar and click Properties. A window (Fig. 34) will pop-up. Insert values as shown.
Figure 33 Positionlist setup for exposure
Figure 34 Patterning properties window
No need to modify
– input from GDSII
design coordinates
Click to open lower
part of this window
Verify if correct
Input desired
exposure location
Opens window in
Fig. 32 – confirm
values and press OK
Exposure time
estimate
Important Note:
Changing the values
in Calculator from
this interface is
strongly discouraged.
To scale exposure
doses, modify Dose
Factor in Fig. 33.

NanoFab 21 September 2011 A Micro Machining & Nanofabrication Facility Version 1: Mohammad Ali Mohammad
NanoFab, University of Alberta
www.nanofab.ualberta.ca 18
33. Prior to exposure, the following necessary precautions must be taken:
Ensure the joystick is turned off.
Ensure the beam is blanked in the Raith software.
Ensure the usage of SEM mode in the SEM software (i.e., not chamber camera mode).
34. To begin exposure, enable the Raith software, click Scan >> All in the top level menu. Alternatively,
enable the positionlist, right click on the file information bar (Fig. 33) and click Scan. A window will
pop-up which will show the exposure progress to the user. Once the exposure is complete, this window
will disappear.
35. Unload sample as described in step 6 (Fig. 8), except click Unload Sample this time. The Load Sample
icon will be disabled. The unloading process will take approximately five minutes.
36. Close the Raith software followed by the SEM software. Log Off the EM Server when prompted.
37. Remove your sample, fill in the log-book, and clean up the computer area before leaving.
5. TROUBLESHOOTING
If you encounter a black SEM screen after ramping up the voltage, (i) ensure the correct detector is
used (see Fig. 15) as follows: InLens for 0.1 – 20 keV, and SE2 for 20 – 30 keV , (ii) ensure the
Emission mode is not selected (see Fig. 20), and (iii) correct brightness/contrast levels are used.
If the system fails to load the sample holder after 10 minutes or more, restart the Raith software and
try again. If met with failure two consecutive times, please phone the designated staff member and/or
proceed with the error reporting procedure as outlined in the notice beside the Raith computers.
If the system fails to ramp-up to the desired voltage after waiting for 5 minutes or more, note down
and clear any error/warning messages on the Raith software and try to ramp again. If the systems fails
again, restart the Raith software and attempt ramping again. If met with failure two consecutive
times, please phone the designated staff member and/or proceed with the error reporting procedure as
outlined in the notice beside the Raith computers.
Error reporting guidelines are posted on the wall beside the Raith 150TWO
computers. This document
defines what to do in various emergency situations. For processing issues and more information, please
contact [email protected] or the trainers listed above.
6. APPROVAL
Qualified Trainer: Eric Flaim (780-492-8357, [email protected])
Training Coordinator: Stephanie Bozic (780-492-6724, [email protected])