pocketdtm utility surveys - atlas-files.com utility surveys.pdf · technical note 12 august 2009...
TRANSCRIPT

Technical Note
12 August 2009 PocketDTM Utility SurveysBrief Outline
Atlas Computers Ltd 15 Moyville Lawns Taylors Lane Rathfarnham Dublin 16 Republic of Ireland Ph: +353(0) 1 4958714/5/6 Fax: +353(0) 1 4958717 Email: [email protected]

All rights reserved. No parts of this work may be reproduced in any form or by any means - graphic, electronic, or mechanical, including photocopying, recording, taping, or information storage and retrieval systems - without the written permission of the publisher.
Products that are referred to in this document may be either trademarks and/or registered trademarks of the respective owners. The publisher and the author make no claim to these trademarks.
While every precaution has been taken in the preparation of this document, the publisher and theauthor assume no responsibility for errors or omissions, or for damages resulting from the use of information contained in this document or from the use of programs and source code that may accompany it. In no event shall the publisher and the author be liable for any loss of profit or any other commercial damage caused or alleged to have been caused directly or indirectly by this document.
Printed: August 2009
SCC created by Atlas Computers Ltd
Document written by Áine Martin Date 12/08/2009 Reference Number
9028 Revision Number 1.0 SCC Version
The content of this document is provided for guidance purposes only. While every effort is made in ensuring the correctness of information presented, the document is provided ‘as is’, without representation, condition, or warranty of any kind, either express or implied, including, but not limited to, fitness for use or a particular purpose. Atlas Computers Ltd shall not be responsible under any circumstances for any indirect consequential loss or damage (including but not limited to loss of contracts or profits) however caused or arising.
(C) Copyright 2008, Atlas Computers Ltd

Table of Contents 1 Getting Started: Basic Survey
1.1 Setting Up The ATX1230 GPS Using PocketDTM
1
11.1.11.1.21.1.3
General Options Starting New ProjectSmartWorX
122
1.2 Surveying Stations 61.2.1 1.2.2 1.2.3 1.2.3.1 1.2.3.2 1.2.3.3
Setting Target Height Station Establsihment Surveying Topographic Detail
Starting A New Utility String Additional Observation Entries Keyboard Shortcuts
6 7 8
10 11 12
2 Feature Library: Code Table
2.1 SCC Feature Library 2.2 Transfer SCC Feature Library To PocketDTM 2.3 Setting Up Extra Database Fields Against Specific
Features Within PocketDTM Library
3 Transferring Files From SCC and CAD To PocketDTM
3.1 Transferring SCC Model To PocketDTM As Background Mapping
13
1314
15 18 18
3.1.1 Sample Image of Models Transferred from SCCto PocketDTM 19
3.2 Transferring Client DXF to PocketDTM 193.2.1 Sample Images of Client Data Transferred from
SCC to PocketDTM 224 Utility Survey
4.1 Surveying Points Using Chain and Offset / Intersecting Distances
4.2 Sketching In Points On Screen Using The Pen 4.3 Surveying Points Using Taped Right Angle Offsets 4.4 Collection Of Attribute Information
24 24272931
4.4.14.4.2
Entering Attribute Information As Part of SurveyEntering Additional Attribute Information After Initial Survey
32 32
5 Downloading to SCC
6 Generating Reports and CAD Drawing from Survey
33 34
©2009 Atlas Computers Ltd

1
1 Getting Started: Basic Survey
PocketDTM software should be installed on the Storage Card of the RX unit.
1.1 Setting Up The ATX1230 GPS Using PocketDTM
1.1.1 General Options
The following outlines briefly the steps taken to set up job and instrument settings:
Double Click on PocketDTM icon
From the start up menu, select ‘Review Program Options’
COMMS
Select Leica GPS 1200 from the Instrument drop down menu
Note: The port COM 8, parity and baud rate are set automatically. Files are saved in a default location \StorageCard\PocketDTM\
Units
From the COMMS screen, select the 'Next>' button or 'Units' tab
From this dialog, the ‘Units of Measurement’ and the Feature File are set
©2009 Atlas Computers Ltd

2
Select ‘OK’
1.1.2 Starting New Project
Select ‘Start a new job’ and enter in the ‘Job Number’, ‘Name’ and any other relevant comments.
Select ‘Ok’ to create the new job and the Plan view is displayed
1.1.3 SmartWorX
To connect to NTRIP it is necessary to use Leica SmartWorx software
With the stylus press the right hand corner to access the windows toolbar
Press the Desktop button which will minimise PocketDTM
©2009 Atlas Computers Ltd

3
Double click the SmartWorx dialog
Pick GPS as the Sensor
Press F1 (CONT)
To Connect Modem:
Open SmartWorX
Select 1. Survey
©2009 Atlas Computers Ltd

4
Press F1 (CONT)
Press Shift
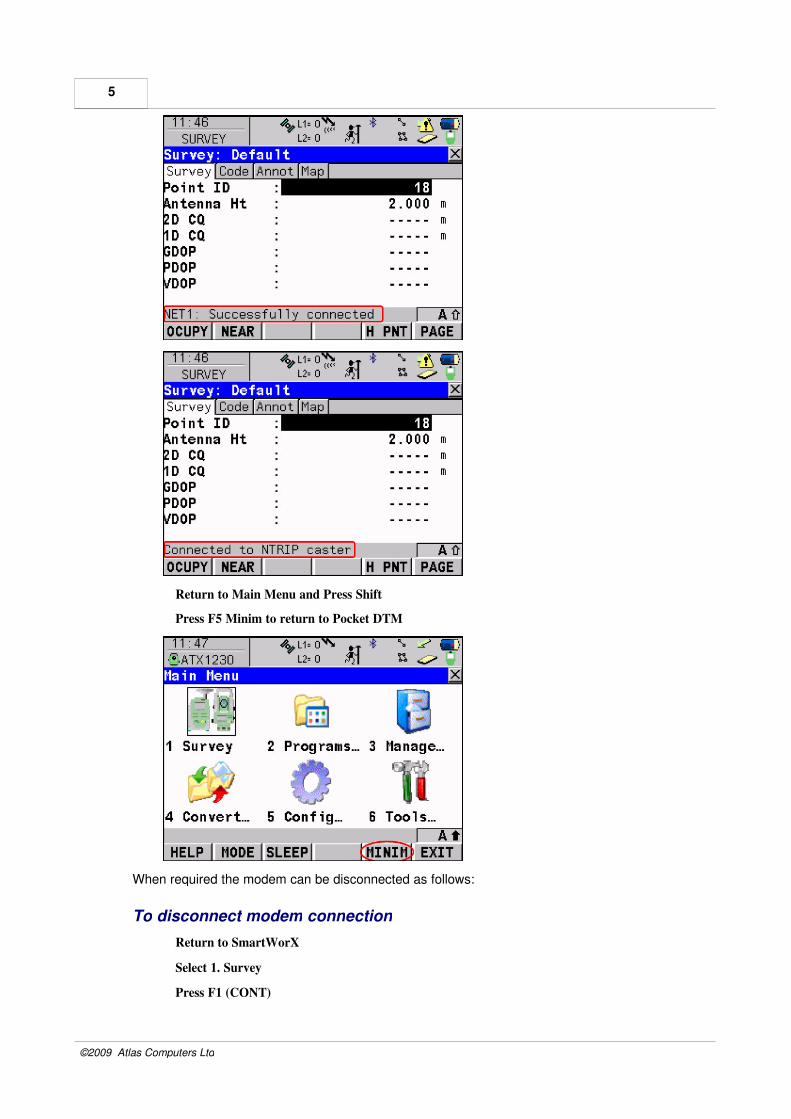
Press F3 CONNECT
'NET1: Successfully connected' and 'Connected to NTRIP caster' messages will be displayed
©2009 Atlas Computers Ltd
5
Return to Main Menu and Press Shift
Press F5 Minim to return to Pocket DTM
When required the modem can be disconnected as follows:
To disconnect modem connection
Return to SmartWorX
Select 1. Survey
Press F1 (CONT)
©2009 Atlas Computers Ltd

6
Press Shift
Press F3 (DISCO)
���������� ����������������������
1.2 Surveying Stations
The option to survey station information and detail is examined in brief:
1.2.1 Setting Target Height
Before picking up any detail, pick 'new string' button from the main toolbar
Set Target Height
©2009 Atlas Computers Ltd

7
1.2.2 Station Establsihment
To access the ‘station establishment’ dialog, select the icon.
The above options will only be presented when the instrument box in the general options is set to one of the GPS instruments.
In this instance, a station
Select 'Survey a station'
The Reading GPS Observation dialog is presented.
Note:
©2009 Atlas Computers Ltd

8
GPS Tolerance are set from the GPS tab 'Edit > GPS Menu'
1.2.3 Surveying Topographic Detail
Accessing feature codes and surveying topographic detail can be carried out from several options:
Option 1: From the drop down menu
Option 2: From the Ftr button
©2009 Atlas Computers Ltd

9
Option 3: From the String button
©2009 Atlas Computers Ltd

10
1.2.3.1 Starting A New Utility String
From the Plan view, pick codes from the drop down feature library
Once the codes has been picked, a prompt to start a new string is given. Note: this prompt option can be turned off within the feature library to reduce the number key presses
Select 'Yes' and begin surveying points by pressing the enter key on the keyboard
Features can also be selected from the feature tab button 'Ftr' on the main toolbar or from the the 'new string' button as shown in Surveying Topographic Detail 8 .
©2009 Atlas Computers Ltd

11
1.2.3.2 Additional Observation Entries
From the survey dialog sting tab available from the main toolbar, the user has the option of :
• Setting/Changing Feature Code
• Setting/Changing Tag Height
• Accessing Line Connection Tag: Curve, Straight, 2 point rectangle, etc. • Accessing DTM status: DTM Elevation, Approximate Elevation (2D), Elevation (2D),
etc.,
• Entering Remark against a point
• Entering Dimensional Information
• Accessing Offset options
©2009 Atlas Computers Ltd

12
All additional information assigned to an observation is displayed in the observation view. This data can be edited and changed in the field.
1.2.3.3 Keyboard Shortcuts
Several keyboard shortcuts can be set up to allow the user to quickly change details as the survey is being carried out. For instance, the 'C' key on the keyboard can be assigned to change an observation type to 'Curve' and likewise 'D' can be assigned to change the DTM status to 'DTM Elevation' The shortcuts can be assigned within 'VIEW > Keyboard Shortcuts'
©2009 Atlas Computers Ltd
13
2 Feature Library: Code Table
2.1 SCC Feature Library
Feature libraries set up in SCC can be directly transferred to PocketDTM as follows:
Open SCC and open project
General Options
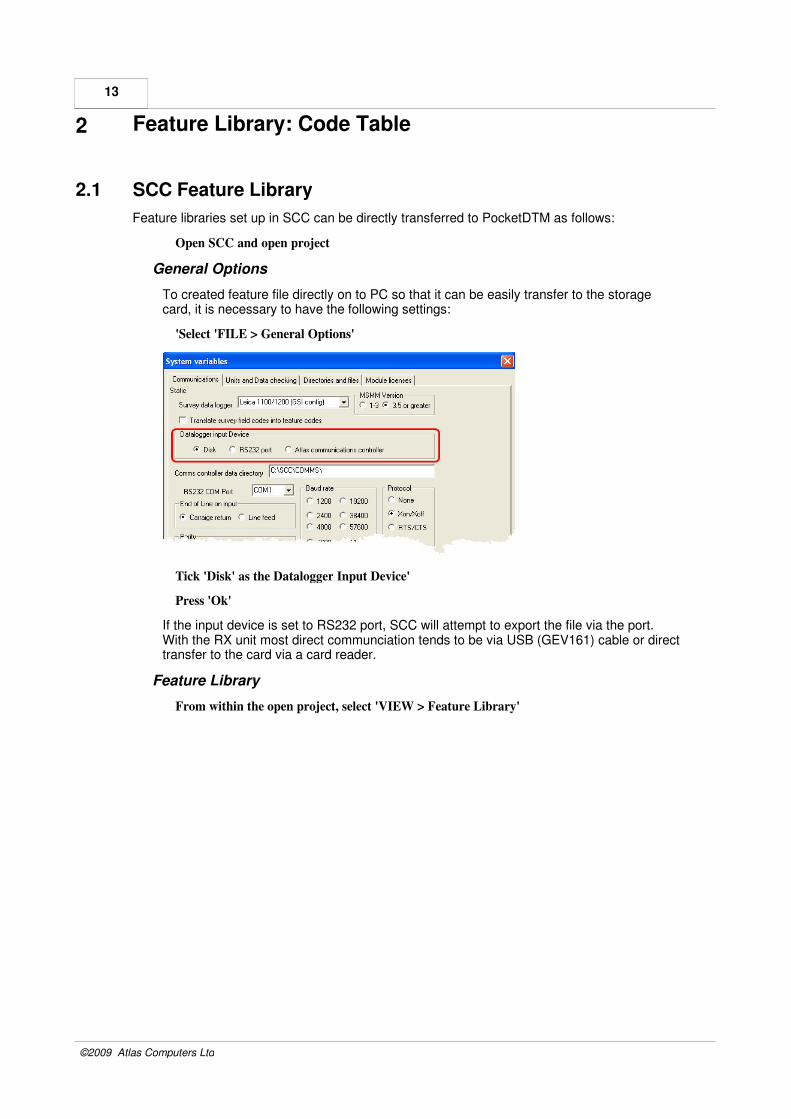
To created feature file directly on to PC so that it can be easily transfer to the storage card, it is necessary to have the following settings:
'Select 'FILE > General Options'
Tick 'Disk' as the Datalogger Input Device'
Press 'Ok'
If the input device is set to RS232 port, SCC will attempt to export the file via the port. With the RX unit most direct communciation tends to be via USB (GEV161) cable or direct transfer to the card via a card reader.
Feature Library
From within the open project, select 'VIEW > Feature Library'
©2009 Atlas Computers Ltd

14
Select 'FILE > Export > Upload feature library'
Enter file name in 'Write Set out data' dialog
The file name must be given the extension .sio
Transfer the sio file to CF card on the RX unit 2.2 Transfer SCC Feature Library To PocketDTM
Set up New Job within PocketDTM, select 'FILE > New'
Enter Job Name
Go to 'FTRS' tab
Select 'FILE > Import / Export > Import Feature Library'
Select 'No' to Connect to SCC dialog (as the file is on the storage card)
Pick newly created and transfered file 'Test.sio' file from Open dialog and press 'OK'
The file may take several minutes to import depending on original size of feature library within SCC
©2009 Atlas Computers Ltd

15
Once imported, select 'FILE > Save feature file'
Enter Name
The PockdetDTM file (which will have .def extension) is now saved on the storage card. The file will be available within 'FILE > General Options > Units', Feature File drop down list for selection within further jobs
2.3 Setting Up Extra Database Fields Against Specific Features Within PocketDTM Library
The GIS form option can be accessed by selecting 'VIEW > GIS forms' within the plan view. This option allows the user to customized attribute information for a specific feature.
©2009 Atlas Computers Ltd

16
� Name � Type (Text, List, Yes/No, Number, Date, Length, Angle, Grade, File) � Level � Decimal Places � Default Value � Default Type (Last value, default values, incremental, time) For example in the images below, the MH (Manhole) point feature is selected. Several attribute rows have been added using the ‘Add’ button (Manhole No., Type, Cover Duty, etc.). Consider the ‘Type’ attribute, which has been set up as a ‘List’ to allow the user to pick from drop down menu when surveying (Circle, Square, Triangle, Rectangle). All attribute information can be saved as *.csv files which can be reloaded or loaded into other feature library / projects.
©2009 Atlas Computers Ltd

17
©2009 Atlas Computers Ltd

18
Once the attributes have been assigned the feature library should be resaved.
Select 'FILE > Save feature file'
Enter Name
3 Transferring Files From SCC and CAD To PocketDTM
The following explores several options of transferring files to PocketDTM:
3.1 Transferring SCC Model To PocketDTM As Background Mapping
Prior to exporting model it is necessary:
• To transfer SCC library to PocketDTM (as outlined in Transferring SCC Feature Library to PocketDTM 14 ) to PocketDTM, to ensure that when the model is drawn within PocketDTM features are represented correctly
Within SCC, open Project and Model
Step 1: Export SCC Text File
From within the model, select 'FILE > Export Model > SCC Text File'
Select 'Ok' to export file to project folder
The file should be copied and pasted onto Storage Card
Step 2: Importing Background Mapping to PocketDTM
Begin a new job as outline in previous steps
Select feature library suitable for the data within 'FILE > General Options'
Go to the Plan View, select 'FILE > Import /Export > Import survey from SCC'
Select 'No' to Connect to SCC prompt (as file is already transferred to card)
©2009 Atlas Computers Ltd

19
Pick '16095.Model.sio' from the Open dialog and press 'Open'
The background map is imported into the Plan View
3.1.1 Sample Image of Models Transferred from SCC to PocketDTM
�� ����������������� ��� ���������������
� ����������������� ���������!��"�����
3.2 Transferring Client DXF to PocketDTM
There are a number of steps to importing a dxf to PocketDTM.
Step 1: Import DXF into SCC Two options are available when SCC is opened, either open an existing project or start a new project. When using SCC for the first time, it is necessary to start a new project.
Starting the Software
Double click the SCC Icon
On first entry to the software, or if there is no active projects, the following dialog will be shown on screen
©2009 Atlas Computers Ltd

20
Select 'Cancel'
From the Main Menu Bar within SCC, select ‘FILE >New Project’
Enter in a Project/Job name
Select a Project Template from the list / specific utility survey template
Select ‘OK’ The project template contains all the feature coding, layering, string labelling, modelling, symbology and annotation standards that will be applied to the project. The project itself consists of a spreadsheet containing the control stations used in the project, along with a feature library spreadsheet.
Importing DXF
Select 'FILE > Model > DWG / DXF File'
Using the Pick button select dxf
©2009 Atlas Computers Ltd

21
Select ‘Layer to Feature Mapping>>’ This option allows the user to map layer present in the dxf file with feature in the SCC Feature Library
Select 'Import layer map from DXF'
The table should be examined so that layers from the dxf are mapped to the correct feature code from the SCC library. Often layers which are not needed in the model are mapped to an IGNORE feature. This IGNORE feature would be set up in the users library to have a DTM status of Ignore and therefore not modelled.
Select ‘OK’ within the ‘DWG/DXF Input Layer to feature map’ Dialog
Select ‘OK’ within the ‘Import DWG/DXF file’ Dialog
Set the Plot Scale
©2009 Atlas Computers Ltd

22
Pick 'Create the Model and triangulation
Press 'Ok' to model attribute dialog
Save Model
Step 2: Export SCC Text File
From within the model, select 'FILE > Export Model > SCC Text File'
Select 'Ok' to export file to project folder
The file should be copied and pasted onto Storage Card
Step 3: Importing Background Mapping to PocketDTM
Begin a new job as outline in previous steps
Select feature library suitable for the data within 'FILE > General Options'
Go to the Plan View, select 'FILE > Import /Export > Import survey from SCC'
Select 'No' to Connect to SCC prompt (as file is already transferred to card)
Pick 'Sample.Model.sio' from the Open dialog and press 'Open'
The background map is imported into the Plan View
3.2.1 Sample Images of Client Data Transferred from SCC to PocketDTM
�� ����������������� ����� ������������������
� ����������������� ���������!��"�����
©2009 Atlas Computers Ltd

23
©2009 Atlas Computers Ltd

24
4 Utility Survey
4.1 Surveying Points Using Chain and Offset / Intersecting Distances
Consider that a topographic survey has been completed. Additional Manhole features have surveyed using tape and distance measurements which will be added to the main survey as follows:
Open Job within PocketDTM
Pick Manhole feature from drop down feature menu
Select 'EDIT > Intersection by Distance'
Press '>>' button alongside Point A
Select 'Pick from screen' within Pick A Point dialog
©2009 Atlas Computers Ltd

25
Select point on screen using stylus pen
PocketDTM will prompt with the selected point and press 'OK' to confirm
In the same manner pick Point B
Press 'Ok' to confirm point
©2009 Atlas Computers Ltd

26
In this instance, it is know that the new feature point is 6m to A and 4m to B
Set intersection to Pick to allow interaction on screen Moving the stylus whilst keeping contact with the screen either point left or right of line can be set Tap screen with the stylus to confirm new point
Depending on how a feature is set up in the library, additional information may be prompted as shown below
If there is no deviation from the settings in the feature library simply select 'OK' Note the library can be set up to always use defaults and therefore not prompt for additional information
©2009 Atlas Computers Ltd

27
4.2 Sketching In Points On Screen Using The Pen
Consider that a topographic survey has been completed. Additional service information has been obtain and therefore added as follows:
Open Job within PocketDTM
Pick USTE Underground Survey feature from drop down feature menu
Pick 'Active Elevation' button from the Toolbar
If required enter height
Press 'OK'
©2009 Atlas Computers Ltd

28
Turn on Snap controls 'VIEW > Snap Controls'
Press stylus on first point A for example, then B, C, D etc to form required line
©2009 Atlas Computers Ltd

29
Note:
While string information is being sketched the user can add additional information such as line connection tags of curve, straight, arc quickly by using keyboard shortcuts as shown in Keyboard Shortcuts 12
4.3 Surveying Points Using Taped Right Angle Offsets
Consider that a topographic survey has been completed. Additional Manhole features have surveyed using measurements taped from a reference line which will be added to the main survey as follows:
Open Job within PocketDTM
Pick PAV feature from drop down feature menu
Select 'EDIT > Tape Measurement'
Press '>>' button alongside Point A
Select 'Pick from screen' within Pick A Point dialog
©2009 Atlas Computers Ltd

30
Select point on screen using stylus pen
PocketDTM will prompt with the selected point and press 'OK' to confirm
In the same manner pick Point B
Enter the known offset from the baseline C point 67 to C point 68
©2009 Atlas Computers Ltd

31
Press Store point
In the same way, a string can be generated from the baseline and the reference line updated (select 'Use last two survey obs as base line') as new points are entered, as shown below:
4.4 Collection Of Attribute Information
As shown in Setting Up Extra Database Fields Against Specific Features 15 , GIS information can be set up against various features within the library. This options can be used during initial capture of topographic information or as a additional task once the survey has been completed.
©2009 Atlas Computers Ltd
4.4.1 Entering Attribute Information As Part of Survey
32
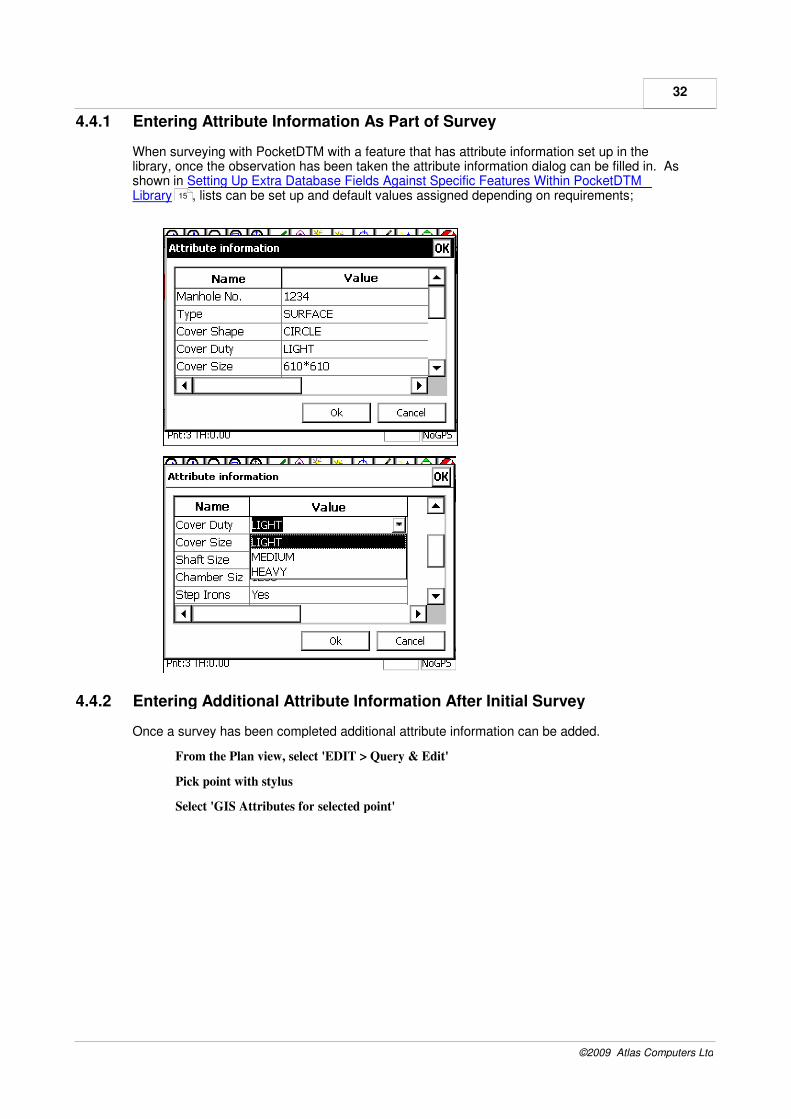
When surveying with PocketDTM with a feature that has attribute information set up in the library, once the observation has been taken the attribute information dialog can be filled in. As shown in Setting Up Extra Database Fields Against Specific Features Within PocketDTM Library 15 , lists can be set up and default values assigned depending on requirements;
4.4.2 Entering Additional Attribute Information After Initial Survey
Once a survey has been completed additional attribute information can be added.
From the Plan view, select 'EDIT > Query & Edit'
Pick point with stylus
Select 'GIS Attributes for selected point'
©2009 Atlas Computers Ltd

33
The user then has access to the GIS tables set up against that feature in the feature library
5 Downloading to SCC
Export from PocketDTM
Select 'FILE > Import / Export > Export to SCC'
Select 'No' to Connect to Comms
At this point, the file is exported as a .sio file onto the storage card (\PocketDTM)
Exit the Job and shut off unit
Take the card out of unit and transfer to PC card reader
©2009 Atlas Computers Ltd

34
Copy the file to the PC
SCC
Open SCC
From the Main Menu Bar within SCC, select ‘FILE >New Project’
Enter in a Project/Job name
Select a Project Template from the list
Ideally this template would correspond to the feature library used in PocketDTM
Select ‘OK’
Select 'FILE > Download Survey'
Pick 'PocketDTM' as the Survey data logger drop down menu
Set 'Detail Topography' as the 'Data Type'
Set 'Disk' as the 'Data logger input device'
Select 'OK'
Pick file and press 'Open'
The file is download as a dataset for analysis and then can be modelled
Generating Reports and CAD Drawing from Survey
SCC produces high quality reports from all SCC documents using the industry acclaimed Crystal reports engine. These reports can include data, charts, bitmaps and other rich content, and can be output to printers, PDF, Excel, HTML and Word files.
Sample reports are available within the SCC directory. These templates can be used to regenerate project specific report data directly from SCC. The Crystal reports also have the advantages that they allow the report layout to be readily changed without affecting the content, they allow automatic highlighting of out of spec values such that they can be easily picked up by anyone reading the report, and they can be readily exported to a range of formats including Word, PDF, Excel and HTML.
Note that while creation of new report formats requires a Crystal reports license, creation, viewing, printing and export of reports is included within the SCC license. To view a report, click 'FILE > Reports' and select sample report.
©2009 Atlas Computers Ltd

35
Extract from sample files provides can be viewed below:
Sample Feature Library Report:
©2009 Atlas Computers Ltd

36
Sample Traverse Report:
©2009 Atlas Computers Ltd

37
Sample Check Survey Report:
©2009 Atlas Computers Ltd