operating instructions for dishwashers - winning …€¦ · operating instructions for dishwashers...
TRANSCRIPT

Operating instructionsfor dishwashers
To avoid the risk of accidents or damage to the appliance, it is essentialto read these instructions as well as the installation plan before it isinstalled and used for the first time.
en-AU, NZ M.-Nr. 10 290 400HG03

2
Contents
3
Guide to the appliance .......................................................................................... 6Appliance overview ................................................................................................. 6Control panel ........................................................................................................... 7
Warning and Safety instructions .......................................................................... 8
Caring for the environment ................................................................................ 17Disposal of the packing material ........................................................................... 17Disposing of your old appliance............................................................................ 17Energy-saving dishwashing................................................................................... 18
Before using for the first time ............................................................................ 19Opening the door .................................................................................................. 19Closing the door.................................................................................................... 19Safety lock............................................................................................................. 19Water softener ....................................................................................................... 20
Displaying and setting the water hardness level .............................................. 21Before using the appliance for the first time, you require: .................................... 23Dishwasher salt ..................................................................................................... 23
Filling the salt reservoir..................................................................................... 24Add salt reminder ........................................................................................ 25
Rinse aid................................................................................................................ 26Adding rinse aid ............................................................................................... 26Add rinse aid reminder ................................................................................ 27Setting the rinse aid dosage............................................................................. 28
Loading the dishwasher...................................................................................... 29Notes ..................................................................................................................... 29Upper basket......................................................................................................... 31
Adjusting the upper basket .............................................................................. 32Lower basket......................................................................................................... 33Cutlery ................................................................................................................... 34
Cutlery tray ....................................................................................................... 34Cutlery basket (depending on model) .............................................................. 35
Loading examples ................................................................................................. 36Dishwashers with cutlery tray........................................................................... 36Dishwashers with cutlery basket...................................................................... 38
Comparison tests ................................................................................................ 40Standard height with cutlery tray .......................................................................... 40XXL height with cutlery tray................................................................................... 43Standard and XXL height with cutlery basket ....................................................... 46
Contents
4
Operation.............................................................................................................. 49Detergent............................................................................................................... 49
Adding detergent.............................................................................................. 51Switching on the dishwasher ................................................................................ 52Selecting a programme ......................................................................................... 52Starting the programme ........................................................................................ 53Display................................................................................................................... 53Energy management ............................................................................................. 54Programme finished .............................................................................................. 54Switching off.......................................................................................................... 55Unloading the dishwasher..................................................................................... 55Interrupting a programme...................................................................................... 56Changing a programme......................................................................................... 56
Programme options............................................................................................. 57Turbo ..................................................................................................................... 57DetergentAgent ..................................................................................................... 57Switching off the refill indicators ........................................................................... 58Delay start ............................................................................................................. 59Adjust Sensor wash............................................................................................... 61Optimise standby .................................................................................................. 62Factory default settings......................................................................................... 63
Programme chart ................................................................................................ 64
Cleaning and care ............................................................................................... 68Cleaning the wash cabinet .................................................................................... 68Cleaning the door and the door seal..................................................................... 68Cleaning the door front ......................................................................................... 69Checking the filters in the wash cabinet ............................................................... 70Cleaning the filters................................................................................................. 70Cleaning the spray arms........................................................................................ 72
Problem solving guide ........................................................................................ 73Technical problems ............................................................................................... 73Water inlet fault ..................................................................................................... 75Water drainage fault .............................................................................................. 75General problems .................................................................................................. 76Noises.................................................................................................................... 77Unsatisfactory washing result ............................................................................... 78
Maintenance ........................................................................................................ 81Cleaning the water inlet filter ................................................................................. 81Cleaning the drain pump and non-return valve..................................................... 82
Contents
5
After sales service ............................................................................................... 83Repairs .................................................................................................................. 83Warranty ................................................................................................................ 83
Optional accessories .......................................................................................... 84
Electrical connection .......................................................................................... 86
Water connection ................................................................................................ 87The Miele Waterproof system................................................................................ 87Connection to the water supply ............................................................................ 87Drainage ................................................................................................................ 88
Technical data...................................................................................................... 89
Guide to the appliance
6
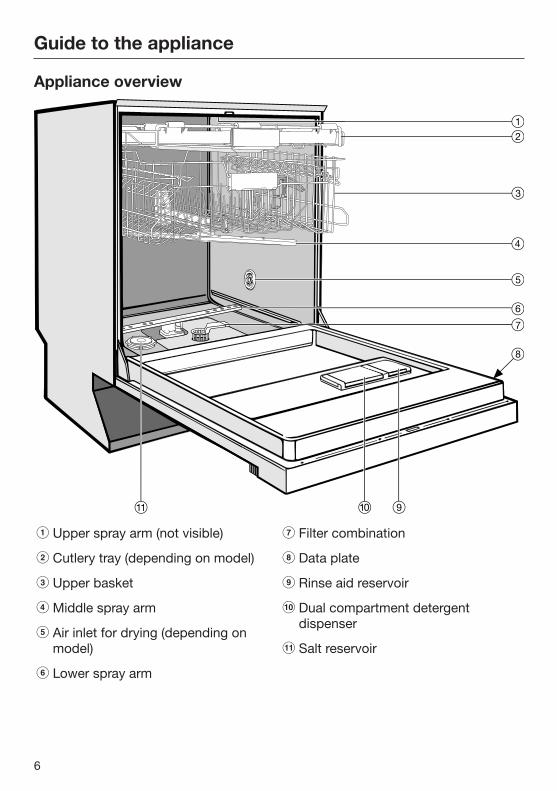
Appliance overview
a Upper spray arm (not visible)
b Cutlery tray (depending on model)
c Upper basket
d Middle spray arm
e Air inlet for drying (depending onmodel)
f Lower spray arm
g Filter combination
h Data plate
i Rinse aid reservoir
j Dual compartment detergentdispenser
k Salt reservoir
Guide to the appliance
7
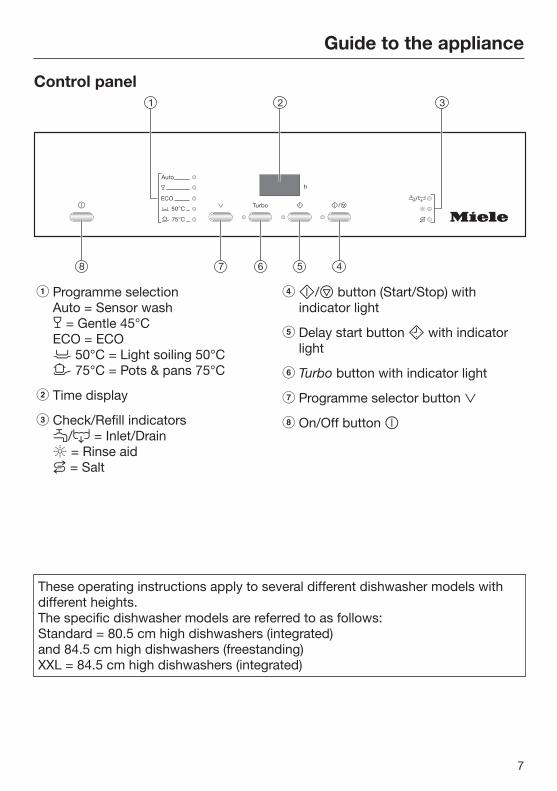
Control panel
a Programme selectionAuto = Sensor wash = Gentle 45°CECO = ECO 50°C = Light soiling 50°C 75°C = Pots & pans 75°C
b Time display
c Check/Refill indicators/ = Inlet/Drain = Rinse aid = Salt
d/ button (Start/Stop) withindicator light
e Delay start button with indicatorlight
f Turbo button with indicator light
g Programme selector button
h On/Off button
These operating instructions apply to several different dishwasher models withdifferent heights. The specific dishwasher models are referred to as follows: Standard = 80.5 cm high dishwashers (integrated) and 84.5 cm high dishwashers (freestanding) XXL = 84.5 cm high dishwashers (integrated)
Warning and Safety instructions
8
This dishwasher complies with current safety requirements.Inappropriate use can, however, lead to personal injury anddamage to property.
To avoid the risk of accidents and damage to the dishwasher,please read the installation plan and the operating instructionscarefully before it is installed and used for the first time. Theycontain important information on its installation, safety, use andmaintenance.
Keep the installation plan and the operating instructions in a safeplace and pass them on to any future owner.
Miele cannot be held liable for damage caused by non-compliancewith this information.
Warning and Safety instructions
9
Correct application
This appliance is designed for domestic use and for use in similarenvironments by guests in hotel or motel rooms, bed & breakfastsand other typical living quarters. This does not include common/shared facilities or commercial facilities within hotels, motels or bed& breakfasts.
This dishwasher is not suitable for outdoor use.
It must only be used as specified in these operating instructionsfor cleaning domestic crockery and cutlery. Any other usage is notsupported by the manufacturer and could be dangerous.
This appliance is not intended for use by persons (includingchildren) with reduced physical, sensory or mental capabilities, orlack of experience and knowledge, unless they have been givensupervision or instruction concerning its use by a person responsiblefor their safety, and are able to recognise the dangers of misuse.

Warning and Safety instructions
10
Safety with children
Young children must not be allowed to use this appliance.
Older children may only use the appliance when its operation hasbeen clearly explained to them and they are able to use it safely,recognising the dangers of misuse.
Cleaning work may only be carried out by older children under thesupervision of an adult.
Children should be supervised to ensure that they do not play withthe appliance. Keep small children away from the appliance at alltimes to avoid the risk of injury. There is the risk that children maylock themselves in the dishwasher.
If the automatic door opening mechanism (depending on model) isactive, keep young children away from the area in which the dooropens. Danger of injury in the unlikely event of a fault with theopening mechanism.
Danger of suffocation! Children may be able to wrap themselves inpacking material or pull it over their heads with the risk ofsuffocation. Keep children away from any packing material.
Keep detergent and other household agents out of the reach ofchildren at all times. Some dishwasher detergents are stronglyalkaline and contain irritants and corrosive ingredients. They can beextremely dangerous if swallowed, and can cause burning in themouth, nose and throat, or inhibit breathing. Avoid contact with theskin and eyes. Keep children away from the dishwasher when thedoor is open. There could still be detergent residues in the cabinet ordispenser. Check that the dispenser is empty after the completion ofa programme. Seek medical advice immediately if your child hasswallowed or inhaled detergent, e.g. Poisons Information Centre(Australia) or National Poisons Centre (NZ).

Warning and Safety instructions
11
Technical safety
Repairs and other work by unqualified persons could bedangerous. Installation, maintenance work and repairs to electricalappliances must only be carried out by a Miele approved servicetechnician.
Before installation, check the dishwasher for visible signs ofdamage. Under no circumstances should you use a damageddishwasher. A damaged dishwasher could be dangerous.
The electrical safety of this appliance can only be guaranteedwhen continuity is complete between it and an effective earthingsystem. It is most important that this basic safety requirement ispresent and regularly tested and, where there is any doubt, theelectrical system in the house should be checked by a qualifiedelectrician.Miele cannot be held liable for the consequences of an inadequateearthing system (e.g. electric shock).
Reliable and safe operation of this dishwasher can only beassured if it has been connected to the mains electricity supply.
The dishwasher must only be plugged into the electricity supplyvia a suitable switched socket. The electrical socket must be easilyaccessible after the dishwasher is installed so that it can bedisconnected from the electricity supply at any time.
There must be no electrical sockets behind the dishwasher.Danger of overheating and fire risk if the dishwasher were to bepushed up against a plug.
The dishwasher must not be installed under a cooktop. The highradiant temperatures which are sometimes generated by a cooktopcould damage the dishwasher. For the same reason, it should not beinstalled next to open fires or other appliances which give off heat,such as heaters etc.
Warning and Safety instructions
12
To avoid the risk of damage to the dishwasher, make sure that theconnection data on the data plate (fuse rating, voltage andfrequency) matches the mains electricity supply before connectingthe dishwasher to the mains. Consult a qualified electrician if in anydoubt.
Do not connect the dishwasher to the mains supply until it hasbeen fully installed and any adjustment has been made to the doorsprings.
The dishwasher may only be operated if the door openingmechanism is working correctly. Otherwise there could be a risk ofinjury whilst the automatic door opening mechanism (depending onmodel) is active.To check that the door opening mechanism is working correctly:
– the door springs must be adjusted equally on both sides. Theyare correctly adjusted when the door remains stationary when lefthalf open (approx. 45° opening angle). It is also important that thedoor cannot fall open.
– the door locking pins automatically retract when the door opensat the end of the drying phase.
Do not connect the appliance to the mains electricity supply by amulti-socket adapter or an extension lead. These do not guaranteethe required safety of the appliance (e.g. danger of overheating).
This appliance must not be installed and operated in mobileinstallations (e.g. on a ship).
Do not install the dishwasher in a room where there is a risk offrost. Frozen hoses may burst or split. The reliability of the electroniccontrol unit may be impaired at temperatures below freezing point.
To avoid any damage to the appliance, the dishwasher must onlybe operated when it is connected to a fully vented plumbing system.
The plastic housing of the water connection contains an electricalvalve. The housing must not be dipped in water.
Warning and Safety instructions
13
There are electrical wires in the water inlet hose. Do not cut thewater inlet hose, even if it is too long.
The integrated Waterproof system offers protection from waterdamage, provided the following conditions are met:
– The dishwasher is correctly installed and plumbed in.
– The dishwasher is properly maintained and parts are replacedwhere it can be seen that this is necessary.
– The tap has been turned off when the appliance is not used for alonger period of time (e.g. during holidays).
The Waterproof system will work even if the appliance is switchedoff. However, the appliance must remain connected to the electricitysupply.
The water pressure (flow pressure at the connection point) mustbe between 50 and 1000 kPa (0.5 and 10 bar).
A damaged appliance could be dangerous. If the dishwasher getsdamaged, switch it off at the mains and call Miele.
The manufacturer's warranty will be invalidated if the appliance isnot repaired by a Miele approved service technician.
Faulty components must only be replaced by genuine Miele spareparts. The manufacturer can only guarantee the safety of theappliance when Miele replacement parts are used.
During installation, maintenance and repair work, the appliancemust be disconnected from the mains electricity supply.
If the mains connection cable is damaged, it must be replacedwith a special cable of the same type (available from Miele) by aMiele authorised service technician only in order to avoid a hazard.
Warning and Safety instructions
14
In areas which may be subject to infestation by cockroaches orother vermin, pay particular attention to keeping the appliance andits surroundings in a clean condition at all times. Any damage whichmay be caused by cockroaches or other vermin will not be coveredby the warranty.
Correct installation
The dishwasher must be installed and connected in compliancewith the installation instructions.
Be careful when installing the dishwasher. Wearprotective gloves to avoid injury on any sharp metalcomponents.
The dishwasher must be correctly aligned to ensure problem-freeoperation.
In order to ensure stability, built-under and integrated dishwashersmust only be installed under a continuous worktop which is securedto adjacent cabinetry.
If you want to convert your freestanding dishwasher to a built-under ("U") model, you will need to order the appropriate conversionkit. If you remove the existing plinth, you must replace it with a U-model plinth. This is necessary to avoid the risk of injury caused byprotruding metal parts.
The door springs on either side need to be evenly adjusted. Theyare correctly adjusted if the half-opened door (approx. 45° dooropening angle) remains in this position when it is released. The doormust not fall down under its own weight. The appliance may only be used with correctly adjusted doorsprings.
Warning and Safety instructions
15
Correct use
Do not use solvents in the dishwasher. Danger of explosion!
Do not inhale or ingest dishwasher detergent. Some dishwasherdetergents are strongly alkaline and contain irritants or corrosiveingredients. They can be extremely dangerous if swallowed, and cancause burning in the nose, mouth and throat, or inhibit breathing.Avoid contact with the skin and eyes. Seek medical adviceimmediately if detergent has been swallowed or inhaled, e.g. PoisonsInformation Centre (Australia) or National Poisons Centre (NZ).
Avoid leaving the door open unnecessarily as someone could tripover it and be injured by it.
Do not sit or lean on the opened door. This could cause thedishwasher to tip and be damaged, and you could get injured.
Dishes can be very hot at the end of a programme. Allow them tocool until they are comfortable enough to handle before unloading.
Only use detergent and rinse aid formulated for domesticdishwashers. Do not use washing-up liquid.
Do not use commercial or industrial detergents as these maycause damage, and there is a risk of a severe explosive chemicalreaction (such as an explosive oxyhydrogen gas reaction).
Do not fill the rinse aid reservoir with powder or liquid detergent.This will cause serious damage to the reservoir.
Inadvertently filling the salt reservoir with powder or liquiddishwasher detergent will damage the water softener. Make sure youhave picked up the correct packet of dishwasher salt before fillingthe salt reservoir!
Only use special coarse grained dishwasher salt for reactivation.Do not use other salts such as cooking salt, agricultural grade orgritting salt. These may contain insoluble additives which can impairthe functioning of the water softener.
Warning and Safety instructions
16
In an appliance with a cutlery basket (depending on model) cutleryis cleaned and dried more efficiently if placed in the basket with thehandles downwards. However, to avoid the risk of injury, placeknives and forks etc. with the handles upwards.
Plastic items which cannot withstand being washed in hot water,such as disposable plastic containers, or plastic cutlery and crockeryshould not be cleaned in the dishwasher. The high temperatures inthe dishwasher may cause them to melt or lose shape.
If you use the "FlexiTimer/Delay start" option (depending onmodel), make sure that the dispenser is dry before adding detergent.Wipe dry if necessary. Detergent will clog if poured into a dampdispenser and may not be thoroughly dispersed.
Please observe the information given in "Technical data" regardingthe capacity of the dishwasher.
Accessories
Use only genuine original Miele spare parts. If spare parts oraccessories from other manufacturers are used, the warranty will beinvalidated, and Miele cannot accept liability.
Disposal of your old dishwasher
Make the door lock inoperative so that children cannotaccidentally shut themselves in. Remove or destroy the lockingbracket of the door lock, and make appropriate arrangements for thedisposal of the appliance.
Caring for the environment
17
Disposal of the packingmaterialThe packaging is designed to protectthe appliance from damage duringtransportation. The packaging materialsused are selected from materials whichare environmentally friendly for disposaland should be recycled.
The packaging consists of the followingmaterials:
Outer packaging:
– Corrugated cardboard made from upto 100% recyclable material:or: Polyethylene (PE) shrink wrap
– Polyproplylene (PP) strapping
Inner packaging:
– Chlorine and fluorine free expandedpolystyrene (EPS)
– Base, lid frame and support battensmade from untreated natural woodfrom renewable forests
– Polyethylene (PE) protective wrap
Recycling the packaging reduces theuse of raw materials in themanufacturing process and alsoreduces the amount of waste in landfillsites. Rather than just throwing thesematerials away, please ensure they arerecycled.
Ensure that any plasticwrappings, bags, etc. are disposedof safely and kept out of the reach ofbabies and young children. Dangerof suffocation.
Disposing of your oldapplianceElectrical and electronic appliancesoften contain materials which, ifhandled or disposed of incorrectly,could be potentially hazardous tohuman health and to the environment.They are, however, essential for thecorrect functioning of your appliance.Therefore, please do not dispose ofyour old appliance with your householdwaste.
Please dispose of it at your localcommunity waste collection / recyclingcentre.
Ensure that your old appliance presentsno danger to children while beingstored for disposal.
To enable sorting by type of plastic forrecycling, all plastic parts of theappliance are labelled with internationalstandard symbols.

Caring for the environment
18
Energy-saving dishwashingThis dishwasher is exceptionallyeconomical in its use of water andelectricity.You can make the most of yourappliance by following these tips:
– For most economical dishwashing,make full use of the baskets withoutoverloading the dishwasher.
– Choose the programme to suit thetype of crockery being washed andthe degree of soiling.
– Select the ECO programme forenergy-saving dishwashing. Thisprogramme is the most efficient interms of its combined energy andwater consumption at cleaningnormally soiled crockery.
– Follow the detergent manufacturer'srecommendations on detergentdosage.
– When using powder or liquiddetergent you can use 1/3 lessdetergent if baskets are only half full.
– If your household water system issuitable, this dishwasher can beconnected to a hot water supply forfurther economies. If the water isheated by solar panels, for example,this would be energy efficient. However, if your water is heated byelectricity, we would recommendconnection to cold water.
You can find further tips on energy-saving dishwashing in "Miele's guideto dishwashing".

Before using for the first time
19
Opening the door
To open the door, reach under thedoor grip and pull.
If the door is opened during operation,all functions are automaticallyinterrupted.
Water in the dishwasher may behot. Danger of scalding!Only open the door during operationif absolutely necessary and exerciseextreme caution when doing so.
Closing the door Push the baskets right in.
Then lift the door upwards and pushuntil it clicks into position.
Danger of injury!Do not put your hand inside the dooras it is closing.
Safety lockUse the safety lock to prevent childrenopening the dishwasher door.
To lock the door, push the slideunderneath the door grip to the right.
To unlock the door, push the slide tothe left.
Before using for the first time
20
Water softenerIn order to achieve good cleaningresults, the dishwasher needs tooperate with soft water. Hard waterresults in a build-up of calcium depositson crockery and in the dishwasher. Mains water with a hardness levelhigher than 0.7 mmol/l (4 °d - Germanscale) needs to be softened. This takesplace automatically in the integratedwater softener. The water softener inthe dishwasher is suitable for a waterhardness level of up to 12.6 mmol/l (70°d - German scale).
– The water softener requiresdishwasher salt. Depending on the water hardnesslevel (< 3.8 mmol/l, or 21 °d - Germanscale), dishwasher salt is not requiredif combination tablets are being used(see "Operation - Detergent").
– The dishwasher must beprogrammed for the water hardnesslevel in your area.
– Your local water authority will be ableto advise you of the water hardnesslevel in your area.
– Where the water hardness fluctuates,e.g. between 1.8 and 2.7 mmol/l (10 -15 °d - German scale), alwaysprogramme the dishwasher to thehigher value (2.7 mmol/l or 15 °d inthis example).
In the event of a fault, it will help theservice technician if you know thehardness of your local water supply.
Enter the water hardness below:
____________mmol/l
The dishwasher is programmed at thefactory for a water hardness level of0.2 mmol/l (1 °d - German scale).
If this setting corresponds to thehardness of your water, you do notneed to do anything more.
However, if you have a different waterhardness, you must adjust the watersoftener to match your water hardness.
Before using for the first time
21
Displaying and setting the waterhardness level
Switch the dishwasher off with the button, if it is switched on.
Press the / button in and, whilstholding it in, switch the dishwasheron using the button.Keep the / button pressed in forat least four seconds until the /indicator light comes on.
If this does not happen, start theprocedure from the beginning again.
Press the button twice.
The indicator light will flash rapidlytwice at intervals.
The value which has been set for thewater hardness is shown as a figureafter in the display (see chart).
will start flashing in the display.This is the factory default setting of15 °d.
Use the / button to select thevalue which equates to your waterhardness level.Each press of the button moves youup a level. When the highest waterhardness level is reached, the settingstarts from the beginning again.
The setting is now stored in memory.
Switch the dishwasher off with the button.

Before using for the first time
22
°d mmol/l °f Display
1 0.2 2 1
2 0.4 4 2
3 0.5 5 3
4 0.7 7 4
5 0.9 9 5
6 1.1 11 6
7 1.3 13 7
8 1.4 14 8
9 1.6 16 9
10 1.8 18 10
11 2.0 20 11
12 2.2 22 12
13 2.3 23 13
14 2.5 25 14
15 2.7 27 15
16 2.9 29 16
17 3.1 31 17
18 3.2 32 18
19 3.4 34 19
20 3.6 36 20
°d mmol/l °f Display
21 3.8 38 21
22 4.0 40 22
23 4.1 41 23
24 4.3 43 24
25 4.5 45 25
26 4.7 47 26
27 4.9 49 27
28 5.0 50 28
29 5.2 52 29
30 5.4 54 30
31 5.6 56 31
32 5.8 58 32
33 5.9 59 33
34 6.1 61 34
35 6.3 63 35
36 6.5 65 36
37-50 6.7-9.0 67-89 50
51-60 9.2-10.8 91-108 60
61-70 11.0-12.6 110-126 70

Before using for the first time
23
Before using the appliance forthe first time, you require:– approx. 2 litres of water,
– approx. 2 kg dishwasher salt,
– domestic dishwasher detergent,
– rinse aid formulated for domesticdishwashers.
Every dishwasher is tested at thefactory. There will be residual water inthe appliance from this test. It is notan indication that it has been usedpreviously.
Dishwasher saltIn order to achieve good cleaningresults, the dishwasher needs tooperate with soft water. Hard waterresults in a build-up of calcium depositson crockery and in the dishwasher. Mains water with a hardness levelhigher than 0.7 mmol/l (4 °d - Germanscale) needs to be softened. This takesplace automatically in the integratedwater softener. The water softener inthe dishwasher is suitable for a waterhardness level of up to 12.6 mmol/l(70 °d - German scale).
The water softener requires dishwashersalt. Depending on the water hardness level(< 3.8 mmol/l, or 21 °d - German scale),dishwasher salt is not required ifcombination tablets are being used (see"Operation - Detergent").
If the water hardness in your area isconstantly lower than 0.9 mmol/l(5 °d), you do not need to adddishwasher salt. The prompt to adddishwasher salt will be switched offautomatically. The water softenermust, however, still be programmed tocorrespond to the water hardnesslevel in your area.
Dishwasher detergent willdamage the water softener.Do not fill the salt reservoir withpowder or liquid detergent.
Only use special coarse graineddishwasher salt for reactivation,as other salts (e.g. cooking salt,agricultural grade or gritting salt) maycontain insoluble additives which canimpair the functioning of the watersoftener.

Before using for the first time
24
Filling the salt reservoir
Before filling the salt reservoir withdishwasher salt for the first time, youmust fill it with approx. 2 litres ofwater to enable the salt to dissolve.Once the dishwasher has been used,there is always sufficient water in thereservoir.
Remove the lower basket andunscrew the salt reservoir cap.
Water or saline solution will run outof the reservoir when the cap isremoved.It should therefore only be removedin order to refill the salt reservoir.
Fill the reservoir with approx. 2 litresof water (first use only).
Place the funnel provided over thesalt reservoir and carefully fill withdishwasher salt until the reservoir isfull. The salt reservoir holds approx. 2kg of salt depending on the brandused.
Clean any excess salt from aroundthe reservoir opening and then screwthe cap on again firmly.
Immediately after filling the saltreservoir, run the Gentle 45°C programme with the Turboprogramme option selected andwithout any crockery in thedishwasher to remove any traces ofsalt from the cabinet.

Before using for the first time
25
Add salt reminder
Fill the salt reservoir with dishwashersalt when the Salt indicator lightcomes on (If it comes on during aprogramme, wait until the end of theprogramme).
Risk of corrosion! Immediately after filling the saltreservoir, run the Gentle 45°C programme with the Turboprogramme option selected andwithout any crockery in thedishwasher to remove any traces ofsalt from the cabinet.
After the salt reservoir has been filled,the refill indicator may still be lit up ifthe salt concentration has not yetreached the correct level. It will go outwhen the correct concentration isreached.
The refill reminder will be switched off ifyou have programmed the dishwasherfor a water hardness below 0.9 mmol/l(5 °d - German scale).
If you only ever use multi-functioncombination products in yourdishwasher, you can switch off bothrefill reminders for salt and rinse aid ifyou wish (see "Programme options -Switching off the refill indicators").
If you switch to using detergent thatdoes not contain salt or rinse aid, itis important to remember to adddishwasher salt and rinse aid and toswitch the reminders back on.

Before using for the first time
26
Rinse aidRinse aid is necessary to ensure waterdoes not cling and leave marks oncrockery during the drying phase andhelps crockery dry faster after it hasbeen washed. Rinse aid is poured into the storagereservoir and the amount set isdispensed automatically.
Inadvertently filling the rinse aidreservoir with powder or liquiddetergent will damage the reservoir.Only pour rinse aid formulated fordomestic dishwashers into thereservoir.
Alternatively, it is possible to use
– household vinegar with a max. 5%acid content
or
– liquid citric acid up to 10% acidcontent
The resulting rinsing and drying qualitywill not, however, be as good as whenrinse aid is used.
Do not use vinegar with a higheracid content (e.g. vinegar essence25% acid).This would damage the dishwasher.
If you only ever use combinationproducts containing rinse aid in yourdishwasher, you do not need to addrinse aid.
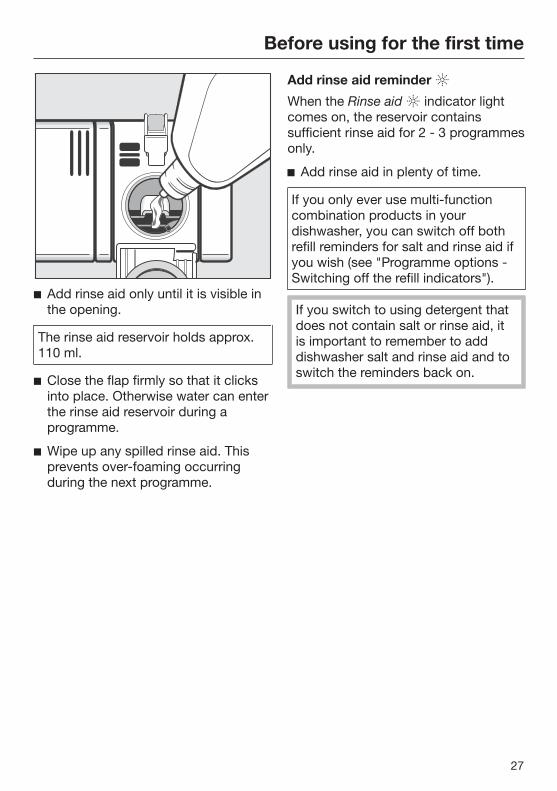
Adding rinse aid
Press the button on the lid of therinse aid reservoir in the direction ofthe arrow until the flap springs open.
Before using for the first time
27
Add rinse aid only until it is visible inthe opening.
The rinse aid reservoir holds approx.110 ml.
Close the flap firmly so that it clicksinto place. Otherwise water can enterthe rinse aid reservoir during aprogramme.
Wipe up any spilled rinse aid. Thisprevents over-foaming occurringduring the next programme.
Add rinse aid reminder
When the Rinse aid indicator lightcomes on, the reservoir containssufficient rinse aid for 2 - 3 programmesonly.
Add rinse aid in plenty of time.
If you only ever use multi-functioncombination products in yourdishwasher, you can switch off bothrefill reminders for salt and rinse aid ifyou wish (see "Programme options -Switching off the refill indicators").
If you switch to using detergent thatdoes not contain salt or rinse aid, itis important to remember to adddishwasher salt and rinse aid and toswitch the reminders back on.

Before using for the first time
28
Setting the rinse aid dosage
You can adjust the rinse aid dosage forbest results.
The rinse aid dosage is set in stagesfrom 0 to 6. It is set to 3 at the factory.This is the recommended setting.
If the "Adjust Sensor wash" programmefunction (depending on model) hasbeen activated, the amount of rinse aiddispensed in the Sensor washprogramme can be higher than that set.
If spots appear on crockery andglassware:
Increase the rinse aid dosage.
If clouding or smearing appears oncrockery and glassware:
Decrease the rinse aid dosage.
Switch the dishwasher off with the button, if it is switched on.
Press the / button in and, whilstholding it in, switch the dishwasheron using the button.Keep the / button pressed in forat least four seconds until the /indicator light comes on.
If this does not happen, start theprocedure from the beginning again.
Press the button three times.
The indicator will flash rapidly 3times at intervals.
The dosage set will appear in thedisplay after .
The flashing sequence will appear inthe display. This indicates the factory default setting3.
Use the / button to select thesetting required.Each press of the button moves youup a level. After reaching the highestvalue, the counter starts from thebeginning again.
The setting is now stored in memory.
Switch the dishwasher off with the button.
Loading the dishwasher
29
NotesRemove coarse food residues fromcrockery.
There is no need to rinse items underrunning water.
Do not wash items soiled withash, sand, wax, lubricating grease orpaint in the dishwasher. Ash doesnot dissolve and is distributed in thewash cabinet. Wax, sand, lubricatinggrease and paint cause damage tothe dishwasher.
Crockery can be loaded anywhere inthe baskets, but the following notesshould be observed:
– Do not place crockery and cutleryinside other pieces where they maybe concealed.
– Load the crockery so that water canaccess all surfaces. This ensures thatthey get properly cleaned.
– Make sure that all items are securelypositioned.
– Hollow items such as cups, glasses,pans, etc. must be inverted in thebasket.
– Tall, narrow, hollow items, e.g.champagne glasses, should beplaced in the centre of the basket toensure better water coverage.
– Wide based items should be placedat an angle so that water can run offthem freely.
– The spray arms must not be blockedby items which are too tall or hangthrough the baskets. If in doubt, testfor free movement by manuallyrotating the spray arms.
– Make sure that small items cannotfall through the holders in thebaskets. Small items, e.g. lids, shouldtherefore be placed in the cutlery trayor cutlery basket (depending onmodel).
Some foodstuffs may contain naturaldyes, e.g. carrots, tomatoes ortomato sauce. Plastic items in thedishwasher may discolour if largequantities of these foodstuffs findtheir way into the dishwasher on thecrockery. The stability of plasticitems is not affected by thisdiscolouration.Cleaning silver cutlery in thedishwasher may also cause plasticitems to discolour.

Loading the dishwasher
30
Items not suitable for dishwashers:
– Wooden cutlery and crockery oritems with wooden parts: these maydiscolour and fade. The glue used inthese items is not dishwasher-proofand wooden handles may comeloose after being washed in adishwasher.
– Craft items, antiques, valuable vasesand decorative glassware are alsonot suitable for dishwashers.
– Plastic items which are not heat-resistant: the high temperatures inthe dishwasher may cause them tomelt or lose shape.
– Copper, brass, tin and aluminiumitems may discolour or become matt.
– Colours painted over a glaze mayfade after a number of washes.
– Delicate glassware and glasswarecontaining lead crystal: clouding mayoccur over time.
Please note
Silverware previously cleaned with asilver polish may still be damp orspotted at the end of a programme,where water has not run off smoothly. Itmay need to be rubbed dry with a softcloth.
Silver which has been in contact withfoods containing sulphur can discolour.These include egg yolk, onions,mayonnaise, mustard, pulses, fish, fishbrine and marinades.
Aluminium components (e.g.rangehood grease filters) must not becleaned with caustic alkalinecommercial or industrial cleaningagents.These may damage the material, orin extreme cases, there is a risk of asevere explosive chemical reaction(such as an explosive oxyhydrogengas reaction).
Useful tip: When purchasing newcrockery and cutlery, make sure theyare dishwasher-proof.
Glass care
– Clouding may occur on glasses afterfrequent washing. If delicateglassware is washed in thedishwasher, ensure that only very lowtemperatures are used (seeprogramme chart), or a special glass-care programme is used (dependingon model). This will reduce the risk ofclouding.
– Purchase glassware which isdishwasher-safe (e.g. Riedelglassware).
– Use detergents with glass protectiveadditives (e.g. Miele CareCollectiontabs).
– Visit "http://www.mieleglasscare.com/international/en/glasscare/english" formore information on glass care.
Loading the dishwasher
31
Upper basket
See "Loading the dishwasher /Loading examples" for examples ofhow to load crockery and cutlery.
For safety reasons, do notoperate the dishwasher without theupper and lower baskets in place(except when running the Tall itemsprogramme, if available).
Use the upper basket for small,lightweight and delicate items suchas cups, saucers, glasses, dessertbowls, etc. Shallow pans or casserole dishes canalso be placed in the upper basket.
Long items such as soup ladles,mixing spoons and long knivesshould be placed lying down acrossthe front of the upper basket.
Cup rack
To make room for tall items, raise therack upwards.
Glasses can be arranged along thepositioning rail of the cup rack to givethem some support during theprogramme.
Lower the cup rack and lean theglasses against it.
Loading the dishwasher
32
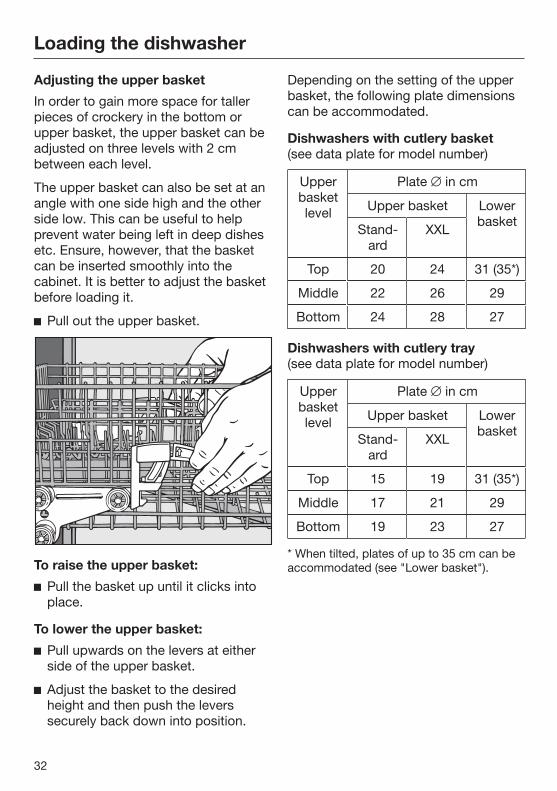
Adjusting the upper basket
In order to gain more space for tallerpieces of crockery in the bottom orupper basket, the upper basket can beadjusted on three levels with 2 cmbetween each level.
The upper basket can also be set at anangle with one side high and the otherside low. This can be useful to helpprevent water being left in deep dishesetc. Ensure, however, that the basketcan be inserted smoothly into thecabinet. It is better to adjust the basketbefore loading it.
Pull out the upper basket.
To raise the upper basket:
Pull the basket up until it clicks intoplace.
To lower the upper basket:
Pull upwards on the levers at eitherside of the upper basket.
Adjust the basket to the desiredheight and then push the leverssecurely back down into position.
Depending on the setting of the upperbasket, the following plate dimensionscan be accommodated.
Dishwashers with cutlery basket(see data plate for model number)
Upperbasketlevel
Plate in cm
Upper basket Lowerbasket
Stand-ard
XXL
Top 20 24 31 (35*)
Middle 22 26 29
Bottom 24 28 27
Dishwashers with cutlery tray (see data plate for model number)
Upperbasketlevel
Plate in cm
Upper basket Lowerbasket
Stand-ard
XXL
Top 15 19 31 (35*)
Middle 17 21 29
Bottom 19 23 27
* When tilted, plates of up to 35 cm can beaccommodated (see "Lower basket").
Loading the dishwasher
33
Lower basket
See "Loading the dishwasher -Loading examples" for examples ofhow to load crockery and cutlery.
For larger and heavier items such asplates, serving platters, saucepans,bowls, etc.Glasses, cups and small items suchas saucers can also be placed in thelower basket. Do not place thin,delicate glassware in the lowerbasket.
Place large platters and dishes in thecentre of the lower basket.
When tilted, plates up to 35 cm indiameter can be accommodated.
MultiComfort area
The rear section of the lower basket isused for washing cups, glasses, plates,pots and pans.
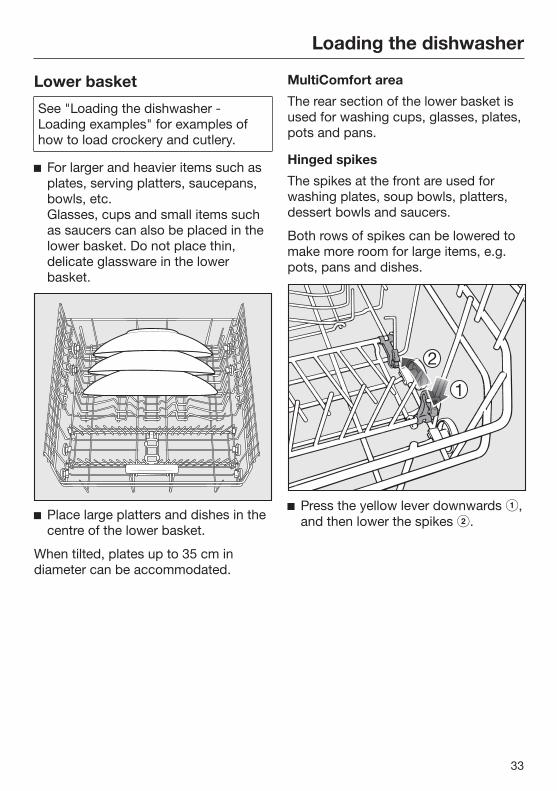
Hinged spikes
The spikes at the front are used forwashing plates, soup bowls, platters,dessert bowls and saucers.
Both rows of spikes can be lowered tomake more room for large items, e.g.pots, pans and dishes.
Press the yellow lever downwards ,and then lower the spikes .
Loading the dishwasher
34
Cutlery
Cutlery tray
See "Loading the dishwasher -Loading examples" for examples ofhow to load crockery and cutlery.
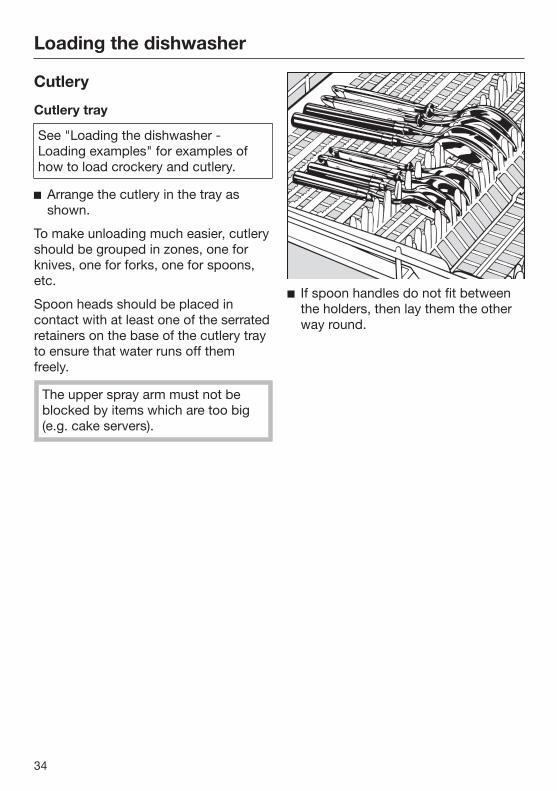
Arrange the cutlery in the tray asshown.
To make unloading much easier, cutleryshould be grouped in zones, one forknives, one for forks, one for spoons,etc.
Spoon heads should be placed incontact with at least one of the serratedretainers on the base of the cutlery trayto ensure that water runs off themfreely.
The upper spray arm must not beblocked by items which are too big(e.g. cake servers).
If spoon handles do not fit betweenthe holders, then lay them the otherway round.

Loading the dishwasher
35
Cutlery basket (depending on model)
The cutlery basket can be placedanywhere on the front rows of spikes inthe lower basket.
To avoid the risk of injury, knives andforks should be placed with thehandles upwards in the basket.However, cutlery placed handle downin the basket will come out cleanerand drier.
Place small items of cutlery in theindividual slots on three sides of thecutlery basket.
Cutlery insert for the cutlery basket
Use the insert supplied for heavilysoiled items of cutlery. The insertseparates the items so that they can bemore easily accessed by water.
Fit it onto the cutlery basket ifrequired.
Insert cutlery with the handles facingdownwards.
Distribute them evenly along theinsert.

Loading the dishwasher
36
Loading examples
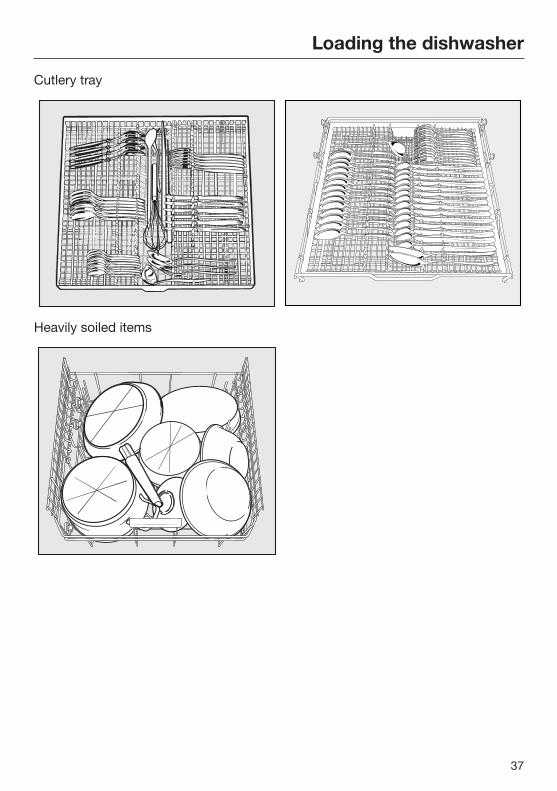
Dishwashers with cutlery tray
Upper basket
Lower basket
Loading the dishwasher
37
Cutlery tray
Heavily soiled items
Loading the dishwasher
38
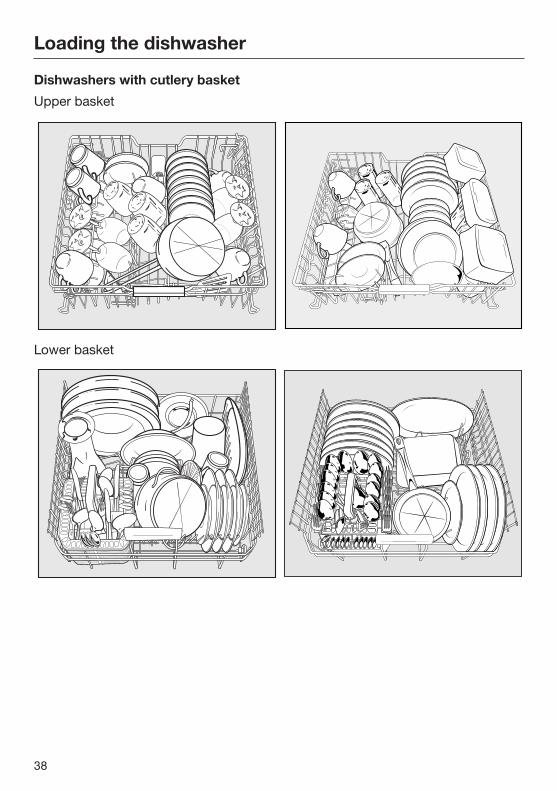
Dishwashers with cutlery basket
Upper basket
Lower basket

Loading the dishwasher
39
Cutlery basket
Heavily soiled items

Comparison tests
40
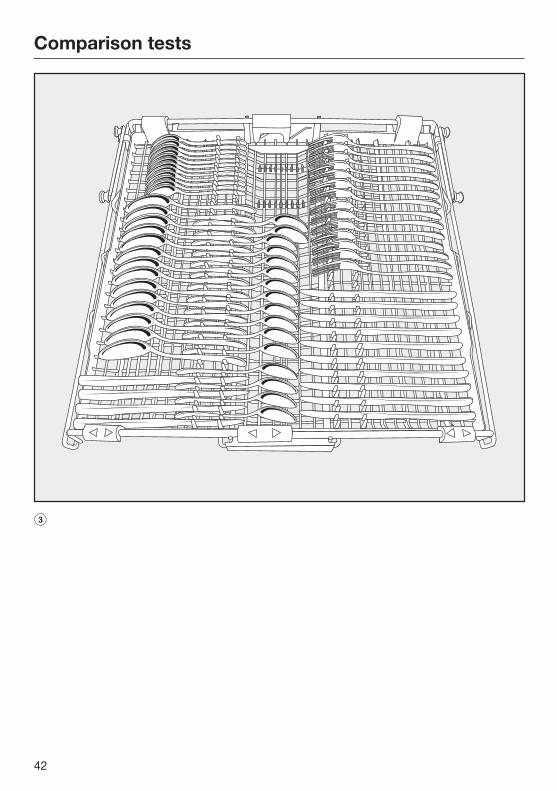
Standard height with cutlery tray
Test standard: AS/NZS 2007.1:2005, AS/NZS 2007.2:2005;AS/NZS 6400:2005
Standard programmefor energy label comparisontests:
ECO
Capacity: 14 place settings
Detergent quantity: 32.5 g in Compartment II
Rinse aid dispensing: Setting 3
You can find information on adjusting the rinse aid dosage in the "Rinse aid"section of this booklet.
Drying measurements: Door ajar using a block of approximately 50 mmupon completion of dry test.
Upper basket level:
Position: Bottom
Jumbo cup rack (if available):
Outer position
Loading examplesPictures illustrating how to load the dishwasher are shown on the following pages.
Picture : Upper basket
Picture : Lower basket
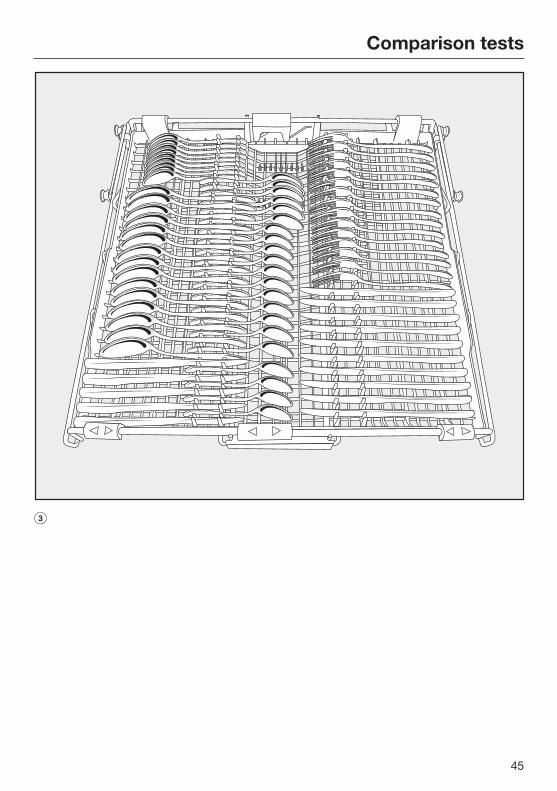
Picture : Cutlery tray
Do not lower or remove the basket inserts.
Remove the bottle holder from the lower basket (if available).

Comparison tests
41
Capacity 14
Comparison tests
42
Comparison tests
43
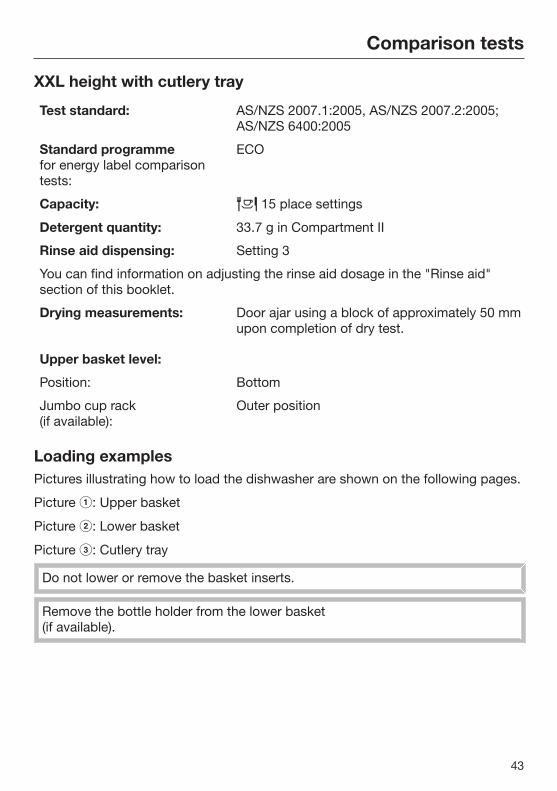
XXL height with cutlery tray
Test standard: AS/NZS 2007.1:2005, AS/NZS 2007.2:2005;AS/NZS 6400:2005
Standard programmefor energy label comparisontests:
ECO
Capacity: 15 place settings
Detergent quantity: 33.7 g in Compartment II
Rinse aid dispensing: Setting 3
You can find information on adjusting the rinse aid dosage in the "Rinse aid"section of this booklet.
Drying measurements: Door ajar using a block of approximately 50 mmupon completion of dry test.
Upper basket level:
Position: Bottom
Jumbo cup rack (if available):
Outer position
Loading examplesPictures illustrating how to load the dishwasher are shown on the following pages.
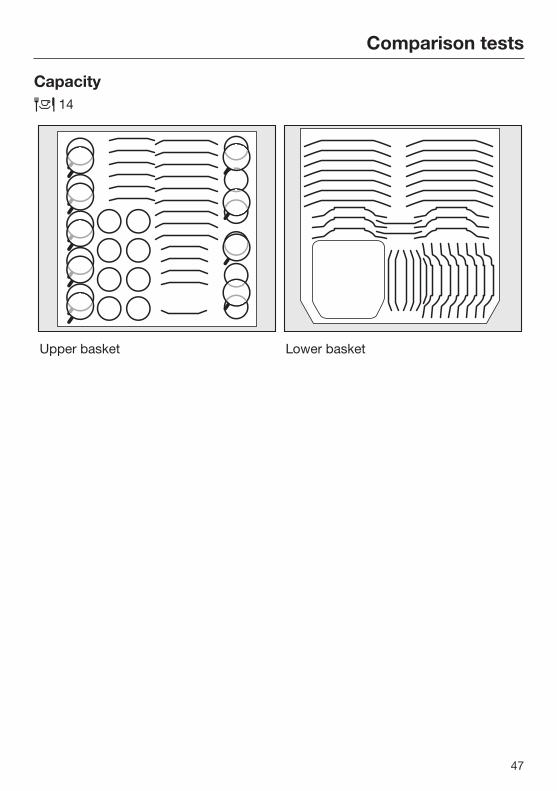
Picture : Upper basket
Picture : Lower basket
Picture : Cutlery tray
Do not lower or remove the basket inserts.
Remove the bottle holder from the lower basket (if available).

Comparison tests
44
Capacity 15
Comparison tests
45

Comparison tests
46
Standard and XXL height with cutlery basket
Test standard: AS/NZS 2007.1:2005, AS/NZS 2007.2:2005;AS/NZS 6400:2005
Standard programmefor energy label comparisontests:
ECO
Capacity: 14 place settings
Detergent quantity: 5.0 g in Compartment I, 27.5 g in Compartment II
Rinse aid dispensing: Setting 5
You can find information on adjusting the rinse aid dosage in the "Rinse aid"section of this booklet.
Drying measurements: Door ajar using a block of approximately 50 mmupon completion of dry test.
Upper basket level:
Position: Bottom
Jumbo cup rack (if available):
Outer position
Loading examplesPictures illustrating how to load the dishwasher are shown on the following pages.
Picture : Upper basket
Picture : Lower basket
Picture : Cutlery basket
Do not lower or remove the basket inserts.
Remove the bottle holder from the lower basket (if available).
Comparison tests
47
Capacity 14
Upper basket Lower basket
Comparison tests
48
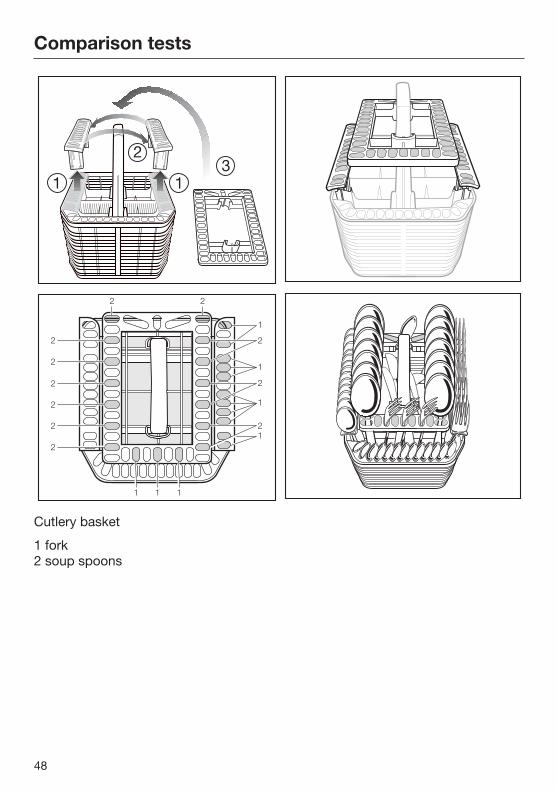
Cutlery basket
1 fork2 soup spoons

Operation
49
Detergent
Only use detergents formulatedfor domestic dishwashers. Do notuse washing-up liquid.
Active ingredients
Modern detergents contain variousactive ingredients, the most importantof which are:
– Complexing agents to preventcalcification.
– Alkalis to aid the removal of dried onsoiling.
– Enzymes to break down starch andloosen protein.
– Oxygen based bleaching agents toremove coloured stains (e.g. tea,coffee, tomato sauce).
Most dishwasher detergents are mildlyalkaline and contain enzymes andoxygen based bleaching agents.
Types of detergent:
– Powder and liquid gel detergents.These detergents allow you to adjustthe amount dispensed according tothe amount of load and level ofsoiling.
– Tab detergents. These are suitable formost levels of soiling.
You can also buy combination products(see "Programme options -DetergentAgent", if applicable). In addition to detergent, these productscontain rinse aid and salt substitutes.They are available as "3 in 1" or whenthey also contain other componentssuch as glass and stainless steelprotective additives and enhancedcleaning power, as "5 in 1", "7 in 1", "Allin 1" etc. Refer to the manufacturer's packagingas to whether combination products aresuitable for the water hardness level inyour area. Please note that the cleaning anddrying results of combinationdetergents can vary greatly.
For optimum cleaning and dryingresults, use Miele dishwasherdetergent and add Miele salt andMiele rinse aid separately. See"Optional accessories".

Operation
50
Detergent dosage
Follow the dosage recommended bythe manufacturer on the packaging.
Unless directed otherwise, use onedetergent tab or add 20 to 30 mldetergent to compartment II,depending on the level of soiling.With very heavy soiling you can alsoadd a small amount of detergent tocompartment l.
Tabs may not dissolve completelywhen the Quick wash programme (ifavailable) is used.
Failure to dispense therecommended amount of detergentmay impair cleaning results.
Some dishwasher detergents arestrongly alkaline and contain irritantor corrosive ingredients. They can beextremely dangerous if swallowedand can cause burning in the nose,mouth and throat or inhibit breathing.Avoid inhalation of powderdetergents and do not ingestdishwasher detergent. Seek medicaladvice immediately if detergent hasbeen swallowed or inhaled.Keep detergent and other householdagents out of the reach of children atall times. Keep children away fromthe dishwasher when the door isopen. There could still be detergentresidues in the cabinet. Check thatthe detergent dispenser is empty atthe completion of a programme. Toavoid the danger of children cominginto contact with the dishwasherdetergent, only add detergent justbefore starting the programme andclose the door, activating the safetylock (if your dishwasher is fitted withone).

Operation
51
Adding detergent
Press the opening catch on thedetergent dispenser. The flap willspring open.
The flap is always open at the end of aprogramme.
Add the required amount of detergentand close the flap.
Make sure that the detergentpackaging is properly closed afteruse to avoid it getting damp andbecoming lumpy.
For information
Compartment I holds max. 10 ml, Compartment II holds max. 50 ml.
There are marks in Compartment II toassist with dispensing: 20, 30. Themarks indicate a level of approx. 20 or30 ml when the door is open in ahorizontal position.

Operation
52
Switching on the dishwasher Make sure the spray arms are not
obstructed.
Close the door.
Turn on the tap if it is turned off.
Switch the dishwasher on with the button.
The / indicator light flashes andthe indicator light comes on next to theprogramme selected.
Selecting a programmeChoose your programme according tothe type of load and how dirty it is.
The different programmes and theiruses are described in the Programmechart later on in this booklet.
Use the programme selector button to select the programme required.
The indicator light for the programmeselected will light up.The programme duration will appear inhours and minutes in the display.
You can now select programmeoptions (see "Programme options").
If any programme options are selected,the appropriate indicator lights will lightup.
Operation
53
Starting the programme Press the / button.
The programme will begin.
The / indicator light comes on.
A programme should only becancelled in the first few minutes, ifat all. Otherwise importantprogramme stages could be omitted.
DisplayThe duration of the programme selectedappears in hours and minutes in thedisplay before the programme begins.During the programme the time left untilthe end of the programme is displayed.
The programme duration displayed mayvary with the same programme. It isinfluenced by, among other things, thewater temperature at each intake, thereactivation process, the type ofdetergent, the amount of crockery andhow dirty it is.
When a programme is selected for thefirst time, the display shows an averagetime for a cold water intake.
The times shown in the Programmechart refer to standard test loads andtemperatures.
Each time a programme is run, theelectronic unit takes the new conditionsinto account, and calculates the timerequired.

Operation
54
Energy managementTo save energy, the dishwasher willswitch off automatically 10 minutesafter the last time a button has beenpressed or 10 minutes after the end ofthe programme (see "Programmeoptions - Optimise standby").
Press the button to switch thedishwasher back on.
The dishwasher will not switch offwhilst a programme is running, duringthe Delay start period or if there is afault.
Programme finishedThe programme has ended when .appears in the display.
The drying fan may continue to run fora few minutes at the end of theprogramme.
The dishwasher can now be openedand unloaded (see "Unloading thedishwasher").
To prevent the risk of steamdamage to the worktop edgingabove the dishwasher, it is advisableto leave the door closed until you areready to unload the crockery.Alternatively, you can open the doorfully until the crockery is cool enoughto unload. Do not leave the door onlypartially open.
Operation
55
Switching offAt the end of a programme:
The dishwasher can be switched offat any time using the button.
Switching the dishwasher off during aprogramme stops the programme.
Switching the dishwasher off during therun-up to a Delay start time will alsostop the process.
If the dishwasher is not going to beused for a longer period of time, e.g.whilst on holiday, the tap should beturned off.
Unloading the dishwasherDishes tend to break and chip moreeasily when they are hot. Allow thedishes to cool until they are comfortableenough to handle before unloadingthem.
If you open the door fully after switchingoff, the dishes will cool much faster.
First unload the lower basket, then theupper basket and finally the cutlery tray(depending on model). This will prevent water drops from theupper basket and cutlery tray fromfalling onto the dishes in the lowerbasket.
Operation
56
Interrupting a programmeA programme is interrupted as soon asthe door is opened. If the door is closed again, theprogramme will continue from the pointit was at before the door was opened.
Water in the dishwasher may behot. Danger of scalding!Only open the door if absolutelynecessary and exercise extremecaution when doing so. Beforeclosing the door again, leave it ajarfor approx. 20 seconds. This willenable the temperature in the washcabinet to settle. Then raise the doorup and push until the catch engages.
Changing a programme
If the detergent dispenser flap hasalready opened, do not change theprogramme.
If a programme has already started andyou wish to change it, proceed asfollows:
Press and hold the / button forat least one second.
The programme will be cancelled.
Select the programme you want, andthen start it.
Programme options
57
TurboThe Turbo option reduces the durationof programmes in which this option isavailable.
In order to achieve optimum cleaningresults, consumption rates areincreased with this option.
Switch the dishwasher on with the button.
The / indicator light will flash.
Select a programme.
Press the Turbo button.
The Turbo indicator light comes on.
The programme can now be started.
The option selected will remain activefor all programmes until the setting ischanged.
DetergentAgentFor optimum cleaning results, thedishwasher automatically adjusts theprogramme sequence to the type ofdetergent being used. Depending onthe programme, this can mean that therunning time and energy consumptionvary slightly.

Programme options
58
Switching off the refillindicatorsIf you only ever use multi-functioncombination products in yourdishwasher, you can switch the refillreminders for salt and rinse aid off ifyou wish. Doing so will not affect theDetergentAgent function.
Switch the dishwasher off with the button, if it is switched on.
Press the / button in and, whilstholding it in, switch the dishwasheron using the button.Keep the / button pressed in forat least four seconds until the /indicator light comes on.
If this does not happen, start theprocedure from the beginning again.
Press the button nine times.
The indicator light will flash rapidlynine times at intervals.
The flashing sequence in the display willshow whether the refill indicators areswitched on or off.
– : Refill indicators are switched on.
– : Refill indicators are switched off.
Press the / button to change thesetting.
The setting is now stored in memory.
Switch the dishwasher off with the button.
If you switch to using detergent thatdoes not contain salt or rinse aid, itis important to remember to adddishwasher salt and rinse aid and toswitch the reminders back on.
Programme options
59
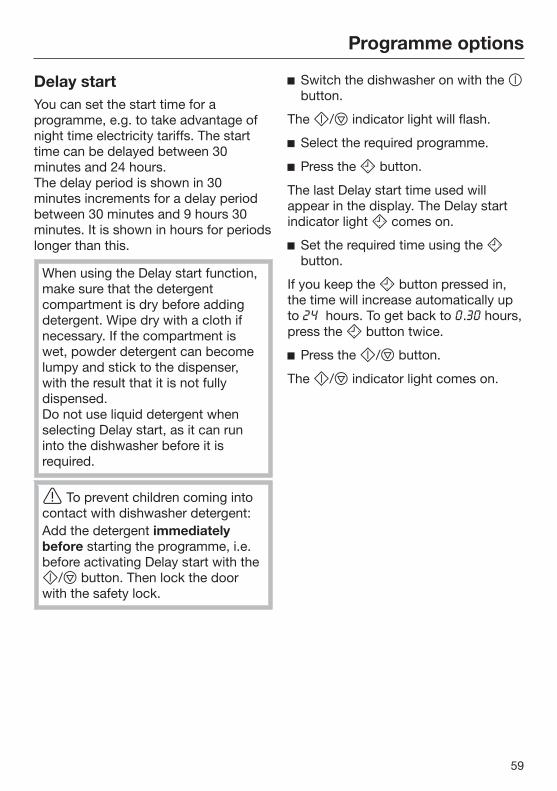
Delay startYou can set the start time for aprogramme, e.g. to take advantage ofnight time electricity tariffs. The starttime can be delayed between 30minutes and 24 hours. The delay period is shown in 30minutes increments for a delay periodbetween 30 minutes and 9 hours 30minutes. It is shown in hours for periodslonger than this.
When using the Delay start function,make sure that the detergentcompartment is dry before addingdetergent. Wipe dry with a cloth ifnecessary. If the compartment iswet, powder detergent can becomelumpy and stick to the dispenser,with the result that it is not fullydispensed.Do not use liquid detergent whenselecting Delay start, as it can runinto the dishwasher before it isrequired.
To prevent children coming intocontact with dishwasher detergent:Add the detergent immediatelybefore starting the programme, i.e.before activating Delay start with the/ button. Then lock the doorwith the safety lock.
Switch the dishwasher on with the button.
The / indicator light will flash.
Select the required programme.
Press the button.
The last Delay start time used willappear in the display. The Delay startindicator light comes on.
Set the required time using the button.
If you keep the button pressed in,the time will increase automatically upto hours. To get back to . hours,press the button twice.
Press the / button.
The / indicator light comes on.

Programme options
60
If "Optimise standby" is switched on(see "Programme options - Optimisestandby"), the display will go out aftera few minutes, leaving just the / indicator light flashing slowly.
Press any button to switch the displayback on again for a few minutes.
The time up until the programme startswill show counting down in the displayin hours for durations above 10 hours,and in minutes for durations below this.
When the set time is reached, theprogramme selected will startautomatically. The time remaining willappear in the display and the indicator light will go out.
How the Delay start time is shown inthe display:
up to 59 minutes:e.g. 30 minutes = .1 hour up to 9 hours 30 minutes:e.g. 5 hours = .10 hours and over:e.g. 15 hours =
Starting a programme before theDelay start period has elapsed:
A programme can be started before theDelay start period has elapsed. Proceed as follows:
Press and hold the / button forat least one second.
The indicator light goes out and the/ indicator light begins flashing.
Press the / button again.
The programme will begin and the / indicator light will light up.
Programme options
61
Adjust Sensor washYou can adjust the Sensor washprogramme so that it will removestubborn soiling in a lightly soiled load.
Switch the dishwasher off with the button, if it is switched on.
Press the / button in and, whilstholding it in, switch the dishwasheron using the button.Keep the / button pressed in forat least four seconds until the /indicator light comes on.
If this does not happen, start theprocedure from the beginning again.
Press the button five times.
The indicator light will flash rapidlyfive times at intervals.
The flashing sequence in the displayindicates whether "Adjust sensor wash"is activated or not.
– : "Adjust sensor wash" is switchedon.
– : "Adjust sensor wash" is switchedoff.
Press the / button to change thesetting.
The setting is now stored in memory.
Switch the dishwasher off with the button.

Programme options
62
Optimise standby"Optimise standby" is activated bydefault.
To save energy, the dishwasher willswitch off automatically a few minutesafter the last time a button has beenpressed or after the end of aprogramme.
The dishwasher will not switch offwhilst a programme is running, duringthe Delay start period or if there is afault.
"Optimise standby" can be switched offif you prefer. If you do this, the durationbefore the dishwasher switches offincreases to 6 hours. Doing this willincrease energy consumption.
Switch the dishwasher off with the button, if it is switched on.
Press the / button in and, whilstholding it in, switch the dishwasheron using the button.Keep the / button pressed in forat least four seconds until the /indicator light comes on.
If this does not happen, start theprocedure from the beginning again.
Press the button eight times.
The indicator light will flash rapidlyeight times at intervals.
The flashing sequence in the displayshows whether Optimise standby isactivated or not.
– : "Optimise standby" is switchedon.
– : "Optimise standby" is switchedoff.
Press the / button to change thesetting.
The setting is now stored in memory.
Switch the dishwasher off with the button.
Programme options
63
Factory default settingsIf you have altered any settings from thefactory default, you can reset themback to the factory default settings asfollows:
Switch the dishwasher off with the button, if it is switched on.
Press the / button in and, whilstholding it in, switch the dishwasheron using the button.Keep the / button pressed in forat least four seconds until the /indicator light comes on.
If this does not happen, start theprocedure from the beginning again.
Press the button 12 times.
The indicator light will do 1 longflash and 2 short flashes at intervals.
The flashing sequence in the displayindicates whether a setting has beenchanged from its factory default.
– : All settings are set to factorydefault settings.
– : At least one setting has beenchanged.
To reset the dishwasher to the factorydefault settings, press the /button.
The setting is now stored in memory.
Switch the dishwasher off with the button.
Programme chart
64
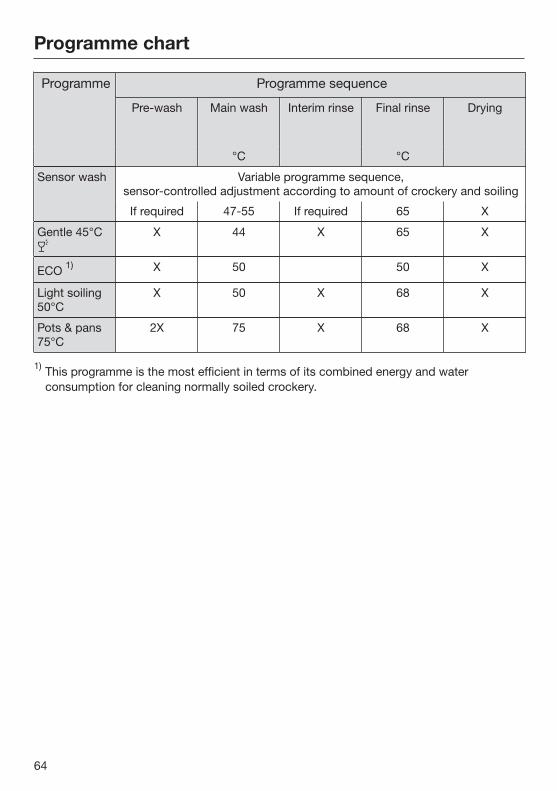
Programme Programme sequence
Pre-wash Main wash Interim rinse Final rinse Drying
°C °C
Sensor wash Variable programme sequence,sensor-controlled adjustment according to amount of crockery and soiling
If required 47-55 If required 65 X
Gentle 45°C
X 44 X 65 X
ECO 1) X 50 50 X
Light soiling50°C
X 50 X 68 X
Pots & pans75°C
2X 75 X 68 X
1) This programme is the most efficient in terms of its combined energy and waterconsumption for cleaning normally soiled crockery.
Programme chart
65
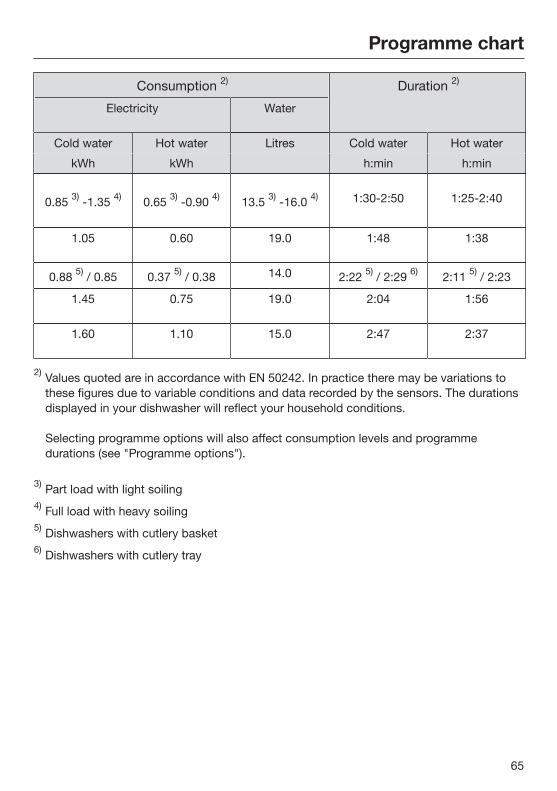
Consumption 2) Duration 2)
Electricity Water
Cold water Hot water Litres Cold water Hot water
kWh kWh h:min h:min
0.85 3) -1.35 4) 0.65 3) -0.90 4) 13.5 3) -16.0 4) 1:30-2:50 1:25-2:40
1.05 0.60 19.0 1:48 1:38
0.88 5) / 0.85 0.37 5) / 0.38 14.0 2:22 5) / 2:29 6) 2:11 5) / 2:23
1.45 0.75 19.0 2:04 1:56
1.60 1.10 15.0 2:47 2:37
2) Values quoted are in accordance with EN 50242. In practice there may be variations tothese figures due to variable conditions and data recorded by the sensors. The durationsdisplayed in your dishwasher will reflect your household conditions.
Selecting programme options will also affect consumption levels and programmedurations (see "Programme options").
3) Part load with light soiling4) Full load with heavy soiling5) Dishwashers with cutlery basket6) Dishwashers with cutlery tray
Programme chart
66
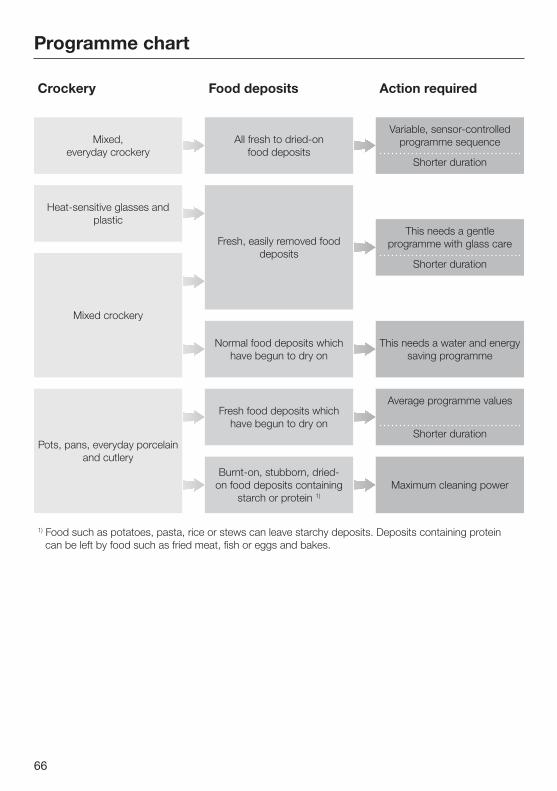
Mixed, everyday crockery
Heat-sensitive glasses and plastic
Mixed crockery
Pots, pans, everyday porcelain and cutlery
All fresh to dried-on food deposits
Fresh, easily removed food deposits
Normal food deposits which have begun to dry on
Fresh food deposits which have begun to dry on
Burnt-on, stubborn, dried-on food deposits containing
starch or protein 1)
Variable, sensor-controlled programme sequence
Shorter duration
This needs a gentle programme with glass care
Shorter duration
This needs a water and energy saving programme
Average programme values
Shorter duration
Maximum cleaning power
1) Food such as potatoes, pasta, rice or stews can leave starchy deposits. Deposits containing protein can be left by food such as fried meat, fish or eggs and bakes.
Crockery Food deposits Action required
Programme chart
67
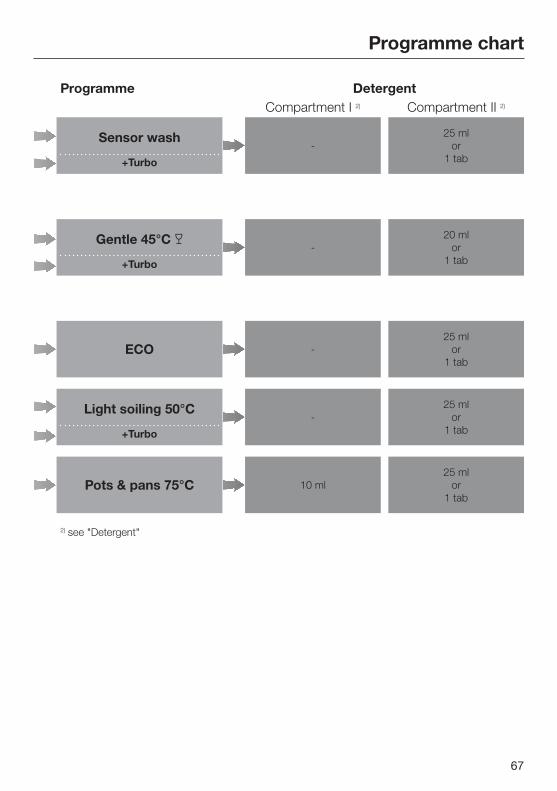
-25 ml
or 1 tab
Sensor wash
+Turbo
-20 ml
or 1 tab
Gentle 45°C
+Turbo
-25 ml
or 1 tab
ECO
-25 ml
or 1 tab
Light soiling 50°C
+Turbo
10 ml25 ml
or 1 tab
Pots & pans 75°C
2) see "Detergent"
DetergentCompartment I 2) Compartment II 2)
Programme
Cleaning and care
68
Check your dishwasher regularly(approx. every 4-6 months). This wayfaults and problems can be avoided.
The external surfaces of thisappliance are all susceptible toscratching.Contact with unsuitable cleaningagents can alter or discolour theexternal surfaces.
Cleaning the wash cabinetThe wash cabinet is largely self-cleaning, provided that the correctamount of detergent is always used.
If, however, there are limescale orgrease deposits in the cabinet, thesecan be removed with a specialdishwasher cleaner (see "Optionalaccessories"). Follow the instructionson the packaging.
Using mainly low temperatureprogrammes (below 50°C), could causebacteria and unpleasant odours to buildup in the wash cabinet. To avoid this,the Pots & pans 75°C programmeshould be run once a month.
Clean the filters in the wash cabinetregularly.
Cleaning the door and the doorsealMould could build up on the door sealand the sides of the dishwasher door asthese surfaces are outside the washcabinet and are not accessed andcleaned by the spray arm jets.
Wipe the door seals regularly with adamp cloth to remove food deposits.
Wipe off any food or drink residueswhich may have dripped onto thesides of the dishwasher door beforeclosing it.
Cleaning and care
69
Cleaning the door front
Soiling that is left too long mightbecome impossible to remove andcould cause external surfaces to alteror discolour.Remove any soiling immediately.
Clean the front with a solution ofwarm water and a little washing-upliquid applied with a soft sponge.Wipe the surfaces dry using a softcloth.For cleaning, you can also use aclean, damp microfibre cloth, such asthe Original Miele all purposemicrofibre cloth, without any cleaningagent.
To avoid damaging external surfaces,do not use:
– cleaning agents containing soda,ammonia, acids or chlorides,
– cleaning agents containing descalingagents,
– abrasive cleaning agents, e.g.powder cleaners and cream cleaners,
– solvent-based cleaning agents,
– stainless steel cleaning agents,
– dishwasher cleaner,
– oven cleaner,
– glass cleaning agents,
– hard, abrasive brushes or sponges,e.g. pot scourers, brushes orsponges which have been previouslyused with abrasive cleaning agents,
– dirt erasers,
– sharp metal scrapers,
– steel wool or metal scourers,
– steam cleaning appliances.
Cleaning and care
70
Checking the filters in thewash cabinetThe filter combination in the base of thewash cabinet retains coarse soil fromthe suds solution, preventing itaccessing the circulation system andre-entering the cabinet through thespray arms.
This dishwasher must not beused without all the filters in place.
Collection of coarse soil may cause thefilters to clog. The level of soiling andtime it takes before the filters needcleaning will vary depending on use.
Check the condition of the filtersregularly and clean them if necessary.
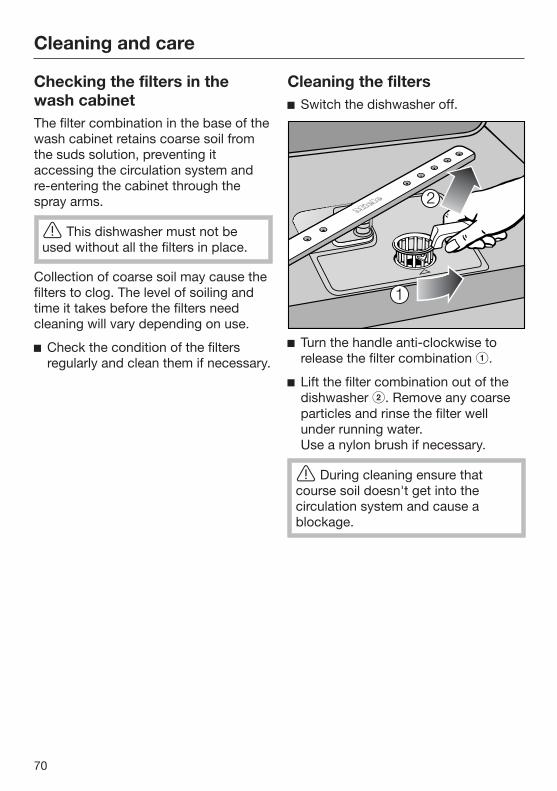
Cleaning the filters Switch the dishwasher off.
Turn the handle anti-clockwise torelease the filter combination .
Lift the filter combination out of thedishwasher . Remove any coarseparticles and rinse the filter wellunder running water. Use a nylon brush if necessary.
During cleaning ensure thatcourse soil doesn't get into thecirculation system and cause ablockage.
Cleaning and care
71
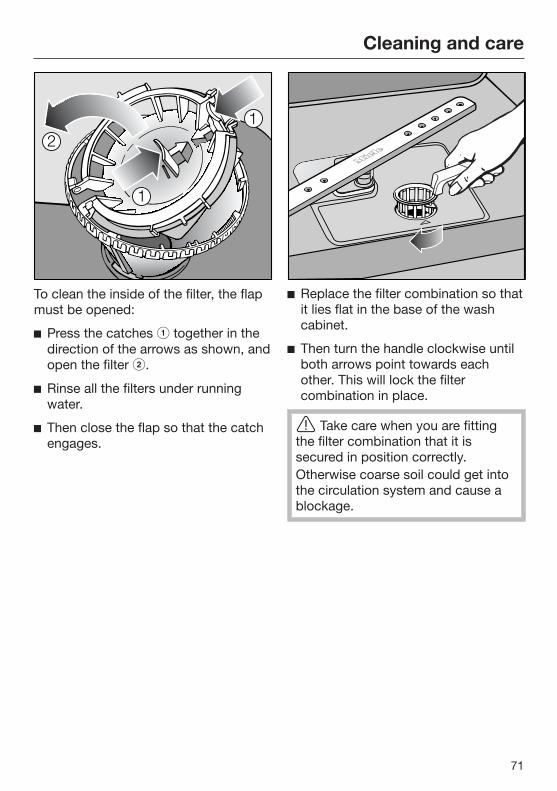
To clean the inside of the filter, the flapmust be opened:
Press the catches together in thedirection of the arrows as shown, andopen the filter .
Rinse all the filters under runningwater.
Then close the flap so that the catchengages.
Replace the filter combination so thatit lies flat in the base of the washcabinet.
Then turn the handle clockwise untilboth arrows point towards eachother. This will lock the filtercombination in place.
Take care when you are fittingthe filter combination that it issecured in position correctly.Otherwise coarse soil could get intothe circulation system and cause ablockage.
Cleaning and care
72
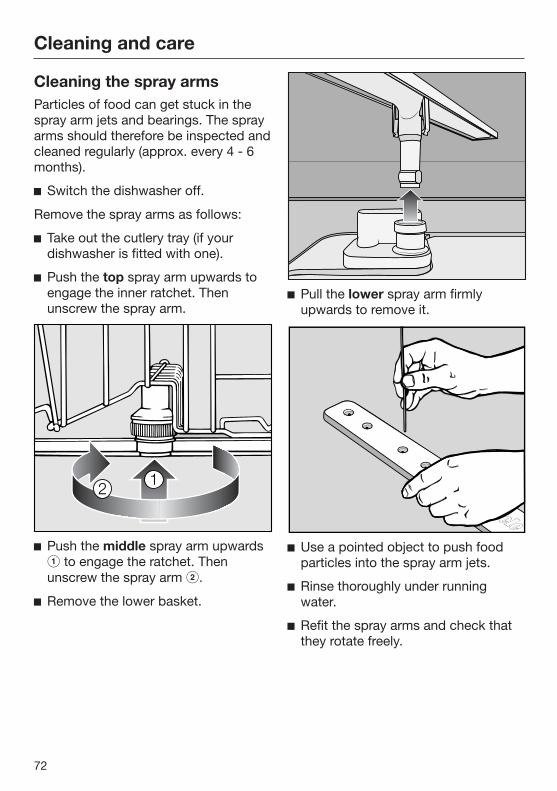
Cleaning the spray armsParticles of food can get stuck in thespray arm jets and bearings. The sprayarms should therefore be inspected andcleaned regularly (approx. every 4 - 6months).
Switch the dishwasher off.
Remove the spray arms as follows:
Take out the cutlery tray (if yourdishwasher is fitted with one).
Push the top spray arm upwards toengage the inner ratchet. Thenunscrew the spray arm.
Push the middle spray arm upwards to engage the ratchet. Thenunscrew the spray arm .
Remove the lower basket.
Pull the lower spray arm firmlyupwards to remove it.
Use a pointed object to push foodparticles into the spray arm jets.
Rinse thoroughly under runningwater.
Refit the spray arms and check thatthey rotate freely.

Problem solving guide
73
With the help of the following guide, minor faults in the performance of theappliance, some of which may result from incorrect operation, can be put rightwithout contacting Miele. This will save time and money.
Please note that a call-out charge will be applied to unnecessary service visitswhere the problem could have been rectified as described in these operatinginstructions.
Unauthorised or incorrect repairs could cause personal injury or damage tothe appliance.Repair work to electrical appliances must only be carried out by a suitablyqualified and competent person in strict accordance with current local andnational safety regulations. The manufacturer cannot be held liable forunauthorised work.
Technical problems
Problem Possible cause and remedy
The / indicator lightdoes not flash after thedishwasher has beenswitched on using the button.
The appliance is not plugged in. Insert the plug and switch on at the socket.
The mains fuse has tripped. Reset or replace the circuit breaker (see data plate
for minimum fuse rating).
The dishwasher stopsduring a programme.
The mains fuse has tripped. Reset or replace the circuit breaker (see data plate
for minimum fuse rating). If the mains fuse trips again, call Miele.

Problem solving guide
74
Problem Possible cause and remedy
The / and indicator lights areflashing at the sametime.Fault number isvisible in the display.
There may be a technical fault. Switch the dishwasher off with the button. Switch the dishwasher back on after a few
seconds. Select the required programme. Press the / button.
If the indicator lights flash again, there is a technicalfault. Call Miele.
Fault :The drain pump is stillrunning, even with thedoor open.
The Waterproof system has reacted. Turn off the tap. Call Miele.
Problem solving guide
75
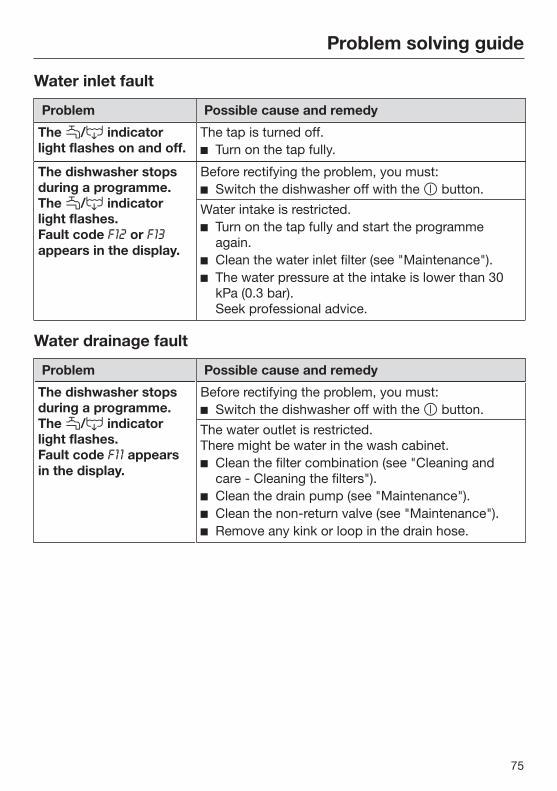
Water inlet fault
Problem Possible cause and remedy
The / indicatorlight flashes on and off.
The tap is turned off. Turn on the tap fully.
The dishwasher stopsduring a programme.The / indicatorlight flashes.Fault code or appears in the display.
Before rectifying the problem, you must: Switch the dishwasher off with the button.
Water intake is restricted. Turn on the tap fully and start the programme
again. Clean the water inlet filter (see "Maintenance"). The water pressure at the intake is lower than 30
kPa (0.3 bar).Seek professional advice.
Water drainage fault
Problem Possible cause and remedy
The dishwasher stopsduring a programme.The / indicatorlight flashes.Fault code appearsin the display.
Before rectifying the problem, you must: Switch the dishwasher off with the button.
The water outlet is restricted. There might be water in the wash cabinet. Clean the filter combination (see "Cleaning and
care - Cleaning the filters"). Clean the drain pump (see "Maintenance"). Clean the non-return valve (see "Maintenance"). Remove any kink or loop in the drain hose.
Problem solving guide
76
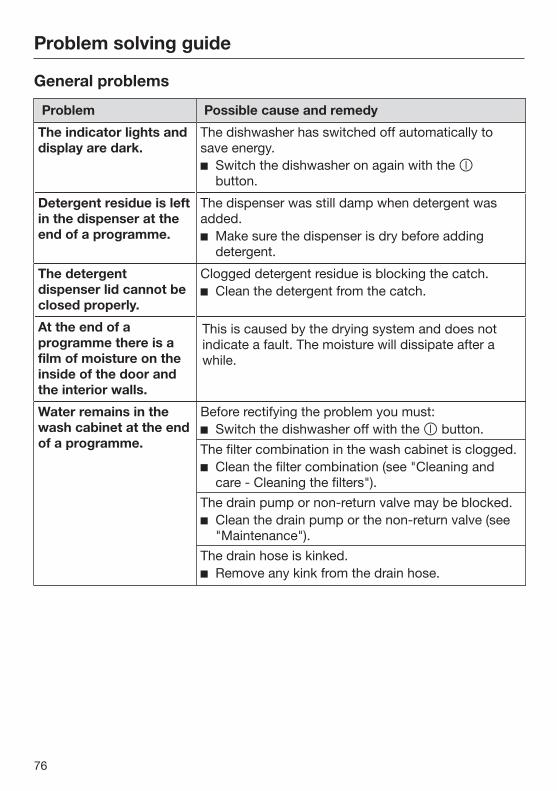
General problems
Problem Possible cause and remedy
The indicator lights anddisplay are dark.
The dishwasher has switched off automatically tosave energy. Switch the dishwasher on again with the
button.
Detergent residue is leftin the dispenser at theend of a programme.
The dispenser was still damp when detergent wasadded. Make sure the dispenser is dry before adding
detergent.
The detergentdispenser lid cannot beclosed properly.
Clogged detergent residue is blocking the catch. Clean the detergent from the catch.
At the end of aprogramme there is afilm of moisture on theinside of the door andthe interior walls.
This is caused by the drying system and does notindicate a fault. The moisture will dissipate after awhile.
Water remains in thewash cabinet at the endof a programme.
Before rectifying the problem you must: Switch the dishwasher off with the button.
The filter combination in the wash cabinet is clogged. Clean the filter combination (see "Cleaning and
care - Cleaning the filters").The drain pump or non-return valve may be blocked. Clean the drain pump or the non-return valve (see
"Maintenance").The drain hose is kinked. Remove any kink from the drain hose.

Problem solving guide
77
Noises
Problem Possible cause and remedy
Knocking noise in thewash cabinet.
A spray arm is knocking against an item in a basket. Interrupt the programme, and rearrange the items
which are obstructing the spray arm.
Rattling noise in thewash cabinet.
Items of crockery are insecure in the wash cabinet. Interrupt the programme, and rearrange the items
of crockery.A foreign object (e.g. a cherry stone) has becomelodged in the drain pump. Remove the foreign object from the drain pump
(see "Maintenance - Cleaning the drain pump andnon-return valve").
Knocking noise in thewater pipes.
This may be caused by the on-site installation or thecross-section of the piping. This has no influence on dishwasher function. If in
doubt, contact a suitably qualified plumber.
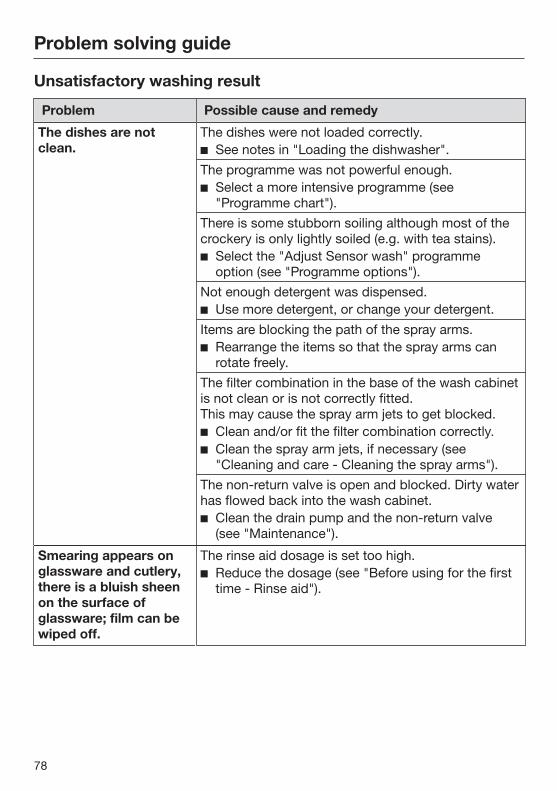
Problem solving guide
78
Unsatisfactory washing result
Problem Possible cause and remedy
The dishes are notclean.
The dishes were not loaded correctly. See notes in "Loading the dishwasher".
The programme was not powerful enough. Select a more intensive programme (see
"Programme chart").There is some stubborn soiling although most of thecrockery is only lightly soiled (e.g. with tea stains). Select the "Adjust Sensor wash" programme
option (see "Programme options").Not enough detergent was dispensed. Use more detergent, or change your detergent.
Items are blocking the path of the spray arms. Rearrange the items so that the spray arms can
rotate freely.The filter combination in the base of the wash cabinetis not clean or is not correctly fitted. This may cause the spray arm jets to get blocked. Clean and/or fit the filter combination correctly. Clean the spray arm jets, if necessary (see
"Cleaning and care - Cleaning the spray arms").The non-return valve is open and blocked. Dirty waterhas flowed back into the wash cabinet. Clean the drain pump and the non-return valve
(see "Maintenance").
Smearing appears onglassware and cutlery,there is a bluish sheenon the surface ofglassware; film can bewiped off.
The rinse aid dosage is set too high. Reduce the dosage (see "Before using for the first
time - Rinse aid").
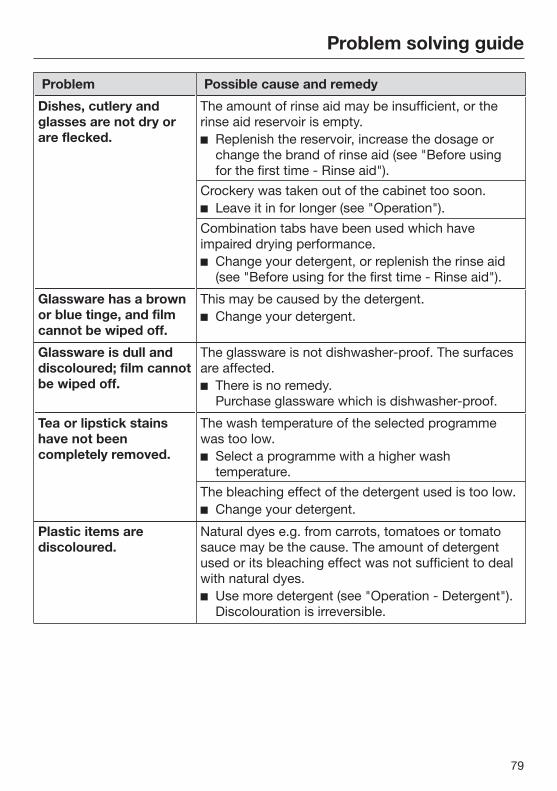
Problem solving guide
79
Problem Possible cause and remedy
Dishes, cutlery andglasses are not dry orare flecked.
The amount of rinse aid may be insufficient, or therinse aid reservoir is empty. Replenish the reservoir, increase the dosage or
change the brand of rinse aid (see "Before usingfor the first time - Rinse aid").
Crockery was taken out of the cabinet too soon. Leave it in for longer (see "Operation").
Combination tabs have been used which haveimpaired drying performance. Change your detergent, or replenish the rinse aid
(see "Before using for the first time - Rinse aid").
Glassware has a brownor blue tinge, and filmcannot be wiped off.
This may be caused by the detergent. Change your detergent.
Glassware is dull anddiscoloured; film cannotbe wiped off.
The glassware is not dishwasher-proof. The surfacesare affected. There is no remedy.
Purchase glassware which is dishwasher-proof.
Tea or lipstick stainshave not beencompletely removed.
The wash temperature of the selected programmewas too low. Select a programme with a higher wash
temperature.The bleaching effect of the detergent used is too low. Change your detergent.
Plastic items arediscoloured.
Natural dyes e.g. from carrots, tomatoes or tomatosauce may be the cause. The amount of detergentused or its bleaching effect was not sufficient to dealwith natural dyes. Use more detergent (see "Operation - Detergent").
Discolouration is irreversible.

Problem solving guide
80
Problem Possible cause and remedy
White residue is visibleon cutlery and crockery,clouding occurs onglassware; film can bewiped off.
Not enough rinse aid was used. Increase the dosage (see "Before using for the first
time - Rinse aid").There is no salt in the salt reservoir. Fill the salt reservoir (see "Before using for the first
time - Dishwasher salt").The salt reservoir cap has not been screwed oncorrectly. Replace it, making sure that it screws back on
correctly.An unsuitable combination detergent has been used. Change your detergent. Use a standard liquid,
tablet or powder detergent, and fill the salt andrinse aid reservoirs in the dishwasher.
The water softener is programmed to too low a waterhardness level. Programme the water softener for harder water
(see "Before using for the first time - Watersoftener").
There are rust stains oncutlery.
The affected items are not corrosion resistant. There is no remedy.
Purchase cutlery which is dishwasher-proof.A programme was not run after dishwasher salt wasadded. Traces of salt have got into the wash cycle. Always run the Gentle 45°C programme with the
Turbo programme option selected and without anycrockery in the dishwasher after addingdishwasher salt.
The salt reservoir cap has not been screwed oncorrectly. Replace it, making sure that it screws back on
correctly.
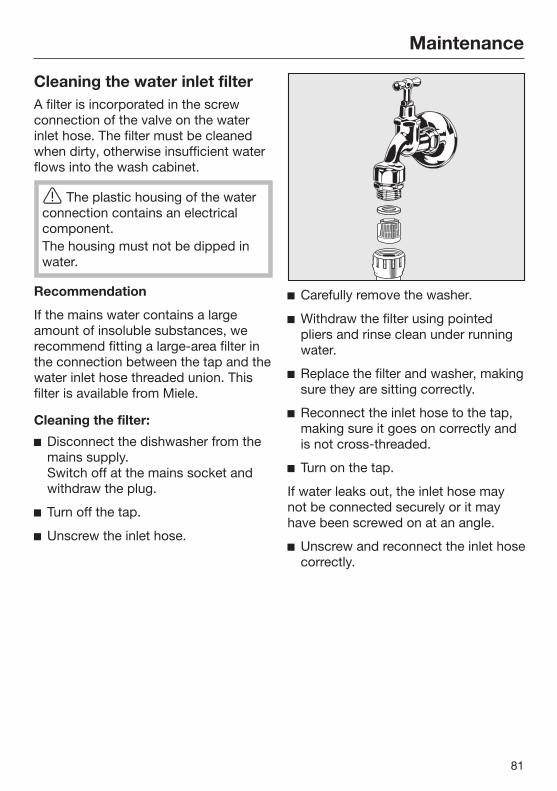
Maintenance
81
Cleaning the water inlet filterA filter is incorporated in the screwconnection of the valve on the waterinlet hose. The filter must be cleanedwhen dirty, otherwise insufficient waterflows into the wash cabinet.
The plastic housing of the waterconnection contains an electricalcomponent.The housing must not be dipped inwater.
Recommendation
If the mains water contains a largeamount of insoluble substances, werecommend fitting a large-area filter inthe connection between the tap and thewater inlet hose threaded union. Thisfilter is available from Miele.
Cleaning the filter:
Disconnect the dishwasher from themains supply. Switch off at the mains socket andwithdraw the plug.
Turn off the tap.
Unscrew the inlet hose.
Carefully remove the washer.
Withdraw the filter using pointedpliers and rinse clean under runningwater.
Replace the filter and washer, makingsure they are sitting correctly.
Reconnect the inlet hose to the tap,making sure it goes on correctly andis not cross-threaded.
Turn on the tap.
If water leaks out, the inlet hose maynot be connected securely or it mayhave been screwed on at an angle.
Unscrew and reconnect the inlet hosecorrectly.

Maintenance
82
Cleaning the drain pump andnon-return valveIf the water has not been pumped awayat the end of a programme, the drainpump or the non-return valve might beblocked. They are, however, easy toclean.
Disconnect the dishwasher from themains supply. Switch off at the mainssocket and withdraw the plug.
Take the filter combination out of thewash cabinet (see "Cleaning and care- Cleaning the filters").
Scoop the water out of the cabinetusing a suitable container or utensil.
Press the catch for the non-returnvalve inwards .
Lift out the non-return valve , andrinse well under running water.
Remove all foreign objects from thenon-return valve.
The drain pump is situated under thenon-return valve (see arrow).
Remove all foreign objects from thedrain pump (watch out for glass orbone splinters which are particularlydifficult to detect and could causeinjury). Turn the drain pump impellerby hand to check that there are nomore obstructions. You will feel a littleresistance when you turn the impeller.
Carefully refit the non-return valveand secure it with the catch.
Ensure that the catch engagescorrectly.
Be careful not to damage anydelicate components when cleaningthe drain pump and the non-returnvalve.
After sales service
83
RepairsIn the event of any faults which youcannot remedy yourself, please contactMiele.
The contact details for Miele aregiven at the back of theseinstructions.
When contacting Miele, please quotethe model and serial number of yourdishwasher, both of which are shownon the data plate on the right-hand sideof the door.
WarrantyThe manufacturer's warranty for thisappliance is 2 years.
For further information, please refer toyour warranty booklet.
Optional accessories
84
Dishwasher detergent and rinse aid, aswell as cleaning and care products, areavailable as optional accessories.All the products are designed for usewith Miele dishwashers.
These and many other useful productscan be ordered via the internet atwww.miele-shop.com (depending oncountry) or from Miele (see end of thisbooklet for contact details).
Dishwasher detergent, rinseaid and saltWhen you decided to buy a Mieledishwasher, you chose excellent qualityand performance. However, ensuringthat your dishwasher always deliversthe best possible results will alsodepend on your choice of dishwasherdetergent, rinse aid and dishwashersalt, as cleaning results can varydepending on the brand used. With Miele CareCollection products,you can be sure of optimum results asthese products have been speciallydesigned for Miele dishwashers.
Detergent tabs
– sparkling results even with stubbornfood deposits
– combination product with othercomponents such as rinse aid, saltand glass protection additives
– phosphate-free - safe for theenvironment
– water-soluble wrapping - no need tounwrap
Powder detergent
– with active oxygen for thoroughcleaning
– with enzymes which are effectiveeven in low temperature programmes
– with glass protection againstcorrosion
Rinse aid
– for gleaming glasses
– helps crockery to dry
– with glass protection againstcorrosion
– specially designed cap for precise,easy dispensing
Dishwasher salt
– prevents limescale on crockery andin the appliance
– extra coarse-grained
Optional accessories
85
Dishwasher care productsMiele cleaning and care productsprovide optimum care for yourdishwasher.
Dishwasher cleaner
– cleans the dishwasher effectively andthoroughly
– removes grease, bacteria andunpleasant odours
– ensures excellent dishwashing results
Dishwasher descaler
– removes heavy limescale deposits
– mild and gentle with natural citricacid
Dishwasher conditioner
– removes odours, limescale and lightdeposits
– maintains the elasticity and leaktightness of the seals
AccessoriesSome accessories may be supplied asstandard, depending on model.
Cappuccinatore insert
The Cappuccinatore insert can be usedfor cleaning the individual parts of theMiele Cappuccinatore in thedishwasher.
Cutlery basket
The cutlery basket is placed in thelower basket and can be used to washadditional items of cutlery.
Glass rail
This rail is designed to hold glasseswith stems securely in the lower basket.
Electrical connection
86
This dishwasher is supplied with amains cable with moulded plug readyfor connection to an AC single phasesupply, (230 - 240 V 50 Hz for NZ andAustralia) via a suitable switchedsocket.
The electrical socket must beeasily accessible after thedishwasher has been installed. Donot connect the dishwasher to themains electricity supply by anextension lead. Extension leads donot guarantee the required safety ofthe appliance (e.g. danger ofoverheating).
Do not connect the appliance solely toan inverter such as those used with anautonomous energy source e.g. solarpower. When switched on, peak loadsin the system can cause the safetyswitch-off mechanism to be triggered.This can damage the electronic unit. The machine must not be used with so-called energy-saving devices either.These reduce the amount of energysupplied to the machine, causing it tooverheat.
Before connecting the appliance,check that the connection data onthe data plate (voltage, frequency,rated load and fuse rating) matchesthe mains electricity supply. If in anydoubt, consult a qualified electrician.
The data plate is located on the right-hand side of the door.
All electrical work must becarried out by a suitably qualifiedand competent person in strictaccordance with current local andnational safety regulations.
For extra safety, it is advisable toinstall a residual current device(RCD), with a trip current of 30 mA.
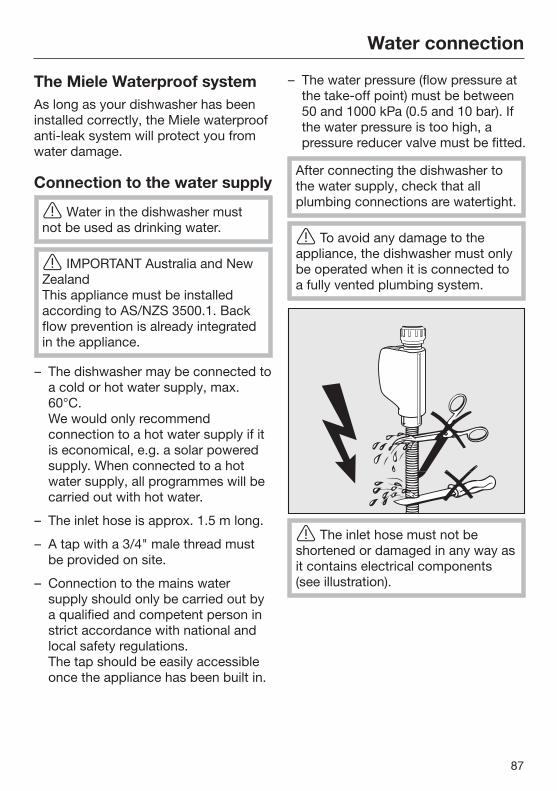
Water connection
87
The Miele Waterproof systemAs long as your dishwasher has beeninstalled correctly, the Miele waterproofanti-leak system will protect you fromwater damage.
Connection to the water supply
Water in the dishwasher mustnot be used as drinking water.
IMPORTANT Australia and NewZealandThis appliance must be installedaccording to AS/NZS 3500.1. Backflow prevention is already integratedin the appliance.
– The dishwasher may be connected toa cold or hot water supply, max.60°C. We would only recommendconnection to a hot water supply if itis economical, e.g. a solar poweredsupply. When connected to a hotwater supply, all programmes will becarried out with hot water.
– The inlet hose is approx. 1.5 m long.
– A tap with a 3/4" male thread mustbe provided on site.
– Connection to the mains watersupply should only be carried out bya qualified and competent person instrict accordance with national andlocal safety regulations.The tap should be easily accessibleonce the appliance has been built in.
– The water pressure (flow pressure atthe take-off point) must be between50 and 1000 kPa (0.5 and 10 bar). Ifthe water pressure is too high, apressure reducer valve must be fitted.
After connecting the dishwasher tothe water supply, check that allplumbing connections are watertight.
To avoid any damage to theappliance, the dishwasher must onlybe operated when it is connected toa fully vented plumbing system.
The inlet hose must not beshortened or damaged in any way asit contains electrical components(see illustration).
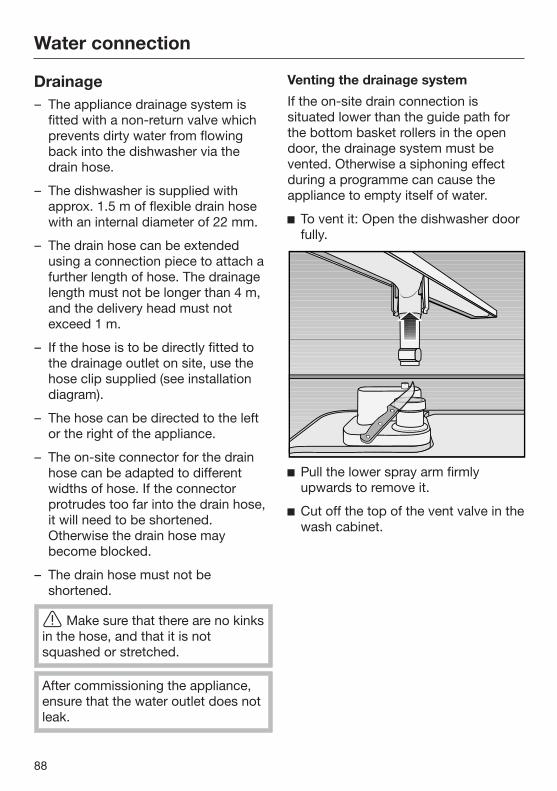
Water connection
88
Drainage– The appliance drainage system is
fitted with a non-return valve whichprevents dirty water from flowingback into the dishwasher via thedrain hose.
– The dishwasher is supplied withapprox. 1.5 m of flexible drain hosewith an internal diameter of 22 mm.
– The drain hose can be extendedusing a connection piece to attach afurther length of hose. The drainagelength must not be longer than 4 m,and the delivery head must notexceed 1 m.
– If the hose is to be directly fitted tothe drainage outlet on site, use thehose clip supplied (see installationdiagram).
– The hose can be directed to the leftor the right of the appliance.
– The on-site connector for the drainhose can be adapted to differentwidths of hose. If the connectorprotrudes too far into the drain hose,it will need to be shortened.Otherwise the drain hose maybecome blocked.
– The drain hose must not beshortened.
Make sure that there are no kinksin the hose, and that it is notsquashed or stretched.
After commissioning the appliance,ensure that the water outlet does notleak.
Venting the drainage system
If the on-site drain connection issituated lower than the guide path forthe bottom basket rollers in the opendoor, the drainage system must bevented. Otherwise a siphoning effectduring a programme can cause theappliance to empty itself of water.
To vent it: Open the dishwasher doorfully.
Pull the lower spray arm firmlyupwards to remove it.
Cut off the top of the vent valve in thewash cabinet.
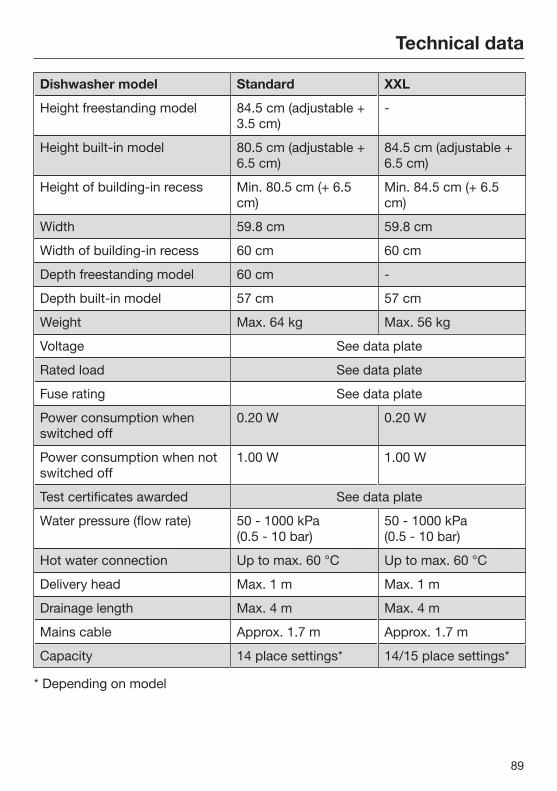
Technical data
89
Dishwasher model Standard XXL
Height freestanding model 84.5 cm (adjustable +3.5 cm)
-
Height built-in model 80.5 cm (adjustable +6.5 cm)
84.5 cm (adjustable +6.5 cm)
Height of building-in recess Min. 80.5 cm (+ 6.5cm)
Min. 84.5 cm (+ 6.5cm)
Width 59.8 cm 59.8 cm
Width of building-in recess 60 cm 60 cm
Depth freestanding model 60 cm -
Depth built-in model 57 cm 57 cm
Weight Max. 64 kg Max. 56 kg
Voltage See data plate
Rated load See data plate
Fuse rating See data plate
Power consumption whenswitched off
0.20 W 0.20 W
Power consumption when notswitched off
1.00 W 1.00 W
Test certificates awarded See data plate
Water pressure (flow rate) 50 - 1000 kPa(0.5 - 10 bar)
50 - 1000 kPa(0.5 - 10 bar)
Hot water connection Up to max. 60 °C Up to max. 60 °C
Delivery head Max. 1 m Max. 1 m
Drainage length Max. 4 m Max. 4 m
Mains cable Approx. 1.7 m Approx. 1.7 m
Capacity 14 place settings* 14/15 place settings*
* Depending on model

www.miele.com.au
Miele Experience Centre and Head Office Melbourne:1 Gilbert Park DriveKnoxfield, VIC 3180
Miele Experience Centre South Melbourne:206-210 Coventry StreetSouth Melbourne, VIC 3205
Miele Experience Centre and Office Sydney:3 Skyline PlaceFrenchs Forest, NSW 2086
Miele Experience Centre and Office Brisbane:39 Harvey Street NorthEagle Farm, QLD 4009
Miele Experience Centre and Office Perth:
83-85 Sir Donald Bradman DriveHilton, SA 5033
205-207 Stirling HighwayClaremont, WA 6010
Miele Experience Centre and Office Adelaide:
Miele Australia Pty. Ltd.
Miele New Zealand Limited
Level 2, 10 College HillFreemans Bay, Auckland 1011
Miele Experience CentreAuckland:8 College HillFreemans Bay, Auckland 1011Telephone:0800 464 353 (0800 4 MIELE)www.miele.co.nz
Miele Global HeadquartersGermanyMiele & Cie. KGCarl-Miele-Straße 2933332 GüterslohFederal Republic of Germany
Head Office:
IRD 98 463 631
ACN 005 635 398ABN 96 005 635 398
Miele Experience Centre Gold Coast:131 Ferry RoadSouthport, QLD 4215
Miele (Hong Kong) Limited41/F - 4101, Manhattan Place23 Wang Tai RoadKowloon Bay, Hong KongTel: (852) 2610 1331Fax: (852)2610 1013Email: [email protected]

M.-Nr. 10 290 400 / 00en-AU, NZ
G 4202 / G 4203 / G 4207 / G 4208 / G 4212 / G 4217