om, 46" grass catcher, 2009-02, 966004101, accessories and tools
TRANSCRIPT

Grass Catcher966004101
OPERATOR AND PARTS MANUAL
Please read the operator’s manual carefully and make sure you
understand the instructions before using the machine.

©2008 HTC. All Rights Reserved.Beatrice, NE. Printed in U.S.A.

CONTENTS
CONGRATULATIONS on your purchase of a new Grass Catcher. It has been designed, engineered and manufactured to give you the best possible dependability and performance.Should you experience any problem you cannot easily remedy, contact the nearest authorized service center/ department. They have competent, well-trained technicians and the proper tools for service and repairs.Read and retain this manual. The instructions will enable you to assemble and maintain your collection system properly. Always observe the SAFETY RULES.
KNOW YOUR GRASS CATCHERREAD THIS OPERATION MANUAL AND SAFETY RULES BEFORE ASSEMBLING OR OPERATING YOUR GRASS CATCHER. Compare the illustrations with the carton contents to familiarize yourself with the parts before starting the assembly. Study the operating instructions and safety precautions thoroughly to insure proper functioning of your Grass Catcher and to prevent injury to yourself and others. Save this manual for future reference.
WARNINGThe operation of any mower can result in foreign objects thrown into the eyes, which can result in severe eye damage. ALWAYS wear safety glasses or eye shields before starting your mower and while mowing. We recommend a wide vision safety mask for over the spectacles or standard safety glasses.
SAFETY RULES ............................................... 4
GENERAL OPERATION ............................. 4
SLOPE OPERATION .................................. 4
CHILDREN ................................................. 5
SERVICE .................................................... 5
CONTAINER CONTENTS ................................ 7
ASSEMBLY ...................................................... 8
OPERATION ................................................... 12
IMPROVED BAGGING TIPS .................... 12
CUSTOMER RESPONSIBILITIES ................. 13
GENERAL RECOMMENDATIONS .......... 13
STORAGE ................................................ 13
PARTS ............................................................ 14

4
SAFETY RULES
SAFE OPERATION PRACTICES FOR RIDE-ON MOWERS
DANGER !THIS CUTTING MACHINE IS CAPABLE OF AMPUTATING HANDS AND FEET AND THROWING OBJECTS. FAILURE TO OBSERVE THE FOLLOWING SAFETY INSTRUCTIONS COULD RESULT IN SERIOUS INJURY OR DEATH.
GENERAL OPERATION• Read, understand and follow all instructions in the
manual and on the machine before starting.• Onlyallowresponsibleadults,whoarefamiliar
with the instructions, to operate the machine.• Cleartheareaofobjectssuchasrocks,stones,
toys, wire etc., which could be picked up and thrown by the blades.
• Besuretheareaisclearofallpeopleandpetsbefore mowing. Stop the machine if anyone enters the area.
• Nevercarrypassengersorchildrenevenwithblades off.
• Donotmowinreverseunlessabsolutelynecessary. Always look down and behind before and while backing.
• Beawareofthemowerdischargedirectionanddonot direct it towards anyone. Do not operate the mower without either the entire grass catcher or the guard in place.
• Slowdownbeforeturning.• Neverleavethemachineunattendedwhenthe
engine is running. Always turn off the blades, set the parking brake, stop the engine and remove the key before leaving the machine.
• Turnoffbladeswhennotmowing.• Stopenginebeforeremovinggrasscatcheror
unclogging chute.• Mowonlyindaylightorgoodartificiallight.• Donotoperatethemachinewhileunderthe
influenceofalcoholordrugs.• Watchoutfortrafficwhenoperatingnearor
crossing roadways.• Useextracarewhenloadingandunloadingthe
machine onto a trailer or truck.• Dataindicatesthatoperators,age60yearsand
above, are involved in a large percentage of riding mower-related injuries. These operators should evaluate their ability to operate the riding mower safely enough to protect themselves and others from serious injury.
• DO NOT operate mower with grass catcher, unless the front weights are installed.
• Keep machine free of grass, leaves or other debris buildup which can touch hot exhaust/engine parts and burn. Do not allow the mower deck to plow leaves or other debris which can cause buildup to occur. Clean any oil or fuel spillage before operating or storing the machine. Allow machine to cool before storage.
SLOPE OPERATIONSlopes are a major factor related to loss-of-control and tip-over accidents, which can result in severe injury or death. All slopes require extra caution. If you cannot back up the slope or if you feel uneasy on it, do not mow it.DO• Mowupanddownslopes(10°Max.),notacross.• Removeobstaclessuchasrocks,treelimbs,etc.• Watchforholes,ruts,orbumps.Uneventerrain
could overturn the machine. Tall grass can hide obstacles.
• Use slow speed. Choose a low speed so that you will not have to stop while on the slope.
• Useextracarewithgrasscatchersorotherattachments. These can change the stability of the machine.
• Keepallmovementontheslopesslow and gradual. Do not make sudden changes in speed or direction.
• Avoidstartingorstoppingonaslope.Iftireslosetraction, disengage the blades and proceed slowly straightdown the slope.

5
SAFETY RULES
SAFE OPERATION PRACTICES FOR RIDE-ON MOWERS
DO NOT• Donot turn on slopes unless necessary, and then,
turn slowly and gradually downhill, if possible.• Donotmow near drop-off, ditches, or
embankments. The mower could suddenly turn over if a wheel is over the edge of a cliff or ditch, or if an edge caves in.
• Do notmow on wet grass. Reduced traction could cause sliding.
• Do nottry to stabilize the machine by putting your foot on the ground.
CHILDRENTragic accidents can occur if the operator is not alert to the presence of children. Children are often attracted to the machine and the mowing activity. Never assume that children will remain where you last saw them.• NEVER allow children to operate the machine.• Keepchildrenoutofthemowingareaandunder
the watchful care of another responsible adult.• Bealertandturnoffthemachineifchildrenenter
the area.• Beforeandwhenbacking,lookbehindanddown
for small children.• Nevercarrychildren.Theymayfalloffandbe
seriously injured or interfere with safe machine operation.
• Useextracarewhenapproachingblindcorners,shrubs, trees, or other objects that may obscure vision.
SERVICE• Theoperationofanymowercanresultinforeign
objects thrown into the eyes, which can result in severe eye damage. Always wear safety glasses or eye shields while operating your mower or performing any adjustments or repairs. We recommend a wide vision safety mask over spectacles or standard safety glasses.
• Use extra care in handling gasoline and other fuels.Theyareflammableandvaporsareexplosive.
- Use only an approved container. - Never remove gas cap or add fuel with the
engine running. - Allow engine to cool before refueling. - Do not smoke. - Never refuel the machine indoors. - Never store the machine or fuel container
insidewherethereisanopenflame,suchasawater heater.
• Neverrunamachineinsideaclosedarea.• Keepnutsandbolts,especiallybladeattachment
bolts, tight and keep equipment in good condition.• Nevertamperwithsafetydevices.Checkthere
proper operation regularly.
CAUTIONIn order to prevent accidental starting when setting up, transporting, adjusting or making repairs, always disconnect spark plug wire and place wire where it cannot contact spark plug.

6
SAFETY RULES
SAFE OPERATION PRACTICES FOR RIDE-ON MOWERS
• Keep machine free of grass, leaves, or other debris buildup. Clean oil or fuel spillage. Allow machine to cool before storing.
• Stopandinspecttheequipmentifyoustrikeanobject. Repair, if necessary, before restarting.
• Nevermakeadjustmentsorrepairswiththeengine running.
• Grasscatchercomponentsaresubjecttowear,damage, and deterioration, which could expose moving parts or allow objects to be thrown. Frequently check components and replace with manufacturer’s recommended parts, when necessary.
• Mowerbladesaresharpandcancut.Wraptheblade(s)orweargloves,anduseextracautionwhen servicing them.
• Checkbrakeoperationfrequently.Adjustandservice as shown in the Operator’s Manual.
WARNING!DO NOT tow any trailers, etc. with this mower. They may jackknife or over turn causing damage to the mower and possibly serious injury to the operator.
WARNING!Battery posts, terminals and related accessories contain lead and lead compounds, chemicals know to the State of California to cause cancer and birth defects or other reproductive harm. Wash hands after handling.

7
UNPACKING INSTRUCTIONS• Removeallpartsandpackingmaterialsfrom
carton.Check carton contents against list. Be sure all •parts are there.
TOOLS REQUIRED• ½"Wrench(2) • 9/16"Wrench(2)• 7/16"Wrench(2) • Ft/Lbs Torque Wrench• Drill • ¼" and 5/16" Drill Bits• 9/16" Socket and Ratchet• Standard Screwdriver
PARTS IDENTIFICATION
CONTAINER CONTENTS2 - Soft bag containers 1 - Bag of Hardware1 - Upper Chute 1 - Lower Chute1 - Cover Assembly 1 - Mounting Hardware
COVER ASSEMBLY
BAG CONTAINERS
LOWER CHUTE
NOTE: Whenrighthand(RH)andlefthand(LH.arementionedinthismanual,itmeanswhenyouareseatedonthemowerintheoperator’sposition.
CAUTIONBEFORE ASSEMBLING GRASS CATCHER TO MOWER:
• Setparkingbrake.
• Placemotioncontrolleversin“NEUTRAL”position.
• Turnignitionkey“OFF”andremovekey.
• Makesurethebladesandallmovingpartshavecompletelystopped.
• Disconnectsparkplugandplacewirewhereitcannotcomeincontactwith plug.
UPPER CHUTE
8
ASSEMBLY
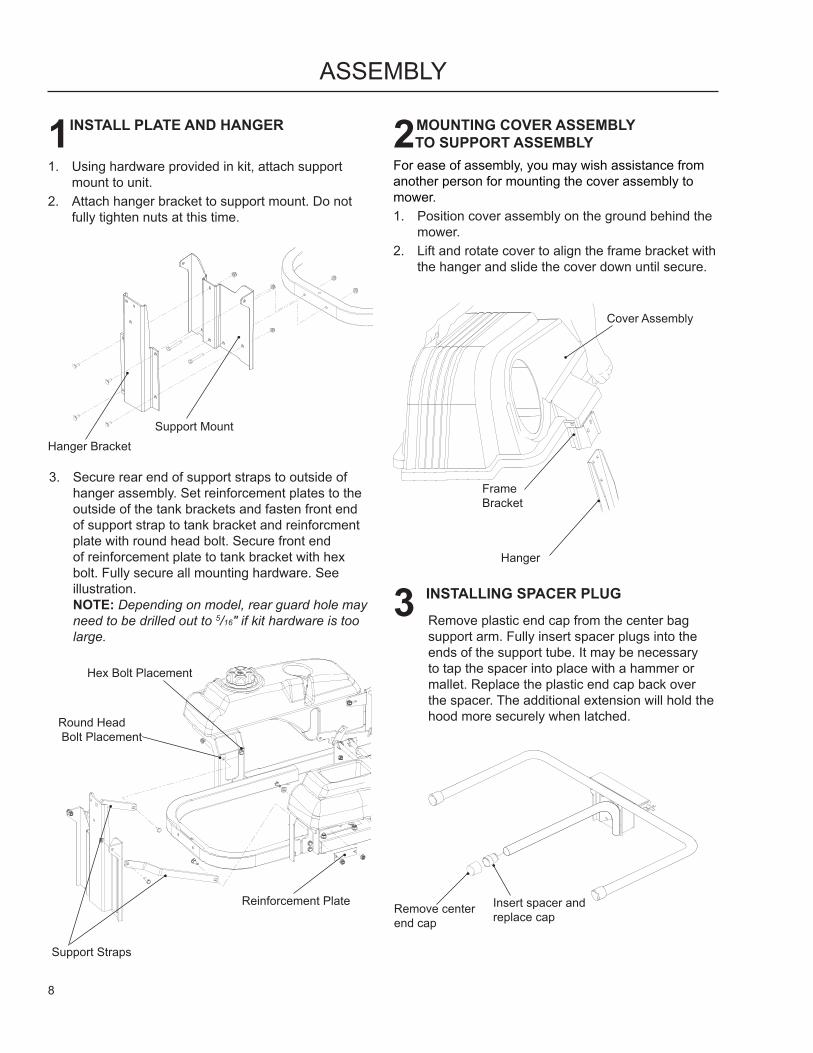
1INSTALL PLATE AND HANGER
Cover Assembly
Frame Bracket
2 MOUNTING COVER ASSEMBLY TO SUPPORT ASSEMBLY
Hanger
For ease of assembly, you may wish assistance from another person for mounting the cover assembly to mower.
Position cover assembly on the ground behind the 1. mower.Lift and rotate cover to align the frame bracket with 2. the hanger and slide the cover down until secure.
Remove plastic end cap from the center bag support arm. Fully insert spacer plugs into the ends of the support tube. It may be necessary to tap the spacer into place with a hammer or mallet. Replace the plastic end cap back over the spacer. The additional extension will hold the hood more securely when latched.
Remove center end cap
Insert spacer and replace cap
3 INSTALLING SPACER PLUG
Using hardware provided in kit, attach support 1. mount to unit.Attach hanger bracket to support mount. Do not 2. fully tighten nuts at this time.
Hanger Bracket
Secure rear end of support straps to outside of 3. hanger assembly. Set reinforcement plates to the outside of the tank brackets and fasten front end of support strap to tank bracket and reinforcment plate with round head bolt. Secure front end of reinforcement plate to tank bracket with hex bolt. Fully secure all mounting hardware. See illustration. NOTE: Dependingonmodel,rearguardholemayneedtobedrilledoutto5/16"ifkithardwareistoolarge.
Support Mount
Support Straps
Reinforcement Plate
Hex Bolt Placement
Round Head Bolt Placement

9
ASSEMBLY
4 CONTAINER INSTALLATION
Install containers on support frame, overlapping 1. containers at center tube. Note: One container should always overlap the other container at the center tube.Close cover and lock latch handle over support 2. tubes.
Support Frame
Latch Handle
WARNING!DO NOT operate mower unless container is properly installed. Container is subject to wear and deterioration, check containers frequently, replace when cracked or damaged. Use only a recommended replacement container.
Raiseandholddeflectorshieldinuprightposition.1. Fit lower chute as shown and hook rear latch to 2. mower deck. Align the bracket slot on lower chute with the 3. deflectorbrackettabonthemowerdeck.Slidechute down over tab.With the lower chute in proper position, hold the 4. chute securely while hooking the front latch to the mower deck.NOTE: Whilehookingthelatches,thedeflectorshieldmaytrytopushthechuteawayfromthemowerdeckopening.Itisimportanttoholdthechuteinpositionwhilehookingthelatchestothemowerdeck.
5LOWER CHUTE INSTALLATION
DeflectorShield
DeflectorBracket Tab
Rear Latch
Attach Rear Latch here
Front Latch

10
ASSEMBLY
With ¼" drill bit, add a new hole 4¾" inches from 1. the top of the chute, down along the side seam.Attach bungee latch assembly from kit.2.
6UPPER CHUTE INSTALLATION
Before continuing to Step 7, locate the seal fasteningkit(packedseparately)andinstallthetop cover grommet.
Slide upper chute onto lower chute, lining up 3. notches and channels.Stretch bungee latch up onto acorn nut on upper 4. chute to secure.
New Bungee Latch Hole

11
ASSEMBLY
7 CHUTE / HOOD INSTALLATION
Push upper chute through the gasketed opening in 1. the cover assembly.Rotate chute so the chute opening is downwards 2. toward the container bags.
Hood Inlet
8 LEVELING MOWER DECK
Be sure deck is properly leveled for best mower performance. See your mower operator’s manual for instructions.
Rotate upper chute to point downwards towards bags

12
OPERATION
IMPROVED BAGGING TIPSFollow the mower operation instructions in the mower operator’s manual.When using the grass catcher on a lawn where grass and leaf bagging equipment has not been used, thatch and debris that has accumulated for long periods of time will be picked up. The amount collected and the total time of operation may be greater than experienced with regular use of the grass catcher.• Alwaysrunthrottleatfullspeedwhenbagging.• Selectaspeedlowenoughtogivegoodmower
cutting performance, good quality cut and good bagging performance.NOTE:Itmaybenecessarytooverlapwidthofcuttosuityourconditions.
• Ifgrassisextremelytall,itshouldbemowedtwice.Thefirsttimerelativelyhigh,thesecondtimetodesired height.
• Uselefthandsideofmowerfortrimming.• Plastictrashbags(3.0mil,30gallon)canbe
inserted inside grass catcher containers for ease of debris disposal. To remove the plastic trash bags when full:
a. Disengage blades, shift into neutral, engage the parking brake and stop the engine.
b. Unlatch and raise cover. c. Remove one container at a time by grasping
container handles and pulling toward the rear, off of the tube rails.
d. With the container resting on the ground, close and secure the top of the plastic lawn bag.
e. Tipthecontaineronitssideandslidethefilledbag from the container.
f. Install a new plastic lawn bag with the edges of the bag draped over upper lip of the container.
g. Repeat for other container. h. Reinstall containers making sure right
container overlaps left container at center supports.
i. Close cover and secure latches over center support tubes.
• Avoidcuttingwetgrassormowinginthemorningwhile the dew is still heavy. Grass clippings collected under these conditions tend to be sticky andadheretothewallsoftheflowpathcausingclogging.
• Ifthegrasscatcherfailstopickupcutgrassor leaves, it is an indication that clogging has occurred in the system or that the grass catcher containers are full.
a. Disengage blades, place motion control levers in neutral position.
- Unlatch and raise cover. - Slide out containers and dispose of
clippings. - Replace containers, close cover, and
latch. b. Unlatch chutes and check for clogging. - Remove all debris in chute. - Reassemble and latch chutes.
DO NOT operate mower with grass catcher •partially installed.
Disengage blades and stop engine before •leaving mower seat to empty containers, unclogging chutes, etc.
Close cover before starting.•
Disengage mower blades when crossing •driveways or gravel surfaces and other areas where thrown objects could be a hazard.
DO NOT attempt to vacuum up cans or •other potentially hazardous projectiles.
CAUTION

13
CUSTOMER RESPONSIBILITIES
GENERAL RECOMMENDATIONSAlways observe safety rules when performing any maintenance.• Beforeeachusecheckforloosefasteners.• Cleanunitthoroughlyaftereachuse.BLADE CAREFor best results mower blades must be kept sharp.
Replace bent or damaged blades.• SeeBLADECAREinstructionsinyourmower
operator’s manual.
STORAGEWhen grass catcher is to be stored for a period of time, clean it thoroughly, remove all dirt, grass, leaves, etc. Store in a clean, dry place.
BEFORE PERFORMING MAINTENANCE, SERVICE OR ADJUSTMENTS:
Set parking brake.•
Placemotioncontrolleversin“NEUTRAL”•position.
Placeclutchcontrolin“DISENGAGED”•position.
Turnignitionkeyto“OFF”position.•
Make sure blades and all moving parts •have completely stopped.
Disconnect spark plug wire(s) from spark •plug(s) and place wire where it cannot come in contact with plug.
CAUTION
Grass catcher components are subject to wear, damage and deterioration, which could expose moving parts or allow objects to be thrown. Frequently check components and replace with manufacturer’s recommended parts when necessary.
CAUTION
Do not leave grass in bagger containers. Empty containers after each use and before storing. Failure to do so may result in spontaneous combustion which could developintoafire.
CAUTION

14
PARTS
1
3
7
4
5
8
18
11
14
15
16
10
17
12
6
2
20
5
20
19
9
13
20

15
PARTS
ITEM PART NO. QTY. DESCRIPTION ITEM PART NO. QTY. DESCRIPTION
NOTE: ALL FASTENERS ARE GRADE 5 UNLESS OTHERWISE SPECIFIED.
539 1111391.. ....1 .... COVER ASSM, COMPLETE INCLUDES ITEMS 2-4
532 1275332.. ....1 .... SCREEN, COVER532 1550423.. ....1 .... STRIP, REINFORCEMENT532 1308954.. ....1 .... LATCH HANDLE, COVER539 9769525.. ....4 .... SCREW #10-24 x 5/8532 1327966.. ....1 .... SPRING, COVER, LH532 1329837.. ....1 .... SPRING, COVER RH532 1332358.. ....1 .... SPACER, COVER532 0859029.. ....1 .... SPRING, RETAINER532 17408310.. ....3 .... CAP, TUBING END
532 17974611.. ....1 .... BAGGER, FRAME532 12860012.. ....1 .... PIN, HINGE532 40022613.. ....2 .... CONTAINER, SOFT BAG539 10540814.. ....8 .... WASHER #10 FLAT539 97697715.. ....4 .... NUT #10-24 HEX NYLOC539 10631216.. ....4 .... HMS #10-24 x ¾522 80130117.. ....1 .... SPACER, PLUG 532 12753418.. ....1 .... GASKET539 10808119.. ....4 .... SCREW #10-24 x ½539 10808620.. ....9 .... NUT #10-24 ACORN

16
PARTS
1
34
17
2
6
7
15
9
10
11
12
13
5
16
14
8
24
5
8
9
18
19
20
21
22
23

17
PARTS
ITEM PART NO. QTY. DESCRIPTION ITEM PART NO. QTY. DESCRIPTION525 4970011.. ....1 .... CHUTE, UPPER532 4054552.. ....1 .... CHUTE, LOWER539 1080823.. ....1 .... INDICATOR, BAG DUMP522 8547024.. ....1 .... BRACKET, HANGER539 1080895.. ....3 .... NUT #10-24 WELD PLATED539 1081946.. ....2 .... LATCH ASSM, CHUTE539 9769527.. ....3 .... SCREW #10-24 x 5/8539 1080848.. ....4 .... WASHER 3/16 x ¾ 16 GA539 1095529.. ....3 .... WASHER 3/16 LOCK52285440210.. .....1 .... STRAP, SUPPORT, RT522 85450211.. ....1 .... STRAP, SUPPORT, LT522 85460212.. ....1 .... BRACKET, COLLECTION
539 99031613.. ....4 .... RHSNB 5/16-18 x ¾539 11289914.. ..12 .... NUT 5/16-18 HEX FLG NYLOC523 11280215.. ....2 .... PLATE539 97693816.. ....2 .... HCS 5/16-18 x 2¼539 10047217.. ....2 .... RHSNB 5/16-18 x 1¼539 99020918.. ....4 .... HCS 5/16-18 x 1539 99018819.. ....6 .... WASHER 5/16 SAE FLAT539 10808120.. ....1 .... SCREW, #10-14 x ½539 10808821.. ....1 .... LATCH, HOOD539 10808322.. ....1 .... SCREW #10-24 x 11/8539 10808523.. ....1 .... SPACER, SPLIT539 10808624.. ....1 .... NUT #10-24 ACORN

HEX HEAD CAP SCREWSThetorquevaluesshownshouldbeusedasageneralguidelinewhenspecifictorquevaluesarenotgiven.
U.S. Standard Hardware
Grade SAE Grade 5 SAE Grade 8 Flangelock Screw w/Flangelock Nut
ft./lbs Nm ft./lbs Nm ft./lbs Nm ft./lbs¼ 9 12 13 18
5/16 18 24 28 38 24 333/8 31 42 46 62 40 54
7/16 50 68 75 108½ 75 102 115 156
9/16 110 150 165 2245/8 150 203 225 305¾ 250 339 370 5027/8 378 513 591 80111/8 782 1060 1410 1912
**Grade5-Minimumcommercialquality(lowerqualitynotrecommended)
Metric Standard Hardware
Grade Grade 8.8 Grade 10.9 Grade 12.9
ft./lbs Nm ft./lbs Nm ft./lbs Nm ft./lbsM4 1.5 2 2.2 3 2.7 3.6M5 3 4 4.5 6 5.2 7M6 5.2 7 7.5 10 8.2 11M7 8.2 11 12 16 15 20M8 13.5 18 18.8 25 21.8 29
M10 24 32 35.2 47 43.5 58M12 43.5 58 62.2 83 75 100M14 70.5 94 100 133 119 159M16 108 144 147 196 176 235M18 142 190 202 269 242 323M20 195 260 275 366 330 440M22 276 368 390 520 471 628M24 353 470 498 664 596 794M27 530 707 474 996 904 1205
Shan
k Si
ze(D
iameterininches,fineorcoarsethread)
Shan
k Si
ze(D
iameterinmillimeters,fineorcoarsethread)
TORQUE SPECIFICATIONS

SECTION 1: LIMITED WARRANTYHusqvarna Professional Products, Inc (“Husqvarna”) warrants the original purchaser the Husqvarna branded product to which this warranty apply (the “Product”) that the Product shall be free from defects in material and workmanshipfrom the date of purchase for the period of the applicable “Warranty Schedule” of the Product as set forth below. Additional limitations are described in Section 2 through 6, inclusive.
PRODUCT CATEGORY CONSUMERWARRANTY SCHEDULE*
COMMERCIAL /PROFESIONAL
WARRANTY SCHEDULE
RENTALWARRANTYSCHEDULE
Reconditioned Products: Reconditioned chainsaws, trimmers, brushcutters, clearing saws, handheld blowers,backpack blowers, hedge trimmers, and electrical products.
90 Days N/A N/A
Chain Saws Lifetime Ignition Warranty (Parts Only). One Year Conditional Crankshaft Warranty for Commercial/Professional use when operated withHusqvarna XP 2 cycle oil (Parts & Labor).
2 Years 90 Days 90 Days
100 Series Trimmers, Stick Edgers, Hedge TrimmersLifetime Ignition Warranty (Parts Only). Lifetime Shaft Warranty.
2 Years 1 Year 90 Days
200 & 300 Series Trimmers, Brushcutters, Clearing Saws, Stick Edgers, Hovering Trimmers & Hedge TrimmersLifetime Ignition Warranty (Parts Only) and Lifetime Shaft Warranty apply to these products (excludes Hovering Trimmers).
2 Years 1 Year 90 Days
Blowers (Lifetime Ignition Warranty - Parts Only) 2 Years 2 Years 90 Days
Pole Pruners, Pole Saws, Pole Hedge Trimmers (Lifetime Ignition Warranty - Parts Only) 1 Year 1 Year 90 Days
Residential Walk-Behind Mowers, Tillers, LE389 Edger † 2 Years N/A N/A
LE475 Edger † 2 Years 90 Days 90 Days
LT, LTH, LS, XLS, GLS, YT, YTH, GT, GTH, 16H, Pro15, 155 ProFlex Series Lawn & Garden Riders andResidential Zero Turn Mowers † 2 Years N/A N/A
MZ and EZ Series Zero Turn Riders † 3 Years or 600 Hours 90 Days
iZ, LZ, BZ Series Zero Turn Riders † (Applies to units factory-equipped with Roll Over Protection System.) 90 Days
Commercial Walk Mowers † (includes 21” & wide area) 90 Days
Commercial Turf Specialty Equipment † 1 Year 1 Year 1 Year
Zero Turn & Commercial Turf Specialty Attachments 2 Years 1 Year 90 Days
Power Cutters (Lifetime Ignition Warranty - Parts Only) 1 Year 90 Days1 Year (K750 only) 90 Days
Automatic Mower (1 Year Battery Warranty) 2 Years 90 Days 90 Days
Snow Throwers † 2 Years 90 Days 90 Days
Pressure Washers † 2 Years 2 Years(Excludes 5525PW) N/A
Generators (Husqvarna s warranty does not cover Engine & Generator Parts, which are warrantied by responsible manufacturer.) †2 Years
(2nd Year Parts Only)2 Years – 1365GN only
(2nd Year Parts only) N/A
Grass Catchers & Bumpers Purchased with New Units Same Warranty As Unit When Purchased with Unit
Parts & Accessories Purchased Separately 30 days
Husqvarna Utility Vehicles** (Engines/transmissions shall be warrantied through Husqvarna.) 2 Year or 2,000 Hour Powertrain & 1 Year or 1,000 Hour Body Warranty
HUV Batteries: 4210E Versions 4 Year Pro-rated
Husqvarna Safety Apparel*** 90-day
Batteries**** (Consumer Products where applicable) 1 year N/A
Replacement Parts, Accessories including Bars and Chains, Tools and Display Items. Emission Control System Components necessary tocomply with CARB-TIER II and EPA Regulations (Excludes components which are part of engine systems manufactured by third part engine manufacturers forwhich the purchaser has received a separate warranty with product at time of purchase.)
30 Day Warranty
All Husqvarna products can be registered online at www.usa.husqvarna.com quickly and easily regardless of their model year. Click the Support tab,then click on the Online Product Registration link, and fill out the electronic form and submit. Ask about Husqvarna s extended service plan!
HUSQVARNA PRODUCT REGISTRATION INFORMATION & WARRANTY STATEMENT
5 Years or 1,500 Hours 5 Years or 1,500 Hours
3 Years 3 Years
Spreaders 1 Year
1 Year or 600 Hours
IR Part Number 525 88 56-01

† Refer to Section 3 for items not covered by this warranty
*All consumer product use must have been limited to the owner s residence. Warranted for noncommercial, nonprofessional, noninstitutional and nonincome producing use.
**HUV 2 Year or 2,000 Hour Powertrain (The engine assembly, unitized transaxle assembly (gasoline vehicle), motor, and main frame assembly are warranted with respect to parts and labor against defects in material andworkmanship or a period of two years or 2000 hours of operation, whichever first occurs, from the date of purchase.) & 1 Year or 1,000 Hour Body Warranty (All remaining components of the vehicle not specified otherwise and allother original equipment options and accessories supplied by Husqvarna are warranted with respect to parts and labor against defects in material and workmanship for a period of one year or 1000 hours of operation, whichever firstoccurs, from the date of purchase.)HUV s Gas & Diesel Powered Battery: 0 – 6 months free replacement and 7 – 12 months proratedHUV s Electric Powered – 4 year or 16,000 Energy Unit Limited Warranty Period
***Husqvarna safety apparel warranty is from the date of the customer s original purchase for defects in material and workmanship. Normal wear, tear or abuse is not covered under warranty. All care and maintenance instructionsmust be followed as stated by the manufacturer on the care label. The fit of the protective apparel/boot is not covered under warranty.
****Battery 1 Year prorated limited warranty with 100% replacement during the first 6 months.
Lifetime Warranty (Parts and Labor): All tiller tines and trimmer shafts against breakage. Proof of purchase required.
Lifetime Warranty (“PARTS ONLY” after initial warranty expiration): Ignition coils and modules on handheld product. Proof of purchase required.
SECTION 2: HUSQVARNA S OBLIGATIONS UNDER THE WARRANTYHusqvarna will repair or replace defective components without charge for parts or labor if a component fails because of a defect in material or workmanship during the warranty period.
SECTION 3: ITEMS NOT COVERED BY THIS WARRANTYThe following items are not covered by this warranty:
(1) Normal customer maintenance items which become worn through normal regular use, including, but not limited to, belts, blades, blade adapters, bulbs, clutches, clutch drums, filters (fuel line, fuel filters, air filters, oil filters),
sprockets, guide bars, lubricants, rewind springs, saw chain, spark plugs, starter ropes and tiller tines;
(2) Natural discoloration of material due to ultraviolet light;
(3) Engine and drive systems not manufactured by Husqvarna; these items are covered by the respective manufacturer s warranty as provided in writing with the product information supplied at the time of purchase; all claims must be
sent to the appropriate manufacturer.
(4) Lawn and garden attachments that are covered by a third party which gives a warranty, all claims for warranty should be sent to the manufacturer.
(5) Commercial or consumer mowing decks with sand abrasion damage.
(6) Emission Control System components necessary to comply with CARB-TIER II and EPA regulations which are manufactured by third party engine manufacturer.
SECTION 4: EXCEPTIONS AND LIMITATIONSThis warranty shall be inapplicable to defects resulting from the following:
(1) Accident, abuse, misuse, negligence and neglect, including stale fuel, dirt, abrasives, moisture, rust, corrosion, or any adverse reaction due to incorrect storage or use habits;
(2) Failure to operate or maintain the unit in accordance with the Owner s/Operator s manual or instruction sheet furnished by Husqvarna;
(3) Alterations or modifications that change the intended use of the product or affects the product s performance, operation, safety, or durability, or causes the product to fail to comply with any applicable laws; or:
(4) Additional damage to parts or components due to continued use occurring after any of the above.
REPAIR OR REPLACEMENT AS PROVIDED UNDER THIS WARRANTY IS THE EXCLUSIVE REMEDY OF THE PURCHASER. HUSQVARNA SHALL NOT BE LIABLE FOR ANY INCIDENTAL OR CONSEQUENTIAL DAMAGESFOR BREACH OF ANY EXPRESS OR IMPLIED WARRANTY ON THESE PRODUCTS EXCEPT TO THE EXTENT PROHIBITED BY APPLICABLE LAW. ANY IMPLIED WARRANTY OF MERCHANTABILITY OR FITNESS FOR APARTICULAR PURPOSE ON THESE PRODUCTS IS LIMITED IN DURATION TO THE WARRANTY PERIOD AS DEFINED IN THE LIMITED WARRANTY STATEMENT. HUSQVARNA RESERVES THE RIGHT TO CHANGE ORIMPROVE THE DESIGN OF THE PRODUCT WITHOUT NOTICE, AND DOES NOT ASSUME OBLIGATION TO UPDATE PREVIOUSLY MANUFACTURED PRODUCTS.
Some states do not allow the exclusion of incidental or consequential damages, or limitations on how long an implied warranty lasts, so the above limitations or exclusions may not apply to you. This warranty gives you specific legalrights, and you may also have other rights which vary by state.
SECTION 5: CUSTOMER RESPONSIBILITIESThe product must exhibit reasonable care, maintenance, operation, storage and general upkeep as written in the maintenance section of the Owner s/Operator s manual. Should an operational problem or failure occur, the productshould not be used. Failure caused by continued use is not covered by warranty. Product should be delivered, at owners expense, as is, to an authorized Husqvarna Servicing Retailer for evaluation. Proof of purchase, as explainedin section 6, rests solely with the customer.
SECTION 6: PROCEDURE TO OBTAIN WARRANTY CONSIDERATIONIt is the Owner s and Retailer s responsibility to make certain that the Warranty Registration Card is properly filled out and mailed to Husqvarna. This card should be mailed within ten (10) days from the date of purchase in order toconfirm the warranty and to facilitate post-sale service. Proof of purchase must be presented to the authorized Husqvarna retailer in order to obtain warranty service. This proof must include date purchased, model number, serialnumber, and complete name and address of the selling retailer. To obtain the benefit of this warranty, the product believed to be defective must be delivered to an authorized Husqvarna retailer in a timely manner, no later than thirty(30) days from date of the operational problem or failure. The product must be delivered at the owner s expense. Downtime, pick-up and delivery charges are not covered by this warranty. An authorized Husqvarna retailer can belocated by calling 1-800-HUSKY-62 or visiting www.husqvarna.com
Subject to change without notice.
HUSQVARNA 7349 Statesville Road, Charlotte, NC 28269 IRPart Number 525 88 56-01

P/N 115 137927 IR 02/20/09