adaptor kit manual - sunrise machine & tool catcher... · three bag grass catcher adaptor kit...
TRANSCRIPT

Three Bag Grass Catcher
Adaptor Kit Manual
Hustler FasTrak and Fastrak Superduty 52” Decks
(2010161)
1380 Legion Road, Detroit Lakes, MN 56501
Phone: 800-725-7761
Fax: 888-385-2345
Email: [email protected]
8/25/2010

2
TABLE OF CONTENTS
To The New Owner .........................................................................................................2 Warranty see owner’s manual Important Safe Operations Practices – See owners’ manual Grass Catcher Instillation .................................................................................................4 Assemble Bagger Assembly ............................................................................................4 Install Blower Housing ....................................................................................................5 Attaching Chute ..............................................................................................................7 Operation..........................................................................................................................7 Parts List ..........................................................................................................................9 Cut Out ............................................................................................................................. The operator’s manual is an important part of your new grass catcher attachment. It will help you
assemble and maintain your unit for best performance. Please read and understand all steps for
installation and heed all warnings for use of attachment.
To The New Owner
The purpose of this manual is to assist owners and operators in installing and operating the grass catcher. Please read carefully; information and instructions furnished can help you achieve years of dependable performance. The decals on the grass catcher are there to remind the operator about possible dangers the belt and chute can be if not used properly. These decals are not intended to be used in place of this manual but instead as an extension of this manual. These decals should not be removed or obliterated. Replace these decals if they become unreadable.
It is the OWNER’S RESPONSIBILITY to make certain all operators read and understand this manual and all decals before operating the grass catcher. It is also the OWNER’S RESPONSIBILITY to make certain that all operators are qualified and physically able individuals that are properly trained in the use of this equipment. For any Questions Contact SMT Integrated Services, LLC at 1-800-725-7761

3
WARNING—YOUR RESPONSIBILITY
Restrict the use of this power machine to persons who can read, understand and follow the warnings and instructions in this manual and on the machine.
REPLACE THIS DECAL IMMEDIATELY IF IT THEY BECOMES UNREADABLE OR DAMAGED.
PART #2010088

4
Assembly Instructions for Hustler FasTrak and Superduty
STEP 1 ASSEMBLE BAGGER ASSEMBLY
Install backend
Place 2081000 Top assembly bag support on back bumper. Align hole in Top assembly bag support with mower bumper and push all the way back to frame. Do not tighten completely until upper mount bolts are installed. (Use a vice grip to position back end frame on bumper during installation) Parts: (1) 2081000 Top assembly bag support (2) 5/16 X 1” bolts, fender washer and nut (1) 5/8 X 11/4” bolt, washer& nylock nut (1) 2010 Brace
1. Fasten support arms to existing holes in tractor frame. 2. Attach 2010099 Brace 3. Drill 2 holes in 2081000 Top assembly bag support to Install bolt, washers and nut trough back end frame and 2010099 Brace. Location of holes to be 6” above existing slot and positioned to allow clearance of braces to machine on each side of the motor.
. Put bags in place on frame as shown in picture
Place lid on backend frame. Line up hinges and insert bolts and washer into bottom holes. The top holes are for the pin that is used to keep lid locked down.
Parts: (2) 3/8 X 1” bolt washers (each side) nylock nut

5
STEP 2 INSTALL BLOWER HOUSING
Install drive pulley
Remove pulley cover, unscrew bolt that attaches outside pulley. Install Pulley assembly on top of outside pulley. Tighten to at least 85 ft lbs. Raise deck to highest transport height. Remove plastic chute from deck and place blower hanger tabs over existing deck discharge chute bracket. Fasten as shown.
Belt Installation
Install belt as shown in picture; route belt with twists as shown in picture below. Use ½ inch drive socket wrench to position idler allowing for belt instillation.
Install pin
Install nut and bolt
Pulley assembly

6
Install Belt Guards
STEP 3 ATTACHING THE CHUTE
See last 2 pages in booklet to locate the Optimal Angle & Length chart to find the Pin Points for your particular Make and Deck Sizes. H-59 & H-50 are the PINSET holes and are used for your reference.
Use the chart in the manual as a layout tool on the tube to drill a ¼” hole in the location found with the chart for your unit. This hole will line with the ¼” hole located in the upper transition tube. Fasten he upper and lower tubes together using the ¼-20 x ¾ bolt and 1/4-20 nylock nut.
Bolt (FasTrak)
Slip guard under washer and attach rubber strap.
Bolt (FasTrak)
Fit slot in guard into groove located in the lower idler spacer.

7
Insert the upper tube in the lid as shown. Place the lower end on the blower housing. Match the slot and attach the fastener.
Diagram 1: A To remove shoot for service or inspection, disengage deck drive and shut off motor. For ease of tube removal, raise lid.

8
Operation
Warning: Read, understand, and follow all instructions and warnings on the tractor, attachment, and in the tractor and catcher Owner’s Manuals before operating. Become familiar with and comfortable using your entire MOWERS controls as instructed in your
Owner’s Manual before operating it with the grass catcher attachment. Make certain the correct weight of motor oil is in your tractors engine as instructed in your
owner’s manual.
Always operate the grass catcher with the engine at high rpm’s
NEVER override any safety feature on either your tractor or grass catcher.
Make sure that all nuts, bolts, and hardware are fastened securely and tight on both the Concord Grass Catcher attachment and your tractor prior to use.
Make certain the grass catcher is assembled properly and mounted to the mower deck as
instructed in the Owner’s Manual. Test all controls for proper operation prior to operating the grass catcher.
Never place hands or feet into blower housing. There is an impeller located inside the housing
that will cause sever injury.
Never engage the mower deck unless chute is strapped in place on blower outlet. If the chute becomes jammed with grass, immediately disengage deck, place control lever in the
park brake position, shut off engine, remove the key, and wait for blower to stop before unclogging. Always use a rod or stick to unplug blower housing or chute. Use a probe to clean debris from blower and spout.
Do not operate on slopes greater than 15 degrees. Always attach the counter weight when using
the Concord Grass catcher.
9
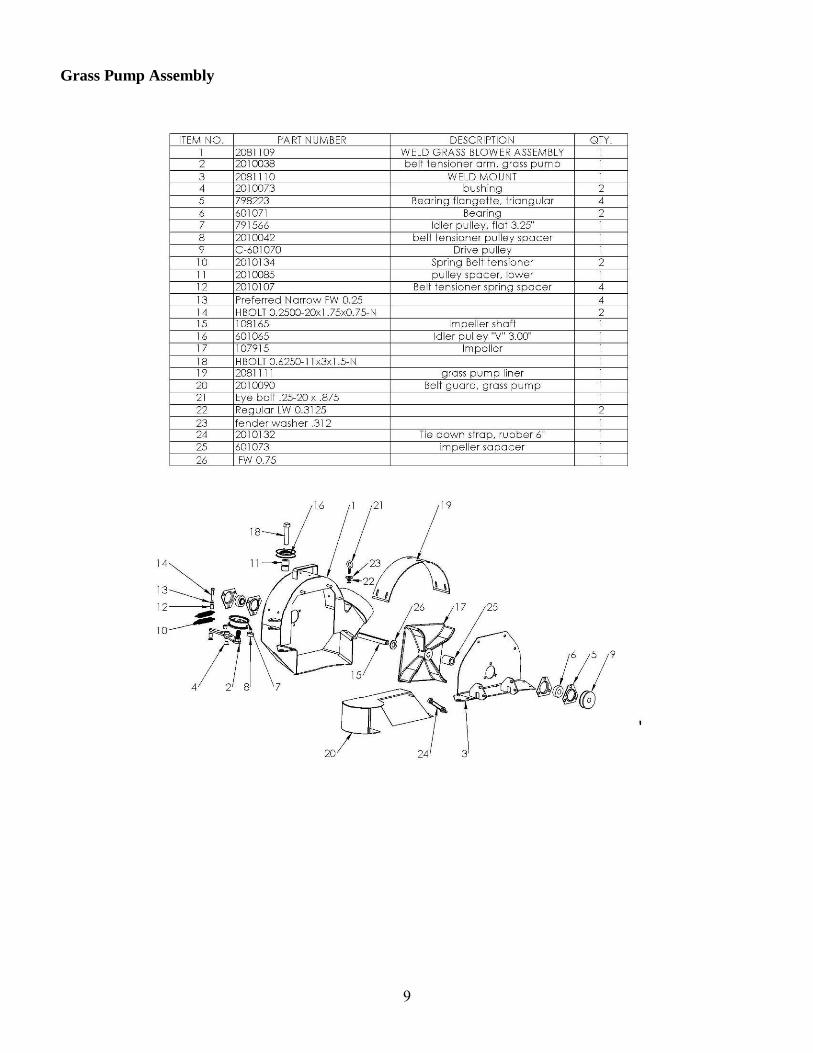
Grass Pump Assembly
10
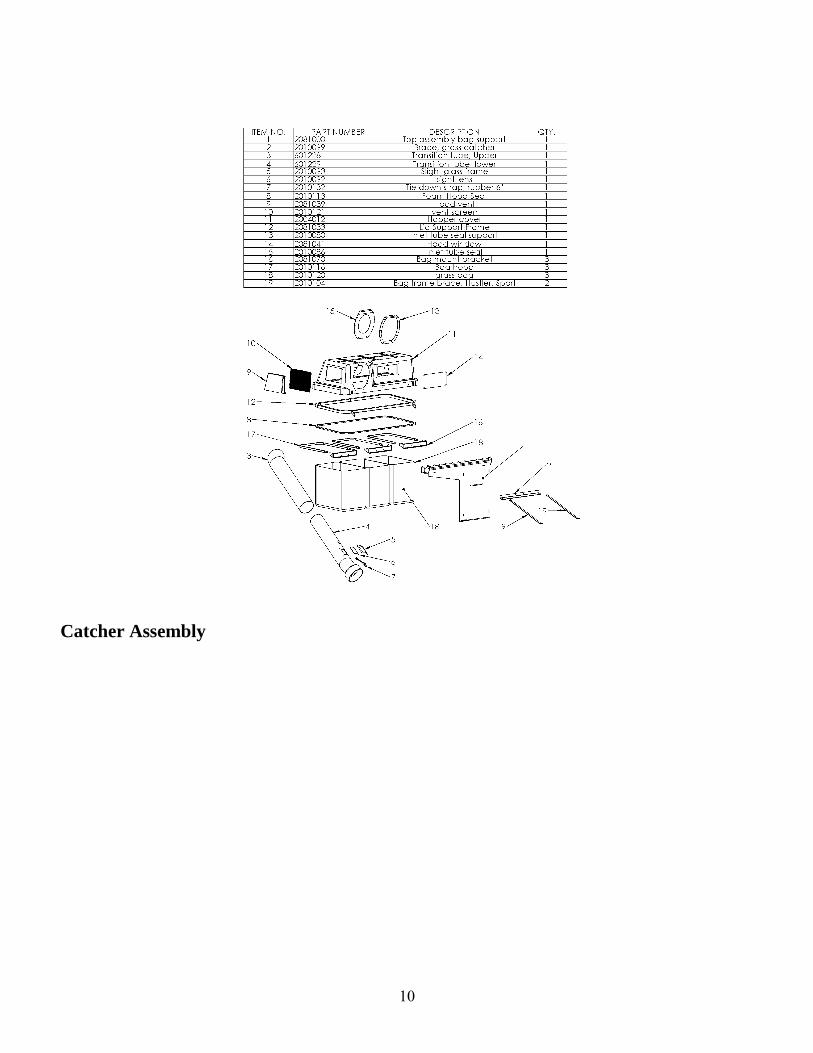
Catcher Assembly

11
2010161 - H-FT/FTSD 52”
DECK ADAPTER KIT
#1. BAGGED COMPONENTS
2 – HHCS 5/16-18 X 1
2 – HHCS 5/16-18 X ¾
2 – FLAT WASHER USS 5/16” ZINC
4 – NYLOCK HEX NUT 5/16-18 ZINC
1 – 1/4 -20 X ½ THUMBSCREW ZINC
2 - HHCS ¼-20 X ¾
2 – FLAT WASHERS USS ¼” ZINC
#2. AX-58 GATES TRI-POWER COGGED
BELT
#3. DRIVE PULLEY ASSEMBLY
2081304A
#4. HUSTLER 52” DECK BELT GUARD ASSEMBLY -
2010162
#5. BELT GUARD – INTERMEDIATE 48”/ 52” /54”
2010089
#6. BAG MOUNT BRACE
2010158 – (QTY 2 PER UNIT)
#7. Straight Brace – 20”

12
1380 Legion Road Detroit Lakes, MN 56578
Phone: 800-725-7761 Fax: 888-385-2345