managing horizon traffic across multiple data centers … · managing horizon traffic across...
TRANSCRIPT
Managing Horizon Traffic across Multiple Data Centers with BIG-IP
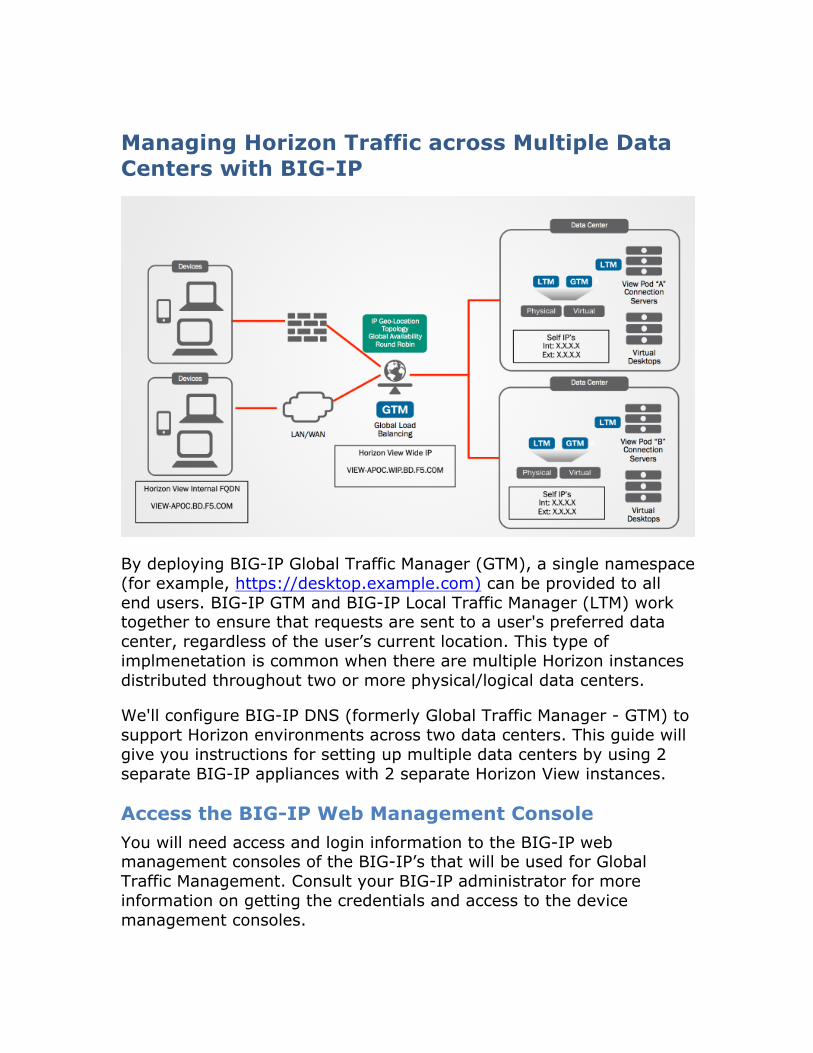
By deploying BIG-IP Global Traffic Manager (GTM), a single namespace (for example, https://desktop.example.com) can be provided to all end users. BIG-IP GTM and BIG-IP Local Traffic Manager (LTM) work together to ensure that requests are sent to a user's preferred data center, regardless of the user’s current location. This type of implmenetation is common when there are multiple Horizon instances distributed throughout two or more physical/logical data centers.
We'll configure BIG-IP DNS (formerly Global Traffic Manager - GTM) to support Horizon environments across two data centers. This guide will give you instructions for setting up multiple data centers by using 2 separate BIG-IP appliances with 2 separate Horizon View instances.
Access the BIG-IP Web Management Console You will need access and login information to the BIG-IP web management consoles of the BIG-IP’s that will be used for Global Traffic Management. Consult your BIG-IP administrator for more information on getting the credentials and access to the device management consoles.

Create Load Balanced Virtual Servers Before proceeding through these next steps, it’s important to or ensure each View pod is configured for load balancing on the BIG-IP using Local Traffic Manager (LTM), or Access Policy Manager (APM) if using F5’s BIG-IP PCoIP Proxy as an alternative. This guide assumes these steps have been completed.
Additional guidance and step-by-step instructions on setting up the PCoIP Proxy can be found here:
https://devcentral.f5.com/articles/implementing-pcoip-proxy-as-a-security-server-or-access-point-alternative
Additional information on setting up load balancing for View Security Servers, Connection Servers, and/or Access Point can be found in the latest deployment guide for Horizon:
https://www.f5.com/pdf/deployment-guides/vmware-view5-iapp-dg.pdf
Enable Global Traffic Management (GTM) Module First, we'll enable the Global Traffic Manager (GTM) module on the BIG-IP.
It’s important to ensure your BIG-IP has enough memory and CPU to run BIG-IP DNS in addition to any other modules that are currently running on the BIG-IP.
1. Logon to the BIG-IP Web Administration interface on the 1st BIG-IP.
2. Click on System
3. Click on Resource Provisioning.

4. CHECK the box next to Global Traffic (GTM).
5. Scroll down until you see the Submit and Revert buttons.
6. Click Submit.
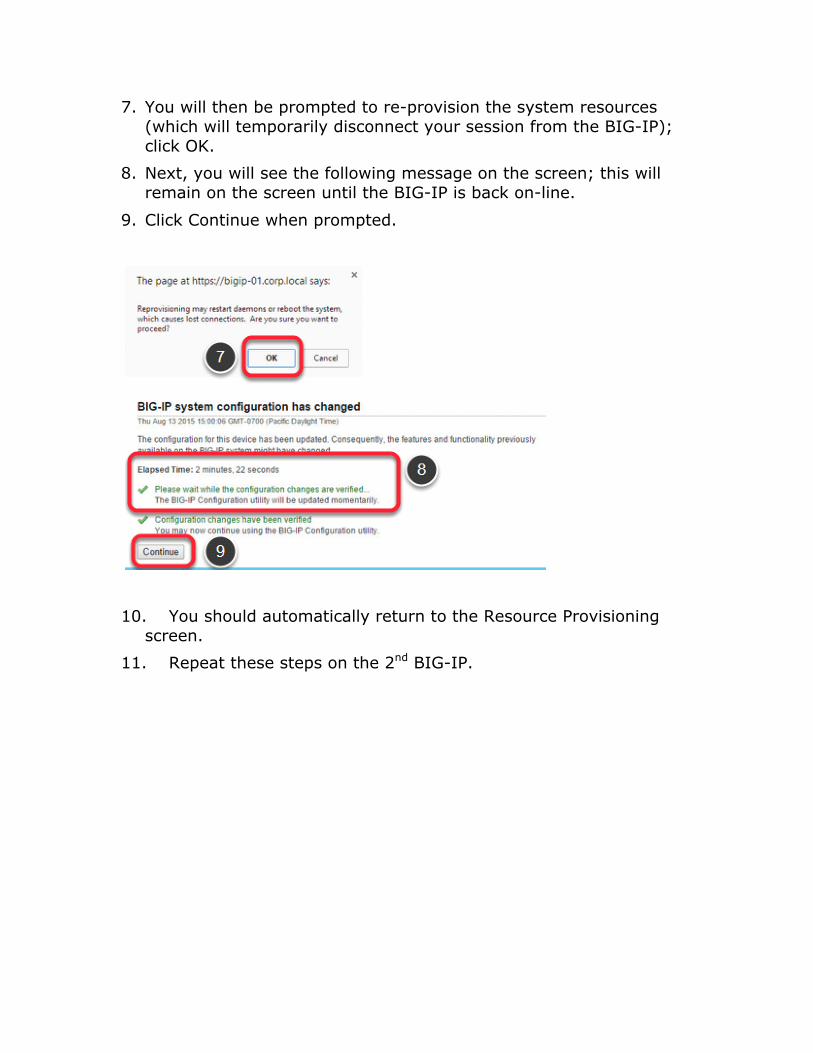
7. You will then be prompted to re-provision the system resources (which will temporarily disconnect your session from the BIG-IP); click OK.
8. Next, you will see the following message on the screen; this will remain on the screen until the BIG-IP is back on-line.
9. Click Continue when prompted.
10. You should automatically return to the Resource Provisioning screen.
11. Repeat these steps on the 2nd BIG-IP.
Configure BIG-IP DNS (Global Traffic Management) In this step, we'll use PUTTY to SSH to each BIG-IP and establish the communications trust relationship between the BIG-IP's exchange DNS and BIG-IP pool information. Go ahead and open an SSH/Putty session to each of the BIG-IP’s.
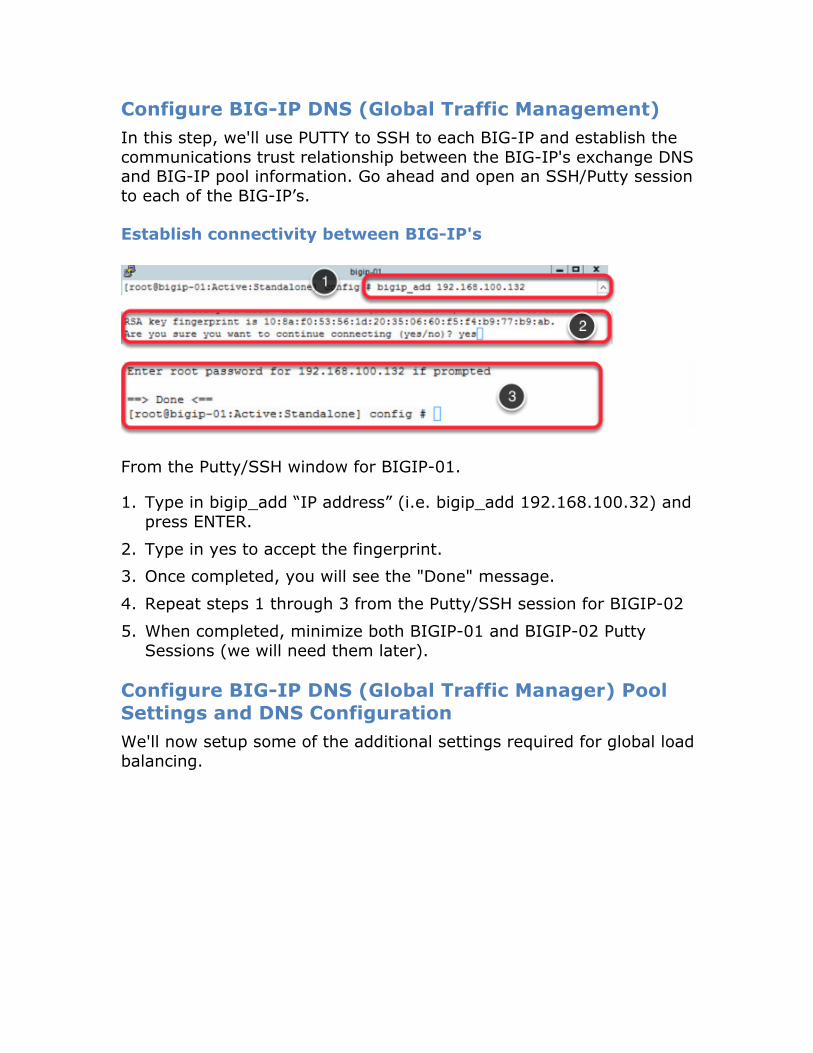
Establish connectivity between BIG-IP's
From the Putty/SSH window for BIGIP-01.
1. Type in bigip_add “IP address” (i.e. bigip_add 192.168.100.32) and press ENTER.
2. Type in yes to accept the fingerprint.
3. Once completed, you will see the "Done" message.
4. Repeat steps 1 through 3 from the Putty/SSH session for BIGIP-02
5. When completed, minimize both BIGIP-01 and BIGIP-02 Putty Sessions (we will need them later).
Configure BIG-IP DNS (Global Traffic Manager) Pool Settings and DNS Configuration We'll now setup some of the additional settings required for global load balancing.

Create Data Centers for BIG-IP DNS
First, we'll configure objects on the BIG-IP that will represent the 2 Horizon sites.
1. Open the BIG-IP Web Administrator interface on the 1st BIG-IP.
2. Click on DNS --> GSLB --> Data Centers.
3. Click Create.
4. Type in the name of the data center for the 1st BIG-IP (i.e. Site-A).
5. Click Repeat.
6. Repeat step 4, typing in the name of the data center for the 2nd BIG-IP (i.e. Site-B).
7. Click Finish.
8. You should see the 2 data center/sites created.
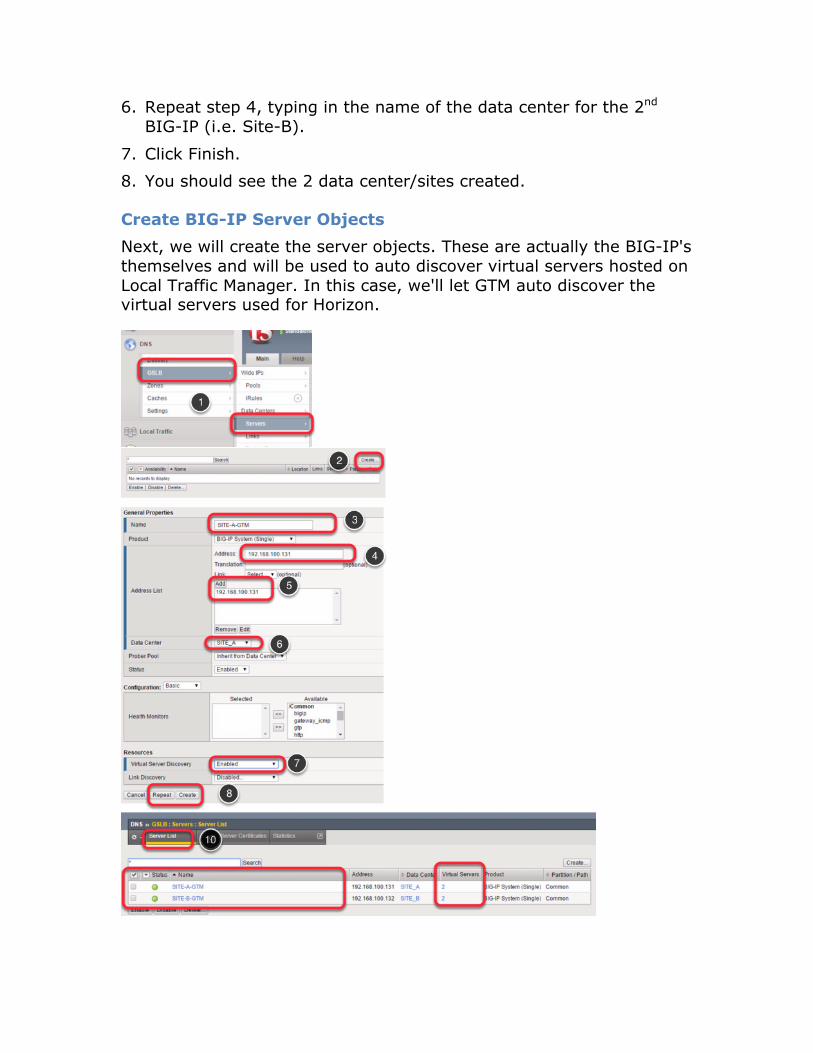
Create BIG-IP Server Objects Next, we will create the server objects. These are actually the BIG-IP's themselves and will be used to auto discover virtual servers hosted on Local Traffic Manager. In this case, we'll let GTM auto discover the virtual servers used for Horizon.

1. Click on DNS --> GSLB --> Servers.
2. Click Create.
3. Type in the name for the 1st GTM that will be used for the 1st data center (i.e. GTM-SITE-A).
4. In the IP Address box, type in the IP address for the 1st GTM (i.e. 192.168.100.131).
5. Click Add - you will see the IP address move into the box below.
6. For the Data Center, choose the name from the 1st data center (i.e. SITE-A).
7. Next to Virtual Server Discovery - choose Enabled.
8. Click Create.
9. Repeat steps 3 through 8, using the 2nd GTM (i.e. GTM-SITE-B) for the name, choosing the name for the 2nd data center (i.e. SITE-B) for the Data Center and the IP Address for the 2nd data center (i.e. 192.168.100.132).
10. You should see the GTM objects in the list, and they should have green circles next to them. If you don't see them right away, click the Server List box as shown in the diagram to refresh the screen until the circles are green and you see two virtual servers for each Site GTM.

Create BIG-IP GTM Pool Next, we will create a pool of resources that will be used by GTM to route users to an available Horizon instance.

1. Click on DNS --> GSLB --> Pools.
2. Click Create.
3. For the name of the pool, type in the name of the pool (i.e. VIEW-GTM-POOL).
4. Under the load balancing method, choose the appropriate load balancing method (i.e. Least Connection for the Preferred method, and Round Robin for the alternate method).
5. To create the member list, click the down arrow on the right side of the virtual server box. Choose one of the virtual servers listed from the 1st data center (i.e. 192.168.100.133:443), then click Add.
6. Choose the other virtual server listed from the 2nd data center (i.e. 192.168.100.134:443) from the list and click Add.
7. Click Finished.
8. You will then seen the pool show up in the list. Click the "Pool List" button until you see the pool's status change to Green.
Setup GTM Wide IP
In this next step, we'll configure the Wide IP. The Wide IP is used to help make the appropriate load balancing/routing decision to a pool of virtual servers that are contained within or across data centers. The Wide IP will be used as the FQDN that returns the IP address of the site the user is directed to.

1. Click on GSLB --> Wide IPs.
2. Click the Create button
3. Type in the DNS name that will be used for the Wide IP (i.e. view-gtm.wip.corp.local) in the name box.
4. In the pool list box, click the down arrow next to Pool. Choose the pool created in the previous step (i.e. VIEW-GTM-POOL), and then click Add.
5. Click Finished.
6. Make sure the Wide IP address returns a green status.

Add BIGIP-02 to Sync Group We'll now establish the trust and perform the initial sync up BIGIP-02 to sync the GTM configuration to the other simulated data center. This configuration allows GTM to failover to an alternate site in the event of a primary site failure.
1. Open the Putty/SSH session to the 2nd BIG-IP. MAKE SURE YOU ARE ON BIGIP #2 - if you run the command in step #2 on the 1st BIG-IP, the configuration will be deleted.
2. Type in gtm_add “IP Address” (i.e. gtm_add 192.168.100.131) and press Enter.
3. When prompted, type y and press Enter.
4. If prompted again, type yes and press enter.
5. You will see the following message once the sync is completed.

6. Minimize the Putty window.
7. Open the Web Interface to the 2nd BIG-IP; click on DNS à GSLB à Wide IP
8. You should see the configuration for GTM from the 1st BIG-IP; this verifies the sync is complete.
Enable GTM Sync on both BIG-IP’s Next, we will turn on the GTM Sync for each BIG-IP.
1. Navigate to the BIG-IP Web Interface for the 1st BIG-IP. Click on DNS --> Settings --> GSLB --> General.
2. Check the box to enable Synchronization; Set the group name to BIG-IP, and check the box to enable Synchronize DNS Zone Files.
3. Scroll to the bottom of the screen and click Update
4. Repeat steps 1 through 4 on the 2nd BIG-IP.
5. When completed, minimize the browser window.
Configure DNS Records In order for BIG-IP to properly route traffic, it needs the authority to manage the DNS record and/or zone that's used for the global load balancing. The first step is to put DNS "A" records in place for each BIG-IP GTM interface that we want to respond to DNS.
Next, we'll create a zone in DNS that we'll delegate resolving the FQDN for Horizon to the BIG-IP. For the lab, we will use the internal self IP's of the BIG-IP's as the resolving IP addresses for DNS. This example uses Active Directory’s DNS Services.

1. Launch the DNS management snap-in for Active Directory.
2. Click the arrow by Forward Lookup Zones to show the domains. Highlight the domain you will be adding the the A records for the BIG-IP (i.e. corp.local).

3. Right-click and choose New Host (A or AAAA)...
4. Type in the host name and the IP address for the 1st BIG-IP (i.e.
BIP-01 and 192.168.100.131) then click Add Host.
5. Click OK.
6. Repeat steps 4 and 5 for the 2nd BIG-IP.
7. When completed with the above steps, click Done.
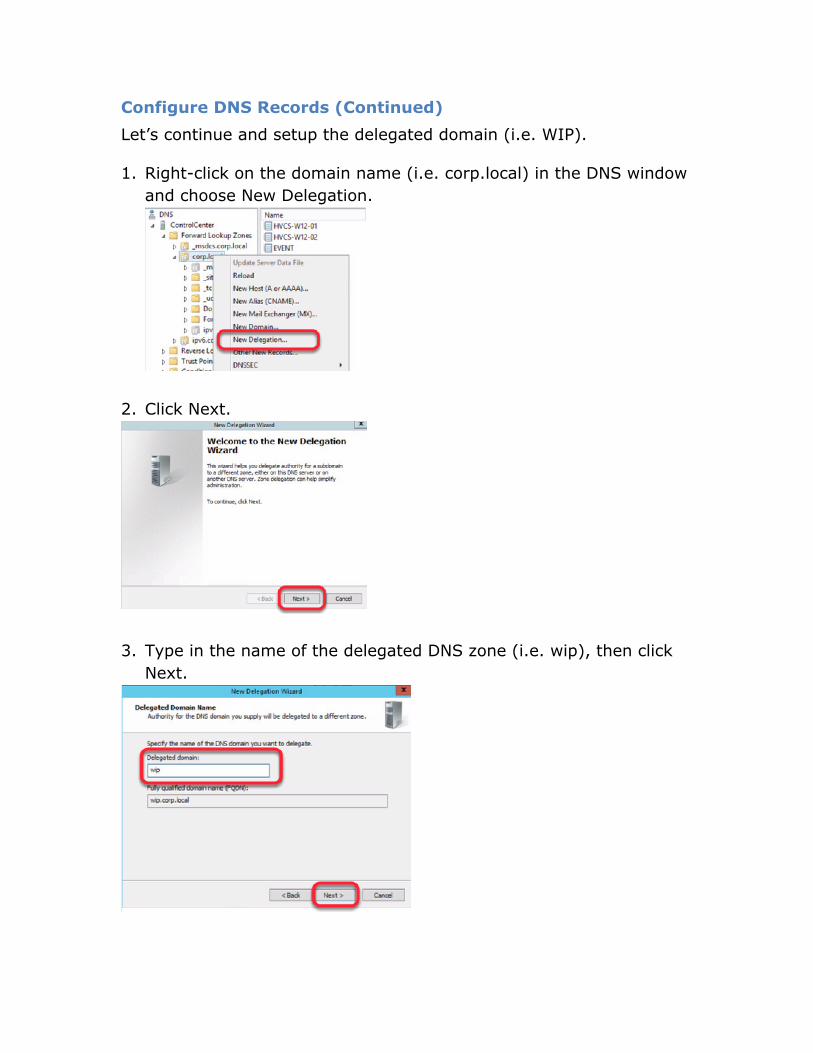
Configure DNS Records (Continued) Let’s continue and setup the delegated domain (i.e. WIP). 1. Right-click on the domain name (i.e. corp.local) in the DNS window
and choose New Delegation.
2. Click Next.
3. Type in the name of the delegated DNS zone (i.e. wip), then click
Next.

4. Click Add.
5. Type in the FQDN of the 1st BIG-IP, then click OK. Repeat by typing
in the FQDN for the 2nd BIG-IP (i.e. BIP-01.corp.local and BIP-02.corp.local). Then click Next.
6. Click Finish. You will see the DNS zone WIP that will be delegated to
the BIG-IP.

Create CNAME DNS Record We'll now create the CNAME record that will redirect the DNS request to the BIG-IP for resolution.
1. Right-click on the domain name (i.e. corp.local) and choose New Alias (CNAME)...
2. Type in the hostname of the FQDN that will be used (i.e. view-gtm if view-gtm.corp.local is the FQDN) for the Alias name and the FQDN that will be used to redirect to the Wide IP on the BIG-IP (i.e. view-gtm.wip.corp.local) for target host.
The FQDN for target host contains the DNS zone we delegated to BIG-IP. In this example, BIG-IP will resolve the DNS name for anyone trying to resolve view-gtm.corp.local.
3. Click OK.

4. Exit the DNS Management snap-in
Configure DNS Listening on the BIG-IP The last step is to configure the BIG-IP to answer DNS requests.
1. Open the Web Administration interface on the 1st BIG-IP.
2. Click on DNS --> Delivery --> Listeners.
3. Click Create.

4. Type in the name that we will use to identify the listener (i.e. GTM-A-DNS, type in the IP address that will be used for DNS requests (i.e. 192.168.100.131) for the Destination IP Address, then click Finished.
5. You will then see the DNS listener created on BIGIP-01.
6. From the BIG-IP Web Administration browser for the 2nd BIG-IP repeat steps 2 through 5 using the values for the 2nd BIG-IP.
NOTE: You may have to repeat these steps 2 more times if you use TCP for DNS resolution as well. If this is required, repeat the steps, except change the Protocol to TCP.
Testing Access using PING Now, we are ready to test! First, let's ping the FQDN to make sure we are resolving DNS properly.
1. Open a command prompt window by clicking on the command prompt icon located in the lower left corner of the desktop.
2. Type in the FQDN to resolve (i.e. view-gtm.wip.corp.local) and press Enter.
3. You should see the DNS name resolve to view-gtm.wip.corp.local with the IP addresses of the virtual servers. If you continually repeat the ping test, you should see it switch back and forth between each virtual server.
4. Exit the Command Prompt window by clicking the "X" in the upper right corner of the window.

Testing Access using Horizon To simulate the GTM working properly, disable the GTM in Site A first and make a connection to Horizon. Then, enable the GTM in Site-A and disable the GTM in Site-B to show GTM working properly.