lighting up chemiluminescent southern blot procedure 2-cholewiak
TRANSCRIPT
Chapter 2
Lighting Up: Analysis Of Yeast RAS Genes Using A
Chemiluminescent Southern Blot Procedure
Karen A. Malatesta and Linda B. Cholewiak
Department of Molecular Biology Princeton University
Princeton, New Jersey 08544 [email protected]; (609) 258-6202 [email protected]; (609) 258-1474
Karen is a Senior Lecturer and Director of the Introductory Molecular Biology Teaching Laboratories in the Department of Molecular Biology. She received her Ph.D. in Genetics from the University of Minnesota and conducted postdoctoral research in prokaryotic gene regulation at the University of California, San Diego, and the State University of New York at Stony Brook. In 1984, she moved to the Department of Molecular Biology at Princeton University as a member of the research faculty and has studied gene expression in the yeast plasmid, 2 micron circle, since then. Her current duties include directing, developing and teaching undergraduate laboratories in molecular biology for students majoring in both the sciences and the humanities. She also directs summer workshops for secondary school science teachers in New Jersey and Princeton students.
Linda is the Associate Director of the Introductory Molecular Biology Teaching Laboratories. She received her B.S. from Salisbury State College and her M.S. in Developmental Biology from the University of Virginia.
© 1997 Trustees of Princeton University
Association for Biology Laboratory Education (ABLE) ~ http://www.zoo.utoronto.ca/able 33
Reprinted From: Malatesta, K. A. and L. B. Cholewiak. 1996. Lighting up: analysis of yeast RAS genesusing a chemiluminescent southern blot procedure. Pages 33-60, in Tested studies for laboratory teaching,Volume 18 (J. C. Glase, Editor). Proceedings of the 18th Workshop/Conference of the Association forBiology Laboratory Education (ABLE), 322 pages.
- Copyright policy: http://www.zoo.utoronto.ca/able/volumes/copyright.htm
Although the laboratory exercises in ABLE proceedings volumes have been tested and due consideration has been given to safety, individuals performing these exercises must assume all responsibility for risk. The Association for Biology Laboratory Education (ABLE) disclaims any liability with regards to safety in connection with the use of the exercises in its proceedings volumes.
Chemiluminescent Southern Blot
34
Contents Introduction....................................................................................................................34 Materials .........................................................................................................................35 Notes for the Instructor ..................................................................................................37 Student Outline ..............................................................................................................39 Literature Cited ..............................................................................................................46 Appendix A. Analysis And Explanation Of The Southern Blot Results .......................47 Appendix B. Additional Procedures for the Southern Blot ...........................................49 Appendix C. Equipment, Supplies, and Vendors ..........................................................55 Appendix D. Preparation of Materials ...........................................................................57 Appendix E. Daily Sequence of Events for an Afternoon Lab ......................................59
Introduction In student laboratories in the introductory molecular and developmental biology course for
students majoring in the sciences, the Southern blot is the third and last of a series of experiments in which students learn to work with and characterize DNA. Students first isolate plasmid DNA (pRAS2; Powers et al., 1984) from Escherichia coli and genomic DNA from a yeast used in brewing, Saccharomyces carlsbergensis, and then employ the methods of agarose gel electrophoresis, restriction mapping, and the Southern blot to analyze these DNAs. These particular procedures were included in the laboratory curriculum because they are essential for constructing a physical map of a DNA molecule and are, thus, fundamental procedures in molecular biology.
The Southern blot (named for E. Southern, who first delineated this method; Southern, 1975) is a technique for transferring DNA from an agarose gel to a membrane to facilitate further analysis. In a previous laboratory experiment, students isolate both plasmid and yeast genomic DNAs. In addition to the genomic DNA samples they prepare from S. carlsbergensis, they are given two prepared digests of genomic DNA from another yeast, S. cerevisiae, or Baker’s yeast, so the concepts of DNA polymorphism and RFLPs can be introduced as part of the laboratory. As will be discovered from analyzing the genomic DNAs in the Southern blot, the genomes of these two yeast species are definitely not identical.
Yeast was selected as the source of genomic DNA for this procedure for several reasons. Yeast are very easy to culture and extremely amenable to manipulation in the laboratory. Also, S. cerevisiae , the smallest eukaryote, has a genome only 1.3 ×10⁷ bp in size (encoding approximately 6,500 genes) and identifying one single-copy gene among 6,500 is considerably easier than identifying a single-copy gene in larger genomes. In addition, S. cerevisiae is one of the model organisms whose entire genome has just been sequenced as part of the Human Genome Project. Surprisingly, about 45% of yeast genes are new and are not similar to any previously known genes (Williams, 1995). Both genome complexity and the Genome Project can be discussed in the context of the laboratory.
pRAS2 was selected as the plasmid for this experiment to facilitate introducing the concepts of oncogenes, cancer, and conservation of DNA sequence and function. The plasmid pRAS2 was constructed by cloning an EcoRI - HindIII fragment encoding the RAS2 gene from the genome of Baker’s yeast, S. cerevisiae, into the EcoRI and HindIII sites of the vector pUC19 (Powers et al., 1984). Ras genes are found in many organisms from yeast to humans. The sequences of Ras genes have been so highly conserved throughout evolution that the human Ras gene can substitute for a yeast Ras gene in yeast cells, and the yeast Ras gene can replace human Ras in human cells (DeFeo-Jones et al., 1985). The success of these yeast-human Ras substitutions suggests that the human Ras
Chemiluminescent Southern Blot
35
gene product has a structure and function similar to that of yeast Ras. In their usual (wild type) form, the protein products of Ras genes regulate normal cellular growth, a critically important function. However, certain mutant alleles of Ras, known as oncogenes, produce proteins which can no longer regulate cell division properly, and can cause cancer in humans and other animals by promoting excessive or inappropriate cell growth, which can result in tumor formation.
The first step in the Southern procedure is running an agarose gel of samples of pRAS2 and yeast genomic DNAs that have been digested with restriction enzymes and which students have prepared previously (See Appendix B). After running the gel, the Southern blotting technique is used to identify the DNA fragments within the pRAS2 plasmid DNA and the genomes of the Baker’s and brewing yeasts which encode the RAS2 gene. Instead of radioisotopes, a chemiluminescent method known as ECL (Enhanced Chemiluminescence), developed by the Amersham Corporation, is employed. A restriction fragment which encodes the yeast RAS2 gene is utilized as the probe in this procedure. Because of limited class time, this fragment is usually labeled with horseradish peroxidase immediately before class begins. When the labeled probe is added to the membrane, it will hybridize to homologous DNA sequences on the membrane during a short incubation. Then, the hydrogen peroxide in the detection reagents reacts with the membrane and is chemically reduced by the peroxidase complexed to the probe, resulting in the oxidation of luminol, another reagent. This last reaction produces blue light, which can be detected using X-ray film. Sometimes this chemiluminescent reaction is so strong that the light emitted is actually visible in the darkroom—which is really cool!
The Southern blot laboratory is usually taught in two three-hour laboratory sessions in successive weeks. Gel electrophoresis and transfer (Procedures A and B) are performed the first week (Southern Blot I), and the processes of hybridization, washing, detection and exposure (Procedures C and D) are performed the second week (Southern Blot II). It is also possible to complete the entire procedure at one time, although this takes 5–6 hours.
Materials
Southern Blot I: Procedures A & B: Electrophoresis and Transfer (per 15 student pairs) Agarose, 1%, in 250 ml Erlenmeyer flasks (5 flasks) Bags, plastic sandwich (Baggies) (60) Bottles, 250 ml, milk dilution for TAE buffer (15) Bottles, 500 ml, with water for weight (15) Bottles, dropper, with water for microfuge balance tubes (2) Boxes, for hazardous waste (4) Cameras (Polaroid) with 4.5 mm red filters #23A (2) Colored dots coded for different lab sections (15) Containers, Rubbermaid, with lid, for gel treatment (15) Containers, sharps disposal, 3.5 quart (6) Cylinders, graduated, 100 ml, for 0.4 NaOH and 0.25 N HCl (4) Cylinders, graduated, 50 ml, for 2×SSC (2) DNA Size Standard, One Kb Ladder aliquots (15) DNA samples (pRAS2 plasmid and yeast genomic; Appendix B) (15 sets) Ethidium bromide staining trays containing 100 ml TAE (10) Ethidium bromide stock solution, 10 ml bottle @10 mg/ml (1)

Chemiluminescent Southern Blot
36
Film, Polaroid #667 (5 pkg. @ 20 prints/pkg.) Gel boxes, leads, combs, etc. (three extras included) (18) Gel loading dye with RNase, reusable aliquots (15) Gel rinse tray, covers of pipet tip boxes, containing100 ml deionized water, (15) Gloves, powder-free, PVC, XS, S, M, L, XL ( two boxes of each size) HCl, 0.25 N, in eight- liter carboy (1500 ml) Innova incubator shaker, room temperature, 50 rpm (1) Markers, Sharpies, fine-tipped (15) Microcentrifuge (1) Microcentrifuge tubes, 0.65 ml, assorted colors, for aliquots of DNA (75) Mitts, autoclave (1 pair) Mitts, “hot hands” protectors (5) NaOH, 0.4 N, in eight- liter carboy (1800 ml) Nylon membranes, 6.0 cm × 8.3 cm, in transfer packet (15) Paper clips (30) Paper, chromatography, 10 cm × 16 cm, folded, to hold membranes (15) Paper, chromatography, wicks, in transfer packet, 5 cm ×7 cm (45) Paper, chromatography, blotter, in transfer packet, 10 cm ×13 cm (15) Paper towels, C-fold, for general use (8 packs) Paper towels, C-fold, cut in half, 2.5 cm thick stack for transfer packets (15 stacks) Paper, bench, 28 cm square (30) Pencils, to mark membranes (15) Pipetor, P20 (15) Pipet tips, 1–200 µl (15 racks @ 100 tips/rack) Plexiglass plates, 15 cm ×13 cm ×0.5 cm (15) Power supplies for gel boxes (8) Racks, for microcentrifuge tubes (15) Rulers, fluorescent, for transilluminators (2) Scissors, blunt for cutting membrane corner (15) Spatula, plastic, to pick up gel (4) SSC, 2×(750 ml) TAE buffer, 1×, in eight- liter carboy (2.25 liters) Pipets, transfer, polyethylene, 15.5 cm in length, for sealing gels (15) Trays, for ethidium bromide staining (colored bases from pipet tip boxes) (10) Trays, for holding gels after staining (white lids from pipet tip boxes) (5) Trays, for wetting membrane (white lids from pipet tip boxes) (15) UV transilluminators (2) Vacuum desiccator for storage of membranes (1) Water bath, 65°–70° C (1) Weights, lead for flasks of 1% agarose in water bath (5)
Southern Blot II: Procedures C & D: Hybridization and Detection (per 15 student pairs)
Boxes for hazardous waste (4) Buffer, hybridization 10 ml/tube, stored @ –20° C (80 ml) Buffer, primary wash, in (two) one-liter Erlenmeyer flasks in 40.5° C incubator (1500 ml)
Chemiluminescent Southern Blot
37
Buffer, secondary wash, (2× SSC) in eight- liter carboy at sink (1800 ml) Cassettes, for exposing X-ray film (2) Colored dots for labeling hybridization tubes (10) Container for gel disposal, lined with two plastic bags (1) Container, sharps disposal, 3.5 quart (6) Containers, plastic, with lid (Rubbermaid) for washing membranes (15) Cylinders, graduated, 100 ml, for measuring wash buffers (4) Dark room for developing film (1) Detection Reagent #1, 2 ml/tube, color code black (15) Detection Reagent #2, 2 ml/tube, color code magenta (15) DNA for probe (Appendix B) ECL reagents for probe-labeling, (1 kit) Forceps, blunt-ended (15) Gloves, powder-free, PVC, XS, S, M, L, XL ( two boxes of each size) Gooseneck lamp with 100 watt bulb for activating “Radtape” (1) Ice bucket for probe labeling (1) Incubator shaker, room temperature, 50 rpm (1) Markers, Sharpies, fine-tipped (17) Oven, Hybridization, 40.5° C with tubes, O-rings, test tube rack (1) Paper, bench, 28 cm square (30) Paper, chromatography, 19 cm ×24 cm for cassettes (3) Pipet, transfer, polyethylene, 15.5 cm in length (1 box) Probe prep: Pipet tips (1 rack) Probe prep: Pipetor, P20 (1) Probe prep: Pipetor, P200 (1) Racks, test tube for 50 ml/15 ml tubes (15) Saran Wrap, roll (1) Tape, Scotch, rolls (6) Timers, count-down for probe and developing film (2) Tubes, 50 ml, centrifuge, Falcon Blue Max, for hybridization (8) Tubes, 14 ml, round-bottom, polypropylene, for detection reagents (30) X-ray film, XAR, 20.3 cm × 25.4 cm (6–10 sheets)
Notes for the Instructor
Sequence and Approximate Duration of Major Events in Southern Blot Procedure A. Southern Blot I
1. Agarose gel electrophoresis of digested DNAs to be analyzed (30–40 minutes) a. Gel electrophoresis tank used is the Gibco-BRL Horizon 58 model, although any similar
apparatus would also be suitable. b. The One Kilobase Ladder DNA Size Standard contains fragments 75–12,000 bp in size and is
used for most electrophoresis experiments. c. The depth of the buffer should be sufficient to completely cover the gel but not be much
deeper or the running time will increase greatly. d. The types of DNA selected for this experiment are a high-copy plasmid carrying the yeast
RAS2 gene and yeast genomic DNA, although any DNAs that share homologous sequences would be suitable. The fragment chosen as probe is part of the pRAS2 plasmid, making it easy

Chemiluminescent Southern Blot
38
to prepare (Appendix B). The fragment encodes the entire RAS2 gene and will hybridize to both plasmid and genomic fragments encoding RAS2. The strength of hybridization of the probe to the plasmid DNA is much greater than that to the genomic DNA because the RAS2 gene constitutes 22% of this plasmid but only one gene of the 6,500 genes in the yeast genomic DNA. Using both types of DNA makes it highly likely that students will see at least the stronger hybridization to the plasmid fragment. Both types of DNA are relatively easy to prepare (Appendix B).
2. Gel staining and photographing (15–20 minutes) a. Ethidium bromide solutions are kept in a chemical hood to minimize the possibility of
contamination. b. The staining solutions containing ethidium bromide are located close to the transilluminators
and camera also to minimize the possibility of contamination. c. No stain other than ethidium bromide has yet been identified that is very sensitive and does
not inhibit the enzymatic ECL reactions. Staining with methylene blue inhibits or quenches the ECL chemiluminescence.
3. Treatment of gel with HCl and NaOH (20–25 minutes) a. Powder-free gloves are used for this and subsequent steps because ECL reactions are inhibited
by powder. b. The HCl treatment breaks the DNA into short fragments by partial depurination, facilitating
the subsequent transfer step. 4. Transfer of the DNA from the gel to a nylon membrane (45–55 minutes)
a. “Upside-down” method of building a stack (F. Volkert, personal communication) ensures rapid transfer while minimizing diffusion.
b. C-fold paper towels are less expensive than blotting paper and can be cut to size rapidly with a table saw.
c. Baggies sandwich bags are used in place of plastic wrap because they require no cutting and are easier to handle.
B. Southern Blot II
1. Labeling of probe (20–25 minutes) a. Probe DNA preparation is described in Appendix B. b. This step is usually performed by the instructor immediately prior to the beginning of lab due
to limited class time. 2. Pre-hybridization of membrane (15 minutes)
a. It is important to use blue-capped Falcon tubes to ensure they fit inside the large glass tubes of the Robbins hybridization oven.
b. The hybridization is carried out at 40.5° C because the ECL enzymatic reactions are inhibited by temperatures greater than 42° C. Setting the oven below 42° C allows a margin of safety.
3. Hybridization of probe to homologous sequences on membrane (60 minutes) 4. Washing of membrane (20–25 minutes)
a. Both the durations and numbers of washes recommended by Amersham have been shortened without affecting the results.
b. The primary wash is usually performed at slow speed (50 rpm) in an incubator shaker at 40.5° C, but shaking by hand at room temperature also gives good results.
5. Application of detection reagents to membrane and wrapping (10–15 minutes) a. It is critical to exclude all air bubbles when wrapping the membrane. b. It is also important that the scotch tape completely covers all the seams to prevent moisture
leaking from the membrane onto the film, which would ruin the exposure. 6. Exposure of membrane to XAR film and developing (20–30 minutes)
a. In tests four years ago, XAR film was found to be more sensitive than ECL film. b. The duration of the longer exposures should be determined by the strength of the initial short
exposure.
Chemiluminescent Southern Blot
39
Student Outline In previous experiments, you have isolated yeast genomic DNA and plasmid DNA from
Escherichia coli. You digested the plasmid DNA with several restriction endonucleases and determined a restriction map of the plasmid after subjecting the digests to agarose gel electrophoresis. These particular techniques have been very important to the success of molecular biology because they are essential for constructing a physical map of a DNA molecule whether the DNA is a plasmid, fragment, or chromosome. In addition, as you will discover, DNA mapping is usually the foundation for other types of analyses such as the Southern blot.
You may have noticed in previous electrophoresis experiments that you had to be fairly careful handling an agarose gel because it was rather fragile. The Southern blot is a technique for transferring DNA from an agarose gel to a membrane to facilitate further analysis. Thus, the Southern blot (named for E. Southern, who first delineated this method) can be thought of as a technique that produces a relatively durable representation of the DNA banding pattern in an agarose gel. Two similar procedures used to transfer RNA and proteins from gels to membranes are known as northern and western blots, respectively.
The first step in the Southern procedure is to run an agarose gel of digested DNA samples such as pRAS2 and yeast genomic DNAs. You will also be given two prepared digests of genomic DNA from Baker’s yeast, Saccharomyces cerevisiae, which is used in making bread and other baking. The yeast genomic DNA you isolated previously was from a strain of Saccharomyces carlsbergensis, a yeast used in brewing. As you will discover from analyzing the genomic DNAs in your blot, the genomes of these two yeast species are definitely not identical.
After running the agarose gel, you will use the Southern blotting technique to identify which DNA fragment(s) encode the RAS2 gene within the plasmid pRAS2 and the genomes of Baker’s and brewing yeasts. Instead of using radioisotopes to do this, you will use a chemiluminescent method known as ECL (Enhanced Chemiluminescence) developed by Amersham. A fragment carrying the yeast RAS2 gene will be used as the probe in this procedure. Because of the limited time of lab sessions, this fragment will already have been labeled with horseradish peroxidase. In the ECL procedure, the probe will hybridize to the DNA on your membrane during a short incubation. Next, you will pour detection reagents on top of the membrane for a one minute incubation. The hydrogen peroxide in these reagents will be chemically reduced by the peroxidase complexed to the probe, resulting in the oxidation of luminol, another reagent. This last reaction produces blue light, which can be detected using X-ray film. Sometimes this chemiluminescence reaction is so strong that the light emitted is actually visible in a darkroom—which is really cool!
All scientific experiments should progress in a logical order. In order to understand what is happening in the different parts of this procedure, you should think about the purpose of each step and keep the goal of the procedure in mind. Although the blot procedure is rather long and will take about six hours to complete, like most techniques in molecular biology, it is relatively easy to perform and will produce meaningful, and even sophisticated, data.
Chemiluminescent Southern Blot
40
Procedure A. Gel Electrophoresis of pRAS2 and Yeast Genomic DNAs
The first step in the Southern blot is to run digested DNA samples in an agarose gel with an appropriate number of sample wells. A 1% agarose gel made with TAE buffer should be prepared in a standard gel electrophoresis tank such as the Gibco-BRL Horizon 58 apparatus, which is described in the following directions: 1. Place a black dam at each end of the red-striped gel bed. Obtain a flask of melted agarose from
the water bath, swirl the flask to mix and use a plastic transfer pipet to pipet a narrow bead of melted agarose along the joint between the black dam and the gel bed at each end of the bed.
2. Wait one minute while the beads solidify and then pour enough melted agarose into the gel bed so the level of the agarose reaches the tops of the sides of the gel bed. It’s important that the gel be as thick as the sides of the gel bed or the wells will not be deep enough to hold the entire volume of the samples. Immediately put a comb with 8 teeth in the slot above the red stripe nearest the negative (black) electrode.
3. Allow the gel to solidify at room temperature for about 20 minutes or until it becomes cloudy. 4. While the gel is cooling, you should add loading dye to your digested samples of genomic and
plasmid DNA using a 1:10 ratio of dye to sample. The loading dye contains blue dye so that the samples can be easily visualized during loading and electrophoresis, Ficol to increase the density so the sample will sink to the bottom of the well, and RNaseA to digest excess RNA in the samples.
5. Be certain that the gel has solidified before proceeding: it should look cloudy and be firm to the touch. Next, pour in approximately 150 ml TAE electrophoresis buffer to completely cover the gel.
6. Wait one minute, then carefully and slowly pull the comb straight up so the gel does not break. The wells created by the teeth of the comb will then be visible.
7. Practice the loading process by loading 15 µl of loading dye alone into the second well of the gel using a P20 micropipetor.
8. To load the dye, the tip of your pipetor should be positioned right above, or just inside, the well. Do not put the tip all the way to the bottom of the well because this could puncture the bottom of the gel, which would cause the sample to leak out. Push the button on the pipetor down very slowly so the sample will sink to the bottom of the well. Avoid getting air bubbles in the tip (they will make loading difficult) by making sure that your pipetor is set to the exact volume you want to load.
9. Before loading the One Kb Ladder and the other prepared samples, mix these samples well by flicking the tubes with your finger and pulse spin them for 2 seconds in a microfuge to collect the samples at the bottom of the tubes, which will make loading easier.
10. Samples, all approximately 20 µl in volume, such as those listed below should be loaded into the eight wells:
Lane 1—1 Kb Ladder Standard (1.5 µg DNA, Gibco-BRL # 15615-016) Lane 2—Leave empty or use for practice loading Lane 3—Students’ HpaI digest of pRAS2 DNA Lane 4—Prepared HpaI digest of Baker’s yeast genomic DNA Lane 5—Students’ HpaI digest of brewing yeast genomic DNA Lane 6—Students’ EcoRI digest of pRAS2 DNA Lane 7—Prepared EcoRI digest of Baker’s yeast genomic DNA Lane 8—Students’ EcoRI digest of brewing yeast genomic DNA
11. After loading the samples, close the lid of the gel box and attach the electrical leads, taking care not to jostle the box. Connect the red (positive) lead to the red jack, which should be at the end of
Chemiluminescent Southern Blot
41
the box farthest from the DNA samples. After checking to see that the power switch is off and that the white dot on the rheostat knob is at the “min” position, connect the leads to the same colored plugs on the power supply, red to red and black to black.
12. Turn the power on and adjust the voltage to between 110–115 V using the rheostat. Don’t use higher voltages because the heat generated could cause the gel to melt. If current is flowing, small bubbles will start to rise from the electrodes, and you will see the dye begin to move out of the wells within the first minute. If the dye does not move, or if it does not move toward the red jack, immediately turn the rheostat to the “min” position, turn off the power supply and ask your lab instructor for assistance.
13. Electrophorese your samples at 110–115 V for about 30 minutes until the blue dye has migrated approximately 5.5 cm to a point between the second and third red stripes of the gel bed. Then, turn the rheostat to the “min” position, turn the power supply off and disconnect the leads.
14. In order to be able to visualize the DNA bands in the gel, it must be stained in buffer containing the dye ethidium bromide, which intercalates into the DNA helix. Because ethidium bromide is a carcinogen, exercise great care and good laboratory technique when working with it. During all steps involving ethidium bromide, always wear a double layer of gloves (two gloves per hand) and be very careful not to get buffer containing ethidium bromide on your skin or clothes.
15. Lift the electrophoresis chamber out of the gel box, and, holding onto the gel firmly but carefully, pour the buffer into the sink. Then, carry the chamber containing the gel to the trays of staining solution in the hood. Lift the gel and gel bed out of the chamber and carefully slide the gel off the bed into one of the purple trays containing the ethidium bromide staining solution. Leave for 10 minutes and then lift the gel carefully with a plastic spatula, tip it slightly so that the excess staining solution drains back into the tray and transfer the gel to a white tray of rinse water for 15 seconds or until a transilluminator is available.
16. Next, carry the rinse tray containing your gel to the photographic apparatus, lift your gel out of the rinse solution with the spatula, tip it to drain off the excess, and transfer it carefully to the surface of the UVtransilluminator, aligning the bottom of the wells with the zero position on the fluorescent ruler.
17. Now, with the plastic cover of the transilluminator in place, turn the UV lamp on and try to visualize the DNA bands, which will fluoresce because of the intercalated ethidium bromide. If you cannot see bands, ask your lab instructor for assistance.
18. Next, lift the cover of the transilluminator, fit the camera hood over the transilluminator, and press the shutter of the camera.
19. To obtain your photograph, pull the extruding white tab to move your piece of film out of the cassette. Next, grasp the end of the film and slowly pull it out; then wait 30 seconds and peel the picture from the backing. Your lab instructor will assist you if your photograph does not show bands of DNA which have migrated to different positions in the gel or if the bands in your pRAS2 sample are blurry or faint.
20. Still wearing gloves, discard the gel in the receptacle provided and rinse your gel box out thoroughly with water at the sink. Discard all tips, tubes, and pipets in the proper receptacles.
Chemiluminescent Southern Blot
42
Procedure B. Transferring the DNA to a Membrane After the gel has been photographed, it is prepared for the Southern transfer as described next:
1. First, put the gel into a small Rubbermaid box and, using a razor blade or a metal spatula, carefully cut off a small triangular piece of gel from the upper corner of the gel nearest to the first lane containing the One Kilobase Ladder.
2. Then, add approximately 100 ml of a 0.25 N HCl solution to the box. Put the cover on the box and shake slowly (approximately 50 rpm) in a shaker (if available) at room temperature for about 5 minutes or until the blue loading dye turns yellow. This treatment partially depurinates the DNA.
3. Still wearing gloves and holding onto your gel firmly but carefully, pour the 0.25 N HCl into the sink and rinse the gel and box once with deionized water. Then, add approximately 100 ml of 0.4 N NaOH to your gel, cover the box, and put it back onto the shaker for 5 minutes or until the loading dye turns blue again.
4. During this time you should obtain a packet of supplies which contains the following items for the transfer: a. A pile of C-fold paper towels approximately 2.5 cm thick, which are slightly larger than your
gel, and a piece of chromatography paper the same size as the towels b. Three pieces of chromatography paper slightly smaller than your gel, which will be used as
wicks c. Three small plastic Baggies (always use the smooth side, without the flap) d. A nylon membrane the same size as your gel, which you will wet in water before using e. One piece of bench paper, approximately 28 cm square, for use as a work surface
5. After the gel has soaked long enough in NaOH to turn the loading blue again, remove it from the box and turn it upside down onto the smooth side (the side without the flap) of a Baggie (#1 in diagrams below). Note the consistency of your gel at this point. Now, still wearing gloves, carefully write the initials of both lab partners in pencil in small letters at the center top and bottom of the nylon membrane.
6. Next, wet your membrane first in deionized water in a white tray (the top of a box of disposable pipet tips) and then in the remaining 0.4 N NaOH in the Rubbermaid box and place it carefully on top of the gel with the side of the membrane bearing your initials in contact with (facing) the gel. Be sure to use a rolling motion to lay the membrane onto the gel, so that air bubbles (which can prevent good transfer of the DNA) will not be trapped between the membrane and the gel.
7. Use scissors to cut a small triangular piece from the corner of the membrane to match the corner of the gel which you cut off earlier.
8. During the rest of the procedure, make sure you apply solutions and reagents only to the side of the membrane which carries the DNA (and your initials) as instructed.
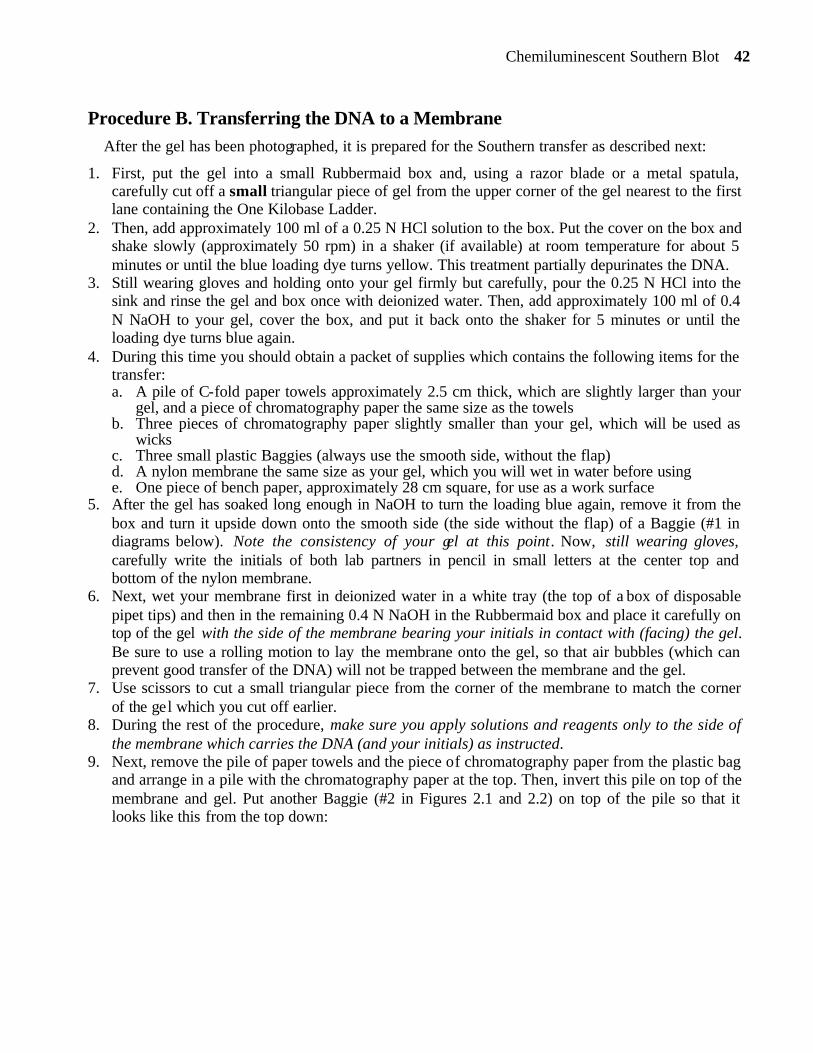
9. Next, remove the pile of paper towels and the piece of chromatography paper from the plastic bag and arrange in a pile with the chromatography paper at the top. Then, invert this pile on top of the membrane and gel. Put another Baggie (#2 in Figures 2.1 and 2.2) on top of the pile so that it looks like this from the top down:
Chemiluminescent Southern Blot
43
Gel
Chromatography paperNylon membrane
Stack of paper towels
Bench paper
Baggie #2
Baggie #1
Figure 2.1. Initial components of transfer stack.
10. Then, putting one hand under Baggie #1 (at the bottom of the stack) and the other hand on top of
the Baggie #2 (at the top of the stack), carefully and quickly turn the stack over (invert it) so that Baggie #1 is now at the top of the stack and Baggie #2 is now at the bottom.
11. Discard the NaOH in which the gel has soaked in the sink and then pour about 20 ml fresh 0.4 N NaOH into the Rubbermaid box. Next, remove Baggie #1 from the top of the stack and discard it. The gel is now exposed at the top of the stack.
12. Working rather quickly, saturate each of the three paper wicks in the fresh NaOH. Place each carefully on top of the gel one at a time, again using a rolling motion so as not to trap air bubbles. Take care; the chromatography paper can tear rather easily once it is wet.
13. When all three wicks have been placed on top of the gel, add one to two transfer pipetsful of 0.4 N NaOH to the top of the wicks, forming a puddle of NaOH which completely covers the surface of the wicks. Be careful not to add so much NaOH that it spills over onto the gel; the surface tension should keep it on top of the wicks.
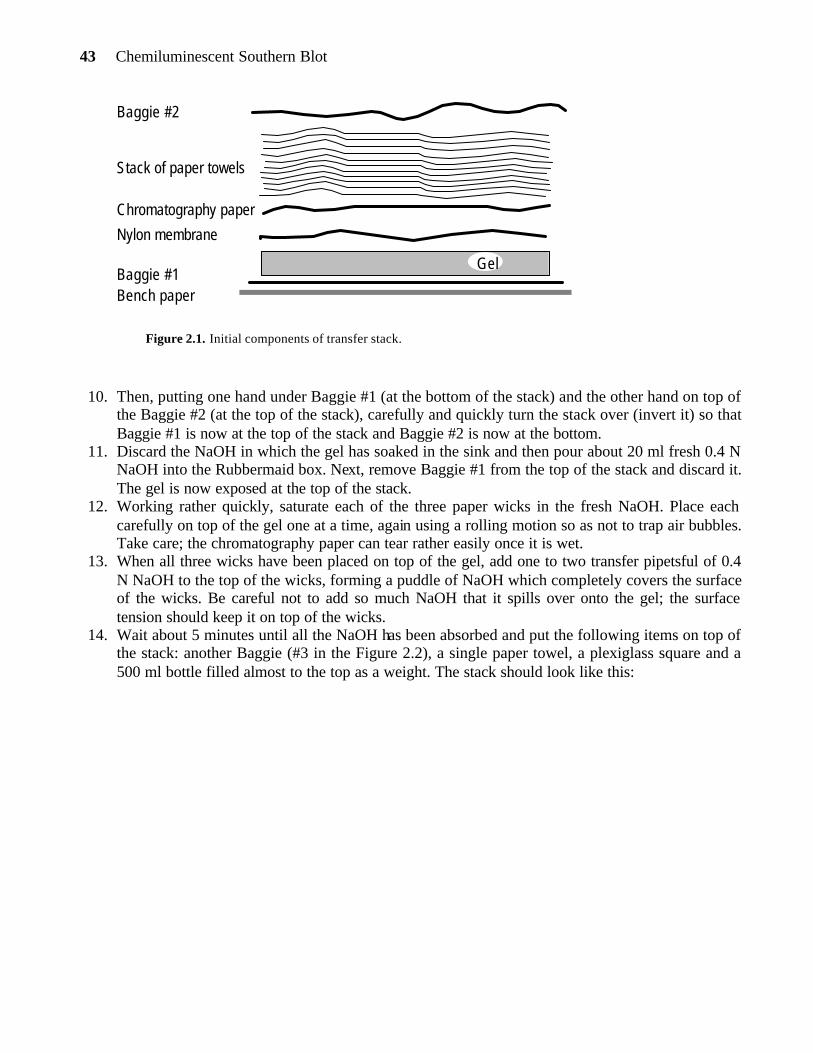
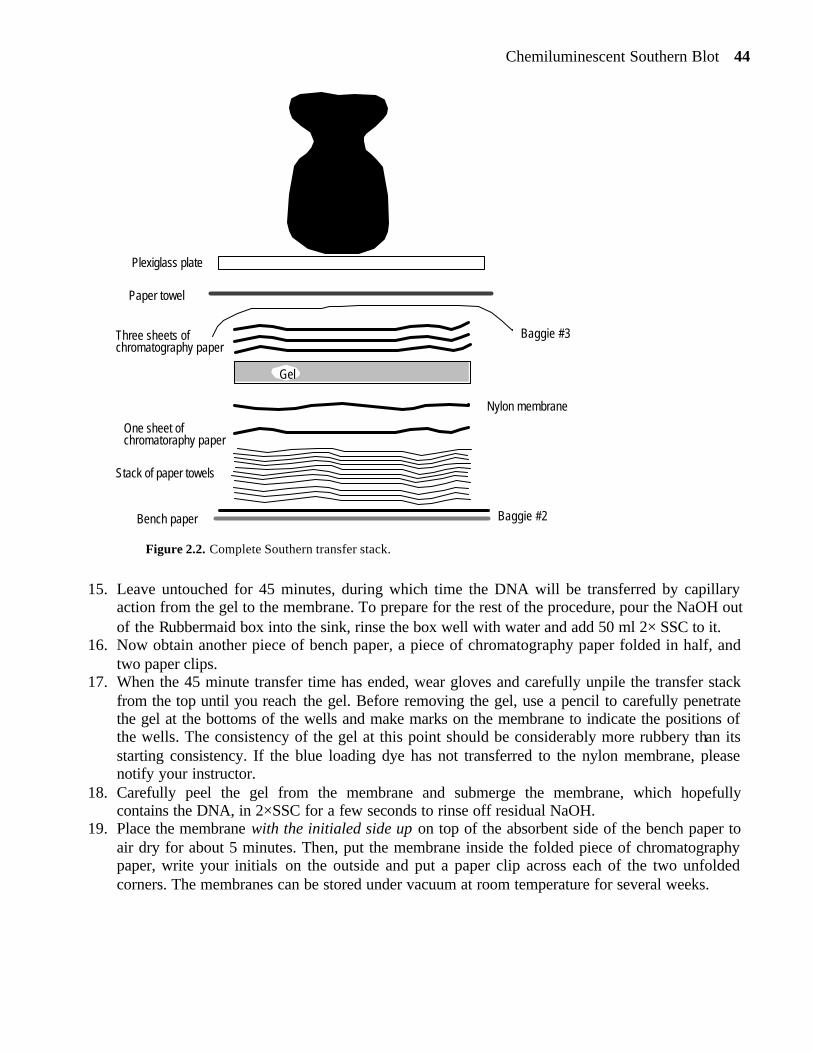
14. Wait about 5 minutes until all the NaOH has been absorbed and put the following items on top of the stack: another Baggie (#3 in the Figure 2.2), a single paper towel, a plexiglass square and a 500 ml bottle filled almost to the top as a weight. The stack should look like this:
Chemiluminescent Southern Blot
44
Gel
Plexiglass plate
Paper towel
Nylon membrane
Stack of paper towels
Bench paper
Three sheets ofchromatography paper
One sheet ofchromatoraphy paper
Baggie #3
Baggie #2
Figure 2.2. Complete Southern transfer stack.
15. Leave untouched for 45 minutes, during which time the DNA will be transferred by capillary action from the gel to the membrane. To prepare for the rest of the procedure, pour the NaOH out of the Rubbermaid box into the sink, rinse the box well with water and add 50 ml 2× SSC to it.
16. Now obtain another piece of bench paper, a piece of chromatography paper folded in half, and two paper clips.
17. When the 45 minute transfer time has ended, wear gloves and carefully unpile the transfer stack from the top until you reach the gel. Before removing the gel, use a pencil to carefully penetrate the gel at the bottoms of the wells and make marks on the membrane to indicate the positions of the wells. The consistency of the gel at this point should be considerably more rubbery than its starting consistency. If the blue loading dye has not transferred to the nylon membrane, please notify your instructor.
18. Carefully peel the gel from the membrane and submerge the membrane, which hopefully contains the DNA, in 2×SSC for a few seconds to rinse off residual NaOH.
19. Place the membrane with the initialed side up on top of the absorbent side of the bench paper to air dry for about 5 minutes. Then, put the membrane inside the folded piece of chromatography paper, write your initials on the outside and put a paper clip across each of the two unfolded corners. The membranes can be stored under vacuum at room temperature for several weeks.

Chemiluminescent Southern Blot
45
Procedure C. Pre-Hybridization and Hybridization
You will continue to wear gloves during lab today. Again, the only gloves that are available in the lab are powder-free because powder inhibits the chemiluminescent reactions. 1. Wearing gloves, retrieve your membrane and carefully put it inside one of the 50 ml blue-capped
plastic tubes with the initialed (DNA-bearing) side of the membrane toward the lumen (center) of the tube. This will ensure that the DNA on the membrane is always in contact with the buffer and probe during hybridization. Write your initials on a colored dot and put it on the side of the tube. Because the hybridization oven holds only 20 plastic tubes, you may have to share your centrifuge tube with another group. Having two membranes in a tube will not affect your hybridization results.
2. After you have put the membranes into the tube, obtain an aliquot of hybridization buffer from the 40.5° C incubator shaker and, holding the centrifuge tube at an angle, pour the buffer into the tube. Replace the cap tightly and roll the tube until the membranes are completely wetted with buffer. Then take the tube to your lab instructor so it can be put into the hybridization oven at 40.5° C for a short period known as pre-hybridization, during which the membrane equilibrates with the hybridization buffer.
3. After the pre-hybridization has continued for 15 minutes, a small amount of labeled probe (18 µl, approximately 0.2 µg of a purified DNA fragment) will be added to the tube by the lab instructor, and the tube will be returned to the oven for 60 minutes to hybridize.
Procedure D. Washing and Detection
After the 60 minute hybridization is over, retrieve the tube with your membrane and a Rubbermaid box and pour approximately 100 ml of primary wash buffer prewarmed to 40.5° C into the box. 1. Use blunt-ended forceps to remove the membrane from the tube, transferring as little
hybridization buffer as possible, and place the membrane into the wash buffer in the box. Make certain that the cover is on the box tightly and shake slowly in a 40.5° C shaker or by hand at room temperature for 15 minutes.
2. During this wash, obtain one tube of each of the two detection reagents (one marked with a black dot and the other with a magenta dot), a plastic transfer pipet and two pieces of bench paper for your membrane. Also, cut a small piece of Saran Wrap for wrapping your membrane.
Carefully read this last section of the lab procedure before proceeding because the next several steps should be done very quickly. Be certain that you understand these procedures before the 15 minute primary wash ends.
3. After 15 minutes, pour the primary wash buffer into the sink, rinse the box and membrane with 20 ml of secondary wash buffer, and add approximately 100 ml of this secondary wash buffer to the box. “Shake” slowly at room temperature on your bench for 5 minutes.
4. When the secondary wash is over, use the blunt-ended forceps to remove the membrane from the wash buffer and place it with the initialed (DNA-bearing) side up onto the absorbent side of the bench paper for one minute only to soak up excess wash buffer. Then, transfer the membrane, again with the DNA side of the membrane facing up, to the plastic side of the second piece of bench paper.
5. Pour one of the two tubes of detection reagents (it doesn’t matter which) into the second tube, invert a couple times to mix and then pour the mixture on top of the membrane, forming a puddle.

Chemiluminescent Southern Blot
46
Agitate the bench paper gently in a circular motion to keep the membrane completely covered with the reagents for one minute only.
6. When the minute ends, lift one corner of the membrane with the blunt forceps so the excess reagents drain off. Then, place the membrane with the initialed (DNA) side down on top of the piece of Saran Wrap.
7. Fold the sides of the Saran Wrap around the membrane, cut off the excess Saran Wrap with scissors and gently press from end to end to exclude any trapped air. Then, seal the entire length of the center back seam of the Saran Wrap with a piece of Scotch tape. Next, fold the ends of the Saran Wrap onto the back side of the membrane, again using pieces of tape long enough to seal the entire length of these seams.
8. Next, bring your membrane to your instructor, who will help you label it with Radtape bearing your initials. It will then be exposed to X-ray film in the dark room for a short exposure of 10–15 minutes, and you will be given this short exposure before you leave today. Later, your blot will be exposed again for a longer period (usually several hours, though this depends on the intensity of the bands), and you will receive copies of this longer exposure for use in your data analysis.
Acknowledgments
The dedication and hard work of the Schultz Teaching Laboratory staff is deeply appreciated, especially that of Ms. Lorraine Schepis who helped immensely in preparing this workshop. We are continually inspired by the enthusiasm and zest for learning of our students at Princeton, who usually rate the Southern blot among their favorite experiments.
Literature Cited Powers, S., T. Kataoka, O. Fasano, M. Goldfarb, J. Strathern , J. Broach and M. Wigler. 1984. Genes
in S. cerevisiae encoding proteins with domains homologous to the mammalian ras proteins. Cell 36: 607–612.
Southern, E. M. 1975. Detection of specific sequences among DNA fragments separated by gel electrophoresis. Journal of Molecular Biology 98: 503–517.
Williams, N. 1995. Closing in on the complete yeast genome sequence. Science 268: 1560–1561. DeFeo-Jones, D., K. Tachell, L. C. Robinson, I. S. Sigel, W. C. Vass, D. R. Lowy and E. M. Scolnick,
1985. Mammalian and yeast ras gene products: biological function in their heterologous systems. Science 228: 179–184.

Chemiluminescent Southern Blot
47
APPENDIX A. Analysis And Explanation Of The Southern Blot Results
Figure 2.3. A photograph of a typical agarose gel and the x-ray exposure of the resulting membrane. The content of the samples is listed below and also in the “Student Outline” section. The numbers to the left of the gel photograph indicate the sizes of selected fragments of the One Kilobase Ladder standard. A radtape label is visible on the upper left corner of the x-ray exposure.
Lane 1—One Kilobase Ladder DNA Standard: Some non-specific hybridization usually occurs, for unknown reasons, between the RAS2 probe and the 1.6 kb fragment (indicated by arrows in Figure above) and occasionally two smaller fragments of the One Kb Ladder. The 1.6 kb band can be used to align the gel photograph with the blot exposure.
Lane 3— HpaI digest of pRAS2: The smaller (1.2 kb) fragment of this digest of pRAS2 hybridizes to the probe and can also be used to align the X-ray exposure with the gel photograph. This is an expected result because this fragment was purified and used as the probe. Thus, this sample serves as a control for the hybridization reaction. Some non-specific hybridization may also occur with the larger fragment in the digest but it should be considerably less intense.
Lane 4—HpaI digest of Baker’s yeast genomic DNA: A band the same size as the 1.2 kb fragment of pRAS2 hybridizes to the probe. This is expected because the 1.2 kb fragment encoding the RAS gene was cloned from this species of yeast and used to construct pRAS2.
Lane 5— HpaI digest of brewing yeast genomic DNA: The band which hybridizes to the probe in this sample is a different size from that present in Baker’s yeast. This is not unexpected because the genomic organization of these two species is quite different.
Lane 6—EcoRI digest of pRAS2: Because there is only one EcoRI site in this plasmid, only one band, approximately 5.5–6 kb (or unit plasmid size) is present in this digest and, of course, hybridizes to the probe.

Chemiluminescent Southern Blot
48
Lane 7—EcoRI digest of Baker’s yeast genomic DNA: This sample contains a band of hybridization smaller than that present in the plasmid digest in Lane 6. These bands should be different sizes because the plasmid band contains vector sequences as well as RAS2 sequences.
Lane 8—EcoRI digest of brewer’s yeast genomic DNA: This sample contains a band that is a different size from the hybridized fragments in both the plasmid and in Baker’s yeast, as expected given the different genomic structures of these two yeast species.
Analysis: Typical Lab Report Questions
1. What is the purpose of treating the gel with HCl? What effect does this have on the DNA transfer? 2. What is the purpose of soaking the agarose gel in 0.4 N NaOH? Are there other procedures by
which this could be accomplished? Considering that you are currently working with a gel, could you use one of these alternative procedures to accomplish this with your gel?
3. Is it be possible to hybridize a probe from a yeast gene to genomic DNA from a human? What condition or requirement must be met for such a reaction to occur? If this reaction were possible, relatively how strong would you expect it to be compared to the reaction between the yeast probe and yeast genomic DNA. Explain your answer briefly.
4. Measure the distance (mm) of all DNA bands in the One Kb Ladder and pRAS2 samples from the photograph of your agarose gel and list them below. Then, use a suitable software analysis program or manually plot a standard curve to determine the sizes of the bands in the pRAS2 samples. Then, use this data to determine the sizes of the fragments which have hybridized to the RAS2 probe as shown on the X-ray film.
5. Compare the sizes of the fragments homologous to RAS2 in the digests of the plasmid and genomic samples. In the three DNA samples digested with HpaI and the three digested with EcoRI, are the plasmid and genomic bands that hybridize to the probe the same or different sizes? Assuming that there are no technical artifacts, what are the reason(s) for their size similarities or differences?

Chemiluminescent Southern Blot
49
APPENDIX B. Additional Procedures for the Southern Blot
A. Isolation of Plasmid DNA (Students’ Mini-Prep Procedure) Grow a culture of the strain of E. coli carrying the plasmid of interest to saturation overnight in
Luria-Bertani (LB) Broth containing the appropriate antibiotic to select for the presence of the plasmid. Aliquot the culture into 2 ml microfuge tubes with screw caps and keep on ice until needed. Students isolate DNA as described below:
1. Centrifuge the 2 ml culture in the microfuge at maximum speed (14,000 rpm) for 30 seconds at room temperature.
2. Pour off the supernatant liquid and resuspend the pelleted cells in the residual liquid by vortexing vigorously. Add approximately 0.65 ml of STET lysis buffer (8% sucrose; 5% Triton X-100; 50 mM Tris-Cl, pH 8; 50 mM Na2EDTA, pH 8.5) and resuspend the bacteria completely by vortexing. The resuspended cells should appear homogeneous and not contain any clumps. Vortex again if necessary.
3. Close the top of the tube tightly and place the tube in a heating block at 100° C for 3 minutes. Use forceps to remove the tube from the block and immediately cool in ice for 5 minutes.
4. Centrifuge (14,000 rpm) for 5 minutes at room temperature and remove the pellet by pulling it along the side of the tube with a wooden applicator stick or, if this is difficult, use the stick to hold the pellet at the bottom of the tube and pour the supernatant into another sterile tube. Save the supernatant (it contains the DNA!) and discard the tube containing the pellet of cellular debris.
5. Add 0.5 ml isopropanol to the supernatant, close the cap tightly, and mix well by inverting the tube several times. Leave at room temperature for 10 minutes to allow the DNA to precipitate.
6. Spin for 5 minutes at room temperature and carefully pour off the supernatant. The pellet, which contains both DNA and RNA, at the bottom of the tube will be small but visible. However, don’t be concerned if you can’t see anything because most of the pellet is salt—not DNA. Have faith—and proceed.
7. Add 0.5 ml iced 70% ethanol to the tube and, taking note of the position of the pellet, invert the tube gently a few times. If this dislodges the pellet, spin again in the microfuge for one minute.
8. Carefully pour off the ethanol and invert the tube onto a paper towel to drain, leaning the tube against a rack or other support. Let it dry about 5 minutes until all the alcohol smell is gone, watching to make sure that the pellet does not slide down the side of tube. If any drops of alcohol remain on the sides of the tube near the mouth, carefully wipe them off with the corner of a Kimwipe.
9. Dissolve the pellet by adding 50 µl TE buffer and vortexing well. Then, spin for 2 seconds in the microfuge to collect all of the DNA solution at the bottom of the tube. Use 2–5 µl for each restriction enzyme digest.
B. Large Scale Plasmid DNA Isolation (Isolation of DNA for Probe) This large (100 ml) DNA isolation procedure is very similar to a standard alkaline lysis miniprep
procedure except for the last precipitations. I use as a host the E. coli strain XL1-Blue (Stratagene #202268) for all plasmid preps because it gives very high yields of plasmid DNA (2–10 mg/100 ml culture).
Chemiluminescent Southern Blot
50
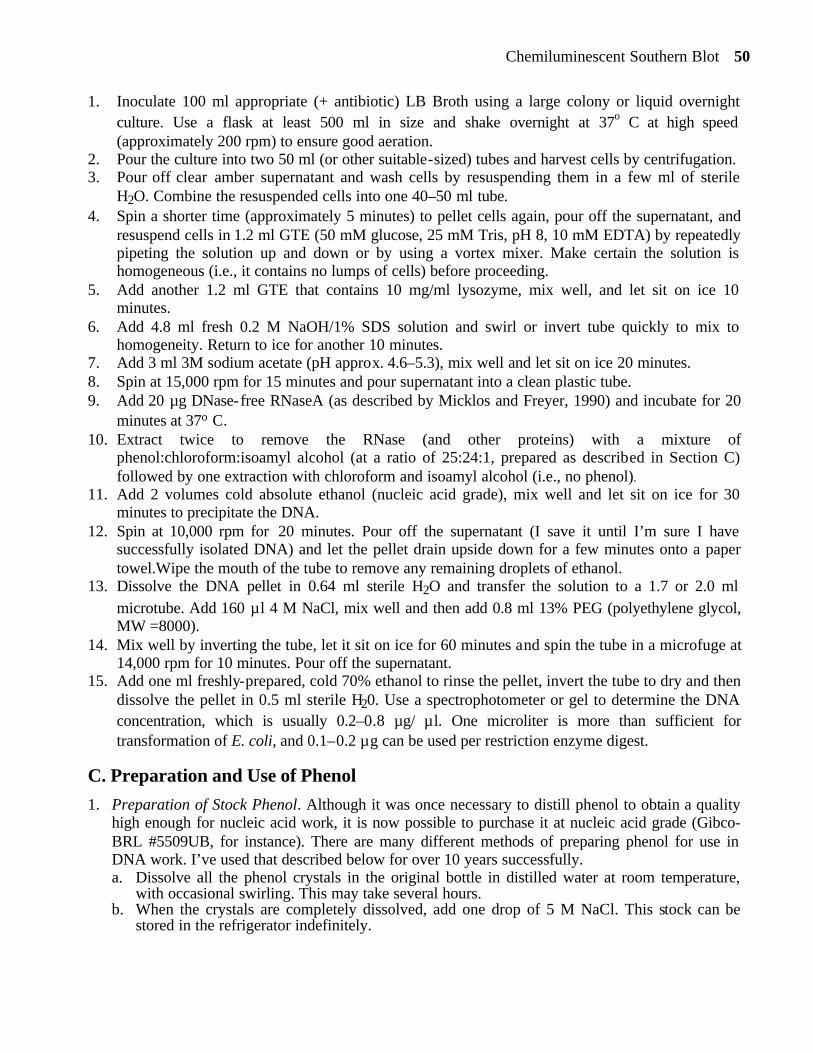
1. Inoculate 100 ml appropriate (+ antibiotic) LB Broth using a large colony or liquid overnight culture. Use a flask at least 500 ml in size and shake overnight at 37o C at high speed (approximately 200 rpm) to ensure good aeration.
2. Pour the culture into two 50 ml (or other suitable-sized) tubes and harvest cells by centrifugation. 3. Pour off clear amber supernatant and wash cells by resuspending them in a few ml of sterile
H2O. Combine the resuspended cells into one 40–50 ml tube. 4. Spin a shorter time (approximately 5 minutes) to pellet cells again, pour off the supernatant, and
resuspend cells in 1.2 ml GTE (50 mM glucose, 25 mM Tris, pH 8, 10 mM EDTA) by repeatedly pipeting the solution up and down or by using a vortex mixer. Make certain the solution is homogeneous (i.e., it contains no lumps of cells) before proceeding.
5. Add another 1.2 ml GTE that contains 10 mg/ml lysozyme, mix well, and let sit on ice 10 minutes.
6. Add 4.8 ml fresh 0.2 M NaOH/1% SDS solution and swirl or invert tube quickly to mix to homogeneity. Return to ice for another 10 minutes.
7. Add 3 ml 3M sodium acetate (pH approx. 4.6–5.3), mix well and let sit on ice 20 minutes. 8. Spin at 15,000 rpm for 15 minutes and pour supernatant into a clean plastic tube. 9. Add 20 µg DNase-free RNaseA (as described by Micklos and Freyer, 1990) and incubate for 20
minutes at 37o C. 10. Extract twice to remove the RNase (and other proteins) with a mixture of
phenol:chloroform:isoamyl alcohol (at a ratio of 25:24:1, prepared as described in Section C) followed by one extraction with chloroform and isoamyl alcohol (i.e., no phenol).
11. Add 2 volumes cold absolute ethanol (nucleic acid grade), mix well and let sit on ice for 30 minutes to precipitate the DNA.
12. Spin at 10,000 rpm for 20 minutes. Pour off the supernatant (I save it until I’m sure I have successfully isolated DNA) and let the pellet drain upside down for a few minutes onto a paper towel.Wipe the mouth of the tube to remove any remaining droplets of ethanol.
13. Dissolve the DNA pellet in 0.64 ml sterile H2O and transfer the solution to a 1.7 or 2.0 ml microtube. Add 160 µl 4 M NaCl, mix well and then add 0.8 ml 13% PEG (polyethylene glycol, MW =8000).
14. Mix well by inverting the tube, let it sit on ice for 60 minutes and spin the tube in a microfuge at 14,000 rpm for 10 minutes. Pour off the supernatant.
15. Add one ml freshly-prepared, cold 70% ethanol to rinse the pellet, invert the tube to dry and then dissolve the pellet in 0.5 ml sterile H20. Use a spectrophotometer or gel to determine the DNA concentration, which is usually 0.2–0.8 µg/ µl. One microliter is more than sufficient for transformation of E. coli, and 0.1–0.2 µg can be used per restriction enzyme digest.
C. Preparation and Use of Phenol
1. Preparation of Stock Phenol. Although it was once necessary to distill phenol to obtain a quality high enough for nucleic acid work, it is now possible to purchase it at nucleic acid grade (Gibco-BRL #5509UB, for instance). There are many different methods of preparing phenol for use in DNA work. I’ve used that described below for over 10 years successfully. a. Dissolve all the phenol crystals in the original bottle in distilled water at room temperature,
with occasional swirling. This may take several hours. b. When the crystals are completely dissolved, add one drop of 5 M NaCl. This stock can be
stored in the refrigerator indefinitely.
Chemiluminescent Southern Blot
51
2. Preparation of Phenol:chloroform:isoamyl alcohol (PCI). In contrast to phenol that has been equilibrated with Tris, which is good for only a few days, phenol:chloroform:isoamyl mixtures can be used for months or even a couple of years. a. In an amber bottle, combine equal volumes of phenol and a 24:1 solution of
chloroform:isoamyl alcohol. b. Mix well and let settle for a short period of time to allow separation of phases. Repeat. The
phenol is the lower phase. c. Once the phases are well separated, most of the upper (aqueous) phase can be removed and
discarded. 3. Phenol Extractions Performed with PCI.
a. To extract a solution with phenol, add to the solution a volume of phenol:chloroform:isoamyl alcohol equal to itself.
b. Mix this well by inverting the container or tube several times. Spin at low speed for a couple of minutes to separate the phases. The aqueous solution (DNA + buffer) is the top phase, and the phenol is the bottom phase.
c. Use a pipet to transfer the aqueous layer to a clean tube, being careful not to transfer any of the phenol or precipitated proteins (white, fluffy material at the junction of the two phases).
d. Repeat the extraction (steps a-c). e. Perform a final extraction with chloroform:isoamyl alcohol (24:1) to extract any phenol
present in the aqueous phase. 4. Handling Precautions. Phenol is an acid and is, thus, very corrosive. One should always wear
gloves and goggles and use glass instead of plastic when working with phenol.
D. Mini-Isolation of Genomic DNA From Saccharomyces Using the Smash and Bash Procedure (Rose et al., 1990)
Grow the desired strain of yeast to saturation in YEPD broth (10 g yeast extract + 20 g peptone/950 ml H2O; 50 ml sterile 40% glucose added after autoclaving) 24–36 hr at 30o C with vigorous shaking. Prepare pellets from 14 ml aliquots of this culture for use by students as follows. Divide the culture into four 250 ml centrifuge bottles and centrifuge at 4500 rpm for 15 min at 4o C . Pour off the supernatant and resuspend each pellet in 10 ml sterile H2O. Adjust the volume of each resuspended pellet to 17 ml total. Transfer one ml aliquots of these resuspended cells to 2 ml microfuge tubes with screw caps. Spin for 10–30 seconds in a microfuge to pellet cells and freeze the pellet at –20°°
C until needed. Students should proceed with the DNA isolation method described below, allowing cells to thaw on ice or at room temperature before beginning. 1. To ensure that the pellet has thawed completely, try to resuspend the pellet completely in the
residual liquid in the tube by vortexing. If a clump of cells is visible at the bottom of the tube, the cells may still be partially frozen. Hold the tube in your hand for a minute or two to thaw further and then vortex until it is homogeneous.
2. Add 0.3 ml of Yeast Lysis Buffer [2% Triton X-100, 1% SDS, 100 mM NaCl, 10 mM Tris-Cl (pH 8), 1 mM Na2EDTA] and vortex well again.
3. Pour the contents of a microtube of acid-washed glass beads (0.45 g; Sigma G 8772) into the resuspended cells. Add 0.3 ml of a mixture of phenol:chloroform:isoamyl alcohol (PCI, in the ratio 25:24:1). Wear gloves during this step because phenol is very corrosive. The PCI will denature and remove proteins, including many nucleases present in yeast which could degrade the genomic DNA.
4. Close the top of the tube tightly and vortex vigorously for 5 minutes to break the cells open by smashing and bashing them with the beads.
Chemiluminescent Southern Blot
52
5. Then, add 0.3 ml TE (10 mM Tris-Cl, pH 8; 1 mM Na2EDTA), vortex to mix, and centrifuge for 5 minutes in the microfuge at room temperature. Three layers will be present in the tube: the upper aqueous layer contains the DNA; the middle, beige-colored layer contains denatured proteins and debris; and the lower layer, the glass beads and PCI. Avoiding the middle layer, transfer most of the aqueous (upper) layer to a new 2 ml tube.
6. Add 1.0 ml cold (–20° C) 100% nucleic acid grade ethanol. A precipitate (the DNA!) should be visible at the ethanol/aqueous interface. Mix completely by inverting the tube gently several times. Dispose of the microtube containing the PCI, glass beads, and pellet in an appropriate waste container.
7. Centrifuge for 4 minutes in the microfuge at room temperature to pellet the DNA. Pour the supernatant into the sink and let the tube stand upside down on a paper towel or Kimwipe for a few minutes to drain off any residual ethanol. Resuspend the pellet (it may be small) in 0.6 ml TE and add 30 µl of a 2 mg/ml solution of DNase-free RNaseA (as described by Micklos and Freyer, 1990). Incubate for 10 minutes at 37° C.
8. When this incubation is over, add 15 µl cold 4 M unbuffered ammonium acetate (prepared as described by Sambrook et al., 1989) and mix gently but thoroughly. Then, add one ml cold 100% ethanol, invert the tube several times to mix, and collect the DNA by centrifugation in the microfuge for 4 minutes. The pellet will be smaller now than before the RNase digestion.
9. Again, pour off the supernatant and invert your tube on a paper towel to drain off the ethanol. Be sure that all the ethanol has evaporated by checking that the tube no longer smells like ethanol before continuing. After about 5 minutes when most of the ethanol is gone (you may need to use a corner of a Kimwipe to carefully absorb drops near the mouth of the tube), add 65 µl TE and vortex well to dissolve your DNA, which may take a few minutes. Collect the DNA solution at the bottom of the tube with a 2 second spin in a microfuge.
10. Approximately 10–20 µl are sufficient for a restriction enzyme digest.
E. Large Scale Isolation of Yeast Genomic DNA
1. Grow the desired strain of yeast to saturation in one liter of YEPD and harvest the culture in 250 ml bottles by centrifuging at 4500 rpm for 15 minutes at 4° C.
2. Resuspend each pellet in 8–10 ml sterile water. Transfer two resuspended pellets to a single Oak Ridge tube (38 ml in volume).
3. Centrifuge at 3,000 rpm for 6 minutes, pour off the supernatant and resuspend each pellet in 20 ml sterile 0.9 M sorbitol, 0.1 M EDTA, pH 8.
4. Spin again to pellet the cells, pour off the supernatant, and freeze the pellets in dry ice or freezer. This freeze-thaw step aids in lysis of the cells. These pellets can be stored frozen until ready to use or thawed and used immediately.
5. Thaw the pellets, vortex to break up any clumps and resuspend each pellet in 20 ml sterile 0.9 M sorbitol, 0.1 M EDTA, pH 8.
6. To each pellet, add 20 µl β-mercaptoethanol and 12 mg Yeast Lytic Enzyme (ICN Biochemicals, #152270) to digest the cell walls. Incubate at 37°° C for 45 minutes with slow shaking if possible.
7. Chill in ice briefly and pellet the spheroplasts at 4,000 rpm for 12 minutes. 8. Pour off the supernatant and resuspend each pellet in 20 ml pH 9 TE buffer (10 mM Tris, 1 mM
EDTA, pH 9). 9. Add 20 ml freshly-made Tris-SDS-EDTA lysis buffer (100 mM Tris pH 9, 10 mM EDTA, 2%
SDS), to each tube and quickly invert several times to mix well. Shake or invert vigorously until the solution is homogeneous.
10. Incubate at 65° C for 60 minutes with occasional agitation.
Chemiluminescent Southern Blot
53
11. To each tube, add 4 ml iced, unbuffered 5M K acetate (Sambrook et al., 1989), invert several times to mix thoroughly and let sit in an ice bucket in ice at 4° C overnight or for several hours.
12. Spin at 8,000 rpm for 40 minutes and pour the supernatant from each tube into a clean 250 ml centrifuge bottle.
13. To each bottle, add 2.5 volumes cold, nucleic acid grade 100% ethanol and centrifuge at 2,000 rpm for 5 minutes.
14. Pour supernatant into a 250 ml bottle and save at 4° C until end of procedure. Often more precipitate will form on storage and can also be processed as described below to obtain additional DNA.
15. Add 5–10 ml iced, freshly-made 70% ethanol to each pellet as a rinse, swirl gently and then pour off.
16. Add 16 ml TE buffer, pH 8, to each bottle and agitate gently overnight at 4° C to dissolve the DNA.
17. Transfer the solution to a 50 ml centrifuge tube or an Oak Ridge tube. If insoluble material remains, spin at 4,000 rpm for 10 minutes and pour off the supernatant into a new tube.
18. Add 0.5 ml 5 mg/ml DNase-free RNaseA (as described by Micklos and Freyer, 1990) to the supernatant and incubate at 37° C for 60 minutes.
19. Layer 0.6 volumes isopropanol on top, but do not mix. With a glass rod, spool out the fibrous DNA which forms at the interface.
20. Dissolve the DNA in 1–2 ml TEN buffer (0.15 M NaCl, 10 mM Tris, pH 8, 1 mM EDTA) at 4° C overnight by standing the glass rod and DNA in a tube containing the buffer and using Parafilm to cover securely.
21. An aliquot of the resulting DNA (approximately 10–20 µl) can be digested with restriction enzymes and used for the Southern blot or purified using a CsCl gradient for construction of a genomic library.
F. Purification of a DNA Fragment for Use as a Probe 1. Digest the DNA (usually plasmid DNA prepared as described in Section B) from which the
probe will be made with an appropriate restriction enzyme(s). In calculating the amount of DNA to digest, assume an 80% recovery from the isolation procedure described below and prepare enough DNA to have 0.2 µg of the purified fragment for each hybridization reaction (two small membranes in one tube).
2. Run this digested DNA through an agarose (use only regular, not Lo-melt agarose) prep gel. The gel should contain ethidium bromide and have a single large sample well and one smaller well for the DNA size standard. Under ultraviolet illumination, cut out the desired band with a new, clean razor blade.
3. To break the agarose into small pieces, force the gel slice containing the DNA through a 1 cc or 5 cc syringe (without a needle) into one or more 1.5 or 2 ml microfuge tubes with screw caps and add an approximately equal volume of phenol-chloroform-isoamyl alcohol (PCI, ratio 25:24:1) prepared as described in Section C-2 to each tube.
4. Freeze in dry ice for at least 15–30 minutes or at –20° C for several hours. 5. Without thawing, spin at top speed in a microfuge at 4° C for 15 minutes and transfer the
aqueous supernatant (upper phase) to a new tube, avoiding transferring any gel particles or the bottom pheno l phase. This can be tricky because the gel particles are often intermingled with the aqueous phase. In this case, the particles can be avoided by keeping the bottom of the pipet tip against the wall of the tube and sucking up the aqueous phase slowly.

Chemiluminescent Southern Blot
54
6. Extract the aqueous supernatant twice with equal volumes of PCI and once with an equal volume of freshly-prepared chloroform-isoamyl alcohol (24:1) as described in Section C-3.
7. Add sodium acetate to a final concentration of 0.3 M, mix, and then add 2.5 volumes nucleic acid grade 100% ethanol, which has been stored at –20° C.
8. Mix contents of this tube by inverting several times and allow the DNA to precipitate in dry ice 15 minutes or overnight at –20° C.
9. Spin at 14,000 rpm in a microfuge at 4° C for 15 minutes. 10. Pour off the supernatant and rinse the pellet with fresh, ice cold 70% ethanol and dry by inverting
the tube. Resuspend in sterile water to give a final concentration of 0.1 µg DNA/µl and use 2 µl as probe for each hybridization reaction (one tube containing one or two membranes).
11. Label the desired amount of probe as described in ECL directions.

Chemiluminescent Southern Blot
55
APPENDIX C. Equipment, Supplies, and Vendors
Equipment & Supplies
1. Gel box: Horizon 58 horizontal gel electrophoresis apparatus from Gibco-BRL Catalog # 41060-013. Cost: $230.
2. Power supply for gel box: Model 250 from Gibco-BRL. Catalog # 11066-016. Cost: $350. 3. Comb for gel box: Analytical delrin comb from Gibco-BRL. Eight-tooth; 1.5 mm thick comb.
Catalog # 21065-081. Cost: $25. 4. Gloves: powder-free, PVC, Phoenix-brand from Fisher. Catalog # 1139387. Cost: $10.20 per
pack of 50 gloves. 5. UV transilluminator and camera: Foto/phoresis I UV Documentation Station from Fotodyne.
Catalog # 1-1435. Cost: $1410. 6. Ruler: fluorescent ruler from Clontech (10 rulers per pack). Catalog # 1907-3. Cost: $30 per
pack. 7. Box, plastic, for rinsing gel and membrane: Rubbermaid-brand “Servin’Saver”, 470 ml (2 cup)
capacity, 15 cm ×15 cm ×5 cm, from supermarket. Cost: $4. 8. Incubator shaker: Innova 4000 microprocessor-controlled benchtop incubator shaker from New
Brunswick Scientific Catalog #M1192-0000. Cost $4700. 9. Forceps: Filter forceps from Baxter/Scientific Products. Catalog # D2568-1. Cost: $18. 10. Membrane: Hybond-N+, nylon membranes from Amersham Life Sciences. One roll of 0.3 m ×3
m material. Catalog # RPN 303B. Cost: $161. 11. Chromatography paper: Whatman Grade 3MM Chr. (a) for wicks, 5 cm ×100 cm roll, Whatman
catalog #3030-653. Cost: $70. (b) for blotters and folders, 10 cm × 100 cm roll, Whatman catalog # 3030-6472. Cost: $102. (c) for liner for cassettes, 20 cm × 25 cm sheets, Whatman catalog #3030-866. Cost: $38. All can be purchased from Fisher.
12. Desiccator: Space saver vacuum desiccator from VWR. Catalog # 24988-197. Cost $61. 13. Test tube rack: “Totally tubular tube support rack,” complete unit of 4 neon colored cubes and 1
natural color support tray, from USA/Scientific Plastics. Catalog # 2344-1040. Cost: $38 per unit.
14. Centrifuge tubes (50 ml) for hybridization oven: Falcon Blue Max graduated tubes from Fisher. Cost: $196 per case of 500.
15. Labeling kit: Enhanced chemiluminescence (ECL) direct nucleic acid labeling and detection kits (non-radioactive) from Amersham. Catalog # RPN 3000 (for 2000 cm2 of membrane) Cost: $330.
16. Hybridization incubator: Model #400 from Robbins Scientific, with a ten- tube rotor for 38 mm ×300 mm glass tubes. Cost: $2995. In addition, order plastic-coated glass tubes (Catalog # 1040-03-0), silicon 0-rings for 50 cc tubes (catalog # 1040-14-0), and two six-place racks or glass tubes (Catalog # 1040-11- 0).
17. Film cassette: Exposure cassette from Sigma. Catalog # E9385. Cost: $115. 18. Labels for film: “Radtape”, ten 10 cm × 15 cm phosphorescent sheets, from Diversified Biotech,
Inc.. Catalog # RAD-10. Cost: $49. 19. Film: X-ray, Kodak-brand Scientific Imaging Film, X-OMAT-AR, (package of 50) from Fisher.
Kodak Catalog # 165-1454. Cost: $97.
Chemiluminescent Southern Blot
56
Vendors
1. Amersham: 2636 S. Clearbrook Dr., Arlington Heights, IL 60005, 1-800-323-9750. 2. Baxter/Scientific Products, 100 Raritan Center Parkway, Edison, New Jersey 08818, 1-800-234-
5227. 3. Clontech: 4030 Fabian Way, Palo Alto, CA 94303-4607, 1-800-662-2566. 4. Diversified Biotech, Inc.: 46 Marcellus Drive, Newton Centre, MA 02159, (607) 323-5709. 5. Fisher Scientific: 52 Fadem Road, Springfield, NJ 07081, 1-800-766-7000. 6. Fotodyne: 950 Walnut Ridge Drive, Hartland, WI 53029, 1-800-362-3686. 7. Gibco-BRL: P.O. Box 78, Grand Island, NY 14072-0068, 1-800-828-6686. 8. New Brunswick Scientific Co., Box 4005, 44 Talmadge Rd., Edison, NJ 08818-4005, 1-800-631-
5417. 9. Pharmacia: 800 Centennial Avenue, PO Box 1327, Piscataway, NJ 08855-1327, 1-800-526-3593. 10. Robbins Scientific: 814 San Aleso Ave., Sunnyvale, CA 94086-141, 1-800-752-8585. 11. Sigma Chemicals: PO Box 14508, St. Louis, MO 63178-9916, 1-800-325-3010. 12. USA/Scientific Plastics: PO Box 3565, Ocala, FL 34478, 1-800-522-8477. 13. VWR: PO Box 626, Bridgeport, NJ 08014, 1-800-234-9300.
Chemiluminescent Southern Blot
57
APPENDIX D. Preparation of Materials
Southern Blot I
1. Agarose (1.0%) : Add 110 ml TAE buffer to one gram agarose in a 250 ml Erlenmeyer flask. (Extra water allows for evaporation.) Allow one flask for four pairs of students. Autoclave (without caps) for seven minutes in a pan with about 1.25 cm of water. Cap securely but not air-tight and place flasks with lead weight rings in a 65–70° C water bath.
2. HCl (0.25 N) : Put 3916.5 ml of deionized water into an eight- liter carboy. Under a hood, add 83.5 ml concentrated (12 N) HCl slowly. Stir or swirl gently.
3. NaOH (0.4 N): Put 3840 ml of deionized water into an eight- liter carboy. Under a hood, add 160 ml of 10 N NaOH (#SS255-1 from Fisher Scientific) slowly. Stir.
4. SSC (Saline Sodium Citrate) (20× ) : Dissolve 175.3 g of NaCl and 88.2 g of sodium citrate in 800 ml of deionized water. Adjust the pH to 7.0 with a few drops of 10 N NaOH. Bring the volume to one liter with water. Sterilize by autoclaving.
5. SSC (Saline Sodium Citrate) (2× ) : Add 400 ml of SSC (20× ) to 3600 ml deionized water in an eight- liter carboy.
6. EDTA (0.5M), pH 8.0: Add 186.12 g EDTA to 800 ml of deionized water. Because EDTA goes into solution at pH 8, add approximately 30 ml of 10 N NaOH until the solution clears. Bring volume up to one liter.
7. TAE Buffer (50× ) : Start with 600 ml of deionized water. Add 242 grams of Tris Base (final concentration of 40 mM). (Tris Base has approximately 200 ml displacement volume.) Add 57.1 ml of glacial acetic acid, then 100 ml of 0.5 M EDTA (pH 8.0). Bring volume up to one liter.
8. TAE Buffer (1× ) : Add 160 ml of the 50× TAE stock to 7840 ml of deionized water in an eight-liter carboy.
9. Ethidium bromide staining solution (2.0 µg per ml): Add 20 µl of stock ethidium bromide solution (10 mg per ml from Sigma, catalog # E1510) to 100 ml of 1×TAE in staining tray.
10. Gel loading dye plus RNase a. Prepare 0.25% Bromophenol Blue plus 15% Ficol (Type 400 from Pharmacia) b. To make up 50 ml:
1. Add 7.5 g Ficol to approximately 30 ml of deionized water in a 125 ml Erlenmeyer flask. 2. Add 0.125 g Bromophenol Blue or to desired color; stir for 1/2 hour. 3. Transfer to a graduated cylinder; bring volume up to 50 ml. 4. Store at room temperature. 5. Add 40 µl RNase to 200 µl dye for students’ use. Test for lack of DNase (inability to
degrade DNA) before using because different lots may vary. 11. Packet for building one transfer stack (Use gloves for cutting chromatography paper and
membranes.) a. Nylon membrane (1): 6.0 cm × 8.3 cm b. Chromatography paper
1. wicks (3): 5.0 cm × 7.0 cm 2. blotter (1): 10.0 cm × 13.0 cm
c. C-fold paper towels cut in 1/2 (15): 2 cm × 10 cm × 13 cm d. Baggies, sandwich size (3): 14 cm × 16 cm
12. Folder (chromatography paper) for storing membrane (1): 10.0 cm × 16 cm
Chemiluminescent Southern Blot
58
Southern Blot II
1. Detection reagents #1 and #2. Use directly from Amersham kit. Aliquot 2 ml into 14 ml tubes that have been color-coded: black (#1) and magenta (#2). Aliquot in dim light, cover with aluminum foil, and refrigerate for up to a week.
2. Hybridization Buffer Add 2.922 g NaCl to 100 ml hybridization buffer from kit. Add 5 g blocking reagent from kit. Stir at room temperature for an hour. The buffer can be aliquoted into sterile plastic 15 ml tubes and stored at –20° for at least three months.
3. Primary Wash Buffer:**Note: Urea is toxic. Use caution when handling .To make 20 liters, put 6 liters of deionized water into a 20 liter carboy, add 500 ml 20×SSC then, under the hood, add 7200 g urea slowly while stirring. Bring volume up to nearly 19 liters with water. Add 80 g SDS and adjust the volume. Store in two to four liter glass flasks with tight caps at 2°–8° C for a year or more. In the lab, put out two (one liter) flasks. Leave the buffer in a 40.5° C incubator during the lab.
4. Secondary wash buffer (SSC 2X) See Southern Blot I. 5. Labeled Probe: Each probe = 2 µl DNA
# Probes (z ) = # students /4 + 2 extra 2 µl probe DNA × z 4 µl water (ECL) × z ------ 6 µl × z to boil for 5 minutes, then on ice for 5 minutes then add 6 µl × z labeling reagent and 6 µl × z gluteraldehyde to 37° C for ten minutes. Add 18 µl per centrifuge tube.
6. Exposing and developing film: a. Use two 20.3 cm × 25.4 cm cassettes. b. Label cassette with room number and TA’s name. c. Place a piece of chromatography paper (19 cm ×24 cm) in the cassette. d. Tape the membranes on the paper (7 to 8 membranes per cassette). e. Use “Radtape” with the students’ initials in magic marker at the corner of each membrane. f. Expose the Radtape to bright light for 10 seconds before adding film. g. In darkroom, bend upper right corner of film and chromatography paper for orientation. h. Expose film for 15 minutes. (More or less depending on trial run.) i. Develop film. j. If probe/DNA complex is faint, put another sheet of film in and leave for several hours or
overnight. k. Students should return to lab the next day to pick up the longer exposures.
Chemiluminescent Southern Blot
59
APPENDIX E. Daily Sequence of Events for an Afternoon Lab
Southern Blot I: Electrophoresis And Transfer
In the morning:
1. Autoclave agarose and put in water bath. 2. Put film out at room temperature, three boxes per camera.
Before lab:
1. Put on ice: a. Student-digested samples of pRAS2 and brewing yeast genomic DNA b. Prepared digests of Baker’s yeast genomic DNA c. One Kb Ladder d. Loading dye with RNAse A
2. Clean the roller assembly of cameras if cameras are empty. 3. Check buffers:
a. Refill TAE bottles if necessary. b. Refill 1×TAE in eight- liter carboys. c. Refill 0.25 N HCl carboys; check pH (should be 1). d. Refill 0.4N NaOH carboys; check pH (should be 14). e. Refill 2× SSC carboys; check pH, (should be 7).
4. Put out transfer packets and bench paper squares (16 per lab room). 5. Change the colored dots to colors of the current day/night lab section. 6. Replenish or change trays of ethidium bromide. 7. Replenish clear tubes (0.65 ml) for mixing samples. 8. Check paper towels, gloves, pipet tips, etc.
Southern Blot II: Hybridization And Detection
Afternoon the day before lab:
1. Set incubator shaker and hybridization oven at 40.5° C. 2. Transfer hybridization buffer from freezer to refrigerator. 3. Transfer X-ray film from refrigerator to room temperature.
In the morning:
1. Vortex hybridization buffer and place tubes in the incubators to warm. (One tube of buffer for two pairs of students.)
2. Put primary wash buffer flasks in the incubator to warm. (Two one-liter flasks per room.) 3. Check and replenish eight-liter carboys of secondary wash buffer.
Chemiluminescent Southern Blot
60
Before lab :
1. Prepare probe 15 minutes before class, and store on ice. 2. Label the cassettes with the color tape of the day and room number. 3. Put a sheet of chromatography paper in the cassette. 4. Put out envelope with Radtape pieces. 5. Put out colored dot markers for the day. 6. Put out 50 ml tubes, one per two pairs of students. 7. Replenish paper towels, gloves, pipet tips, etc. 8. Put out student membranes.
During lab:
1. Set out detection reagents (covered with aluminum foil) on ice.
Methods References
Sambrook, J., Fritsch, E. F., and T. Maniatis. 1989. Molecular Cloning: A Laboratory Manual. 2nd Ed., Cold Spring Harbor Laboratory Press, Cold Spring Harbor, N.Y.
Micklos, D. A. and G. A Freyer. 1990. DNA Science: A First Course in Recombinant DNA Technology. Cold Spring Harbor Laboratory Press and Carolina Biological Supply Company, Cold Spring Harbor, NY, 477 pages.
Rose, M. D., F. Winston, and P. Hieter. 1990. Methods in Yeast Genetics, A Laboratory Course Manual. Cold Spring Harbor Laboratory Press, Cold Spring Harbor, N.Y., 198 pages.