ldms assay training - pk assay · the pk assay module. ldms preview tab listing ... an...
TRANSCRIPT
LDMS Training Manual Pharmacology Assay
Pharmacology Assay The LDMS supports data entry for pharmacology (PK) assays. When results are obtained, they can be manually entered or pasted into the proper data entry screens in the Assay module of the LDMS. Before entering pharmacology assay results in the Assay module, a template for each drug combination must be designed.
Templates
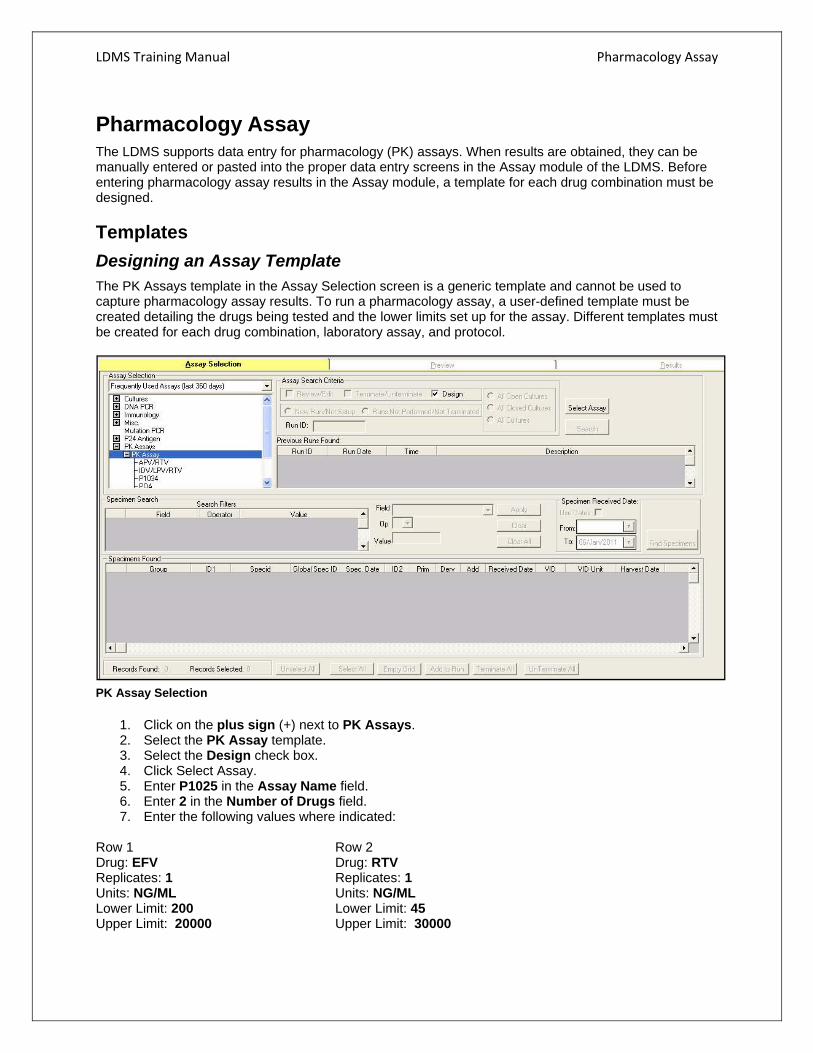
Designing an Assay Template The PK Assays template in the Assay Selection screen is a generic template and cannot be used to capture pharmacology assay results. To run a pharmacology assay, a user-defined template must be created detailing the drugs being tested and the lower limits set up for the assay. Different templates must be created for each drug combination, laboratory assay, and protocol.
PK Assay Selection
1. Click on the plus sign (+) next to PK Assays. 2. Select the PK Assay template. 3. Select the Design check box. 4. Click Select Assay. 5. Enter P1025 in the Assay Name field. 6. Enter 2 in the Number of Drugs field. 7. Enter the following values where indicated:
Row 1 Row 2 Drug: EFV Drug: RTV Replicates: 1 Replicates: 1 Units: NG/ML Units: NG/ML Lower Limit: 200 Lower Limit: 45 Upper Limit: 20000 Upper Limit: 30000
LDMS Training Manual Pharmacology Assay
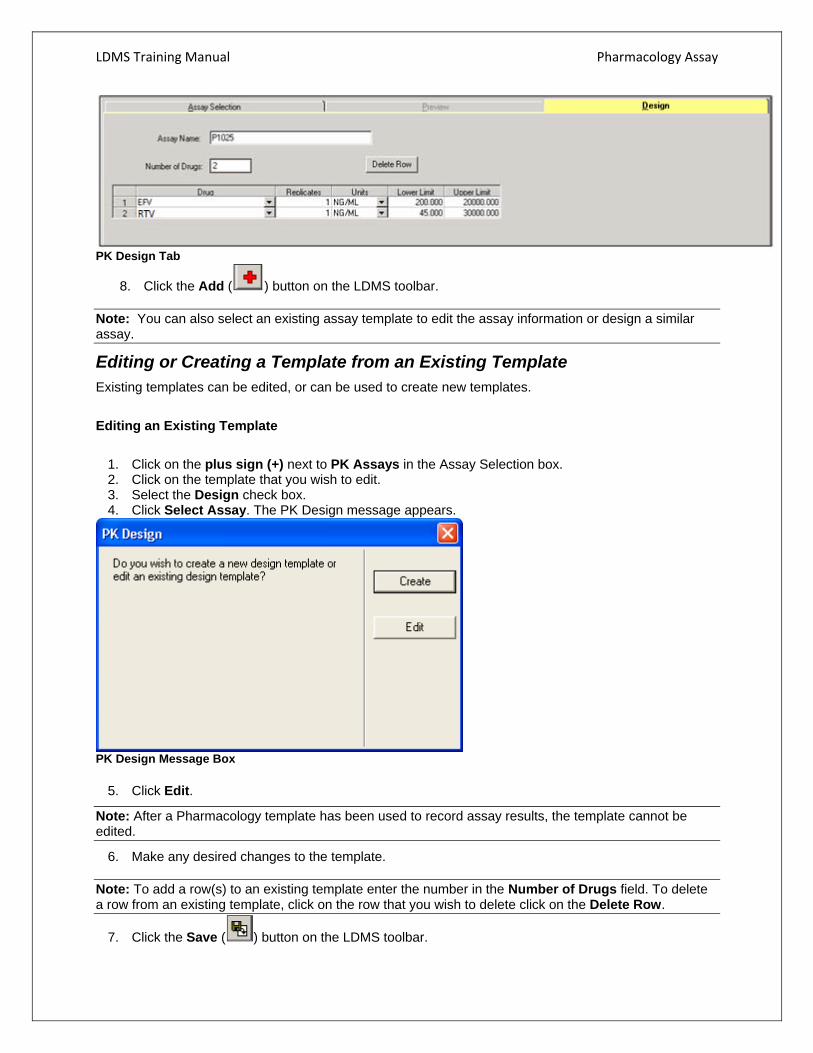
PK Design Tab
8. Click the Add ( ) button on the LDMS toolbar.
Note: You can also select an existing assay template to edit the assay information or design a similar assay.
Editing or Creating a Template from an Existing Template Existing templates can be edited, or can be used to create new templates.
Editing an Existing Template
1. Click on the plus sign (+) next to PK Assays in the Assay Selection box. 2. Click on the template that you wish to edit. 3. Select the Design check box. 4. Click Select Assay. The PK Design message appears.
PK Design Message Box
5. Click Edit.
Note: After a Pharmacology template has been used to record assay results, the template cannot be edited.
6. Make any desired changes to the template.
Note: To add a row(s) to an existing template enter the number in the Number of Drugs field. To delete a row from an existing template, click on the row that you wish to delete click on the Delete Row.
7. Click the Save ( ) button on the LDMS toolbar.
LDMS Training Manual Pharmacology Assay
Creating a New Template from an Existing Template 8. Click on the plus sign (+) next to PK Assays in the Assay Selection box. 9. Click on the template that you wish to edit. 10. Select the Design check box. 11. Click Select Assay. The PK Design message appears. 12. Click Create. 13. Follow steps 4–11 in the Designing an Assay Template section.
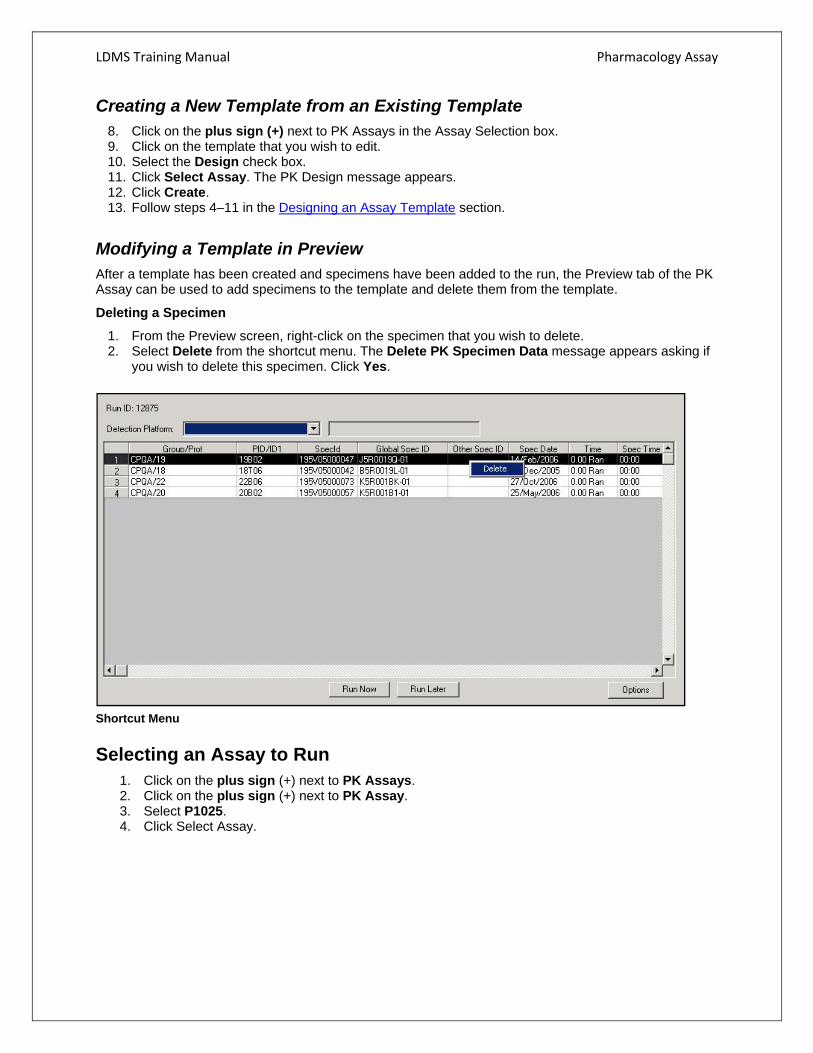
Modifying a Template in Preview After a template has been created and specimens have been added to the run, the Preview tab of the PK Assay can be used to add specimens to the template and delete them from the template.
Deleting a Specimen
1. From the Preview screen, right-click on the specimen that you wish to delete. 2. Select Delete from the shortcut menu. The Delete PK Specimen Data message appears asking if
you wish to delete this specimen. Click Yes.
Shortcut Menu
Selecting an Assay to Run 1. Click on the plus sign (+) next to PK Assays. 2. Click on the plus sign (+) next to PK Assay. 3. Select P1025. 4. Click Select Assay.

LDMS Training Manual Pharmacology Assay
Searching for Specimens to Test
Searching for Specimens
1. Select Group from the Field box. 2. Select ACTG/IMPAACT from the Value box. 3. Click Add Filter 4. Select Protocol/ID2 from the Field box. 5. Select = from the Operator box. 6. Select P1025 from the Value box. 7. Click Add Filter. 8. Click Find Specimens.
Selecting Specimens to Populate a Plate 1. Select three of the specimens. 2. Click Add to Run. The Preview tab displays.
LDMS Training Manual Pharmacology Assay
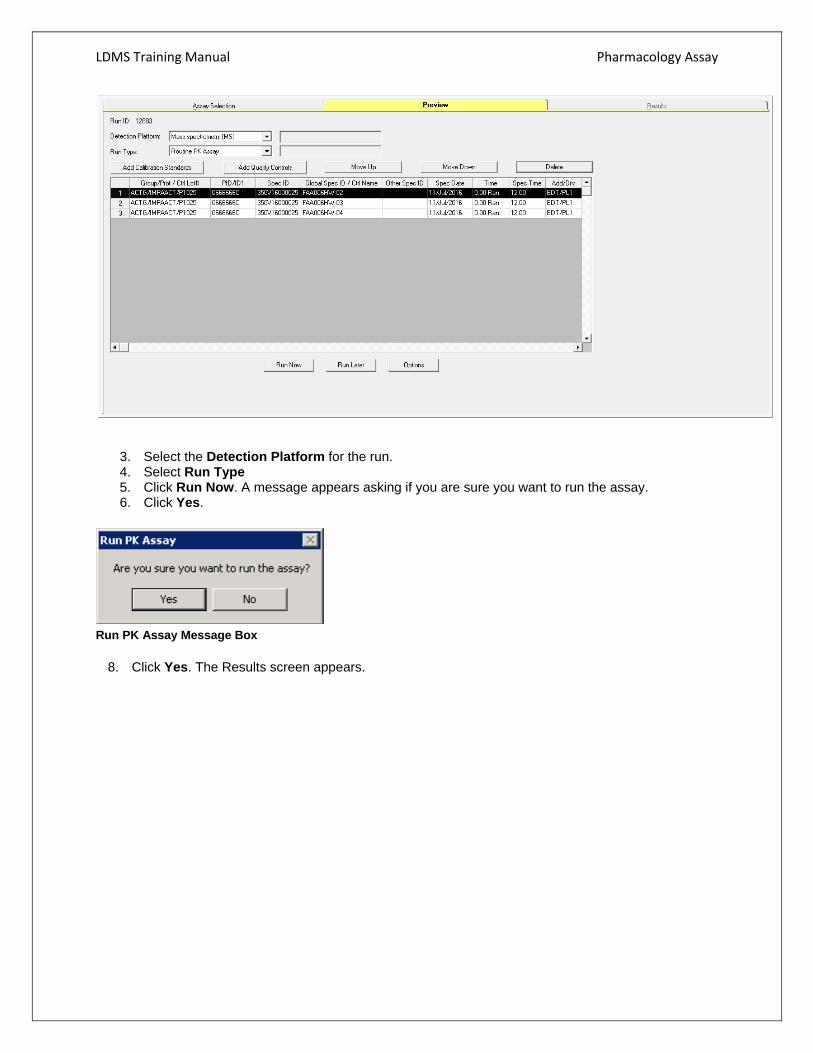
3. Select the Detection Platform for the run. 4. Select Run Type 5. Click Run Now. A message appears asking if you are sure you want to run the assay. 6. Click Yes.
Run PK Assay Message Box
8. Click Yes. The Results screen appears.

LDMS Training Manual Pharmacology Assay
Traditional View Results Screen
9. Click on the first specimen in the top grid and enter the following results: EFV: 500 RTV: 600
10. Click on the second specimen in the top grid and enter the following results: EFV: 2000 RTV: 15000
11. Click on the third specimen in the top grid and enter the following results: EFV: 10000 RTV: NA
Note: To enter NA for a result in traditional format, right-click in the result field and select No Result Obtained.
12. Select the date that the specimens were run at the lab from the Assay Date box. 13. Click Calculate. The Calculate PK Assay Results message appears. 14. Click Yes. You will be prompted to enter the Daily/Run lower and upper limits for each drug
tested on the run. Note: Traditional view allows the lab to enter the patient results manually and will only show one patient’s results at a time. Spreadsheet view allows the lab to view the entire run on one screen and resembles an Excel format. The data can be viewed with the drugs reported in columns or rows. In Spreadsheet View, the lab has the ability to manually enter results in individual cells or copy and paste results. To report your results in Spreadsheet View, refer to the Reporting Results in Spreadsheet View section.
LDMS Training Manual Pharmacology Assay
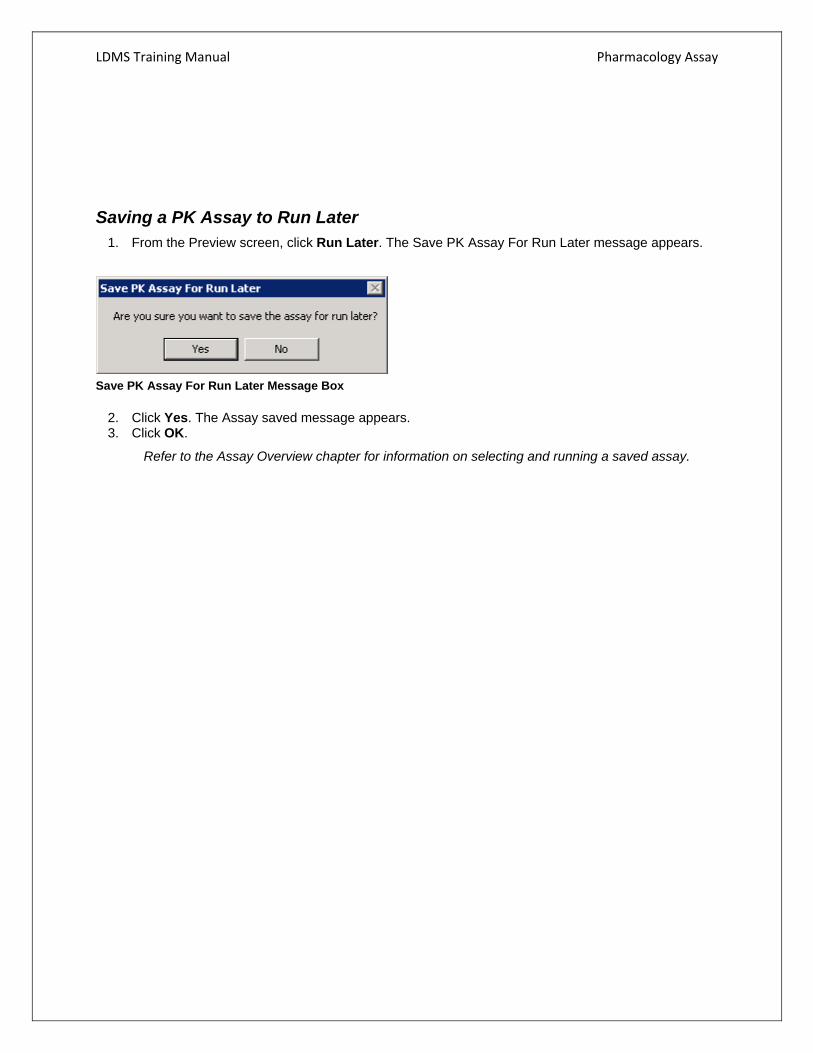
Saving a PK Assay to Run Later 1. From the Preview screen, click Run Later. The Save PK Assay For Run Later message appears.
Save PK Assay For Run Later Message Box
2. Click Yes. The Assay saved message appears. 3. Click OK.
Refer to the Assay Overview chapter for information on selecting and running a saved assay.
LDMS Training Manual Pharmacology Assay
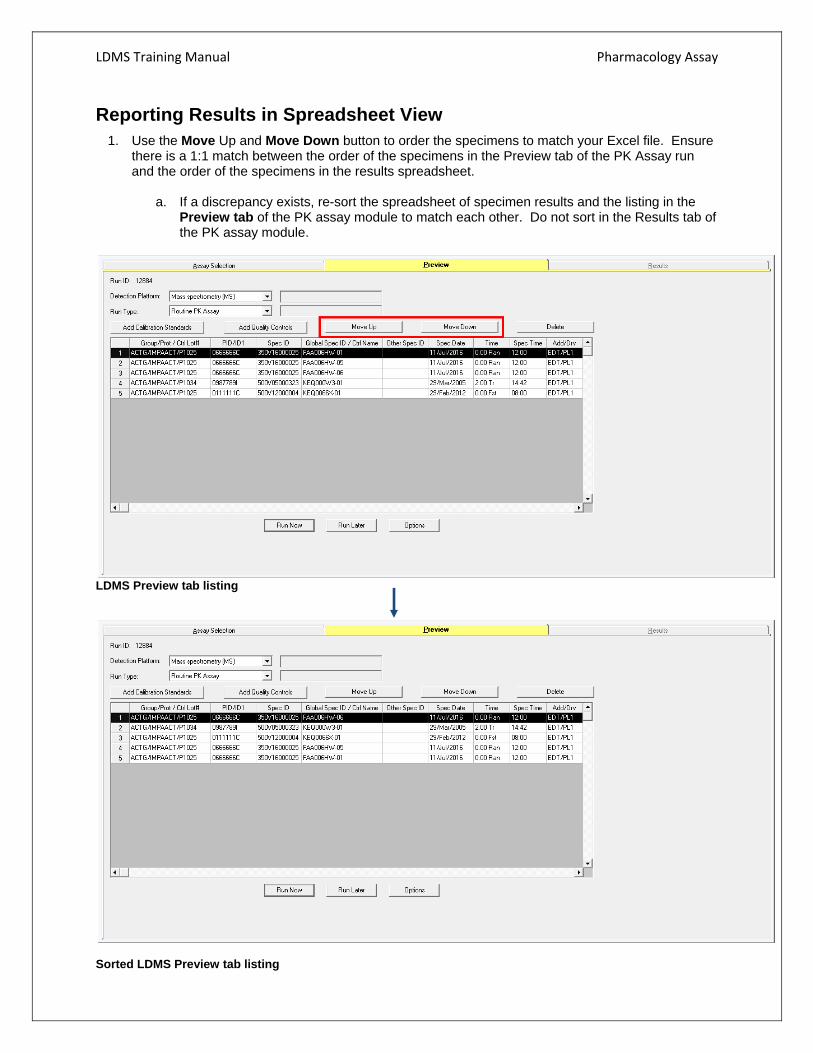
Reporting Results in Spreadsheet View 1. Use the Move Up and Move Down button to order the specimens to match your Excel file. Ensure
there is a 1:1 match between the order of the specimens in the Preview tab of the PK Assay run and the order of the specimens in the results spreadsheet.
a. If a discrepancy exists, re-sort the spreadsheet of specimen results and the listing in the Preview tab of the PK assay module to match each other. Do not sort in the Results tab of the PK assay module.
LDMS Preview tab listing
Sorted LDMS Preview tab listing
LDMS Training Manual Pharmacology Assay
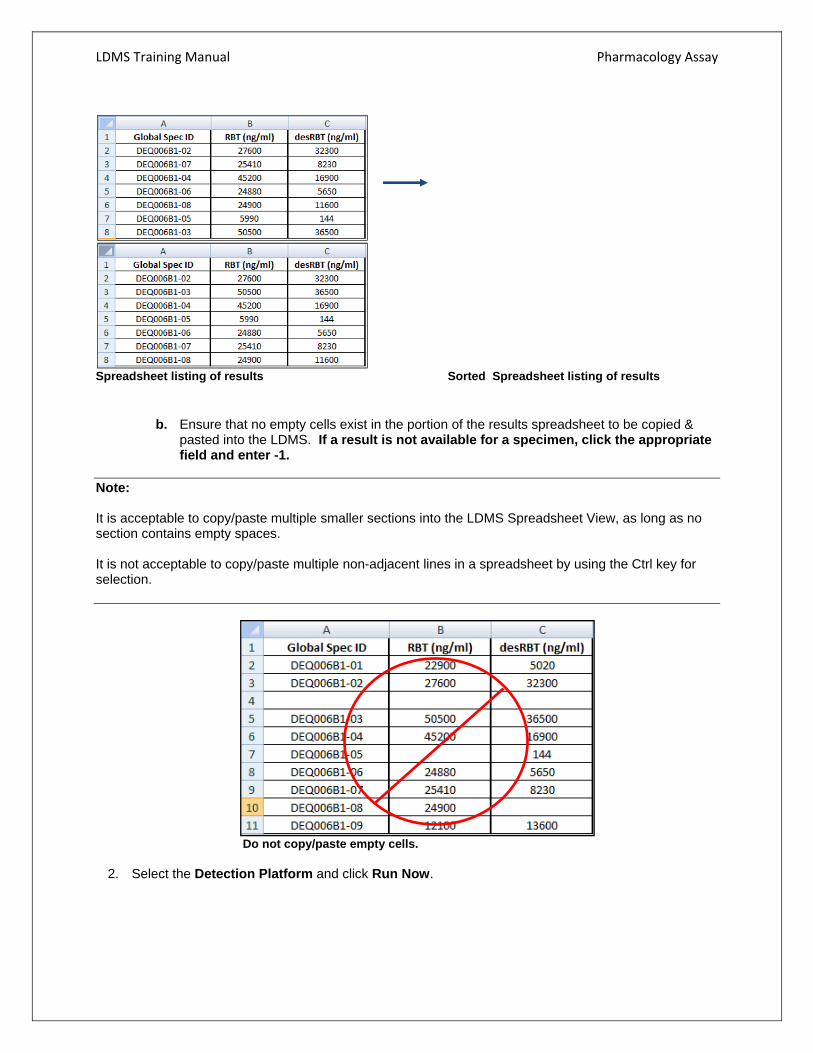
Spreadsheet listing of results Sorted Spreadsheet listing of results
b. Ensure that no empty cells exist in the portion of the results spreadsheet to be copied & pasted into the LDMS. If a result is not available for a specimen, click the appropriate field and enter -1.
Note: It is acceptable to copy/paste multiple smaller sections into the LDMS Spreadsheet View, as long as no section contains empty spaces. It is not acceptable to copy/paste multiple non-adjacent lines in a spreadsheet by using the Ctrl key for selection.
Do not copy/paste empty cells.
2. Select the Detection Platform and click Run Now.
LDMS Training Manual Pharmacology Assay
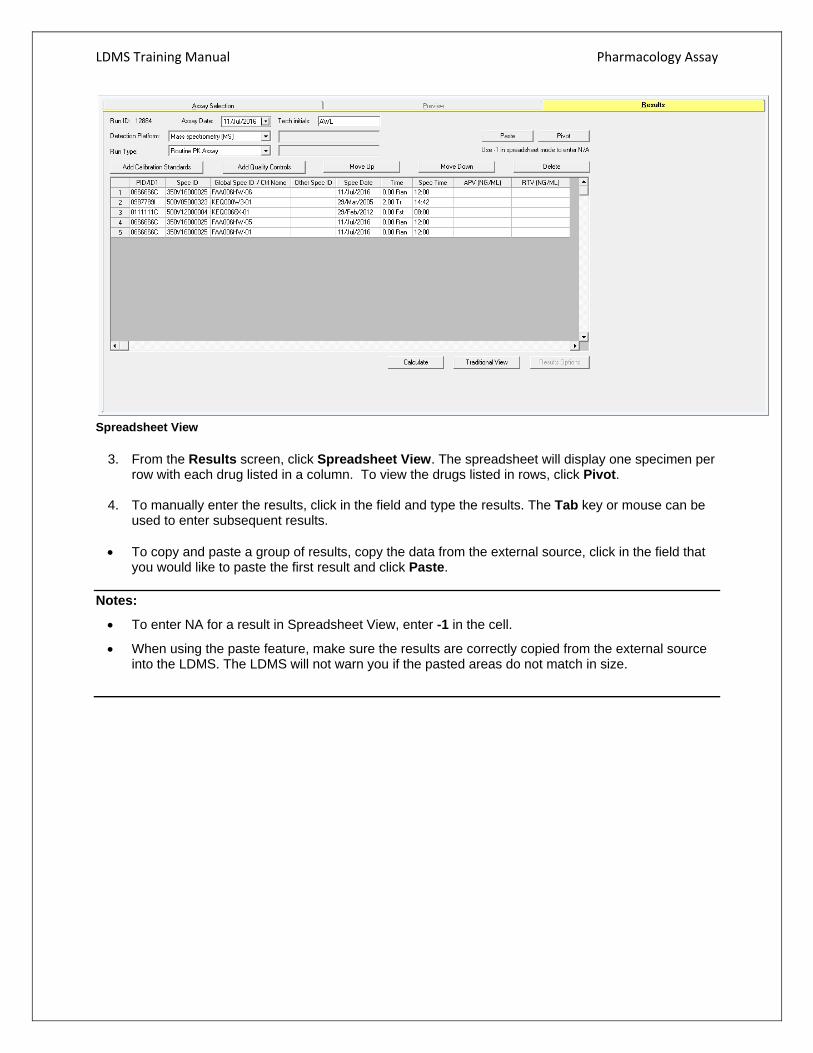
Spreadsheet View
3. From the Results screen, click Spreadsheet View. The spreadsheet will display one specimen per
row with each drug listed in a column. To view the drugs listed in rows, click Pivot.
4. To manually enter the results, click in the field and type the results. The Tab key or mouse can be used to enter subsequent results.
To copy and paste a group of results, copy the data from the external source, click in the field that
you would like to paste the first result and click Paste. Notes:
To enter NA for a result in Spreadsheet View, enter -1 in the cell.
When using the paste feature, make sure the results are correctly copied from the external source into the LDMS. The LDMS will not warn you if the pasted areas do not match in size.

LDMS Training Manual Pharmacology Assay
Results entered via copy/paste
5. Perform a visual review and any required edits to the results in the LDMS assay spreadsheet. 6. Select the date the samples were assayed in the lab from the Assay Date box. 7. Click Calculate. The Calculate PK Assay Results message appears, asking if you are sure you
want to calculate the assay results. 8. Click OK. The LDMS will calculate censors based on the design lower limit and run lower limit.
Reviewing and Editing Pharmacology Assay Results The Review/Edit screen allows you to:
Recalculate All Censors View/Modify Run Lower Limits Display System Censors Display User Censors
Refer to the Assay Overview chapter for information on how to search for a run to review. Note: To allow ACTG & IMPAACT data to be available for statistical analysis purposes, the data must be reviewed.
1. Select the appropriate PK assay from the available assays listing.
2. Check the Review/Edit box. 3. Click Search. The Previous Runs Found grip populates with the available runs.
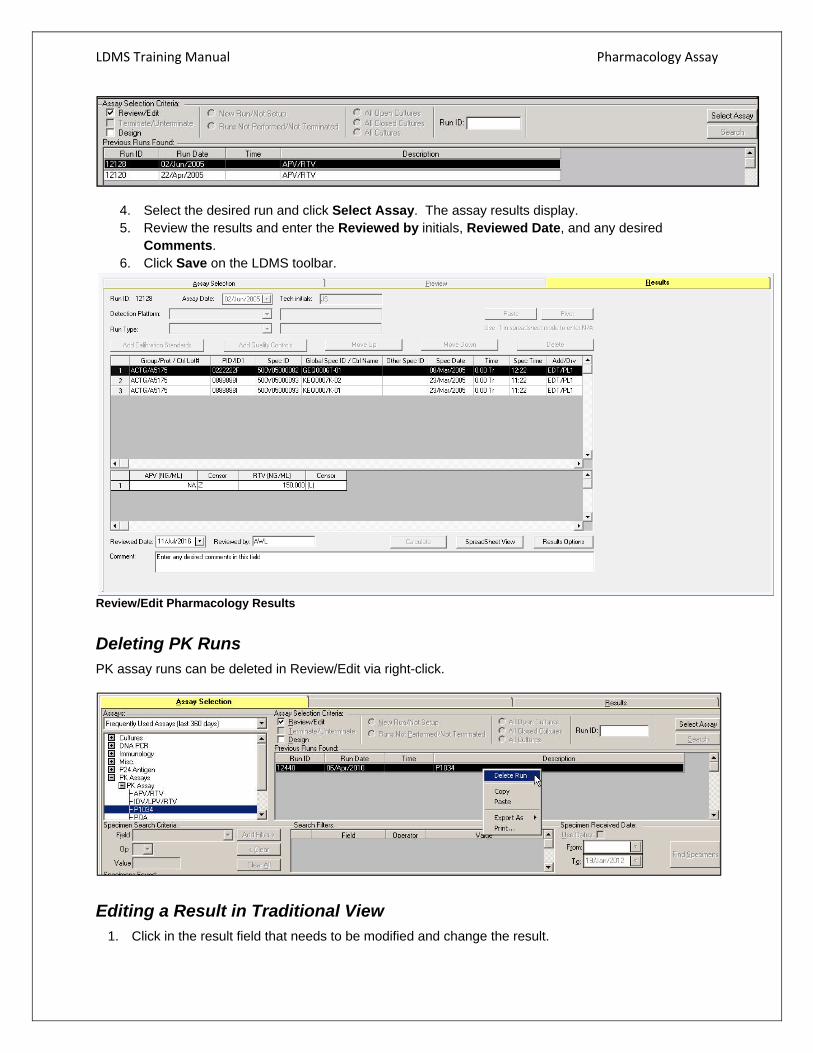
LDMS Training Manual Pharmacology Assay
4. Select the desired run and click Select Assay. The assay results display. 5. Review the results and enter the Reviewed by initials, Reviewed Date, and any desired
Comments. 6. Click Save on the LDMS toolbar.
Review/Edit Pharmacology Results
Deleting PK Runs PK assay runs can be deleted in Review/Edit via right-click.
Editing a Result in Traditional View 1. Click in the result field that needs to be modified and change the result.

LDMS Training Manual Pharmacology Assay
Note: If a result is not available (NA) for a specimen, right-click in the field and a shortcut menu appears. Select No Result Obtained from the shortcut menu. “NA” appears in the result grid.
2. Click Options. The Results Options dialog box appears. 3. Click Recalculate All Censors. 4. Click OK. The LDMS automatically recalculates the censors for all of the specimens on the run.
Editing a Result in Spreadsheet View
1. Click in the result field that needs to be modified and change the result.
Note: If a result is not available (NA) for a specimen, click in the appropriate field and enter -1.
2. Click Options. The Results Options dialog box appears. 3. Click Recalculate All Censors. 4. Click OK. The LDMS automatically recalculates the censors for all of the specimens on the run.

LDMS Training Manual Pharmacology Assay
Censors
The LDMS has three types of censors for pharmacology data: system generated specimen and run censors, user-defined specimen censors and test assignment censors. Test assignment censors are assigned by the user in the Specimen Management module of the LDMS and provide an explanation of why a result will not be available for a particular specimen.
An interpretation of the test assignment censor codes is provided below:
Censor Code (text) Description
CTM Contaminated COR Controls Out of Range EQF Equipment Failure LBE Lab Error LBA Lab Accident MSW Missing Well QNS Quantity Not Sufficient WCT Wrong Controls OUT Resulted Outside LDMS NPA Sample Drawn Without Patient Adherence to Regimen PSW Sample not Drawn Within Protocol Specified Window STO Specimen Too Old to Run on Test
System-generated censors are automatically assigned by the LDMS in the Assay module during the algorithm/calculation processes. The user is unable to remove a system-generated censor code.
Censor Code (text) Description Validity of Result
A Invalid. Greater than the upper limit, dilute and repeat
Invalid
B Below Quantifiable Limit Valid L Lower Limit Adjusted Up for this Run Valid R Repeat (With L system censor only) Invalid F Failed Invalid H Unacceptable HQC Invalid M Unacceptable MQC Invalid Q Unacceptable LQC/ LQC1/LQC2 Invalid I Unacceptable HOQ Invalid
User-defined censors are assigned by the user in the Assay module of the LDMS after the assay results have been entered into the LDMS. If a result has a user censor applied that indicates that the result is invalid, that result may be removed from the final LDMS view.
Censor Code (text) Description Validity of Result
A Invalid. Greater than the upper limit. Dilute and repeat
Invalid
B Below Quantitation Limit or No Peak Valid
D Drug not required to be assayed Valid, but removed from final view
O QC Out of Range. Dilute and Repeat Invalid
LDMS Training Manual Pharmacology Assay
Censor Code (text) Description Validity of Result
P Not Able to Interpret Results Invalid U Sample Diluted Valid X Per lab, sample must be repeated Invalid Z No Result, Lab Issue Invalid
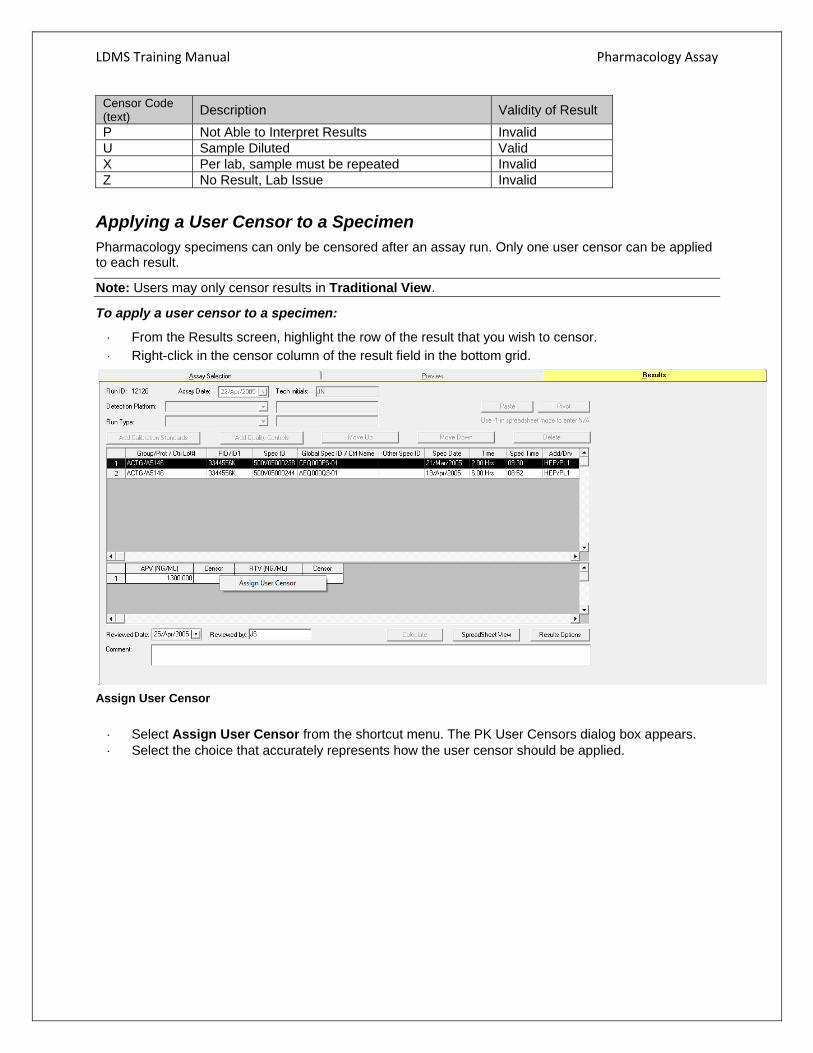
Applying a User Censor to a Specimen Pharmacology specimens can only be censored after an assay run. Only one user censor can be applied to each result.
Note: Users may only censor results in Traditional View.
To apply a user censor to a specimen:
From the Results screen, highlight the row of the result that you wish to censor. Right-click in the censor column of the result field in the bottom grid.
Assign User Censor
Select Assign User Censor from the shortcut menu. The PK User Censors dialog box appears. Select the choice that accurately represents how the user censor should be applied.
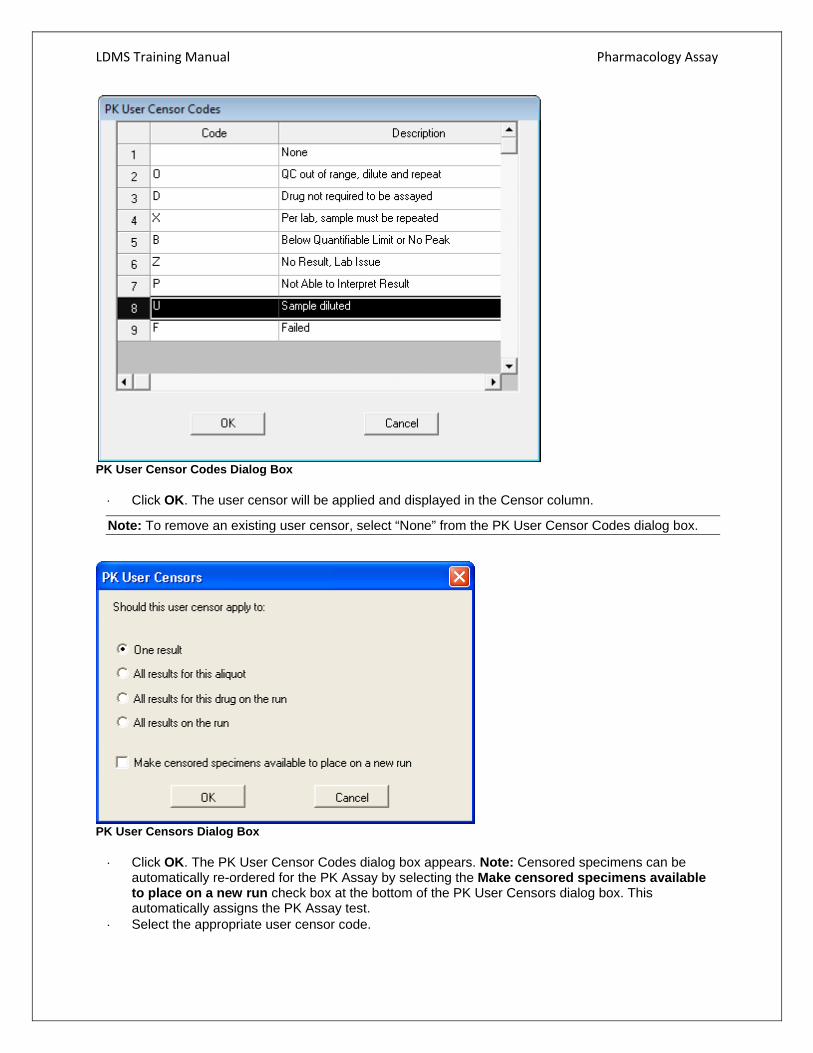
LDMS Training Manual Pharmacology Assay
PK User Censor Codes Dialog Box Click OK. The user censor will be applied and displayed in the Censor column.
Note: To remove an existing user censor, select “None” from the PK User Censor Codes dialog box.
PK User Censors Dialog Box Click OK. The PK User Censor Codes dialog box appears. Note: Censored specimens can be
automatically re-ordered for the PK Assay by selecting the Make censored specimens available to place on a new run check box at the bottom of the PK User Censors dialog box. This automatically assigns the PK Assay test.
Select the appropriate user censor code.
LDMS Training Manual Pharmacology Assay
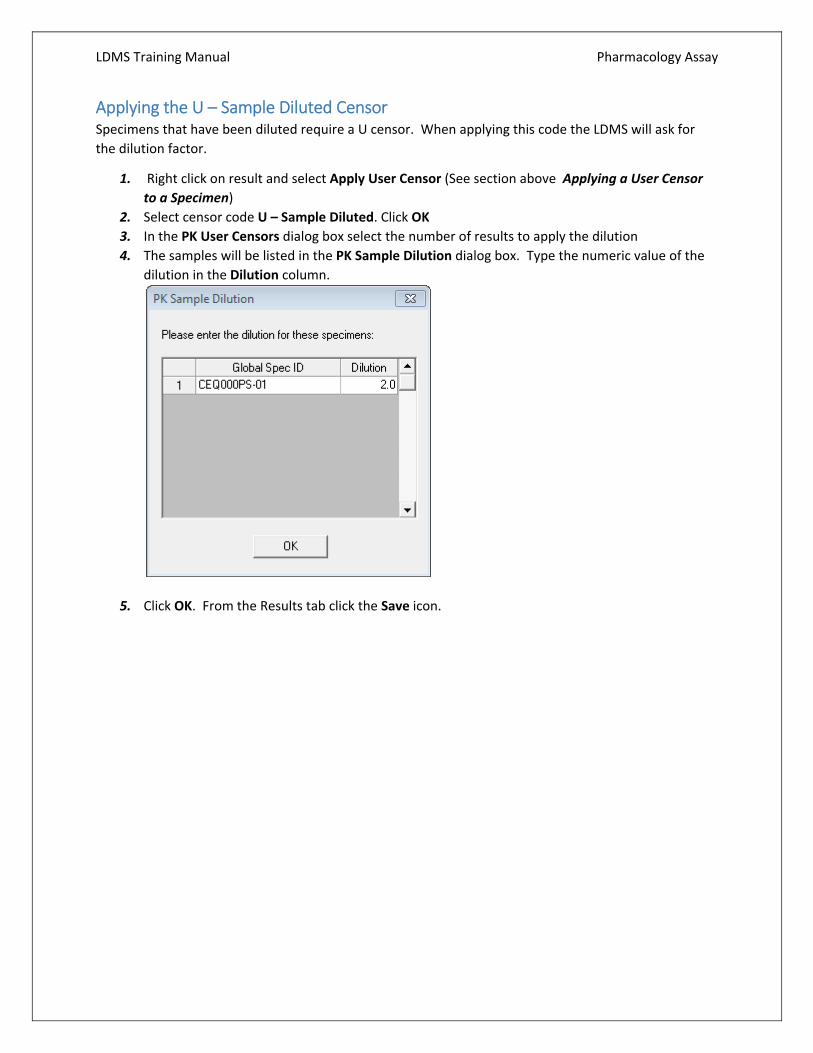
Applying the U – Sample Diluted Censor Specimens that have been diluted require a U censor. When applying this code the LDMS will ask for
the dilution factor.
1. Right click on result and select Apply User Censor (See section above Applying a User Censor
to a Specimen)
2. Select censor code U – Sample Diluted. Click OK
3. In the PK User Censors dialog box select the number of results to apply the dilution
4. The samples will be listed in the PK Sample Dilution dialog box. Type the numeric value of the
dilution in the Dilution column.
5. Click OK. From the Results tab click the Save icon.
LDMS Training Manual Pharmacology Assay
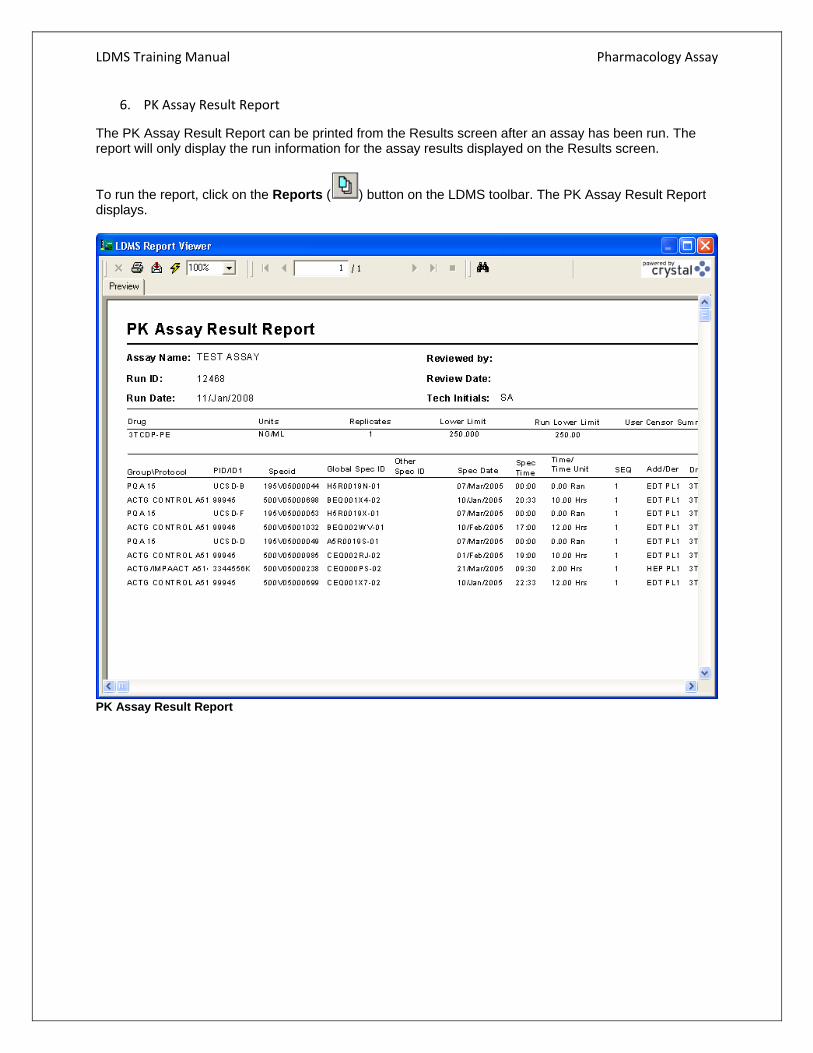
6. PK Assay Result Report
The PK Assay Result Report can be printed from the Results screen after an assay has been run. The report will only display the run information for the assay results displayed on the Results screen.
To run the report, click on the Reports ( ) button on the LDMS toolbar. The PK Assay Result Report displays.
PK Assay Result Report
LDMS Training Manual Pharmacology Assay
PK Reports Available in the Reports Module
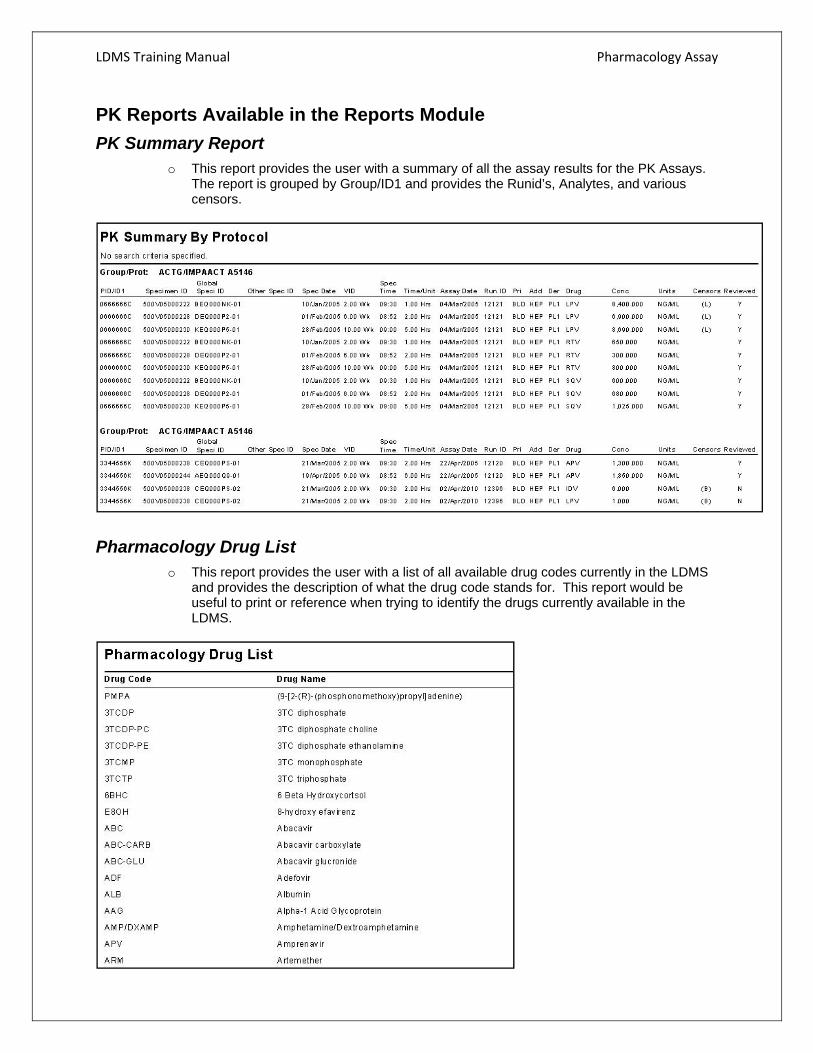
PK Summary Report o This report provides the user with a summary of all the assay results for the PK Assays.
The report is grouped by Group/ID1 and provides the Runid’s, Analytes, and various censors.
Pharmacology Drug List o This report provides the user with a list of all available drug codes currently in the LDMS
and provides the description of what the drug code stands for. This report would be useful to print or reference when trying to identify the drugs currently available in the LDMS.
LDMS Training Manual Pharmacology Assay
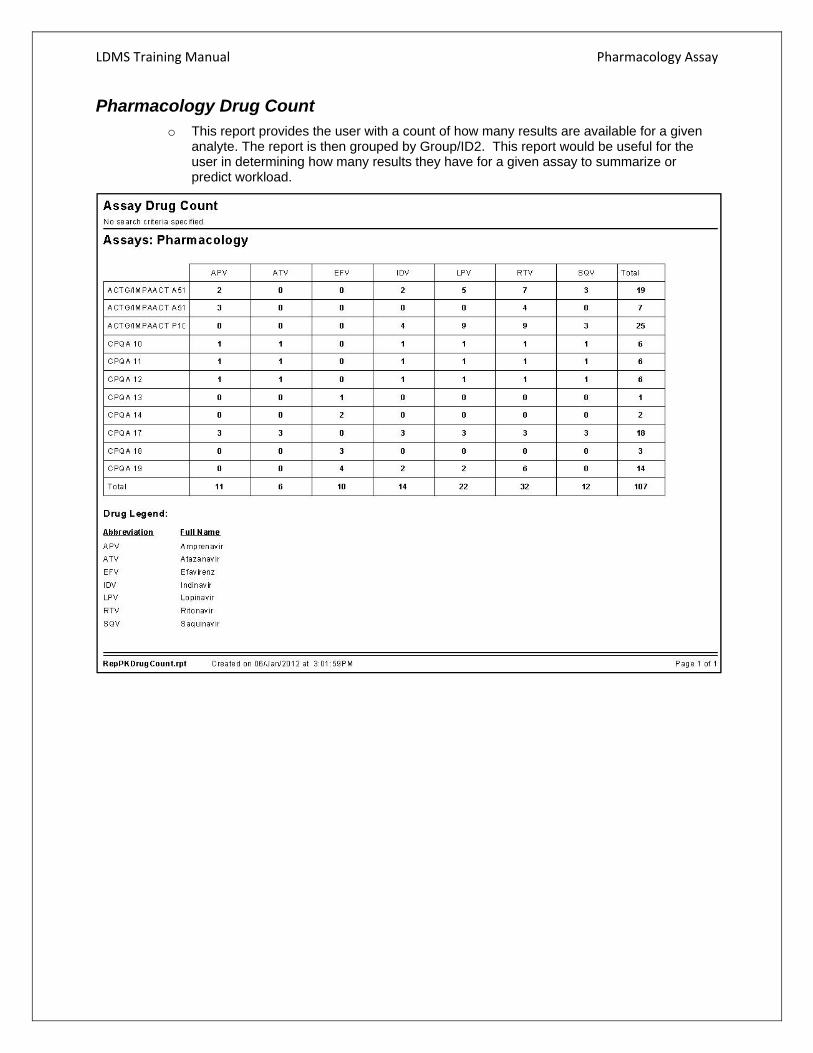
Pharmacology Drug Count o This report provides the user with a count of how many results are available for a given
analyte. The report is then grouped by Group/ID2. This report would be useful for the user in determining how many results they have for a given assay to summarize or predict workload.
LDMS Training Manual Pharmacology Assay
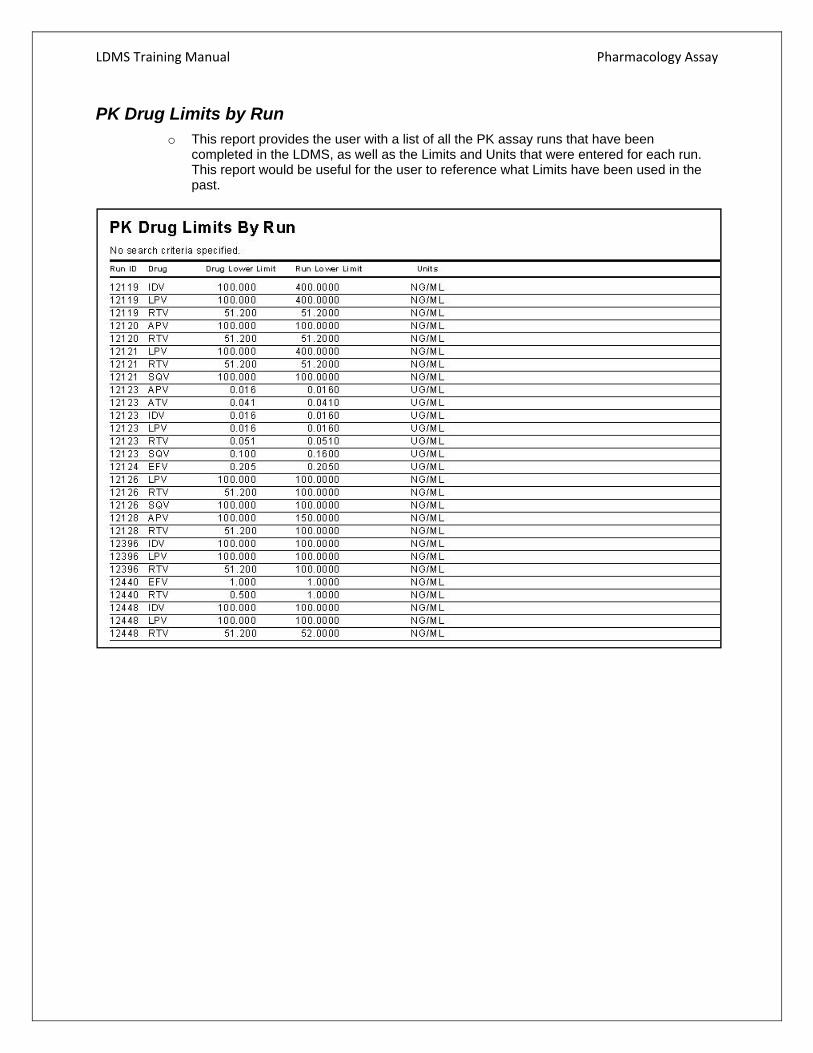
PK Drug Limits by Run o This report provides the user with a list of all the PK assay runs that have been
completed in the LDMS, as well as the Limits and Units that were entered for each run. This report would be useful for the user to reference what Limits have been used in the past.
LDMS Training Manual Pharmacology Assay
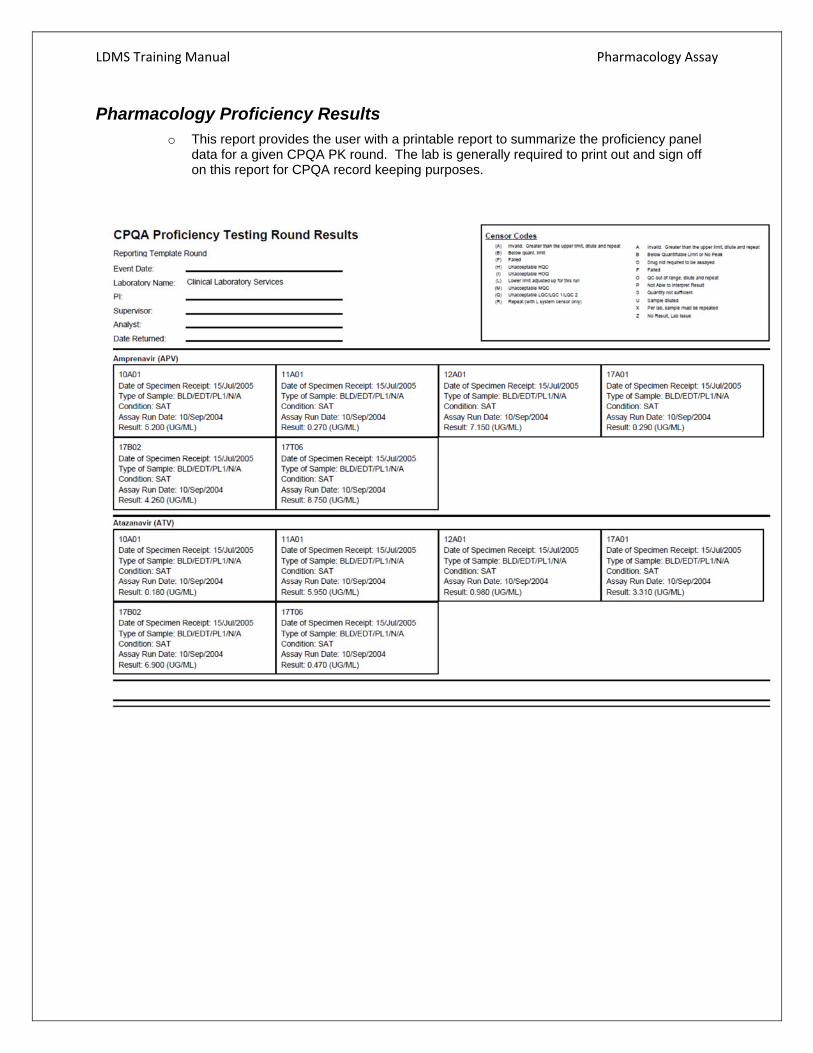
Pharmacology Proficiency Results o This report provides the user with a printable report to summarize the proficiency panel
data for a given CPQA PK round. The lab is generally required to print out and sign off on this report for CPQA record keeping purposes.
LDMS Training Manual Pharmacology Assay
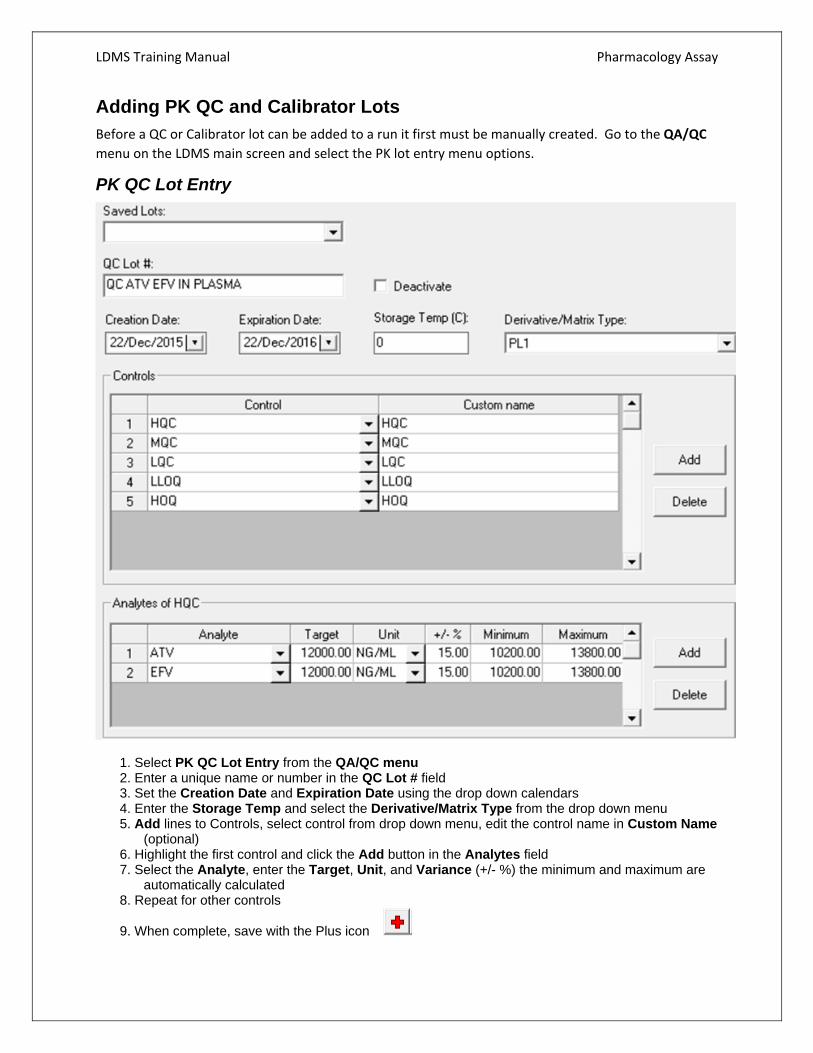
Adding PK QC and Calibrator Lots Before a QC or Calibrator lot can be added to a run it first must be manually created. Go to the QA/QC
menu on the LDMS main screen and select the PK lot entry menu options.
PK QC Lot Entry
1. Select PK QC Lot Entry from the QA/QC menu 2. Enter a unique name or number in the QC Lot # field 3. Set the Creation Date and Expiration Date using the drop down calendars 4. Enter the Storage Temp and select the Derivative/Matrix Type from the drop down menu 5. Add lines to Controls, select control from drop down menu, edit the control name in Custom Name
(optional) 6. Highlight the first control and click the Add button in the Analytes field 7. Select the Analyte, enter the Target, Unit, and Variance (+/- %) the minimum and maximum are
automatically calculated 8. Repeat for other controls
9. When complete, save with the Plus icon
LDMS Training Manual Pharmacology Assay
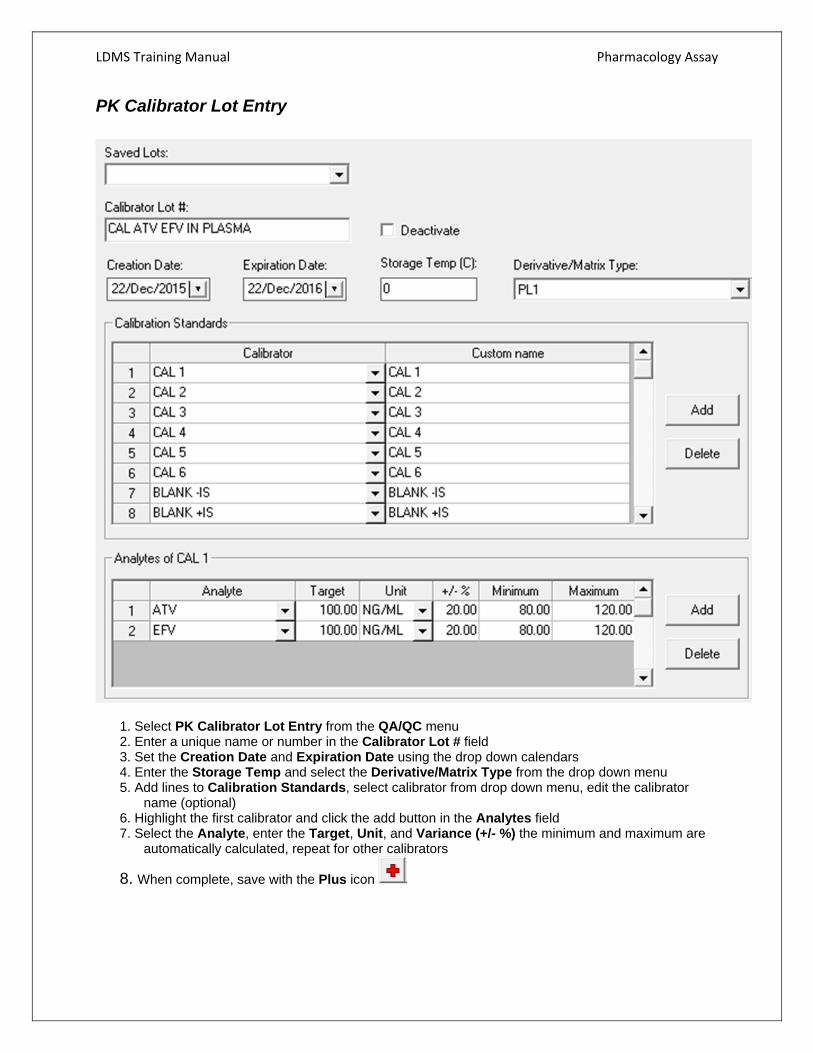
PK Calibrator Lot Entry
1. Select PK Calibrator Lot Entry from the QA/QC menu 2. Enter a unique name or number in the Calibrator Lot # field 3. Set the Creation Date and Expiration Date using the drop down calendars 4. Enter the Storage Temp and select the Derivative/Matrix Type from the drop down menu 5. Add lines to Calibration Standards, select calibrator from drop down menu, edit the calibrator
name (optional) 6. Highlight the first calibrator and click the add button in the Analytes field 7. Select the Analyte, enter the Target, Unit, and Variance (+/- %) the minimum and maximum are
automatically calculated, repeat for other calibrators
8. When complete, save with the Plus icon
LDMS Training Manual Pharmacology Assay
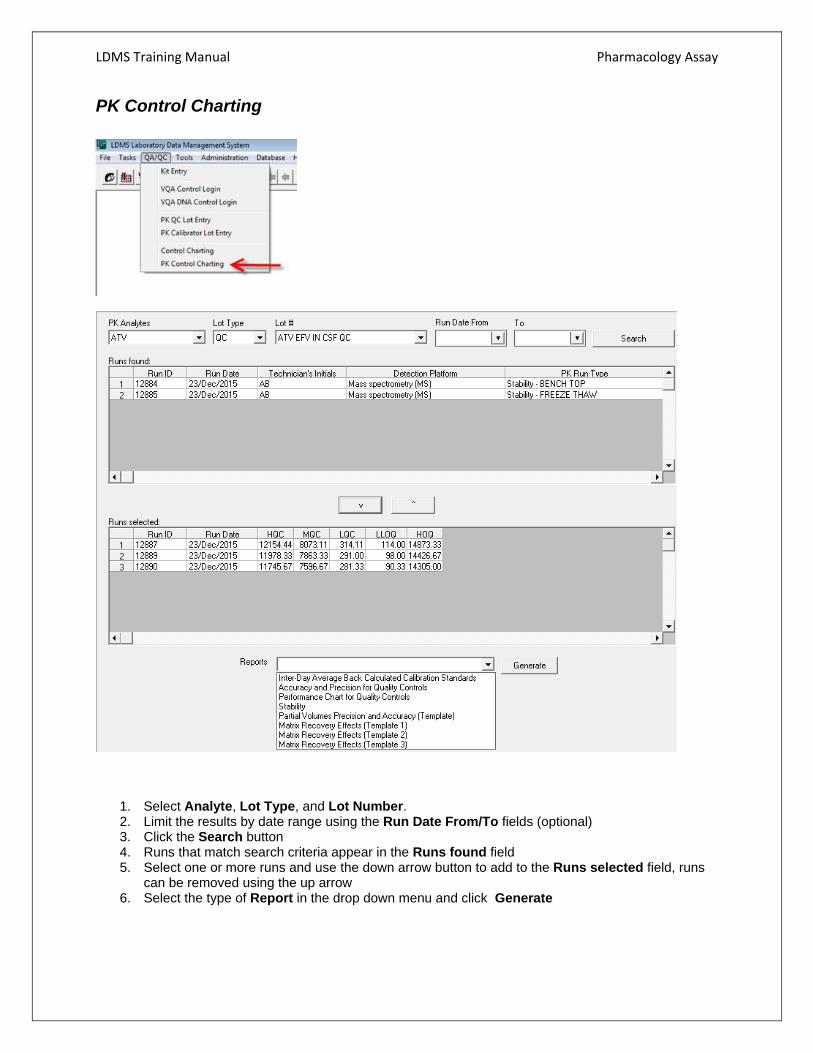
PK Control Charting
1. Select Analyte, Lot Type, and Lot Number. 2. Limit the results by date range using the Run Date From/To fields (optional) 3. Click the Search button 4. Runs that match search criteria appear in the Runs found field 5. Select one or more runs and use the down arrow button to add to the Runs selected field, runs
can be removed using the up arrow 6. Select the type of Report in the drop down menu and click Generate

LDMS Training Manual Pharmacology Assay
Calibrator and QC Reports Using the PK Control Charting module (see above), the user can generate the following Reports:
Inter-day Average Back Calculated Calibration Standards Accuracy and Precision for Quality Control Performance Charts for Quality Control Stability
And the following Templates:
Partial Volumes Precision and Accuracy Matrix Recovery Effects Template 1 Matrix Recovery Effects Template 2 Matrix Recovery Effects Template 3

LDMS Training Manual Pharmacology Assay