l541 lab week 2 - indiana university bloomingtonl541/2016/slides/l541 lab week 2_2016_upload.pdf ·...
TRANSCRIPT

L541 Lab Week 2
January 21/22, 2016
L541 Lab Week 2 January 21/22, 2016 1 / 21

Table of contents
1 Projects
2 IRB Basis
3 Sagittal Section
4 Transcription Practice
5 Intro to Praat
6 Homework 2
L541 Lab Week 2 January 21/22, 2016 2 / 21

Projects
Projects
I Sketch due 5pm 1/29. Email both Prof. de Jong and Phillip (and ccall team members).
I Draft Sketch = one-paragraph description of at least three projectswhich are potentially feasible. Include a list of the proposed groupmembers at the top.
L541 Lab Week 2 January 21/22, 2016 3 / 21

IRB Basis
IRB Basics
I Human Subjects IRB
I CITI Training: Social/Behavioral Researcher
I KC IRB: IRB proposal
I Approval timeline
I IRB Basics Slide Show
L541 Lab Week 2 January 21/22, 2016 4 / 21

Sagittal Section
Sagittal Section
L541 Lab Week 2 January 21/22, 2016 5 / 21
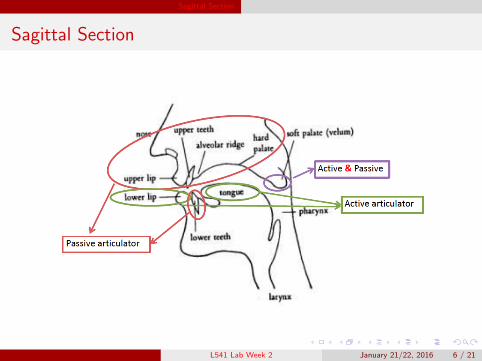
Sagittal Section
Sagittal Section
L541 Lab Week 2 January 21/22, 2016 6 / 21
Sagittal Section
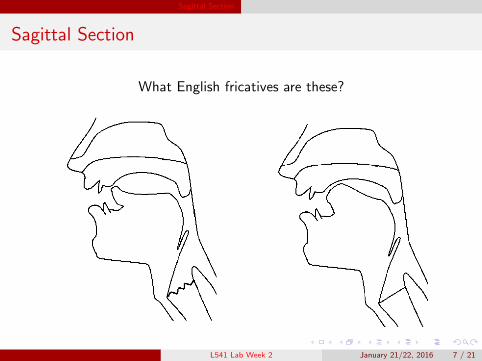
Sagittal Section
What English fricatives are these?
L541 Lab Week 2 January 21/22, 2016 7 / 21

Sagittal Section
Sagittal Section
What English plosives are these?
L541 Lab Week 2 January 21/22, 2016 8 / 21

Sagittal Section
Sagittal Section
What English plosives are these?
L541 Lab Week 2 January 21/22, 2016 9 / 21

Sagittal Section
Sagittal Section
Draw a sound and let your classmate guess!
L541 Lab Week 2 January 21/22, 2016 10 / 21

Sagittal Section
Sagittal Section
Real-time productionMRI Song
L541 Lab Week 2 January 21/22, 2016 11 / 21
Transcription Practice
Transcription Practice
Transcribe the following sounds using IPA symbols
L541 Lab Week 2 January 21/22, 2016 12 / 21

Intro to Praat
Intro to PraatBasics
L541 Lab Week 2 January 21/22, 2016 13 / 21

Intro to Praat
Intro to PraatBasics
Opening sound files
1. Open Praat. (Object andPicture windows)
2. Open: Read from file...
3. Find and choose a sound file.
Or Right click on a file(s) and openthe file with Praat.
Or Drag the sound file to the Praaticon.
Saving sound files
1. Sounds show up in the objectwindow. Note: Sound files arenot automatically saved!
2. To save sound files (ones in theobject window), Save > Save asWAV file... For Windows: Besure to type .wav at the end ofthe file name
Or in Edit mode, select the materialyou want to save, go to File >Save selected sound as WAV file> Save
L541 Lab Week 2 January 21/22, 2016 14 / 21

Intro to Praat
Intro to PraatBasics
Keyboard Shortcuts
I Command (Ctrl) + i: zoom in
I Command (Ctrl) + o: zoom out
I Command (Ctrl) + n zoom in to selection
I Command (Ctrl) + s: save
I Tab: Play/Stop current selection
L541 Lab Week 2 January 21/22, 2016 15 / 21

Intro to Praat
Intro to PraatExercise
1. Download ‘Sentence.wav’ from the lab website and save it on thedesktop.
2. Open ‘Sentence’ in the object window > Click “View & Edit”3. Listen carefully . . . find and select the word ‘scoop’
– clicking on the beginning of the word > hold the mouse and move thecursor to select/highlight the wordOR
– SHIFT + click on both ends4. Once you have ‘scoop’ selected, Save the selected sound
– In Edit mode, select the section you want to save, then go to ‘File’ >‘Save selected sound as WAV file’ > choose directory > SaveOR
– Select the section you want to save, then go to ‘File’ > ‘Extractselected sound (Time from 0)’, which will send the selection to theobject window; > Save sound from Object window, ‘Save as WAV file’> choose directory > Save
L541 Lab Week 2 January 21/22, 2016 16 / 21

Intro to Praat
Intro to PraatExercise
Create a 50-ms silence
1. To create a file with silence, from the Object window, go to New >Sound > Create sound from formula
2. Name = silence, Start Time = 0, End Time = 0.05(sec) (= 50 ms),sampling frequency: 44100, Formula = 0
3. It will appear in the object window
L541 Lab Week 2 January 21/22, 2016 17 / 21

Intro to Praat
Intro to PraatExercise
Adding Silence
1. Open the sound file containing your target word ‘scoop’
2. Add silence to ‘scoop’ by highlighting both sounds (scoop selectionand silence) in Object window > Combine sounds > ConcatenateOR
– Open ‘scoop’ and ‘silence’ in Edit mode, Copy silence by selecting allsilence and copying it (Edit > ‘Copy selection to Sound clipboard’).Then, in scoop selection, paste the silence before and after sound(Edit > ‘Paste after selection’)
3. Save your new file!
L541 Lab Week 2 January 21/22, 2016 18 / 21

Intro to Praat
Intro to PraatExercise
Annotation: Text Grids
1. Highlight sound in Object window
2. Click on Annotate: To TextGrid. . .
3. All Tier names = ‘Transcription’Which of these are point tiers? = (none)
4. Select both your new sound file and new TextGrid file in Objectwindow hold ‘Command/Ctrl’ and then click to select) > ‘View &Edit’. Your annotation tier will show up below waveform andspectrogram.
5. Mark the boundaries for each segment.
6. Save the TextGrid file.
L541 Lab Week 2 January 21/22, 2016 19 / 21
Intro to Praat
Intro to PraatExercise
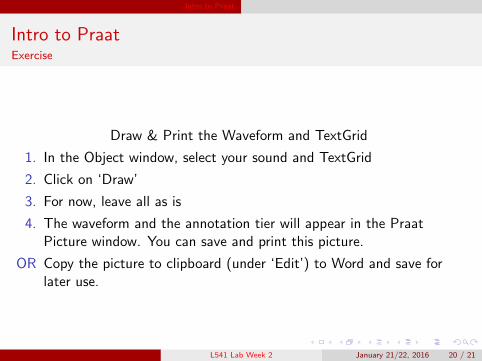
Draw & Print the Waveform and TextGrid
1. In the Object window, select your sound and TextGrid
2. Click on ‘Draw’
3. For now, leave all as is
4. The waveform and the annotation tier will appear in the PraatPicture window. You can save and print this picture.
OR Copy the picture to clipboard (under ‘Edit’) to Word and save forlater use.
L541 Lab Week 2 January 21/22, 2016 20 / 21

Homework 2
Homework 2
Due next Thursday/Friday in lab sectionsFiles available on the lab webpage (1 PDF, 2 Sound files)
L541 Lab Week 2 January 21/22, 2016 21 / 21