intro to email - digitallearn
TRANSCRIPT

1
Intro to Email
Hi, I’m Kate and I’m here to get you started with email. We will follow along with Amy, who is setting up a Gmail account. Let’s begin by talking about what email is and how it works.

2
If you’ve never used email before, it’s just like mailing someone a letter at the post office, except that the letter is mailed digitally through the Internet and the person receives the letter instantly.

3
You can include all kinds of things in an email. In addition to a letter. You can include pictures, documents, videos and other computer files.

4
You can send an email to multiple people at the same time and you can access your email on any device that has the Internet, like your computer or your mobile phone. Best of all, sending an email is free.

5
In order to receive emails, you will have to sign up for your own private email account, which is an electronic mailbox just for you. That account will have its own email address so that people will know where to send you an email.

6
Like a real address, the email address has to be typed in correctly, or the other person will not receive their mail. An email address will always have two main parts, which are connected by the @ symbol: The first part of the email address is the person’s username. This is similar to the name you write on a regular address. The second part of the email address is the location. It could be the name of an email provider, the organization the person works for, or a website that the person is associated with. To recap, an email address is made up of who you are sending the email to, the @ symbol, and the location for their email, just like a regular address is made up of who and where.

7
Your email account is protected by a password of your choice, so that the only person who has access to your email is you. Think about your password as the key to your mailbox. This provides you with protection and privacy.

8
Signing Up for Email
If you don’t have an e-mail account, you can easily set one up for free. You can do that with a variety of different e-mail providers, such as Gmail, Yahoo! or Outlook.

9
Let’s follow along with Amy as she sets up a Gmail account. First, she will open her Internet browser and go to the address bar.

10
In the address bar, Amy will type gmail.com and then press enter to go to the Gmail website. Now she can start setting up her account. If you’d like the website to display in a language other than English, you can change the language using the drop-down menu at the bottom.

11
Here we see a form to log in, but first we need to create an account. When Amy clicks on this link, a form will appear.

12
At the top of the form, Amy will begin by typing in her first and last name.
13
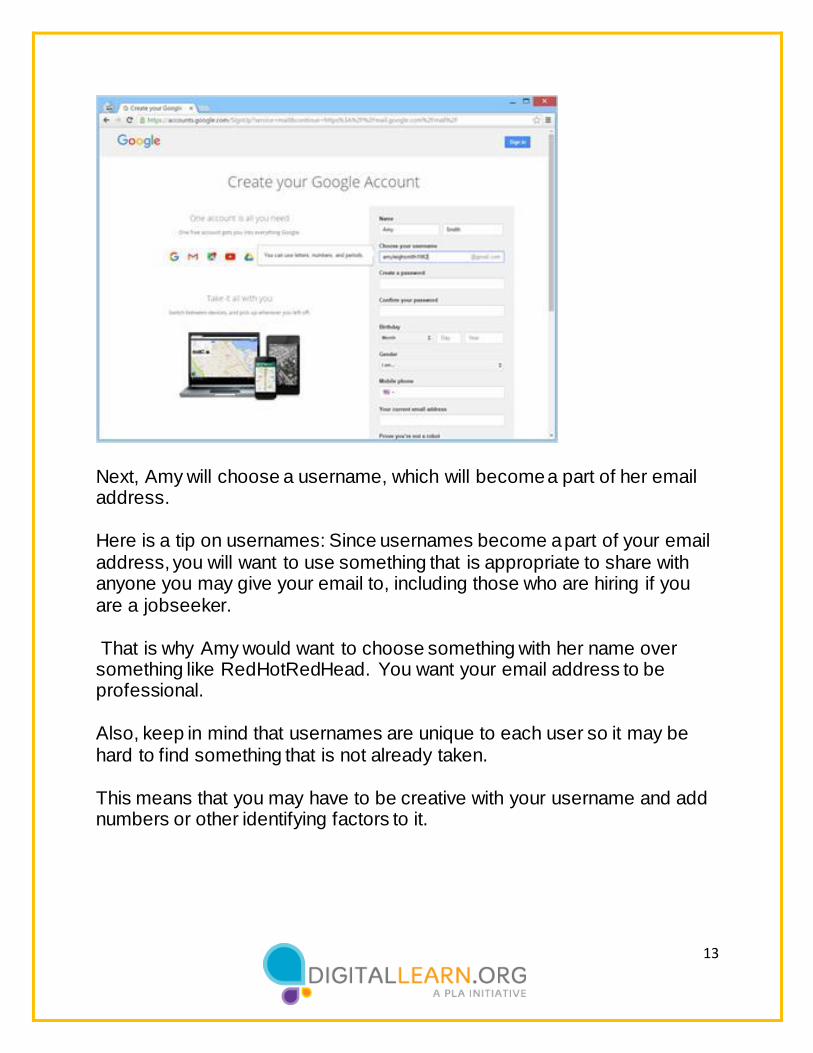
Next, Amy will choose a username, which will become a part of her email address. Here is a tip on usernames: Since usernames become a part of your email address, you will want to use something that is appropriate to share with anyone you may give your email to, including those who are hiring if you are a jobseeker. That is why Amy would want to choose something with her name over something like RedHotRedHead. You want your email address to be professional. Also, keep in mind that usernames are unique to each user so it may be hard to find something that is not already taken. This means that you may have to be creative with your username and add numbers or other identifying factors to it.

14
Next, Amy will also have to choose a password for her account. Passwords are secret because they are like the lock to your mailbox. To keep your password secret, it will be masked with symbols as it is typed so that others watching can’t see the characters.
A password on Gmail must be at least 8 characters long, and should not be a word that is too easy to guess. You can add capital letters, numbers, and symbols to make your password more secure. After setting up an account, it is important to remember your username and password, because you will need these to access your account later. It’s a good idea to write them down and keep them in a safe place until you have memorized them.

15
When entering her password, Amy is prompted to type it in one more time; this confirms that it was typed correctly by making sure both entries are the same.

16
Amy then adds her date of birth, typing all four digits for the year.

17
Next, Amy will select her gender from the drop down menu.

18
Next, Amy enters her mobile phone number. This number will be used if she loses her password and needs help accessing her account. This is optional, but if you have a mobile phone I recommend you include it. If you have another email address, you also have the option to enter it here.

19
In order to make sure that everyone who signs up for an email account is a person, Google will ask you to type the strange text under this section labeled “Prove you’re not a robot.” Sometimes, this can be pretty tough to read. If you have trouble reading them, you can press the refresh button to see a different word or the sound button to listen to an audio recording. You can also skip this step if you would prefer receiving a code on your phone instead.

20
Finally, Amy agrees to Google’s Terms of Service and Privacy Policy.
Now that Amy is done completing this form, she clicks the “Next Step” button.

21
Amy’s email is now all set up and she gets a welcome message from Google.
She clicks on the blue button that says “Continue to Gmail” and goes to her inbox for the first time.

22
Logging In
Amy has been using Gmail for a little while now and is about to login to check her email account. First, she clicks in the address bar and types gmail.com. Then she presses enter on the keyboard to load the website.

23
Now that Amy is on the Gmail login page, she will type her email address into the box. Then she clicks on “Next.”

24
Now, Amy types in her password. Once Amy has entered her username and password, she clicks on the blue button that says “Sign in.”

25
And there you have it! Amy has logged in to her email account. Now we can see a list of email messages in the middle of the screen. The left side allows you to switch between folders that organize your email messages, such as the Inbox, Sent Mail, Drafts, and Deleted Messages. You can look for specific messages using the search box at the top, and access your account settings in the top-right. We’ll look at this in more detail over the next lessons.

26
Opening & Replying
The first thing that Amy sees when she opens her account is the Inbox. The Inbox is where all of her messages are received, and where she will be able to manage all of her messages. Each email will list the name of the sender, the subject of the message, a preview of the message, and finally, the date the message was sent. The newest emails will always be at the top of the Inbox.

27
Amy sees that she has a new e-mail from Sandy, her best friend. She clicks on the email to open it and reads Sandy’s message.

28
Amy is going to reply to Sandy’s email. She can do this two different ways: • By clicking on the arrow on the right hand side of the message. • Or by clicking on the reply link in the box right below the message.

29
Once Amy clicks reply, she begins to type her message in the large box under the recipient’s name.

30
When Amy is done typing her message, she clicks the send button and her reply is sent to Sandy.

31
Once the reply is sent, a notification appears at the top of the screen and the new email will appear below the first message from Sandy.

32
Sending Messages
If you want to send a new email, you can do that by clicking the Compose button in the top left.

33
A message box will appear. Amy needs to fill in who the message is to, describe the subject, and then type what she wants to say. In the “To” field, Amy types in the email address of her friend Nikki.
But if Amy wanted to send this message to more than one person , she could type several email addresses separated by commas.

34
Amy types in a subject to let people know what the message is about.

35
Next, she types in the body of the message.

36
Finally, Amy clicks the “Send” button to send the email.

37
Once the message is sent, a notification appears at the top of the screen. Amy can open her sent folder if she needs to find email messages that she has already sent.

38
Quiz
We’ve learned a lot about email. Let’s see what you remember. If Amy wants to set up an email account so she can contact potential employers, what would be the most appropriate? Click on the address you think would be best.

39

40
If Amy wants to send the same email to six different people, what's the best way to do it? Should she send a separate email to each person one at a time, or, send one email to multiple people at once?

41

42
Let's take a look at Amy's inbox. If Amy wants to send an email to her friend Michelle, what does she click on to create a new email message? Click on the button in the correct place.

43

44
Amy has a new email from her friend Sandy. Click on the correct part of the screen to open Sandy's message.

45

46
Amy has just read this email from her friend Sandy. If she wants to reply, there are two places she can do that. Click one of the two possibilities for Amy to send a reply.

47

48
Amy wants to see an email she sent. Click on the correct part of the screen to open the sent mail folder.

49

50
Great job! In this class, we learned what email is, and walked through as Amy set up her email account. Now why don't you give it try?