installing cpv labcpvlab.com/forusers/cpv_lab_installation_instructions.pdf · clicking "i...
TRANSCRIPT

CPV Lab Installation Guide – v2.17 - Copyright 2010 – 2015 CPVLab.com Reproduction or Sharing of this Guide is strictly prohibited without the authorized consent from CPVLab.com
Installing CPV Lab Version 2.17

CPV Lab Installation Guide – v2.17 - Copyright 2010 – 2015 CPVLab.com Reproduction or Sharing of this Guide is strictly prohibited without the authorized consent from CPVLab.com
END-USER LICENSE AGREEMENT (“EULA”) FOR CPV LAB This End-User License Agreement ("EULA") pertains to the CPV Lab product (called “Software" in this Agreement). Read the terms and conditions of this End-User License Agreement ("EULA") before installing, copying, or using CPV Lab. This End-User License Agreement ("EULA") is a legal agreement between you, (either an individual person or a single legal entity, who will be referred to in this EULA as "you" or "Customer"), and the owner/s of CPV Lab ("Authors"). By clicking "I accept", installing, copying, or otherwise using any part of the above Software, you agree to be bound by the terms of this EULA. If you do not agree to the terms of this EULA, promptly return the unused Software to your supplier for a full refund. 1. GRANT OF NON-EXCLUSIVE, LIMITED LICENSE
The Software is licensed, not sold. Any rights not clearly and expressly granted to you under this EULA are reserved to the Authors. Provided you have paid all applicable fees and complied with this EULA, then you are granted the following personal, perpetual (subject to termination as set forth below), non-exclusive, non-transferable, limited rights: a. You may use the Software on a single domain for personal purposes for each license you have acquired; or copy the Software for archival and disaster recovery purposes, provided any copy must contain all of the original Software's proprietary notices. Each user using the Software must own a license. b. You may not decompile, disassemble, extract or otherwise reverse engineer any of the Software. You shall not have the right to obtain or use any source code for the Software, nor copy, reproduce, or distribute the Software except as provided above. You agree not to share, rent, lease, or loan the Software. You may not make any commercial use of the Software code except as expressly permitted under this Agreement.
2. COPYRIGHT
The Software and documentation is copyrighted by the Authors. All Rights Reserved. Making unauthorized copies is prohibited by law. No part of the software or documentation may be reproduced, transmitted, transcribed, stored in a retrieval system or translated into any human or computer language without prior written permission.
3. WARRANTY, REMEDY, AND LIMITATIONS A. YOU ARE GRANTED A LIMITED WARRANTY THAT THE SOFTWARE WILL PERFORM IN SUBSTANTIAL ACCORDANCE WITH THE ACCOMPANYING USER MANUAL FOR 56 DAYS FOLLOWING YOUR RECEIPT OF THE SOFTWARE. THIS IS YOUR ONLY WARRANTY. B. AUTHORS' ENTIRE LIABILITY AND YOUR EXCLUSIVE REMEDY FOR ANY CLAIM YOU MAY HAVE AGAINST AUTHORS SHALL BE, AT AUTHORS' OPTION, (I) RETURN OF AMOUNTS PAID FOR THE APPLICABLE SOFTWARE; OR (II) REPAIR OR REPLACEMENT OF SOFTWARE WHICH DOES NOT MEET THE ABOVE LIMITED WARRANTY.
UNLESS OTHERWISE STATED ABOVE, THE SOFTWARE AND THE DOCUMENTATION SOLD WITH THIS PUBLICATION ARE PROVIDED "AS IS" WITHOUT WARRANTY OF ANY KIND EITHER EXPRESS OR IMPLIED, INCLUDING BUT NOT LIMITED TO THE IMPLIED WARRANTIES OF MERCHANTABILITY AND PARTICULAR PURPOSE. THE ENTIRE RISK ARISING OUT OF THE USE OR PERFORMANCE OF THIS SOFTWARE REMAINS WITH YOU. IN NO EVENT WILL AUTHORS OR ANY OF ITS SUPPLIERS BE LIABLE FOR ANY LOST PROFITS, LOST SAVINGS, INCIDENTAL OR INDIRECT DAMAGES, OR OTHER ECONOMIC OR CONSEQUENTIAL DAMAGES, EVEN IF THEY HAVE BEEN ADVISED OF THE POSSIBILITY OF SUCH DAMAGES. AUTHORS RESERVE THE RIGHT TO MODIFY THIS DOCUMENT AT ANY TIME WITHOUT OBLIGATION TO NOTIFY ANYONE. IN NO EVENT SHALL AUTHORS' OR ITS SUPPLIERS' LIABILITY UNDER THIS AGREEMENT EXCEED THE SUM OF ANY AMOUNTS PAID HEREUNDER BY YOU TO AUTHORS OR THE SUPPLIER. 4. TERMINATION
The license will terminate automatically if you fail to comply with the terms, conditions, or limitations contained in this EULA, including the payment of applicable license or other fees. On termination, you shall, at Authors' option, either return or destroy all copies of the Software and documentation. Otherwise, this EULA shall remain in force until terminated. You may terminate this EULA at any time by destroying all copies of the Software, deleting any copies of the Software from your hard drives, ceasing all use of the Software and documentation; and providing satisfactory proof to the Authors that you have done so. The disclaimer of warranty and limitations on liability contained in Section 3 shall continue in force even after your rights to use the Software are terminated.

CPV Lab Installation Guide – v2.17 - Copyright 2010 – 2015 CPVLab.com Reproduction or Sharing of this Guide is strictly prohibited without the authorized consent from CPVLab.com
Version 2.17 Server Requirements: Linux Server - VPS or Dedicated Hosting (recommended)
o PHP 5.3 or Above o MySQL 5.1 or Above o minimum 60 MB of disk space o IonCube Loaders 4.4 installed on the server
You can install CPV Lab on any domain, within… the Root Domain http://yourdomain.com a Sub-Domain http://media.yourdomain.com a Sub-Folder http://yourdomain.com/media In these examples, the install directory is “mediai”, but you can name the install location
anything you wish.
STEP #1: Unzip Files Unzip “cpv_lab_files.zip” on your desktop
STEP #2: Check Server Requirements Upload the “check-server-requirements.php” page to your server before uploading any other files from the install package. Then open this page in your browser: http://yourdomain.com/check-server-requirements.php This page will check your server and determine if requirements are met.
PHP version IonCube Loaders version Request to check license validation
If you open this page and it’s a blank white page, this means you don’t have ION Loaders installed at all. Contact your webhost to install ION Cube Loaders v4.4 or above. If you get green 'PASS' on all 3 requirements, then proceed through the rest of the installation process.

CPV Lab Installation Guide – v2.17 - Copyright 2010 – 2015 CPVLab.com Reproduction or Sharing of this Guide is strictly prohibited without the authorized consent from CPVLab.com
STEP #3: Upload Files to Server Create an empty directory (sub-domain or sub-folder) in the root of your server.
o You don’t have to use CPVLab in the folder name, to avoid footprints. o We recommend using something generic, such as: media or link, etc.
Upload the files with an FTP client to the server. If you don’t have an FTP Client, Visit Filezilla.com & download it Free.
STEP #4: Edit File Permissions Open the “lib” folder…
o Give write permissions 666 to ‘db_params.php’ file located in the ‘lib’ folder. Open the “license” folder…
o Give write permissions 666 to ‘license.php’ file located in the ‘license’ folder.
Set Write Permissions (777) to… o NOTE: Permission Changes Not Required for Servers using SUEXEC o phpbrowscap\BrowserCache o WURFLres o WURFLres\storage\cache o WURFLres\storage\persistence
CPV Lab Installation Guide – v2.17 - Copyright 2010 – 2015 CPVLab.com Reproduction or Sharing of this Guide is strictly prohibited without the authorized consent from CPVLab.com
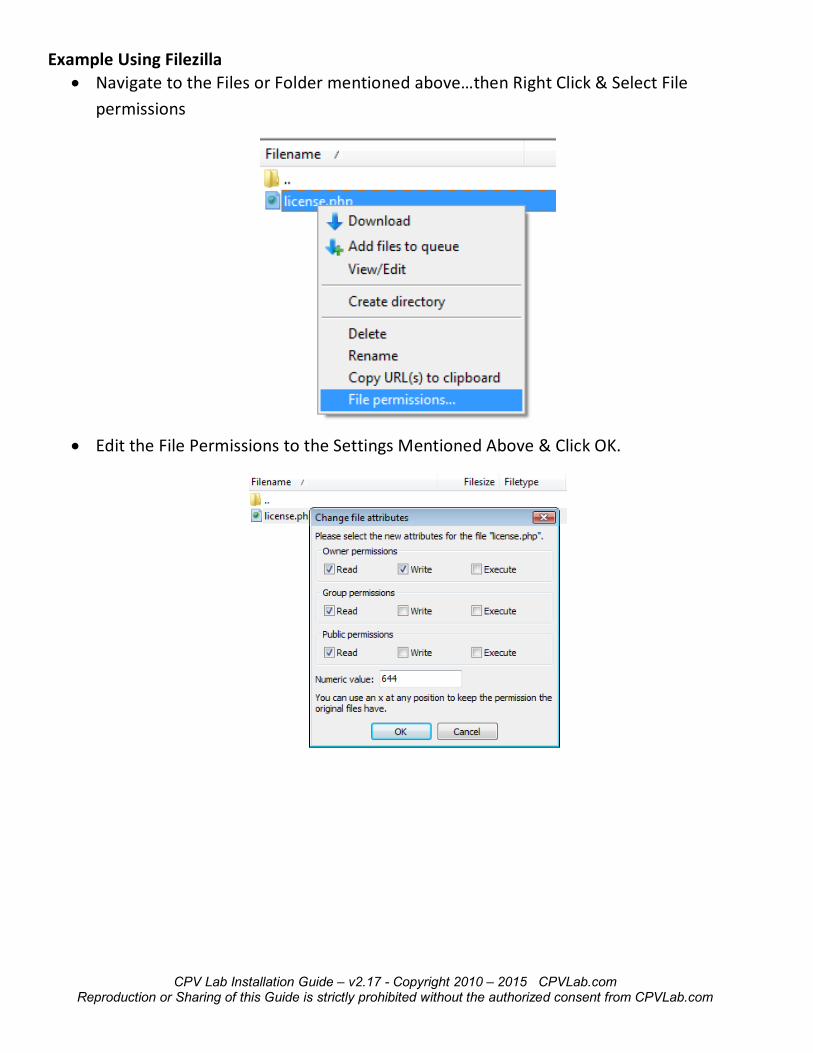
Example Using Filezilla Navigate to the Files or Folder mentioned above…then Right Click & Select File
permissions
Edit the File Permissions to the Settings Mentioned Above & Click OK.

CPV Lab Installation Guide – v2.17 - Copyright 2010 – 2015 CPVLab.com Reproduction or Sharing of this Guide is strictly prohibited without the authorized consent from CPVLab.com
STEP #5: Create MySQL Database
First, Login to your Cpanel and Choose MySQL Databases
Enter a Name for the New Database and Click Create Database
You’ll then see a confirmation that the database has been created:
Add A New User

CPV Lab Installation Guide – v2.17 - Copyright 2010 – 2015 CPVLab.com Reproduction or Sharing of this Guide is strictly prohibited without the authorized consent from CPVLab.com
You’ll then see a confirmation that a new user has been created:
Add the New User to the New Database:
Set Privileges for the User:
o Check All Privileges and Click Make Changes
o You’ll then see a confirmation that use was added to the database:
Done…The New Database and User have been created.

CPV Lab Installation Guide – v2.17 - Copyright 2010 – 2015 CPVLab.com Reproduction or Sharing of this Guide is strictly prohibited without the authorized consent from CPVLab.com
STEP #6: Open Install Page Navigate your browser to the ‘install.php’ file from the root of the website. This page will handle the rest of the install process. All you have to do is enter the
required data in this page (database server, database login, database password, database name, installation directory and email address used when you purchased CPV Lab).
Then click the ‘Install’ button and wait until the installation is complete and you are
redirected to the login page.
Regarding Database Creation and Names: The install page will attempt to create a database with the name specified in the textbox above. Some hosting providers use the username as prefix, followed by the database name. For example if you’re creating a database named “cpvtrack” and the username of your hosting account is “hostinguser”. You would enter the database name on the install page as: hostinguser_cpvtrack However, some hosting providers just use the database name, such as: cpvtrack from the example above. If you are unsure of this, with your current hosting provider…you can ask them, or simply create the database yourself from your Cpanel before opening the Install Page and then just add the details to the Install Page after creation of the database.

CPV Lab Installation Guide – v2.17 - Copyright 2010 – 2015 CPVLab.com Reproduction or Sharing of this Guide is strictly prohibited without the authorized consent from CPVLab.com
STEP #7: Edit File Permissions & Delete Install Page Open the “lib” folder…
o Change permissions to 644 to ‘db_params.php’ file Open the “license” folder…
o Change permissions to 644 to ‘license.php’ file Delete the ‘install.php’ file from the root of your website, because the installation was
completed successfully.
STEP #8: Login to CPV Lab & Change Your Password Go to the Login Page
o Depending on your Installation (Sub-Domain or Sub-Folder), you’ll go to: o Sub-Domain Install: http://SubDomain.YourDomain.com/login.php o Sub-Folder Install: http://YourDomain.com/YourFolder/login.php
Use admin for both username and password in order to login to the application. Change your username and password from the Settings page after the first login.
NOW YOU’RE READY TO GO!
Note!!!! Be sure to save your login details (username & password), there is no “email my password” feature if you lose it. We didn’t add that to the app to avoid any potential exploits.

CPV Lab Installation Guide – v2.17 - Copyright 2010 – 2015 CPVLab.com Reproduction or Sharing of this Guide is strictly prohibited without the authorized consent from CPVLab.com
Setup CRON Job for Automatic Mobile Detection Updates The CRON job consists of a PHP page (cron-wurfl.php) that will be called periodically to update the detection databases with new carriers, mobile devices and browsers. Login into cPanel and find the ‘Cron jobs’ page
Setup a Cron Job, that will run once a day. You have to provide the complete server path to the 'cron-wurfl.php' page from the root of CPV Lab. Then enter as command: cd /home/<server-name>/public_html/cpvlab/; php cron-wurfl.php Or by an alternate command if the command above doesn’t function properly on your server. php /home/<server-name>/public_html/cpvlab/cron- wurfl.php ***Replace <server-name> with the correct Server Name based on your server configuration. In the attached image you can see the Cron job being scheduled to run every day at 6:40 AM.
Click the ‘Add New Cron Job’ button and the new Cron job will appear in the jobs list.

CPV Lab Installation Guide – v2.17 - Copyright 2010 – 2015 CPVLab.com Reproduction or Sharing of this Guide is strictly prohibited without the authorized consent from CPVLab.com
Checking if the Cron job is setup correctly… Each time the Cron page runs it will write 2 lines in a log file: one for marking the start of the process and one for the end of the process. Each time the Cron job runs, it will write 2 records in the Error Log, like in the image below.

CPV Lab Installation Guide – v2.17 - Copyright 2010 – 2015 CPVLab.com Reproduction or Sharing of this Guide is strictly prohibited without the authorized consent from CPVLab.com
Optional: Import Mobile Carriers to Reduce Database Calls Import the carriers file named 'cpvlabscript-carriers.sql' into PhpMyAdmin. If you don't import this file, carriers will still be captured correctly, however an extra database call is needed every time a new carrier is found. This optional step Pre-loads the Carrier Database. Again, this step isn’t required…but recommended for Users moving high levels of traffic. A. Open the PhpMyAdmin utility from cPanel, select the CPV Lab database and click on the ‘Import’ tab
B. Click on the ‘Browse’ button and select the ‘'cpvlabscript-carriers.sql' file from the CPV Lab installation package. C. Click on the ‘Go’ button and PhpMyAdmin will start to execute file and once the process is finished you will see a confirmation message.

CPV Lab Installation Guide – v2.17 - Copyright 2010 – 2015 CPVLab.com Reproduction or Sharing of this Guide is strictly prohibited without the authorized consent from CPVLab.com
Solutions to Common Issues Installing CPV Lab… ISSUE: I keep getting an error like this after clicking Install?
Warning: fopen(/home/public_html//license/license.php) [function.fopen]: failed to open stream: No such file or directory in /home/public_html/cpv/install.php on line 0 No access to file license.php
SOLUTION:
First make sure all your file permissions have been edited as shown above. Also, check the Install Directory field.
What to enter in the Install Directory Field? If you install directly in the domain root, then the Installation Directory field in left blank.
If you install in subfolder (like http://thedomain.com/cpvtrack), then the Installation Directory is the subfolder ('cpvtrack' in this example). If you install in multiple levels of subfolders (like http://thedomain.com/scripts/cpvtrack), then the Installation Directory consists of all the subfolders ('scripts/cpvtrack' in this example). If you install in subdomain (like http://cpv.thedomain.com), then most of the times the Installation Directory must be left blank. This is what is most common in all Linux environments where I've tested the install.
----------------------------------------------------------------------------------------------------------------------------- ISSUE: When I try to login after installing, I get this message: "The application requires an active Internet connection" SOLUTION:
That message appears when a connection cannot be established to our security script in order to validate the license. There is only one external URL called from the application and that is done for the license check. Contact your web host to adjust the PHP setting ( allow_url_fopen ) to ON.
----------------------------------------------------------------------------------------------------------------------------- ISSUE: After Install and Login…I can only see a blank page? SOLUTION:
This is generally caused by a slightly older version of PHP (v5.1 or lower) and how it is configured to handle specific functions. Also you may have error messages disabled on your server from php.ini configuration file, that's why the blank page isn’t displaying any warnings or errors. The easiest solution is to contact your web host and have them upgrade you to PHP 5.3 which was released some time ago and is very stable.

CPV Lab Installation Guide – v2.17 - Copyright 2010 – 2015 CPVLab.com Reproduction or Sharing of this Guide is strictly prohibited without the authorized consent from CPVLab.com
Knowledgebase & Helpdesk
@
www.TheLabHelpdesk.com