ics rrl plugin v1 rrl plugin user manual.pdfatdi pty : 29/07/2017 ics rrl plugin - 4/46 2....
TRANSCRIPT

User guide
ATDI South Pacific
User guide for ICS RRL Plugin v1.9

ATDI PTY : 29/07/2017 ICS RRL Plugin - 2/46
Table of Contents 1. MODIFICATIONS .................................................................................................................................................... 3 2. INTRODUCTION ..................................................................................................................................................... 4 3. SYSTEM REQUIREMENTS.................................................................................................................................... 5 4. INSTALLING RRL PLUGIN ................................................................................................................................... 6 5. RUNNING RRL PLUGIN FROM ATDI APPLICATION ................................................................................ 10
6. CHECKING DATABASE STATUS ..................................................................................................................... 15 7. EXTRACTING MICROWAVE NETWORK FROM RRL DATABASE ......................................................... 16 8. EXTRACTING LAND MOBILE RADIO AND TERRESTRIAL SERVICES ................................................. 22 9. QUICK MICROWAVE LINK CALCULATOR ................................................................................................... 26 10. SUMMARY OF IMPORTED MICROWAVE PARAMETERS ........................................................................ 30 11. 400 MHZ STATION CULL ACCORDING TO DISTANCE AND FREQUENCY RANGE .......................... 31 12. STANDALONE MODE ......................................................................................................................................... 37 13. UPDATING RRL PLUGIN ................................................................................................................................... 40 14. METHODOLOGY FOR UPDATING COORDINATES USING COORDINATION DISTANCE ............... 41
15. TOOLS>>ELLIPSOIDAL DISTANCE CALCULATOR ................................................................................... 44 16. SETTINGS>>ADVANCED QUERY SETTINGS............................................................................................... 46

ATDI PTY : 29/07/2017 ICS RRL Plugin - 3/46
1. Modifications
Data Plugin version
Changes
25/01/2017 V 1.0 Document released
30/01/2017 V 1.0 Added quick introduction video link
01/02/2017 V 1.1 Added ACMA SITE_ID
13/02/2017 V 1.2 Added “Find candidate channels for assignment” option under 400 MHz trunked radio to call stations, channels and produce map view with the option to analyse channel-by-channel
28/04/2017 V 1.3 General graphical optimization for “Find candidate channels for assignment”
17/07/2017 V 1.4 General GUI loading optimization
29/07/2017 V 1.5 Introducing microwave calculator, GHz, MHz, KHz units for frequency range query. Also added support for RPE (Microwave) antenna modelling using the RPE model number. Many other improvements.
06/08/2017 V 1.6 General improvements and new feature added tools>>Filter results by radius. Allowing circular geographical filtering for table results.
18/08/2017 V 1.7 Added option to export table as CSV for 400MHz channel search Added option to dump RRL’s enite site table in CSV for ATDI site update feature Added option to export links and LMR as KML General stability improvement
1/09/2017 V 1.8 Fixed issue with csv export; ms excel unable to read all lines due to use of quotes in site address. Optimized square boundary calculations for “Update coordinates using coordination distance” by using WGS84 ellipsoid. See manual for further details.
2/09/2017 V 1.9 “Filter results by radius” is now WGS-84 compatible and in compliance with (GDA Vincenty inverse calculation method). Works for both LMS & P2P queries.New feature Tools>>Ellipsoidal distance calculator.New feature Settings>>Advanced query settings. An option to select equipment type “T” or “T/R”

ATDI PTY : 29/07/2017 ICS RRL Plugin - 4/46
2. Introduction
This document entails steps to download, configure and run RRL plugin with ATDI tools.
What is ICS RRL Plugin?
ICS RRL Plugin is an integration of ACMA’s RRL daily extracts into ATDI’s RF modelling and simulation tools such
as HTZ Warfare and ICS Telecom EV.
The plugin imports, on daily basis, and hosts a clone copy of RRL database online without any efforts required from
end users. The entire importation process has been automated.
The provided records are read-only, hence no users can add or modify any of the existing records.
Is the end-user required to download entire/partial RRL database?
No, the entire driver behind the plugin is to make the records searching criteria and equipment importation extremely
simple and effective. Users are not required to pre-download or post-process any form of records. The plugin will
automatically liaise with its own, online-hosted, SQL database and overlay the licensed equipment within the tool.
How long does it take to get 500 microwave links or 1000 land-mobile stations on the map together with all
subsequent RF parameters?
It’s a matter of one minute including loading time. The actual downloading process would be 1-10 seconds depending
on internet speed. It was tested with areas as big as NSW.
How does it work?
The plugin has two major parts,
• Online API: Obviously, internet connectivity is required to query and access the online database. The user has nothing
else to do with this part.
• Local windows compatible executable that take the form of extension to ATDI’s tools. The user is required to download
and install this part to be able to make use of the service.
Does it require fast internet connection?
No not really. 56kbps internet speed will do fine. All online transactions are seamlessly compressed
Is it secure?
All online transactions are going through HTTPS SSL encryption. The certificate is typically updated every 6-12
months.
What are the requirements?
• Internet connectivity
• Pre-generated username/password (issued by ATDI PTY)
• Windows operating system (x86 or x64)
• .NET Framework 4.5 or higher (Typically available on Windows VISTA and above)
• One of ATDI’s tools (ICS/HTZ)
Hardware requirements?
The plugin itself is not execution intensive – no need for a powerful PC. Any PC will do.
Will it work without using ATDI’s products?
Yes, but you will only be able to view the records. In fact, the application can be run in stand-alone mode just like any
other software.

ATDI PTY : 29/07/2017 ICS RRL Plugin - 5/46
What parameters can be imported?
The plugin can deal with P2P FX links and land mobile services (TX/RX). The following minimum parameters are
supported:
• Antenna height
• EIRP and related parameters (gains/losses)
• Antenna type – also pattern for some RPE models
• Bandwidth and frequency
• emission designation
• License number
• Long/lat
• Address
• Antenna orientation
• others..
Please see section 10 for further details.
Shall I be concerned with firewall?
Firewall should not be a problem. The service provided is similar to web-browsing.
A quick introduction video for RRL plugin can be found in the link below:
https://www.youtube.com/watch?v=bLnvyQR2rCU
Plugin
3. System requirements
• NET Framework 4.5 – or better
• Windows 7 32 bit/64 bit – or higher

ATDI PTY : 29/07/2017 ICS RRL Plugin - 6/46
4. Installing RRL Plugin
To download RRL plugin follow the steps below:
• Go to the ATDI application server: http://atdiptyserver.com.au
• Go to updates and download RRL plugin as shown in the screen shot below:
• Request user/password credentials from your local ATDI contact
Figure 1 Download RRL plugin
To install RRL plugin follow the steps below:
• Double click on the downloaded ICS RRL and follow the instructions
Figure 2 Setup RRL plugin

ATDI PTY : 29/07/2017 ICS RRL Plugin - 7/46
• Click next
Figure 3
• Accept licence agreement and click next
Figure 4: User agreement

ATDI PTY : 29/07/2017 ICS RRL Plugin - 8/46
• Click next (it is highly recommended you keep default destination folder)
Figure 5: Specify installation directory
• Click next (It is highly recommended you check both options below if user wishes to run the plugin in
standalone mode)
Figure 6: Create short cuts for standalone access

ATDI PTY : 29/07/2017 ICS RRL Plugin - 9/46
• Click finish to complete the installation
Figure 7: Finish

ATDI PTY : 29/07/2017 ICS RRL Plugin - 10/46
5. Running RRL plugin from ATDI application
To run RRL plugin from ATDI tools follow steps below:
• Open a project in ATDI ICS software.
• Define area where you want to extract station using rectangular tool by first left clicking on the
upper left corner of target area then left click on the lower right corner.
Figure 8 Rectangle tool to define target location
• Select RRL data access…(This area is acting as a geographical filter so users are responsible to draw
large enough rectangle to cover the coordination radius – say 200km)
Figure 9 Accessing RRL plugin
• The location of RRL plugin and the network file where, the extracted station is required to be saved
must be defined (This step is required only once):
Figure 10 Configure RRL plugin

ATDI PTY : 29/07/2017 ICS RRL Plugin - 11/46
•
Figure 11: Linking ATDI with the plugin executable file for the first time
Note: Please select a simple name for the EWX file. No spaces are allowed.
•
Figure 12: Creating EWX file link for network parameters exchange (Write-permission required)

ATDI PTY : 29/07/2017 ICS RRL Plugin - 12/46
• An example of such configuration could be:
• Above the network file location can be selected anywhere with write-permission. Doesn’t have to
be in the installation directory
• It is preferable to have a short path for the installation – some issues has been registered on some
operating systems
Figure 13 RRL plugin configuration example
• RRL plugin window will now open: Make sure the status is “online” otherwise contact support
Figure 14 RRL server status check and user account
• Check the server status: it should be online. User: Account used to login in the RRL plugin

ATDI PTY : 29/07/2017 ICS RRL Plugin - 13/46
• Go to -> Login -> Use Existing account
Figure 15 RRL user accounts
• Input the credential provided by ATDI (Contact [email protected] if you require demo license)
• Check the “Remember my credentials” check box so the plugin can save your encrypted password
locally
Figure 16 RRL login
• If login is successful - authenticated status will be shown.
Figure 17
Encrypted version of the credentials is saved at the local user “Documents” folder with .XML extension

ATDI PTY : 29/07/2017 ICS RRL Plugin - 14/46
• The User status will change to the user account name.
Figure 18 RRL current user status

ATDI PTY : 29/07/2017 ICS RRL Plugin - 15/46
6. Checking database status
This step is not compulsory but its highly recommended to check the integrity of the database before you use it. To
check database station follow steps below:
• Go to tools -> RRL database maintenance
Figure 19 RRL database maintenance validation
• The update date of the database and the updates in various fields is reported:
Figure 20 RRL Database update record
Note: The importation date need to be observed and make sure that there is an importation on that day in the morning.
The RRL plugin database is updated every morning at 5 am, Sydney Local time. The table above shows number of
records imported/available in every table of ACMA’s RRL database. Increment number of records indicate daily
additions//submissions of licensing/equipment.

ATDI PTY : 29/07/2017 ICS RRL Plugin - 16/46
7. Extracting Microwave network from RRL database
To extract microwave links using RRL plugin follow the steps provided below:
• In mode select Microwave Fixed Services
Figure 21 Microwave mode
• Frequency band can be selected to limit the option for lower frequency and upper frequency
Figure 22 Frequency band selection
Note, the band drop-down list is only to assist the user load predefined centre-frequencies for the next two fields
“Lower frequency” and “Upper frequency” and the default unit is Hz. Never the less, the user may skip band selection
and specify the frequency range manually. If you wish to add specific band please contact the support – these bands can
be added dynamically and at any time.
• Select the lower and upper frequency from the dropdown menu or manually enter the values.
Figure 23 Lower and upper frequency limit configuration
• The RRL plugin search for sites inclusive of the lower and upper frequency bounds.
• Changing frequency unit (Hz, kHz, MHz and GHz)
Select the numeric input fields either “Lower frequency (Hz)” or “Upper frequency (Hz)” and push on the keyboard
either h, k, m or g for Hz, kHz, MHz and GHz respectively

ATDI PTY : 29/07/2017 ICS RRL Plugin - 17/46
Figure 24 The frequency query range is Hz by default
Figure 25: Key board shortcuts for setting the frequency range unit to Hz, kHz, MHz & GHz
Figure 26 The frequency query range is set to MHz

ATDI PTY : 29/07/2017 ICS RRL Plugin - 18/46
• A query title can be given for each search. After you run the query you can save the query from
File-> Save. This way same query can be used in future but not compulsory.
Figure 27 RRL query title
• Click on Run Query
Figure 28 Running query
• List of stations satisfying the search criteria will be listed
Figure 29 Query result

ATDI PTY : 29/07/2017 ICS RRL Plugin - 19/46
• Click on Add to map to add the station to map and then Done.
Figure 30 Adding station to map
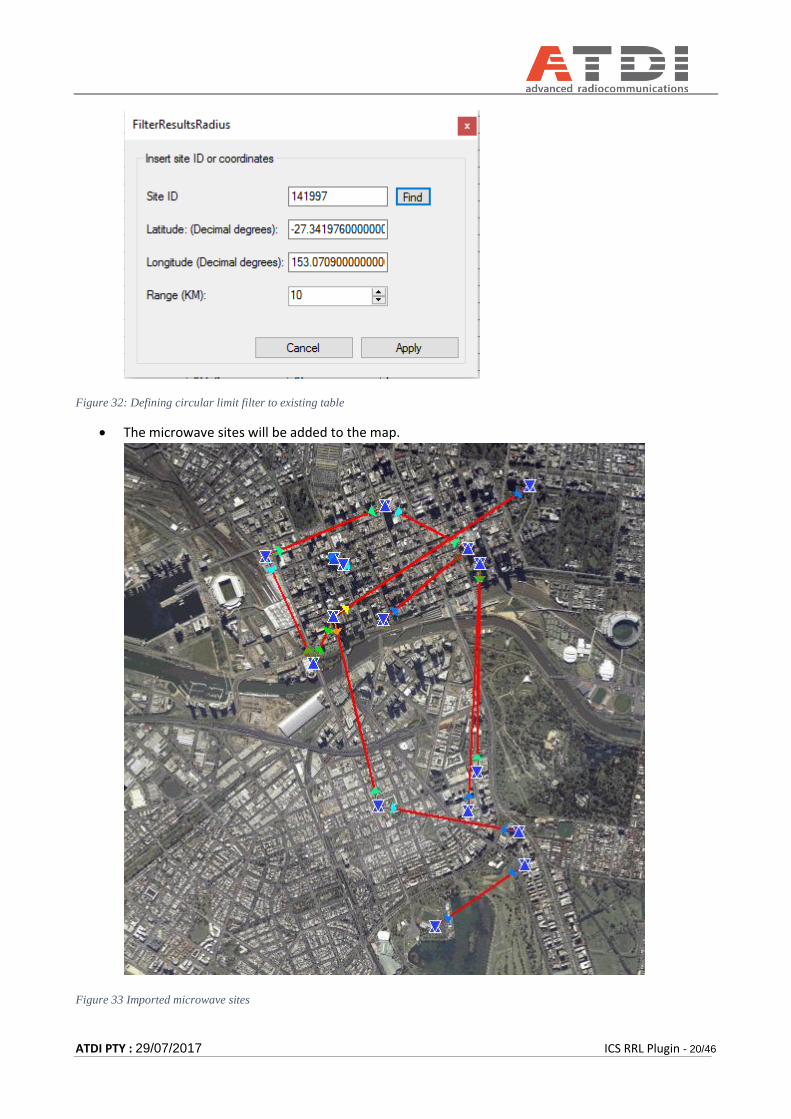
• Optional: applying circular filter to query results
This step is not compulsory but some users might find it useful. The application run rectangular
geographical query following the ULC and LRC corners. Since the query is not circular; some users
may wish to apply a secondary circular filtering for coordination purposes. Where the circle is
specified by a centre coordinates and a radius.
Figure 31: Filter results by radius
ATDI PTY : 29/07/2017 ICS RRL Plugin - 20/46
Figure 32: Defining circular limit filter to existing table
• The microwave sites will be added to the map.
Figure 33 Imported microwave sites

ATDI PTY : 29/07/2017 ICS RRL Plugin - 21/46
It should be noted not all site details are available in ACMA database for all site so imported data
for each site must be verified for correctness.
Highlighted parameters in the next two figures highlight imported fields (highlighted in red). The
green fields are either assumed or calculated with the assistance of other parameters.
Figure 34 Imported general microwave parameters from RRL records

ATDI PTY : 29/07/2017 ICS RRL Plugin - 22/46
Figure 35 Imported antenna parameters from RRL records
RPE antenna model would automatically be selected if present I the database. Otherwise ITU-R F.699-4 would be used. ACMA’s records for antenna orientation imported but not used. Links are autoamticaly re-oriented to suite ATDI’s map and tool.
8. Extracting Land Mobile Radio and terrestrial services
To extract site information for LMR and other terrestrial services follow the steps below:
• Go to Mode-> Land mobile
Figure 36 Land mobile mode

ATDI PTY : 29/07/2017 ICS RRL Plugin - 23/46
• You can select band and define lower and upper frequency limit.
Figure 37 Frequency limits configuration
Note, the band drop-down list is only to assist the user load predefined centre-frequencies for the next two fields
“Lower frequency” and “Upper frequency” and the default unit is Hz. Never the less, the user may skip band selection
and specify the frequency range manually. If you wish to add specific band please contact the support – these bands can
be added dynamically and at any time.
• A title can be given to the query and click on run query to search the database. After you run the
query you can save the query from File-> Save. This way same query can be used in future.
Figure 38 Query title setup

ATDI PTY : 29/07/2017 ICS RRL Plugin - 24/46
• Sites satisfying the criteria are listed:
Figure 39 Query’s result
• Optional: applying circular filter to query results
This step is not compulsory but some users might find it useful. The application run rectangular
geographical query following the ULC and LRC corners. Since the query is not circular; some users
may wish to apply a secondary circular filtering for coordination purposes. Where the circle is
specified by a centre coordinates and a radius.
Figure 40: Filter results by radius

ATDI PTY : 29/07/2017 ICS RRL Plugin - 25/46
Figure 41: Defining circular limit filter to existing table
• Click on Add to map and Done to import the station on the map
Figure 42 Result importation to map
It should be noted not all site details are available in ACMA database for all site so imported data for each site must be
verified for correctness.

ATDI PTY : 29/07/2017 ICS RRL Plugin - 26/46
9. Quick microwave link calculator
This new menu recently added from version 1.4 and on. It is based on two CSV files:
The user may contribute to these files to add new microwave equipment or antenna parameters.
• To access the calculator
• Select the microwave band
• Select the microwave bandwidth

ATDI PTY : 29/07/2017 ICS RRL Plugin - 27/46
• Select the microwave link speed
• Select the antenna size

ATDI PTY : 29/07/2017 ICS RRL Plugin - 28/46
• Calculations
The calculator would provide bandwidth options available from the selected band.
The speeds would be those available for the selected bandwidth
Modulation is according to the speed
Antenna sizes are those available bases on your band selection
Transmission power is user input
Sensitivity is relevant to the band, bandwidth & speed/modulation selected
Antenna gain is according to the antenna size selected
The Power received is assuming free space and counting the antenna gain
The calculator doesn’t really calculate the sensitivity; it would look up the values accordingly to the two CSV files
discussed earlier in this section

ATDI PTY : 29/07/2017 ICS RRL Plugin - 29/46
ATDI PTY : 29/07/2017 ICS RRL Plugin - 30/46
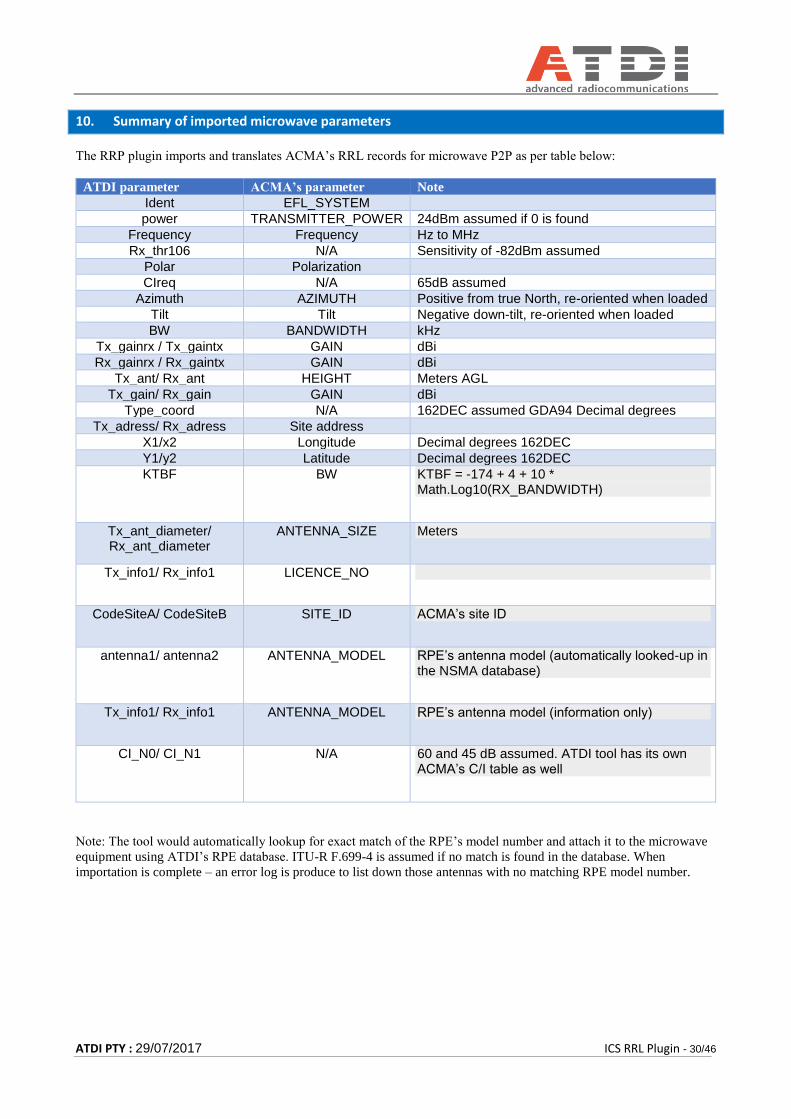
10. Summary of imported microwave parameters
The RRP plugin imports and translates ACMA’s RRL records for microwave P2P as per table below:
ATDI parameter ACMA’s parameter Note
Ident EFL_SYSTEM
power TRANSMITTER_POWER 24dBm assumed if 0 is found
Frequency Frequency Hz to MHz
Rx_thr106 N/A Sensitivity of -82dBm assumed
Polar Polarization
CIreq N/A 65dB assumed
Azimuth AZIMUTH Positive from true North, re-oriented when loaded
Tilt Tilt Negative down-tilt, re-oriented when loaded
BW BANDWIDTH kHz
Tx_gainrx / Tx_gaintx GAIN dBi
Rx_gainrx / Rx_gaintx GAIN dBi
Tx_ant/ Rx_ant HEIGHT Meters AGL
Tx_gain/ Rx_gain GAIN dBi
Type_coord N/A 162DEC assumed GDA94 Decimal degrees
Tx_adress/ Rx_adress Site address
X1/x2 Longitude Decimal degrees 162DEC
Y1/y2 Latitude Decimal degrees 162DEC
KTBF BW KTBF = -174 + 4 + 10 * Math.Log10(RX_BANDWIDTH)
Tx_ant_diameter/ Rx_ant_diameter
ANTENNA_SIZE Meters
Tx_info1/ Rx_info1 LICENCE_NO
CodeSiteA/ CodeSiteB SITE_ID ACMA’s site ID
antenna1/ antenna2 ANTENNA_MODEL RPE’s antenna model (automatically looked-up in the NSMA database)
Tx_info1/ Rx_info1 ANTENNA_MODEL RPE’s antenna model (information only)
CI_N0/ CI_N1 N/A 60 and 45 dB assumed. ATDI tool has its own ACMA’s C/I table as well
Note: The tool would automatically lookup for exact match of the RPE’s model number and attach it to the microwave
equipment using ATDI’s RPE database. ITU-R F.699-4 is assumed if no match is found in the database. When
importation is complete – an error log is produce to list down those antennas with no matching RPE model number.

ATDI PTY : 29/07/2017 ICS RRL Plugin - 31/46
11. 400 MHz station cull according to distance and frequency range
The purpose of this function is not to automatically assign a frequency. Frequency assignment can be achieved using
ICS Telecom Ev. This function helps AP to execute distance and frequency cull in batch mode. The tool also helps
analyse frequency re-use and nearest station within cull limits and co-channel separation.
The culling is based on the “proposed” location and not the proposed frequency. There will be culling for every channel
in the band selected identified by the lower and upper frequency limit.
• Access the function from Tools>>400 MHz trunked radio>>Find candidate channels for assignment
• Step number one is to enter coordinates of the new site being investigated. Alternatively, the user
may specify the site ID if it’s an existing site. The coordinates can be updated by clicking “Update”
• One the coordinates are set; click “Next”
• Next is to select the band of interest. One selected the tool will automatically load the frequencies
in the frequency range “Lower frequency” and “Upper frequency”. The use may also specify the
frequencies manually. The use may set any frequency range of interest and do not have to be
available in the drop-down list. The frequencies are in ascending order including RX and TX
channels. So the use may select any frequency range including reception channels.

ATDI PTY : 29/07/2017 ICS RRL Plugin - 32/46
• Once frequency range selected – click “Next” to validate input and jump to next tab
• Select the band of operations following LM8 table C1 or specify the coordination distance and cull
frequency range manually. The band drop-down list is to assist you and it’s not restrictive.
• Click “Next”
• Do not click “Clone ” now turn your attention to the right-side of the form

ATDI PTY : 29/07/2017 ICS RRL Plugin - 33/46
• User may now cull all stations within coordination distance of the proposed site specified in the
first step. This culling is based on “Lower frequency (Hz)” and “Upper frequency (Hz)” frequency
limits and the coordination distance (Km). The “cull frequency range (Hz)” is not utilized at this
step. Hence, criteria as follows:
Freq >= “Lower frequency (Hz)”
Freq <= “Upper frequency (Hz)”
Distance (site, proposed site) <= “Coordination distance (KM)”
• User may choose to export all stations following the cull criteria above. Click “Export stations”
• The user might start visually analysing frequency re-use for every channel. Click “Map analysis”
• The application would automatically display the map and overlay all stations within cull limits. The
map would clearly shows the “Proposed” location. Hover the cursor over the surrounding sites –
the marker would display site ID, frequency, distance to proposed site and EIRP level.

ATDI PTY : 29/07/2017 ICS RRL Plugin - 34/46
• To assist in display and analysis. The use may attempt to check the “Auto zoom” option. Then use
the channel selection drop-down list and select a transmission frequency. The frequency range is
sorted and include reception and transmission channels. The tool will automatically display co-
channel, first adjacent and 2nd adjacent channels and their peresptive locations. The use may also
click in the channel selection field and use UP/DOWN keyboard key to automatically jump to the
second frequency and so forth.

ATDI PTY : 29/07/2017 ICS RRL Plugin - 35/46
• Channel culling is the second step after stations culling which was purely distance. The purpose of
this “Cull channels” to automatically analyse all channels in the band and report per channel the
number of violators for the cull limits.
• Channel culling criteria
Stations pool:
Freq >= “Lower frequency (Hz)”
Freq <= “Upper frequency (Hz)”
Distance (site, proposed site) <= “Coordination distance (KM)”
Per channel:
Channel being considered – Feq <= “Cull frequency range (Hz)”

ATDI PTY : 29/07/2017 ICS RRL Plugin - 36/46
The total per channel is the number of sites within cull limits. i.e coordination distance and “cull frequency range
(Hz)”

ATDI PTY : 29/07/2017 ICS RRL Plugin - 37/46
12. Standalone mode
The RRL plugin can be operated in standalone mode with no dependency on ICS. The installation will also create
desktop and start-menu shorts to run the plugin in standalone mode.
• Run the ICS RRL Plugin from start menu or Desktop
Figure 43: ICS RRL Plugin icon
• The application starts with “No -c option” and “No -o option” specified; Indicating that the plugin
will not pass the network file to ICS and it will not read the area filter mask (polygon) from ICS
Designer
Figure 44: ICS RRL Plugin in standalone mode
• With standalone mode the plugin doesn’t provide an option to specify a destination for the
network file (XML) to be generated. By default, it goes to
“C:/Users/<CURRENT_USER>/Documents/RRL_Network.EWX”

ATDI PTY : 29/07/2017 ICS RRL Plugin - 38/46
Figure 45: ICS RRL standalone mode saving EWX file under User's documents
• Specifying a reference point and coordination distance
The plugin is not aware of the area of interest when running in stand-alone mode. ULC & LRC are not relevant for the
area of study. Accordingly, the user is expected to specify the area of interest. This can either be done by know the
ULC/LRC coordinates or by specifying a reference point and a radius (KM). Example is provided below:
Figure 46 Updating the area of interest for the search criteria

ATDI PTY : 29/07/2017 ICS RRL Plugin - 39/46
Figure 47: Calculating the area filter using reference location and coordination distance
There are two approaches provided to identify the reference location and coordination distance. Use may specify the
site ID, if existing, and click “^” button as shown in figure above. The function would translate the site ID to lat/long
coordinates. Another option would be to insert the lat/long coordinates directly. Once the corners calculations – the user
may click “Apply” button.

ATDI PTY : 29/07/2017 ICS RRL Plugin - 40/46
13. Updating RRL plugin
New updates for RRL plugin can be checked from Help-> Check for updates. You can follow the instruction to update
the plugin to the latest one whenever it is outdated.
Figure 48 Checking RRL updates
User login required.
The plugin will automatically compare the current version with latest one available online. The plugin will verify both
database version and plugin executable version.
If plugin or database version is not matching – the tool will automatically download latest executables, shutdown the
application and proceed with the installation.
• New update detected; press ok to download
Figure 49: A new release has been detected
• Download completed; press ok to start installation
Figure 50
Kindly refer to the installation section for further instructions on installation.

ATDI PTY : 29/07/2017 ICS RRL Plugin - 41/46
14. Methodology for updating coordinates using coordination distance
This section details the calculations approach for the boundary box using in geographical queries. Below is an example
of calculations from version 1.7 together with the visual representation in GE for verification purposes.
The tool queries the RRL database following a rectangle filtering for speed and efficiency; never the less, the user may
still be able to apply circular filtering after the first query is issued. The engine assumes Earth ellipsoid model following
WGS-84 and not a sphere.
Figure 51: Sample location and boundary box calculations

ATDI PTY : 29/07/2017 ICS RRL Plugin - 42/46
Figure 52: Visualization of the boundary box calculations
Where:
• Centre: The input Long/Lat as per Figure 51
• ULC, URC, LLC and LRC are the calculated boundary as per Figure 51
Code:
public class MapPoint { public double Longitude { get; set; } // In Degrees public double Latitude { get; set; } // In Degrees } public class BoundingBox { public MapPoint MinPoint { get; set; } public MapPoint MaxPoint { get; set; } } // Semi-axes of WGS-84 geoidal reference

ATDI PTY : 29/07/2017 ICS RRL Plugin - 43/46
private const double WGS84_a = 6378137.0; // Major semiaxis [m] private const double WGS84_b = 6356752.3; // Minor semiaxis [m] // 'halfSideInKm' is the half length of the bounding box you want in kilometers. public static BoundingBox GetBoundingBox(MapPoint point, double halfSideInKm) { var lat = Deg2rad(point.Latitude); var lon = Deg2rad(point.Longitude); var halfSide = 1000 * halfSideInKm; // Radius of Earth at given latitude var radius = WGS84EarthRadius(lat); // Radius of the parallel at given latitude var pradius = radius * Math.Cos(lat); var latMin = lat - halfSide / radius; var latMax = lat + halfSide / radius; var lonMin = lon - halfSide / pradius; var lonMax = lon + halfSide / pradius; return new BoundingBox { MinPoint = new MapPoint { Latitude = Rad2deg(latMin), Longitude = Rad2deg(lonMin) }, MaxPoint = new MapPoint { Latitude = Rad2deg(latMax), Longitude = Rad2deg(lonMax) } }; } // degrees to radians private static double Deg2rad(double degrees) { return Math.PI * degrees / 180.0; } // radians to degrees private static double Rad2deg(double radians) { return 180.0 * radians / Math.PI; } // Earth radius at a given latitude, according to the WGS-84 ellipsoid [m] private static double WGS84EarthRadius(double lat) { // http://en.wikipedia.org/wiki/Earth_radius var An = WGS84_a * WGS84_a * Math.Cos(lat); var Bn = WGS84_b * WGS84_b * Math.Sin(lat); var Ad = WGS84_a * Math.Cos(lat); var Bd = WGS84_b * Math.Sin(lat); return Math.Sqrt((An*An + Bn*Bn) / (Ad*Ad + Bd*Bd)); }
Outcome:

ATDI PTY : 29/07/2017 ICS RRL Plugin - 44/46
Figure 53: Filter results by radius for P2P mode
For P2P, if any of the terminals is inside the circle the link will be included for coordination.
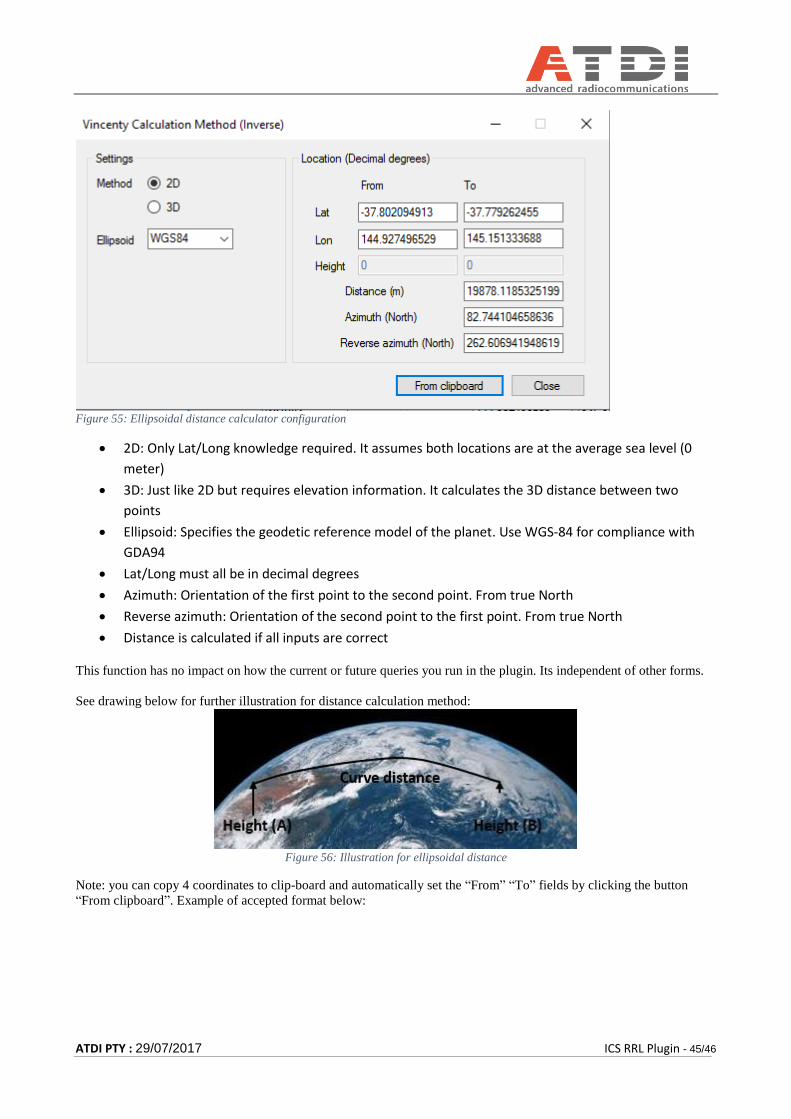
15. Tools>>Ellipsoidal distance calculator
This is an advanced distance calculator for two points. The calculations are based on Inverse Vincenty method.
Figure 54: Ellipsoidal distance calculator
ATDI PTY : 29/07/2017 ICS RRL Plugin - 45/46
Figure 55: Ellipsoidal distance calculator configuration
• 2D: Only Lat/Long knowledge required. It assumes both locations are at the average sea level (0
meter)
• 3D: Just like 2D but requires elevation information. It calculates the 3D distance between two
points
• Ellipsoid: Specifies the geodetic reference model of the planet. Use WGS-84 for compliance with
GDA94
• Lat/Long must all be in decimal degrees
• Azimuth: Orientation of the first point to the second point. From true North
• Reverse azimuth: Orientation of the second point to the first point. From true North
• Distance is calculated if all inputs are correct
This function has no impact on how the current or future queries you run in the plugin. Its independent of other forms.
See drawing below for further illustration for distance calculation method:
Figure 56: Illustration for ellipsoidal distance
Note: you can copy 4 coordinates to clip-board and automatically set the “From” “To” fields by clicking the button
“From clipboard”. Example of accepted format below:

ATDI PTY : 29/07/2017 ICS RRL Plugin - 46/46
16. Settings>>Advanced query settings
Figure 57: Advanced query settings
This function applies to future queries you run and not to currently executed queries. User selection in this form is
maintained while the plugin is open. The Device type will always restore to TX only every time the user run the plugin.
Figure 58: Advanced query settings form
By default, the RRL plugin only returns equipment of the type “T” for LMS queries. P2P mode such as microwave is
always T->R so this form doesn’t apply to P2P mode.
• TX: Applies to future queries; only equipment of type “T” are returned by the API
• TX/RX: Applies to future queries until the plugin is restarted. Both “T” and “R” type equipment are
returned. Especially useful if user wishes to extract the data into a CSV. Don’t use this option when
modelling the network for ICS Telecom EV importation.