how to create a magcloud publication in microsoft...
TRANSCRIPT

How to Create a MagCloud Publication in
Microsoft Publisher
a step-by-step guide from
36
Mic
roso
ft P
ublis
her
Create a Standard Publication or Pamphlet in Microsoft PublisherPDF Size: 8.5” x 11” | Product Trim Size: 8.25” x 10.75”
1A . Use the Publisher Template for MagCloud Standard to create a new document:
a: Visit www .magcloud .com/create/pdfguides to download the Publisher Template for MagCloud Standard
b: Unzip and open the file (MagCloud_Publisher_Standard .pub) in Microsoft Publisher 2007 or newer
1B . Change the settings of an existing Publisher document to work with MagCloud:
a: Open your document in Microsoft Publisher 2007 or newer
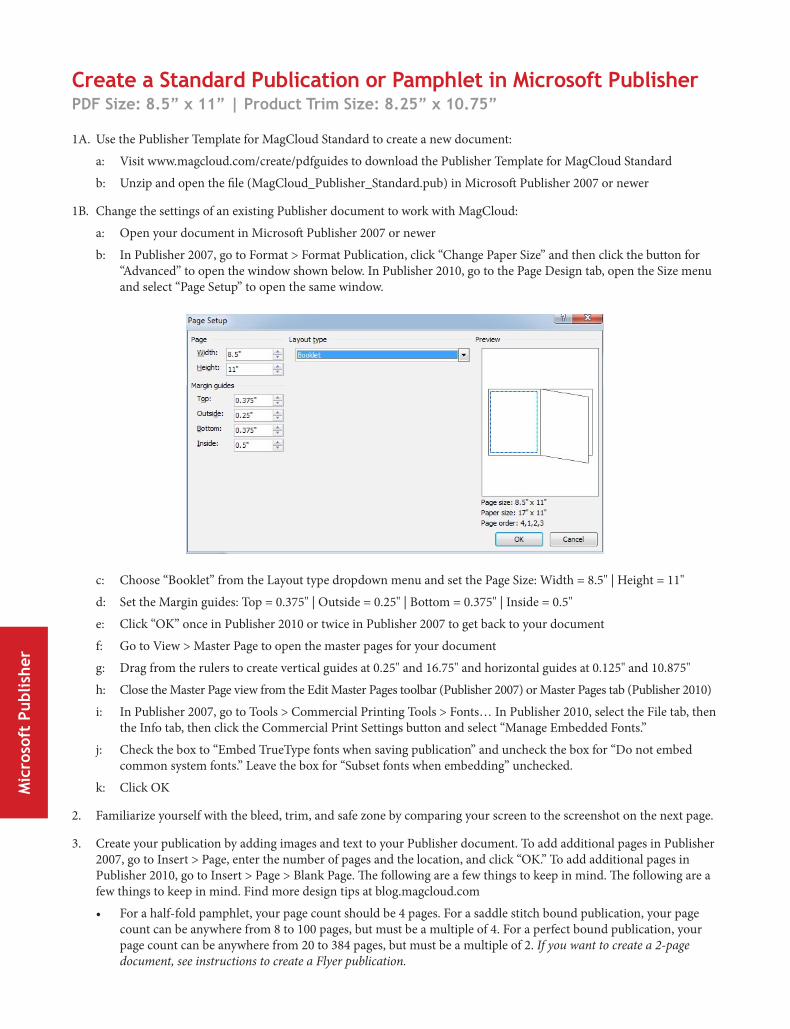
b: In Publisher 2007, go to Format > Format Publication, click “Change Paper Size” and then click the button for “Advanced” to open the window shown below . In Publisher 2010, go to the Page Design tab, open the Size menu and select “Page Setup” to open the same window .
c: Choose “Booklet” from the Layout type dropdown menu and set the Page Size: Width = 8 .5" | Height = 11"
d: Set the Margin guides: Top = 0 .375" | Outside = 0 .25" | Bottom = 0 .375" | Inside = 0 .5"
e: Click “OK” once in Publisher 2010 or twice in Publisher 2007 to get back to your document
f: Go to View > Master Page to open the master pages for your document
g: Drag from the rulers to create vertical guides at 0 .25" and 16 .75" and horizontal guides at 0 .125" and 10 .875"
h: Close the Master Page view from the Edit Master Pages toolbar (Publisher 2007) or Master Pages tab (Publisher 2010)
i: In Publisher 2007, go to Tools > Commercial Printing Tools > Fonts… In Publisher 2010, select the File tab, then the Info tab, then click the Commercial Print Settings button and select “Manage Embedded Fonts .”
j: Check the box to “Embed TrueType fonts when saving publication” and uncheck the box for “Do not embed common system fonts .” Leave the box for “Subset fonts when embedding” unchecked .
k: Click OK
2 . Familiarize yourself with the bleed, trim, and safe zone by comparing your screen to the screenshot on the next page .
3 . Create your publication by adding images and text to your Publisher document . To add additional pages in Publisher 2007, go to Insert > Page, enter the number of pages and the location, and click “OK .” To add additional pages in Publisher 2010, go to Insert > Page > Blank Page . The following are a few things to keep in mind . The following are a few things to keep in mind . Find more design tips at blog .magcloud .com
• For a half-fold pamphlet, your page count should be 4 pages. For a saddle stitch bound publication, your page count can be anywhere from 8 to 100 pages, but must be a multiple of 4 . For a perfect bound publication, your page count can be anywhere from 20 to 384 pages, but must be a multiple of 2 . If you want to create a 2-page document, see instructions to create a Flyer publication.
37
Microsoft Publisher
• For the best print output, we recommend that images have a resolution of 300 pixels per inch. For example, a full-page image would be 2550 pixels by 3300 pixels .
• A 6mm square 2D barcode will be printed in the lower right-hand corner of the back cover of your publication (ie, the last page of your PDF) . Be sure to keep this area clear of any content you want to appear in your final publication .
• If your publication will be perfect bound, you can find design tips in the post “Designing for Perfect Binding” on the MagCloud Blog .
4 . When you are ready to export your PDF, go to File > Save As
a: Choose a name for your PDF and select where you want it to be saved on your computer
b: Select “PDF” from the Save as type drop-down menu
c: Click the “Change” button (Publisher 2007) or the “Options” button (Publisher 2010)
5 . In the Publish Options window that appears:
a: Select “Commercial Press” from the top menu
b: Check the box for “ISO 19005-1 compliant (PDF-A)” under PDF Options, if it is not checked already
c: Click the “Print Options” button
d: Select “One page per sheet” in the Printing options section and uncheck all the boxes under Printer’s marks
f: Click “OK” and then “OK” again to close both the Print Options and Publish Options windows
6 . Click “Save” and upload your PDF to www .magcloud .com/publish
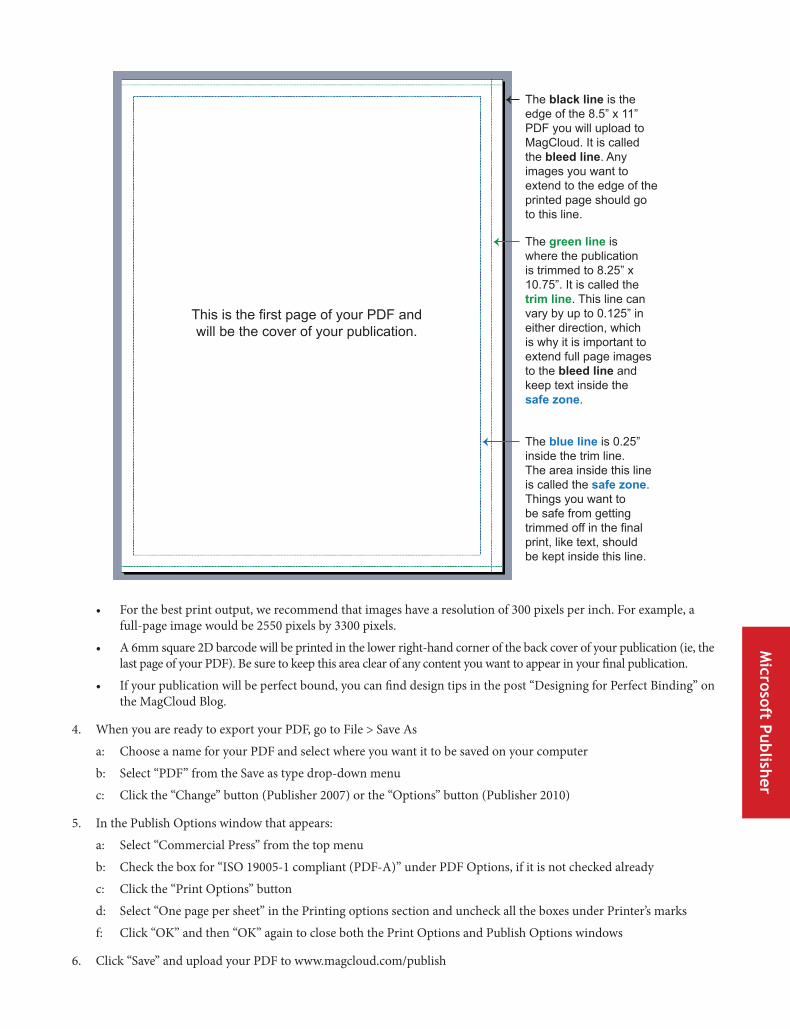
The black line is the edge of the 8.5” x 11” PDF you will upload to MagCloud. It is called the bleed line. Any images you want to extend to the edge of the printed page should go to this line.
The blue line is 0.25” inside the trim line. The area inside this line is called the safe zone. Things you want to be safe from getting trimmed off in the final print, like text, should be kept inside this line.
The green line is where the publication is trimmed to 8.25” x 10.75”. It is called the trim line. This line can vary by up to 0.125” in either direction, which is why it is important to extend full page images to the bleed line and keep text inside the safe zone.
This is the first page of your PDF and will be the cover of your publication.

38
Create a Square Publication or Pamphlet in Microsoft PublisherPDF Size: 8.25” x 8.25” | Product Trim Size: 8” x 8”
1A . Use the Publisher Template for MagCloud Square to create a new document:
a: Visit www .magcloud .com/create/pdfguides to download the Publisher Template for MagCloud Square
b: Unzip and open the file (MagCloud_Publisher_Square .pub) in Microsoft Publisher 2007 or newer
1B . Change the settings of an existing Publisher document to work with MagCloud:
a: Open your document in Microsoft Publisher 2007 or newer
b: In Publisher 2007, go to Format > Format Publication, click “Change Paper Size” and then click the button for “Advanced” to open the window shown below . In Publisher 2010, go to the Page Design tab, open the Size menu and select “Page Setup” to open the same window .
c: Choose “Booklet” from the Layout type dropdown menu and set the Page Size: Width = 8 .25” | Height = 8 .25”
d: Set the Margin guides: Top = 0 .375” | Outside = 0 .25” | Bottom = 0 .375” | Inside = 0 .5”
e: Click “OK” once in Publisher 2010 or twice in Publisher 2007 to get back to your document
f: Go to View > Master Page to open the master pages for your document
g: Drag from the rulers to create vertical guides at 0 .25” and 16 .25” and horizontal guides at 0 .125” and 8 .125”
h: Close the Master Page view from the Edit Master Pages toolbar (Publisher 2007) or Master Pages tab (Publisher 2010)
i: In Publisher 2007, go to Tools > Commercial Printing Tools > Fonts… In Publisher 2010, select the File tab, then the Info tab, then click the Commercial Print Settings button and select “Manage Embedded Fonts .”
j: Check the box to “Embed TrueType fonts when saving publication” and uncheck the box for “Do not embed common system fonts .” Leave the box for “Subset fonts when embedding” unchecked .
k: Click OK
2 . Familiarize yourself with the bleed, trim, and safe zone by comparing your screen to the screenshot on the next page .
3 . Create your publication by adding images and text to your Publisher document . To add additional pages in Publisher 2007, go to Insert > Page, enter the number of pages and the location, and click “OK .” To add additional pages in Publisher 2010, go to Insert > Page > Blank Page . The following are a few things to keep in mind . The following are a few things to keep in mind . Find more design tips at blog .magcloud .com
• For a half-fold pamphlet, your page count should be 4 pages. For a saddle stitch bound publication, your page count can be anywhere from 8 to 100 pages, but must be a multiple of 4 . For a perfect bound publication, your page count can be anywhere from 20 to 384 pages, but must be a multiple of 2 . If you want to create a 2-page document, see instructions to create a Flyer publication.
Mic
roso
ft P
ublis
her
39
• For the best print output, we recommend that images have a resolution of 300 pixels per inch. For example, a full-page image would be 2550 pixels by 3300 pixels .
• A 6mm square 2D barcode will be printed in the lower right-hand corner of the back cover of your publication (ie, the last page of your PDF) . Be sure to keep this area clear of any content you want to appear in your final publication .
• If your publication will be perfect bound, you can find design tips in the post “Designing for Perfect Binding” on the MagCloud Blog .
4 . When you are ready to export your PDF, go to File > Save As
a: Choose a name for your PDF and select where you want it to be saved on your computer
b: Select “PDF” from the Save as type drop-down menu
c: Click the “Change” button (Publisher 2007) or the “Options” button (Publisher 2010)
5 . In the Publish Options window that appears:
a: Select “Commercial Press” from the top menu
b: Check the box for “ISO 19005-1 compliant (PDF-A)” under PDF Options, if it is not checked already
c: Click the “Print Options” button
d: Select “One page per sheet” in the Printing options section and uncheck all the boxes under Printer’s marks
f: Click “OK” and then “OK” again to close both the Print Options and Publish Options windows
6 . Click “Save”
7 . Upload your PDF to www .magcloud .com/publish
Microsoft Publisher
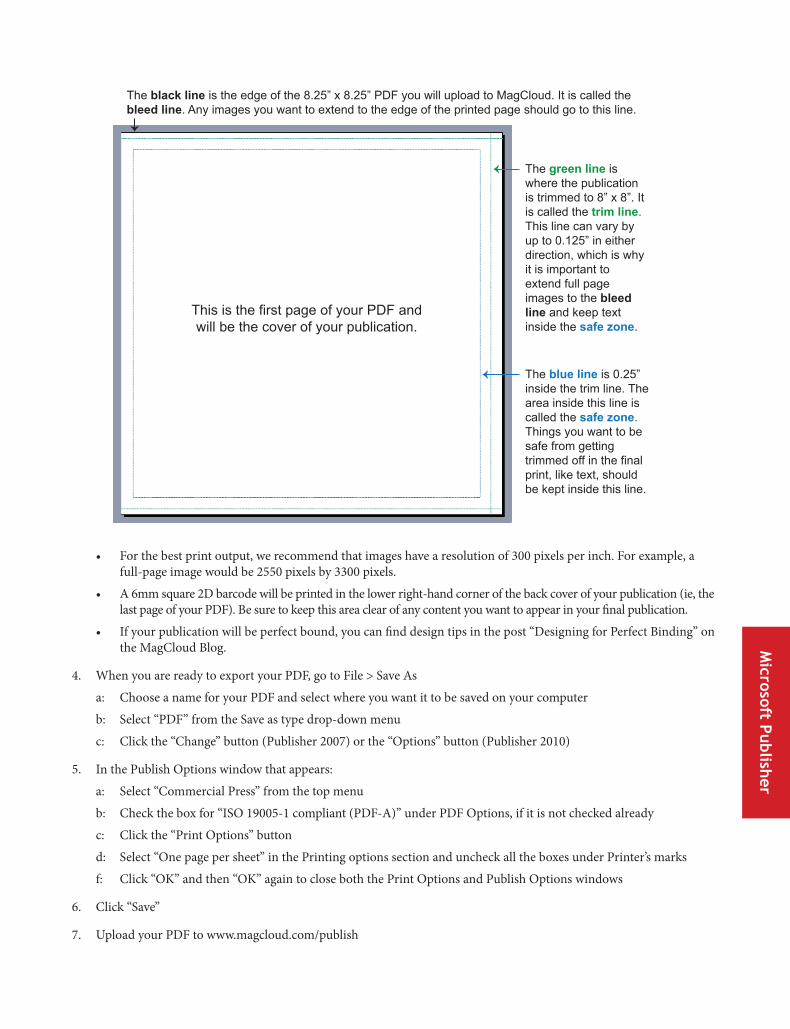
The blue line is 0.25” inside the trim line. The area inside this line is called the safe zone. Things you want to be safe from getting trimmed off in the final print, like text, should be kept inside this line.
The green line is where the publication is trimmed to 8” x 8”. It is called the trim line. This line can vary by up to 0.125” in either direction, which is why it is important to extend full page images to the bleed line and keep text inside the safe zone.
This is the first page of your PDF and will be the cover of your publication.
The black line is the edge of the 8.25” x 8.25” PDF you will upload to MagCloud. It is called the bleed line. Any images you want to extend to the edge of the printed page should go to this line.
40
Create a Digest Publication or Pamphlet in Microsoft PublisherPDF Size: 5.5” x 8.5”, 8.5” x 5.5” | Product Trim Sizes: 5.25” x 8.25”, 8.25” x 5.25”
1A . Use one of the Publisher Templates for MagCloud Digest to create a new document:
a: Visit www .magcloud .com/create/pdfguides to download one of the Publisher Templates for MagCloud Digest
b: Unzip and open the file you downloaded in Microsoft Publisher 2007 or newer
1B . Change the settings of an existing Publisher document to work with MagCloud:
a: Open your document in Microsoft Publisher 2007 or newer
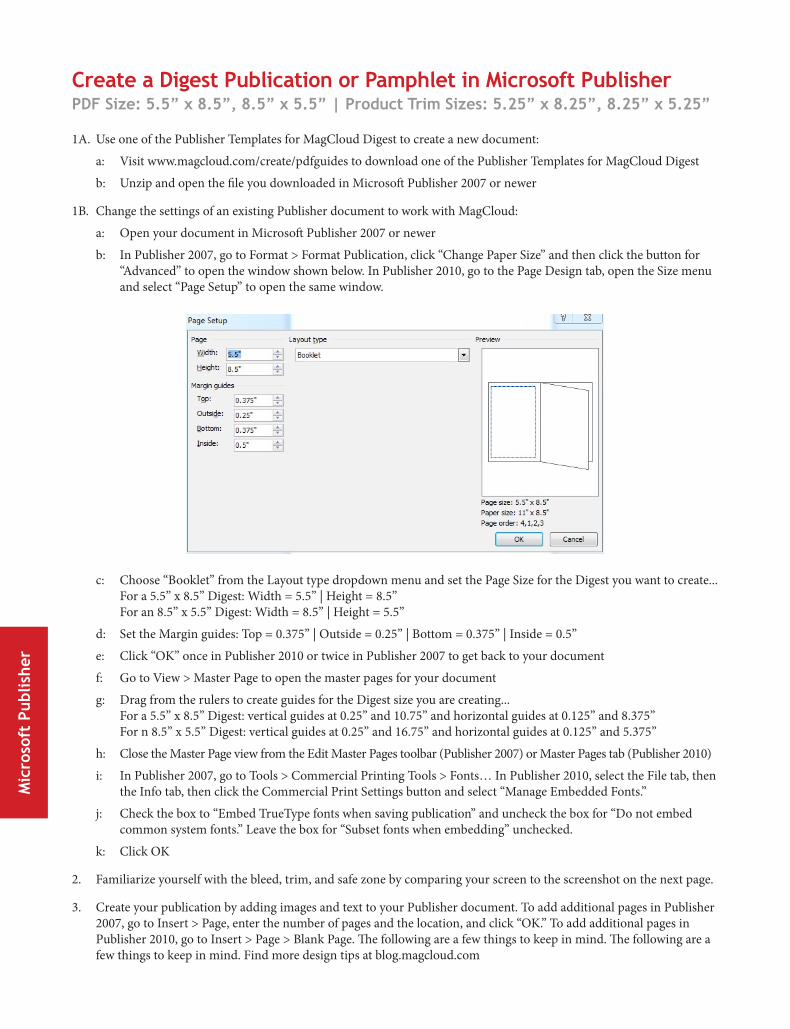
b: In Publisher 2007, go to Format > Format Publication, click “Change Paper Size” and then click the button for “Advanced” to open the window shown below . In Publisher 2010, go to the Page Design tab, open the Size menu and select “Page Setup” to open the same window .
c: Choose “Booklet” from the Layout type dropdown menu and set the Page Size for the Digest you want to create . . . For a 5 .5” x 8 .5” Digest: Width = 5 .5” | Height = 8 .5” For an 8 .5” x 5 .5” Digest: Width = 8 .5” | Height = 5 .5”
d: Set the Margin guides: Top = 0 .375” | Outside = 0 .25” | Bottom = 0 .375” | Inside = 0 .5”
e: Click “OK” once in Publisher 2010 or twice in Publisher 2007 to get back to your document
f: Go to View > Master Page to open the master pages for your document
g: Drag from the rulers to create guides for the Digest size you are creating . . . For a 5 .5” x 8 .5” Digest: vertical guides at 0 .25” and 10 .75” and horizontal guides at 0 .125” and 8 .375” For n 8 .5” x 5 .5” Digest: vertical guides at 0 .25” and 16 .75” and horizontal guides at 0 .125” and 5 .375”
h: Close the Master Page view from the Edit Master Pages toolbar (Publisher 2007) or Master Pages tab (Publisher 2010)
i: In Publisher 2007, go to Tools > Commercial Printing Tools > Fonts… In Publisher 2010, select the File tab, then the Info tab, then click the Commercial Print Settings button and select “Manage Embedded Fonts .”
j: Check the box to “Embed TrueType fonts when saving publication” and uncheck the box for “Do not embed common system fonts .” Leave the box for “Subset fonts when embedding” unchecked .
k: Click OK
2 . Familiarize yourself with the bleed, trim, and safe zone by comparing your screen to the screenshot on the next page .
3 . Create your publication by adding images and text to your Publisher document . To add additional pages in Publisher 2007, go to Insert > Page, enter the number of pages and the location, and click “OK .” To add additional pages in Publisher 2010, go to Insert > Page > Blank Page . The following are a few things to keep in mind . The following are a few things to keep in mind . Find more design tips at blog .magcloud .com
Mic
roso
ft P
ublis
her
41
• For a half-fold pamphlet, your page count should be 4 pages. For a saddle stitch bound publication, your page count can be anywhere from 8 to 100 pages, but must be a multiple of 4 . For a perfect bound publication, your page count can be anywhere from 20 to 384 pages, but must be a multiple of 2 . If you want to create a 2-page document, see instructions to create a Flyer publication.
• For the best print output, we recommend that images have a resolution of 300 pixels per inch. For example, a full-page image would be 1650 pixels by 2550 pixels .
• A 6mm square 2D barcode will be printed in the lower right-hand corner of the back cover of your publication (ie, the last page of your PDF) . Be sure to keep this area clear of any content you want to appear in your final publication .
• If your publication will be perfect bound, you can find design tips in the post “Designing for Perfect Binding” on the MagCloud Blog .
4 . When you are ready to export your PDF, go to File > Save As
a: Choose a name for your PDF and select where you want it to be saved on your computer
b: Select “PDF” from the Save as type drop-down menu
c: Click the “Change” button (Publisher 2007) or the “Options” button (Publisher 2010)
5 . In the Publish Options window that appears:
a: Select “Commercial Press” from the top menu
b: Check the box for “ISO 19005-1 compliant (PDF-A)” under PDF Options, if it is not checked already
c: Click the “Print Options” button
d: Select “One page per sheet” in the Printing options section and uncheck all the boxes under Printer’s marks
f: Click “OK” and then “OK” again to close both the Print Options and Publish Options windows
6 . Click “Save”
7 . Upload your PDF to www .magcloud .com/publish
Microsoft Publisher
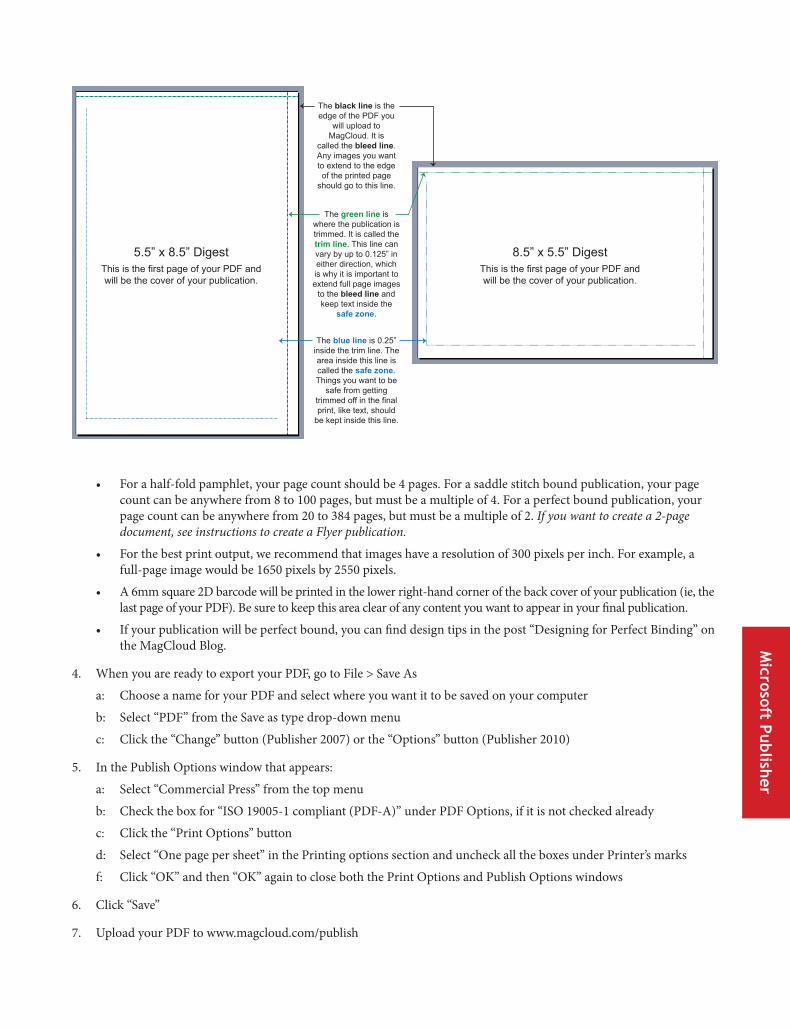
The black line is the edge of the PDF you
will upload to MagCloud. It is
called the bleed line. Any images you want to extend to the edge of the printed page
should go to this line.
The blue line is 0.25” inside the trim line. The area inside this line is called the safe zone. Things you want to be
safe from getting trimmed off in the final print, like text, should
be kept inside this line.
The green line is where the publication is trimmed. It is called the trim line. This line can vary by up to 0.125” in either direction, which is why it is important to extend full page images
to the bleed line and keep text inside the
safe zone.
5.5” x 8.5” DigestThis is the first page of your PDF and will be the cover of your publication.
8.5” x 5.5” DigestThis is the first page of your PDF and will be the cover of your publication.
42
Create a Flyer Publication in Microsoft PublisherAvailable in all MagCloud sizes
1A . Use one of the Publisher Templates for MagCloud Flyer to create a new document:
a: Visit www .magcloud .com/create/pdfguides to download one of the Publisher Templates for MagCloud Flyer
b: Unzip and open the file you downloaded in Microsoft Publisher 2007 or newer
1B . Change the settings of an existing Publisher document to work with MagCloud:
a: Open your document in Microsoft Publisher 2007 or newer
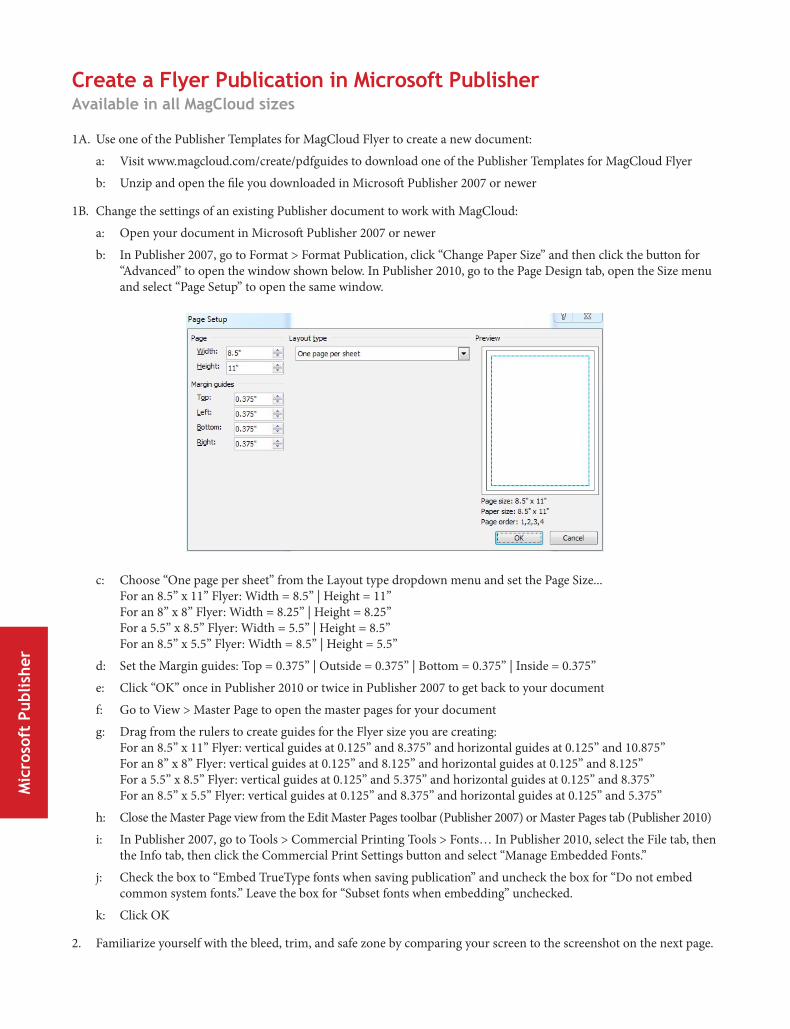
b: In Publisher 2007, go to Format > Format Publication, click “Change Paper Size” and then click the button for “Advanced” to open the window shown below . In Publisher 2010, go to the Page Design tab, open the Size menu and select “Page Setup” to open the same window .
c: Choose “One page per sheet” from the Layout type dropdown menu and set the Page Size . . . For an 8 .5” x 11” Flyer: Width = 8 .5” | Height = 11” For an 8” x 8” Flyer: Width = 8 .25” | Height = 8 .25” For a 5 .5” x 8 .5” Flyer: Width = 5 .5” | Height = 8 .5” For an 8 .5” x 5 .5” Flyer: Width = 8 .5” | Height = 5 .5”
d: Set the Margin guides: Top = 0 .375” | Outside = 0 .375” | Bottom = 0 .375” | Inside = 0 .375”
e: Click “OK” once in Publisher 2010 or twice in Publisher 2007 to get back to your document
f: Go to View > Master Page to open the master pages for your document
g: Drag from the rulers to create guides for the Flyer size you are creating: For an 8 .5” x 11” Flyer: vertical guides at 0 .125” and 8 .375” and horizontal guides at 0 .125” and 10 .875” For an 8” x 8” Flyer: vertical guides at 0 .125” and 8 .125” and horizontal guides at 0 .125” and 8 .125” For a 5 .5” x 8 .5” Flyer: vertical guides at 0 .125” and 5 .375” and horizontal guides at 0 .125” and 8 .375” For an 8 .5” x 5 .5” Flyer: vertical guides at 0 .125” and 8 .375” and horizontal guides at 0 .125” and 5 .375”
h: Close the Master Page view from the Edit Master Pages toolbar (Publisher 2007) or Master Pages tab (Publisher 2010)
i: In Publisher 2007, go to Tools > Commercial Printing Tools > Fonts… In Publisher 2010, select the File tab, then the Info tab, then click the Commercial Print Settings button and select “Manage Embedded Fonts .”
j: Check the box to “Embed TrueType fonts when saving publication” and uncheck the box for “Do not embed common system fonts .” Leave the box for “Subset fonts when embedding” unchecked .
k: Click OK
2 . Familiarize yourself with the bleed, trim, and safe zone by comparing your screen to the screenshot on the next page .
Mic
roso
ft P
ublis
her
43
3 . Create your publication by adding images and text to your Publisher document . The following are a few things to keep in mind . The following are a few things to keep in mind . Find more design tips at blog .magcloud .com
• Flyer publications cannot be more than 2 pages long.
• For the best print output, we recommend that images have a resolution of 300 pixels per inch.
• A 6mm square 2D barcode will be printed in the lower right-hand corner of the back of your Flyer (ie, the second page of your PDF) . Be sure to keep this area clear of any content you want to appear in your final publication .
4 . When you are ready to export your PDF, go to File > Save As
a: Choose a name for your PDF and select where you want it to be saved on your computer
b: Select “PDF” from the Save as type drop-down menu
c: Click the “Change” button (Publisher 2007) or the “Options” button (Publisher 2010)
5 . In the Publish Options window that appears:
a: Select “Commercial Press” from the top menu
b: Check the box for “ISO 19005-1 compliant (PDF-A)” under PDF Options, if it is not checked already
c: Click the “Print Options” button
d: Select “One page per sheet” in the Printing options section and uncheck all the boxes under Printer’s marks
f: Click “OK” and then “OK” again to close both the Print Options and Publish Options windows
6 . Click “Save” and upload your PDF to www .magcloud .com/publish
Microsoft Publisher
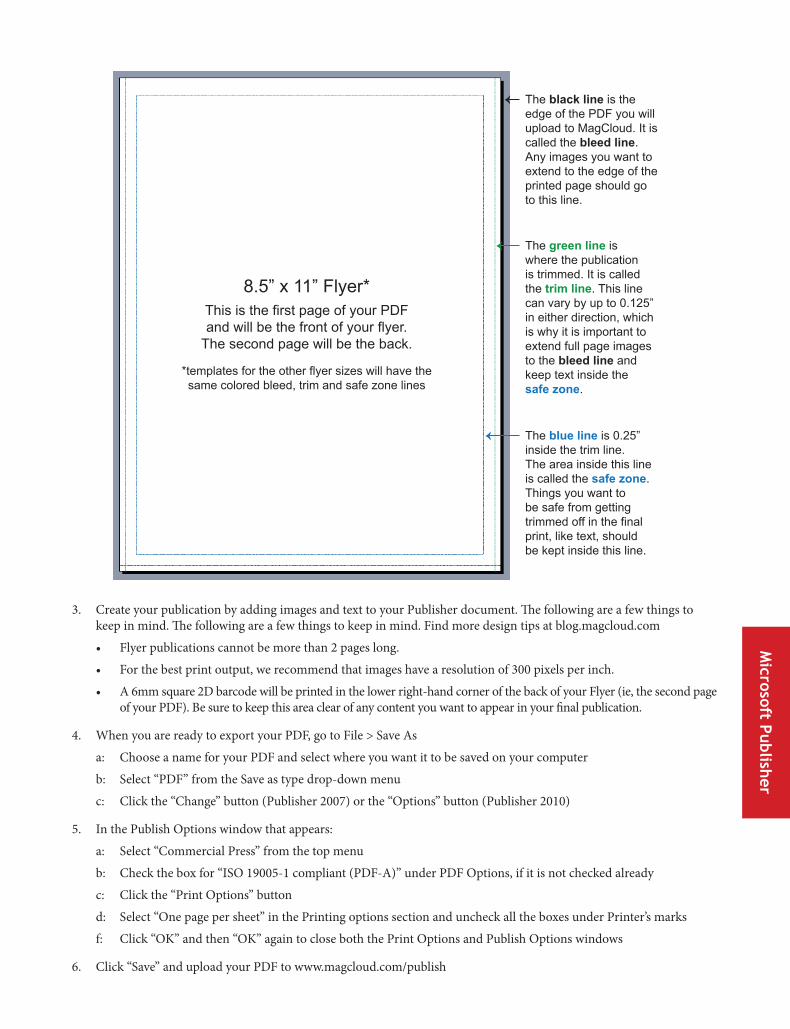
The black line is the edge of the PDF you will upload to MagCloud. It is called the bleed line. Any images you want to extend to the edge of the printed page should go to this line.
The blue line is 0.25” inside the trim line. The area inside this line is called the safe zone. Things you want to be safe from getting trimmed off in the final print, like text, should be kept inside this line.
The green line is where the publication is trimmed. It is called the trim line. This line can vary by up to 0.125” in either direction, which is why it is important to extend full page images to the bleed line and keep text inside the safe zone.
8.5” x 11” Flyer*This is the first page of your PDF and will be the front of your flyer.
The second page will be the back.
*templates for the other flyer sizes will have the same colored bleed, trim and safe zone lines


www.magcloud.com