home theatre system - pdf.crse.compdf.crse.com/manuals/4475782212.pdf · home theatre system ......
TRANSCRIPT
4-475-782-21(2)
HT-CT60BT
Home Theatre System
Getting Started
BLUETOOTH Function
Playback Options
Additional Information
2GB
Do not install the appliance in a confined space, such as a bookcase or built-in cabinet.
To reduce the risk of fire, do not cover the ventilation opening of the appliance with newspapers, tablecloths, curtains, etc.Do not expose the appliance to naked flame sources (for example, lighted candles).
To reduce the risk of fire or electric shock, do not expose this appliance to dripping or splashing, and do not place objects filled with liquids, such as vases, on the appliance.
The unit is not disconnected from the mains as long as it is connected to the AC outlet, even if the unit itself has been turned off.
As the main plug is used to disconnect the unit from the mains, connect the unit to an easily accessible AC outlet. Should you notice an abnormality in the unit, disconnect the main plug from the AC outlet immediately.
Do not expose batteries or appliances with battery-installed to excessive heat, such as sunshine and fire.
Indoor use only.
Notice for customers: the following information is only applicable to equipment sold in countries applying EU directives.This product has been manufactured by or on behalf of Sony Corporation, 1-7-1 Konan Minato-ku Tokyo, 108-0075 Japan. Inquiries related to product compliance based on European Union legislation shall be addressed to the authorized representative, Sony Deutschland GmbH, Hedelfinger Strasse 61, 70327 Stuttgart, Germany. For any service or guarantee matters, please refer to the addresses provided in the separate service or guarantee documents.
Hereby, Sony Corp., declares that this equipment is in compliance with the essential requirements and other relevant provisions of Directive 1999/5/EC.For details, please access the following URL:http://www.compliance.sony.de/
Disposal of Old Electrical & Electronic Equipment (Applicable in the European Union and other European countries with
separate collection systems)This symbol on the product or on its packaging indicates that this product shall not be treated as household waste. Instead it shall be handed over to the applicable collection point for the
WARNING
3GB
recycling of electrical and electronic equipment. By ensuring this product is disposed of correctly, you will help prevent potential negative consequences for the environment and human health, which could otherwise be caused by inappropriate waste handling of this product. The recycling of materials will help to conserve natural resources. For more detailed information about recycling of this product, please contact your local Civic Office, your household waste disposal service or the shop where you purchased the product.
Disposal of waste batteries (applicable in the European Union and other European countries with separate
collection systems)This symbol on the battery or on the packaging indicates that the battery provided with this product shall not be treated as household waste.On certain batteries this symbol might be used in combination with a chemical symbol. The chemical symbols for mercury (Hg) or lead (Pb) are added if the battery contains more than 0.0005% mercury or 0.004% lead.By ensuring these batteries are disposed of correctly, you will help prevent potentially negative consequences for the environment and human health which could otherwise be caused by inappropriate waste handling of the battery. The recycling of the materials will help to conserve natural resources. In case of products that for safety, performance or data integrity reasons require a permanent connection with an incorporated battery, this battery
should be replaced by qualified service staff only. To ensure that the battery will be treated properly, hand over the product at end-of-life to the applicable collection point for the recycling of electrical and electronic equipment. For all other batteries, please view the section on how to remove the battery from the product safely. Hand the battery over to the applicable collection point for the recycling of waste batteries. For more detailed information about recycling of this product or battery, please contact your local Civic Office, your household waste disposal service or the shop where you purchased the product.

4GB
PrecautionsOn safetyShould any solid object or liquid fall
into the system, unplug the system and have it checked by qualified personnel before operating it any further.
Do not climb on the Sound Bar or the subwoofer, as you may fall down and injure yourself, or system damage may result.
On power sourcesBefore operating the system, check
that the operating voltage is identical to your local power supply. The operating voltage is indicated on the nameplate at the rear of the Sound Bar.
If you are not going to use the system for a long time, be sure to disconnect the system from the wall outlet (mains). To disconnect the AC power cord (mains lead), grasp the plug itself; never pull the cord.
One blade of the plug is wider than the other for the purpose of safety and will fit into the wall outlet (mains) only one way. If you are unable to insert the plug fully into the outlet, contact your dealer.
AC power cord (mains lead) must be changed only at the qualified service shop.
On heat buildupAlthough the system heats up during operation, this is not a malfunction. If you continuously use this system at a large volume, the system temperature of the back and bottom rises considerably. To avoid burning yourself, do not touch the system.
On placementPlace the system in a location with
adequate ventilation to prevent heat buildup and prolong the life of the system.
Do not place the system near heat sources, or in a place subject to direct sunlight, excessive dust, or mechanical shock.
Do not place anything at the rear of the Sound Bar that might block the ventilation holes and cause malfunctions.
If the system is being used in combination with a TV, VCR, or tape deck, noise may result, and picture quality may suffer. In this case, place the system away from the TV, VCR, or tape deck.
Use caution when placing the system on surfaces that have been specially treated (with wax, oil, polish, etc.) as staining or discoloration of the surface may result.
Take care to avoid any possible injury on the corners of the Sound Bar or the subwoofer.
On operationBefore connecting other equipment, be sure to turn off and unplug the system.
If you encounter color irregularity on a nearby TV screenColor irregularities may be observed on certain types of TV sets.
If color irregularity is observed...Turn off the TV set, then turn it on again after 15 to 30 minutes.
If color irregularity is observed again...Place the system further away from the TV set.

5GB
On cleaningClean the system with a soft dry cloth. Do not use any type of abrasive pad, scouring powder or solvent such as alcohol or benzine.
If you have any question or problem concerning your system, please consult your nearest Sony dealer.
This model incorporates Dolby* Digital Surround System.* Manufactured under license from
Dolby Laboratories. Dolby and the double-D symbol are trademarks of Dolby Laboratories.
The BLUETOOTH® word mark and logos are registered trademarks owned by Bluetooth SIG, Inc. and any use of such marks by Sony Corporation is under license.
The N Mark is a trademark or registered trademark of NFC Forum, Inc. in the United States and in other countries.
Android is a trademark of Google Inc.
“PlayStation®” is a registered trademark of Sony Computer Entertainment Inc.
“WALKMAN” and “WALKMAN” logo are registered trademarks of Sony Corporation.
Other trademarks and trade names are those of their respective owners.
BLUETOOTH wireless technologySupported BLUETOOTH version and profilesProfile refers to a standard set of capabilities for various BLUETOOTH product capabilities. See “Specifications” (page 25) on the BLUETOOTH version and profiles supported by this system.
For you to use the BLUETOOTH function, the BLUETOOTH device to be connected must support the same profile as this system. Even if the device supports the same profile, the functions may differ because of the specifications of the BLUETOOTH device.
The audio playback on this system may be delayed from that on the BLUETOOTH device because of the characteristics of the BLUETOOTH wireless technology.
Effective communication rangeBLUETOOTH devices should be used within approximately 10 meters (unobstructed distance) of each other. The effective communication range may become shorter under the following conditions. When a person, metal object, wall
or other obstruction is between the devices with a BLUETOOTH connection
Locations where a wireless LAN is installed
Around microwave ovens that are in use
Locations where other electromagnetic waves occur
Copyrights
Notes
continued
6GB
Effects of other devicesBLUETOOTH devices and wireless LAN (IEEE 802.11b/g) use the same frequency band (2.4 GHz). When using your BLUETOOTH device near a device with wireless LAN capability, electromagnetic interference may occur.This could result in lower data transfer rates, noise, or inability to connect. If this happens, try the following remedies: Try connecting this system and
BLUETOOTH mobile phone or BLUETOOTH device when you are at least 10 meters away from the wireless LAN equipment.
Turn off the power to the wireless LAN equipment when using your BLUETOOTH device within 10 meters.
Effects on other devicesThe radio waves broadcast by this system may interfere with the operation of some medical devices. Since this interference may result in malfunction, always turn off the power on this system, BLUETOOTH mobile phone and BLUETOOTH device in the following locations: In hospitals, on trains, in airplanes,
at gas stations, and any place where flammable gasses may be present
Near automatic doors or fire alarms
This system supports security functions that comply with the BLUETOOTH specification as a means of ensuring security during communication using BLUETOOTH technology. However, this security may be insufficient depending on the setting contents and other factors, so always be careful when performing communication using BLUETOOTH technology.
Sony cannot be held liable in any way for damages or other loss resulting from information leaks during communication using BLUETOOTH technology.
BLUETOOTH communication is not necessarily guaranteed with all BLUETOOTH devices that have the same profile as this system.
BLUETOOTH devices connected with this system must comply with the BLUETOOTH specification prescribed by the Bluetooth SIG, Inc., and must be certified to comply. However, even when a device complies with the BLUETOOTH specification, there may be cases where the characteristics or specifications of the BLUETOOTH device make it impossible to connect, or may result in different control methods, display or operation.
Noise may occur or the audio may cut off depending on the BLUETOOTH device connected with this system, the communications environment, or surrounding conditions.
Notes

7GB
Precautions ..............................4BLUETOOTH wireless
technology .........................5Getting Started
Unpacking ...............................8Index to parts and controls .....9Connecting the TV and player,
etc. ....................................11Positioning the system ......... 13Connecting the AC power cord
(mains lead) ..................... 15Setting up the sound output of
the connected equipment ....................... 15
Auto Standby function .......... 15BLUETOOTH Function
Using the BLUETOOTH function ............................ 16
Playback OptionsOperating the system using the
supplied remote control ..............................20
Controlling a connected TV ..................................... 21
Changing the battery ............22Additional Information
Troubleshooting ....................23Specifications ........................25Index ...................................... 27
Table of contents

8GB
Unpacking Subwoofer (1)
Sound Bar (1)
Digital optical cord for a TV (1)
AC power cord (mains lead) (1) Remote control (RM-ANU191) (1)
Operating Instructions (1) Warranty (1)
Getting Started

9GB
Ge
tting
Starte
d
Index to parts and controlsFor more information, see the pages indicated in parentheses.
SURROUND indicator (page 20)
Input indicators (page 20)OPTICALCOAXIALANALOG
BLUETOOTH indicator (page 16)
Sound Bar
continued
10GB
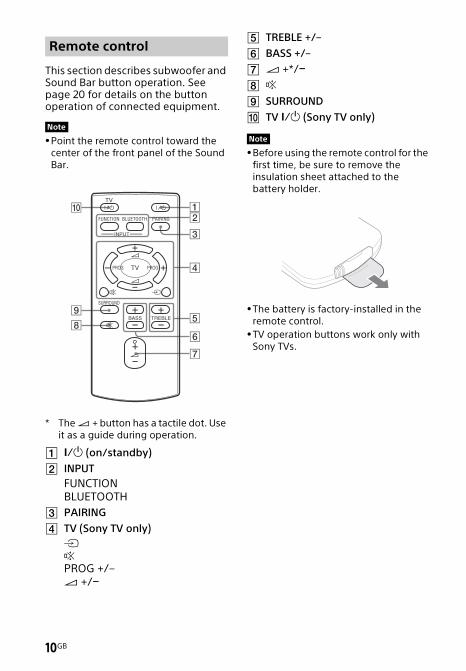
This section describes subwoofer and Sound Bar button operation. See page 20 for details on the button operation of connected equipment.
Point the remote control toward the center of the front panel of the Sound Bar.
* The + button has a tactile dot. Use it as a guide during operation.
(on/standby)
INPUTFUNCTIONBLUETOOTH
PAIRING
TV (Sony TV only)PROG +/– +/
TREBLE +/–
BASS +/–
+*/ SURROUND
TV (Sony TV only)
Before using the remote control for the first time, be sure to remove the insulation sheet attached to the battery holder.
The battery is factory-installed in the remote control.
TV operation buttons work only with Sony TVs.
Remote control
Note
Note

11GB
Ge
tting
Starte
d
Connecting the TV and player, etc.Insert the plug of the AC power cord (mains lead) fully to the end.
Connecting the TV, player, and other equipment
TV1)
Digital coaxial cord(not supplied)
DVD player, etc.
Digital coaxial audio output
Digital optical audio output
Analog audio cord (not supplied)
Digital optical cord (supplied)2)
Analog signal output
To the wall outlet
Subwoofer
“PlayStation®3,” Blu-ray Disc™ player, DVD player,
satellite tuner, cable television tuner, etc.
HDMI output
Smartphone, WALKMAN, or
other audio equipment
Sound Bar (rear)
HDMI cable (not supplied)
HDMI input

12GB
1) If the TV is not equipped an optical digital audio output jack, see “Connecting a TV not equipped an optical digital audio output jack”.
2) When connecting the digital optical cord (supplied) to the OPTICAL jack on the Sound Bar, remove the protective cap from the OPTICAL jack.
If your TV is equipped a headphone jack that is compatible with an audio out jack, check the audio output settings. For details, refer to the operating instructions supplied with your TV.
Connecting a TV not equipped an optical digital audio output jack
TV
Analog audio cord (not supplied)
Sound Bar (rear)
Headphone

13GB
Ge
tting
Starte
d
Positioning the systemThe illustrations below are examples of how to install the Sound Bar.
•When you select a place for the Sound Bar, do not block the heat ventilation on the rear panel of the Sound Bar.
Note on installing the subwooferPlace the subwoofer so that the rear panel is at least ten centimeters away from the wall.
Note
Installing the Sound Bar
Installing the Sound Bar on a rack Installing the Sound Bar on a wall (page 14)
10 cm

14GB
When the Sound Bar is to be placed facing upward slightly or on a wall, remove the two stands at the bottom of the Sound Bar, as shown below.
When the Sound Bar is placed facing upward slightly with the stands removed, take care not to block the ventilation holes with carpet, etc.
You can install the Sound Bar on the wall.
Use screws that are suitable for the wall material and strength. As a plaster board wall is especially fragile, attach the screws securely to a wall beam. Install the Sound Bar on a vertical and flat reinforced area of the wall.
Be sure to subcontract the installation to Sony dealers or licensed contractors and pay special attention to safety during the installation.
Sony is not responsible for accidents or damage caused by improper installation, insufficient wall strength,
improper screw installation or natural calamity, etc.
1 Prepare screws (not supplied) that are suitable for the holes on the back of the Sound Bar.
2 Fasten the screws to the wall.The screws should protrude 7 to 8 mm.
Removing the stands
Note
Installing the Sound Bar on a wall
Notes
Stand
Hole on the back of the Sound Bar
4 mm
more than 25 mm
5 mm
10 mm
380 mm
7 to 8 mm

15GB
Ge
tting
Starte
d
3 Hang the Sound Bar onto the screws.Align the holes on the back of the Sound Bar to the screws, then hang the Sound Bar onto the two screws.
Connecting the AC power cord (mains lead)Before connecting the AC power cord (mains lead) of the Sound Bar to a wall outlet (mains), connect all the other equipment and TV to the system.
Setting up the sound output of the connected equipmentTo output multi-channel digital audio, check the digital audio output setting on the connected equipment.For details, refer to the operating instructions supplied with the connected equipment.
Auto Standby functionThe Sound Bar enters standby mode automatically when you do not operate the Sound Bar for about 15 minutes and the Sound Bar is not receiving an input signal.
16GB
Using the BLUETOOTH function
If the system is not paired with any equipment, you must pair the system with the equipment to be connected. Select “BLUETOOTH” with the BLUETOOTH button on the remote control to enter pairing mode.
1 Place the system and a BLUETOOTH device within 1 meter.
2 Press BLUETOOTH on the remote control.
3 Set the BLUETOOTH device in pairing mode.For details on setting the BLUETOOTH device in pairing mode, refer to the operating instructions supplied with the device.
4 When the detected devices are listed on the BLUETOOTH device, check that “SONY:HT-CT60BT” is listed.On some BLUETOOTH devices, the list may not be displayed.
5 Select “SONY:HT-CT60BT” on the list.If entering a Passkey is requested, enter “0000.”
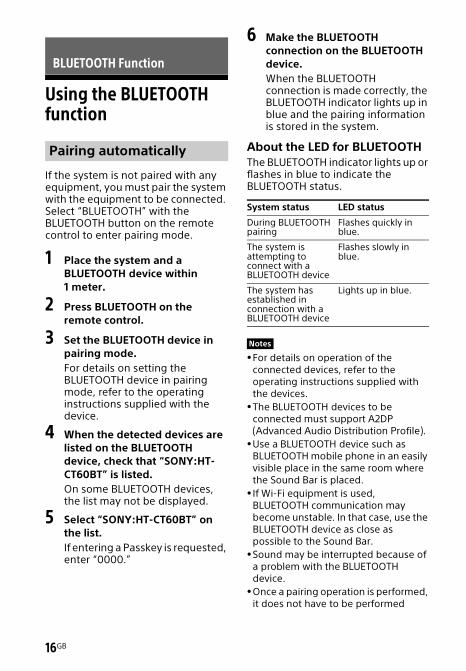
6 Make the BLUETOOTH connection on the BLUETOOTH device.When the BLUETOOTH connection is made correctly, the BLUETOOTH indicator lights up in blue and the pairing information is stored in the system.
About the LED for BLUETOOTHThe BLUETOOTH indicator lights up or flashes in blue to indicate the BLUETOOTH status.
For details on operation of the connected devices, refer to the operating instructions supplied with the devices.
The BLUETOOTH devices to be connected must support A2DP (Advanced Audio Distribution Profile).
Use a BLUETOOTH device such as BLUETOOTH mobile phone in an easily visible place in the same room where the Sound Bar is placed.
If Wi-Fi equipment is used, BLUETOOTH communication may become unstable. In that case, use the BLUETOOTH device as close as possible to the Sound Bar.
Sound may be interrupted because of a problem with the BLUETOOTH device.
Once a pairing operation is performed, it does not have to be performed
BLUETOOTH Function
Pairing automatically
System status LED status
During BLUETOOTH pairing
Flashes quickly in blue.
The system is attempting to connect with a BLUETOOTH device
Flashes slowly in blue.
The system has established in connection with a BLUETOOTH device
Lights up in blue.
Notes

17GB
BLU
ETOO
TH Fu
nctio
n
again. However, you must repeat pairing in the cases listed below.– Pairing information is deleted by
repairing the system.– Pairing for 9 or more devices is to be
set.This system can set pairing with up to 8 devices. If pairing is to be set on a device after pairing has been set on 8 devices, the pairing information on a device whose connection date is the oldest is overwritten with new information.
– The connection history with this system is deleted on the connected device.
If you intend to pair the system with 2 or more BLUETOOTH, manual pairing is necessary.
1 Place the BLUETOOTH device to be connected to this system within 1 meter of the system.
2 Press PAIRING on the remote control.
3 Perform steps 3 to 6 in “Pairing automatically” (page 16).
“Passkey” may be called “Passcode,” “PIN code,” “PIN number” or “Password,” etc., depending on the device.
The pairing standby status of the system is canceled after about 5 minutes. If pairing is not successful, redo the procedure from step 1.
If you wish to pair with several BLUETOOTH devices, perform the procedure from steps 1 to 3 individually for each BLUETOOTH device.
If no pairing information is stored in the system, the system automatically
enters pairing mode when “BLUETOOTH” is selected as input. In this case, pairing mode is not released automatically.
By touching the system with a smartphone, the system is paired and connected with the smartphone via BLUETOOTH, and turns on automatically.
NFCNFC (Near Field Communication) is a technology enabling short-range wireless communication between various devices, such as mobile phones and IC tags. Thanks to the NFC function, data communication can be achieved easily just by touching the relevant symbol or designated location on NFC compatible devices.
Compatible smartphonesSmartphones with the NFC function built-in(OS: Android 2.3.3 or later, excluding Android 3.x and 4.x)
1 Download and install the app “NFC Easy Connect.”“NFC Easy Connect” is a free Android app you can download from Google Play. Download the app by searching for “NFC Easy Connect” or access it by using the following two-dimensional code. Fees may be charged for downloading the app.Use a two-dimensional code reader app.
Pairing manually
Notes
One-touch connection with a smartphone (NFC)
continued

18GB
2 Turn on the system.
3 Start the app “NFC Easy Connect” on the smartphone.Make sure that the application screen is displayed.
4 Touch the N mark on the Sound Bar with the smartphone.Keep touching the Sound Bar with the smartphone until the smartphone vibrates.
Complete the connection by following the instructions on the screen.When the BLUETOOTH indicator (blue) stops flashing and remains lit, the system is connected with the device.To disconnect the system, touch it with the smartphone again.
If you cannot connect the system, try the following.– Start the app on the smartphone,
and move the smartphone slowly over the N mark of the Sound Bar.
– If the smartphone is in a case, remove it from the case.
Depending on your smartphone, you may not need to download “NFC Easy Connect” to connect the system with your smartphone by one touch. In that case, the operation and specifications may be different from the description here. For details, refer to the operating instructions supplied with your smartphone.
The App may not be available in some countries and/or regions.
Before starting music playback, check the following: The BLUETOOTH function on the
BLUETOOTH device is on. The pairing procedure is completed
on both this system and the BLUETOOTH device.
1 Press BLUETOOTH on the remote control.
2 Start the BLUETOOTH connection from the BLUETOOTH device.The BLUETOOTH indicator lights up in blue when the BLUETOOTH connection is established.
3 Start playback on the BLUETOOTH device.
4 Adjust the volume.Set the volume of the BLUETOOTH device to a moderate level and press +/.
If the source device has a bass boost function or equalizer function, turn
Tips
Note
Listening to music with the BLUETOOTH connection
Notes
19GB
BLU
ETOO
TH Fu
nctio
n
them off. If these functions are on, sound may be distorted.
In the following cases, you will have to make the BLUETOOTH connection again.– The power of the system is not on.– The power of the BLUETOOTH device
is not on, or the BLUETOOTH function is off.
– The BLUETOOTH connection is not established.
If more than one devices paired with the system are playing, sound will be heard from just one of those devices.
Terminate the BLUETOOTH connection by any of the operations listed below. Operate the BLUETOOTH device to
terminate the connection. For details, refer to the operating instructions supplied with the device.
Turn off the BLUETOOTH device. Turn off the system.
Finishing the BLUETOOTH connection

20GB
Operating the system using the supplied remote control
1 Press to turn on the system.
2 Press FUNCTION repeatedly to select the input source.
3 Adjust the volume by pressing +/.
To activate the muting functionPress .
The sound may be output from the TV’s speaker. In this case, turn the volume of the TV’s speaker down to minimum.
This system can create multichannel surround sound.Press SURROUND. Each time you press the button, surround mode is toggled ON or OFF. When surround mode is active, the SURROUND indicator on the Sound Bar is lit.
You can adjust the bass and treble level. To adjust the treble level, press TREBLE +/–.To adjust the bass level, press BASS +/–.When bass or treble is set to either minimum or maximum, the input indicators on the Sound Bar flash.
You can enjoy sound effects and hear the dialog clearly even at a low volume level (night mode). Night mode is available only for Dolby encoded TV programs, DVD, and Blu-ray discsTM.
To set night mode to ONPress and hold SURROUND until the COAXIAL indicator on the Sound Bar flashes twice.
Playback Options
Input source
Playable equipment
OPTICAL Device connected to the OPTICAL jack
COAXIAL Device connected to the COAXIAL jack
ANALOG Device connected to the ANALOG jacks
INPUT
+/
SURROUNDTREBLE +/–
BASS +/–
Tip
Enjoying the surround effect
Adjusting the bass and treble level
Enjoying sound at low volume (night mode)
21GB
Pla
yba
ck Op
tion
s
To set night mode to OFFPress and hold SURROUND until the OPTICAL indicator on the Sound Bar flashes twice.
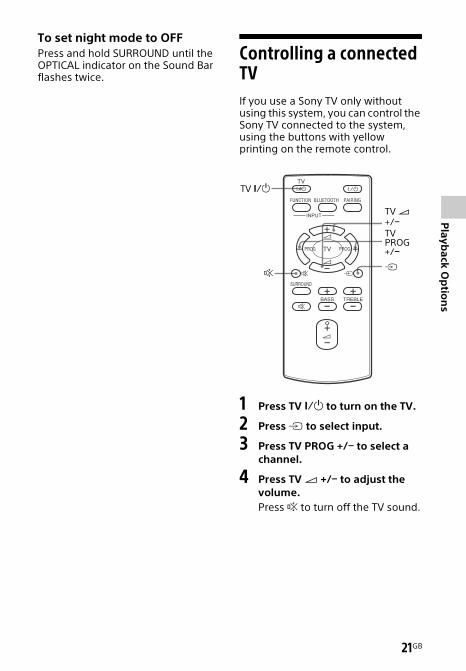
Controlling a connected TVIf you use a Sony TV only without using this system, you can control the Sony TV connected to the system, using the buttons with yellow printing on the remote control.
1 Press TV to turn on the TV.
2 Press to select input.
3 Press TV PROG +/ to select a channel.
4 Press TV +/ to adjust the volume.Press to turn off the TV sound.
TV +/TV PROG +/
TV

22GB
Changing the batteryThe working distance of the remote shortens as the battery becomes exhausted. When the remote no longer operates the unit, replace the battery with a new CR2025 lithium battery.
1 Push and hold the latch of the battery holder, then pull out the battery holder.
2 Replace the battery with the “+” facing up, then insert the battery holder into the slot.
Notes If you do not use the remote for a long
period of time, remove the battery to avoid possible damage from battery leakage and corrosion.
Dispose of used battery promptly. Keep the lithium battery out of the reach of children. Should the battery be swallowed, immediately consult a doctor.
Wipe the battery with a dry cloth to assure a good contact.
Be sure to observe the correct polarity when installing the battery.
Do not hold the battery with metallic tweezers, otherwise a short-circuit may occur.
Use of batteries other than the CR2025 may cause a fire or explosion.Latch
+ facing up
Battery holder
CAUTIONDanger of explosion if battery is incorrectly replaced. Replace only with the same or equivalent type.

23GB
Ad
ditio
na
l Info
rma
tion
TroubleshootingIf you experience any of the following difficulties while using the system, use this troubleshooting guide to help remedy the problem before requesting repairs. Should any problem persist, consult your nearest Sony dealer.
POWER
The power is not turned on.Check that the AC power cord
(mains lead) is connected securely.
SOUND
Dolby Digital sound is not reproduced.Check that the Blu-ray Disc, DVD,
etc., is recorded in Dolby Digital format.
When connecting the Blu-ray Disc, DVD player, etc., to the digital input jacks of this system, check the audio setting (settings for the audio output) of the connected equipment.
The surround effect cannot be obtained.Depending on the input signal
and the setting for the sound field, surround sound processing may not work effectively. The surround effect may be subtle depending on the program or disc.
If you connect a Blu-ray Disc player or a DVD player compatible with the surround effect function, the surround effect of the system may not work.
In this case, set the surround effect function of the connected equipment to off.For details, refer to the operating instructions supplied with the connected equipment.
No TV sound is output from the system.Check the connection of the
digital optical cord or audio cord that is connected to the system and the TV (page 11, 12).
Check the sound output of the TV (page 15).
Check if the TV sound is set to low volume or muted (page 21).
Check that the input jack connected to the TV is correctly selected (page 20).
The sound is output from both the system and the TV.Turn off the sound of the system
or the TV.
No sound or only a very low-level sound of the connected equipment is heard from the system.Press + and check the volume
level (page 20).Press or + to cancel the
muting function (page 20).Check that the input source is
correctly selected (page 20).Check that all the cables and
cords of the system and the connected equipment are fully inserted.
A subwoofer is for reproducing bass sound. In the case of input sources that contain very little bass sound components (i.e., a TV broadcast), the sound from the subwoofer may be difficult to hear.
Additional Information
continued

24GB
BLUETOOTH
There is no sound.Make sure this system is not too
far from the BLUETOOTH device, or this system is not receiving interference from a Wi-Fi network, other 2.4 GHz wireless device, or microwave oven.
Check that the BLUETOOTH connection is made properly between this system and the BLUETOOTH device.
Pair this system and the BLUETOOTH device again.
Sound skips or the correspondence distance is short. If a device that generates
electromagnetic radiation, such as a Wi-Fi network, other BLUETOOTH device(s), or a microwave oven is nearby, move this system away from such sources.
Remove any obstacle between this system and the BLUETOOTH device, or move this system away from the obstacle.
Locate this system and the BLUETOOTH device as near as possible.
Re-position this system.Re-position the BLUETOOTH
device.Change the Wi-Fi frequency of
the Wi-Fi router, computer, etc., to 5 GHz band.
Pairing cannot be done.Bring this system and the
BLUETOOTH device closer together.
The sound is not in sync with the image.When you are watching movies,
you may hear the sound with a slight delay from the image.
The BLUETOOTH connection cannot be completed.Make sure the BLUETOOTH device
to be connected is turned on and the BLUETOOTH function is enabled.
The BLUETOOTH connection has become disconnected. Make the BLUETOOTH connection again.
The remote control does not functionPoint the remote control toward
the center of the front panel of the Sound Bar.
Remove any obstacles in the path between the remote control and the system.
Replace a battery in the remote control with a new one, if it is weak.
Make sure you select the correct input on the remote control.
If the system still does not operate properly after performing the above measures, reset the system as follows:Use buttons on the remote control for the operation.
1 Press BASS +, , and TREBLE + in that order within three seconds.
After checking the above item and fixing any problems, turn on the system. If the cause of the problem cannot be found even after checking the above item, consult your nearest Sony dealer.

25GB
Ad
ditio
na
l Info
rma
tion
SpecificationsFormats supported by this systemDigital input formats supported by this system are as follows.
Sound Bar
Amplifier sectionPOWER OUTPUT (rated)
Front L + Front R: 7 W + 7 W (at 4 ohms, 1 kHz, 1 % THD)
POWER OUTPUT (reference)Front L/Front R: 15 W (per channel at 4 ohms, 1 kHz)
InputsANALOGOPTICALCOAXIAL
BLUETOOTH sectionCommunication system
BLUETOOTH Specification version 2.1 +EDR (Enhanced Data Rate)
OutputBLUETOOTH Specification Power Class 2
Maximum communication rangeLine of sight approx. 10 m*1
Frequency band2.4 GHz band (2.4000 GHz - 2.4835 GHz)
Modulation methodFHSS (Freq Hopping Spread Spectrum)
Compatible BLUETOOTH profiles*2
A2DP (Advanced Audio Distribution Profile)
Supported Codecs*3
SBC*4
Transmission range (A2DP)20 Hz - 20,000 Hz (Sampling frequency 44.1 kHz)
*1 The actual range will vary depending on factors such as obstacles between devices, magnetic fields around a microwave oven, static electricity, cordless phone, reception sensitivity, operating system, software application, etc.
*2 BLUETOOTH standard profiles indicate the purpose of BLUETOOTH communication between devices.
*3 Codec: Audio signal compression and conversion format
*4 Subband Codec
Front speaker unitSpeaker system
2-way speaker system, Acoustic Suspension
Speaker unitWoofer: 25 mm × 120 mmTweeter: 38 mm cone type
Rated impedance4 ohms
Power requirements220 V - 240 V AC, 50/60 Hz
Power consumptionOn: 20 WStandby mode: 0.5 W or less
Dimensions (approx.)940 mm × 83 mm × 70 mm (with stands)940 mm × 71 mm × 69 mm (without stands)
Mass (approx.)1.7 kg
SubwooferPOWER OUTPUT (reference)
30 W (per channel at 8 ohms, 100 Hz)
Speaker systemSubwoofer, Bass reflex
Speaker unit130 mm cone type
Rated impedance8 ohms
Format Supported/Not supported
Dolby Digital
Linear PCM 2ch 48 kHz or less
continued
26GB
Dimensions (approx.)170 mm × 245 mm × 300 mm (w/h/d)
Mass (approx.)2.7 kg
Design and specifications are subject to change without notice.
27GB
Ad
ditio
na
l Info
rma
tion
Index
Symbols 10 10
BBLUETOOTH 5, 16
CConnecting
TV 11
DDigital optical cord 11DVD player 11
IInstalling 13
PPositioning the system 13
RRemote control
operating 10Reset 24
