galleon - the armchair general - home page · 4 determining officers: the number of officers on...
TRANSCRIPT

1
GALLEON
Copyright by Trevor Raymond. Version 3.1: December, 2008
(Exodus 20:15 – You shall not steal.)
GALLEON is a set of wargame rules designed for a quick and easy naval wargame for naval battles
in and around the Spanish Armada period.
I’ve tried to maintain the flavour of this period whilst also trying to keep them as simple as possible.
You will find that the movement, gunnery, damage determination and boarding actions are reasonably quick and straight forward. Hopefully they are also easy to follow.
I hope you enjoy them.
Trevor Raymond
SOME BASICS
Certain basics need to be set out first:
1D6 means one standard six sided dice, reading 1 to 6
1D10 means one standard ten sided dice, reading 0 to 9
1 White means one white six sided dice, reading 0,0,0,0,1,2
1 Red means one red six sided dice, reading 0,0,0,1,2,3
The red and white dice are always thrown as a pair, ie, a pair consisting of one red and one white.
1 Ship = 1 Ship
You will obviously need some ships. A ship may be referred to occasionally as a model which refers to the actual based model ship on the table.

2
Ship model scale = 1:500 recommended
This scale is chosen mainly because I have quite a number of the old Airfix Revenge models which are about this scale.
Basing Ships: Each ship model must be based on a rectangular base. The base sizes are:
A Great Ship is based on a 120 mm x 35 mm base
A Galleon is based on a 100 mm x 30 mm base
A Carrack is based on a 70 mm x 30 mm base
A Coaster is based on a 50 mm x 25 mm base
A Picket is based on a 35 mm x 20 mm base
Ship Classification: Next, you will need to refer to a good reference book to help you classify a ship into one of the following classes:
A Great Ship: This class covers the really large ships and larger galleons. A Great ship is any ship of 700 tons or more.
A Galleon: This class covers the bulk of the galleons. A Galleon is any ship between 400 and 699 tons.
A Carrack: This class covers the smaller galleons and other warships. A Carrack is any ship between 200 and 399 tons.
A Coaster: This class covers the small warships. A Coaster is any ship between 50 and 199 tons.
A Picket: This class covers the really small ships. A Picket is a ship of less than 50 tons.
Other types of ships are covered in the campaign rules. They include: Merchants, Laterna, Galleass,
Galley, Galiot, Bergantina and Nefs. The use of fire ships is also covered in the campaign rules.
Determining the Size of a ship:
All Great ships and Galleons are designated as Large All Carracks and Coasters are designated as Medium sized All Pickets are designated as Small
3
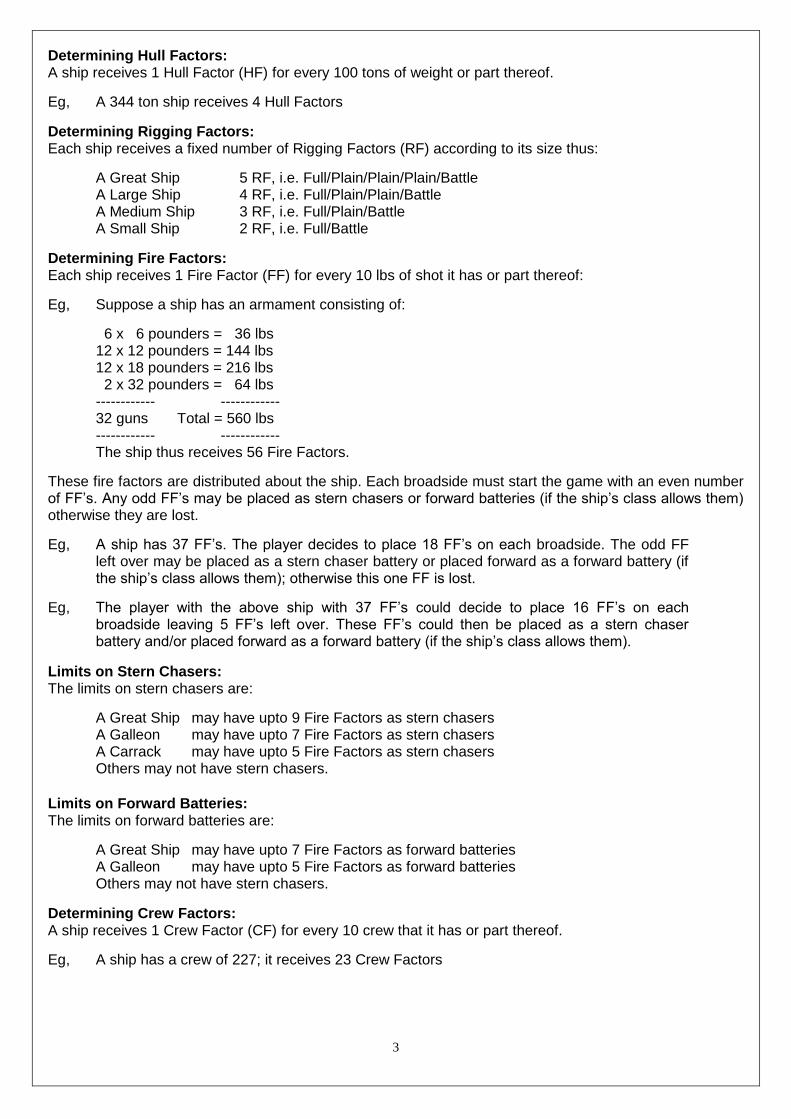
Determining Hull Factors: A ship receives 1 Hull Factor (HF) for every 100 tons of weight or part thereof.
Eg, A 344 ton ship receives 4 Hull Factors
Determining Rigging Factors: Each ship receives a fixed number of Rigging Factors (RF) according to its size thus:
A Great Ship 5 RF, i.e. Full/Plain/Plain/Plain/Battle A Large Ship 4 RF, i.e. Full/Plain/Plain/Battle A Medium Ship 3 RF, i.e. Full/Plain/Battle A Small Ship 2 RF, i.e. Full/Battle
Determining Fire Factors: Each ship receives 1 Fire Factor (FF) for every 10 lbs of shot it has or part thereof:
Eg, Suppose a ship has an armament consisting of:
6 x 6 pounders = 36 lbs 12 x 12 pounders = 144 lbs 12 x 18 pounders = 216 lbs 2 x 32 pounders = 64 lbs ------------ ------------ 32 guns Total = 560 lbs ------------ ------------ The ship thus receives 56 Fire Factors.
These fire factors are distributed about the ship. Each broadside must start the game with an even number of FF’s. Any odd FF’s may be placed as stern chasers or forward batteries (if the ship’s class allows them) otherwise they are lost.
Eg, A ship has 37 FF’s. The player decides to place 18 FF’s on each broadside. The odd FF left over may be placed as a stern chaser battery or placed forward as a forward battery (if the ship’s class allows them); otherwise this one FF is lost.
Eg, The player with the above ship with 37 FF’s could decide to place 16 FF’s on each broadside leaving 5 FF’s left over. These FF’s could then be placed as a stern chaser battery and/or placed forward as a forward battery (if the ship’s class allows them).
Limits on Stern Chasers: The limits on stern chasers are:
A Great Ship may have upto 9 Fire Factors as stern chasers A Galleon may have upto 7 Fire Factors as stern chasers A Carrack may have upto 5 Fire Factors as stern chasers Others may not have stern chasers.
Limits on Forward Batteries: The limits on forward batteries are:
A Great Ship may have upto 7 Fire Factors as forward batteries A Galleon may have upto 5 Fire Factors as forward batteries Others may not have stern chasers.
Determining Crew Factors: A ship receives 1 Crew Factor (CF) for every 10 crew that it has or part thereof.
Eg, A ship has a crew of 227; it receives 23 Crew Factors

4
Determining Officers: The number of Officers on each ship has is determined thus:
A Great Ship receive 7 Officers A Galleon receive 6 Officers A Carrack receive 5 Officers All others receive 3 Officers
Unknown Data: Often there isn’t much data on ships from this period, but having said that, the tonnage is usually known. If the tonnage is known then the armament limits will be:
A Great Ship between 0.50 and 0.85 lbs of shot per ton A Galleon between 0.70 and 1.15 lbs of shot per ton A Carrack between 0.40 and 0.90 lbs of shot per ton A Coaster between 0.55 and 0.65 lbs of shot per ton A Galleon between 0.55 and 0.65 lbs of shot per ton
For crew, the limits will be:
A Great Ship between 0.35 and 0.50 crew per ton A Galleon between 0.35 and 0.65 crew per ton A Carrack between 0.35 and 0.95 crew per ton A Coaster between 0.25 and 0.70 crew per ton A Galleon between 0.65 and 1.10 crew per ton
Eg, The only data known about a ship is that it weighed 450 tons Thus, it would be classed as a Galleon; all Galleons are Large It would have between 0.70x450=315 and 1.15x450=517 lbs of shot (32 to 52 FF) It would have between 0.35x450=157 and 0.65x450=292 crew (16 to 30 CF)
Ground Scale:
At 1:500 the ground scale is 2 mm = 1 yard
Thus, a nautical mile (2,000 yards) scales to 4 metres (for game purposes). The maximum effective gunnery range is set at 400 yards (scaled 800 mm). If using other scales, then scale proportionally.
Time Scale:
The time scale is 1 Turn = 1 minute (approximately)
Finally, some other items are required and they are found in the Appendix. They are:
The Movement Scale
The all important Turn Device
Some HIGH and LOW hit markers
BEFORE PLAY
Well before the game commences, each player should prepare a simple data sheet for each of his ships. (See the Appendix for the ship data sheet and complete it using the guidelines above).
Determining the wind direction: Players may determine the wind direction by any means they wish. The wind does not change direction during the course of the game.
Placing ships: Players should agree on a method to place their ships on the playing surface. Otherwise, the ships are placed at least 800 mm apart (but no more than 1000 mm apart) on the playing surface (and in a line astern formation). The player with the advantage places last (see the End Phase). The game then begins.

5
SEQUENCE OF PLAY
Each full game turn is made up of a series of phases. The sequence of play for each full game turn is:
1) Resolve Boarding Actions Phase: The players immediately resolve any and all boarding actions.
2) Movement Phase: The player with the Advantage has the Initiative and thus moves first in the movement phase. Ships are then moved one at a time thus:
1) The current player with the Initiative chooses one of his ships that has not yet been used this turn.
2) Once the player selects such a ship, then that player: a) Conducts any Turns for that ship b) Determines the speed of that ship for its current facing (Aspect) c) Conducts that ship’s actual movement and firing
3) The player then determines if he has lost the Initiative. The player will keep the Initiative providing that the chosen ship fired its guns and did
some non-crew damage on an enemy ship.
If the player retains the Initiative, then he may then choose another one of his ships that has not yet been chosen this turn, and use it. The Initiative will pass over to the other player as soon as a player’s chosen ship fails to do non-crew damage as noted above during its turn.
Thus, play continues one ship at a time, alternating between players in a semi-random manner until all ships have been used. The movement phase is then over.
3) End Phase: Once all ships have completed movement, firing, etc, players then do the tasks below in the order noted:
1) Firstly, players move ships that were afoul at the start of the turn at the slowest drift rate of those ships involved
2) Players then resolve the random events on all of their ships
3) Players then: a) Check to see if any crew Recover on all of their ships b) Check to see if any of their ships Strike c) Check to see if any of their ships have become Unsteady
4) Ships that have not Struck may then either: a) Attempt to Jury Rig, OR, b) Attempt to Unfoul
5) Players then: a) Adjust the sail settings on all of their ships b) Determine if the Advantage has changed hands
The whole cycle is then repeated for the next full game turn.
THE BOARDING and HAND-TO-HAND COMBAT RESOLUTION PHASE
To board an enemy ship and engage in hand-to-hand combat a friendly ship must be afoul with an enemy ship at the start of this phase (see Movement). Ships that are afoul with any enemy ship MUST board and engage in hand-to-hand combat.
Boarding actions will probably be one on one. However, it is possible that you may have several ships afoul with each other causing a multi-ship hand-to-hand combat situation. In this case, all of the ships afoul with each other fight at the same time in one big boarding action.

6
The hand-to-hand combat must be resolved on the move that it starts. Crew Factors (CF’s) fight once and once only during each round of the hand-to-hand resolution phase.
The hand-to-hand combat starts in the melee situation:
You You have a Enemy has a Enemy Win Foothold Melee Foothold Wins
When one side wins the melee then that side gains a foothold on the enemy ship/s
When a side wins from its foothold position then that side wins the hand-to-hand combat
When a side has a foothold and looses then the hand-to-hand combat goes back to melee and continues on
Thus, the combat see-saws backwards and forwards until one side or the other is victorious; quick and brutal.
Unusual situations: If a ship has zero CF’s at the start of a hand-to-hand round, or if it is unable to throw at least one pair of dice, then that ship must surrender immediately and the ship is captured.
Should both sides end up with zero CF’s, or if both sides are unable to throw at least one pair of dice, then both players throw 1D10 to determine the winner; highest wins; re-throw on a tie. Again; quick and brutal.
How to resolve each round of hand-to-hand combat: Each player tallies up the total number of CF’s he has still alive on his ship/s and the number of dice used is determined thus:
Total CF’s Dice Used
1-9 0 Pairs
10-19 1 Pair
20-29 2 Pairs
30-39 3 Pairs
40+ 4 Pairs
This number of dice is modified thus:
If you have the foothold add 2 Pairs If you are unsteady subtract 2 Pairs
Eg, A player has 17 steady CF’s in a melee situation. He gets 1 pair of dice.
The final number of dice is thrown by each player and the result on his opponent is determined thus:
Total up the Red dice; this is the number of CF’s lost by your opponent. The opponent’s Crew Factors are reduced by this number and as evenly as possible over all of the opponent’s ships involved. The player who threw the dice will resolve any disputes.
Total up the White dice; the player with the greatest total makes a gain. On a draw neither player gains.
The next round is fought immediately if no player has won.
Once you have won: When a player wins a boarding action that player captures the enemy ship/s involved and they are now considered Prize ship/s.
Prize Ships: Firstly, prize ships are not friendly to either side when determining the Advantage. A captured ship must have a prize crew drawn from the winning ship/s crews. A minimum prize crew consists of:
7
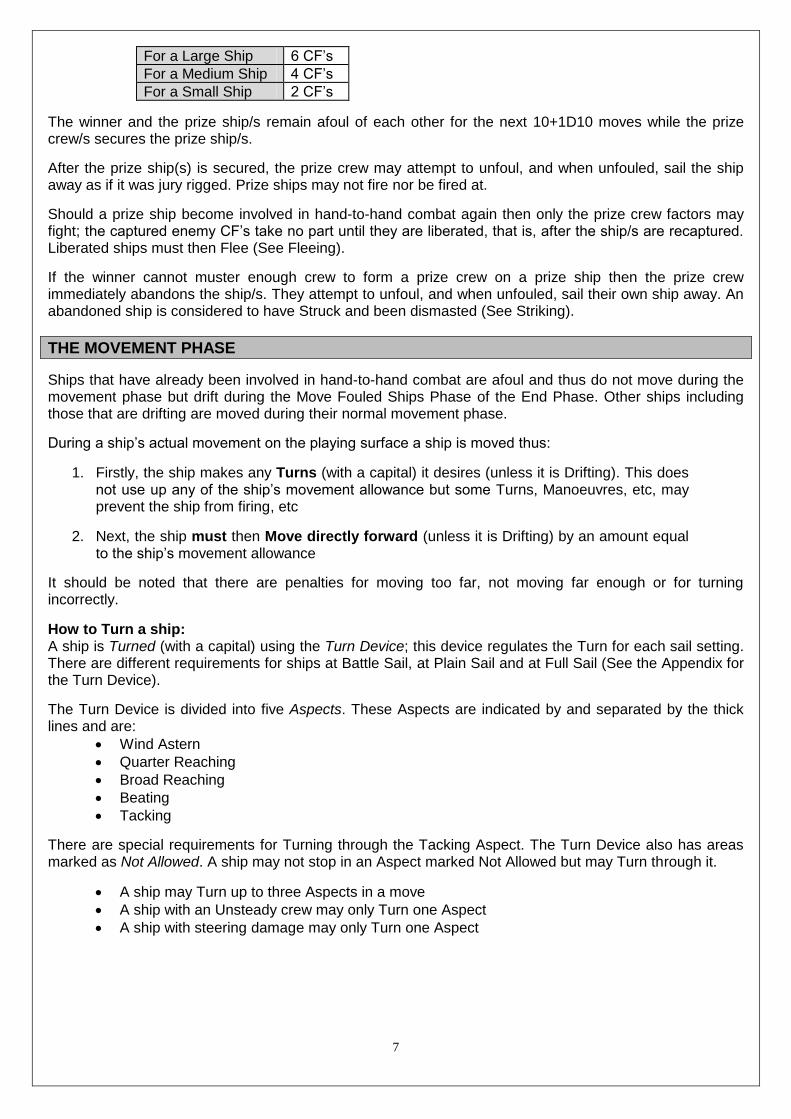
For a Large Ship 6 CF’s
For a Medium Ship 4 CF’s
For a Small Ship 2 CF’s
The winner and the prize ship/s remain afoul of each other for the next 10+1D10 moves while the prize crew/s secures the prize ship/s.
After the prize ship(s) is secured, the prize crew may attempt to unfoul, and when unfouled, sail the ship away as if it was jury rigged. Prize ships may not fire nor be fired at.
Should a prize ship become involved in hand-to-hand combat again then only the prize crew factors may fight; the captured enemy CF’s take no part until they are liberated, that is, after the ship/s are recaptured. Liberated ships must then Flee (See Fleeing).
If the winner cannot muster enough crew to form a prize crew on a prize ship then the prize crew immediately abandons the ship/s. They attempt to unfoul, and when unfouled, sail their own ship away. An abandoned ship is considered to have Struck and been dismasted (See Striking).
THE MOVEMENT PHASE
Ships that have already been involved in hand-to-hand combat are afoul and thus do not move during the movement phase but drift during the Move Fouled Ships Phase of the End Phase. Other ships including those that are drifting are moved during their normal movement phase.
During a ship’s actual movement on the playing surface a ship is moved thus:
1. Firstly, the ship makes any Turns (with a capital) it desires (unless it is Drifting). This does not use up any of the ship’s movement allowance but some Turns, Manoeuvres, etc, may prevent the ship from firing, etc
2. Next, the ship must then Move directly forward (unless it is Drifting) by an amount equal to the ship’s movement allowance
It should be noted that there are penalties for moving too far, not moving far enough or for turning incorrectly.
How to Turn a ship: A ship is Turned (with a capital) using the Turn Device; this device regulates the Turn for each sail setting. There are different requirements for ships at Battle Sail, at Plain Sail and at Full Sail (See the Appendix for the Turn Device).
The Turn Device is divided into five Aspects. These Aspects are indicated by and separated by the thick lines and are:
Wind Astern
Quarter Reaching
Broad Reaching
Beating
Tacking
There are special requirements for Turning through the Tacking Aspect. The Turn Device also has areas marked as Not Allowed. A ship may not stop in an Aspect marked Not Allowed but may Turn through it.
A ship may Turn up to three Aspects in a move
A ship with an Unsteady crew may only Turn one Aspect
A ship with steering damage may only Turn one Aspect

8
Eg, Turning One Aspect and Turning Three Aspects:
Remember, since firing is done as part of moving straight ahead then once a ship fires it may not conduct a Turn.
Turning Penalties:
Ships found Turning more Aspects than allowed lose one Rigging Factor (RF) due to rigging damage. They are left in their current position and may not fire this Turn.
How to move a ship: A ship must move DIRECTLY forward using the Movement Scale (See the Appendix). A ship may not alter direction unless it is forced to do so by the Close Quarters Manoeuvring rules.
There are two Movement Scales:
1. One for ships under Sail 2. One for ships that are Drifting
The Movement Scale is placed on the leading edge of the ship model’s base, and the ship is moved the required distance directly forward. The distance it MUST be moved by is determined by its current sail setting and its Aspect to the wind and is shown on the appropriate area of the Turn Device.

9
Movement Penalties:
Ships found Moving more than permitted lose one Rigging Factor due to rigging damage. They are then moved back to a legitimate position and may not fire.
Ships found moving less than permitted lose one Rigging Factor due to rigging damage. They are left in their current position and may not fire.
MANOEUVRES
Ships may conduct special movement called Manoeuvres (with a capital).
Some Manoeuvres required major sail adjustments thus using much of the crew. Those ships doing such Manoeuvres may not be able to fire during the move as noted either through lack of crew or because the ship is heeling over too much.
The details of the special Manoeuvres and their effects are:
Tacking: A ship Tacking changes the direction by Turning the bow across/through the wind.
A ship with steering damage may not Tack
A ship doing a Tack may NOT fire
See the diagram below.
A ship Tacking runs the risk of being Taken Aback. Thus, any ship doing a Tack must check to see if it is Taken Aback. Throw 1D10, the result being:

10
On 0 or 1 The ship is Taken Aback
On 2 to 9 The ship is not Taken Aback
A ship that is Taken Aback stops with its bow pointing directly into the wind. The ship then Drifts for a number of moves after which it may complete the Tack. The minimum number of turns Drifting back is determined by throwing one white dice; the ship Drifts for one plus the white dice moves.
Eg, A player throws to see if he is Taken Aback. He throws a 1 on the D10; he is Taken Aback. He then throws a 2 on a white dice and so must Drift for the 1+2=3 moves after which he may complete the Tack.
Heave To: A ship Heaving To Turns so that the ship is side on to the wind. This slows (and eventually stops) the ship without the need of reducing the sail setting.
A ship with steering damage may still Heave To
A ship Heaving To can still fire
A ship Heaves To by turning perpendicular to the wind direction. The ship then moves one less on the movement scale that it did last move. The ship Drifts once its speed is reduced to zero.
Normally, a ship may not remain in an area marked Not Allowed. However, a ship Heaving To may Turn and remain in a Not Allowed area but only if Heaving To.
Back Sail:

11
A ship attempting to Back Sail turns some of its sails into the wind in an attempt to slow or stop.
A ship with steering damage may still Back Sail
A ship Backing Sail may NOT fire
A ship may only attempt to Back Sail if it is in the Beating Aspect. A ship Backing Sail may not Turn (by any amount). The ship then moves directly ahead by any amount from zero up to its normal move distance.
For each move that a ship attempts to Back Sail it runs the risk of doing some rigging damage to itself. Throw 1D10. The damage is determined thus:
On 0 or 1 The ship suffers one Rigging Factor damage
On 2 to 9 The ship suffers no damage
Eg, A ship throws to see if it suffers damage due to Back Sailing. It throws a 1; the ship suffers
one Rigging Factor damage.
Drifting: Ships Drift at slightly different rates depending on their size. The rates are shown on the back of the Movement Scale.
A ship with steering damage may still Drift
A Drifting ship may not Turn
A Drifting ship can still fire
A ship drifts in the direction of the wind using the appropriate drift movement rate for a ship of its size.
To break out of a Drift, a ship merely sets its sails (to any legitimate setting), and moves off using the normal movement rules. The ship starts by moving off at a speed of one, then increases its speed by one each move until the ship reaches its correct speed for its Aspect and sail setting.

12
A note on Heeling Over The Turn Device shows those Aspects/sail combinations in which a ship is deemed to be Heeling Over. Also:
A ship Heeling Over can not fire due to excessive list
A ship Turning three Aspects is also deemed to be Heeling over
CLOSE QUARTERS MANOEUVRING
It is important that you understand this section of the rules reasonably well for when ships are in close proximity to each other their movement will be dictated by these rules.
When do these rules apply? As a ship Turns or moves directly forward it may be that such a Turn or movement forward will result in that ship colliding (ie, coming into base to base contact) with another ship, be it friend or foe.
If any ship Turns (before moving) and the Turn collides with another ship then the collision is deemed to be a Glancing Collision (See below).
If after Turning, movement directly forward will cause a ship to collide, then BEFORE any movement or firing a dice is thrown to see how the captain of the moving ship responds. (If the ship is the player’s personal ship, that is, the one he is “on”, then that player may decide exactly what the ship is to do; all others must throw). Throw 1D10 to determine what happens, the result being:
0 to 4 Pass
5 to 7 Glancing Collision
8 Collision
9 Ramming Collision
The details of each of these situations are:
Pass: The captain of the ship attempts to Pass the other ship thus:
If the centre line of the ship projected forward is ahead of the other ship's mainmast then the captain attempts to pass forward
Similarly, if the centre line of the ship projected forward is behind of the other ship's mainmast, then the captain attempts to pass astern

13
How to Pass:
The moving ship is pivoted about it’s mainmast by the minimum amount necessary to just clear the base of the other ship as required (see the diagram above). This pivot incurs no penalty except that the ship Heels Over and thus may not fire
The ship is then moved directly forward by its normal movement allowance just clearing the other ship
Glancing Collision: The captain of the ship fails to respond quickly enough and a Glancing Collision occurs thus:
The ship moves part of its move directly forward (without firing) until it just touches the other ship's base
The other ship is then pivoted about this point of contact to bring it parallel to the moving ship
Each player then checks his ship for damage. Throw 1 Red dice and 1 White dice, the result being:
The ship loses the Red dice in CF's
The ship loses the White dice in FF's
If both dice do damage then the ship also loses 1 Rigging Factor
The moving ship then checks to see if it fouls the other ship. The moving player throws 1D10 and modifies it thus:
If either player wishes to grapple +3 If both players wish to grapple +6
The result of the modified D10 is:
On a 0 to 6 The ships don't foul
On a 7 to 9 The ships foul If they foul, then the ships do no further movement. Fouled ships may not fire. If they do not foul, then the moving ship completes its movement directly forward and parallel to the other ship. Since it is not afoul it may fire.
Collision The captain of the ship fails to respond quickly enough, and a reasonably good Collision occurs thus:
The ship moves part of its move directly forward (without firing) until it just touches the other ship’s base.
The other ship is then pivoted about this point of contact to bring it parallel to the moving ship.
The two ships automatically Foul each other and so both ships do no further movement. Fouled ships may not fire.

14
Each player then checks his ship for damage. Throw 2 Red dice and 2 White dice, the result being:
The ship loses the Red dice in CF's
The ship loses the White dice in FF's
If two or more dice do damage, then the ship also loses 1 Rigging Factor
Ramming Collision: Despite the fact that ramming was just about as hazardous to the rammer as it was to the ship being rammed, the captain of the ship decides to attempt to Ram the other ship thus:
The ship moves part of its move directly forward (without firing) until it just touches the other ship’s base
The other ship is then pivoted about this point of contact until it is perpendicular to the other ship
Each player then checks his ship for damage thus:
a) The ramming ship throws 2 Red dice and 2 White dice, the resulting damage to itself being:
The ship loses the two Red dice total in CF's
The ship loses the two White dice total in FF's
If the ramming ship is: - Drifting, it loses 1 Rigging Factor - At Battle Sail, it loses 2 Rigging Factors and 1 Hull Factor

15
b) The ship being rammed throws 2 Red dice and 2 White dice, the resulting damage to itself being:
The ship loses the Red dice total in CF's
The ship loses the White dice total in FF's
If the ramming ship is: - Drifting, it loses 1 Hull Point - At Battle Sail, it loses 1 Rigging Factor and 1 Hull Factor
The two ships automatically Foul each other and the ships do no further movement. Fouled ships may not fire.
FIRING
The gunnery during this period was a very hit and miss affair; broadsides could be very devastating, total failures or anything in between. These rules reflect this.
Firstly, a ship may only fire at an enemy ship. Next, any ship that is Heeling over may not fire. Also, any ship that is afoul with another ship may not fire.
A ship may fire at any time during its movement (however, see the Close Quarters Manoeuvring rules). Thus, once a ship fires it may not Turn, but may only be moved directly forward.
Further, a ship gets only one chance to fire during its movement phase. A ship may:
Fire then do its full move, or,
Partially move, fire, then complete its move, or,
Do its full move then fire
A ship’s Fire Factors (FF’s) may fire once and once only during the firing phase of the move. A ship may fire at several targets but only once at any particular target.
Firing Arcs: A ship may fire in one or more of the four firing arcs. The firing arcs are:
1. The Bow (Forward) firing arc: Only forward mounted FF’s may fire
2. The Starboard (Right) broadside firing arc: Only starboard mounted FF’s may fire
3. The Port (Left) broadside firing arc: Only port mounted FF’s may fire
4. The Stern (Rear) firing arc: Only aft mounted FF’s may fire

16
A target ship must have part of its base in the firing arc to be in the arc. Common sense is required to determine which guns can fire in which arc. Any ship with an unusual gun layout should have its capabilities agreed to before the game commences.
Line of Sight: To determine a line of sight, a straight line is projected from the mainmast of the firer to mainmast of the
target. Should it pass over/through the base of another ship, then that ship blocks the line of sight for firing purposes but not for visibility.
No ship can fire over or past another ship blocking line of sight.
Smoke: Smoke is generated by ships that were on fire. Smoke is shown by a small piece of cotton wool placed on the ship’s model; the whole model is then considered smoke.
No ship can see past another ship generating smoke. However, they can see the ship generating smoke and fire at it.
Partial Broadside: Not all guns on a broadside could pivot far enough to fire at a target when it was off to one side of the broadside. Thus, if the target’s base is in arc but the mainmast of the target is outside the arc then the shot is deemed a partial broadside.
Initial Broadside: A ship gets this bonus only once during a game, that is, the first time that it fires any Fire Factors (FF’s) from either broadside. Bow and stern fire does not get this bonus nor does their fire affect this bonus.
Gun Ranges: The effective gun ranges for all FF's are:
Point Blank Range Upto 50 yards (100 mm)
Short Range Upto 100 yards (200 mm)
Medium Range Upto 200 yards (400 mm)
Long Range Upto 400 yards (800 mm)
Gun ranges are measured from the mainmast of the firer to the mainmast of the target.
How to fire: To fire at a target, the target must be:
Visible to the firer, and,
In the firing arc for the particular FF’s firing, and,
Within range of the FF’s firing.
The player nominates the number of FF’s he wishes to fire. Firing is done by using pairs of dice, one Red dice and one White dice. The number of dice used is determined thus:

17
Total FF’s Dice Used
1-9 0 Pairs
10-19 1 Pair
20-29 2 Pairs
30-39 3 Pairs
40+ 4 Pairs
This number of dice is modified thus:
Broadside at Point Blank range add 2 Pairs Broadside at Short range add 1 Pair Broadside at Medium range No effect Broadside at Long range subtract 1 Pair
Rake stern at Point Blank range add 3 Pairs Rake stern at Close range add 2 Pairs Rake stern at Medium range add 1 Pair Rake bow at Point Blank range add 1 Pair
Initial Broadside add 2 Pairs If firing at an afoul ship add 2 Pair If firing a partial broadside subtract 2 Pairs If the firer is Unsteady subtract 2 Pairs If the target is Small subtract 2 Pairs
Eg, Firing 16 FF’s, Medium range, Unsteady is 0 pairs, thus unable to fire Eg, Firing 32 FF’s, Point Blank, Stern Rake, Initial Broadside is 10 pairs
The final number of dice is thrown, and the damage is determined thus:
Total up the Red dice. This is the number of CF’s lost on the target. The target ship’s crew factors are reduced by this number immediately.
Eg, The total of the Red dice is 5. Five CF’s are lost on the target ship
Total up the White dice. This is the number of FF’s lost on the target immediately.
Eg, The total of the white dice thrown is 6; six FF’s are lost on the target ship
The FF’s are removed from the firing arc being fired at first then other arcs (as evenly as possible). The firing player will settle any disputes. If no FF’s are available then these hits become Crew Factor (CF) hits but the ship still has the required counter placed on it (See Random Events).
How to determine a Raking shot: Only broadside fire can Rake; bow and stern guns cannot rake. For a target ship to be raked:
The firer must have the target ship in the firer’s broadside firing arc, AND,
The target must have the firing ship in the target’s bow or stern firing arc

18
Remember, that if the mainmast of the target is outside the firing arc, then the shot is not a broadside shot but it is a partial broadside shot (which cannot rake).
A target ship loses one Officer each time it is stern raked at point blank range or close range. They just didn't like this sort of thing happening.
Firing at ships that are afoul: Ships that are afoul present a very slow, non-manoeuvring target and are thus easier to hit. Ships may only fire at ships that are afoul if all the ships that are afoul are enemy ships. The closest enemy ship takes all the damage. The firer will decide if there is any dispute.
THE END PHASE
MOVING FOULED SHIPS
Ships that were involved in hand-to-hand combat at the start of the movement phase are afoul and thus do not move during the normal movement phase but drift during this phase.
Fouled ships drift like normal drifting ships but they drift as a group; they start afoul and end afoul. The ships drift at the rate of the slowest ship in the group.
RANDOM EVENTS
All ships must check for Random Events during this phase.
Whenever a ship fires its guns at an enemy ship at either point blank range or close
range, and the shot inflicts non-crew damage (ie, it does damage with a white dice),
then the target ship has a LOW marker placed on the ship’s base.
Similarly, whenever a ship fires its guns at an enemy ship at either medium range or
long range, and the shot inflicts non-crew damage (ie, it does damage with a white
dice), then the target ship has a HIGH marker placed on the ship’s base.
To check for a random event on a ship, throw 1D10 for each marker on the ship base, the result being thus:

19
With no markers. Each LOW Marker Each HIGH Marker
On a 0 Officer recovers No effect No effect
On a 1 Officer recovers No effect No effect
On a 2 Guns repaired No effect No effect
On a 3 No effect No effect No effect
On a 4 No effect No effect No effect
On a 5 No effect Officer wounded Officer wounded
On a 6 No effect Steering hit No effect
On a 7 No effect Waterline hit No effect
On a 8 No effect Fire No effect
On a 9 No effect Explosion Rigging hit
The details of each of these random events are:
Officer Recovers: A wounded officer recovers and returns to service; the ship gains 1 Officer. A ship may never have more Officers than it started with.
Guns Repaired: Some guns are repaired and returned to service. The player who owns the ship affected adds 1D6 FF’s to his ship anywhere he chooses. A ship may never have more FF’s than it started with in any particular firing arc.
Officer Wounded: An officer is wounded; the ship loses 1 Officer.
Steering Hit: The ship suffered a hit in the tiller or rudder area. The ship loses 1 Officer, one CF and one stern FF if available. The hit also causes a temporary loss of steering. Throw 1D10; the ship may only turn one aspect for the next 1D10 moves while repairs are undertaken.
Waterline Hit: The ship suffers a waterline hit causing some serious flooding. The hole is soon plugged but the ship loses 1 Hull Factor due to the flooding.
Fire: A fire breaks out on the ship but it is quickly extinguished. However, the smoke lingers on for a time.
Throw 1D10; the smoke lingers on for the next 1D10 moves. The ship may not fire any of its guns until the smoke clears. Smoke is shown by placing a small piece of cotton wool on the ship model that was on fire. The whole model is then considered "smoke".
Explosion: If the tester is Small then it explodes and sinks very quickly. Remove the ship from play. Otherwise, throw 3 Red and 3 White dice; the damage is determined thus:
If the total of the dice throw is zero then no significant damage occurs and the damage is thus: 1) The ship loses 1 Hull Factor 2) The ship loses 1 Officer 3) The ship catches Fire (See Fire)
If the total is not zero then significant damage occurs and the damage is thus: 1) The ship loses 1 Hull Factor 2) The ship loses 1 Officer 3) The ship catches Fire (See Fire) 4) The ship also loses the 3 White dice total in FF’s 5) The ship also loses the 3 Red dice total in CF’s 6) The ship also loses one Rigging factor

20
Eg, A player throws for an explosion. He throws a total of 1 on the red dice and a total of 2 on the white dice. The ship loses 1 CF, 2 FF’s, 1 Hull Factor, 1 Officer 1 Rigging Factor and catches fire.
The FF’s cab be removed from anywhere on the ship. If no FF’s are available then FF hits become CF hits.
Rigging Hit: The ship suffers a rigging hit causing significant damage. One Rigging Factor is lost from the ship. The wreckage falls over one side of the ship obscuring gunfire. Throw 1D10 to determine which side of the ship is affected, the result being:
On 0-4 The port (left) side is affected
On 5-9 The starboard (right) side is affected
Throw the 1D10 again. The wreckage is cleared after the 1D10 moves.
The ship loses the use of the guns on the affected side while the wreckage is being cleared. Once cleared, the ship may fire its guns on the affected side next move. Bow and stern gunfire is unaffected.
CREW RECOVERY
During this phase, each player checks to see if any crew recover, rally and return to action on each of his ships.
The player nominates which ship he is checking. He then throws one red and one white dice for that particular ship. The total of the two dice is added to the CF total of the ship nominated. A ship may never have more CF’s than it started with.
STRIKING
During the End phase, a check is made to see if it any ships surrender (or strike), if any ships decide to make a run for it (or flee) or if any ships sink. A ship only checks to see if it surrenders, flees or sinks during this phase.
A ship Strikes if its Crew Factors are zero at this stage and it has no Officers at this stage
A ship will Flee if it has no Crew Factors at this stage but has some Officers at this stage
A ship will also Flee if it has some Crew Factors at this stage BUT has no Officers at this stage
A ship will Sink if it has no Hull Factors at this stage
Striking: A ship that Strikes will Drift. It may not fire nor may it be fired upon. It simply waits to be boarded by the enemy.
If, however, the ship finds itself more than 400 yards (800 mm) from the nearest enemy then the ship will attempt to Flee instead (See below).
Fleeing: A ship that is fleeing must move away from the nearest enemy where possible. It must attempt to flee at the highest speed it can muster ignoring the usual sail setting proximity restrictions. It may attempt to Jury Rig if necessary.
Once a ship begins to flee it will continue to do so and will only surrender if grappled by (becomes afoul with) an enemy ship. Fleeing ships may not fire.
Sinking: Small ships sink immediately. For all others it takes 10+1D10 moves for them to sink. The crew abandons ship and so it may not do anything except Drift. Once it sinks the ship model is removed from play.
If afoul with another ship when it sinks, then that other ship suffers one Rigging Factor damage and it may not fire next move due to excessive heel.

21
CREW UNSTEADINESS
When a ship’s crew casualty level becomes sufficiently high the crew will automatically become Unsteady; this affects their performance. A ship only checks for unsteadiness during this phase thus:
The crew of a ship becomes unsteady if its Crew Factors are reduced to below half of its
starting value at this stage, AND the ship is within 200 yards (400 mm) of any sighted enemy ship
An unsteady ship that finds itself over 200 yards (400 mm) from all sighted enemy at this stage regains steadiness (at least temporarily)
Officers and Unsteadiness: A ship starts the game with a certain number of Officers as set out in the ship classification section (see the appendix). These Officers are used to overcome penalties or restrictions caused by unsteadiness during the game.
There is no limit on how many Officers a ship can use during a single turn except that it must actually have the Officers to use.
Eg, A ship wishes to fire but is unsteady. It may use one Officer to ignore the subtract 2 pairs of dice penalty for firing when unsteady.
Eg, A ship wishes to Turn but is unsteady. It may use one Officer to ignore the one aspect restriction for turning when unsteady.
Officers are crossed off as they are used. Remember though, that when the Officer level of a ship reaches zero that the ship may have to Strike or Flee (see above). A ship may have some Officers return via certain random events (see random events).
JURY RIGGING
Any ship that has had its rigging factors reduced to the point where it is forced to Drift is Dismasted. The crew of a dismasted ship could make temporary repairs to the rigging to get them under way again, that is, they could Jury Rig the ship. A ship may only be Jury Rigged if:
It is not afoul with another ship, and,
It is over 200 yards (400 mm) away from the nearest sighted enemy ship
It takes 10+1D10 moves to jury rig a ship during which time the ship may not fire or participate in any boarding actions (hand-to-hand combat).
Once the ship is successfully jury rigged it is considered to have one Rigging Factor, that is, it can set Battle sail only. If this Jury Rigged Rigging Factor is lost, then the ship can not attempt to jury rig again during the game. The ship will drift for the remainder of the game.
ATTEMPTING TO UNFOUL
It takes 10+1D10 moves for any two (or more) ships to unfoul.
Eg, Three ships are fouled. The player controlling the ships throws a 4 on 1D10 to determine how long they will remain fouled. They will remain fouled for the next 10+4=14 moves.
Once they unfoul, they are moved up to one Drift move apart during this phase (in any direction) after which they may move, fire, etc, if able.
CHANGING SAIL SETTINGS
A ship must be at one of four sail settings. They are:

22
1. No Sail 2. Battle Sail 3. Plain Sail 4. Full Sail
All ships normally start the game being able to set their sails upto Full Sail; a ship at No Sail Drifts.
Sail settings and proximity to the enemy: Ships of this period set their sails according to their proximity to the enemy. Thus, the maximum sail setting for any ship is:
When no enemy is sighted - Full Sail
Enemy sighted, but over 800 yards away - Full Sail
Enemy sighted, and under 800 yards away - Plain Sail
Enemy sighted, and under 400 yards away - Battle Sail
This maximum sail setting for a ship may be further limited by damage done to the rigging. These requirements mean that for most of the game a ship will move rather slowly at Battle sail; that’s what they did historically.
Changing Sail Settings: During this phase a ship may alter its present sail setting up or down by one sail setting thus:
No sail Battle sail Plain sail Full sail
Eg, A ship at Plain sail may either: 1) Increase from Plain sail to Full sail, or, 2) Maintain it’s current sail setting, or, 3) Decrease from Plain sail to Battle sail
Eg, A ship at Full sail may: 1) Maintain it’s present sail setting, or, 2) Decrease from Full sail to Plain sail.
Further, as a ship takes rigging hits its maximum sail setting is reduced to the following settings:
Ship Size
1st
Rigging Hit
2nd
Rigging Hit
3rd
Rigging Hit
4th
Rigging Hit
5th
Rigging Hit
A Great Ship Plain Plain Plain Battle Drift
A Large Ship Plain Plain Battle Drift Drift
A Medium Ship Plain Battle Drift Drift Drift
A Small Ship Battle Drift Drift Drift Drift
All ships Drift on the fourth and subsequent rigging hits. A ship reduced to Drift by rigging hits is considered Dismasted (See Jury Rigging).
Eg, A Medium sized Ship starts the game being able to set Full sail. After the first rigging loss it can only set up to Plain sail; the next loss Battle sail; on the next and all subsequent losses the ship Drifts.
Eg, A Small Ship starts the game being able to set Full sail. After the first rigging loss it can only set up to Battle sail. On the next and all subsequent losses the ship drifts.
Remember, the maximum sail setting for a ship may also be limited by the ship’s proximity to the enemy, or by damage caused to the rigging.

23
Effect of changing sail settings on gunnery: A ship may not fire its guns on the turn AFTER it changes its sail settings simply because most of the crew is involved in changing the sails.
Changing circumstances: Obviously, as a ship takes rigging damage its maximum sail setting allowed may also change. In this case, the sail setting is immediately reduced to the new maximum sail setting at no penalty.
Eg, A ship can set sails to a maximum of Plain sail. It suffers one Rigging Factor damage. This reduces its maximum setting to the Battle sail setting. Thus, next move, the ship may move at Battle sail without having to change its sail setting.
DETERMINING THE ADVANTAGE
The side with the most ships is more likely to dictate the general course of an action with the smaller side then reacting to the other’s actions. Thus, before play the player holding the Advantage is determined thus:
Each side tallies the total number of ships that it has that are not captured, that have not surrendered, that are not fleeing and that are still afloat
The side with the greatest number has the Advantage
If equal, then both sides throw 1D10; the side with the higher throw has the Advantage; re-throw on a tie
A player will hold on to the Advantage from move to move until the other player can take it off him in the noted phase. The player with the Advantage always moves first each Turn.
FINALLY
Well, that’s it; that’s GALLEON. Please remember, it’s a game! Try and have fun and sort out any
problems that you may have with a dice throw.
Players may decide between themselves as to what the victory conditions for the game will be. Of course, a player may concede the game to his opponent at any time.
Trevor Raymond
Copyright by Trevor Raymond. Version 3, February 2008 (Exodus 20:15 – You shall not steal.)

24
GALLEON: APPENDIX Copyright by Trevor Raymond. Version 3, February 2008

25

26
GALLEON PLAYSHEETS SHIP’S NAME: Size: Officers:
Type: Hull:
Sail Setting:
Rigging Factors:
Crew Factors:
Bow FF’s =
Port FF’s =
Starboard FF’s =
Stern FF’s =
Notes:
SHIP’S NAME: Size: Officers:
Type: Hull:
Sail Setting:
Rigging Factors:
Crew Factors:
Bow FF’s =
Port FF’s =
Starboard FF’s =
Stern FF’s =
Notes:

27
GALLEON HIT MARKERS
HIGH
HIGH
HIGH
HIGH
HIGH
HIGH
HIGH
HIGH
HIGH
HIGH
HIGH
HIGH
HIGH
HIGH
HIGH
HIGH
HIGH
HIGH
HIGH
HIGH
HIGH
HIGH
HIGH
HIGH
LOW
LOW
LOW
LOW
LOW
LOW
LOW
LOW
LOW
LOW
LOW
LOW
LOW
LOW
LOW
LOW
LOW
LOW
LOW
LOW
LOW
LOW
LOW
LOW