digital sweeps instruction manual.doc
TRANSCRIPT
Digital Sweeps instruction manual 27.02.13
Database Instruction manual.
Return to Table of contents
Digital Sweeps instruction manual 08/08/2017
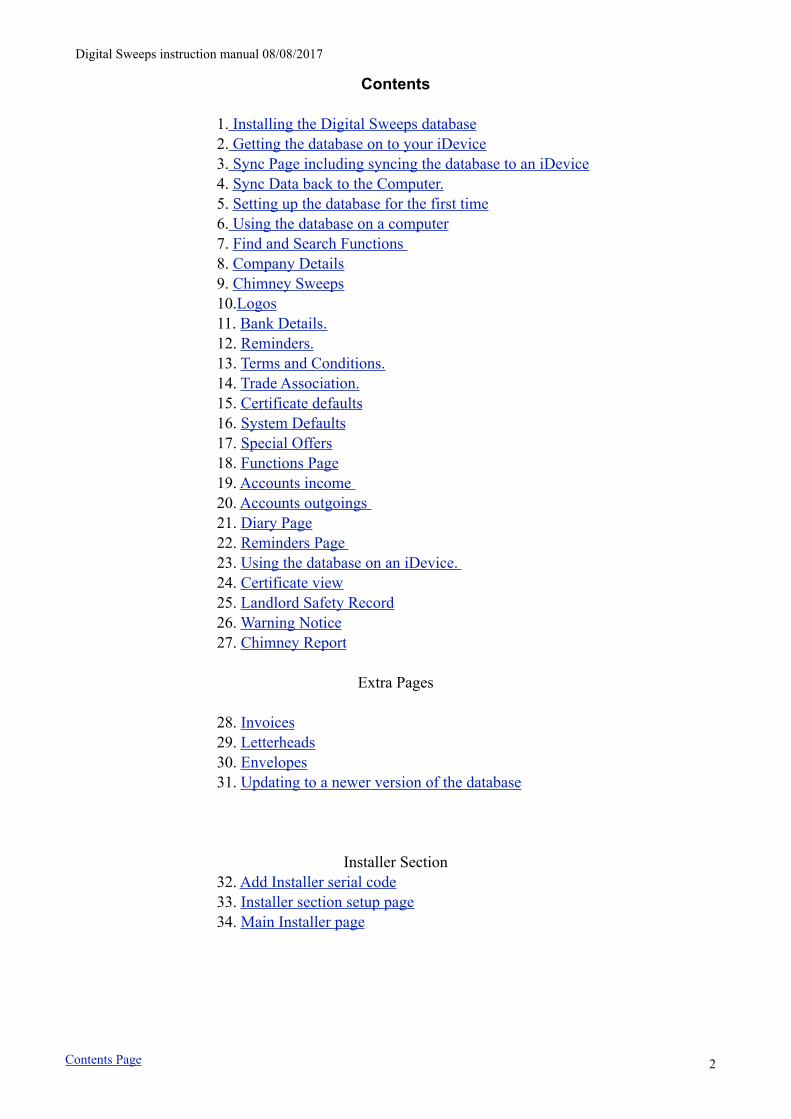
Contents
1. Installing the Digital Sweeps database 2. Getting the database on to your iDevice 3. Sync Page including syncing the database to an iDevice 4. Sync Data back to the Computer. 5. Setting up the database for the first time 6. Using the database on a computer 7. Find and Search Functions 8. Company Details 9. Chimney Sweeps 10.Logos 11. Bank Details. 12. Reminders. 13. Terms and Conditions. 14. Trade Association. 15. Certificate defaults 16. System Defaults 17. Special Offers 18. Functions Page 19. Accounts income 20. Accounts outgoings 21. Diary Page 22. Reminders Page 23. Using the database on an iDevice. 24. Certificate view 25. Landlord Safety Record 26. Warning Notice 27. Chimney Report
Extra Pages
28. Invoices 29. Letterheads 30. Envelopes 31. Updating to a newer version of the database
Installer Section 32. Add Installer serial code 33. Installer section setup page 34. Main Installer page
Return to Table of contents 2Contents Page

Digital Sweeps instruction manual 08/08/2017
1 Installation of the Digital Sweeps database
The Digital Sweeps database can be downloaded from http://www.digitalsweeps.co.uk/download.html
Download in install the version for your computer. One the file is downloaded. un zip the file and install the
software. Install the full version and use the provided code which came in the folder.
Once Filmmaker is installed then download the Digital Sweeps Database
Return to Table of contents 3
Digital Sweeps instruction manual 08/08/2017
2 How to get the database on an iPad or iPhone
On your iPad or iPhone you will need to download the Free “Filemaker Go” app
Download the latest version of FileMaker Go that you iOS version supports
You will also need to download the latest version of Apple iTunes on your main computer
Return to Table of contents 4
Digital Sweeps instruction manual 08/08/2017
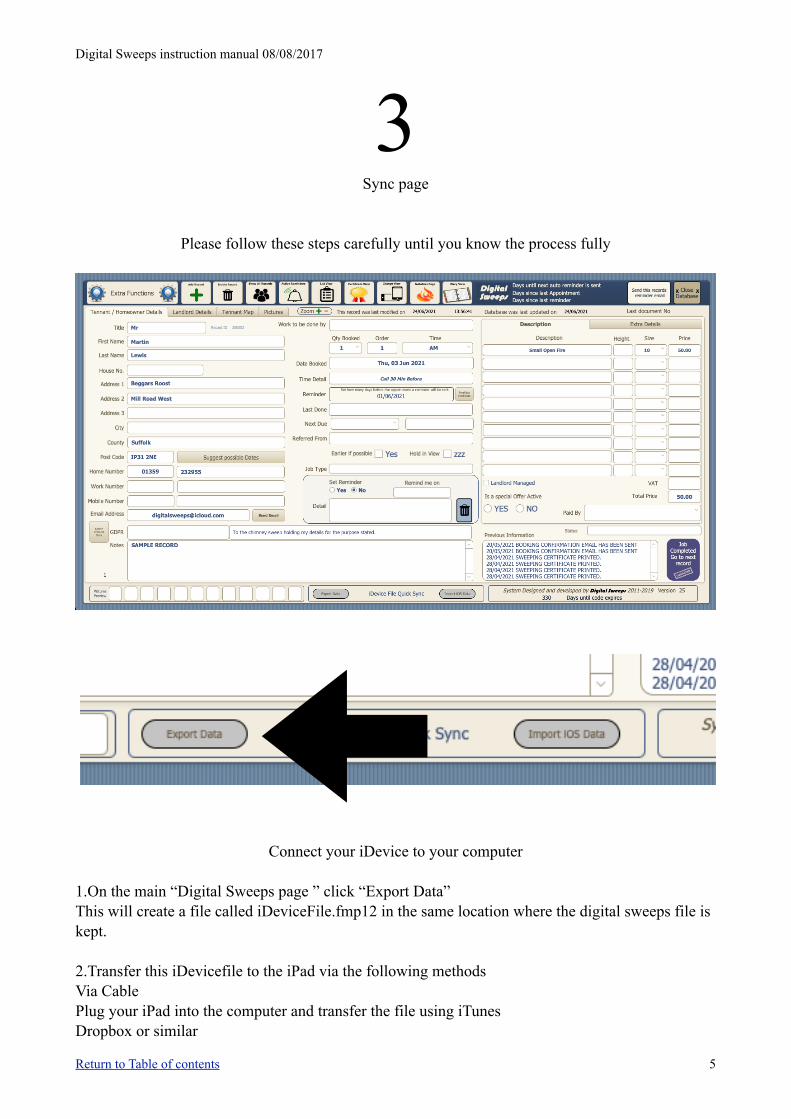
3 Sync page
Please follow these steps carefully until you know the process fully
Connect your iDevice to your computer
1.On the main “Digital Sweeps page ” click “Export Data” This will create a file called iDeviceFile.fmp12 in the same location where the digital sweeps file is kept.
2.Transfer this iDevicefile to the iPad via the following methods Via Cable Plug your iPad into the computer and transfer the file using iTunes Dropbox or similar
Return to Table of contents 5
Digital Sweeps instruction manual 08/08/2017
Save the file to a folder in Dropbox, On your ipad navigate to this folder and click the file to open it in FileMaker go. Airdrop Right click on the file and choose share with airdrop. Choose the iPad and click continue. Then open the file on the iPad with filmmaker go.
For Windows computers To transfer the file from the main computer to the iDevice with iTunes
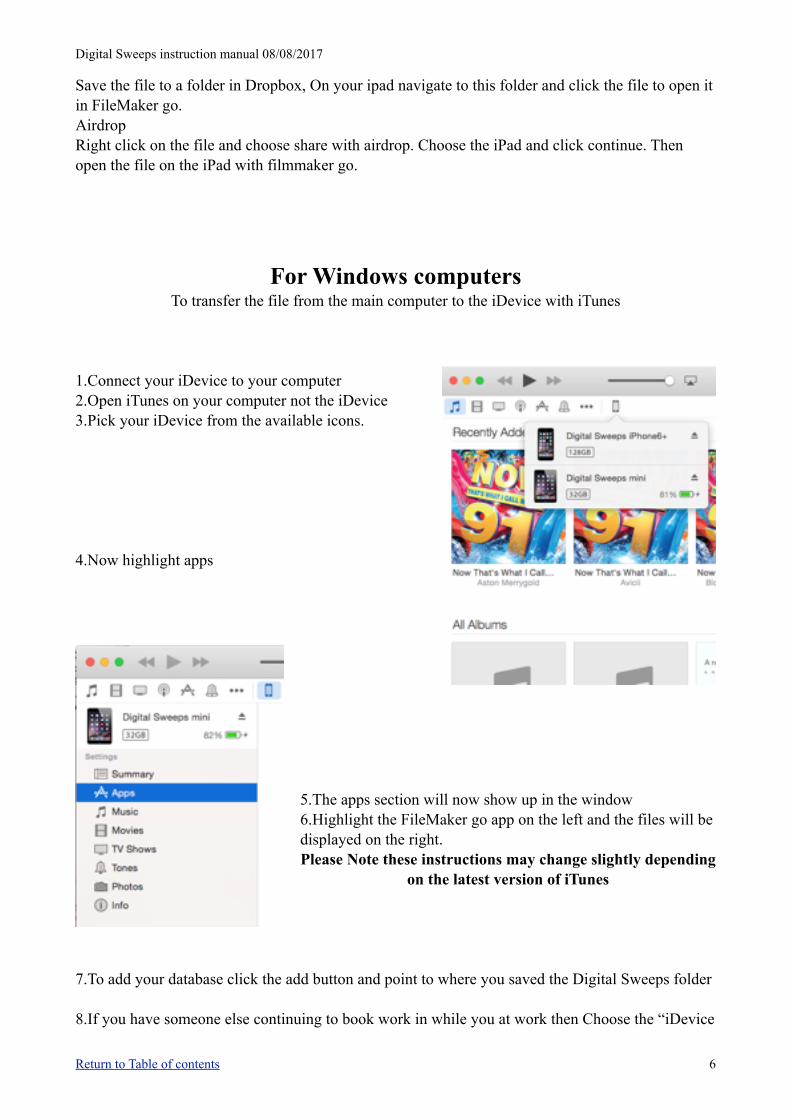
1.Connect your iDevice to your computer 2.Open iTunes on your computer not the iDevice 3.Pick your iDevice from the available icons.
4.Now highlight apps
5.The apps section will now show up in the window 6.Highlight the FileMaker go app on the left and the files will be displayed on the right. Please Note these instructions may change slightly depending
on the latest version of iTunes
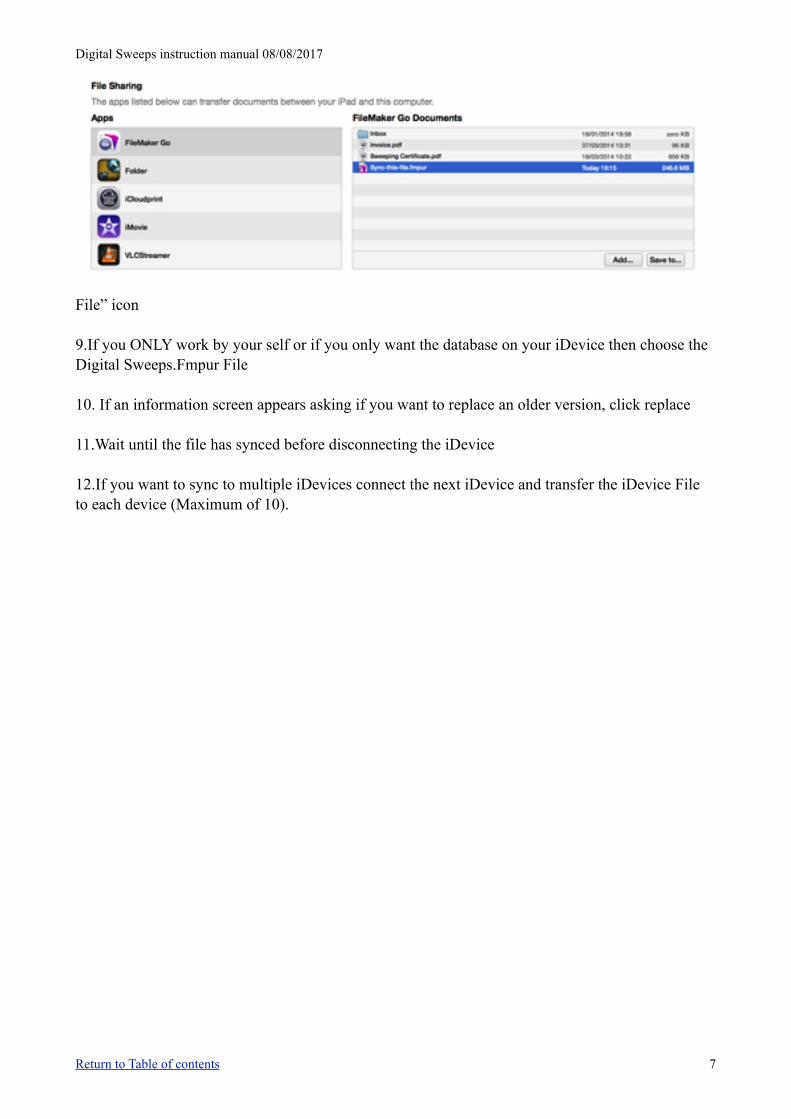
7.To add your database click the add button and point to where you saved the Digital Sweeps folder
8.If you have someone else continuing to book work in while you at work then Choose the “iDevice
Return to Table of contents 6
Digital Sweeps instruction manual 08/08/2017
File” icon
9.If you ONLY work by your self or if you only want the database on your iDevice then choose the Digital Sweeps.Fmpur File
10. If an information screen appears asking if you want to replace an older version, click replace
11.Wait until the file has synced before disconnecting the iDevice
12.If you want to sync to multiple iDevices connect the next iDevice and transfer the iDevice File to each device (Maximum of 10).
Return to Table of contents 7
Digital Sweeps instruction manual 08/08/2017
4
Sync data Back to the computer
Transfer the iDevice file back to the digital sweeps folder
Via cable Connect the iPad to the computer and using iTunes or the Mac finder window select the
iDevicefile.fmp12 and move it the the Digital Sweeps folder.
Via Dropbox On the iPad select the dropdown box on the top left of the screen and click Save/Send as
select Database and click continue select Dropbox or similar and navigate to the digital sweeps folder on the computer.
Via Airdrop On the iPad select the dropdown box on the top left of the screen and click Save/Send as
select Database and click continue select airdrop and choose your mac computer
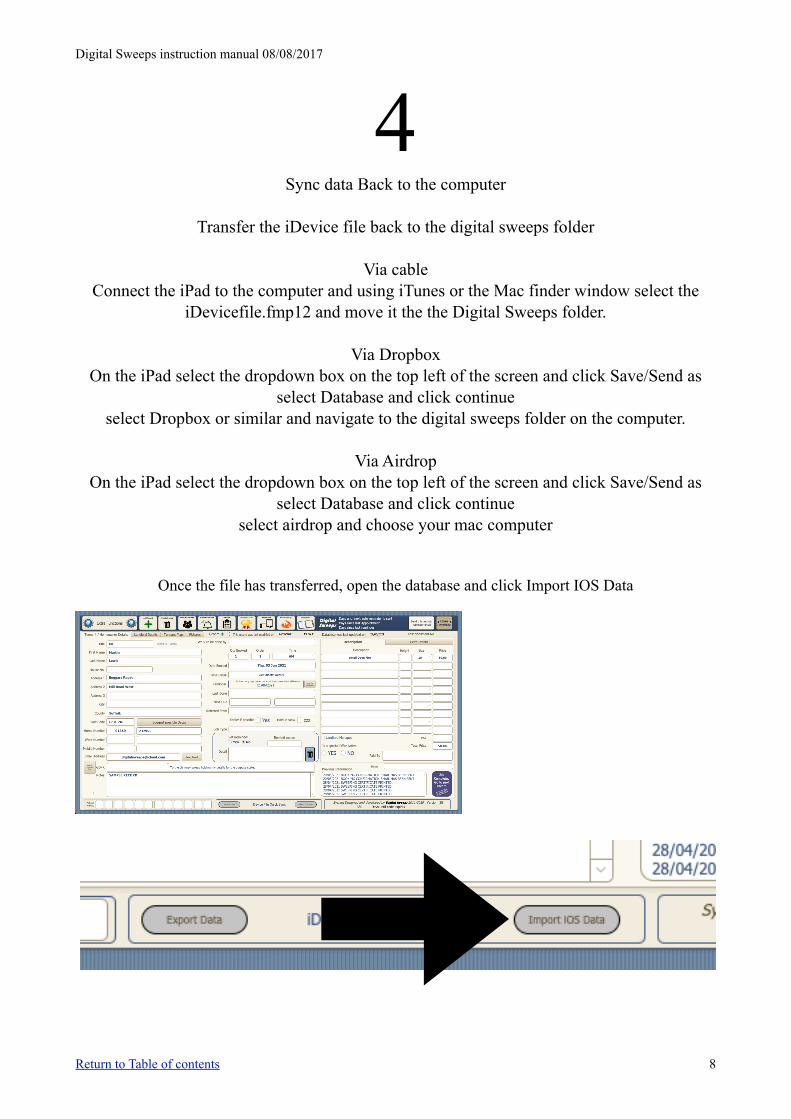
Once the file has transferred, open the database and click Import IOS Data
Return to Table of contents 8
Digital Sweeps instruction manual 08/08/2017
5 Setting up the database
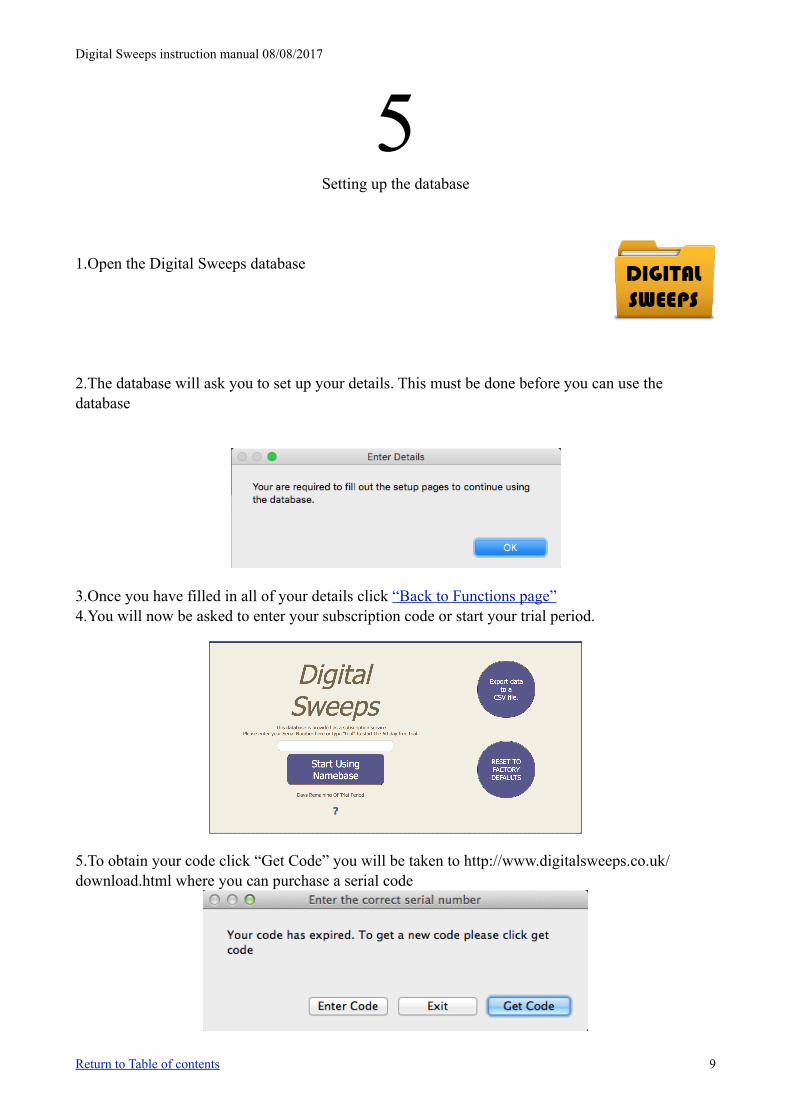
1.Open the Digital Sweeps database
2.The database will ask you to set up your details. This must be done before you can use the database
3.Once you have filled in all of your details click “Back to Functions page” 4.You will now be asked to enter your subscription code or start your trial period.
5.To obtain your code click “Get Code” you will be taken to http://www.digitalsweeps.co.uk/download.html where you can purchase a serial code
Return to Table of contents 9
Digital Sweeps instruction manual 08/08/2017
6.Once you have completed payment your code will be emailed to you.
7.Click “Enter Code” and type in your code and click “Start using Namebase”
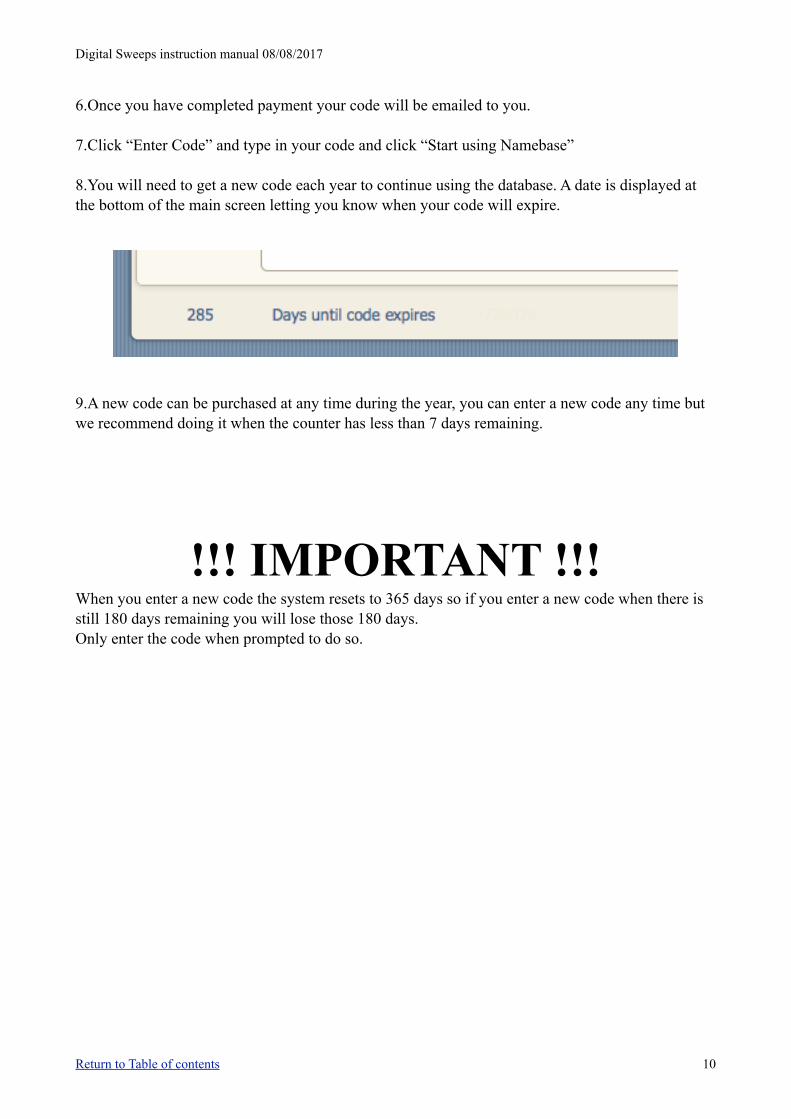
8.You will need to get a new code each year to continue using the database. A date is displayed at the bottom of the main screen letting you know when your code will expire.
9.A new code can be purchased at any time during the year, you can enter a new code any time but we recommend doing it when the counter has less than 7 days remaining.
!!! IMPORTANT !!!
When you enter a new code the system resets to 365 days so if you enter a new code when there is still 180 days remaining you will lose those 180 days. Only enter the code when prompted to do so.
Return to Table of contents 10
Digital Sweeps instruction manual 08/08/2017
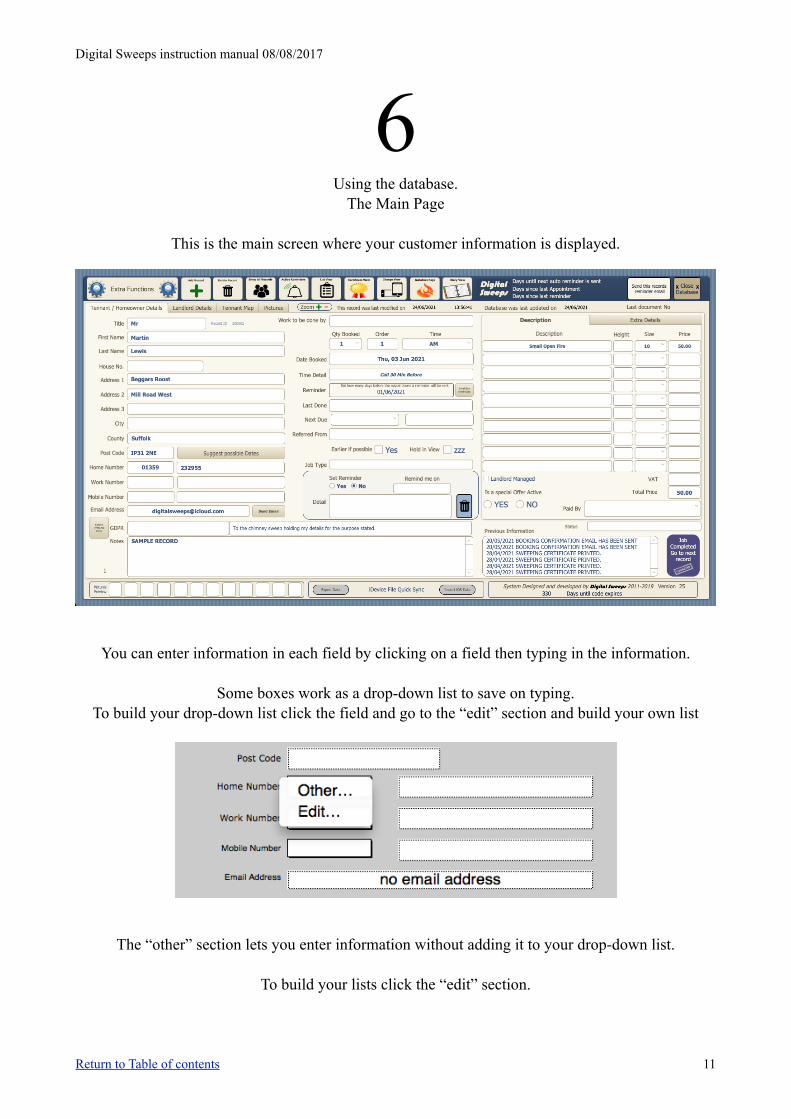
6 Using the database.
The Main Page
This is the main screen where your customer information is displayed.
You can enter information in each field by clicking on a field then typing in the information.
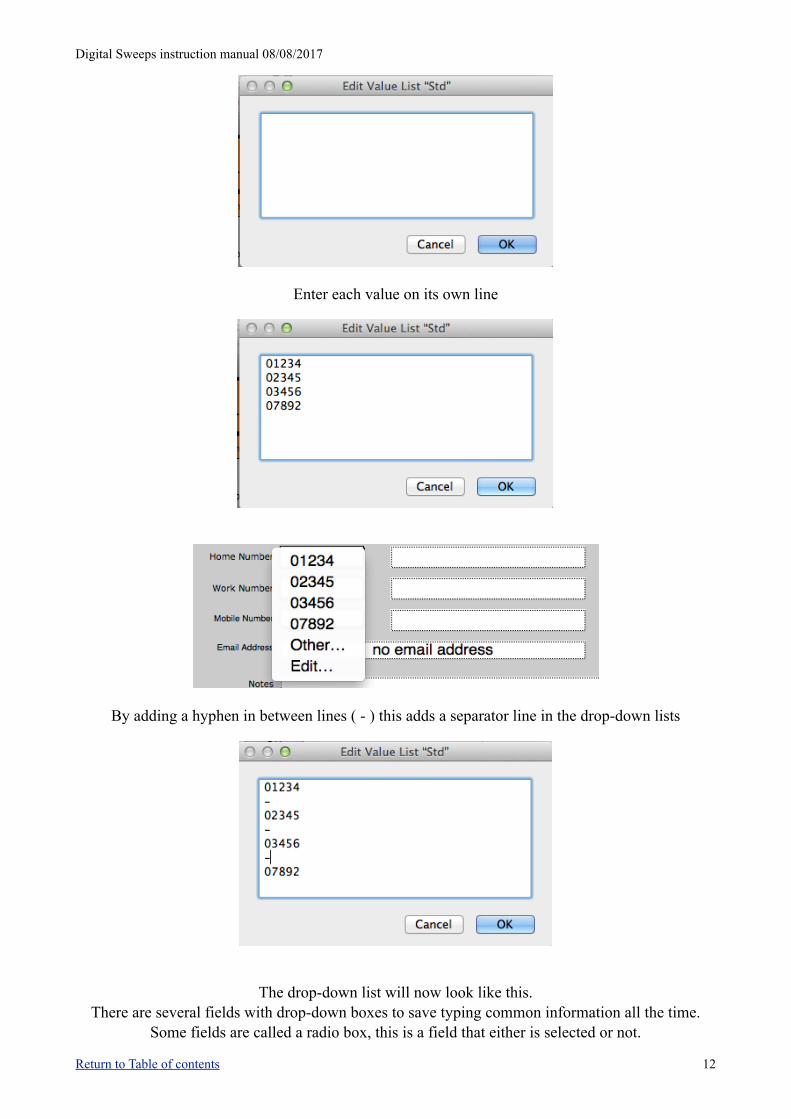
Some boxes work as a drop-down list to save on typing. To build your drop-down list click the field and go to the “edit” section and build your own list
The “other” section lets you enter information without adding it to your drop-down list.
To build your lists click the “edit” section.
Return to Table of contents 11
Digital Sweeps instruction manual 08/08/2017
Enter each value on its own line
By adding a hyphen in between lines ( - ) this adds a separator line in the drop-down lists
The drop-down list will now look like this.
There are several fields with drop-down boxes to save typing common information all the time. Some fields are called a radio box, this is a field that either is selected or not.
Return to Table of contents 12
!
!
Digital Sweeps instruction manual 08/08/2017
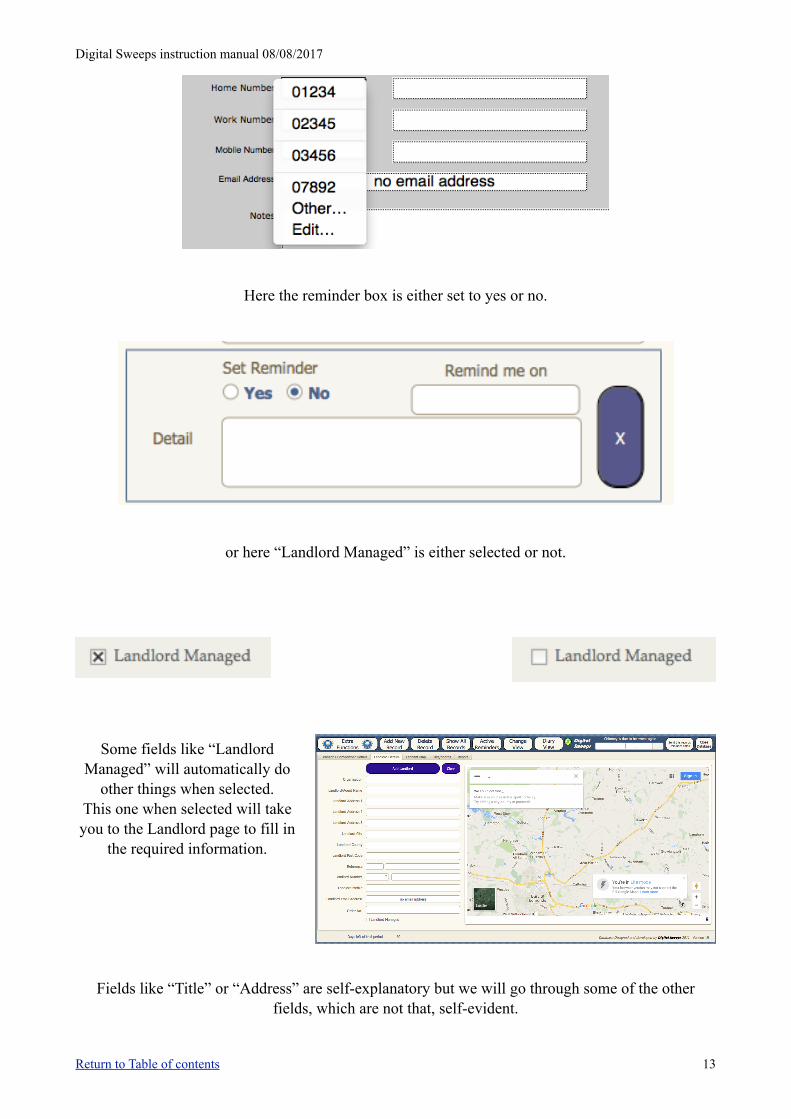
Here the reminder box is either set to yes or no.
or here “Landlord Managed” is either selected or not.
Some fields like “Landlord Managed” will automatically do
other things when selected. This one when selected will take you to the Landlord page to fill in
the required information.
Fields like “Title” or “Address” are self-explanatory but we will go through some of the other fields, which are not that, self-evident.
Return to Table of contents 13
!
Digital Sweeps instruction manual 08/08/2017
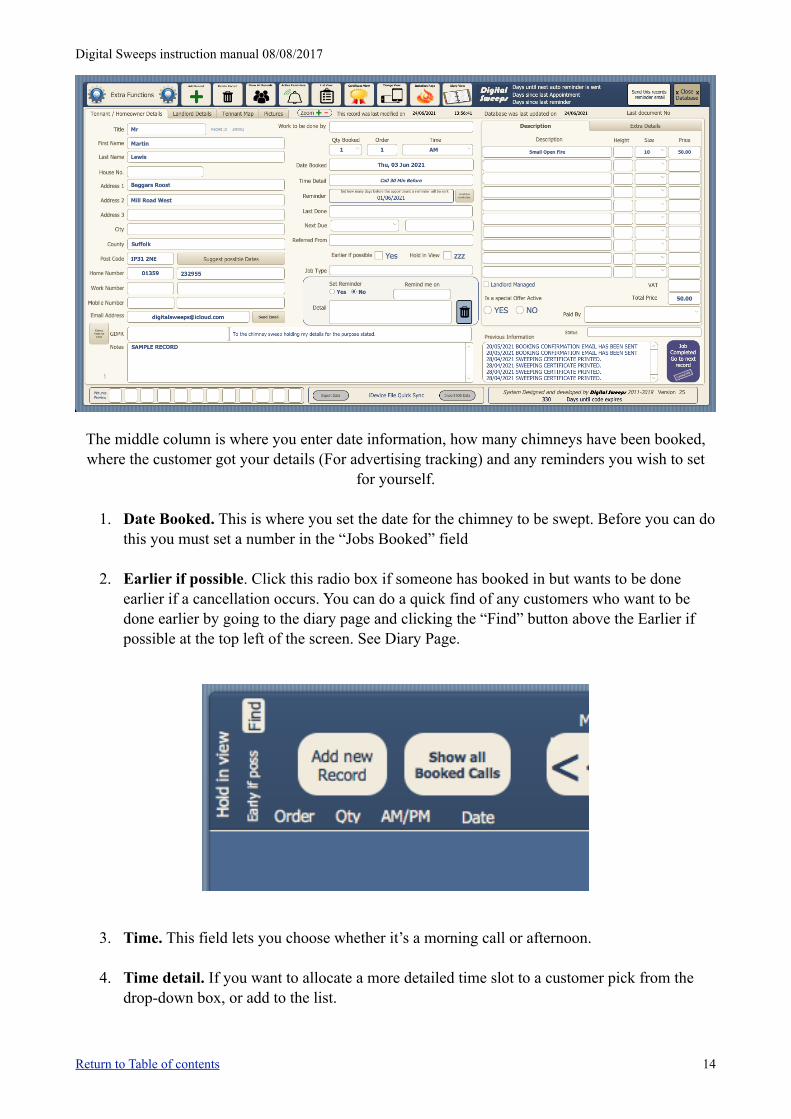
The middle column is where you enter date information, how many chimneys have been booked, where the customer got your details (For advertising tracking) and any reminders you wish to set
for yourself.
1. Date Booked. This is where you set the date for the chimney to be swept. Before you can do this you must set a number in the “Jobs Booked” field
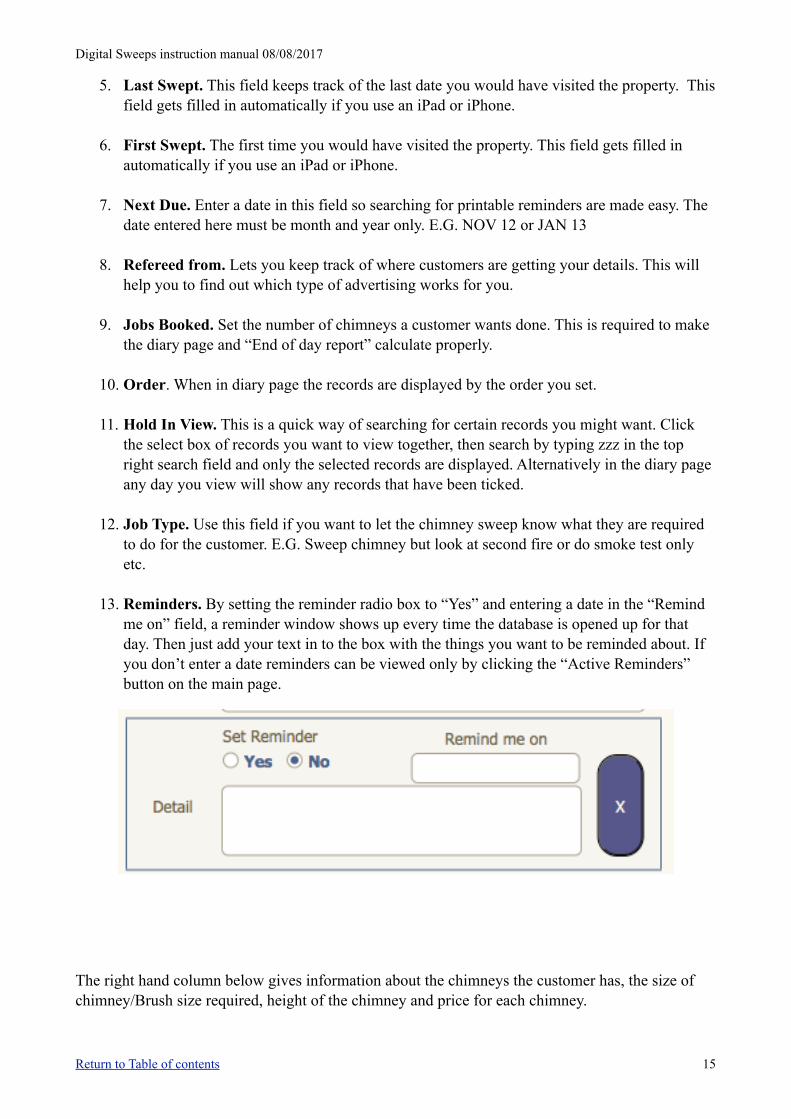
2. Earlier if possible. Click this radio box if someone has booked in but wants to be done earlier if a cancellation occurs. You can do a quick find of any customers who want to be done earlier by going to the diary page and clicking the “Find” button above the Earlier if possible at the top left of the screen. See Diary Page.
3. Time. This field lets you choose whether it’s a morning call or afternoon.
4. Time detail. If you want to allocate a more detailed time slot to a customer pick from the drop-down box, or add to the list.
Return to Table of contents 14
Digital Sweeps instruction manual 08/08/2017
5. Last Swept. This field keeps track of the last date you would have visited the property. This field gets filled in automatically if you use an iPad or iPhone.
6. First Swept. The first time you would have visited the property. This field gets filled in automatically if you use an iPad or iPhone.
7. Next Due. Enter a date in this field so searching for printable reminders are made easy. The date entered here must be month and year only. E.G. NOV 12 or JAN 13
8. Refereed from. Lets you keep track of where customers are getting your details. This will help you to find out which type of advertising works for you.
9. Jobs Booked. Set the number of chimneys a customer wants done. This is required to make the diary page and “End of day report” calculate properly.
10. Order. When in diary page the records are displayed by the order you set.
11. Hold In View. This is a quick way of searching for certain records you might want. Click the select box of records you want to view together, then search by typing zzz in the top right search field and only the selected records are displayed. Alternatively in the diary page any day you view will show any records that have been ticked.
12. Job Type. Use this field if you want to let the chimney sweep know what they are required to do for the customer. E.G. Sweep chimney but look at second fire or do smoke test only etc.
13. Reminders. By setting the reminder radio box to “Yes” and entering a date in the “Remind me on” field, a reminder window shows up every time the database is opened up for that day. Then just add your text in to the box with the things you want to be reminded about. If you don’t enter a date reminders can be viewed only by clicking the “Active Reminders” button on the main page.
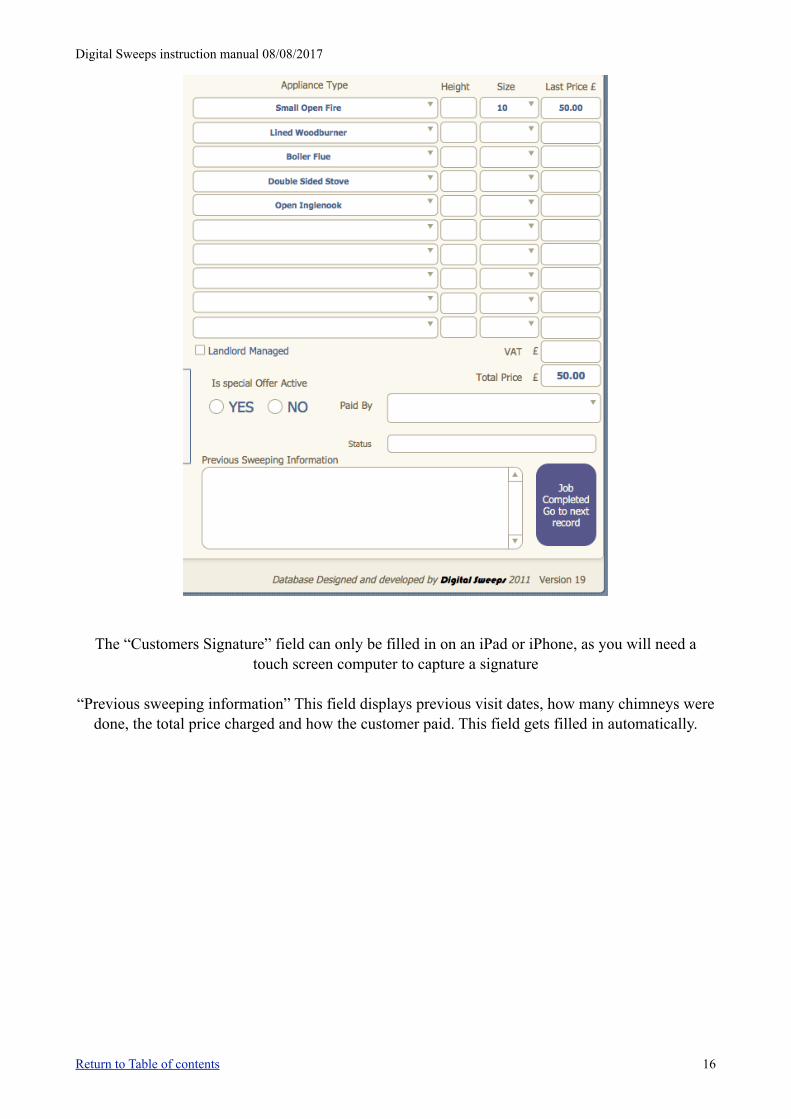
The right hand column below gives information about the chimneys the customer has, the size of chimney/Brush size required, height of the chimney and price for each chimney.
Return to Table of contents 15
Digital Sweeps instruction manual 08/08/2017
The “Customers Signature” field can only be filled in on an iPad or iPhone, as you will need a
touch screen computer to capture a signature
“Previous sweeping information” This field displays previous visit dates, how many chimneys were done, the total price charged and how the customer paid. This field gets filled in automatically.
Return to Table of contents 16
Digital Sweeps instruction manual 08/08/2017
7 Find & Search Functions
The find and search functions can be done on any page only for the information that is displayed on those pages. i.e. you can't do a find or search on the diary page for appliance information as it is not
displayed on that page.
The difference between a find request and a search request is as follows
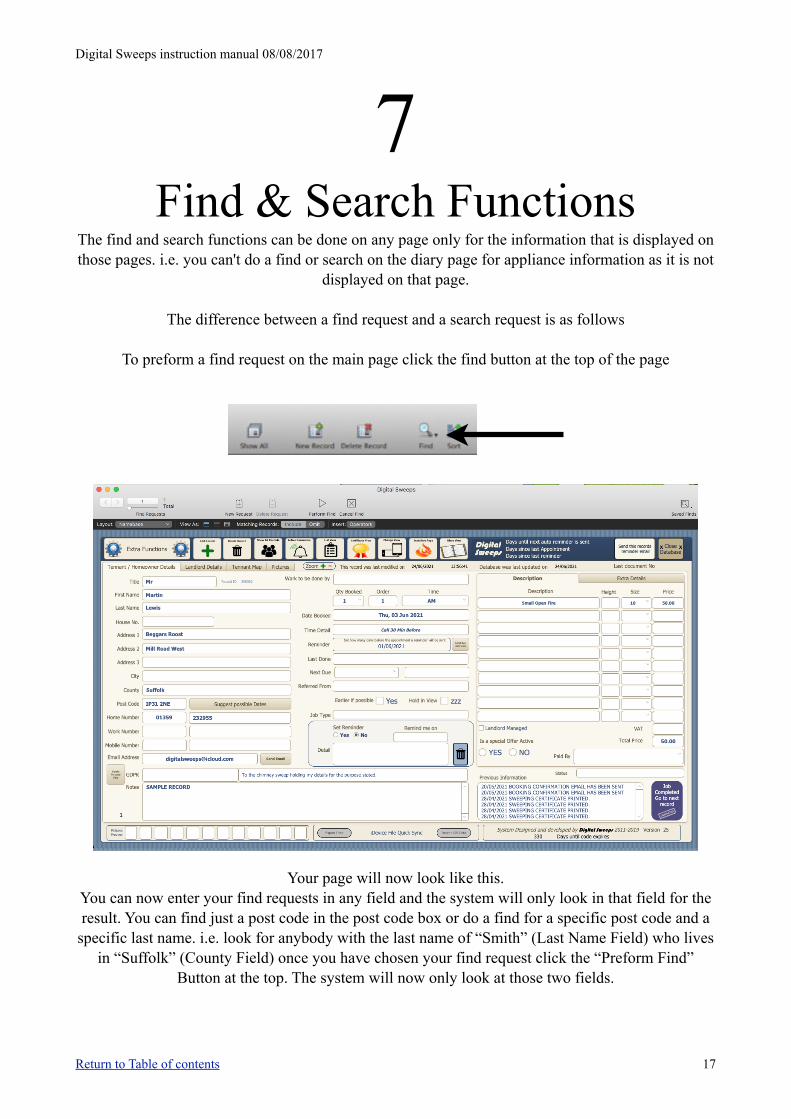
To preform a find request on the main page click the find button at the top of the page
Your page will now look like this. You can now enter your find requests in any field and the system will only look in that field for the result. You can find just a post code in the post code box or do a find for a specific post code and a
specific last name. i.e. look for anybody with the last name of “Smith” (Last Name Field) who lives in “Suffolk” (County Field) once you have chosen your find request click the “Preform Find”
Button at the top. The system will now only look at those two fields.
Return to Table of contents 17
Digital Sweeps instruction manual 08/08/2017
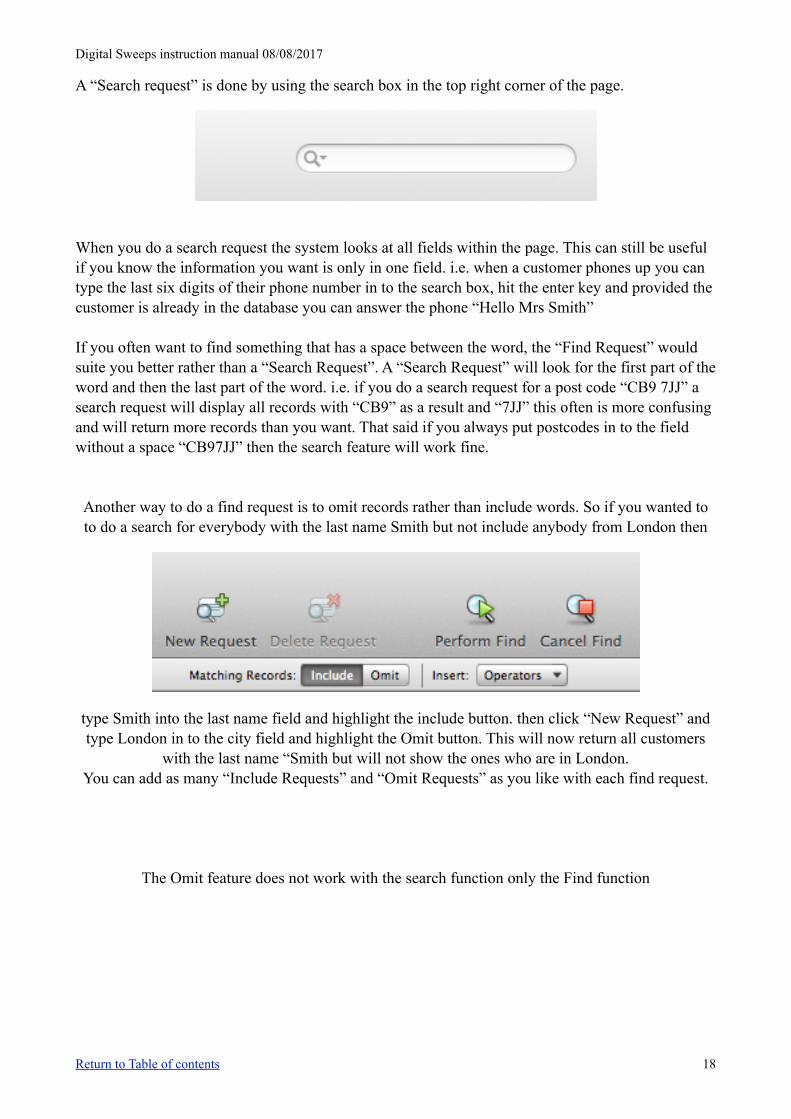
A “Search request” is done by using the search box in the top right corner of the page.
When you do a search request the system looks at all fields within the page. This can still be useful if you know the information you want is only in one field. i.e. when a customer phones up you can type the last six digits of their phone number in to the search box, hit the enter key and provided the customer is already in the database you can answer the phone “Hello Mrs Smith”
If you often want to find something that has a space between the word, the “Find Request” would suite you better rather than a “Search Request”. A “Search Request” will look for the first part of the word and then the last part of the word. i.e. if you do a search request for a post code “CB9 7JJ” a search request will display all records with “CB9” as a result and “7JJ” this often is more confusing and will return more records than you want. That said if you always put postcodes in to the field without a space “CB97JJ” then the search feature will work fine.
Another way to do a find request is to omit records rather than include words. So if you wanted to to do a search for everybody with the last name Smith but not include anybody from London then
type Smith into the last name field and highlight the include button. then click “New Request” and type London in to the city field and highlight the Omit button. This will now return all customers
with the last name “Smith but will not show the ones who are in London. You can add as many “Include Requests” and “Omit Requests” as you like with each find request.
The Omit feature does not work with the search function only the Find function
Return to Table of contents 18
Digital Sweeps instruction manual 08/08/2017
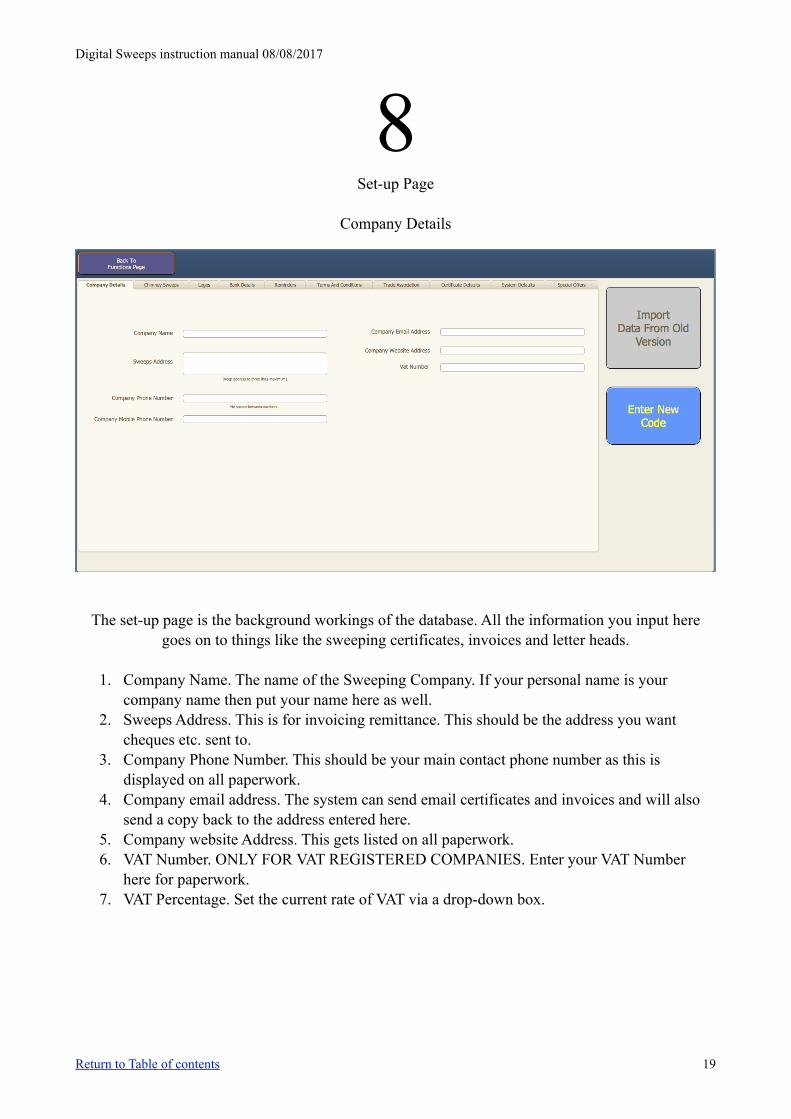
8 Set-up Page
Company Details
The set-up page is the background workings of the database. All the information you input here
goes on to things like the sweeping certificates, invoices and letter heads.
1. Company Name. The name of the Sweeping Company. If your personal name is your company name then put your name here as well.
2. Sweeps Address. This is for invoicing remittance. This should be the address you want cheques etc. sent to.
3. Company Phone Number. This should be your main contact phone number as this is displayed on all paperwork.
4. Company email address. The system can send email certificates and invoices and will also send a copy back to the address entered here.
5. Company website Address. This gets listed on all paperwork. 6. VAT Number. ONLY FOR VAT REGISTERED COMPANIES. Enter your VAT Number
here for paperwork. 7. VAT Percentage. Set the current rate of VAT via a drop-down box.
Return to Table of contents 19
Digital Sweeps instruction manual 08/08/2017
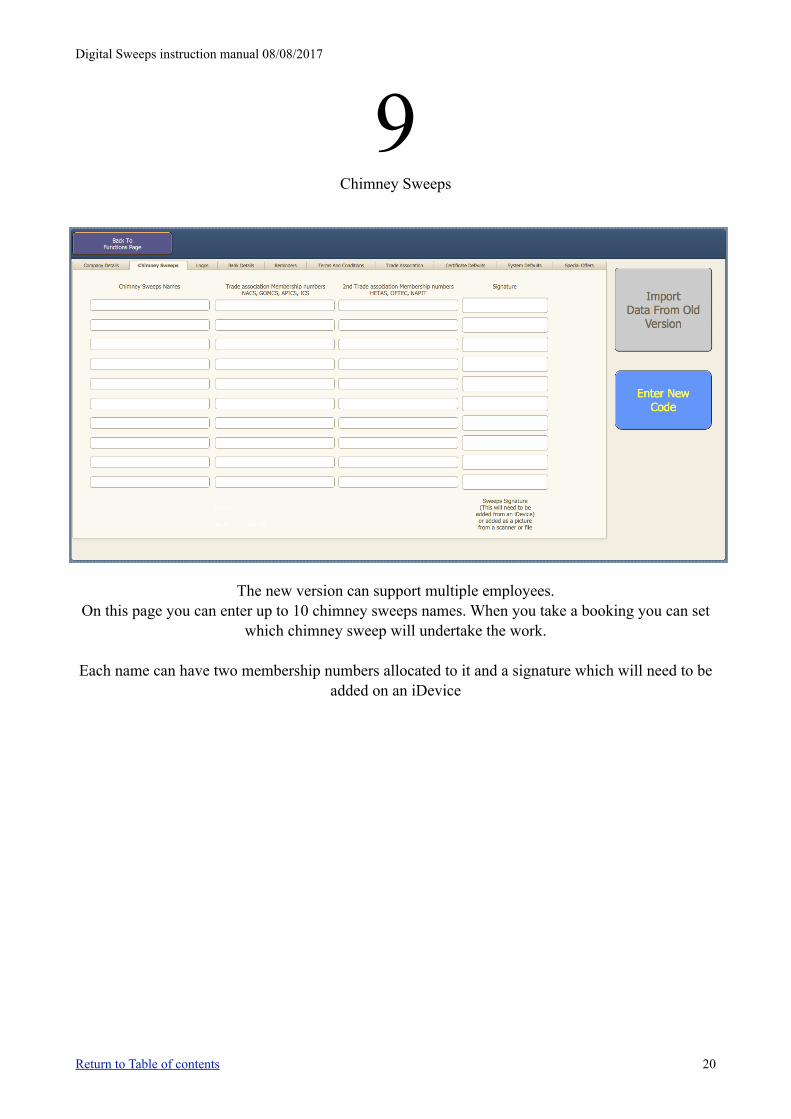
9 Chimney Sweeps
The new version can support multiple employees. On this page you can enter up to 10 chimney sweeps names. When you take a booking you can set
which chimney sweep will undertake the work.
Each name can have two membership numbers allocated to it and a signature which will need to be added on an iDevice
Return to Table of contents 20
Digital Sweeps instruction manual 08/08/2017
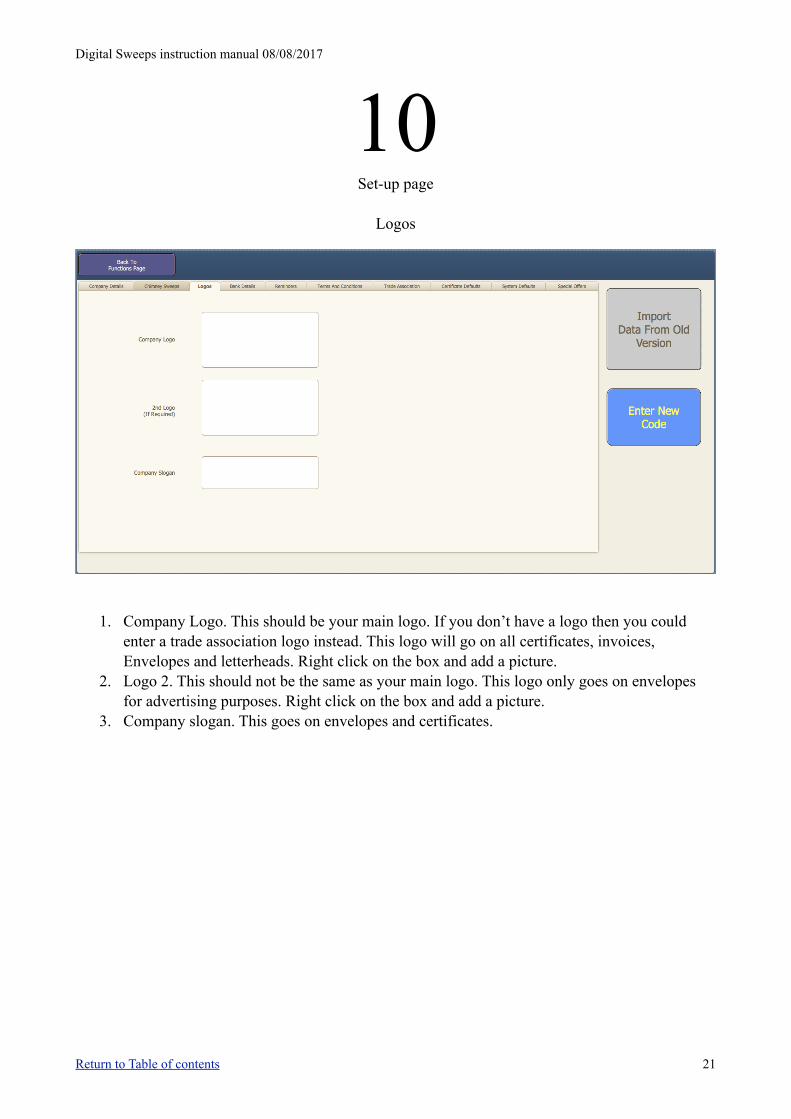
10 Set-up page
Logos
1. Company Logo. This should be your main logo. If you don’t have a logo then you could
enter a trade association logo instead. This logo will go on all certificates, invoices, Envelopes and letterheads. Right click on the box and add a picture.
2. Logo 2. This should not be the same as your main logo. This logo only goes on envelopes for advertising purposes. Right click on the box and add a picture.
3. Company slogan. This goes on envelopes and certificates.
Return to Table of contents 21
Digital Sweeps instruction manual 08/08/2017
11 Set-up Page. Bank Details
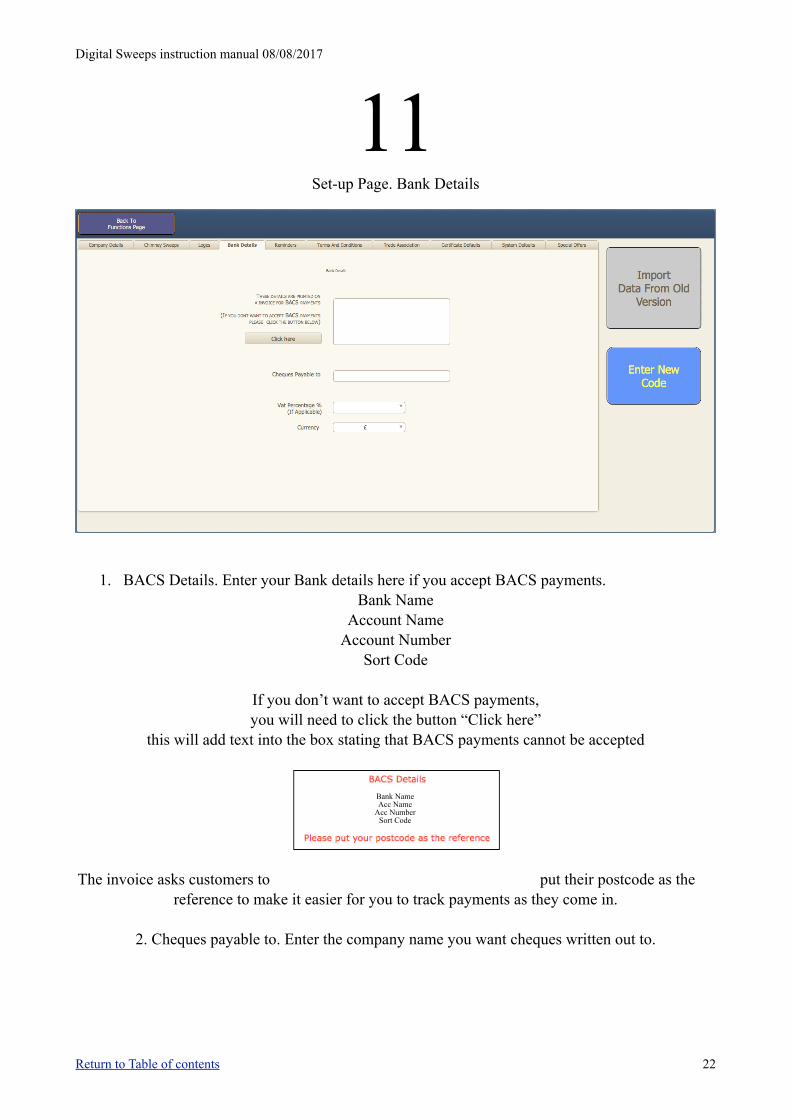
1. BACS Details. Enter your Bank details here if you accept BACS payments.
Bank Name Account Name
Account Number Sort Code
If you don’t want to accept BACS payments, you will need to click the button “Click here”
this will add text into the box stating that BACS payments cannot be accepted
The invoice asks customers to put their postcode as the reference to make it easier for you to track payments as they come in.
2. Cheques payable to. Enter the company name you want cheques written out to.
Return to Table of contents 22
Bank Name Acc Name
Acc Number Sort Code
Digital Sweeps instruction manual 08/08/2017
12 Set-up Page
Reminders
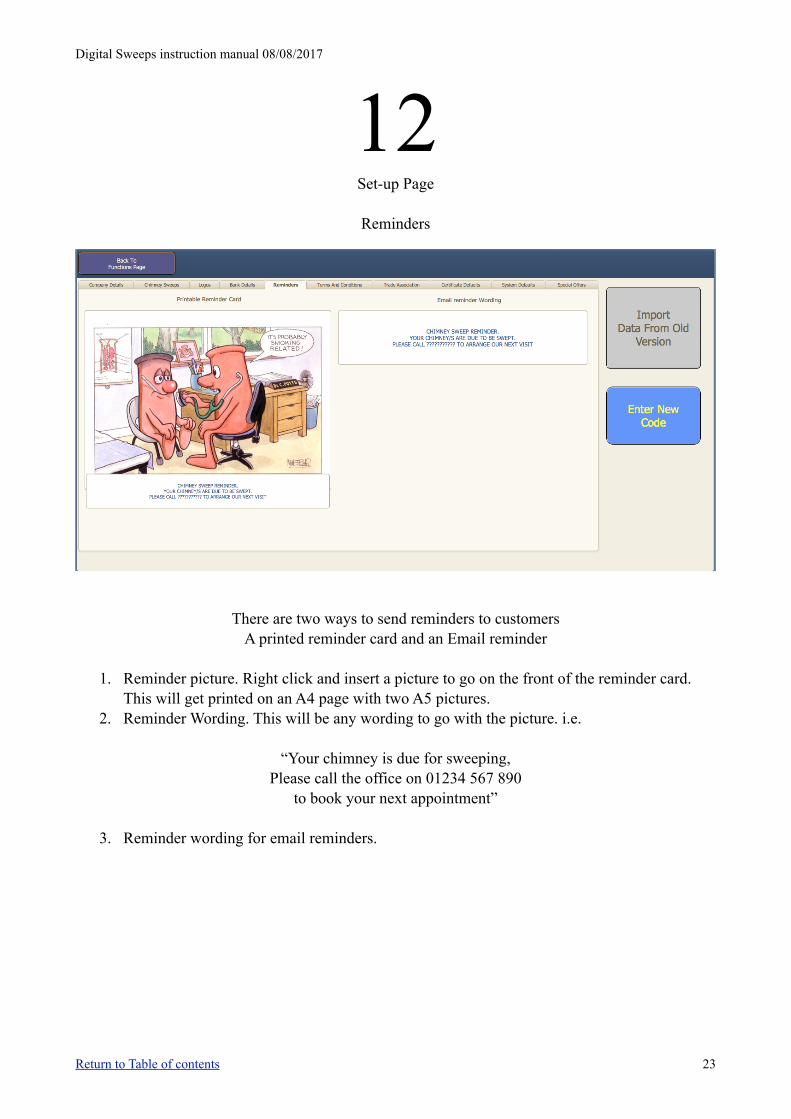
There are two ways to send reminders to customers
A printed reminder card and an Email reminder
1. Reminder picture. Right click and insert a picture to go on the front of the reminder card. This will get printed on an A4 page with two A5 pictures.
2. Reminder Wording. This will be any wording to go with the picture. i.e.
“Your chimney is due for sweeping, Please call the office on 01234 567 890
to book your next appointment”
3. Reminder wording for email reminders.
Return to Table of contents 23
Digital Sweeps instruction manual 08/08/2017
13 Terms and Conditions
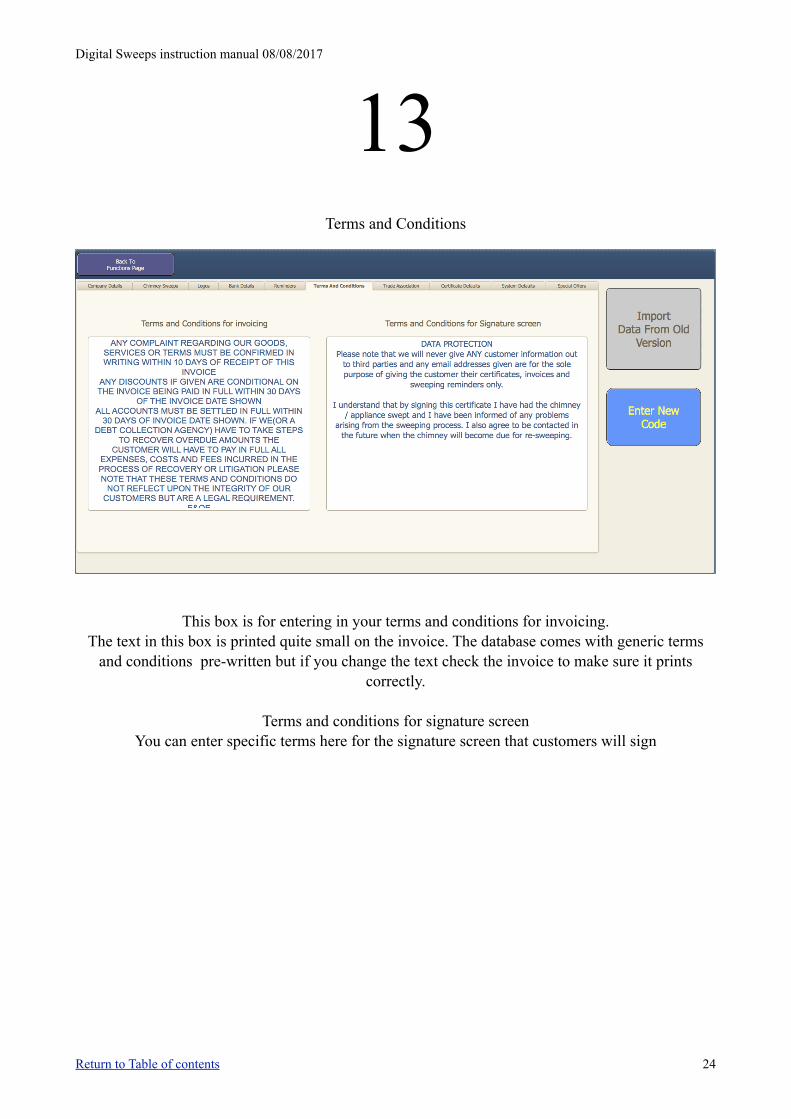
This box is for entering in your terms and conditions for invoicing.
The text in this box is printed quite small on the invoice. The database comes with generic terms and conditions pre-written but if you change the text check the invoice to make sure it prints
correctly.
Terms and conditions for signature screen You can enter specific terms here for the signature screen that customers will sign
Return to Table of contents 24
Digital Sweeps instruction manual 08/08/2017
14 Set-up Page
Trade association details
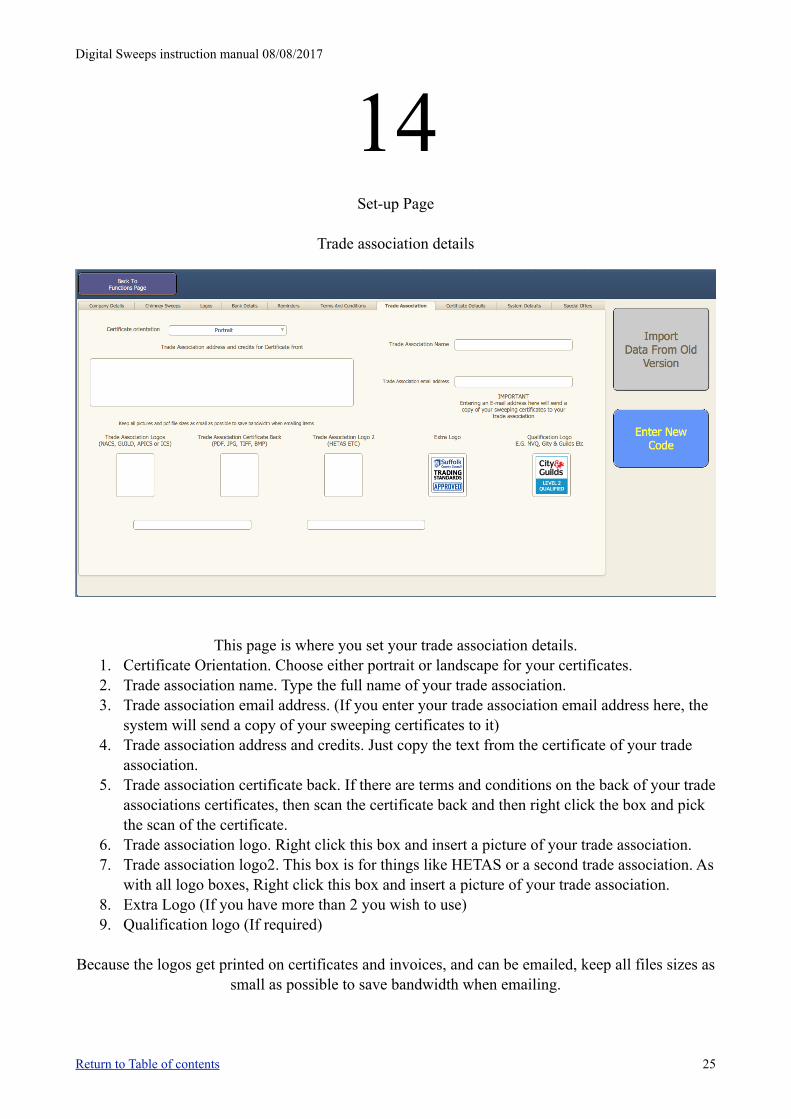
This page is where you set your trade association details.
1. Certificate Orientation. Choose either portrait or landscape for your certificates. 2. Trade association name. Type the full name of your trade association. 3. Trade association email address. (If you enter your trade association email address here, the
system will send a copy of your sweeping certificates to it) 4. Trade association address and credits. Just copy the text from the certificate of your trade
association. 5. Trade association certificate back. If there are terms and conditions on the back of your trade
associations certificates, then scan the certificate back and then right click the box and pick the scan of the certificate.
6. Trade association logo. Right click this box and insert a picture of your trade association. 7. Trade association logo2. This box is for things like HETAS or a second trade association. As
with all logo boxes, Right click this box and insert a picture of your trade association. 8. Extra Logo (If you have more than 2 you wish to use) 9. Qualification logo (If required)
Because the logos get printed on certificates and invoices, and can be emailed, keep all files sizes as small as possible to save bandwidth when emailing.
Return to Table of contents 25
Digital Sweeps instruction manual 08/08/2017
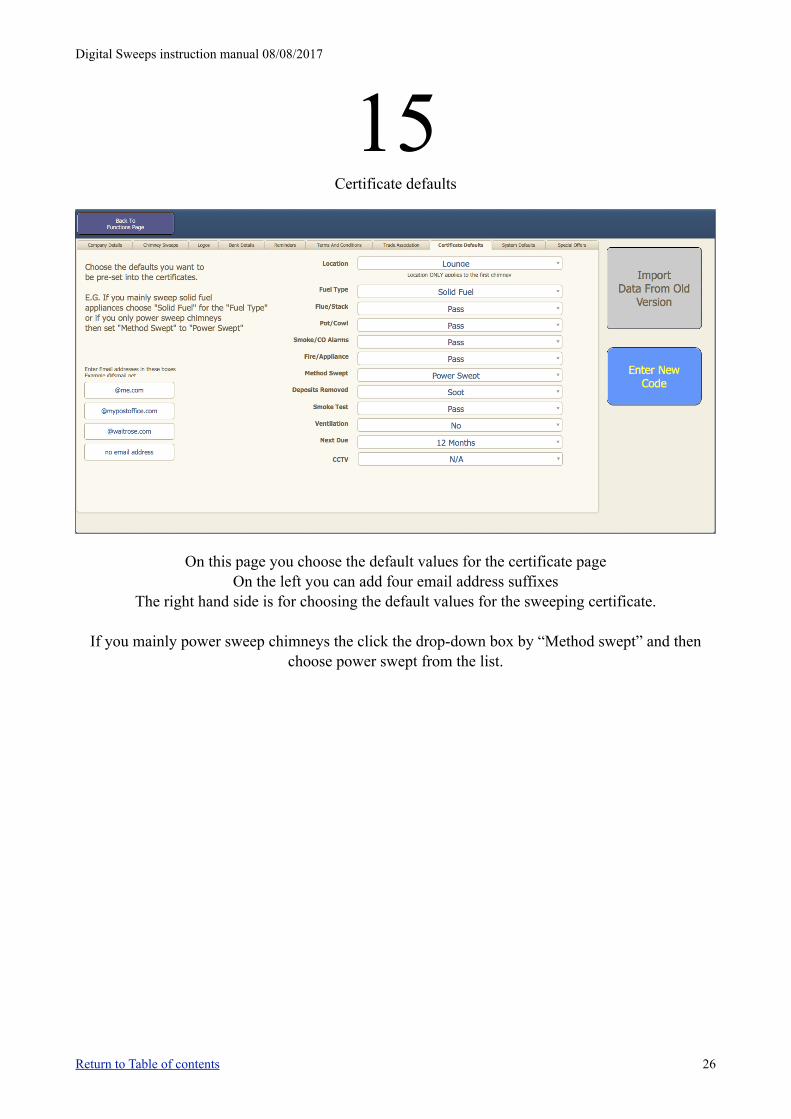
15 Certificate defaults
On this page you choose the default values for the certificate page On the left you can add four email address suffixes
The right hand side is for choosing the default values for the sweeping certificate.
If you mainly power sweep chimneys the click the drop-down box by “Method swept” and then choose power swept from the list.
Return to Table of contents 26
Digital Sweeps instruction manual 08/08/2017
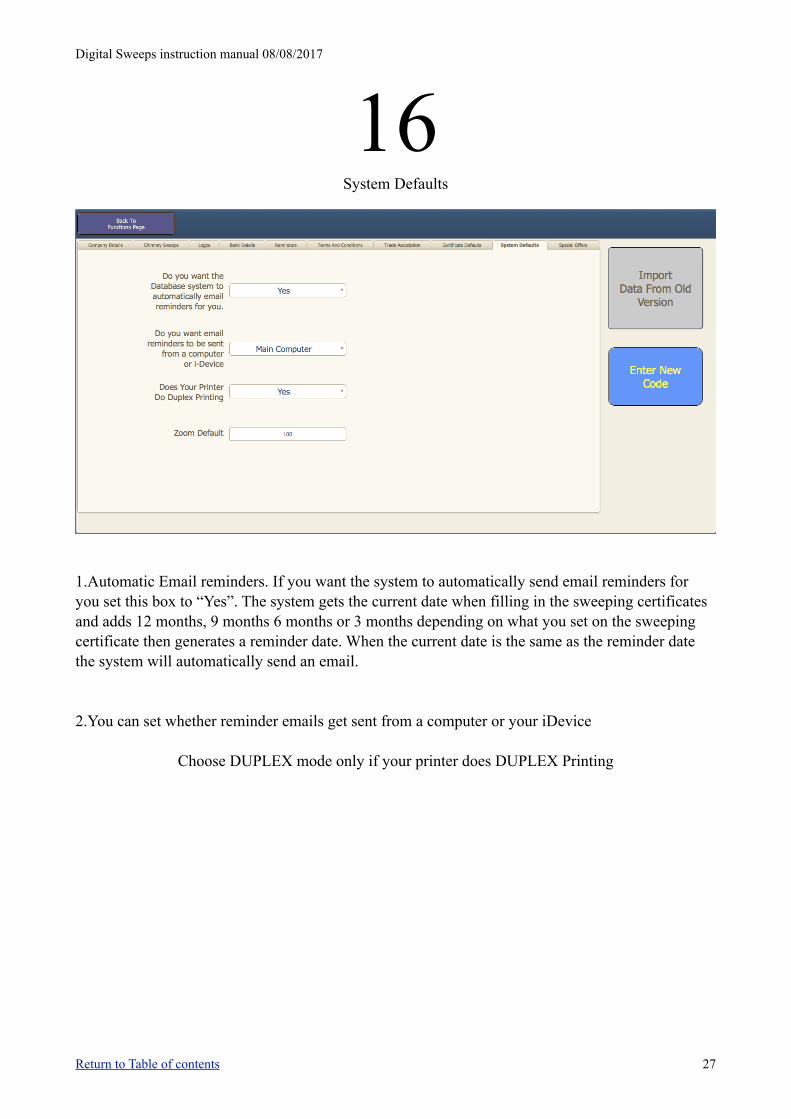
16 System Defaults
1.Automatic Email reminders. If you want the system to automatically send email reminders for you set this box to “Yes”. The system gets the current date when filling in the sweeping certificates and adds 12 months, 9 months 6 months or 3 months depending on what you set on the sweeping certificate then generates a reminder date. When the current date is the same as the reminder date the system will automatically send an email.
2.You can set whether reminder emails get sent from a computer or your iDevice
Choose DUPLEX mode only if your printer does DUPLEX Printing
Return to Table of contents 27
Digital Sweeps instruction manual 08/08/2017
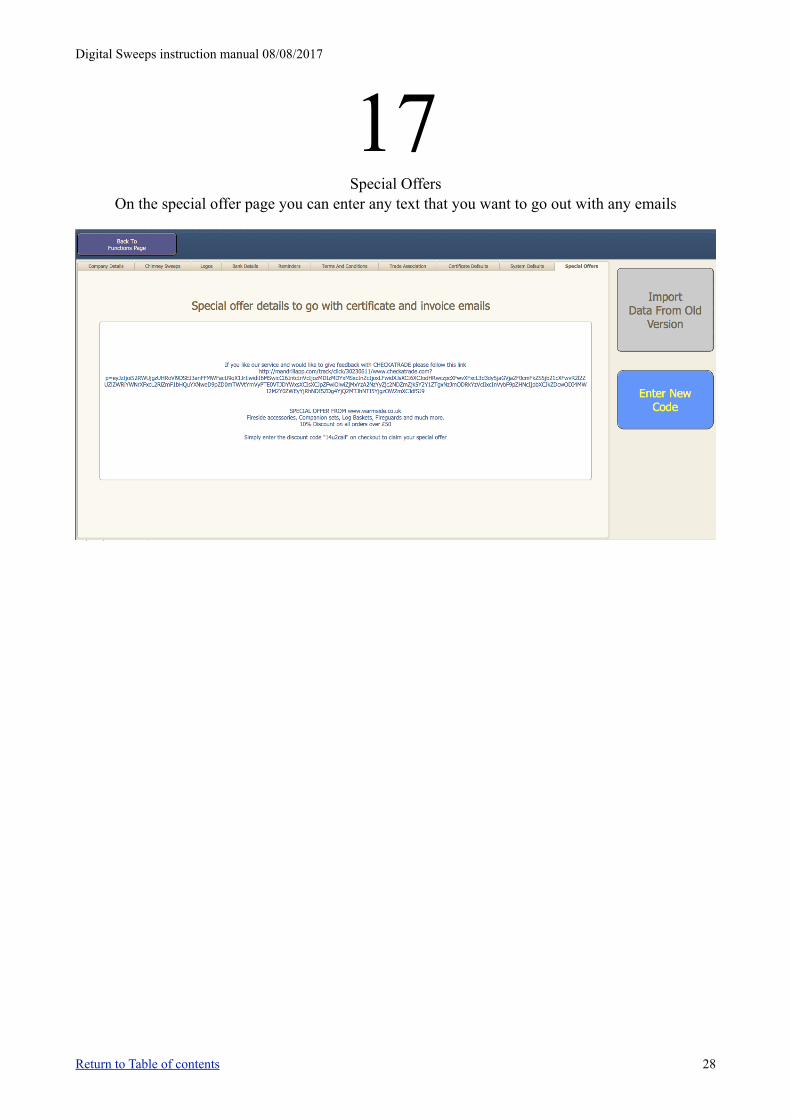
17 Special Offers
On the special offer page you can enter any text that you want to go out with any emails
Return to Table of contents 28
Digital Sweeps instruction manual 08/08/2017
18 Functions page
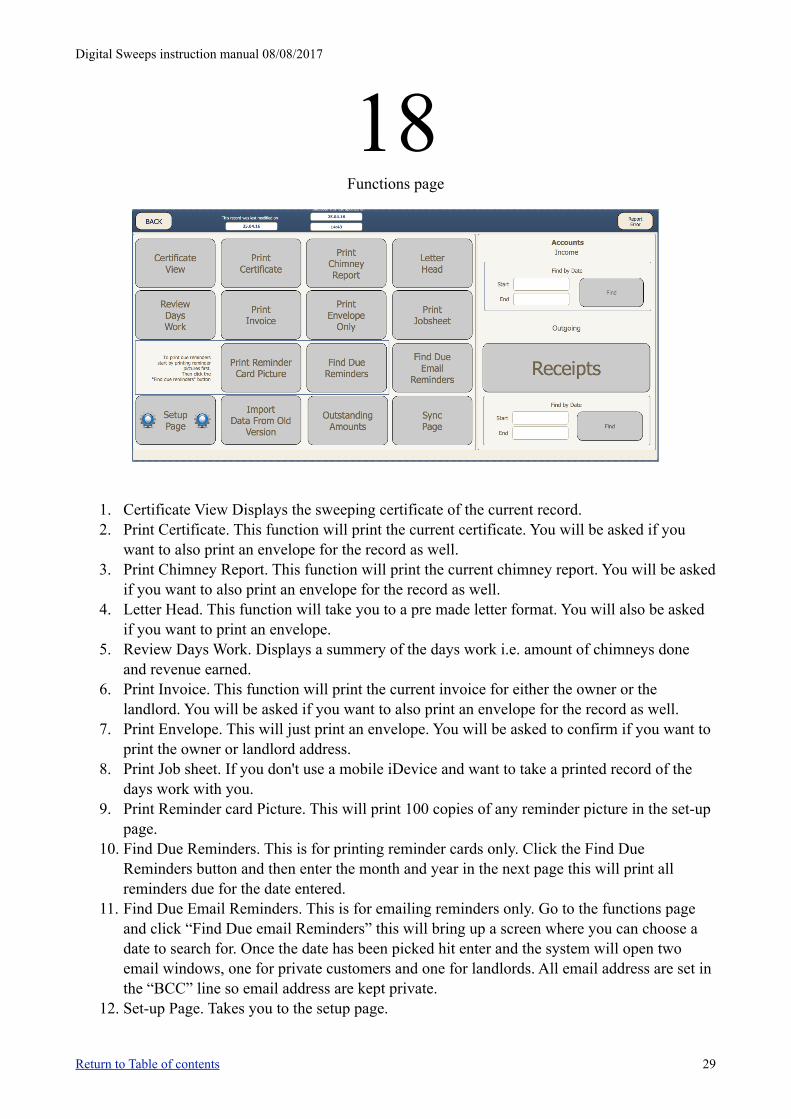
1. Certificate View Displays the sweeping certificate of the current record. 2. Print Certificate. This function will print the current certificate. You will be asked if you
want to also print an envelope for the record as well. 3. Print Chimney Report. This function will print the current chimney report. You will be asked
if you want to also print an envelope for the record as well. 4. Letter Head. This function will take you to a pre made letter format. You will also be asked
if you want to print an envelope. 5. Review Days Work. Displays a summery of the days work i.e. amount of chimneys done
and revenue earned. 6. Print Invoice. This function will print the current invoice for either the owner or the
landlord. You will be asked if you want to also print an envelope for the record as well. 7. Print Envelope. This will just print an envelope. You will be asked to confirm if you want to
print the owner or landlord address. 8. Print Job sheet. If you don't use a mobile iDevice and want to take a printed record of the
days work with you. 9. Print Reminder card Picture. This will print 100 copies of any reminder picture in the set-up
page. 10. Find Due Reminders. This is for printing reminder cards only. Click the Find Due
Reminders button and then enter the month and year in the next page this will print all reminders due for the date entered.
11. Find Due Email Reminders. This is for emailing reminders only. Go to the functions page and click “Find Due email Reminders” this will bring up a screen where you can choose a date to search for. Once the date has been picked hit enter and the system will open two email windows, one for private customers and one for landlords. All email address are set in the “BCC” line so email address are kept private.
12. Set-up Page. Takes you to the setup page.
Return to Table of contents 29

Digital Sweeps instruction manual 08/08/2017
13. Import Data from old version. This is for when we make updates to the system and send out new copies.
14. Outstanding Amounts. This should be done monthly. This searches for all accounts overdue. You will be asked to either print or view. If you choose “Print” the system will only print accounts, which are overdue by more than 30 days. If you choose “View” the system will show you all accounts that are unpaid.
15. Sync Page is where you transfer data to and from the computer and iDevice
Return to Table of contents 30
Digital Sweeps instruction manual 08/08/2017
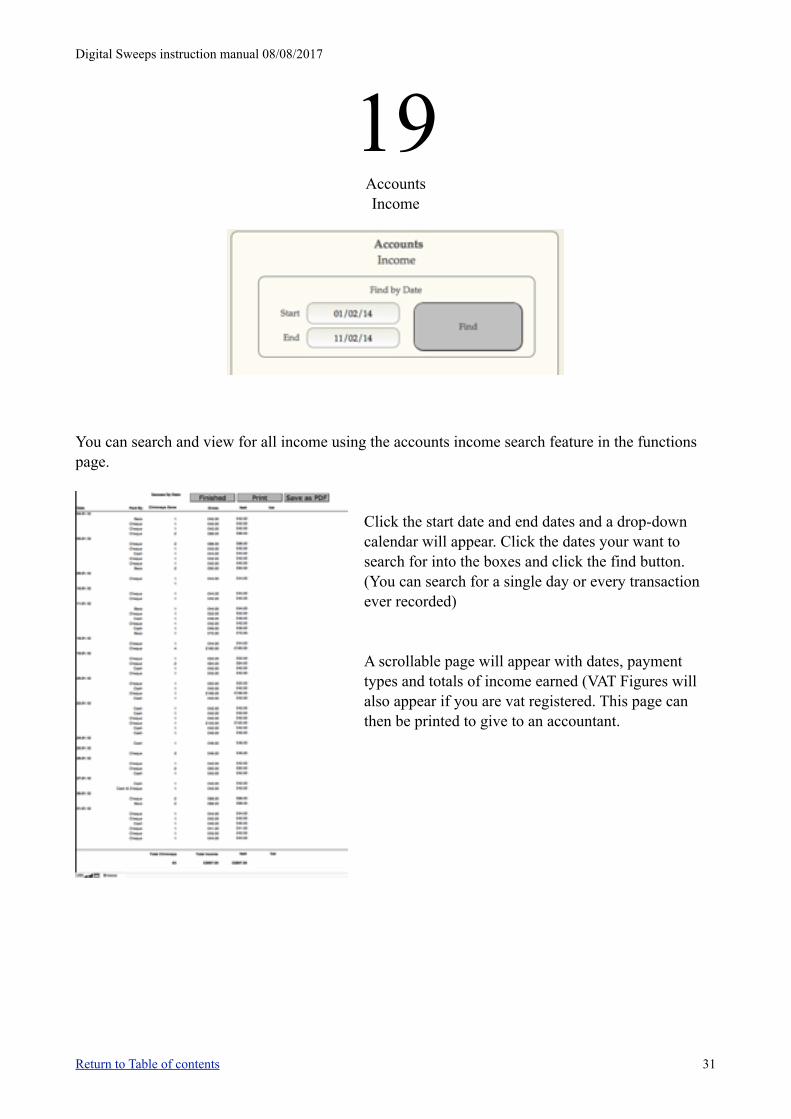
19 Accounts Income
You can search and view for all income using the accounts income search feature in the functions page.
Click the start date and end dates and a drop-down calendar will appear. Click the dates your want to search for into the boxes and click the find button. (You can search for a single day or every transaction ever recorded)
A scrollable page will appear with dates, payment types and totals of income earned (VAT Figures will also appear if you are vat registered. This page can then be printed to give to an accountant.
Return to Table of contents 31
Digital Sweeps instruction manual 08/08/2017
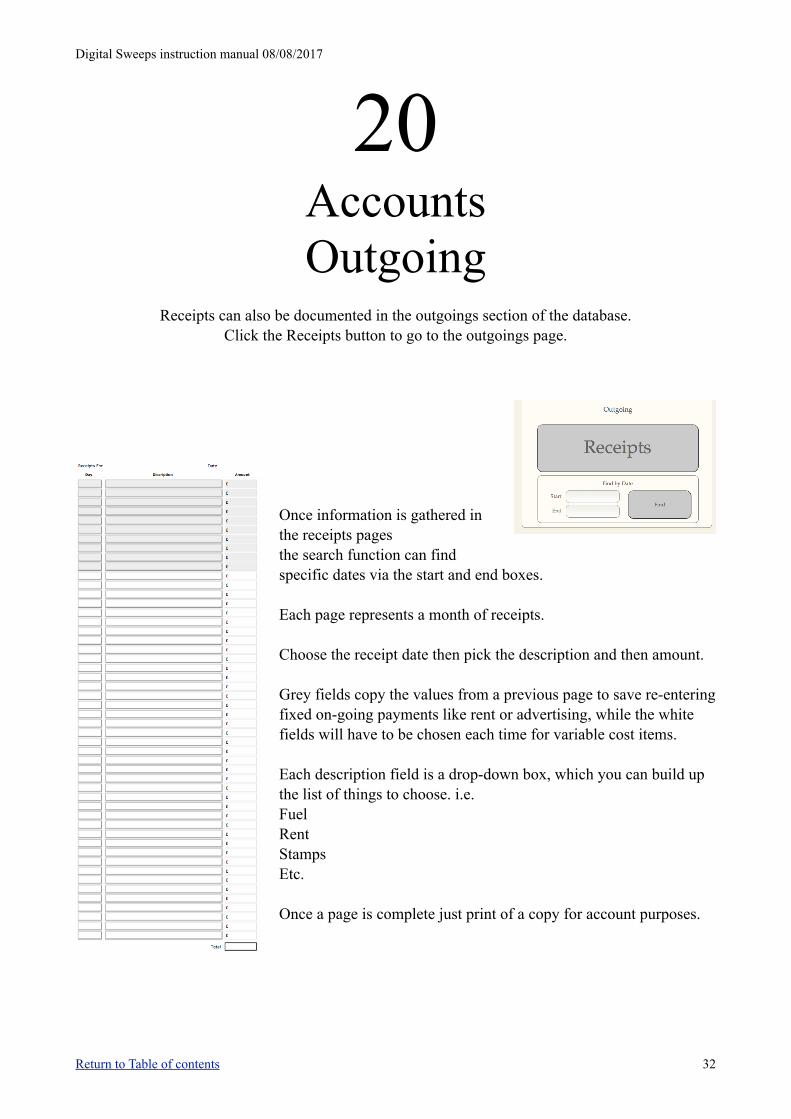
20 Accounts Outgoing
Receipts can also be documented in the outgoings section of the database. Click the Receipts button to go to the outgoings page.
Once information is gathered in the receipts pages the search function can find specific dates via the start and end boxes.
Each page represents a month of receipts.
Choose the receipt date then pick the description and then amount.
Grey fields copy the values from a previous page to save re-entering fixed on-going payments like rent or advertising, while the white fields will have to be chosen each time for variable cost items.
Each description field is a drop-down box, which you can build up the list of things to choose. i.e. Fuel Rent Stamps Etc.
Once a page is complete just print of a copy for account purposes.
Return to Table of contents 32
Digital Sweeps instruction manual 08/08/2017
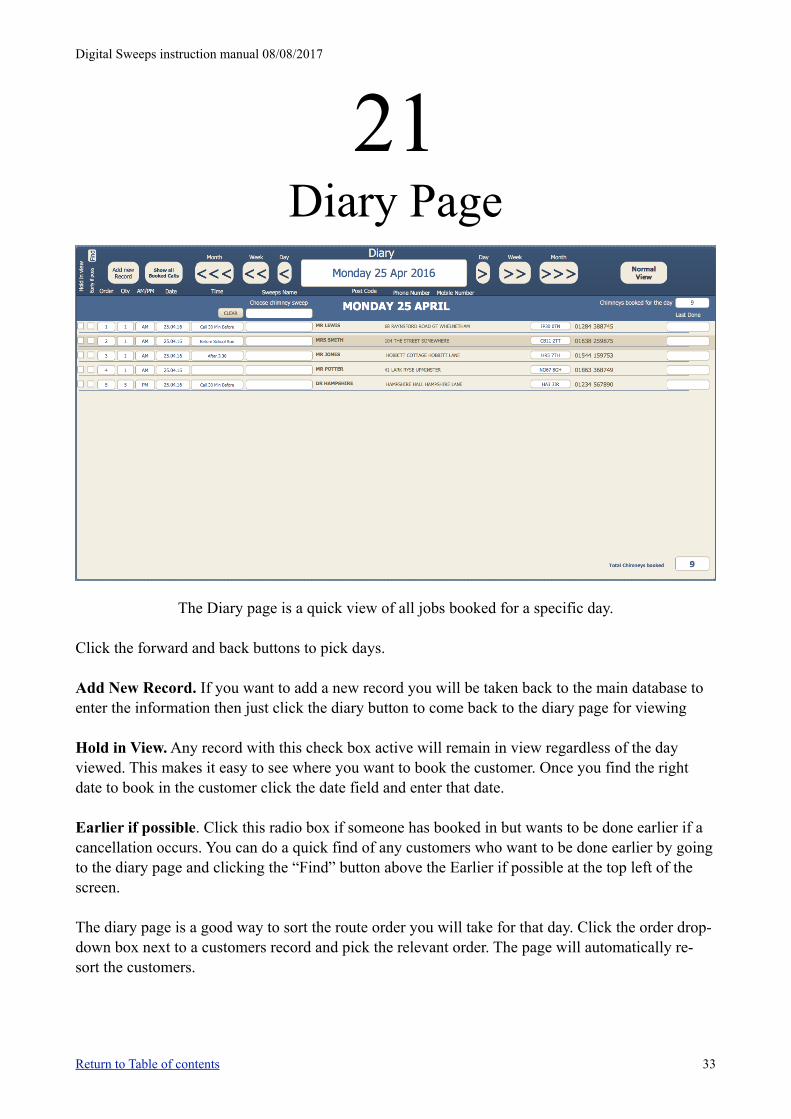
21 Diary Page
The Diary page is a quick view of all jobs booked for a specific day.
Click the forward and back buttons to pick days.
Add New Record. If you want to add a new record you will be taken back to the main database to enter the information then just click the diary button to come back to the diary page for viewing
Hold in View. Any record with this check box active will remain in view regardless of the day viewed. This makes it easy to see where you want to book the customer. Once you find the right date to book in the customer click the date field and enter that date.
Earlier if possible. Click this radio box if someone has booked in but wants to be done earlier if a cancellation occurs. You can do a quick find of any customers who want to be done earlier by going to the diary page and clicking the “Find” button above the Earlier if possible at the top left of the screen.
The diary page is a good way to sort the route order you will take for that day. Click the order drop-down box next to a customers record and pick the relevant order. The page will automatically re-sort the customers.
Return to Table of contents 33
Digital Sweeps instruction manual 08/08/2017
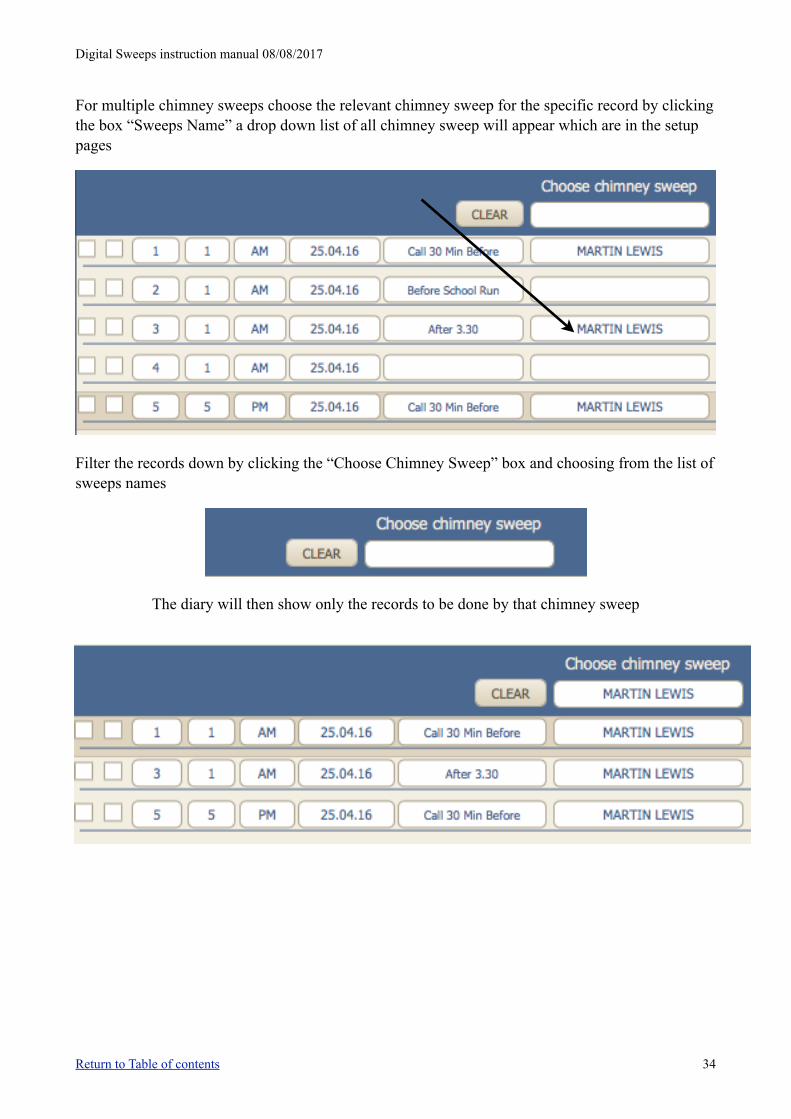
For multiple chimney sweeps choose the relevant chimney sweep for the specific record by clicking the box “Sweeps Name” a drop down list of all chimney sweep will appear which are in the setup pages
Filter the records down by clicking the “Choose Chimney Sweep” box and choosing from the list of sweeps names
The diary will then show only the records to be done by that chimney sweep
Return to Table of contents 34

Digital Sweeps instruction manual 08/08/2017
22 Reminder Page
The reminder page is where you can view anything you have set to be reminded about. This screen will automatically be displayed if you have set a specific date to be reminded on.
If you have set a reminder but no date then you have to press the “Active Reminders” button on the main page to view this page.
The reminders can be set on either of the main pages i.e. Computer main page or the iDevice main
page.
To clear completed reminders click the X to the side
Return to Table of contents 35
Digital Sweeps instruction manual 08/08/2017
23 Using the database on an iDevice
Because an iDevice is touch screen the main database screen has been designed differently to get the best functionality from it. Because fields are picked with the touch of a finger or stylus the normal view meant the fields were too small to click accurately. So we made the main screen
portrait, which is scrollable.
The iDevice main screen contains everything the normal one does plus a few extra functions i.e. if
you using the database on an iPhone and you want to call the customer there is a “Dial” button next to the phone number. We will go through all the extra features later.
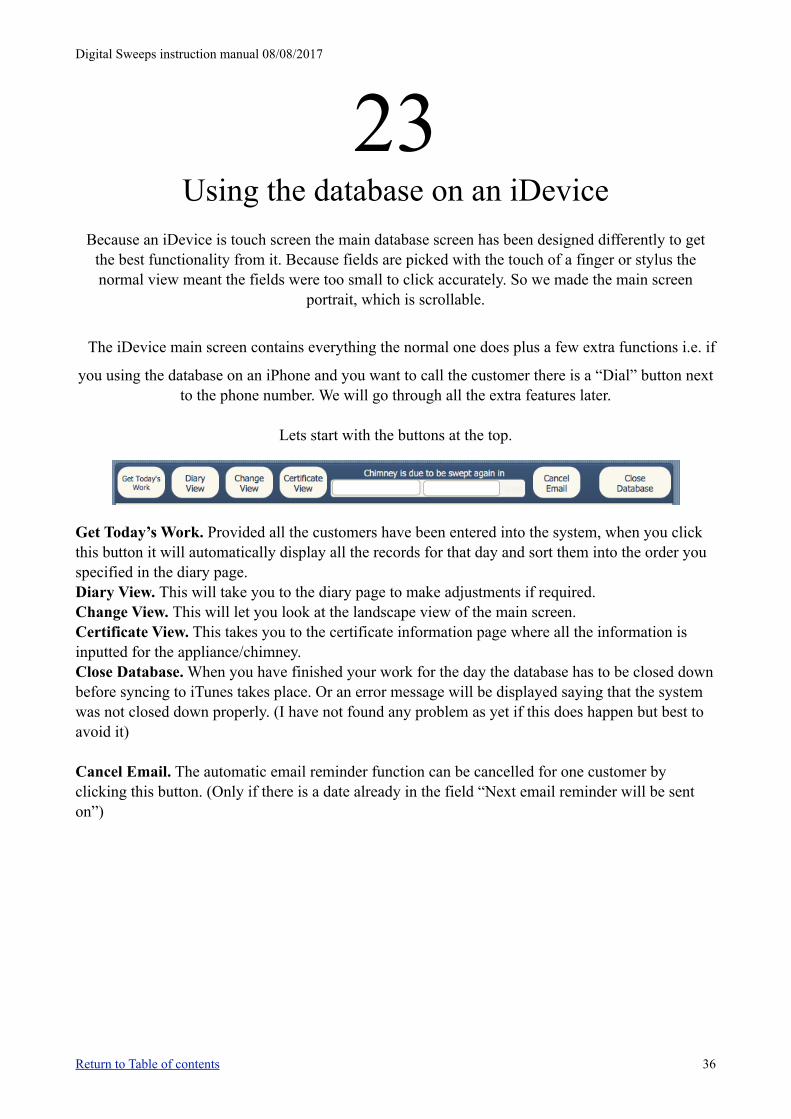
Lets start with the buttons at the top.
Get Today’s Work. Provided all the customers have been entered into the system, when you click this button it will automatically display all the records for that day and sort them into the order you specified in the diary page. Diary View. This will take you to the diary page to make adjustments if required. Change View. This will let you look at the landscape view of the main screen. Certificate View. This takes you to the certificate information page where all the information is inputted for the appliance/chimney. Close Database. When you have finished your work for the day the database has to be closed down before syncing to iTunes takes place. Or an error message will be displayed saying that the system was not closed down properly. (I have not found any problem as yet if this does happen but best to avoid it)
Cancel Email. The automatic email reminder function can be cancelled for one customer by clicking this button. (Only if there is a date already in the field “Next email reminder will be sent on”)
Return to Table of contents 36
Digital Sweeps instruction manual 08/08/2017
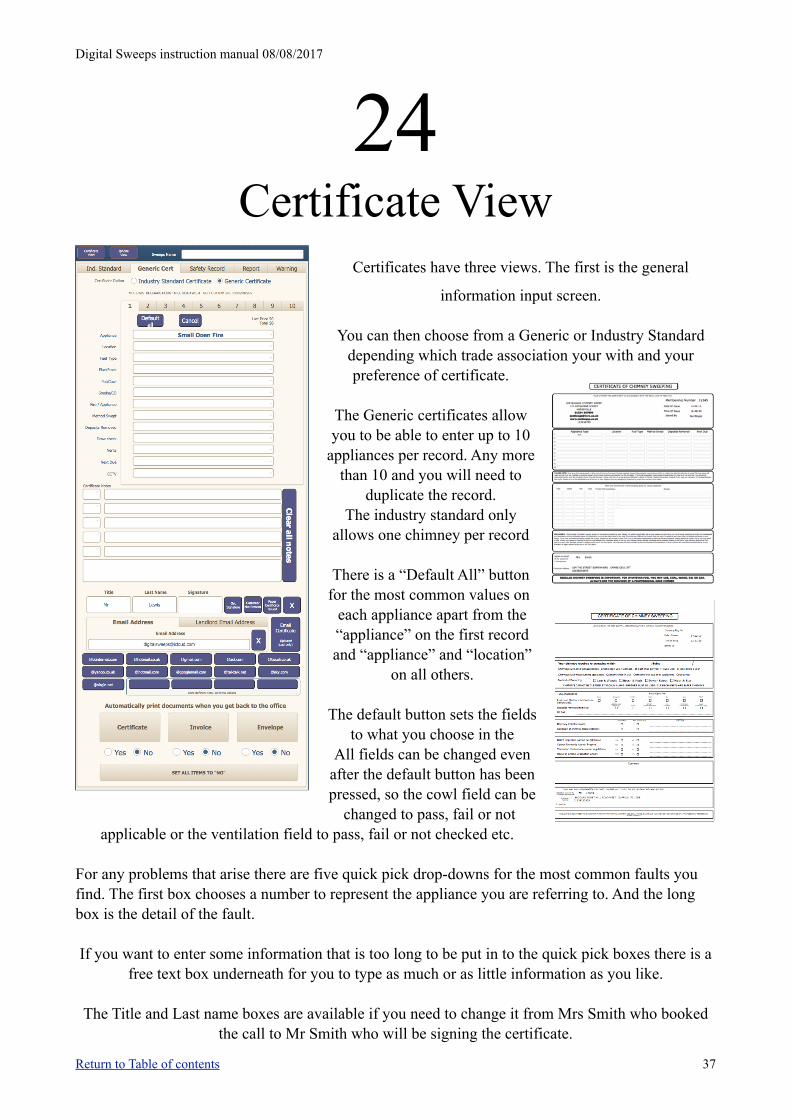
24 Certificate View
Certificates have three views. The first is the general
information input screen.
You can then choose from a Generic or Industry Standard depending which trade association your with and your preference of certificate.
The Generic certificates allow you to be able to enter up to 10
appliances per record. Any more than 10 and you will need to
duplicate the record. The industry standard only
allows one chimney per record
There is a “Default All” button for the most common values on
each appliance apart from the “appliance” on the first record and “appliance” and “location”
on all others.
The default button sets the fields to what you choose in the
All fields can be changed even after the default button has been pressed, so the cowl field can be
changed to pass, fail or not applicable or the ventilation field to pass, fail or not checked etc.
For any problems that arise there are five quick pick drop-downs for the most common faults you find. The first box chooses a number to represent the appliance you are referring to. And the long box is the detail of the fault.
If you want to enter some information that is too long to be put in to the quick pick boxes there is a free text box underneath for you to type as much or as little information as you like.
The Title and Last name boxes are available if you need to change it from Mrs Smith who booked the call to Mr Smith who will be signing the certificate.
Return to Table of contents 37
Digital Sweeps instruction manual 08/08/2017
25
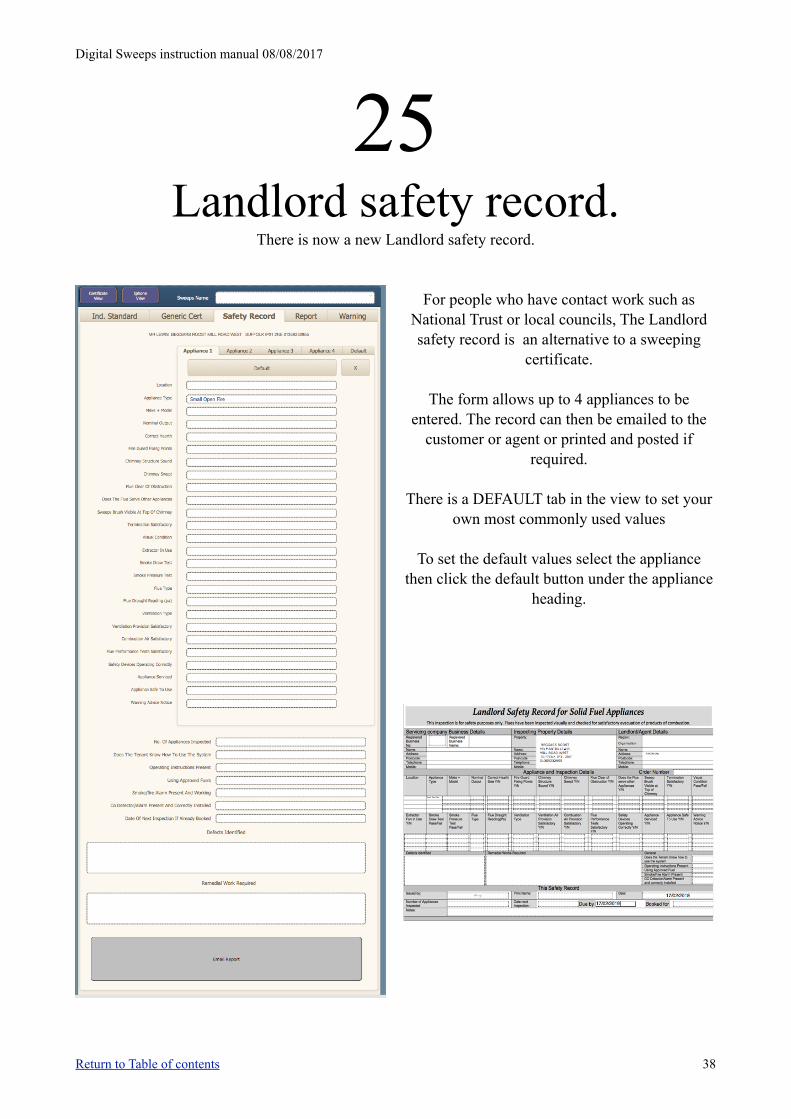
Landlord safety record. There is now a new Landlord safety record.
For people who have contact work such as
National Trust or local councils, The Landlord safety record is an alternative to a sweeping
certificate.
The form allows up to 4 appliances to be entered. The record can then be emailed to the
customer or agent or printed and posted if required.
There is a DEFAULT tab in the view to set your own most commonly used values
To set the default values select the appliance then click the default button under the appliance
heading.
Return to Table of contents 38
Digital Sweeps instruction manual 08/08/2017
26
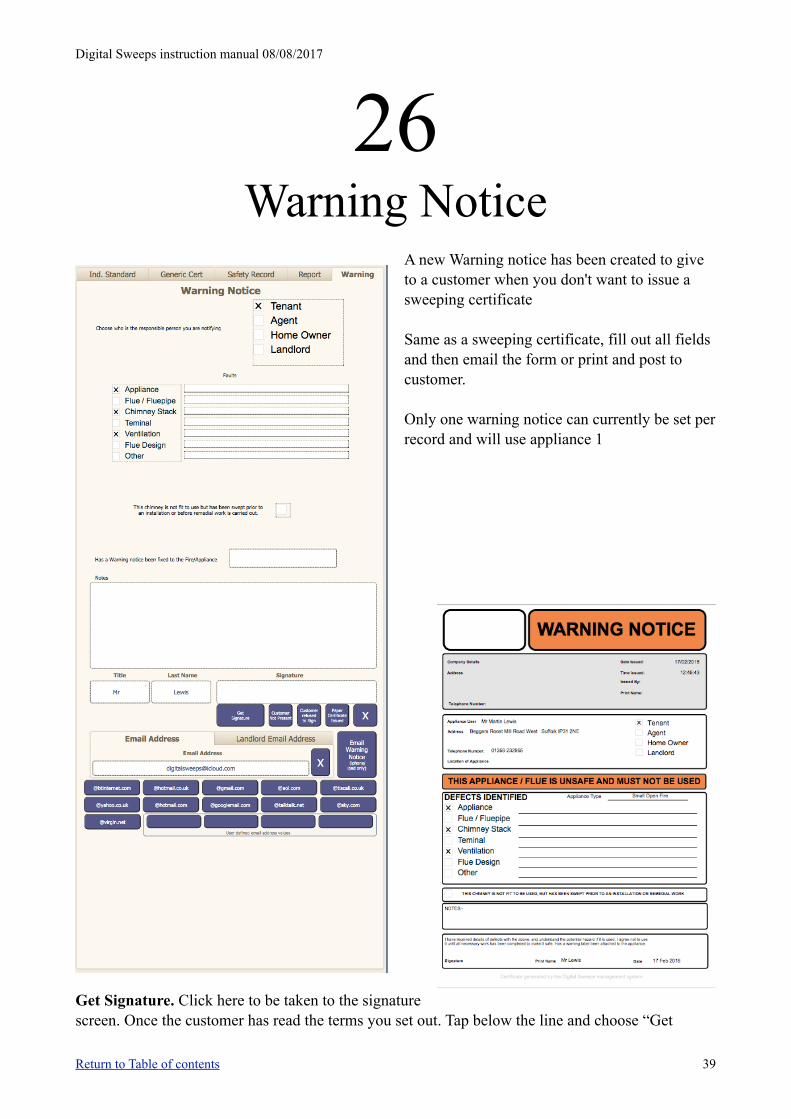
Warning Notice
A new Warning notice has been created to give to a customer when you don't want to issue a sweeping certificate
Same as a sweeping certificate, fill out all fields and then email the form or print and post to customer.
Only one warning notice can currently be set per record and will use appliance 1
Get Signature. Click here to be taken to the signature screen. Once the customer has read the terms you set out. Tap below the line and choose “Get
Return to Table of contents 39

Digital Sweeps instruction manual 08/08/2017
Signature” then the customer can sign their name. In the top right corner click accept or in the left top corner cancel or clear. It is important that when the customer is signing the screen they ONLY touch with one finger/stylus. iDevices may be multi touch but if the customer’s thumb is holding the screen then the signature will not draw.
Customer Not Present. Click here if there is nobody to sign the certificate and it will enter this
in to the signature box. Paper Certificate Issued. If the customer does
not have an email address or can't sign the screen and you want to write a paper certificate
instead then click here and this will be entered in to the signature box.
X This deletes the Customer not present or Paper certificate issued text from the signature box.
The email address box is where you can enter the customers email address and if required the landlords email address. For the most common email syntax’s we have put buttons to save on typing. So you will only need to enter the text before the “@”. there are four email boxes that you can customise in the setup page. To clear the “no email address” click the X to the right.
If you want to print a certificate or invoice or landlord invoice when you return to the office set the check boxes as required. When the database opens up on a computer the marked items will automatically print.
Return to Table of contents 40
Digital Sweeps instruction manual 08/08/2017
Once all information is complete hit the Email Certificate button and the email will be sent to the customer and if required the landlord as well.(This will only be done instantly if you have a 3G or 4G connection. Otherwise this will be done when a Wi-Fi connection is made) Once this is done you will be taken back to the iDevice main screen to complete the job.
Now the emails and signatures have been done, complete the main screen by entering the price charged. You will not be allowed to continue until you have set how the customer paid.
When all the information has been entered click the “Job Complete go to next record” button. This is important as the button does several things when pressed. As follows ✓The system will check that you have entered a next due amount. i.e. 12 Months, 9 Months etc. etc. ✓It will also check that you have entered how the customer has paid. ✓It Deletes the date from “Date Booked” and puts it into last swept field. And also deletes the time
field. ✓If the First swept field is empty then it will add the date to this also. ✓It will also look to see the next due date and enters the reminder date in to the reminder field. You
will then be taken to the next customer in the order you have set.
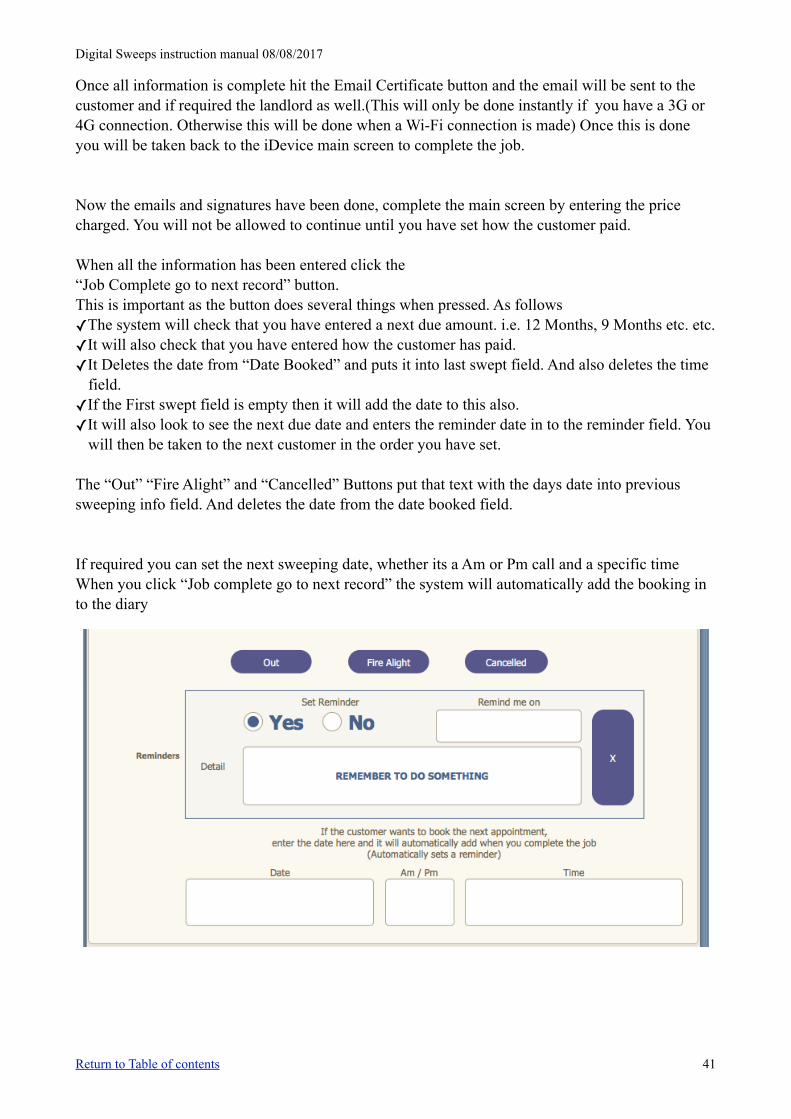
The “Out” “Fire Alight” and “Cancelled” Buttons put that text with the days date into previous sweeping info field. And deletes the date from the date booked field.
If required you can set the next sweeping date, whether its a Am or Pm call and a specific time When you click “Job complete go to next record” the system will automatically add the booking in to the diary
Return to Table of contents 41
Digital Sweeps instruction manual 08/08/2017
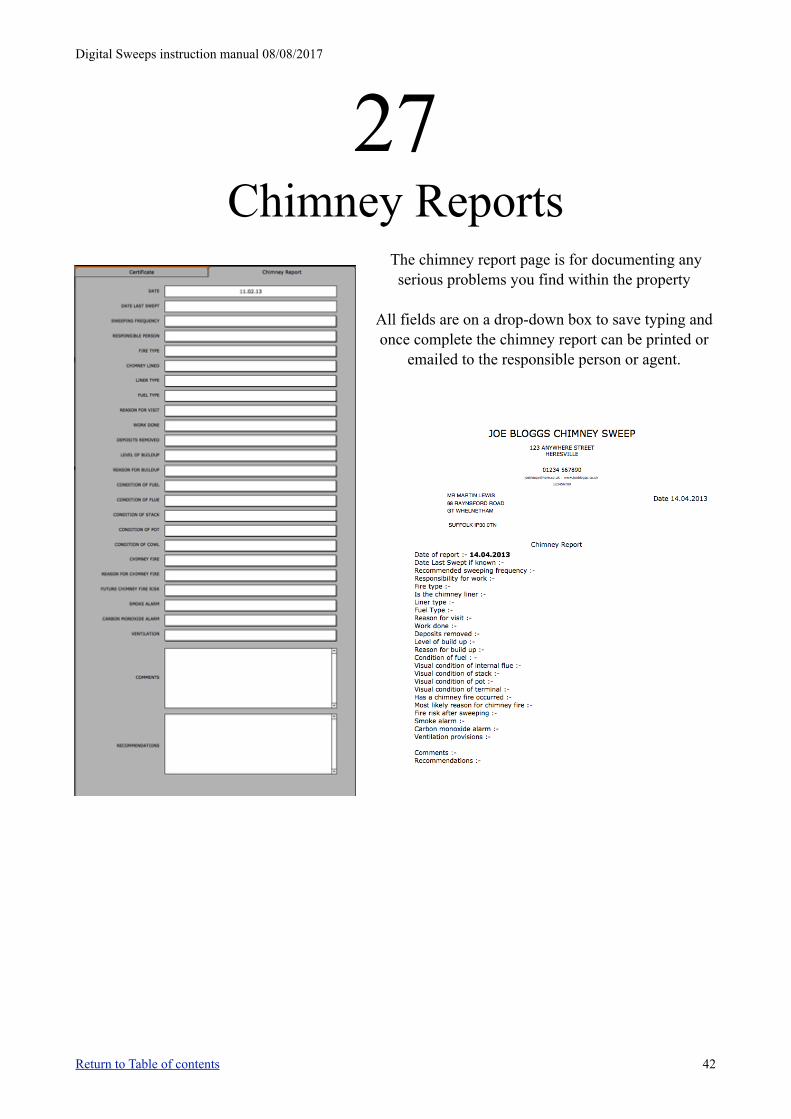
27 Chimney Reports
The chimney report page is for documenting any serious problems you find within the property
All fields are on a drop-down box to save typing and once complete the chimney report can be printed or
emailed to the responsible person or agent.
Return to Table of contents 42
Digital Sweeps instruction manual 08/08/2017
28 Invoices
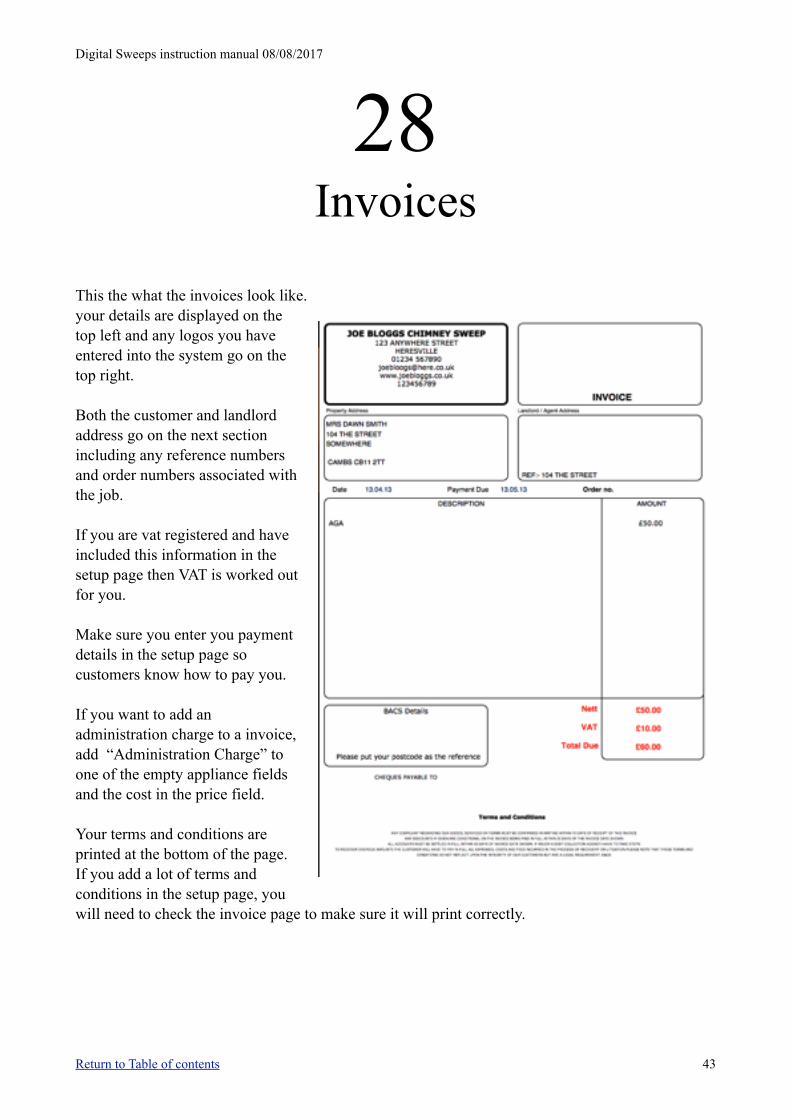
This the what the invoices look like. your details are displayed on the top left and any logos you have entered into the system go on the top right.
Both the customer and landlord address go on the next section including any reference numbers and order numbers associated with the job.
If you are vat registered and have included this information in the setup page then VAT is worked out for you.
Make sure you enter you payment details in the setup page so customers know how to pay you.
If you want to add an administration charge to a invoice, add “Administration Charge” to one of the empty appliance fields and the cost in the price field.
Your terms and conditions are printed at the bottom of the page. If you add a lot of terms and conditions in the setup page, you will need to check the invoice page to make sure it will print correctly.
Return to Table of contents 43
Digital Sweeps instruction manual 08/08/2017
29 Letterheads
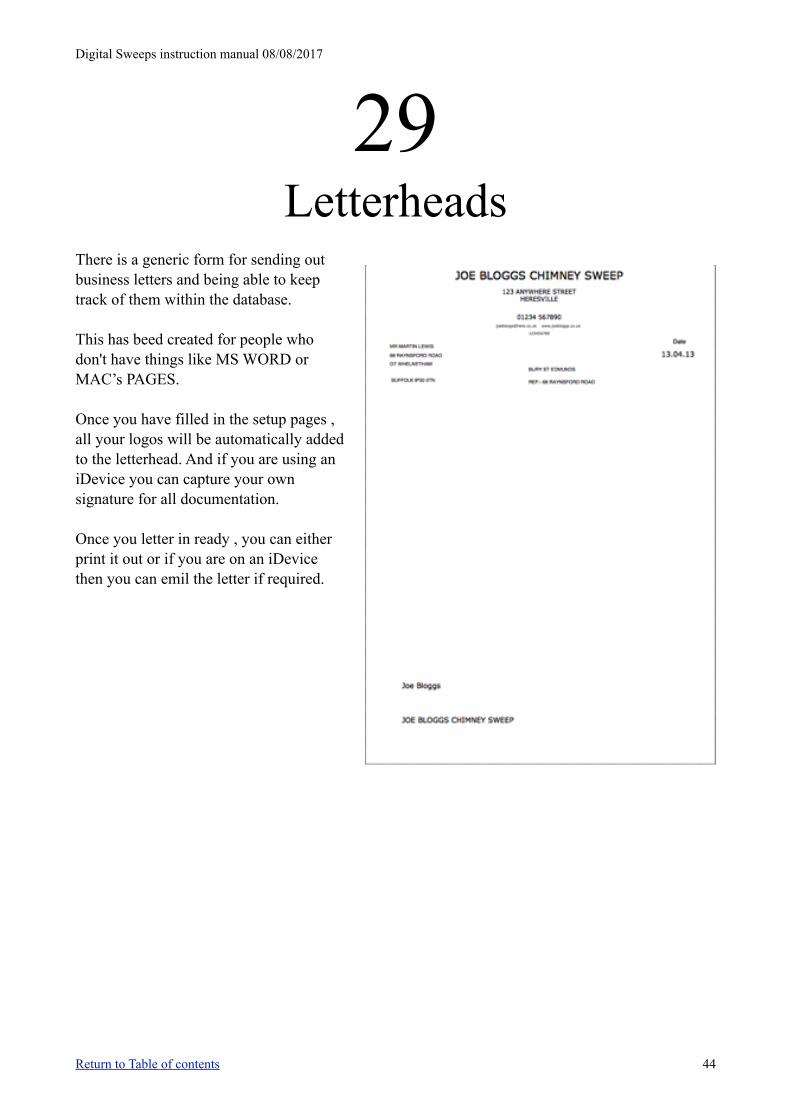
There is a generic form for sending out business letters and being able to keep track of them within the database.
This has beed created for people who don't have things like MS WORD or MAC’s PAGES.
Once you have filled in the setup pages , all your logos will be automatically added to the letterhead. And if you are using an iDevice you can capture your own signature for all documentation.
Once you letter in ready , you can either print it out or if you are on an iDevice then you can emil the letter if required.
Return to Table of contents 44
Digital Sweeps instruction manual 08/08/2017
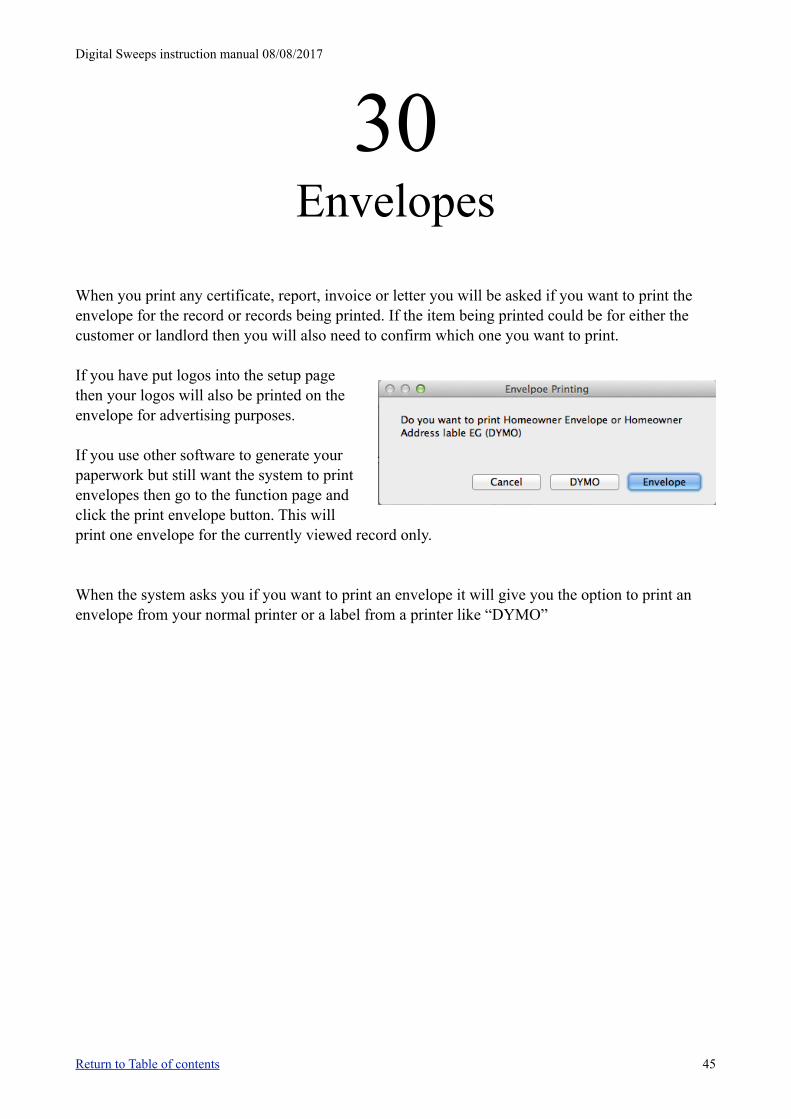
30 Envelopes
When you print any certificate, report, invoice or letter you will be asked if you want to print the envelope for the record or records being printed. If the item being printed could be for either the customer or landlord then you will also need to confirm which one you want to print.
If you have put logos into the setup page then your logos will also be printed on the envelope for advertising purposes.
If you use other software to generate your paperwork but still want the system to print envelopes then go to the function page and click the print envelope button. This will print one envelope for the currently viewed record only.
When the system asks you if you want to print an envelope it will give you the option to print an envelope from your normal printer or a label from a printer like “DYMO”
Return to Table of contents 45
Digital Sweeps instruction manual 08/08/2017
31 Updating the Database V20 and above
Periodically we will make changes to the database and upload them to the website for download. Follow these steps to ensure you have the very latest version to ensure smooth running of the system.
1. IMPORTANT Always back up your copy of the database to a safe location before updating. This can be done by simply coping the file “Digital Sweeps.fmpur” and pasting it to a secure location. Then close the database down. 2.Go to http://www.digitalsweeps.co.uk/download.html and download the latest version of the relevant database. Then unzip the file to your desktop.
3. Right click of the existing Digital Sweeps folder and Change the name of the current Digital Sweeps folder not the files within to “Digital Sweeps old” and move the whole folder to your desktop
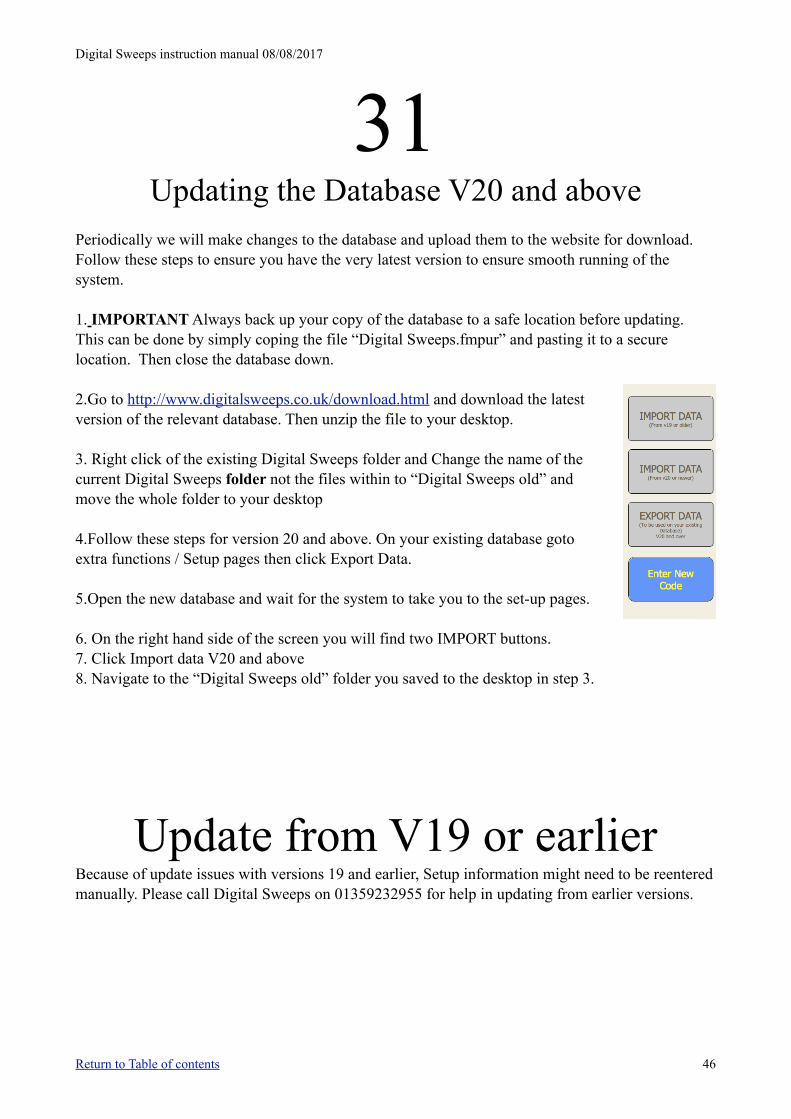
4.Follow these steps for version 20 and above. On your existing database goto extra functions / Setup pages then click Export Data.
5.Open the new database and wait for the system to take you to the set-up pages.
6. On the right hand side of the screen you will find two IMPORT buttons. 7. Click Import data V20 and above 8. Navigate to the “Digital Sweeps old” folder you saved to the desktop in step 3.
Update from V19 or earlier Because of update issues with versions 19 and earlier, Setup information might need to be reentered manually. Please call Digital Sweeps on 01359232955 for help in updating from earlier versions.
Return to Table of contents 46
Digital Sweeps instruction manual 08/08/2017
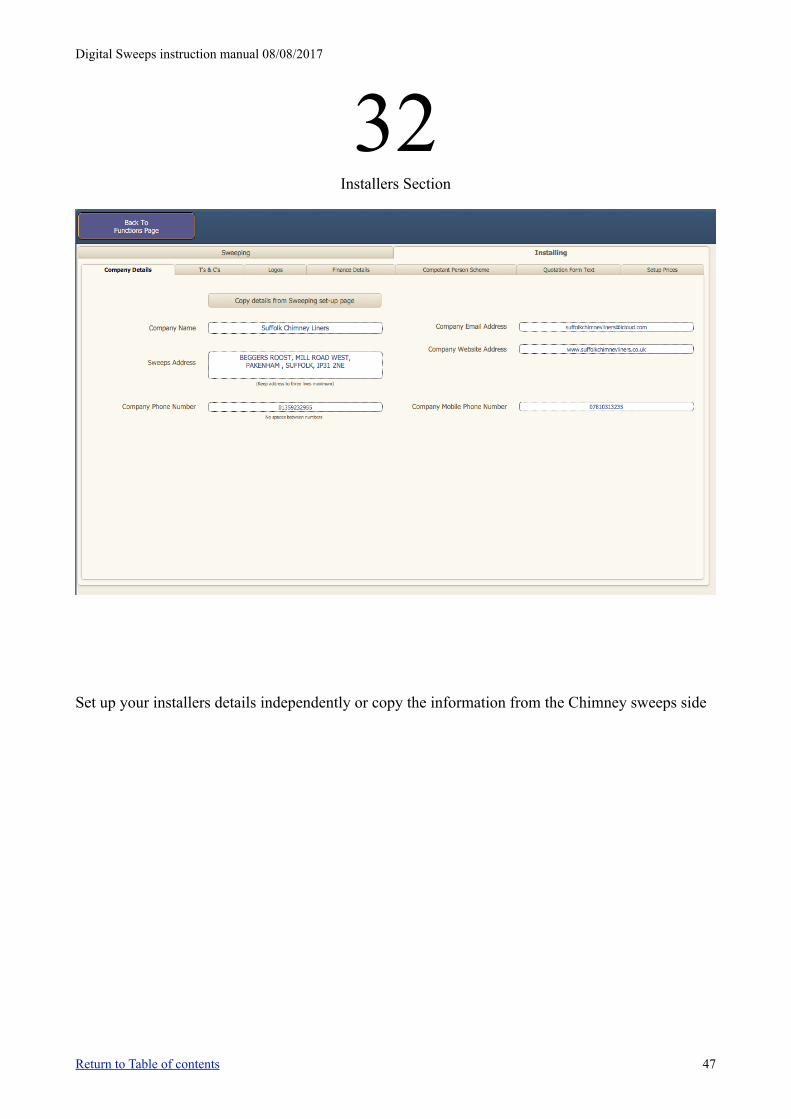
32 Installers Section
Set up your installers details independently or copy the information from the Chimney sweeps side
Return to Table of contents 47
Digital Sweeps instruction manual 08/08/2017
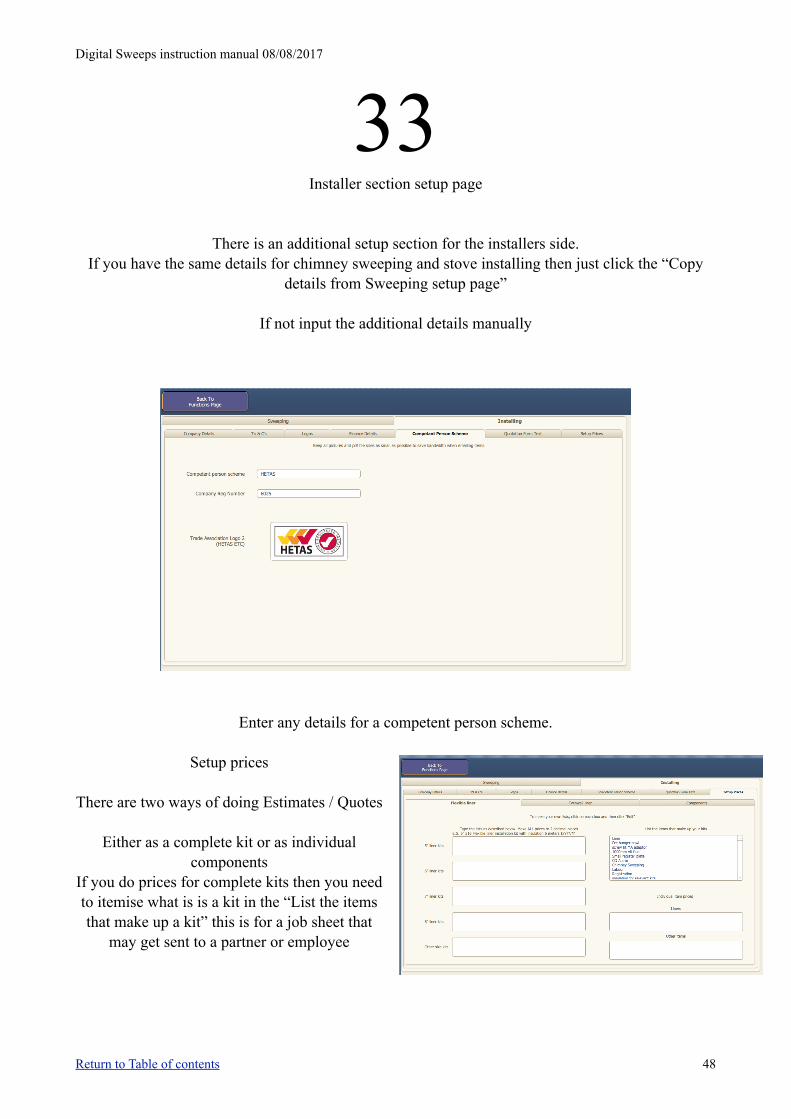
33 Installer section setup page
There is an additional setup section for the installers side. If you have the same details for chimney sweeping and stove installing then just click the “Copy
details from Sweeping setup page”
If not input the additional details manually
Enter any details for a competent person scheme.
Setup prices
There are two ways of doing Estimates / Quotes
Either as a complete kit or as individual components
If you do prices for complete kits then you need to itemise what is is a kit in the “List the items that make up a kit” this is for a job sheet that
may get sent to a partner or employee
Return to Table of contents 48
Digital Sweeps instruction manual 08/08/2017
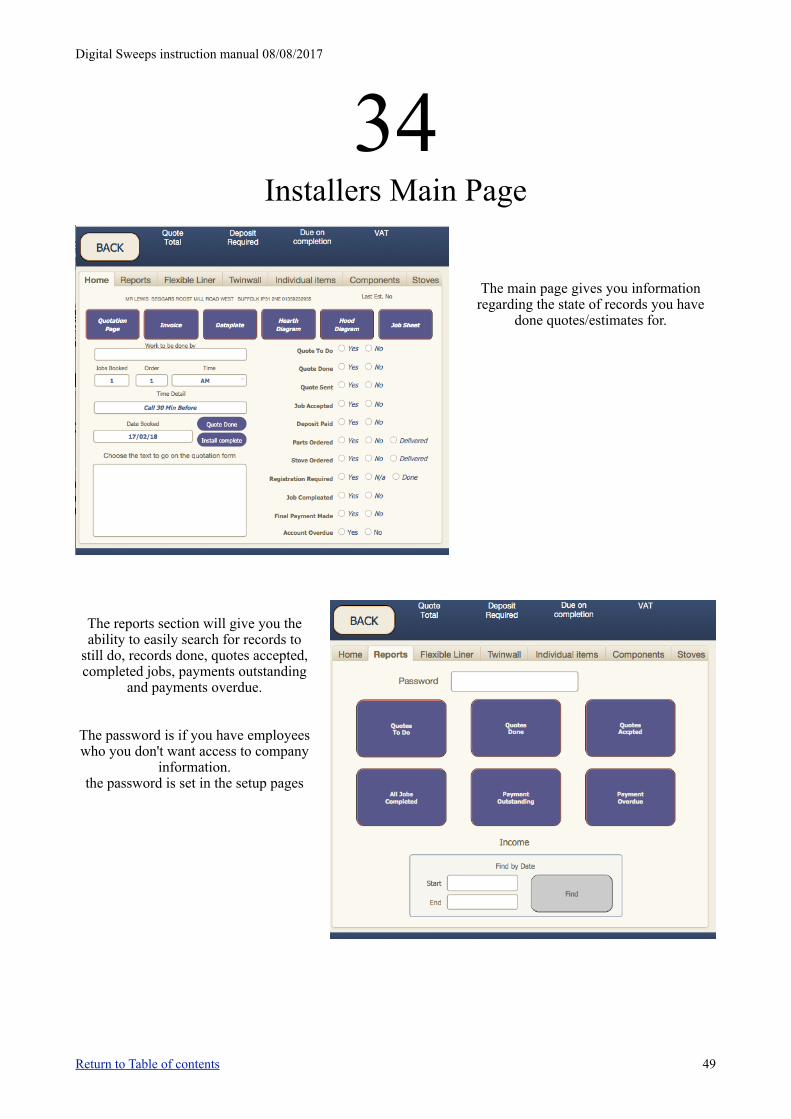
34 Installers Main Page
The main page gives you information regarding the state of records you have
done quotes/estimates for.
The reports section will give you the ability to easily search for records to
still do, records done, quotes accepted, completed jobs, payments outstanding
and payments overdue.
The password is if you have employees who you don't want access to company
information. the password is set in the setup pages
Return to Table of contents 49
Digital Sweeps instruction manual 08/08/2017
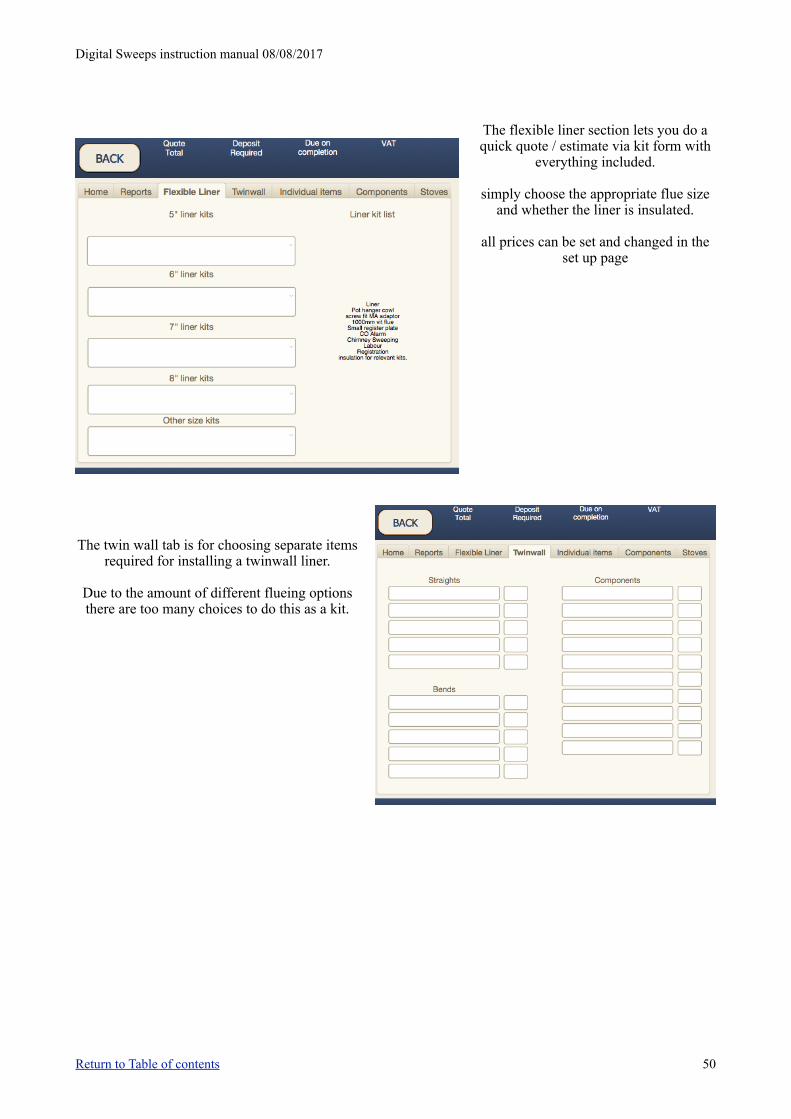
The flexible liner section lets you do a quick quote / estimate via kit form with
everything included.
simply choose the appropriate flue size and whether the liner is insulated.
all prices can be set and changed in the set up page
The twin wall tab is for choosing separate items required for installing a twinwall liner.
Due to the amount of different flueing options there are too many choices to do this as a kit.
Return to Table of contents 50
Digital Sweeps instruction manual 08/08/2017
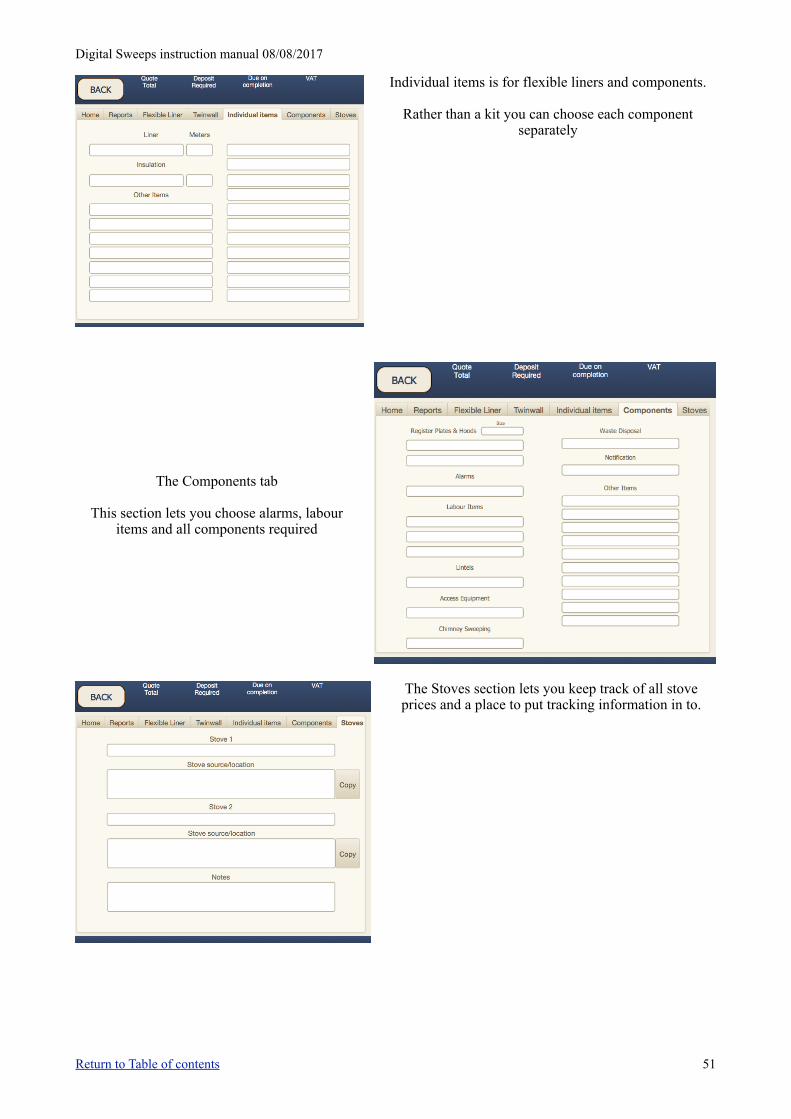
Individual items is for flexible liners and components.
Rather than a kit you can choose each component separately
The Components tab
This section lets you choose alarms, labour items and all components required
The Stoves section lets you keep track of all stove prices and a place to put tracking information in to.
Return to Table of contents 51