canon cdlc astrophotography quick guide
DESCRIPTION
Canon CDLC Astrophotography Quick GuideTRANSCRIPT
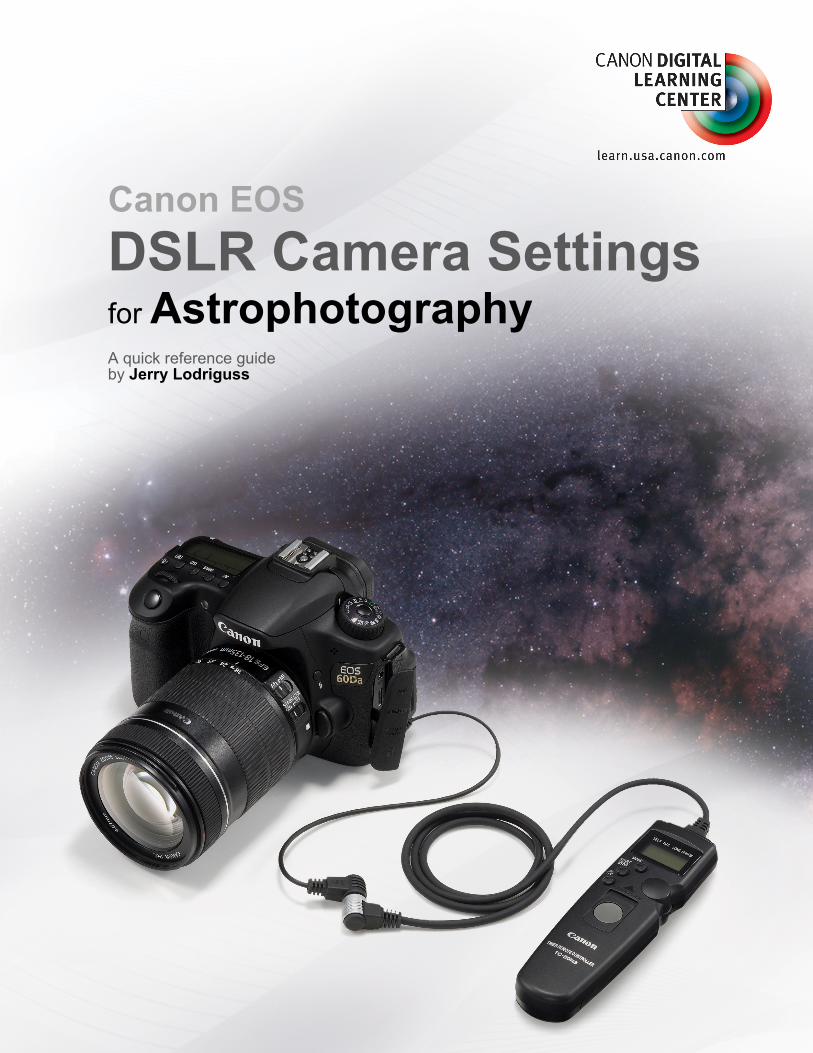
Canon EOS DSLR Camera Settings for Astrophotography A quick reference guide by Jerry Lodriguss

© 2012 Canon U.S.A., Inc. All Rights Reserved. Reproduction in whole or in part without permission is prohibited. 2
This quick reference guide is designed to be an in-the-field companion to the Canon Digital Learning Center's comprehensive article "Astrophotography Techniques with the Canon EOS System" by Jerry Lodriguss. For more information about the suggested settings below, please refer back to the online article for detailed explanations from the author.
Exposure Mode - Set to Manual (M).
Autofocus - Set to Manual (MF on lens).
ISO - Set to 800 to 1600 for faint objects under dark skies. Set to a lower ISO for bright objects with a large dynamic range, or if shooting under a lot of light pollution.
Aperture - The aperture is fixed if you are shooting through a telescope so you can't change this. For a camera lens:
• Set to the widest aperture for a slow (f/2.8 to f/4) lens, or stop down one stop.
• Stop down 2~3 stops for a fast (f/1.2 to f/1.8) lens. • Experiment to find the best compromise between light gathering at a wide,
fast aperture, and better optical performance at a smaller, slower aperture.
Shutter Speed - Set to the correct exposure as determined by examining the histogram. Up to 30 second exposures can be dialed in directly. For longer than 30 seconds, set to Bulb and control with a remote release timer (Canon Timer Remote Controller TC-80N3). On some cameras, Bulb may be a separate exposure mode setting, or it may be accessed on the shutter speed dial one click past the 30-second setting. Nearly all EOS cameras will show an ascending count of elapsed exposure time when in Bulb mode, allowing fairly accurate long exposure timing even if you don’t have access to the programmable TC-80N3.

© 2012 Canon U.S.A., Inc. All Rights Reserved. Reproduction in whole or in part without permission is prohibited. 3
White Balance - Set to Auto White Balance, or set a custom white balance on the sky background in a correctly exposed test image.
Drive - Set to Single Shooting.
Color Space - Set to sRGB if shooting JPEGs in the camera. Doesn't matter if you are shooting Raw you can change it later in Canon's Digital Photo Professonal. sRGB offers a simpler worflow for most photographers, and there is little benefit to using Adobe RGB, since the enhanced cyans and greens in that color space don't really help with the night sky.
Image File Type - Set to Raw, or Raw + JPEG
• Raw - Set to full-sized raw file format (not medium or small raw). Raw file format preserves all of the original data as it comes from the sensor in the camera. This is, unquestionably, the best file format to use. The raw format saves the data in the high bit depth (12 or 14 bits) that comes out of the analog-digital converter as linear data. This is extremely important for astronomical images. High-bit linear data allows the most control over how the data is calibrated, manipulated and enhanced to produce the best images.
• JPEG - Set to Large/Fine. JPEG file format creates compressed files that take up less space on the memory card. JPEG images take the raw data produced by the sensor and process it, applying the white balance setting, a non-linear curve, and contrast, sharpening, saturation and image style adjustments. A compression algorithm is then applied to the image which trades image data for storage space. This type of compression is called "lossy" because some data is lost when it is discarded in the compression process. Raw files are "lossless" because all of the original data is preserved in them.
• Raw and JPEG Concurrently - Most cameras allow you to shoot both raw and JPEG file formats concurrently in the camera, producing two files that are stored on the memory card. The camera will apply whatever in-camera settings you have in terms of contrast, sharpening and color adjustments to the JPEG only.

© 2012 Canon U.S.A., Inc. All Rights Reserved. Reproduction in whole or in part without permission is prohibited. 4
Shutter Release Without Card - Set to Disable. This will prevent the camera from shooting without a memory card present.
Image Review - Turn off. The camera will display the image after the shutter closes. You can view an image after you shoot it by simply pressing the Playback button on the back of the camera. Having the image displayed after every shot will heat the camera up causing more thermal noise. It can also be very distracting to other people at a star party. After you have done your test exposures and focused and framed, you don't need to review every image if you are shooting a series of images for stacking.
Lens Peripheral Illumination Correction - Set to Off. You can correct later during image processing.
Red-Eye Reduction - Set to disable.
Exposure Compensation / Auto Exposure Bracketing - Set to Zero. We won't use this for normal astrophotography because we are not using autoexposure.
Metering Mode - Set to Evaluative. This doesn't really matter as we won't use this for deep-sky. For lunar or solar work (with the proper safe solar filter), you can set it to spot metering.
White Balance Shift / Bracketing - Leave at the default, or try adding a little blue if you have set a custom white balance on the sky background for wide-angle shots.
Dust Delete Data - Set to none, or turn off.
ISO Auto - Manually set the ISO speed you want to use, do not use the auto setting.

© 2012 Canon U.S.A., Inc. All Rights Reserved. Reproduction in whole or in part without permission is prohibited. 5
Canon Picture Styles - Set to Faithful. Picture styles are applied to JPEG images during in-camera processing, but not to the raw file format. However, this information is stored in the raw file and applied as the default in DPP. It can be changed during raw processing in DPP later.
• Contrast - Increase for faint deep-sky objects. Turn down for star clusters.
• Sharpening - Turn down for JPEGs shot in the camera. Sharpening can exaggerate any noise present in the image. Sharpening is not applied in the camera to raw images, but it is applied to JPEG images.
• Saturation - Leave at default, or adjust to taste by shooting a test image.
Auto Power Off - Set to 1 minute.
Auto Rotate - Set to off.
Format - It is a good idea to format your memory card once in a while after you have copied your images to your computer. Warning! Formatting your memory card erases all images on it. Be sure your images are safely copied to another hard drive or storage area before you format a memory card.
File Numbering - Set to Continuous.
LCD Auto Off - Set to disable.
Live View Function Settings - Enable Live View Shooting.
Live View Exposure Simulation - Set to enable (on EOS Rebel models, Live View is always performed using Exposure Simulation, so there’s no menu setting)
Custom Functions
• ISO Expansion - Set to off.
© 2012 Canon U.S.A., Inc. All Rights Reserved. Reproduction in whole or in part without permission is prohibited. 6
• Exposure Level Increments - Set to 1/3 stop.
• Long-Exposure Noise Reduction - If you are going to shoot just a couple of long-exposure frames in JPEG format at high ambient temperatures and don't plan to shoot separate darks, turn on in-camera long-exposure noise reduction.
If you are going to shoot multiple light frames for stacking and are shooting separate dark frames, then turn off long-exposure noise reduction.
You should note that in-camera long-exposure noise reduction will essentially double the time it takes to take a picture. Say you want to take a one minute exposure of a subject. The shutter opens, and the one-minute exposure, called the "light frame" begins. It's called the "light frame" because photons of light are hitting the sensor in the camera and are being counted. This exposure ends, but the image is not immediately downloaded to the memory card in the camera. Instead, another exposure begins, of the same length as the light frame, but this time with the shutter closed. This exposure is called the "dark frame", because the camera is taking a picture of the dark, with no photons hitting the sensor from the subject. Instead it is taking a picture of the thermal signal in the camera. Because the thermal signal is consistent from frame to frame, if the frames are taken at the same temperature, the processor in the camera can then subtract the thermal signal in the dark frame from the light frame, thereby improving it.
Many people are often frustrated and confused when they take a long time-exposure with long exposure noise reduction turned on, and then it ends, but the busy light stays lit on the back of the camera for what seems like way too long. They think that surely it can't take that long for the image to be written to a card! It never takes that long during normal daytime photos. Well, that's right. It doesn't take that long for normal short exposures. The in-camera long-exposure noise reduction is only works for long exposures — one second or longer. The red “card busy”light is on for that long because the camera is making a dark frame of the same length as the light frame and processing it in the camera before it is written to the memory card.
• High ISO Speed Noise Reduction - Set to low. Like long-exposure noise reduction, if you are going to shoot just a couple of long-exposure frames at a high ISO, turn on High ISO Speed Noise Reduction. If you are going to shoot multiple frames for stacking and are shooting separate dark frames, then turn it off.
• Highlight Tone Priority - Set to disable.

© 2012 Canon U.S.A., Inc. All Rights Reserved. Reproduction in whole or in part without permission is prohibited. 7
• Auto-Lighting Optimizer - Set to disable.
• Autofocus Assist Beam Firing - Set to disable.
• Mirror Lock-Up - For long exposures with a very solid mounting, it probably is not necessary to lock the mirror up before an exposure. For short exposures for high-resolution planetary or double-star work, it is a good idea to lock the mirror up before the exposure to reduce camera movement and vibration caused by mirror slap. Some cameras access this setting with a control on top of the camera and some through a custom setting in a menu. Some require the shutter to be pressed once to lock the mirror up, and then be pressed again to actually open the shutter. Take care to learn exactly how your camera works for this feature, because you could press the shutter thinking you have opened it for a long exposure and go off to do something else, and then come back only to find that all you had done was lock the mirror up and that no exposure had been taken. Some cameras do not offer a mirror lockup at all, but they may move the mirror up out of the way as the first thing when using the self timer. Read the camera manual to learn how your particular model works. Keep in mind that if you’re using Live View, you don’t have to separately set mirror lock-up — by definition, Live View locks up the mirror already.
Add Image Verification Data - Set to disable.
Self Timer - If you don't have a remote release, you can use the camera's self-timer to trip the shutter so you don't have to touch the camera, which will help reduce vibrations and possible star trailing.
Built-in Flash - Turn off. It won't help to illuminate astrophotography subjects.
For more instructional articles and downloadable resources like this, please visit the Canon Digital Learning Center: learn.usa.canon.com