best practices guide - canon...
TRANSCRIPT

Best Practices Guide
© 2015 Canon U.S.A., Inc. All Rights Reserved. Reproduction in whole or part without permission is prohibited.
A 25 Step Guide for Preparing The EOS C300 Mark II for Shooting
V 5.4
Best Practices Guide
2
© 2015 Canon U.S.A., Inc. All Rights Reserved. Reproduction in whole or part without permission is prohibited.
Table of Contents Camera Buttons and Controls Page
Camera Left Side Buttons and Controls 3 Camera Rear View Buttons and Controls 4 Camera Right Side Buttons and Controls 5 Camera Front View 6 Camera Bottom and Top View 7
Camera Setup
1. Download the Manual 8 2. Powering the Camera 9 3. Checking Battery Power 10 4. Check the Firmware 11 5. Reset the Camera 12 6. Set the Date, Time, and Language 12 7. Check the Status Screens 13 8. Assignable Buttons 16 9. Check the Sensor/Perform Black Balance 20 10. Prepare Recording Media 22 11. Set the Clip Name 23 12. Set the Video Configuration 25 13. Setup Simultaneous Recording of Proxy Clips 29 14. Setup Slow and Fast Motion Recording 31 15. Setup the Main Camera Functions 33 16. Select the Custom Picture Setting 38 17. Apply a LUT to Screens and Video Outputs 43 18. Configure Onscreen Displays 45 19. Superimpose Onscreen Displays on Video Outputs 51 20. Configure the Modular Units 51 21. Configure the Viewfinder 53 22. Configure the Viewfinder/LCD Screen 54 23. Configure the Grip Unit 55 24. Configure the Outputs 56 25. Configure the Dual Pixel Autofocus 60
Menu Items Complete Menu and Submenu Item-by-Item 67
Notes 77

Best Practices Guide
3
© 2015 Canon U.S.A., Inc. All Rights Reserved. Reproduction in whole or part without permission is prohibited.
Camera Left Side Buttons and Controls

Best Practices Guide
4
© 2015 Canon U.S.A., Inc. All Rights Reserved. Reproduction in whole or part without permission is prohibited.
Camera Rear View Buttons and Controls
NOTE: This LCD panel display on the back of the camera body is the only place you can visually monitor all four tracks of audio the camera is acquiring.

Best Practices Guide
5
© 2015 Canon U.S.A., Inc. All Rights Reserved. Reproduction in whole or part without permission is prohibited.
Camera Right Side Buttons and Controls

Best Practices Guide
6
© 2015 Canon U.S.A., Inc. All Rights Reserved. Reproduction in whole or part without permission is prohibited.
Camera Front View

Best Practices Guide
7
© 2015 Canon U.S.A., Inc. All Rights Reserved. Reproduction in whole or part without permission is prohibited.
Camera Bottom & Top View

Best Practices Guide
8
© 2015 Canon U.S.A., Inc. All Rights Reserved. Reproduction in whole or part without permission is prohibited.
Download the EOS C300 Mark II Manual
Every procedure outlined in this guide comes from the EOS C300 Mark II Instruction Manual. To download it, click the link below, copy and paste the link in your browser, or visit the Canon, USA web site at usa.canon.com for more details.
For the complete EOS C300 Mark II instruction manual go to:
EOS C300 Mark II Manual
https://www.usa.canon.com/internet/portal/us/home/products/details/cameras/cinema-eos/eos-c300-mark-ii#BrochuresAndManuals
25 STEPS FOR PREPARING THE EOS C300 MARK II FOR SHOOTING
Troubleshooting: If you need help in resolving an issue with the EOS C300 Mark II:
Canon Cinema EOS Support (1-855-246-3367)
1

Best Practices Guide
9
© 2015 Canon U.S.A., Inc. All Rights Reserved. Reproduction in whole or part without permission is prohibited.
Power the Camera
Power the camera using the supplied 14.4 V DC BP-A30 Battery Pack, which comes with the camera, or the optional BP-A60 Battery Pack.
Charging Times:
• BP-A30: Approximately 2 hours and 50 minutes • BP-A60: Approximately 5 hours
• The camera body does not have a built-in battery recharging function.
• Use the CG-A10 Battery Charger to charge battery packs.
• You can charge two battery packs simultaneously with the CG-A10.
Connecting the CA-A10 AC Adapter -- 16.7 V DC (DC-IN): • Set the POWER switch to OFF • Connect the AC Adapter’s DC
plug to the DC IN terminal of the camera.
o Align the cable so the red dot on the plug is facing up.
o To disconnect the cable, pull back the metallic tip of the plug and then disconnect the cable from the terminal.
• Connect the power cord to the AC Adapter and plug it into a power outlet.
• NOTE: Even after Power is set to OFF, the time code based on the
internal clock continues to count up.
2
BP-A30 BP-A60

Best Practices Guide
10
© 2015 Canon U.S.A., Inc. All Rights Reserved. Reproduction in whole or part without permission is prohibited.
Check the Battery Power
Check the Battery: a). Press the button on the back of the battery and LEDs on the battery will indicate its approximate state of charge: b). Approximate percentage of charge and remaining battery run time can be displayed in the camera’s viewfinder, and on its LCD monitor (please note that these are not precise numbers, and depending on conditions may not be entirely accurate).
Lithium Button Battery:
The CR2025 lithium button battery ensures that any settings saved on the camera are not lost when no power source (battery or AC adapter) is connected to the camera. Removing the lithium button battery when no other power source is connected to the camera will reset all the camera’s settings to default values. To avoid losing the camera settings, save them to an SD card in advance.
3

Best Practices Guide
11
© 2015 Canon U.S.A., Inc. All Rights Reserved. Reproduction in whole or part without permission is prohibited.
Check the Firmware
Charge the battery and power the camera (see Powering the Camera Step #2). Check the firmware version against the Canon, USA website to see that the camera has the latest firmware installed:
https://www.usa.canon.com/internet/portal/us/home/support/
Click ‘Drivers and Downloads’: • Enter the model Information, then follow the instructions on
the website to download, install and update the firmware, if necessary.
• To check the current firmware installed on the camera
navigate in the Menu to this screen: [System Setup]>[Firmware] >[Camera]
4

Best Practices Guide
12
© 2015 Canon U.S.A., Inc. All Rights Reserved. Reproduction in whole or part without permission is prohibited.
Reset the Camera
When setting up for a new shoot, performing a full reset of All Settings on the camera is advisable. This clears any previous settings, and returns the camera to a known, factory-default state. This is especially important if you’re not certain of all settings from its most recent use.
To Reset All Settings on the Camera: [System Setup] > [Reset] > [All Settings] > [OK]
Set the Date, Time and Language
It is important to set the date and time and time zone correctly on the camera before you start using it. When the time and date are not set or the lithium button battery is depleted, the [Set Clock/Date/Time] screen will appear automatically with the time zone selected when you turn on the camera. Setting Date and Time should be done immediately after a full reset, when the lithium button battery fails, or can be done after the initial setup:
To Set the Date and Time: [System Setup] > [Time Zone] [System Setup] > [Set Clock] > [Date/Time] and [Date Format]
5
6

Best Practices Guide
13
© 2015 Canon U.S.A., Inc. All Rights Reserved. Reproduction in whole or part without permission is prohibited.
Using the optional GP-E1 GPS Receiver, you can have the camera adjust settings automatically according to the UTC date/time information received from the GPS signal: [System Setup] > [GPS] > [Auto Time Setting] > [On]
Check the Status Screens
• Status screens give you a quick check of all camera settings. You can also output the status screens to an external monitor.
• Check the EOS C300 Mark II settings, make notes on the setup, and
return to the Menu to make changes, if necessary:
To Check the Status Screens:
• Assign a button to [STATUS] in advance (skip to Step #6 for options). o [System Setup] > [Assignable Buttons] > [Camera] or [Grip] or
[Monitor] or [Remote Controller]
• Alternately: Press the MENU button, while holding it pressed down, press the assignable button whose function you wish to change.
o A list of available functions appears with the current function assigned to the button highlighted.
7
Step 1 Step 2
Canon GPS-E1

Best Practices Guide
14
© 2015 Canon U.S.A., Inc. All Rights Reserved. Reproduction in whole or part without permission is prohibited.
• Press the assignable button to open the status screens:
o The status screen most recently displayed will appear unless you turned off the camera or changed the operating mode.
o In that case, the [Gamma/Color Space/Color Matrix] status screen appears in CAMERA mode and the [Assignable Buttons 1/3] status screen appears in MEDIA mode.
• Push the joystick up/down, or turn the SELECT Dial to scroll through the
Status screens
• Press the assignable button for [STATUS] again to clear the Status screen. Alternately, you can press the [CANCEL] button.
Step 3

Best Practices Guide
15
© 2015 Canon U.S.A., Inc. All Rights Reserved. Reproduction in whole or part without permission is prohibited.
Available Status Screens include:
• [Gamma/Color Space/Color Matrix] screen, [CP Data] screens
• [Assignable Buttons] screens
• [Audio] screens
• [Media] screen
• [Video] screen
• [Metadata] screen
• [Battery/Hour Meter] screen
• [GPS Information Display] screen If optional GPS Receiver GP-E1 is attached and active
• [Network Settings] If optional WFT-E6A Wireless File Transmitter is attached and active
Canon GPS Receiver GP-E1 Canon Wireless File Transmitter WFT-E6A

Best Practices Guide
16
© 2015 Canon U.S.A., Inc. All Rights Reserved. Reproduction in whole or part without permission is prohibited.
Assign External Buttons
The camera offers 22 buttons to which you can assign various functions. Assign often-used functions to the buttons you find most convenient to personalize the camera to your needs and preferences.
You Can Assign:
• 11 buttons on the camera body • 10 buttons on the monitor unit • 1 button on the grip unit
Changing the Assigned Function:
1. Press the MENU button, while holding it pressed down, press the assignable button whose function you wish to change. • A list of available functions appears with the current function assigned to
the button highlighted. • You can also open the submenu corresponding to the button you wish to
change under [System Setup] > [Assignable Buttons] > [Camera], [Grip], [Monitor] or [Remote Controller].
8

Best Practices Guide
17
© 2015 Canon U.S.A., Inc. All Rights Reserved. Reproduction in whole or part without permission is prohibited.
Changing the Assigned Function (cont’d):
2. Select the desired function and press SET. • The selected function will be assigned to the selected button. • If you selected one of the preset functions, the rest of this procedure is
not necessary. If you selected [User Setting], the menu’s title bar will turn blue to indicate you are selecting a menu setting to register.
3. To register a menu item, navigate to the menu setting you want to register and then press SET.
About Assignable Buttons: • You can check the three [Assignable Buttons] status screens to see what
functions are currently assigned to each button. • To reset to default only the functions assigned to the assignable buttons
without affecting other camera settings: o [System Setup] > [Reset] > [Assignable Buttons].

Best Practices Guide
18
© 2015 Canon U.S.A., Inc. All Rights Reserved. Reproduction in whole or part without permission is prohibited.
Using an Assignable Button: After you assign a function to one of the buttons, press the button to activate the function. For some functions an options menu may appear. In such case press the desired option and press SET.
Assignable Functions: Functions can be set separately in CAMERA mode and MEDIA mode. Refer to the following table for assignable functions and available modes.
Function Name Assignable Button Descriptions Camera Media [One-Shot AF] The camera focuses automatically one time only (one-shot AF function) ✔ [AF-Lock] Locks the AF during continuous AF ✔ [Focus Guide] Turns the Dual Pixel Focus Guide function on/off ✔ [Face AF] Toggles the [Face AF] function between [Face Only] and [Face Priority] ✔ [Face Det. & Tracking]
Turns the face detection function on/off ✔
[Tracking] Turns the tracking function on/off ✔ [Push Auto Iris] The camera automatically adjusts the aperture while this button is held
pressed down ✔
[Iris Mode] Switches the aperture adjustment mode between automatic and manual ✔ [Iris +] Opens the aperture ✔ [Iris -] Closes the aperture ✔ [ND +] Cycles through ND filter settings in increasingly (higher density) order ✔ [ND -] Cycles through ND filter settings in decreasingly (lower density) order ✔ [AE Shift +] Compensates the exposure making the image brighter ✔ [AE Shift -] Compensates the exposure making the image dimmer ✔ [Backlight] Turns the [Backlight] light metering option on/off ✔
[Spotlight] Turns the [Spotlight] light metering option on/off ✔ [FUNC.] Enters the direct setting mode replicating the function of the camera’s
FUNC. button ✔
[Shutter] Enters the direct setting mode with the shutter speed highlighted and ready to be adjusted
✔
[ISO/Gain] Enters the direct setting mode with the ISO speed or gain value highlighted and ready to be adjusted
✔
[White Balance] Enters the direct setting mode with the white balance highlighted and ready to be adjusted
✔
[Peaking] Turns peaking on/off ✔ [Zebra] Turns zebras on/off ✔ [WFM] Turns waveform on/off ✔ ✔
[Magnification] Turns magnification on/off ✔ [Color Bars] Turns color bars on/off ✔ [Markers] Turns markers on/off ✔ [LCD Setup] Opens the [LCD Setup] submenu ✔ ✔
[Viewfinder Setup] Opens the [Viewfinder Setup] submenu ✔ ✔
[LUT] Turns on/off the application of selected LUTs to the selected screens/video outputs
✔
[OSD Output] Turns on/off the inclusion of onscreen displays to the selected screens/video outputs
✔ ✔
[Display] Changes the onscreen display level ✔ ✔
[Add Shot Mark 1]* Adds an S1 mark to the clip ✔ ✔
[Add Shot Mark 2]* Adds an S2 mark to the clip ✔ ✔
[Add OK Mark] Adds an OK mark to the clip ✔ ✔

Best Practices Guide
19
© 2015 Canon U.S.A., Inc. All Rights Reserved. Reproduction in whole or part without permission is prohibited.
Function Name Assignable Button Descriptions Camera Media [Add ✓ Mark] Adds an ✓mark to the clip ✔ ✔
[Time Code] Displays the [Time Code] submenu ✔ [Time Code Hold]* Puts the time code information on hold and resumes it ✔ ✔
[Headphones +] Increases the headphone volume ✔ ✔
[Headphones -] Decreases the headphone volume ✔ ✔
[Monitor Channels] Switches the audio output channel ✔ ✔
[Audio Level] Turns the audio level meter on/off ✔ ✔
[Photo]* Records a photo ✔ ✔
[Review Recording]* Plays back the last clip recorded in CAMERA mode ✔ [S&F Frame Rate] Changes the shooting frame rate during slow & fast motion recording
mode ✔
[Status]* Displays the status screens ✔ ✔
[Custom Picture] Opens the [CP Custom Picture] submenu ✔ [My Menu] Opens the [My Menu] submenu ✔ [Initialize Media] Opens the [Initialize Media] submenu ✔ ✔
[Index] From the clip index screen: Opens the index screen selection menu From other index screens: Returns to the clip index screen
✔
[★User Setting]* Customizable slot. Assign to the button any menu setting you would like to register.
✔ ✔
* Function can be used only by assigning a button
Assignable Button Locations (in yellow):

Best Practices Guide
20
© 2015 Canon U.S.A., Inc. All Rights Reserved. Reproduction in whole or part without permission is prohibited.
Check the Sensor/Perform Black Balance
NOTE: The camera’s 8.85 megapixel CMOS sensor is a delicate piece of precision engineering. Direct exposure of the sensor to ion rays or other types of cosmic radiation may affect it and may rarely appear as bright colored dots on the screen. This is the nature of CMOS image sensors and does not represent a malfunction. Adjusting the black balance may solve the problem. The effects of the issue may be more noticeable when the camcorder is subject to high temperatures, when a high ISO speed or gain level is used and when slow shutter speeds are used.
To Check the Sensor: Put body cap on (no lens), connect monitor, and slowly increase the ISO or Gain. If there are noticeable pixels, then do a black balance. If this does not correct the issue, contact Canon Support (1-855-246-3367).
Perform a Black Balance: 1. Allow the camera to warm up. 2. Remove the lens, and attach a body cap 3. Open the [ABB] screen:
• [Camera Setup] > [ABB] • Select [OK] and then press [SET]
9
The EOS C300 Mark II Sensor Facts:
• CMOS sensor (single-paned) 35mm equivalent developed and manufactured in-house by Canon.
• Approx 9.84 MP Total (4206x2340) • Approx 8.85 MP When 4096x2160 or
2048x1080 is selected as the resolution • Approx 8.29 MP When 3840x2160 or
1920x1080 is selected as the resolution • Unit Pixel 6.4 x 6.4 • Effective Screen Size 26.4 x 13.8mm
(29.8mm on the diagonal ): When 4096x2160 or 2048x2160 is selected as the resolution
• 24.6 x 13.8mm (28.2mm on the diagonal): When 3840 x 2160 or 1920 x 1080 is selected as the resolution

Best Practices Guide
21
© 2015 Canon U.S.A., Inc. All Rights Reserved. Reproduction in whole or part without permission is prohibited.
Perform a Black Balance (cont’d):
Adjusting the Black Balance is also necessary in the following cases: • When using the camera for the very first time or after a long period of not
using it. • After sudden or extreme changes in ambient temperature. • After changing the ISO speed/gain settings • After resetting all the camera settings
NOTE: The automatic black balance procedure takes about 40 seconds when the frame rate is set to 23.98P.

Best Practices Guide
22
© 2015 Canon U.S.A., Inc. All Rights Reserved. Reproduction in whole or part without permission is prohibited.
Prepare Recording Media
The C300 Mark II records 4K clips on CFast 2.0™ compliant cards, and 2K or Full HD clips (proxy files) and photos on SD Class 6 and Class 10 cards. CFast (CompactFast) 2.0™ cards are the next-generation mass-storage media employed by the EOS C300 Mark II for in-camera 4K video recording. The EOS C300 Mark II Digital Cinema Camera features two CFast 2.0™ card slots, each of which is protected by a convenient hinged cover. The camera also includes an SD card slot for HD and Proxy recording. For example, the camera can simultaneously record 4K on two CFast 2.0™ cards along with 2K proxy images on its SD card for off-line editing.
Initialize the Media:
• [Recording/Media Setup] > [Initialize Media] • Select the card to be initialized and press [SET].
NOTE: While recording to one CFast 2.0™ card, you can still initialize the other CFast 2.0™ card in the other CFast 2.0™ card slot without affecting the recording.
CFast 2.0™ Card Compatibility Table:
Manufacturer Label Model Numbers Capacity
SanDisk
Extreme Pro CFast 2.0™ SDCFSP-128G-xxxA 128 GB Extreme Pro CFast 2.0™ SDCFSP-128G-xxxB 128 GB Extreme Pro CFast 2.0™ SDCFSP-064G-xxxB 64 GB
CFast 2.0™ card recording capacity:
Card Capacity Recording Time
4K, 410 Mbps Recording Time
2K, 50 Mbps 32 GB 10 minutes 1 hour, 20 minutes 64 GB 20 minutes 2 hours, 45 minutes
128 GB 40 minutes 5 hours, 35 minutes
10

Best Practices Guide
23
© 2015 Canon U.S.A., Inc. All Rights Reserved. Reproduction in whole or part without permission is prohibited.
Set the Clip Name
11

Best Practices Guide
24
© 2015 Canon U.S.A., Inc. All Rights Reserved. Reproduction in whole or part without permission is prohibited.
The Basic Clip Name File Structure is as Follows:
1. Camera Index: One character A to Z that identifies the camera used. 2. Reel Number: 3 characters 001 to 999 that identify the recording media
used. 3. Clip Number: 4 characters C001 to D999. The clip number advances
automatically with each clip recorded, switching to D001 to C999) but you can set the initial clip number.
4. Recording Date: Set automatically by the camera 5. Random Component: 2 characters (numbers 0 to 9 and capital letters A to Z)
that change randomly with each clip. 6. User defined field: 5 characters (numbers 0 -9 and capitol letters A to Z) for
any identification purposes. 7. The camera will automatically add the suffix “_P” to the file name of proxy
clips. Additionally when an SD cards is used, a stream number (01 to 99) will be added before the “P”. The stream number will advance every time the video (stream) file within the clip is split and recording continues on a separate stream file.
To set the components of the clip file name Open the [Camera Index] screen:
• [Recording/Media Setup] > [Metadata] > [Camera Index] Use the joystick or turn the SELECT dial to select the desired camera ID and then press [SET] twice.
• Repeat the above procedure for: § [Reel Number] § [Clip Number] § [User Defined]

Best Practices Guide
25
© 2015 Canon U.S.A., Inc. All Rights Reserved. Reproduction in whole or part without permission is prohibited.
Set the Video Configuration System Frequency, Frame Rate, Resolution, Bit Rate
RAW Recording*:
While the C300 Mark II is recording either 4K or UHD on-board via the XF-AVC codec, it simultaneously delivers an uncompressed 10-bit Log encoded RAW version of that selected format (4K DCI or UHD) via the 3G -SDI output terminal labeled REC OUT. It is also capable of delivering the same signal on the MON. 3G-SDI output terminal. You can connect either of these outputs to an external recorder to record 4K RAW data. The 4K RAW signal is prepared in an identical manner to the RAW output of the EOS C500 camera. *[4K RAW] recording is only available when [CP Custom Picture] > [Main Settings] > [Gamma] has been set to [Canon Log 2] or [CP Custom Picture] > [Preset] has been set to one of the [Canon Log 2] options.
XF-AVC Intra-frame Recording: The C300 Mark II offers you numerous options when it comes to the video configuration of your recordings. XF-AVC Intra-frame recording uses H.264 Intra-frame compression to achieve maximum image quality. You can select to record 4K or 2K (2048x1080 or 1920 x 1080) video YCbCr 4:2:2, 10-bit color sampling, or 2K video with RGB 4:4:4, 10-bit or 12-bit color sampling.
XF-AVC Long GOP and XF-AVC Proxy Recording: XF-AVC Long GOP and XF-AVC Proxy options use Long GOP compression. You can select to record 2K video with a color sampling of YCbCr 4:2:2, 10-bit or YCbCr 4:2:0, 8-bit.
12

Best Practices Guide
26
© 2015 Canon U.S.A., Inc. All Rights Reserved. Reproduction in whole or part without permission is prohibited.
1. Select the System Frequency: • [Recording/Media Setup] > [System Frequency] > [59.94Hz] or
[50.00Hz] or [24.00Hz] The camera will reset and restart in the selected mode.
2. Select the Frame Rate: • [Recording/Media Setup] > [Frame Rate] > ex. [29.97P]
The selected frame rate will appear on the top of the screen and on the rear panel.
3. Select the Resolution and Color Sampling Settings: • [Recording/Media Setup] > [Resolution/Color Sampling] > ex.
[4096x2160 YCC422 10 bit]
NOTE: By default the resolution/color sampling used does not appear on the display screen, but you can choose to display it with the custom display function.
Best Practices Guide
27
© 2015 Canon U.S.A., Inc. All Rights Reserved. Reproduction in whole or part without permission is prohibited.
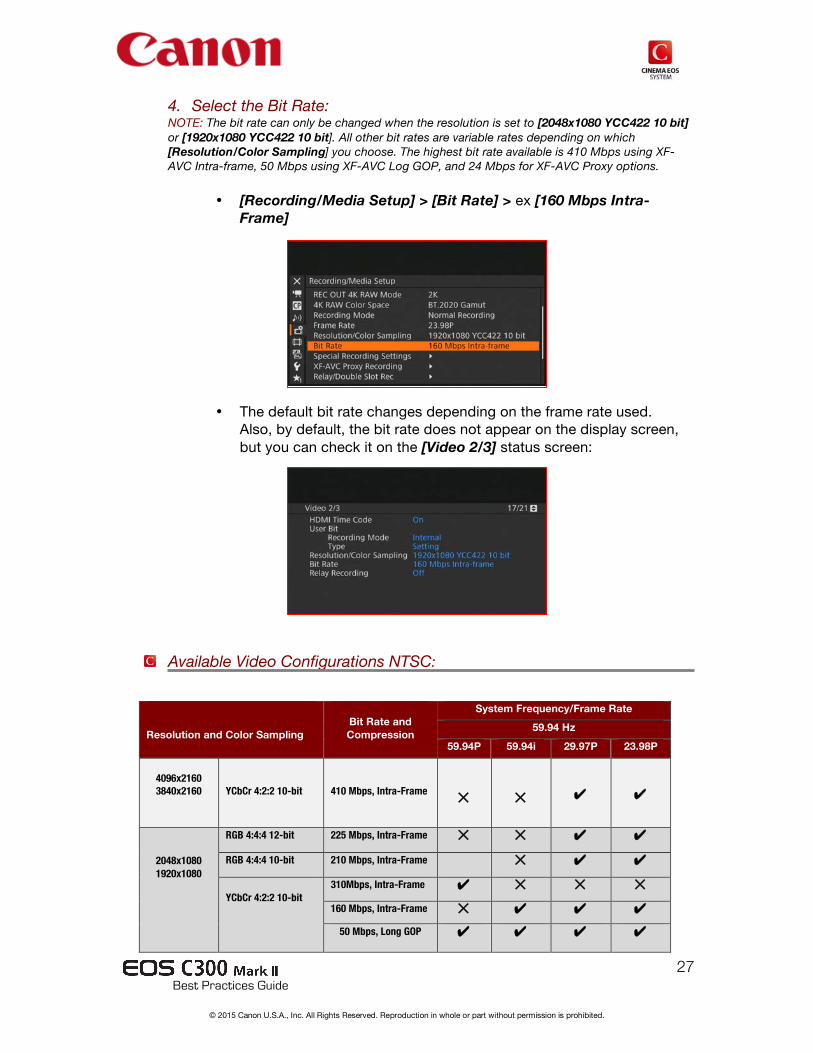
4. Select the Bit Rate: NOTE: The bit rate can only be changed when the resolution is set to [2048x1080 YCC422 10 bit] or [1920x1080 YCC422 10 bit]. All other bit rates are variable rates depending on which [Resolution/Color Sampling] you choose. The highest bit rate available is 410 Mbps using XF-AVC Intra-frame, 50 Mbps using XF-AVC Log GOP, and 24 Mbps for XF-AVC Proxy options.
• [Recording/Media Setup] > [Bit Rate] > ex [160 Mbps Intra-Frame]
• The default bit rate changes depending on the frame rate used. Also, by default, the bit rate does not appear on the display screen, but you can check it on the [Video 2/3] status screen:
Available Video Configurations NTSC:
Resolution and Color Sampling
Bit Rate and Compression
System Frequency/Frame Rate
59.94 Hz
59.94P 59.94i 29.97P 23.98P
4096x2160 3840x2160
YCbCr 4:2:2 10-bit
410 Mbps, Intra-Frame
✕
✕
✔
✔
2048x1080 1920x1080
RGB 4:4:4 12-bit 225 Mbps, Intra-Frame ✕ ✕ ✔ ✔ RGB 4:4:4 10-bit 210 Mbps, Intra-Frame ✕ ✔ ✔ YCbCr 4:2:2 10-bit
310Mbps, Intra-Frame ✔ ✕ ✕ ✕ 160 Mbps, Intra-Frame ✕ ✔ ✔ ✔
50 Mbps, Long GOP ✔ ✔ ✔ ✔

Best Practices Guide
28
© 2015 Canon U.S.A., Inc. All Rights Reserved. Reproduction in whole or part without permission is prohibited.
Available Video Configurations PAL:
Resolution and Color Sampling
Bit Rate and Compression
System Frequency/Frame Rate
50.00 Hz
50.00P 50.00i 25.00P 24.00P
4096x2160 3840x2160
YCbCr 4:2:2 10-bit
410 Mbps, Intra-Frame
✕
✕
✔
✔
2048x1080 1920x1080
RGB 4:4:4 12-bit 225 Mbps, Intra-Frame ✕ ✕ ✔ ✔ RGB 4:4:4 10-bit 210 Mbps, Intra-Frame ✕ ✔ ✔ YCbCr 4:2:2 10-bit
310Mbps, Intra-Frame ✔ ✕ ✕ ✕ 160 Mbps, Intra-Frame ✕ ✔ ✔ ✔
50 Mbps, Long GOP ✔ ✔ ✔ ✔
XF-AVC Intra CODEC Details and Recording Durations:
Format Color Coding
Bit Depth Bit Rate (Mbps)
Frame Rates (fps)
Media Cfast (GB)
128 256 4K / UHD 4:2:2 10 410 29.97P/25P
24.00P/23.98P 40 min 80 min
2K / HD
4:2:2 4:2:2
10 10
550 310
119.88P/100P 59.94P/50P
30 min 50 min
60 min 105 min
4:4:4 4:4:4
12 10
225 210
29.97P/25P 24.00P/23.98P
75 min 80 min
150 min 160 min
4:2:2 10 160 29.97P/25P 24.00P/23.98P
105 min 210 min
Bit Rate and Compression: The camera uses a variable bit rate (VBR). Intra-frame options compress the image after analyzing each frame separately and are more appropriate for editing. Long GOP options compress the image after analyzing changes across a group of pictures, which offers better compression (smaller data size). 50.00i: The 50.00i frame rate is only available when the camera is set to HD 1920x1080. NOTES: A single Cfast card cannot be used to record clips using different frequencies. When the REC OUT terminal’s output is set to 4K RAW, frame rates exceeding 29.97P cannot be selected.

Best Practices Guide
29
© 2015 Canon U.S.A., Inc. All Rights Reserved. Reproduction in whole or part without permission is prohibited.
XF-AVC Long-GOP CODEC Details and Recording Durations
Setup Simultaneous Recording of Proxy Clips:
In addition to the primary clip recorded on a CFast 2.0™ card, you can simultaneously record a 2K/HD YCbCr 4:2:0 proxy clip on an SD card. You can also add a LUT to the proxy file with different color space/gamma characteristics than those of the primary clips, making it edit and review ready.
Video Configuration of Proxy Clips:
Format Color Coding
Bit Depth Bit Rate (Mbps)
Frame Rates (fps)
Media Cfast (GB)
32 64
XF-AVC Long GOP Broadcast
4:2:2
10
50
59.94P / 50P
80 min
160 min
29.97P/25P 24.00P/23.98P
59.94i / 50i
80 min
160 min
Video Configuration of primary clips Video Configuration of Proxy Clips Resolution Frame Rate Resolution Color Sampling Bit Rate and Compression
4096x2160 2048x1080
29.97P, 25.00P 24.00P, 23.98P
2048x1080
YCbCr 4:2:0 8-bit
24 Mbps, Long GOP 3840x2160 1920x1080
1920x1080
1920x1080 59.94i, 50.00i 1920x1080 2048x1080
59.94P, 50.00P 2048x1080
35 Mbps, Long GOP 1920x1080 1920x1080
13
NOTES: The frame rate and audio recording settings will be the same as those used for the primary clips. The camera uses a Variable bit rate (VBR).

Best Practices Guide
30
© 2015 Canon U.S.A., Inc. All Rights Reserved. Reproduction in whole or part without permission is prohibited.
Steps to setup proxy clip recording: 1. Open the proxy recording [Activate] submenu:
• [Recording/Media Setup] > [XF-AVC Proxy Recording] > [Activate] 2. Select [On] and press SET.
3. To apply a LUT to proxy clips, open the proxy recording [Apply LUT] submenu: • [Recording/Media Setup] > [XF-AVC Proxy Recording] > [Apply LUT]
4. Select the desired LUT and then press SET.
Press the START/STOP button to start and stop recording. Proxy clips will be recorded at the same time as the primary clip on the CFast 2.0™ card.
XF-AVC Proxy Details and Recording Durations:
NOTES: Proxy recording during [Fast and Slow Motion] is not possible at recording frame rates greater than 59.94P.
Format
Color
Coding
Bit Depth
Bit Rate (Mbps)
Frame Rates
(fps)
SD Card (GB) 16 32
XF-AVC Proxy
4:2:0
8
35
59.94P, 50.00P
60 min
120 min
24
29.97P/25P
24.00P/23.98P 59.94i / 50i
85 min
175 min

Best Practices Guide
31
© 2015 Canon U.S.A., Inc. All Rights Reserved. Reproduction in whole or part without permission is prohibited.
Setup Slow & Fast Motion Recording (if necessary):
The C300 Mark II can be set to shoot and capture at a wide range of frame rates. It can be set in 1 fps increments from 1 to 30 fps, in 2fps increments from 32 to 60 fps, and in 4 fps increments from 60 to 120 fps. Depending upon the choice of recording frame rate and the separate choice of the playback
frame rate the C300 Mark II can implement either Fast Motion playback (over quite a broad range) or alternatively Slow Motion Playback (over a more modest range). The chart that follows outlines all of the choices when the camcorder is operating in either the 2K or the HD mode.
Available Slow and Fast Shooting Rates
Video Configuration Shooting Frame Rate** (fps) Frame Rate Vertical Resolution Color Sampling*
59.94P 1080 YCC422 10 bit 1 to 60 1080 (cropped)*** 1 to 120
29.97P 24.00P 23.98P
2160 YCC422 10 bit 1 to 30
1080 RGB444 10 bit RGB444 12 bit YCC422 10 bit 1 to 60
1080 (cropped)*** YCC422 10 bit 1 to 120
50.00P
1080 YCC422 10 bit
1 to 50 1080 (cropped)*** 1 to 100
25.00P
2160
YCC422 10 bit 1 to 25
1080
RGB444 10 bit RGB444 12 bit
1 to 50
1080 (cropped)*** YCC422 10 bit 1 to 100
14
* Part of the [Recording Media Setup] > [Resolution/Color Sampling] setting. ** Between 1 and 30 (fps), in 1-fps increments; between 32 and 60 (fps) in 2-fps increments; between 64 and 120 (fps) in 4-fps increments. *** This range is available only for Slow and Fast Motion recording in crop mode.

Best Practices Guide
32
© 2015 Canon U.S.A., Inc. All Rights Reserved. Reproduction in whole or part without permission is prohibited.
To Configure the Camera for Slow & Fast Motion Shooting:
• Open [Recording/Media Setup] > [Recording Mode]
• Select [Slow & Fast Motion] or [Slow & Fast Motion (crop)]
o With the [Slow & Fast Motion (crop)], you can select frame rates up to 120fps (by pressing S&F Frame Rate button #7 on the left side of the camera body and moving the joystick up or down), but the resolution is lowered, a 2X crop is applied, and the color sampling is changed to YCbCr4:2:2 10bit.
• “S&F STBY” appears at the top of the display screen.
• The shooting frame rate appears at the top of the screen next to the playback frame rate: Shooting frame rate/Playback frame rate.

Best Practices Guide
33
© 2015 Canon U.S.A., Inc. All Rights Reserved. Reproduction in whole or part without permission is prohibited.
• To change the shooting frame rate, press the S&F FRAME RATE button and the shooting frame will be highlighted in orange.
• Push the joystick up/down or turn the SELECT dial to select the desired rate.
Set the Main Camera Functions: Shutter Speed, ISO Speed/Gain, White Balance:
Set the Shutter Speed Mode and Value:
1. Navigate to [Camera Setup] > [Shutter] > [Mode]
2. Select operating mode: [Speed], [Angle], [Clear Scan], [Slow], or [Off]. [Off] uses a standard shutter speed based on the frame rate.
3. Select the desired mode and press SET
15

Best Practices Guide
34
© 2015 Canon U.S.A., Inc. All Rights Reserved. Reproduction in whole or part without permission is prohibited.
Available Shutter Speeds:
Shutter Speed Mode
System Frequency/Frame Rate 59.94 Hz 24.00 Hz 50.00 Hz
59.94P/59.94i 29.97P 23.98P 24.00P 50.00P/50.00i 25.00P
[Speed]*
1/3 Stop
1/1, 1/1.26, 1/2, to 1/2000
1/4 Stop
1/1, 1/1.19, 1/1.41, 1/1.68, 1/2 to 1/24, 1/30, 1/34, 1/40, 1/48,
1/60 to 1/2000
1/1, 1/1.19, 1/1.41, 1/1.68, 1/2 to
1/25, 1/33, 1/40, 1/50, 1/60 to 1/2000
[Angle]*, **
360.00°, 240.00°, 180.00°, 120.00°, 90.00°, 60.00°, 45.00°, 30.00°, 22.50°, 15.00°, 11.25°
[Clear Scan]*
23.98 Hz to 250.38 Hz 24.00 Hz to 250.40 Hz
[Slow]***
1/4, 1/8,
1/15, 1/30
1/4, 1/8,
1/15
1/3, 1/6, 1/12
1/3, 1/6,
1/12, 1/25
1/3, 1/6,
1/12 [Off]*
1/60
1/30
1/24
1/24
1/50
1/25
To Set the Shutter Speed:
• There are two ways to access the shutter speed.
1. You can use the FUNC button on
either the back of the camera or the monitor unit, or use the SHUTTER button (#6) on the left side of the camera.
2. Press the FUNC or SHUTTER button to select and push the joystick left or right, or press the SHUTTER button repeatedly to change the shutter speed.
* During slow and fast motion recording, available values will vary depending on the selected shooting frame rate. ** You can also select angle values equivalent to the following shutter speeds: 1/100, 1/60, 1/50, 1/40, 3/100, 1/30, 1/25. Available angle values will vary depending on the frame rate used. *** Not available during slow and fast motion recording.

Best Practices Guide
35
© 2015 Canon U.S.A., Inc. All Rights Reserved. Reproduction in whole or part without permission is prohibited.
To Change the ISO Speed or Gain Value:
1. Navigate to [Camera Setup] >
[ISO/Gain] > [Select]
2. Select [ISO] or [Gain] and then press SET.
3. Open the [ISO Increment] or [Gain Increment] submenu to select the increment (1 Stop or 1/3 Stop) to use when adjusting ISO or Gain: [Camera Setup] > [ISO/Gain] > [ISO Increment] or [Gain Increment]
4. After closing the menu, press the ISO/Gain button to enter the direct setting mode with the ISO speed or gain value highlighted. (Or use the FUNC button and joystick).

Best Practices Guide
36
© 2015 Canon U.S.A., Inc. All Rights Reserved. Reproduction in whole or part without permission is prohibited.
Using the Control Dial to change the ISO Speed or Gain Value:
• You can adjust the ISO speed or gain value by using the control dial on the camera or the grip unit. You will need to set it up in advance by assigning the function to each control independently.
1. Open the [Camera Control Dial] or [Grip Control Dial] submenu: [System Setup] > [Custom Function] > [Camera Control Dial] or [Grip Control Dial].
2. Select [ISO/Gain] and press SET.
Available ISO speed and Gain settings*
Increment** Normal Range Extended Range*** ISO Speed [1 stop]
(1-stop increments) 160, 200, 400, 800, 1600, 3200, 12800, 25600 100, 51200, 102400
[1/3 stop] 1/3 Stop Increments)
160****, 200, 250, 320, 400, 500, 640, 800, 1000, 1250, 1600,2000, 2500,3200, 4000, 5000, 6400, 8000, 10000, 12800, 16000, 20000, 25600
100, 125, 32000, 40000, 51200, 80000, 102400
Gain [Normal] (3-dB increments)
-2 dB****, 0 dB to 42 dB -6 dB, -3 dB, 45 dB to 54 dB
[Fine] (0.5-dB increments) -2 dB to 24 dB __
NOTE: * The minimum sensitivity needed to obtain the recommended dynamic range is ISO 400 / 6 dB gain (when [Custom Picture] > [Main Settings] > [Gamma] is set to [Canon Log] or [Wide DR]) or ISO 800 / 12 dB gain (when it is set to [Canon Log 2]). ** [Camera Setup] > [ISO/Gain] > [ISO Increment] setting (ISO speed), or [Camera Setup] > [ISO/Gain] > [Extended Range] to [On]. *** Sensitivity settings that are not recommended but can still be used by setting [Camera Setup]>[ISI/Gain]>[Extended Range] to [On]. **** Available only when [Camera Setup] > [ISO/Gain] > [Extended Range] is set to [Off].

Best Practices Guide
37
© 2015 Canon U.S.A., Inc. All Rights Reserved. Reproduction in whole or part without permission is prohibited.
Adjust the White Balance: The EOS C300 Mark II uses an electronic white balance process to calibrate the picture and produce accurate colors under different lighting conditions. To adjust the white balance either press the WB button or press the FUNC. button and joystick to enter the direct setting mode.
There are 4 different methods to adjust the white balance:
1. Custom White Balance: You can use a gray card or white object with no pattern to establish the white balance or set it to one of two custom white balance positions. (When recording under fluorescent lights, we recommend setting the custom white balance).
2. Set Color Temperature: Allows you to se the color temperature in degrees of Kelvin between 2,000K and 15,000K.
3. Preset white balance: Presets for white balance are daylight or incandescent. Preset can be further fine tuned within a range of -9 to 9.
4. Auto white balance (AWB): The camera automatically adjusts the white balance to the optimal level.
EOS C300
EOS C300 Mark II

Best Practices Guide
38
© 2015 Canon U.S.A., Inc. All Rights Reserved. Reproduction in whole or part without permission is prohibited.
Select the Custom Picture Settings
Custom Picture Files The Camera lets you edit many of the settings that control various aspects of the image produced. As a set, all of these settings are treated as a single “custom picture file”. You can save up to 20 custom picture files – either internally or to an SD card – and use them later to apply the exact same settings. You can also save the custom picture file as part of the metadata. Embedded in the clips recorded on the CFast card.
Preset Picture Settings The camera offers the following preset picture settings (combinations of gamma curve, color space and color matrix). When you edit a custom picture file to your preference, you can use one of the presets or turn the presets off and change the desired settings individually.
Available Custom Picture settings*
[Preset]* [Custom Picture] > [Main Settings] settings
Characteristics [Gamma] [Color Space] [Color Matrix]
[Canon Log 2: C.Gamut]
[Canon Log 2]
[ [Cinema Gamut]
[Neutral]
These settings use Canon Log 2 gamma and presume a workflow that includes post-production processing. They achieve an even wider dynamic range than with the [Canon Log] setting and superior gradation in the shadows. The color space can be selected from 4 options.
[Canon Log 2: BT.2020]
[BT.2020 Gamut]
[Canon Log 2: DCI-P3]
[DCI-P3 Gamut]
[Canon Log 2: BT.709]
[BT.709]
[Canon Log]**
[Canon Log]
[BT.709 Gamut]
[Cinema EOS Original]
This setting uses Canon Log gamma and presumes a workflow that includes post-production processing. It can obtain an impressive dynamic range and color tones.
[BT.2020]**
[Wide DR]
[BT.2020 Gamut]
[Neutral]
These settings produce the widest dynamic range possible without requiring post-production. The color space can be selected from two options.
[BT.709]**
[Wide DR]
[BT.709 Gamut]
[Neutral]
*[CP Custom Picture] > [Preset] **Only when [Recording/Media Setup] > [REC OUT RAW Mode] is set to a setting other than [4K RAW]
16

Best Practices Guide
39
© 2015 Canon U.S.A., Inc. All Rights Reserved. Reproduction in whole or part without permission is prohibited.
Select the Custom Picture Settings (cont’d):
Preset and Main Picture Settings: [Preset] The camera offers a number of preset picture settings (combinations of color space, gamma curve, and color matrix). [CP Custom Picture] > [Preset]
When [Preset] setting is selected, the settings are established in the combinations that are listed in the table below:
Preset Canon Log 2:
Cinema Gamut
Canon Log 2:
Cinema Gamut
Canon Log 2:
Cinema Gamut
Canon Log 2:
BT. 709
Canon Log
BT. 2020
BT. 709
Off
Gamma
Canon Log 2
Canon Log 2
Canon Log 2
Canon Log 2
Canon Log
Wide DR
Wide DR
__
Color Space
Cinema Gamut
BT.2020 Gamut
DCI-P3 Gamut
BT.709 Gamut
BT.709 Gamut
BT.2020 Gamut
BT.709 Gamut
__
Color Matrix
Neutral
Neutral
Neutral
Neutral
Cinema EOS Original
Neutral
Neutral
__
Select [OFF] when you want to set a different combination of custom picture settings with the individual [CP Custom Picture] > [Main Settings] settings described in the sections below.

Best Practices Guide
40
© 2015 Canon U.S.A., Inc. All Rights Reserved. Reproduction in whole or part without permission is prohibited.
Select the Gamma Curve (if a [Preset] setting was not selected): [Main Settings] > [Gamma]: The gamma curve changes the overall look of the image. (Default: [Wide DR]). [Canon Log 2]: Logarithmic gamma curve that obtains an even wider dynamic
range than with the [Canon Log] option. Requires image processing in post-production. (18% Gray = 39.2 IRE)
The Following settings are available only when [Recordings/Media Setup] > [REC OUT 4K RAW
Mode] is set to a setting other than [4K RAW]: [Canon Log]: Logarithmic gamma curve that obtains an impressive dynamic
range. Requires image processing in post-production. (18% Gray = 32.8 IRE)
[Wide DR]: Gamma curve with a very wide dynamic range. Optimized for playback on TV monitors.
[EOS Standard]: This gamma curve approximates the look of an EOS digital SLR camera when the picture style is set to [Standard]. It produces higher contrast than with the [Normal 1 (Standard)] setting.
[Normal 1 (Standard)]: Standard picture style for playback on TV monitors. [Normal 2 (x4.0)]: Produces brighter highlights than [Normal 1 (Standard)]
setting. [Normal 3 (BT.709)]: Produces a more faithful black gradation in the shadows
than with the [Normal 2 (x4.0)] setting. [Normal 4 (x5.0)]: Produces even better black gradation in the shadows than
with the [Normal 3 (BT.709)] setting.

Best Practices Guide
41
© 2015 Canon U.S.A., Inc. All Rights Reserved. Reproduction in whole or part without permission is prohibited.
Select the Color Space (if a [Preset] setting was not selected): [Main Settings] > [Color Space] Determines the color space of the image. (Default: [BT.709 Gamut]). [Cinema Gamut]:
Color Space developed by Canon based on the specific characteristics of the camera’s imaging sensor. It covers a wider color gamut than that of BT.2020. Use this setting with workflows that require ACES color space.
[BT.2020]: Color space that
meets ITU-R BT.2020 standards, which defines parameters for UHD 4K and 8K television.
[DCI-P3 Gamut]:
Color space that meets the guidelines established by DCI (Digital Cinema Initiatives).
[BT.709]: Standard color space that is compatible with sRGB
specifications.

Best Practices Guide
42
© 2015 Canon U.S.A., Inc. All Rights Reserved. Reproduction in whole or part without permission is prohibited.
Select the Color Matrix (if a [Preset] setting was not selected): [Main Settings] > [Color Matrix]
The color matrix affects the overall color tonality of the image and can be useful when matching with other cameras from Canon or even different manufacturers.
[Neutral]: Reproduces colors faithful to the colors of the subject. The colors are calibrated to those, which are stipulated by the ACES standard (that is, to the characteristics applying when subjects have been shot using a camcorder with ideal characteristics). The images similar to the EOS C500 3G-SDI output (but not with the BT.709 color gamut) are created.
[Video]: Reproduces the colors of an EOS C300/EOS C500 camera with
no custom picture settings applied. Images similar to when CP is OFF for the XF series or CINEMA EOS series are created.
[Cinema EOS Original]:
Images similar to the EOS C500 3G-SDI output (with the BT.709 color gamut) or with the Cinema Locked setting of the EOS C300/C500 are created.
[Production Camera]: Reproduces colors more suitable for motion picture production. The colors are calibrated to the images, which are similarly displayed when the Arriflex ALEXA is set to Log C color processing.
[EOS Standard]: Approximates the look of an EOS digital SLR when the picture
style is set to [Standard]. [Off]: Colors are not adjusted. Matrix Off: The colors are calibrated to
the Matrix OFF setting of Ikegami’s cameras and the F55.

Best Practices Guide
43
© 2015 Canon U.S.A., Inc. All Rights Reserved. Reproduction in whole or part without permission is prohibited.
Apply a LUT to Screens/Video Outputs:
While recording to [Canon Log 2], [Canon Log], or [WIDE DR] gammas, you can apply LUTs to the video output from the REC OUT terminal, MON. terminal or HDMI terminal and to the image displayed on the LCD viewfinder. To check the image with the LUT applied on an external monitor, you will need one that is compatible with the selected color space.
Available LUTs by gamma curve and color space [Gamma]
[Color Space] Available LUTs
[BT.709] [BT.2020] [DCI] [ACESproxy10]
[Canon Log2]
[Cinema Gamut]
✔
✔
✔
✔
[BT.2020 Gamut]
✔ ✔
__ __
[DCI-P3 Gamut]
✔ __
✔ __
[BT.709 Gamut]
✔ __ __ __
[Canon Log]
[BT.709 Gamut]
✔ __ __ __
[Wide DR]
[BT.2020 Gamut]
✔ __ __ __
*ACESproxy10 is only available when [CP Custom Picture] > [Preset] is set to [Canon Log 2: C.Gamut]
To apply a LUT to the image: 1. Open [Assistance Functions] > [LUT] > [Activate] 2. Select [On] and press SET.
17

Best Practices Guide
44
© 2015 Canon U.S.A., Inc. All Rights Reserved. Reproduction in whole or part without permission is prohibited.
3. Select [MON. & HDMI (2K)], [REC OUT (2K)] or [LCD & VF] and then press SET.
• Repeat as necessary to select the LUT applied to other output terminals/displays. • For the LCD screen and viewfinder, only the [BT.709] LUT is available. • If a LUT is not needed, select [Off]. • If you change the [CP Custom Picture] > [Preset] or [CP Custom Picture] > [Main
Settings] > [Gamma] or [Color Space] settings, the LUT will be deactivated and all the terminals’ output settings will be rest to [Off].
LUT Options and Descriptions
Applied LUT
Output Settings with LUT applied
Description
Gamma curve Color space
[BT.709]
Wide DR
BT.709
LUT for viewing on the camera’s LCD screen and viewfinder or external monitors compatible with BT.709 specifications.
[BT.2020]
Wide DR
BT.2020
LUT for viewing on external monitors compatible with ITU-R BT.2020 standards, which define parameters for ultra-high definition television (4K/8K).
[DCI]
DCI
DCI-P3
LUT for viewing on external monitors that support color spaces and gamma curves that follow the guidelines established by DCI (Digital Cinema Initiatives).
[ACESproxy10]
ACESproxy10
ACES
LUT for viewing on external monitors compatible with the ACESproxy10 standard, established by ACES (Academy Color Encoding System).
[Off]
__ __ No LUT applied.
To Download LUTs for Post-Production Image Processing:
Visit the C300 Mark II support page on the Canon, USA website:
Download 300 Mark II LUTs
https://www.usa.canon.com/internet/portal/us/home/support/details/cameras/cinema-eos/eos-c300-mark-ii?tab=drivers

Best Practices Guide
45
© 2015 Canon U.S.A., Inc. All Rights Reserved. Reproduction in whole or part without permission is prohibited.
Configure Onscreen Displays:
Customizing Onscreen Displays: Use the custom display function to turn off individual onscreen displays if they are not required, or simply to remove items to suit your shooting style.
To Customize the Onscreen Displays During Recording: • [Picture/Terminals Setup] > [Custom Display 1] or [Custom Display 2] • Select the desired onscreen display • Change the setting option to what you like and then press SET.
18
This is a representation of the Monitor Unit display screen fully loaded. See the charts below for explanations of the individual components by screen position (left, right, top, bottom).

Best Practices Guide
46
© 2015 Canon U.S.A., Inc. All Rights Reserved. Reproduction in whole or part without permission is prohibited.
Configure Onscreen Displays (cont’d)
To Customize the Arrangement of the OLED Displays on the Monitor Unit: • Repeatedly press the DISP. button on the monitor unit, or assign a
button set to [Display] to switch the onscreen display options in the following sequence:
1. Show all onscreen displays:
This layout is almost exactly like the display on screen display appearance of previous Canon Cinema EOS cameras like the C100, C300, and the C500.
2. Surrounding icons: AKA “perimeter displays.” The image display size is somewhat reduced and smaller icons are displayed around the periphery of the image.
3. Show onscreen markers: Aspect ratios, safety, center markers, grids, etc. Only when [Assistance Functions] > [Markers] > [Activate] is set to [On]. The various frames used for the focus-related functions are displayed as well.
4. Hide all onscreen displays:
Except for the red dot recording function.

Best Practices Guide
47
© 2015 Canon U.S.A., Inc. All Rights Reserved. Reproduction in whole or part without permission is prohibited.
Configure Onscreen Displays (cont’d)
Onscreen Display Explanations: The menu item that controls each display is given in the tables that follow on the next few pages. The number “1:” Indicates a menu item under [Custom Display 1] and “2:” indicates a menu item under [Custom Display 2]. Refer to the manual (where indicated) for more information.
Onscreen Displays - Left Side of LCD Screen:

Best Practices Guide
48
© 2015 Canon U.S.A., Inc. All Rights Reserved. Reproduction in whole or part without permission is prohibited.
Onscreen Displays - Top of LCD Screen:

Best Practices Guide
49
© 2015 Canon U.S.A., Inc. All Rights Reserved. Reproduction in whole or part without permission is prohibited.
Onscreen Displays - Right Side of LCD Screen:

Best Practices Guide
50
© 2015 Canon U.S.A., Inc. All Rights Reserved. Reproduction in whole or part without permission is prohibited.
Onscreen Displays – Bottom-Center of LCD Screen:

Best Practices Guide
51
© 2015 Canon U.S.A., Inc. All Rights Reserved. Reproduction in whole or part without permission is prohibited.
Superimpose Onscreen Displays on Video Outputs
To Output Onscreen Displays to External Monitors: • Open the [OSD Output (2K)] submenu.
o [Picture/Terminals Setup] > [MON. Terminal] > [ mode) or [REC OUT/MON. Terminal] ( mode) > [OSD Output (2K)]
o Select [ON] and then press SET.
NOTE: In CAMERA mode, when [Recording/Media Setup] > [REC OUT 4K RAW mode] is set to [4K RAW] and [Picture/Terminals Setup] > [MON. Terminal] > [Output] is set to [4K RAW Priority], onscreen displays will not be output.
Configure the Modular Units:
19
20

Best Practices Guide
52
© 2015 Canon U.S.A., Inc. All Rights Reserved. Reproduction in whole or part without permission is prohibited.
Handle Unit and Mounting Bracket:

Best Practices Guide
53
© 2015 Canon U.S.A., Inc. All Rights Reserved. Reproduction in whole or part without permission is prohibited.
Configure the Viewfinder:
Install the rubber Eye Cup:
Adjust the Diopter:
Check the Eye Sensor: The camera’s viewfinder features an OLED screen that turns on automatically when you look through it, and turns off shortly after you stop using it.
You can turn on the viewfinder for constant operation by setting: [Picture/Terminals Setup] > [Viewfinder Setup] > [Eye Sensor] > [Off]
WARNING! Never point the viewfinder at the sun or a strong light source as this may damage internal components. When you are not using it, make sure to attach the viewfinder cap to protect it.
21

Best Practices Guide
54
© 2015 Canon U.S.A., Inc. All Rights Reserved. Reproduction in whole or part without permission is prohibited.
Configure the Viewfinder/LCD Screen:
Adjusting the Viewfinder/LCD Screen: You can adjust brightness, contrast, color, sharpness, and luminance of the viewfinder and LCD screen independently of each other: [Picture/Terminals Setup] > [LCD Setup] or [Viewfinder Setup]
• Select the desired adjustment.
• Also, you can choose to have either or both display a black and white image.
22
23

Best Practices Guide
55
© 2015 Canon U.S.A., Inc. All Rights Reserved. Reproduction in whole or part without permission is prohibited.
The Grip Unit: The Grip Unit comes attached to the camera body, but you can replace it with a thumb rest for a minimal configuration.
The Grip Unit can be attached in any of 24 positions.
Be sure to firmly seat the cable when attaching the Grip Unit as it contains an internal data connection.
Seat the plug until the white line around the terminal is no longer visible.
Failure to seat it completely will prevent the camera from operating properly.
Configure the Grip Unit: 23

Best Practices Guide
56
© 2015 Canon U.S.A., Inc. All Rights Reserved. Reproduction in whole or part without permission is prohibited.
Configure the Outputs:
Recording Outputs
To use the REC OUT terminal in CAMERA mode: 1. Recording/Media Setup] > [REC OUT 4K RAW Mode] > 2. Select either [4K RAW] or [2K]
NOTE: To use the REC OUT terminal for 4K RAW output, you must set it in advance to [REC OUT 4K RAW Mode]
24 NOTES: The video signal output from the REC OUT and MON. terminals depends on the clips video configuration and on other menu settings.
• The data signal output from the REC OUT terminal and MON. terminal includes the video signal, 4-channel audio*, time code, metadata and file name information.
*During 4K RAW recording, 2-channel 16-bit audio will be output instead.
You can enable output from the REC OUT and MON. terminals independently. If you are not using the outputs, turning them off will conserve battery power.

Best Practices Guide
57
© 2015 Canon U.S.A., Inc. All Rights Reserved. Reproduction in whole or part without permission is prohibited.
To use the MON. OUT terminal in CAMERA mode: 1. [Picture/Terminals Setup] > [Select Monitoring Devices] 2. Select [MON.+HDMI+LCD(VF)] Or, [MON.+HDMI+VF] and then press SET. 3. Open the MON. terminal’s [OUTPUT] submenu
• [Picture/Terminals Setup] > [MON. Terminal] > [Output] 4. Select the desired output and press SET
NOTE: To use the MON. terminal for 4K RAW output, you must set it in advance to 4K RAW output using the previous procedure.
Playback Options
Playback and Viewing in MEDIA mode:
To use either terminal in MEDIA mode (2K output only): 1. Open the REC OUT MON. terminal’s [Output] submenu. • [Picture/Terminals Setup] > [REC
OUT/MON. Terminal] > [Output] 2. Select the desired option and press SET.

Best Practices Guide
58
© 2015 Canon U.S.A., Inc. All Rights Reserved. Reproduction in whole or part without permission is prohibited.
Terminal Options
REC OUT terminal: • [4K RAW]: Outputs 4K RAW video.
This setting is only available when [CP Custom Picture] > [Main Settings] > [Gamma] has been set to [Canon Log 2] or [CP Custom Picture] > [Preset] has been set to one of the [Canon Log 2] options.
• [2K]: Outputs 2K video.
MON. terminal: • [4K RAW Priority]:
When the REC OUT terminal’s output is set to 4K RAW output, outputs 4K RAW video.
• [2048x1080/1920x1080]:
Outputs video with a resolution of 2048x1080 or 1920x1080 regardless of the REC OUT terminal’s output.
• [1920x1080]:
Outputs 1920x1080 (Full HD) video regardless of the REC OUT terminal’s output. When the horizontal resolution of the recording video configuration is 4096 or 2048, the sides of the image will be displayed letterboxed.
Connectivity and Camera Control: The EOS C300 Mark II Digital Cinema Camera comes equipped with two 3G-SDI outputs, a genlock input, a time code input/output, and an HDMI output. (The camera's various "assist-displays" - waveform monitor, edge monitor, peaking, zebra and magnify - can be output through the SDI and HDMI outputs.)

Best Practices Guide
59
© 2015 Canon U.S.A., Inc. All Rights Reserved. Reproduction in whole or part without permission is prohibited.
RC-V100 Remote Support LANC Compatible The EOS C300 Mark II Digital Cinema Camera supports the Canon RC-V100 multi-functional remote controller for enabling image quality adjustments and camera operations to be set from a distance. The EOS C300 Mark II Digital Cinema Camera is also LANC compatible and supports a variety of LANC accessories from third-party manufacturers.
Recording Video Signal Configuration and Video Output Configuration by Terminal Refer to the table below for the video output configuration from each terminal, depending on the recording video configuration used.
[REC OUT 4K RAW Mode]
Setting*1
Recording video configuration Video output configuration
Frame Rate*2
Resolution
REC OUT Terminal
MON Terminal*4 HDMI OUT Terminal*4,5
**
Output Setting*5 [4K RAW Priority]
[2048x1080/ 1920x1080]
[1920x1080]
4K RAW
29.97P 25.00P 24.00P 23.98P
4096x2160 2048x1080
4096x2160 RAW 10 bit
4096x2160 RAW 10 bit
2048x1080 YCbCr 422
10 bit
1920x1080 YCbCr 422
10 bit
1920x1080
720x480 (59.94P Only)
720x576
(50.00P Only)
3840x2160 1920x1080
3840x2160 10 bit
3840x2160 10 bit
1920x1080 YCbCr 422
10 bit
2K
29.97P 25.00P 24.00P 23.98P
2048x1080 2048x1080/RGB444 12 bit or 10 bit
YCbCr 422 10 bit
2048x1080 YCbCr 422
10 bit 1920x1080 1920x1080/RGB444
12 bit or 10 bit YCbCr 422 10 bit
1920x1080 YCbCr 422
10 bit 59.94P 50.00P
2048x1080 2048x1080/RGB444 12 bit or 10 bit
YCbCr 422 10 bit
2048x1080 YCbCr 422
10 bit 59.94P 59.94i 50.00P 50.00i
1920x1080 1920x1080/RGB444 12 bit or 10 bit
YCbCr 422 10 bit
1920x1080 YCbCr 422
10 bit
*1 [Recording Media Setup] > [REC OUT 4K RAW Mode] *2 The frame rate of the video output will be the same as used for recording (except for Slow an Fast motion recording). *3 The color sampling will be determined by the option selected in the [Recording/Media Setup] > [Resolution/Color Sampling]. *4 When the MON. terminal is not set to 4K RAW output, onscreen displays and assistance functions can be output to an external monitor. *5 [Picture/Terminals Setup] > [MON. Terminal] > [Output]. 4K RAW output is available only when the REC OUT terminal’s output is also set to 4K RAW output. *6 When [Picture/Terminals Setup] > [MON. Terminal] > [Output] is set to [OFF], the HDMI OUT terminal’s output will be in HD or SD depending on the capabilities of the external monitor. When the horizontal resolution in the recording configuration is set to 4096 or 2048, the sides will be cropped. The color sampling will be automatically set to YCbCr 4:4:4 8 bit, YCbCr 4:2:2 8 bit, or RGB 4:4:4 8 bit, depending on the capabilities of the external monitor.

Best Practices Guide
60
© 2015 Canon U.S.A., Inc. All Rights Reserved. Reproduction in whole or part without permission is prohibited.
Configure the Dual Pixel CMOS Autofocus
The C300 Mark II offers several ways to assist you in
acquiring sharp and accurate focus – whether manually or in AF mode – incorporating an advanced Dual Pixel CMOS Autofocus system:
Dual Pixel Focus Guide/Peaking/Magnification: In order to focus more reliably, you can use the Dual Pixel Focus Guide – an onscreen graphic guide that illustrates the focusing action and gives you confirmation when the subject is in focus using color and basic animation.
Peaking and Magnification are also available and can be used in conjunction with the Focus Guide, or individually to assist you with acquiring manual focus.
To Activate the Focus Guide:
Press the Focus Guide button on the grip to activate the Focus Guide or, alternatively, you can use [Assistance Functions] > [Focus Guide] setting to turn the focus guide on or off.
25

Best Practices Guide
61
© 2015 Canon U.S.A., Inc. All Rights Reserved. Reproduction in whole or part without permission is prohibited.
To Activate One-Shot AF: With the lens’ focus switch set to AF, you will be able to focus manually, but still have the option to press the ONE-SHOT AF button to let the camera acquire focus on the subject you place inside the AF frame. The camera is set to [One Shot] by default. If you need to reset it to this position perform these steps: [Camera Setup] > [Focus] > [AF Mode] > [One Shot]
To Activate AF Boosted MF: AF Boosted MF allows you to focus manually most of the way and let the camera finish focusing automatically. Using this setting, the camera does not perform random and unreliable focus adjustments, resulting in a smoother focusing operation than Continuous AF. 1. Set the focus mode on the lens to AF.
(AF will appear on the left side of the screen). 2. Open the [AF Mode] submenu:
[Camera Setup] > [Focus] > [AF Mode] 3. Select [AF Boosted MF] and press SET.
• When the focus is in the manual adjustment range, a yellow focus frame will
appear on the screen. • If necessary, change the size and position of the AF frame. • Focus manually to bring the subject closer to focus. When the focus enters the
automatic adjustment range, the focus frame will turn white and the camera will finish focusing automatically. While the focus remains in the adjustment range, the box will stay white. When the subject begins to drift out of the focus adjustment range, the frame will turn yellow indicating that it is holding the focus at the last position, and urging you to start the focusing process again by turning the focusing ring on the lens.

Best Practices Guide
62
© 2015 Canon U.S.A., Inc. All Rights Reserved. Reproduction in whole or part without permission is prohibited.
Continuous AF: The camera continuously focuses on the subject inside the AF frame. You can use the Focus Lock function to change the composition of the image while keeping focus on the selected spot. This works over approximately 80% of the image area. 1. Set the focus mode on the lens to AF 2. Open the [AF Mode] submenu 3. Select [Continuous] and then press SET
• A white AF frame will appear on the screen. If necessary, change the size
and position of the AF frame. • When you are using AF, a white detection frame will appear around the
face of the person who has been determined to be the main subject.
NOTES: About the autofocus functions:
• Autofocus may not work well when [Custom Picture] > [Main Settings] > [Gamma] is set to [Canon Log 2], [Canon Log], or [Wide DR]
• The point where the camera focuses may change slightly depending on shooting conditions, such as subject brightness, and zoom position.
• Autofocus may take longer in the following cases: o When the frame rate is set to 29.97P, 25.00P, 24.00P or 23.98P, or the Slow & Fast
Motion recording is set to 30, 25, or 24 (fps). o With some EF lenses, the camera may take longer to focus automatically or may not
be able to focus correctly.
• When using autofocus with compatible lenses, you can change various aspects of the autofocus function with the following settings:
o [Camera Setup] > [Focus] > [AF Speed] to set the speed at which the focus is adjusted to one of ten levels.
o [Camera Setup] > [Focus] > [Apply AF Speed Limit] to select whether the AF speed is applied at all times or only when recording.
o [Camera Setup] > [Focus] > [AF Response] to set the responsiveness of the autofocus function to one of seven levels.
o While using Continuous AF, you can hold the ONE-SHOT AF button pressed down to temporarily adjust the focus using the maximum AF speed and AF response. This would be helpful to quickly re-establish focus if you lose focus on a subject.

Best Practices Guide
63
© 2015 Canon U.S.A., Inc. All Rights Reserved. Reproduction in whole or part without permission is prohibited.
Activating AF Lock: While using Continuous AF or AF-Boosted MF, you can lock focus and then move the camera to change the composition. • To use AF Lock you must set an assignable button in advance to [AF Lock]. • While the autofocus is active, press the assignable AF Lock button. • The AF frame will turn gray. While you are using Face AF, the face detection
frame will turn gray. • Press the button again to cancel AF Lock and return to continuous
autofocus.
Face Detection and Tracking: The camera locates and tracks a person’s face, focuses on it and keeps focus if that person moves. When there are multiple people in the picture, one person will be determined to be the main subject, but you can select another person to be the main subject, and the camera will track the other face. You can use face detection with one of the autofocus functions to let the camera focus on the main subject automatically (Face AF). You can also combine face detection with the Dual Pixel Focus Guide function (Face Priority) to help you focus on the main subject manually. 1. Open [Face Detection & Tracking] submenu:
[Camera Setup] > [Focus] > [Face Detection & Tracking]
2. Select [On] and then press SET.
3. Open the [Face AF] submenu: [Camera Setup] > [Focus] > [Face AF]

Best Practices Guide
64
© 2015 Canon U.S.A., Inc. All Rights Reserved. Reproduction in whole or part without permission is prohibited.
4. Select the desired option and then press SET
5. Point the camera at the subject • A face detection frame will appear around all detected faces. The person
identified as the main subject will have a face detection frame with small arrows (< >) on the sides. If necessary, push the joystick left/right or turn the SELECT dial to change the main subject when there is more than one person on camera.
• Will appear in white when a face is detected and gray when one is not detected.
• During Continuous AF, the camera will keep focusing on the main subject’s face. During ONE-SHOT AF, the camera will focus on the main subject’s face while you hold the ONE-SHOT AF button pressed down.
• If you use face detection together with the tracking function, the camera will be able to track the main subject more reliably.
Face Detection Options: [Face Priority] When there is no face detected, the camera focuses automatically according to the AF mode currently selected. [Face Only] When there is no face detected, the camera locks focus.
Face AF operation by AF mode:
[Camera Setup] > [Focus] > [AF Mode] setting and focus operation
[Camera Setup] > [Focus] > [Face AF] setting [Face Priority] [Face Only]
Face Detected
No Face Detected
Face Detected
No Face Detected
[One Shot] while the ONE-SHOT AF button is not pressed Manual Focus [One Shot] while the ONE-SHOT AF button is held pressed down Focus on the
detected face Focus on
the subject inside the AF frame
Focus on the detected face
Manual Focus [AF-Boosted MF] within the automatic adjustment range
[AF-Boosted MF] within the manual adjustment range (yellow AF frame)
Manual Focus
[Continuous]
Focus on the detected face
Focus on the subject inside the AF frame
Focus on the detected face
Manual Focus

Best Practices Guide
65
© 2015 Canon U.S.A., Inc. All Rights Reserved. Reproduction in whole or part without permission is prohibited.
Face AF operation by AF mode (cont’d):
AF (Autofocus) Frames
Depending on the focus function used, you may see some of the following AF frames (for further explanation refer to the instruction manual on the page number indicated):
Track a Specific Subject:
The camera can track specific subjects that are not faces and also combine the tracking function with one of the autofocus functions to let the camera focus on the desired subject automatically.
1. To use this function, you will need to set an assignable button to [Tracking] in advance.
2. Activate the face detection and tracking function: To track a face, select [Face Only]; to track other subjects, select [Face Priority].
3. Press the button assigned to [Tracking] 4. If [Face AF] is set to [Face Only], a face detection frame will appear
around all faces detected. If [Face Priority] is set, the subject selection mark will appear on the screen.
5. Press the assignable button again. • In [Face Only] the camera will automatically start tracking the
main subject.
NOTES: About Face AF: • In certain cases faces may not be detected correctly. • Face detection cannot be used in the following cases:
o When the shutter speed used is slower than 1/30 (59.94Hz) or 1/24 (24Hz) recordings.
o When using Slow & Fast motion recording. o The camera may mistakenly detect non-human faces. In this case turn face
detection off.

Best Practices Guide
66
© 2015 Canon U.S.A., Inc. All Rights Reserved. Reproduction in whole or part without permission is prohibited.
• In [Face Priority] push the joystick in and direct it to the center of the desired subject and then press SET. If the tracking failed, the
will turn red momentarily. If that happens, select the subject again.
6. The face detection frame or mark changes to a tracking frame and the camera will start tracking the subject. • During Continuous AF, the camera will continue tracking the
selected subject. • During One-Shot AF, the camera will focus on the selected
subject while you hold the ONE-SOT AF button pressed down. • Press SET again or press the assignable button to return to the
subject selection screen and select a different subject, or press the CANCEL button to end the tracking function and return the camera to the focus mode that was used previously.
Best Practices Guide
67
© 2015 Canon U.S.A., Inc. All Rights Reserved. Reproduction in whole or part without permission is prohibited.
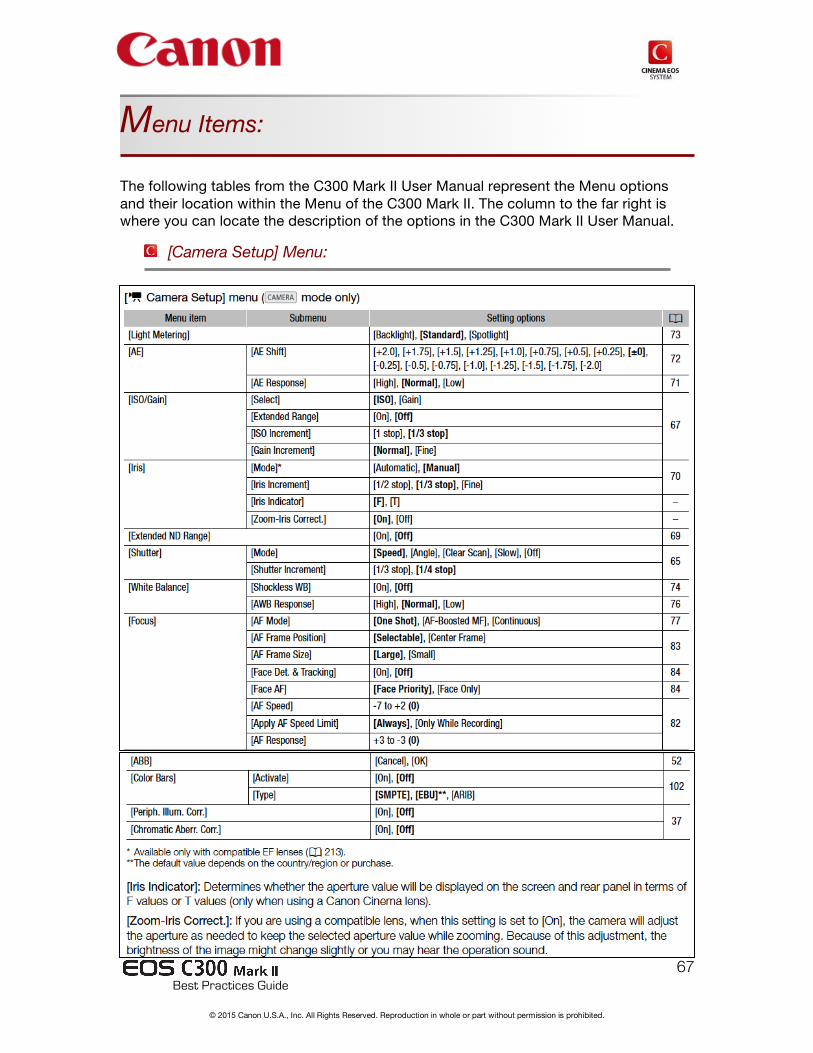
Menu Items:
The following tables from the C300 Mark II User Manual represent the Menu options and their location within the Menu of the C300 Mark II. The column to the far right is where you can locate the description of the options in the C300 Mark II User Manual.
[Camera Setup] Menu:

Best Practices Guide
68
© 2015 Canon U.S.A., Inc. All Rights Reserved. Reproduction in whole or part without permission is prohibited.
[Custom Picture] Menu:
[Audio Setup] Menu:

Best Practices Guide
69
© 2015 Canon U.S.A., Inc. All Rights Reserved. Reproduction in whole or part without permission is prohibited.
[Recording/Media Setup] Menu:

Best Practices Guide
70
© 2015 Canon U.S.A., Inc. All Rights Reserved. Reproduction in whole or part without permission is prohibited.
[Recording/Media Setup] Menu (cont’d):

Best Practices Guide
71
© 2015 Canon U.S.A., Inc. All Rights Reserved. Reproduction in whole or part without permission is prohibited.
[Picture/Terminals Setup] Menu:

Best Practices Guide
72
© 2015 Canon U.S.A., Inc. All Rights Reserved. Reproduction in whole or part without permission is prohibited.
[Picture/Terminals Setup] Menu (cont’d):

Best Practices Guide
73
© 2015 Canon U.S.A., Inc. All Rights Reserved. Reproduction in whole or part without permission is prohibited.
[Assistance Functions] Menu:

Best Practices Guide
74
© 2015 Canon U.S.A., Inc. All Rights Reserved. Reproduction in whole or part without permission is prohibited.
[Assistance Functions] Menu (cont’d):
[System Setup] Menu:

Best Practices Guide
75
© 2015 Canon U.S.A., Inc. All Rights Reserved. Reproduction in whole or part without permission is prohibited.
[System Setup] Menu (cont’d):

Best Practices Guide
76
© 2015 Canon U.S.A., Inc. All Rights Reserved. Reproduction in whole or part without permission is prohibited.
[System Setup] Menu (cont’d):
[My Menu] Menu:

Best Practices Guide
77
© 2015 Canon U.S.A., Inc. All Rights Reserved. Reproduction in whole or part without permission is prohibited.
Notes: