bulletproof vest partnership (bvp) receipts and payment requests
TRANSCRIPT

Submitting Payment Requests in BVPUser GuideThis guide provides information and procedures to help
you create receipts in the BVP system, and submit and monitor payment requests.
Guide provided by BJA, Bureau of Justice Assistance, U.S. Department of Justice, Office of Justice Programs
February 2016

i
Helpful Resources
Using the Guide
The Submitting Payment Requests in BVP user guide is designed as a reference to help you utilize the Bulletproof Vest Partnership system. All of the pages follow the same basic format. On the left page, figures such as screenshots and diagrams will be displayed. Often, figures are annotated to highlight important concepts. On the right, text provides information and instructions related to each topic. References in the text correspond with the annotations on associated figures.
Key Contacts
U.S. Department of Justice
Bureau of Justice Assistance Joseph Husted, Policy Advisor
(202) 353-4411
User Support
BVP Helpdesk [email protected]
(877) 758-3787
Resource Links
BVP Home Page: http://www.ojp.usdoj.gov/bvpbasi/
BVP FAQs: http://www.ojp.usdoj.gov/bvpbasi/bvpfaqs.htm
BVP Program Resources: http://ojp.usdoj.gov/bvpbasi/bvpprogramresources.htm
BVP User and Agency Registration User Guide: http://www.ojp.usdoj.gov/bvpbasi/docs/BVPUserAgencyRegistrationGuide.pdf

ii
Table of Contents Getting Started with Receipts and Payments .............................................................................................................................. 1
Logging in to the BVP System .................................................................................................................................................. 4
Managing Receipts for Vest Purchases ........................................................................................................................................ 6
Creating Payment Requests ....................................................................................................................................................... 18
Viewing Pending Actions – LEA Users.................................................................................................................................... 20
Creating a Payment Request – LEA Users.............................................................................................................................. 22
Requesting a Waiver – LEA Users .......................................................................................................................................... 24
Viewing Pending Actions and Payment Status – All Jurisdiction Users ................................................................................ 26
Creating a Payment Request – All Jurisdiction Users ........................................................................................................... 28
Requesting a Waiver – All Jurisdiction Users ........................................................................................................................ 30
Submitting Payment Requests ................................................................................................................................................... 32
Submitting Payment Requests – LEA Users ........................................................................................................................... 34
Certifying Payment Requests – LEA Users ............................................................................................................................. 36
Certifying Waiver Requests – LEA Users ................................................................................................................................ 38
Justifying Waiver Requests – LEA Users ................................................................................................................................ 40
Viewing Payment History – LEA Users ................................................................................................................................... 42
Submitting Payment Requests – All Jurisdiction Users ........................................................................................................ 44
Denying an LEA Payment Request – Jurisdictions with One or More Associated LEAs ......................................................... 46
Reviewing Banking and Contact Information – All Jurisdictions Users ................................................................................. 48
Banking Information – All Jurisdictions Users ...................................................................................................................... 50
Certifying Payment Requests – All Jurisdictions Users ......................................................................................................... 52
Certifying Waiver Requests – All Jurisdictions Users ............................................................................................................ 54
Justifying Waiver Requests – All Jurisdictions Users ............................................................................................................ 55
Viewing Payment History – All Jurisdictions Users ............................................................................................................... 58
Index of Instructions Organized by BVP User
All Users
How to Log in to BVP ……………………………………………………………………………………………………………………………………. 4
How to Create a New Receipt ………………………………………………………………………………………………………………………. 6
How to Create a New Receipt by Importing a CSV File …………………………………………………………………………………. 8
How to Add a Receipt Line Item …………………………………………………………………………………………………………………... 10
How to Edit a Receipt Line Item …………………………………………………………………………………………………………………... 12

iii
How to Delete a Receipt Line Item ………………………………………………………………………………………………………………… 12
How to Add/Edit/Delete a Vest Assignment ………………………………………………………………………………………………… 14
How to Delete a Receipt ………………………………………………………………………………………………………………………………. 16
LEA Users
How to View Pending Actions ………………………………………………………………………………………………………………………. 20
How to Create a Payment Request ………………………………………………………………………………………………………………. 22
How to Request a Waiver …………………………………………………………………………………………………………………………….. 24
How to Submit a Payment Request ………………………………………………………………………………………………………………. 34
How to Submit a Waiver Request …………………………………………………………………………………………………………………. 34
How to Certify Payment Requests ………………………………………………………………………………………………………………… 36
How to Certify/Justify Waiver Requests ………………………………………………………………………………………………….. 38, 40
How to View Payment History ……………………………………………………………………………………………………………………… 42
All Jurisdiction Users
How to View Pending Actions and Payment Status ………………………………………………………………………………………. 26
How to Create a Payment Request ……………………………………………………………………………………………………………….. 28
How to Request a Waiver ……………………………………………………………………………………………………………………………… 30
How to Submit a Payment Request ………………………………………………………………………………………………………………. 44
How to Submit a Waiver Request …………………………………………………………………………………………………………………. 44
How to Review Banking and Contact Information ………………………………………………………………………………………… 48
How to Update Bank Information …………………………………………………………………………………………………………………. 50
How to Print a Bank Form ……………………………………………………………………………………………………………………………… 50
How to Certify Payment Requests ………………………………………………………………………………………………………………… 52
How to Certify/Justify Waiver Requests ………………………………………………………………………………………………….. 54, 56
How to View Payment History ………………………………………………………………………………………………………………………. 58
Jurisdictions with One or More Associated LEAs
How to Deny an LEA Payment Request …………………………………………………………………………………………………………. 46

1
Getting Started with Receipts and Payments
Getting Started with Receipts and Payments Welcome to the Bulletproof Vest Partnership (BVP) Receipts and Payments user guide. This guide will provide you with detailed instructions on reporting receipts for vest purchases and requesting payments for these purchases.
The BVP System The BVP system enables jurisdictions and law enforcement agencies (LEAs) to work with the Bureau of Justice Assistance (BJA) to receive funding reimbursement for the purchase of bullet resistant and stab protective vests. The BVP system is the program application and payment management system utilized by BJA to allow you, as a representative for your jurisdiction or LEA, to register your agency, apply for funds, report receipts, and request payments. This user guide covers the receipt management and payment request process.
Managing Receipts Following your agency’s purchase of protective vests, you will need to create and manage receipts for these purchases in the BVP system. As part of creating receipts, you will provide exact information on the vests you purchased, including who you purchased them from, the specific serial number for each vest, and which officer within your agency was assigned the vest.
Creating Payment Requests Both LEA and jurisdiction users have the capability to create payment requests in the BVP system. This process involves selecting allowable receipts to include in the payment request; deciding whether to request a waiver; and saving or editing the recommended maximum drawdown amount for each receipt. LEAs submit their payment requests to the jurisdiction for approval.
Submitting Payment Requests The agency’s CEO or authorized designee must certify that all information in the payment request or waiver request is true and correct. Jurisdictions with one or more associated LEAs are also able to deny LEA payment requests.
When requesting reimbursement from BJA, the jurisdiction must ensure their banking information is accurate in the BVP system.
BVP User Accounts There are four different types of BVP users. Understanding which type of account you have is important to completing the receipt management and payment request processes. The User Account table outlines the functions and responsibilities of the four different types of BVP user accounts.

2
Getting Started with Receipts and Payments
Table 1 User Account Functions and Responsibilities
User Account Type
Functions & Responsibilities
Law Enforcement Agency (LEA) • Each LEA is associated with one jurisdiction • Manage receipts for vests purchased • Create payment requests • Submit payment requests to jurisdiction for approval • View payment history
Jurisdiction with no associated LEAs • Not responsible for overseeing any LEA activities • Manage receipts for vests purchased • Create payment requests • Submit payment requests to BJA • View payment history
Jurisdiction with one associated LEA • Manage receipts for vests purchased • Create payment requests • Review (and deny, if necessary) payment requests
submitted by the LEA • Submit payment requests to BJA for both the jurisdiction
and associated LEA • View payment history
Jurisdiction with two or more associated LEAs • Manage receipts for vests purchased • Create payment requests • Review (and deny, if necessary) payment requests
submitted by LEAs • Submit payment requests to BJA for both the jurisdiction
and associated LEAs • View payment history

3
Getting Started with Receipts and Payments
Figure 1 BVP Home Page
Figure 2 OJP System Access Enter Username
Figure 3 OJP System Answer Security Question
Figure 4 OJP System Enter Password

4
Getting Started with Receipts and Payments
Logging in to the BVP System You will log into the BVP system from the BVP home page by selecting the Login link. To log in to the system, you will need your BVP username and password. You may also be prompted to answer one of your security questions, which are displayed randomly; however, this should occur only the first time you log into the system or if you indicate that you are accessing the system from a public computer.
When you log into the BVP system, confirm that your personal image and security phrase are correct. If your security information is different from what you set previously, close your Internet browser and contact the BVP Helpdesk at (877) 758-3787 or send an email to [email protected].
NOTE: You have three attempts to enter your username and password correctly before you are locked out of the BVP system. If you get locked out, contact the BVP Helpdesk for assistance.
Log-In Troubleshooting Tips If you experience trouble logging into the system, you may wish to try these tips before contacting the BVP Helpdesk:
1. Check your keyboard to make sure the CAPS Lock is not on. Your password is case sensitive, so any capitalization discrepancies in your password will prevent you from logging in.
2. Use the Forgot Password link to create a new password if you cannot recall your password.
HOW TO. . . Log in to BVP
1. Go to the BVP homepage: http://www.ojp.gov/bvpbasi/. 2. Select the Login link (p. 3, Fig. 1, A). 3. Enter your username and select the Continue button (p. 3, Fig. 2, B).
Note: Your BVP username and password may be different from your OJP System Access username and password.
4. If prompted, enter the answer to your security question. Next, identify if you are on a personal or public computer and select the Continue button (p. 3, Fig. 3, C).
5. Confirm that your personal image and security phrase are correct. If correct, enter your password and select the Continue button to complete the login process (p. 3, Fig. 4, D).

5
Managing Receipts for Vest Purchases
Figure 5 Create Receipt Process for Jurisdiction and LEA Users
Figure 6 BVP Menu – Payment Section (Note: LEA BVP Menu does not include Bank Information or Print Bank Form.)
Figure 7 Manage Receipts Page
Figure 8 Receipt Header

6
Managing Receipts for Vest Purchases
Managing Receipts for Vest Purchases
Creating a Receipt – All Users After purchasing bullet resistant or stab protective vests, your agency will need to enter receipts for these purchases into the BVP system (Figure 5). To do so, your agency must create a receipt with information that proves your original purchase of the vest(s). To report a receipt, your agency must have (1) funds available in BVP, and (2) funds eligible for the reported receipt based on the receipt order date. After creating a receipt, all users must add at least one receipt line item to the receipt. The receipt line item includes manufacturer, vest model information, and cost per unit. Review Adding a Receipt Line Item for more information.
Validating Receipt Information There are a number of validations your agency must pass in order to successfully report vest purchase receipts and submit payment requests. These validations ensure the information you are entering is accurate, which is critical for BJA to prevent fraud or abuse of the BVP reimbursement program. All data fields marked with a red asterisk (*) in the BVP system are required fields. Be sure to enter information in these fields exactly as it appears on your receipt(s) of purchase.
HOW TO. . . Create a New Receipt
1. Select Payment, then Manage Receipts in the left menu (p. 5, Figure 6, A). 2. Select the Create New Receipt button (p. 5, Figure 7, B). 3. Review the information that appears above the Receipt Header form. This section includes
information about which receipts are eligible for reporting, as well as vest information. 4. Enter the name of the distributor from whom you purchased the vest(s).
Note: Begin typing the name of the distributor, then wait for the system to generate a list of the distributors that match the title you have entered.
5. Select the name of the distributor in the list (p. 5, Figure 8, C). Note: If the distributor you purchased the vest(s) from does not appear in the list, select the Add Vendor link in the Distributor row. Complete the Add Vendor form and select the Add Vendor and Continue button.
6. (Optional) Enter a dollar amount (e.g., 10.00) into the Tax, Shipping & Handling field (D). Note: The Tax, Shipping & Handling cost cannot exceed 15% of the unit price multiplied by the number of vests. This amount does not represent the total receipt value.
7. Select the date on which your jurisdiction ordered the vests by clicking in the Date Ordered field (E), and then selecting the date of the order from the pop-up calendar.
8. Check whether you are importing a CSV file containing your receipt line items. If you are importing this file, go to How to Create a New Receipt by Importing a CSV file.
9. Select the Create Receipt button (F) to create the receipt and display the Receipt Details page to add receipt line items. Go to How to Add a Receipt Line Item and continue with Step 2. Note: Select the Cancel button to return to the previous page without creating the receipt.

7
Managing Receipts for Vest Purchases
Figure 9 BVP Menu – Payment Section
Figure 10 Manage Receipts Page
Figure 11 Receipt Header

8
Managing Receipts for Vest Purchases
Importing a Receipt – All Users BVP system users may create a new receipt by importing a properly formatted comma-separated values (CSV) file. This allows users to maintain their receipt information in an external application, such as Microsoft Excel. However, it is critical to format this file exactly as defined in the Receipt File Import Guidelines.
HOW TO. . . Create a New Receipt by Importing a CSV File
1. Select Manage Receipts under the Payment section in the left menu (p. 7, Fig. 9, A). 2. Select the Create New Receipt button (p. 7, Fig. 10, B). 3. Review the information that appears above the Receipt Header form. This section includes
information about which receipts are eligible for reporting, as well as vest information. 4. Enter the name of the distributor from whom you purchased the vest(s).
Note: Begin typing the name of the distributor, then wait for the system to generate a list of the distributors that match the title you have entered.
5. Select the name of the distributor in the list (p. 7, Fig. 11, C). Note: If the distributor you purchased the vest(s) from does not appear in the list, select the Add Vendor link in the Distributor row. Complete the Add Vendor form and select the Add Vendor and Continue button.
6. (Optional) Enter a dollar amount (e.g., 10.00) in the Tax, Shipping & Handling field (D). Note: The Tax, Shipping & Handling cost cannot exceed 15% of the unit price multiplied by the number of vests. This amount does not represent the total receipt value.
7. Select the date on which your jurisdiction ordered the vests by clicking in the Date Ordered field, and then selecting the date of the order from the pop-up calendar.
8. Select the Importing File? checkbox (F). 9. Select the Receipt File Import Guidelines link (G) and ensure you have followed the formatting
rules exactly. WARNING: If you do not format your file exactly as defined in the guidelines, the system will not import it and will report an error. You must correct the original file and import it again.
10. Select the Browse… button, then locate and select the CSV file you wish to upload. 11. Select whether you added a header to your imported CSV file (I). 12. Select the Create Receipt button (J) to create the receipt and display the Receipt Details page
populated with line items and vest assignments from the CSV file. Note: Select the Cancel button to return to the previous page without creating the receipt.

9
Managing Receipts for Vest Purchases
Figure 12 BVP Menu – Payment Section
Figure 13 Current Receipts
Figure 14 Add Item
Figure 15 Enter Receipt Line Item Information

10
Managing Receipts for Vest Purchases
Adding a Receipt Line Item – All Users After creating a receipt, you must enter all of the receipt line items as they appear on your receipt of purchase. This information includes the manufacturer name, model name, and exact price per unit (the cost of one vest).
NIJ-Approved Vests The BVP program supports only the purchase of body armor that has been tested and found to comply with current National Institute of Justice (NIJ) Ballistic or Stab Standards. As a result, you will only be able to receive reimbursement for purchasing approved vest models from approved manufacturers. A list of acceptable manufacturers and models is available on the following website: http://www.nij.gov/technology/bodyarmor/compliantballisticarmor.htm.
HOW TO. . . Add a Receipt Line Item
1. If needed, navigate to the Manage Receipts page by selecting Payment / Manage Receipts in the left menu (p. 9, Fig. 12, A). Then select the + icon and the View link for the receipt to which you wish to add a line item (p. 9, Fig. 13, B).
2. Select the Add Item link (p. 9, Fig. 14, C). 3. Begin typing the name of the vest manufacturer into the Manufacturer field and then select the
appropriate name from the list generated by the system (p. 9, Fig. 15, D). Note: Manufacturers must be entered using the autocomplete function in order to display the list of approved vest models associated with the manufacturer.
4. Enter the name of the vest model (E). Note: A list of the vest models that are associated with the manufacturer you entered and that were on the NIJ-approved list of vests on the date the vests were ordered will be displayed in a selection box.
5. Select the name of the model from the list. 6. Enter the exact price per unit for the vest model you are adding (F). 7. Select the Save button (G) to save the item and display the Receipt Details page with the receipt
line item listed. Note: Select the Cancel button to return to the previous page without adding the line item.
8. Repeat steps 2-7 to add additional items. When you have finished adding receipt line items, add the vest assignments. See How to Add/Edit a Vest Assignment to continue.

11
Managing Receipts for Vest Purchases
Figure 16 BVP Menu – Payment Section
Figure 17 Current Receipts
Figure 18 Receipt Line Items
Figure 19 Save Receipt Line Item Edits
Figure 20 Delete Receipt Line Item

12
Managing Receipts for Vest Purchases
Editing or Deleting a Receipt Line Item – All Users
HOW TO. . . Edit a Receipt Line Item
1. If needed, navigate to the Manage Receipts page by selecting Payment / Manage Receipts in the left menu (p. 11, Fig. 16, A) and then selecting the + icon and View link for the receipt where you wish to edit a line item (p. 11, Fig. 17, B).
2. Select the Edit link (p. 11, Fig. 18, C). 3. Change the line item information.
Note: For more details on this process, see How to Add a Receipt Line Item, steps 2-6. 4. When you have finished editing the line item, select the Save button (p. 11, Fig. 19, E) to
complete the process. Note: Selecting the Save button will return you to the Receipt Details page. You may also select the Save and Go to Vest Assignment button (F) to save the vest assignment and move to the Vest Assignments page. For more details on editing the vest assignment, see How to Add/Edit a Vest Assignment. Note: Select the Cancel button to return to the previous page without editing the receipt line item.
HOW TO. . . Delete a Receipt Line Item
1. If needed, navigate to the Manage Receipts page by selecting Payment / Manage Receipts in the left menu (p. 11, Fig. 16, A) and then selecting the + icon and View link for the receipt where you wish to delete a line item (p. 11, Fig. 17, B).
2. Select the Delete link (p. 11, Fig. 18, D). 3. Select the Delete button to finalize the deletion (p. 11, Fig. 20, G).
Note: Select the Cancel button to return to the previous page without deleting.

13
Managing Receipts for Vest Purchases
Figure 21 BVP Menu
Figure 22 Current Receipts
Figure 23 Receipt Line Items
Figure 24 Vest Assignment List

14
Managing Receipts for Vest Purchases
Adding/Editing/Deleting a Vest Assignment – All Users All receipts must include all of your agency’s vest assignments in order to receive a reimbursement through BVP. For every vest purchased, you need to enter the specific serial number of the vest and identify which officer within your agency was assigned the vest.
You cannot duplicate serial numbers in the vest assignments from a single manufacturer. You can assign the same officer with more than one vest within a replacement cycle. However, you must provide an explanation for why the officer needs a replacement vest in order to submit the assignment.
HOW TO. . . Add/Edit a Vest Assignment
1. If needed, navigate to the Manage Receipts page by selecting Payment / Manage Receipts in the left menu (p. 13, Fig. 21, A) and then selecting the + icon and View link for the receipt to which you wish to add a vest assignment (p. 13, Fig. 22, B).
2. Select the + icon and then the Edit vest assignment link for the receipt line item where you wish to add/edit an assignment (p. 13, Fig. 23, C).
3. Make any necessary changes to the existing vest assignments. 4. If you need to add a new vest assignment, select the Add button (p. 13, Fig. 24, D). 5. Enter the serial number, officer name, and received date for the new vest assignment. 6. Repeat steps 5 and 6 until all the vest assignments for your agency’s order have been added. 7. Select the Save button (E).
Note: Selecting the Save button will return you to the Receipt Details page. You may also select the Save and Go to Edit Receipt Line Item button to save the vest assignment and then move to the Line Item page. Note: Select the Cancel button to return to the previous page without adding or editing the vest assignment.
HOW TO. . . Delete a Vest Assignment
1. If needed, navigate to the Manage Receipts page by selecting Payment / Manage Receipts in the left menu (p. 13, Fig. 21, A) and then selecting the + icon and View link for the receipt from which you wish to delete an assignment (p. 13, Fig. 22, B).
2. Select the + icon and then the Edit vest assignment link for the receipt line item where you wish to delete an assignment (p. 13, Fig. 23, C).
3. Select the Delete checkbox for the vest assignment you wish to delete (p. 13, Fig. 24, F). Note: By selecting the appropriate checkboxes, you can delete multiple vest assignments at one time.
4. Select the Save button (E). Note: Select the Cancel button to return to the previous page without deleting.

15
Managing Receipts for Vest Purchases
Figure 25 BVP Menu
Figure 26 Current Receipts
Figure 27 Receipt Header for Selected Receipt
Figure 28 Deletion Confirmation

16
Managing Receipts for Vest Purchases
Deleting a Receipt – All Users All BVP users have the ability to delete their own agency’s receipts, if necessary. The receipt deletion process is final; a deleted receipt cannot be retrieved.
HOW TO. . . Delete a Receipt
1. If needed, navigate to the Manage Receipts page by selecting Payment / Manage Receipts in the left menu (p. 15, Fig. 25, A) and then selecting the + icon and View link for the receipt you wish to delete (p. 15, Fig. 26, B).
2. Select the Delete link in the Receipt Header section (p. 15, Fig. 27, C). WARNING: You cannot undo the receipt deletion process once you complete the next step.
3. Select the Delete button to finalize the deletion (p. 15, Fig. 28, D). Note: Select the Cancel button to return to the previous page without deleting the receipt.

17
Creating Payment Requests
Figure 29 Common Functions in the Create Payment Request Process for LEA and Jurisdiction Users
Figure 30 Save/Edit Drawdown Amounts
Figure 31 Request a Waiver

18
Creating Payment Requests
Creating Payment Requests After you have created receipts for vest purchases, you must create a payment request for those receipts in order to receive reimbursement. LEA users no longer send their receipts to the jurisdiction, but instead create payment requests for approval by the jurisdiction. Jurisdictions continue to manage their own receipts and create payment requests for those receipts.
To create a payment request, you will select allowable receipts to include in the request, edit drawdown amounts for available funds, and save the request (Figures 29 and 30). You will also indicate whether or not you want to request a waiver. Requesting a waiver means asking for 100% reimbursement of the cost of your vest purchases.
If you do not request a waiver, 50% of the total cost of the receipt is calculated as the recommended maximum drawdown amount. You can edit the drawdown amount for each receipt, but cannot exceed the maximum drawdown amount available for the fiscal year.
When requesting waivers, LEAs and jurisdictions must save and confirm their requests for 100% reimbursement for vest purchases (Figure 31). When you submit the payment request, you will be required to provide justification for the waiver.
Validating Receipt Information There are a number of validations that both LEAs and jurisdictions must pass in order to request a payment from BJA. These validations ensure the information entered is accurate, which is critical for BJA to prevent fraud or abuse of the BVP reimbursement program. All data fields marked with a red asterisk (*) in the BVP system are required fields.
Important Reminders For every vest purchased, you must enter the specific serial number of the vest and identify which officer within your agency was assigned the vest. You cannot duplicate serial numbers in the vest assignments from a single manufacturer.
You are able to assign the same officer with more than one vest within a replacement cycle. However, in order to submit the assignment, you must have provided an explanation about why the officer is assigned multiple vests within the replacement cycle.
BVP funds may be used for tactical-level armor. However, only one vest may be purchased per officer in a replacement cycle. If an agency purchases a tactical-level vest for an officer, it must be his/her primary vest. Jurisdictions cannot then use BVP funds to purchase a regular-duty vest for the same officer during the same replacement cycle.
Workflows for Creating Payment Requests For more information about the different workflows for creating payment requests, please refer to the following:
Law Enforcement Agency (LEA) Turn to pages 19-24
All Jurisdictions Turn to pages 25

19
Creating Payment Requests
Figure 32 LEA BVP Menu – Status Section
Figure 33 LEA Status Page

20
Creating Payment Requests
Viewing Pending Actions – LEA Users The Status page displays pending actions that must be completed prior to program deadlines. The red exclamation mark “!” in the ATTN column indicates when a near-term action is required (e.g., the award expires within the current year).
The Current Receipts Summary provides information about your agency’s in-progress receipts. You must finish entering all line item information and vest assignments for a receipt before creating a payment request.
The list of Current Payment Requests shows the total amount of requested funds and the current status of the payment requests your agency has created. The statuses for payment requests are as follows:
• Created – the payment request has been created, but no action has been taken on it. • Sent for Chief Executive Approval – the payment request has been submitted to the jurisdiction CEO for
approval. • Not Approved by Chief Executive – the payment request has been denied by the jurisdiction CEO. The
receipts associated with the payment request have been returned to the LEA for editing or deletion. • Sent for BVP Approval – the payment request has been approved by the jurisdiction and submitted for
BJA approval. • Rejected by BVP – the payment request has been denied by BJA. • Approved by BVP – the payment request has been approved by BJA. • Processing Payment – reimbursement for your vest purchases is in process.
You can also view a list of your agency’s payment requests, organized by status, on the Payment History page. See Viewing Payment History for more information.
HOW TO. . . View Pending Actions
1. Select Status, then Current Status in the left menu (p. 19, Fig. 32, A). 2. If there are receipts that require your attention (p. 19, Fig. 33, B), select the View Details link (C)
to access the Manage Receipts page. As needed, you can add, edit, or delete receipt line items and edit vest assignments. Note: For more details on these processes, see Adding a Receipt Line Item, Editing a Receipt Line Item, and Adding/Editing/Deleting a Vest Assignment.
3. Review the Current Status of your agency’s payment requests (D). 4. Select the + icon and then the View Details link (E) to view the drawdown details for a specific
payment request. Note: To return to the Status page, you must select the Back button on the Receipt Drawdown page. Do not use your browser’s back arrow to navigate in the system.

21
Creating Payment Requests
Figure 34 LEA BVP Menu – Payment Section
Figure 35 Create a Payment Request
Figure 36 Select Receipt
Figure 37 Save Receipt Drawdown Amounts
Figure 38 Confirm Receipt Drawdown Amounts

22
Creating Payment Requests
Creating a Payment Request – LEA Users The Payment Requests page displays a list of payment requests that your agency has created, but not yet submitted for payment. Before submission to the jurisdiction, you are able to edit the details of these payment requests. You are also able to delete a payment request.
When you create a payment request, you first view the maximum BVP payments for your agency’s allowable receipts. Based on whether or not you request a waiver, the system calculates a recommended maximum drawdown amount. If you do not request a waiver, 50% of the total cost of the receipt is calculated as the maximum drawdown amount.
You can edit or change the maximum drawdown for each receipt. However, the total cost for the payment request cannot exceed the maximum drawdown amount available for the fiscal year. Before proceeding, you must confirm that the maximum drawdown amounts displayed match what you previously accepted or edited. After confirming the request, you can submit it. See Submitting Payment Requests for information on submitting your payment requests.
HOW TO. . . Create a Payment Request
1. Select Payment / Payment Request in the left menu (p. 21, Fig. 34, A). 2. Select the Create button to create a new payment request (p. 21, Fig. 35, B). 3. On the Select Receipt page, review the maximum BVP payments for your agency’s allowable
receipts, then select the receipt(s) you wish to include in the payment request (p. 21, Fig. 36, C). 4. If needed, select the Receipt ID link (D) to display the Receipts Details page in a separate tab. Be
sure to close this tab when you are finished viewing the receipt details. Note: You are not able to edit your receipts when you are creating a payment request. To edit receipts, you must exit the Payment Request function and navigate to Manage Receipts.
5. If you are not requesting a waiver, select the Continue button (E). For more details on requesting a waiver, see How to Request a Waiver. Note: Based on whether or not you are requesting a waiver, the system calculates the correct maximum drawdown amount. If you request a waiver, the system will display 100% reimbursement. If no waiver is requested, the system will display 50% of the total cost as the maximum drawdown amount.
6. On the Receipt Drawdown page, review the Total Cost and Max. Amount for each of your allowable receipts (p. 21, Fig. 37, F). You can edit the recommended maximum drawdown amount for each receipt. Note: If you change the maximum drawdown amounts, the total amount for the payment request cannot exceed the maximum drawdown amount available for the fiscal year (G).
7. Select the Save button (H). 8. Review the Receipt Drawdown Confirm page. Select the Confirm button (p. 21, Fig. 38, I). 9. See Submitting Payment Requests to continue with submitting the payment request.

23
Creating Payment Requests
Figure 39 LEA BVP Menu – Payment Section
Figure 40 Create a New Payment Request
Figure 41 Select Receipt
Figure 42 Save Waiver Drawdown Amount
Figure 43 Confirm Waiver Drawdown Amount

24
Creating Payment Requests
Requesting a Waiver – LEA Users Your agency may request a waiver to receive 100% reimbursement funding for vest purchases. When you do this, the system calculates a maximum drawdown amount that represents 100% of your total cost. Once you create the request, you can submit it for reimbursement. See Submitting Payment Requests for information on submitting the request.
HOW TO. . . Request a Waiver
1. Select Payment / Payment Request in the left menu (p. 23, Fig. 39, A). 2. Select the Create button to create a new payment request (p. 23, Fig. 40, B). 3. On the Receipt Information page, review the maximum BVP payments for your agency’s
allowable receipts; then select the receipt(s) you wish to include in the request (p. 23, Fig. 41, C).
4. If needed, select the Receipt ID link (D) to display the Receipt Details page in a separate tab. Be sure to close this tab when you are finished viewing the receipt details. Note: You are not able to edit your receipts when you are creating a payment request. To edit receipts, you must exit the Payment Request function and navigate to Manage Receipts.
5. If you are requesting a waiver, select the Waiver button (E). 6. On the Receipt Drawdown page, review the Total Cost and Max. Amount for each receipt for
which you are requesting a waiver (p. 23, Fig. 42, F). Note: Because you requested a waiver, the drawdown amount for each receipt represents 100% reimbursement for vest purchases. Your total amount for the payment request cannot exceed the maximum drawdown amount available for the fiscal year (G).
7. Select the Save button (H). 8. Review the Receipt Drawdown Confirm page. Select the Confirm button (p. 23, Fig. 43, I). 9. See Submitting Payment Requests to continue with submitting the request.

25
Creating Payment Requests
Figure 44 Jurisdiction BVP Menu – Status Section
Figure 45 Jurisdiction Status Page

26
Creating Payment Requests
Viewing Pending Actions and Payment Status – All Jurisdiction Users The Status page displays pending actions that must be completed prior to program deadlines. Jurisdictions are also able to review information about available awards and can track the total amount paid against the total requests by fiscal year. The red “!” in the ATTN column (p. 25, Fig. 45, B) indicates when a near-term action is required (e.g., the award expires within the current year).
The Current Receipts Summary provides information about your agency’s in-progress receipts. The list of Current Payment Requests shows the total amount of requested funds and the current status of each payment request that the jurisdiction has created. The statuses for payment requests include the following:
• Created – the payment request has been created, but no action has been taken on it. • Sent for BVP Approval – the payment request has been certified by the CEO and submitted for BJA
approval. • Rejected by BVP – the payment request has been denied by BJA. • Processing Payment – the payment request has been approved by BJA and reimbursement for vest
purchases is in process.
Jurisdictions with one or more associated LEAs do not see the LEA payment requests listed on the Status page. Information about LEA payment requests is in Payment History. See Viewing Payment History for more information.
HOW TO. . . View Pending Actions and Payment Status
1. Select Status, then Current Status in the left menu (p. 25, Fig. 44, A). 2. If there are receipts that require your attention (p. 25, Fig. 45, B), select the View Details link (C)
to access the Receipt Details page. As needed, you can add, edit, or delete receipt line items and edit vest assignments. Note: For more details on these processes, review Adding a Receipt Line Item, Editing a Receipt Line Item, and Adding/Editing/Deleting a Vest Assignment.
3. Review the Current Status of your agency’s payment requests (D). 4. Select the View Details link (E) to view the receipt drawdown details for a specific payment
request. Note: To return to the Current Status page, you must select the Back button on the Receipt Drawdown page. Do not use your browser’s back arrow to navigate in the system.
5. In the Available Awards section, compare your agency’s Total Paid against the Total Requests for each fiscal year (F).
6. Review the Eligible Balance (G). 7. Address any pending actions that require your attention.

27
Creating Payment Requests
Figure 46 Jurisdiction BVP Menu – Payment Section
Figure 47 Create a Payment Request
Figure 48 Select Receipt
Figure 49 Save Receipt Drawdown Amounts
Figure 50 Confirm Receipt Drawdown Amounts

28
Creating Payment Requests
Creating a Payment Request – All Jurisdiction Users The Payment Request page displays a list of payment requests that your agency has created, but not yet submitted for payment. Before submission, you are able to edit the details of the jurisdiction payment requests. You are also able to delete a payment request.
Jurisdictions with one or more associated LEAs also see the list of payment requests submitted by LEAs for approval by the Chief Executive. These jurisdictions have the ability to deny an LEA payment request. Review Denying an LEA Payment Request for more information.
When you create a payment request, you first view the maximum BVP payments for your agency’s allowable receipts and select the receipts to include in the payment request. Based on whether or not you request a waiver, the system then calculates a recommended maximum drawdown amount. You are able to edit or change the maximum drawdown for each receipt, but the total cost cannot exceed the maximum drawdown amount available for the fiscal year. Once you confirm the request, you can submit it for reimbursement. See Submitting Payment Requests for information on submitting your payment requests.
HOW TO. . . Create a Payment Request
1. Select Payment / Payment Request in the left menu (p. 27, Fig. 46, A). 2. Select the Create button to create a new payment request (p. 27, Fig. 47, B). 3. On the Select Receipt page, review the list of maximum BVP payments for your agency’s
allowable receipts. Then select the receipt(s) you wish to include in the payment request (p. 27, Fig. 48, C).
4. If needed, select the Receipt ID link to display the Receipts Details page in a separate tab (D). Be sure to close this tab when you are finished viewing the receipt details. Note: You are not able to edit your receipts when you are creating a payment request. To edit receipts, you must exit the Payment Request function and navigate to Manage Receipts.
5. If you are not requesting a waiver, select the Continue button (E). For more details on requesting a waiver, see How to Request a Waiver. Note: Based on whether or not you are requesting a waiver, the system calculates the correct maximum drawdown amount. If you request a waiver, the system will display 100% reimbursement. If no waiver is requested, the system will display 50% of the total cost as the maximum drawdown amount.
6. On the Receipt Drawdown page, review the Total Cost and Max. Amount for each of your allowable receipts (p. 27, Fig. 49, F). Note: You can edit the recommended maximum drawdown amount for each in-progress receipt. The total amount for the payment request cannot exceed the maximum drawdown amount available for the fiscal year (G).
7. Select the Save button (H). 8. Review the Receipt Drawdown Confirm page. Select the Confirm button (p. 27, Fig. 50, I).

29
Creating Payment Requests
Figure 51 Jurisdiction BVP Menu – Payment Section
Figure 52 Create a New Payment Request
Figure 53 Select Receipt
Figure 54 Save Waiver Drawdown Amounts
Figure 55 Confirm Waiver Drawdown Amounts

30
Creating Payment Requests
Requesting a Waiver – All Jurisdiction Users Your agency may request a waiver to receive 100% reimbursement funding for vest purchases. When you do this, the system calculates a maximum drawdown amount that represents 100% of your total cost. As with payment requests without a waiver, you can submit the request for reimbursement after you confirm the drawdown amounts. See Submitting Payment Requests for information on submitting the request.
HOW TO. . . Request a Waiver
1. Select Payment / Payment Request in the left menu (p. 29, Fig. 51, A). 2. Select the Create button to create a new payment request (p. 29, Fig. 52, B). 3. On the Receipt Information page, review the list of maximum BVP payments for your agency’s
allowable receipts. Then select the receipt(s) you wish to include in the request (p. 29, Fig. 53, C).
4. If needed, select the Receipt ID link (D) to display the Receipts Details page in a separate browser tab. Be sure to close this tab when you are finished viewing the receipt details. Note: You are not able to edit your receipts when you are creating a payment request. To edit receipts, you must exit the Payment Request function and navigate to Manage Receipts.
5. If you are requesting a waiver, select the Waiver button (E). 6. On the Receipt Drawdown page, review the Total Cost and Max. Amount for the receipt(s) for
which you are requesting a waiver (p. 29, Fig. 54, F). Note: Because you requested a waiver, the drawdown amount represents 100% reimbursement for vest purchases. Be aware that the total amount for the payment request cannot exceed the maximum drawdown amount available for the fiscal year (G).
7. Select the Save button (H). 8. Review the Receipt Drawdown Confirm page. Select the Confirm button (p. 29, Fig. 55, I). 9. See Submitting Payment Requests to continue with submitting the request.

31
Creating Payment Requests
Figure 56 Common Functions of the Payment Request Submission Process for Jurisdiction and LEA Users
Figure 57 Request Submission Process for Jurisdictions with One or More Associated LEAs
Figure 58 Request Submission Process for Jurisdictions

32
Creating Payment Requests
Submitting Payment Requests During the payment request submission process, LEAs and jurisdictions must certify that all information in the payment request is true and accurate (Figure 56).
Jurisdictions with at least one associated LEA must review each payment request certified by the LEA CEO. The jurisdiction can then either submit the payment request to BJA for reimbursement or deny the payment request and provide the LEA reasons for the denial.
If the jurisdiction certifies and submits the payment request, BJA processes the payment request and the LEA receives the reimbursement as administered through the jurisdiction. If the jurisdiction denies the payment request, the BVP system returns the receipts that comprised the payment request to the LEA for editing or deletion (Figure 57).
Validating Bank Information Jurisdictions must enter all of their banking information into the BVP system. The Office of the Chief Financial Officer (OCFO) – Control Desk must then verify and approve this banking information in order for the jurisdiction to be eligible to receive reimbursements.
When submitting payment requests, the BVP system requires jurisdictions to review this banking and contact information to confirm that it is current (Figure 58).
If the banking information has been added or changed and not yet approved by the OCFO – Control Desk, the jurisdiction will not be able to complete the payment request submission process. For assistance with these issues, contact the BVP Helpdesk at (877) 758-3787 or send an email to [email protected]. For information on editing the bank information, review the Banking Information section.
Workflows for Submitting Payment Requests For more information about the different workflows for submitting payment requests, please refer to the following:
Law Enforcement Agency (LEA) Turn to pages 33-42
All Jurisdictions Turn to pages 43-58

33
Submitting Payment Requests
Figure 59 LEA BVP Menu – Payment Section
Figure 60 Select Payment Request(s) for Submission to Jurisdiction
Figure 61 Confirm Submission of Payment Request
Figure 62 Select Waiver Request(s) for Submission to Jurisdiction
Figure 63 Confirm Submission of Waiver Request

34
Submitting Payment Requests
Submitting Payment Requests – LEA Users After confirming your receipt drawdown amounts, you must select and then confirm the payment requests that you want to submit to the jurisdiction for approval. You follow the same process to submit waiver requests to the jurisdiction.
After you select Confirm on the Payment Requests confirmation page, the system checks to see if the payment request is for a vest total that exceeds the total officer count, or if the number of vests purchased in the last three years exceeds the limit. If either is true, the system displays an Explanation page. Type in an explanation for each applicable issue, then select Save to continue.
You will then be prompted to review the authorized designee information and certify the payment/waiver request. See Certifying Payment Requests or Certifying Waiver Requests to continue.
HOW TO. . . Submit a Payment Request
1. If necessary, select Payment / Payment Request in the left menu (p. 29, Fig. 59, A). 2. Select the appropriate checkbox to select the payment request you wish to submit to the
jurisdiction (p. 33, Fig. 60, B). 3. Select the Submit button (C).
Note: The system checks the database for the existence of an uploaded mandatory wear policy. If no current mandatory wear policy exists, BVP will direct you to the Mandatory Wear Policy page. You must upload a mandatory wear policy document before you can submit your payment request.
4. Select the Confirm button (p. 33, Fig. 61, D) and continue with certifying the payment request.
HOW TO. . . Submit a Waiver Request
1. If necessary, select Payment / Payment Request in the left menu (p. 29, Fig. 59, A). 2. Select the appropriate checkbox to select the waiver request you wish to submit to the
jurisdiction (p. 33, Fig. 62, E). 5. Select the Submit button (F).
Note: The system checks the database for the existence of an uploaded mandatory wear policy. If no current mandatory wear policy exists, BVP will direct you to the Mandatory Wear Policy page. You must upload a mandatory wear policy document before you can submit your request.
3. Select the Confirm button (p. 33, Fig. 63, G) and continue with certifying the waiver request.

35
Submitting Payment Requests
Figure 64 Authorized Designee
Figure 65 Payment Request Certification
36
Submitting Payment Requests
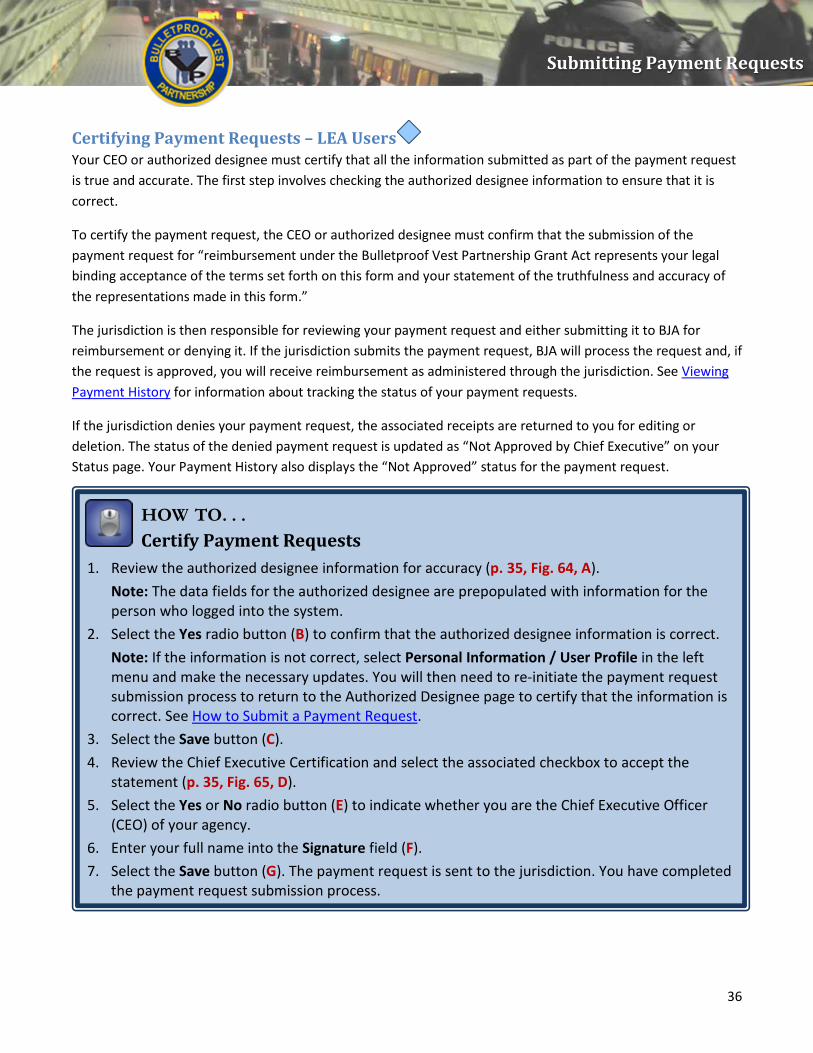
Certifying Payment Requests – LEA Users Your CEO or authorized designee must certify that all the information submitted as part of the payment request is true and accurate. The first step involves checking the authorized designee information to ensure that it is correct.
To certify the payment request, the CEO or authorized designee must confirm that the submission of the payment request for “reimbursement under the Bulletproof Vest Partnership Grant Act represents your legal binding acceptance of the terms set forth on this form and your statement of the truthfulness and accuracy of the representations made in this form.”
The jurisdiction is then responsible for reviewing your payment request and either submitting it to BJA for reimbursement or denying it. If the jurisdiction submits the payment request, BJA will process the request and, if the request is approved, you will receive reimbursement as administered through the jurisdiction. See Viewing Payment History for information about tracking the status of your payment requests.
If the jurisdiction denies your payment request, the associated receipts are returned to you for editing or deletion. The status of the denied payment request is updated as “Not Approved by Chief Executive” on your Status page. Your Payment History also displays the “Not Approved” status for the payment request.
HOW TO. . . Certify Payment Requests
1. Review the authorized designee information for accuracy (p. 35, Fig. 64, A). Note: The data fields for the authorized designee are prepopulated with information for the person who logged into the system.
2. Select the Yes radio button (B) to confirm that the authorized designee information is correct. Note: If the information is not correct, select Personal Information / User Profile in the left menu and make the necessary updates. You will then need to re-initiate the payment request submission process to return to the Authorized Designee page to certify that the information is correct. See How to Submit a Payment Request.
3. Select the Save button (C). 4. Review the Chief Executive Certification and select the associated checkbox to accept the
statement (p. 35, Fig. 65, D). 5. Select the Yes or No radio button (E) to indicate whether you are the Chief Executive Officer
(CEO) of your agency. 6. Enter your full name into the Signature field (F). 7. Select the Save button (G). The payment request is sent to the jurisdiction. You have completed
the payment request submission process.

37
Submitting Payment Requests
Figure 66 Waiver Request Certification

38
Submitting Payment Requests
Certifying Waiver Requests – LEA Users Your CEO or authorized designee must certify that all the information submitted as part of the waiver request is true and correct. The first step involves checking the authorized designee information to ensure that it is accurate.
The CEO or authorized designee must also confirm that the submission of the “Matching Funds Waiver Request under the Bulletproof Vest Partnership Act” represents acceptance of the program’s statutory and programmatic requirements, restrictions, and conditions, including the following:
• The Bureau of Justice Assistance and the Office of the Inspector General reserve the right to take appropriate administrative action to resolve data discrepancies, errors, or audit findings related to any information reported in the waiver request.
• Documentation substantiating the financial hardship listed in the waiver request must be kept for a period of four years. The source cited for the financial hardship must be accurately listed in the BVP Waiver Justification section of the waiver request.
• The BJA director may deny the request if it does not cite the source of the financial hardship in the Waiver Justification section, if the request does not adequately substantiate the need for the matching funds waiver, or if the signature on the request does not list the CEO of the law enforcement agency.
Once you have certified the request, you will be prompted to provide a waiver justification. See Justifying Waiver Requests for information about how to justify your waiver request.
HOW TO. . . Certify Waiver Requests
1. Review the authorized designee information for accuracy (p. 35, Fig. 64, A). Note: The data fields for the authorized designee are prepopulated with information for the person who logged into the system.
2. Select the Yes radio button (B) to confirm that the authorized designee information is correct. Note: If the information is not correct, select User Profile in the left navigation menu and make the necessary updates. You will then need to re-initiate the request submission process to return to the Authorized Designee page to certify that the information is correct. See How to Submit a Waiver Request.
3. Select the Save button (C). 4. Review the Chief Executive Certification and select the associated checkbox to accept the
statement (p. 37, Fig. 66, D). 5. Review the BVP Waiver Certification and select the associated checkbox to accept the statement
(E). 6. Select the Yes or No radio button to indicate whether you are the Chief Executive Officer (CEO)
of your agency (F). 7. Enter your full name into the Signature field (G). 8. Select the Save button (H) and continue with justifying the waiver request (see p. 40).

39
Submitting Payment Requests
Figure 67 BVP Waiver Justification page

40
Submitting Payment Requests
Justifying Waiver Requests – LEA Users Your CEO or authorized designee must provide a comprehensive justification for requesting 100% reimbursement funding for your vest purchases. Justifying the request for a waiver involves the following:
• BVP Waiver Justification – the thorough explanation of the reasons for requesting the waiver and the citation of the specific sources that support these reasons
• Reason for Waiver – the selection of one or more reasons for the waiver. The list of reasons ranges from being declared bankrupt or part of a major disaster area to experiencing significant reduction in law enforcement services or other circumstances that demonstrate severe fiscal distress.
• CEO Signature – the requirement that the waiver request list the title and full name of the chief executive officer
The jurisdiction is responsible for reviewing your waiver request and either submitting it to BJA for reimbursement or denying it. See Viewing Payment History for more information about tracking the status of your waiver requests.
HOW TO. . . Justify Waiver Requests
1. Enter the explanation for requesting the waiver into the BVP Waiver Justification text box (p. 39, Fig. 67, A).
2. In the Reason for Waiver section, select one or more reasons from the options listed to justify the request for a waiver (B).
3. Select Yes or No to indicate whether you are the CEO (C). 4. Select your title from the Title drop-down list or type it into the Title (Other) field (D). Then,
complete the appropriate signature field(s): a. If you are the CEO, type your name into the Your Signature field. b. If you are not the CEO, type your name into the Your Signature field. Type the CEO’s name
into the CEO Signature field. 5. Select the Save button (E). The request is sent to the jurisdiction .You have completed the
request submission process.

41
Submitting Payment Requests
Figure 68 LEA BVP Menu – Payment Section
Figure 69 View Payment History

42
Submitting Payment Requests
Viewing Payment History – LEA Users Your agency’s payment requests, organized by status, are listed on the Payment History page. On this page, you are able to track which payment requests are still awaiting approval by the jurisdiction, which have been submitted to BJA for reimbursement, and when reimbursement for vest purchases is pending. If a payment request has been denied, you can view comments made by either the jurisdiction or BJA that explain the reasons for the denial.
HOW TO. . . View Payment History
1. Select Payment / Payment History in the left menu (p. 41, Fig. 68, A). 2. Select the View link (p. 41, Fig. 69, B) to review detailed information for the payment request
your agency has submitted for approval to the jurisdiction. 3. Track the status of payment requests that have been sent to BJA for reimbursement (C). 4. If the jurisdiction has denied your payment request, review the Denial Comments (D). 5. If BJA has denied a waiver request, review the Denial Comments (E). 6. Select the Details link to review the details about the denied waiver request (F).

43
Submitting Payment Requests
Figure 70 Jurisdiction BVP Menu – Payment Section
Figure 71 Select Payment Request(s) for Submission to BJA
Figure 72 Confirm Submission of Payment Request
Figure 73 Select Waiver Request(s) for Submission
Figure 74 Confirm Submission of Waiver Request

44
Submitting Payment Requests
Submitting Payment Requests – All Jurisdiction Users After confirming your receipt drawdown amounts, you must select and then confirm the payment requests that you want to submit to BJA for approval. You’ll follow the same process to submit your waiver requests to BJA.
Jurisdictions with one or more associated LEAs may approve and submit the LEA payment requests which have been sent to the CEO for approval. LEA payment requests are listed at the bottom of the table on the Payment Request page, under a blue heading with the LEA name. These jurisdictions are also able to deny an LEA payment request. Review Denying an LEA Payment Request for more information.
HOW TO. . . Submit a Payment Request
1. If needed, select Payment / Payment Request in the left menu (p. 43, Fig. 70, A). 2. Select the appropriate checkbox to select a payment request for submission (p. 43, Fig. 71, B). 3. Select the Submit button (C).
Note: If your jurisdiction has its own funds, the BVP system will check the database for the existence of an uploaded mandatory wear policy. If no current mandatory wear policy exists, BVP will direct you to the Mandatory Wear Policy page. You must upload a mandatory wear policy document before you can submit your request.
4. Select the Confirm button (p. 43, Fig. 72, D) and continue with reviewing banking information.
HOW TO. . . Submit a Waiver Request
1. If needed, select Payment / Payment Request in the left menu (p. 43, Fig. 70, A). 2. Select the appropriate checkbox to select a request for submission (p. 43, Fig. 73, E). 3. Select the Submit button (F).
Note: If your jurisdiction has its own funds, the BVP system will check the database for the existence of an uploaded mandatory wear policy. If no current mandatory wear policy exists, BVP will direct you to the Mandatory Wear Policy page. You must upload a mandatory wear policy document before you can submit your request.
4. Select the Confirm button (p. 43, Fig. 74, G) and continue with reviewing banking information.

45
Submitting Payment Requests
Figure 75 Jurisdiction BVP Menu – Payment Section
Figure 76 Deny LEA Payment Request
Figure 77 Enter Reasons for Denial
Figure 78 View Payment History

46
Submitting Payment Requests
Denying an LEA Payment Request – Jurisdictions with One or More Associated LEAs Jurisdictions with at least one associated LEA are able to deny payment requests and provide the LEA the reasons for the denial. The denied payment request is removed from the jurisdiction’s active payment request page.
LEA payment requests that the jurisdiction has denied are listed on the Payment History page under the category “Not Approved by the Chief Executive.” Review Viewing Payment History for more information.
HOW TO. . . Deny an LEA Payment Request
1. Select Payment / Payment Request (p. 45, Fig. 75, A).
2. View the LEA payment requests listed under the heading “Sent for Chief Executive Approval” (p. 45, Fig. 76, B).
3. Select the View link (C) to review detailed information about a specific payment request. 4. Select the appropriate checkbox to select a payment request (D). 5. Select the Deny button (E). 6. In the Denial Comments field provided on the Payment Request Deny page, enter the reasons
for denying the payment request (p. 45, Fig. 77, F). 7. Select the Confirm button (G). 8. To view a denied request, select Payment / Payment History in the left menu. 9. Review the information for the denied payment request (p. 45, Fig. 78, H). 10. Review the Denial Comments (I).

47
Submitting Payment Requests
Figure 79 Review Banking and Contact Information

48
Submitting Payment Requests
Reviewing Banking and Contact Information – All Jurisdictions Users In order to receive reimbursements from BJA, jurisdictions must keep their bank information up to date. The Office of the Chief Financial Officer (OCFO) – Control Desk must then verify and approve the banking information before the jurisdiction will be eligible to receive any reimbursements.
To ensure that your banking information is correct, the BVP system will prompt you to review your jurisdiction’s bank information after you confirm the payment request submission. You must certify that the information is correct. If the information is not correct, you must make the corrections before you can proceed with the payment request submission. You will then be directed to send a signed Bank Form to BJA for re-validation.
For information on editing your bank information, see the Banking Information section.
In addition, if your bank information has been recently added or changed and not yet approved by the OCFO – Control Desk, you will not be able to complete the payment request submission process. In this case also, you will be directed to send a signed Bank Form to BJA for re-validation.
For assistance with these issues, contact the BVP Helpdesk at (877) 758-3779 or send an email to [email protected].
HOW TO. . . Review Banking and Contact Information
1. Confirm that the jurisdiction’s banking and contact information is accurate and up to date.
2. Select the Yes radio button if banking and contact information is correct (p. 47, Fig. 79, A).
Note: If you select the No radio button to indicate that the banking and contact information is incorrect and needs to be updated, you will be prompted to edit the banking information. You will also be directed to send a revised bank form signed by your bank official to the OCFO – Control Desk.
3. Select the Save and Continue button (B).
Note: If you certified that the banking information is correct, you will be directed to certify the request. See Certifying Payment Requests or Certifying Waiver Requests to continue.

49
Submitting Payment Requests
Figure 80: Jurisdiction BVP Menu – Payment Section
Figure 81 Bank Information

50
Submitting Payment Requests
Banking Information – All Jurisdictions Users In order to receive reimbursements from BJA, jurisdictions must keep their bank information up to date. The Office of the Chief Financial Officer (OCFO) – Control Desk must then verify and approve your banking information before the jurisdiction will be eligible to receive any reimbursements.
HOW TO. . . Update Bank Information
1. Select Payment / Bank Information in the left menu (p. 49, Fig. 80, A). Note: You cannot update your banking information through the BVP system unless your jurisdiction has available funds. You must contact the BVP Helpdesk in order to update your banking information when you do not have available funds to draw down. For assistance with this, contact the BVP Helpdesk at (877) 758-3787 or send an email to [email protected].
2. Review all the fields on the Bank Information form to ensure they are correct (p. 49, Fig. 81). 3. If a field is not correct or up to date, enter the correct information in the field. 4. Select the Save and Continue button (B).
Note: The BVP system will prompt you to print and send in a signed Bank Form.
HOW TO. . . Print a Bank Form
1. Select the Print Bank Form link. 2. Select the correct printer for your computer network on the Print dialog box. 3. Select the Print button.

51
Submitting Payment Requests
Figure 82 Authorized Designee
Figure 83 Payment Request Certification

52
Submitting Payment Requests
Certifying Payment Requests – All Jurisdictions Users After certifying the jurisdiction’s banking information, your CEO or authorized designee must certify that all the information submitted as part of the payment request is true and accurate. The first step involves checking the authorized designee information to ensure that it is correct.
The CEO or authorized designee must also confirm that the submission of the payment request for “reimbursement under the Bulletproof Vest Partnership Grant Act represents your legal binding acceptance of the terms set forth on this form and your statement of the truthfulness and accuracy of the representations made in this form.”
Review Viewing Payment History for information about tracking the status of your payment requests.
HOW TO. . . Certify Payment Requests
1. Review the authorized designee information for accuracy (p. 51, Fig. 82, A). Note: The data fields for the authorized designee are pre-populated with information for the person who logged into the system.
2. Select the Yes radio button (B) to confirm that the authorized designee information is correct. Note: If the information is not correct, select Personal Information / User Profile in the left navigation menu and make the necessary updates. You will then need to re-initiate the payment request submission process to return to the Authorized Designee page to certify that the information is correct. See How to Submit a Payment Request.
3. Select the Save button (C). 4. Review the Chief Executive Certification and select the associated checkbox to accept the
statement (p. 51, Fig. 83, D). 5. Select the Yes or No radio button (E) to indicate whether you are the Chief Executive Officer
(CEO) of your jurisdiction. 6. Enter your full name into the Signature field (F). 7. Select the Save button (G).

53
Submitting Payment Requests
Figure 84 Waiver Request Certification
54
Submitting Payment Requests
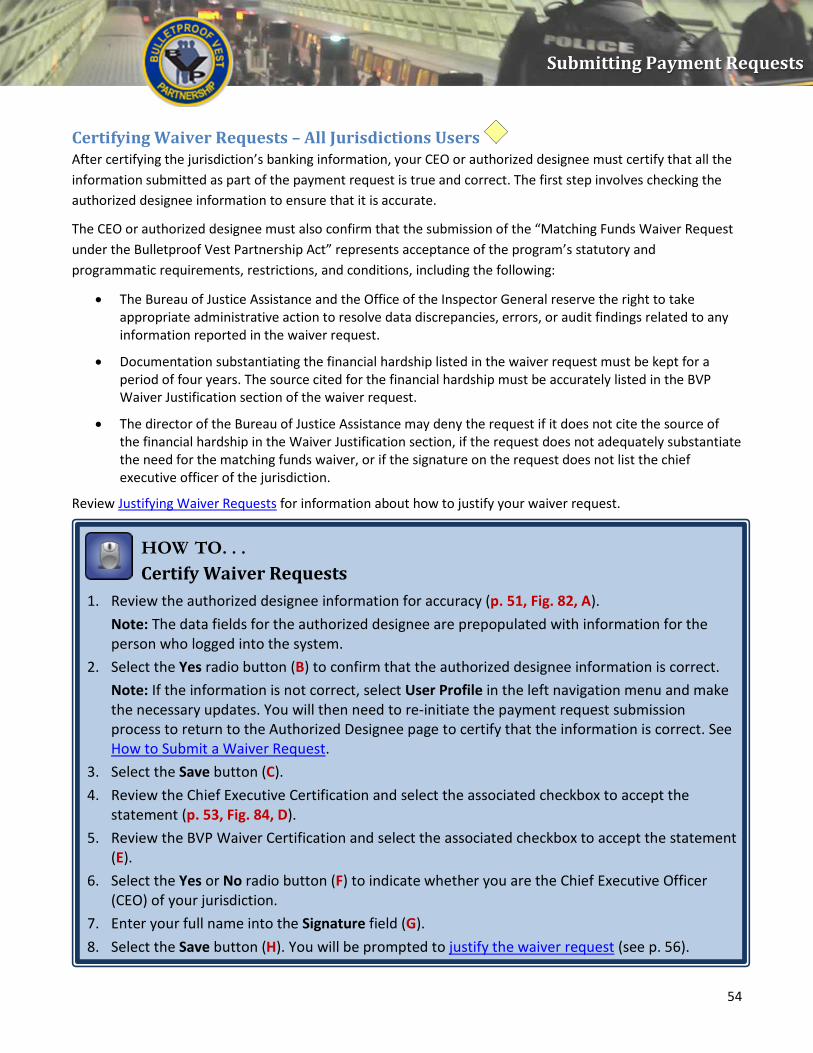
Certifying Waiver Requests – All Jurisdictions Users After certifying the jurisdiction’s banking information, your CEO or authorized designee must certify that all the information submitted as part of the payment request is true and correct. The first step involves checking the authorized designee information to ensure that it is accurate.
The CEO or authorized designee must also confirm that the submission of the “Matching Funds Waiver Request under the Bulletproof Vest Partnership Act” represents acceptance of the program’s statutory and programmatic requirements, restrictions, and conditions, including the following:
• The Bureau of Justice Assistance and the Office of the Inspector General reserve the right to take appropriate administrative action to resolve data discrepancies, errors, or audit findings related to any information reported in the waiver request.
• Documentation substantiating the financial hardship listed in the waiver request must be kept for a period of four years. The source cited for the financial hardship must be accurately listed in the BVP Waiver Justification section of the waiver request.
• The director of the Bureau of Justice Assistance may deny the request if it does not cite the source of the financial hardship in the Waiver Justification section, if the request does not adequately substantiate the need for the matching funds waiver, or if the signature on the request does not list the chief executive officer of the jurisdiction.
Review Justifying Waiver Requests for information about how to justify your waiver request.
HOW TO. . . Certify Waiver Requests
1. Review the authorized designee information for accuracy (p. 51, Fig. 82, A). Note: The data fields for the authorized designee are prepopulated with information for the person who logged into the system.
2. Select the Yes radio button (B) to confirm that the authorized designee information is correct. Note: If the information is not correct, select User Profile in the left navigation menu and make the necessary updates. You will then need to re-initiate the payment request submission process to return to the Authorized Designee page to certify that the information is correct. See How to Submit a Waiver Request.
3. Select the Save button (C). 4. Review the Chief Executive Certification and select the associated checkbox to accept the
statement (p. 53, Fig. 84, D). 5. Review the BVP Waiver Certification and select the associated checkbox to accept the statement
(E). 6. Select the Yes or No radio button (F) to indicate whether you are the Chief Executive Officer
(CEO) of your jurisdiction. 7. Enter your full name into the Signature field (G). 8. Select the Save button (H). You will be prompted to justify the waiver request (see p. 56).

55
Submitting Payment Requests
Figure 85 Waiver Request Justification

56
Submitting Payment Requests
Justifying Waiver Requests – All Jurisdictions Users Your CEO or authorized designee must provide a comprehensive justification for requesting 100% reimbursement funding for your vest purchases. Justifying the request for a waiver involves the following:
• BVP Waiver Justification – the thorough explanation of the reasons for requesting the waiver and the citation of the specific sources that support these reasons
• Reason for Waiver – the selection of one or more reasons for the waiver. The list of reasons ranges from being declared bankrupt or part of a major disaster area to experiencing significant reduction in law enforcement services or other circumstances that demonstrate severe fiscal distress.
• CEO Signature – the requirement that the waiver request list the title and full name of the chief executive officer
Review Viewing Payment History for information about tracking the status of your waiver requests.
HOW TO. . . Justify Waiver Requests
1. Enter a thorough explanation for requesting the waiver into the BVP Waiver Justification text box (p. 55, Fig. 85, A).
2. In the Reason for Waiver section, select one or more reasons from the options listed to justify the request for a waiver (B).
3. Select whether you are the CEO (C). 4. Select your title from the Title drop-down list or type it into the Title (Other) field (D). Then,
type your name into the appropriate signature field: a. If you are the CEO, type your name into the CEO Signature field. b. If you are not the CEO, type your name into the Your Signature field. Type the CEO’s name
into the CEO Signature field. 5. Select the Save button (E). The request is sent to BJA .You have completed the request
submission process.

57
Submitting Payment Requests
Figure 86 Jurisdiction BVP Menu – Payment History
Figure 87 Jurisdiction Payment History
Figure 88 Jurisdiction’s LEA Payment History

58
Submitting Payment Requests
Viewing Payment History – All Jurisdictions Users Your agency’s payment requests, organized by status, are listed on the Payment History page. The statuses for your payment requests include the following:
• Created – the payment request has been created, but no action has been taken on it. • Sent for BVP Approval – the payment request has been certified by the CEO and submitted for BJA
approval. • Approved by BVP – the payment request has been approved by BJA. • Rejected by BVP – the payment request has been denied by BJA. • Processing Payment – reimbursement for your vest purchases is in process.
Jurisdictions with one or more associated LEAs are also able to view the status of LEA payment requests.
HOW TO. . . View Payment History
1. Select Payment / Payment History (p. 57, Fig. 86, A).
2. Review the list of payment requests where reimbursement for your vest purchases is in process (p. 57, Fig. 87, B).
3. Track the payment date (C). 4. For payment requests approved by BVP, select the View link to review the payment request
details (D). 5. Select the Details link to view detailed information for an approved waiver request (E).
HOW TO. . . View LEA Payment History
1. Select the Payment / Payment History (p. 57, Fig. 86, A). LEA requests are listed on the Payment History page under the LEA name in the appropriate status.
2. Select the View link to review detailed information for payment requests submitted for Chief Executive approval (p. 57, Fig. 88, F).
3. Review the Denial Comments for a denied LEA payment request (G). 4. Track the status of payment requests that have been sent to BJA for approval (H). 5. Select the Details link to review waiver request details (I).