build a pallet fueled outdoor wood stove - deb design
TRANSCRIPT

Build a Pallet FueledOutdoor Wood Stove
Copyright DEB Design 2003

2
Pallet Fueled Boiler Plan Table of ContentsCover PageIntroductionTabulated Parts ListDamper/Other Parts ListAdditional MaterialsConstruction TipsDrawingsPhotos with InstructionsAdditional Instructions
IntroductionThis will be a very rewarding project, if you require a high capacity outdoor
wood burning stove, but are concerned about the cost of commercial units. Thisunit was designed to accept 10 -13 full size pallets, and was built for about$1600. You should also budget an additional $300 - $600 to plumb thecompleted unit into your existing heating system. These costs will vary,depending on your current or proposed heating system design.
This stove features:• A large 90 cubic ft. firebox measuring 1/4" thick by 52 " wide x 50" deep x 60"
high• A 280-gallon capacity water jacket• A large, water filled, loading door• Automatic, adjustable, thermostatic control of the water jacket temperature• A blower induced, powered damper, draft control system• An adjustable door hinge system• A complete design requiring no additional housing• An open vent design, preventing the possibilities of dangerous pressures• The ability to burn any type of pallets or other wood without the worry of
creosote build-up and potential chimney fireIncluded in this plan set is:• A complete material list, including sources• Construction tips learned from building prototypes• Step by step construction drawings• Electrical and plumbing schematics• Start up and maintenance instructions• An extensive photo gallery of the stove construction•
This project may seem challenging at first, but with time and patience,you'll be able to build your own outdoor heating plant, to meet your home heatingneeds. You can then; take comfort knowing that your home heating bills canremain safely, controllable.

Quantity Size (L x W x Thickness)
2 60" x 50" x 1/4"
1 62" x 52" x 1/4"
2 50" x 52" x 1/4"
2 66" x 60" x 3/16"
2 66" x 53" x 3/16"
2 60" x 54" x 1/8"
1 58" x 50" x 3/16"
1 51"x 46"x 1/8"
Quantity Size (L x W x Thickness)
2 1"x 3/16"x 10' Flat
3 1"x 1/4"x 10' Flat
3 1"x 1"x 1/8"x 10' Angle Iron
4 1"x 1"x 3/16"x 10' Angle Iron
2 1-1/2"x 1-1/2"x 3/16"x 10' Angle Iron
1 1-1/2"x 1-1/2"x 1/4"x 10' Angle Iron
2 1-1/2"x 1-1/2"x 1/4"x 10' Square Tube
1 2"x2"x 4' Square Tube
12 1-1/4"x 1-1/4"x 1/8"x 10' Angle Iron
http:www.deb-design.comFrom: Build a Pallet Fueled Outdoor Woodstove
Structual Steel List (Boiler)
Structual Steel List (Boiler Enclosure)
Plate Steel List
This is a faxable list of the plate and structural steel required for this project.

Damper/Other Parts List
Quantity Description Specifications
1 Blower Grainger part # 4C447
1 Damper Made from coffee can bottom or similar ( 5" diameter)
1 Damper motor Alliance Laundry Systems part # F380932
1 Damper linkage 12"x 12" key stock
1 Connecting arm 1/8" x 1/2" x 2" metal flat stock
2 Motor housing Weatherproof electrical boxes
4 Motor mounting screws 10-32x3/4"
2 Linkage mounting screw 1/4"x4" carriage bolt, nuts, and washers
1 Motor shaft connecting screw 6-32x1" stainless screw with locknut
5 Connecting screws 1/4"x 1" screws
1 Motor cover Coffee can or similiar
1 Damper housing cover 1/8"x 12"x12" metal flat stock or similar
30' Electrical wire 14 guage
10' Flex-power wire sheathing 1/2"
3 Weatherproof connectors 1/2"
1 pc. Thermostat Local Hardware store or Grainger part # 2E050
1 pc. Circulator pump Grainger part # 2P310
1 pc. Cast iron flange set for circulator pump Grainger part # 4RC79 (1-1/4")
1 pc. Purge pump Salvaged jet pump or similar
4 pcs. Hose bibs 1-1/4 inch
1 pc. Gate valve for boiler drain 3\4 inch
2 pcs. Gate valves for boiler inlet/outlet lines 1-1/4 inch
10 ft. Reinforced PVC hose 1-1/4 inch
4 pcs. Stainless hose clamps 1-1/4 inch
1 pc. Electrical service box with cover (optional) 40 amp/2 breaker
2 pcs. Junction box with cover 4"
4 pcs. Cable clamps 1-1/4"
4 pcs. Stove gasket kits (Thermoseal #206 1” thick X 6’ long) available at most
hardware stores, or building centers
Damper Parts List
Other Materials

Damper/Other Parts List
2 Rolls Non-faced fiberglass insulation 6" thick x 24" wide
8 pcs. Steel Panels for Stove Sides 36" wide x 8' long
2 pcs. Steel Panels for Stove Roof 36" wide x 8' long
2 Boxes Panel Screws 1-1/4" long
Stove thermometer (optional) Grainger part # 2A611
Miscellaneous 1-1/4" galvanized pipe and fittings (nipples, elbows, unions, etc)
Miscellaneous electrical supplies for control circuitry from the house
Note: To find an Alliance Laundry Systems parts dealer near you, use theform located at:
http://www.speedqueen.com/vend/locator.htmor contact Customer Service at 920.748.3121
To located a Grainger branch store, please go here:http://www.grainger.com/Grainger/locator.jsp
or visit your local hardware store and ask if they have a catalog.
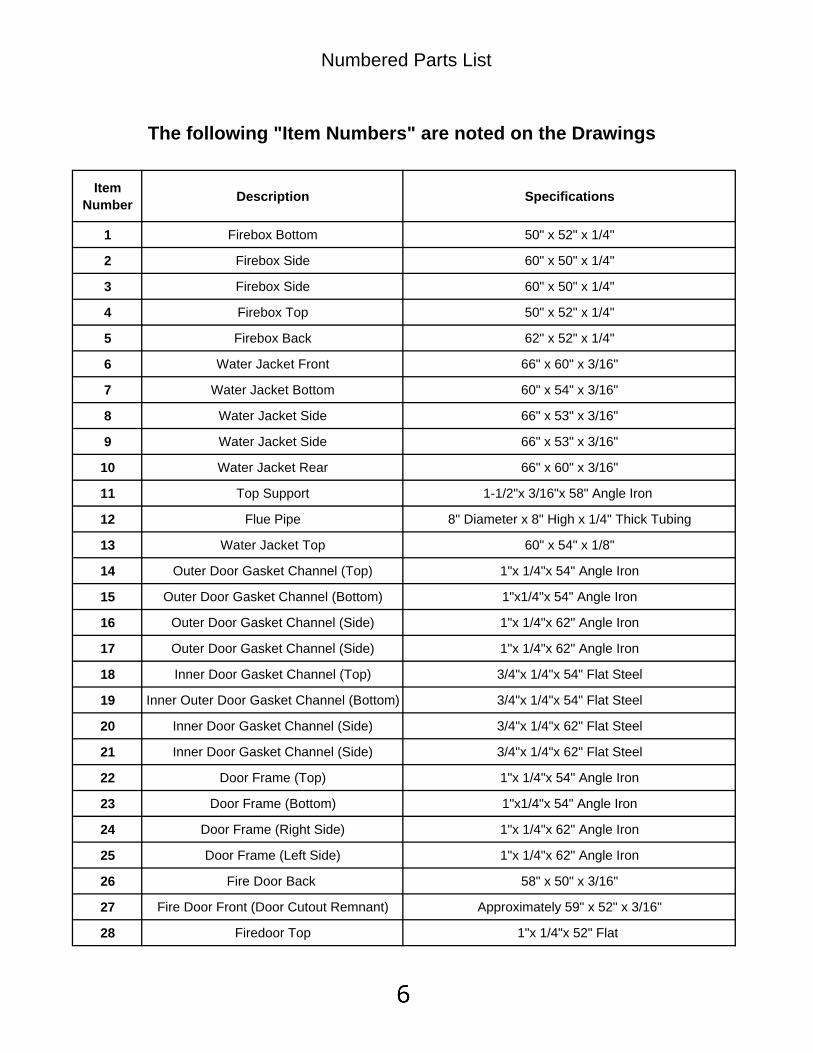
Numbered Parts List
Item Number
Description Specifications
1 Firebox Bottom 50" x 52" x 1/4"
2 Firebox Side 60" x 50" x 1/4"
3 Firebox Side 60" x 50" x 1/4"
4 Firebox Top 50" x 52" x 1/4"
5 Firebox Back 62" x 52" x 1/4"
6 Water Jacket Front 66" x 60" x 3/16"
7 Water Jacket Bottom 60" x 54" x 3/16"
8 Water Jacket Side 66" x 53" x 3/16"
9 Water Jacket Side 66" x 53" x 3/16"
10 Water Jacket Rear 66" x 60" x 3/16"
11 Top Support 1-1/2"x 3/16"x 58" Angle Iron
12 Flue Pipe 8" Diameter x 8" High x 1/4" Thick Tubing
13 Water Jacket Top 60" x 54" x 1/8"
14 Outer Door Gasket Channel (Top) 1"x 1/4"x 54" Angle Iron
15 Outer Door Gasket Channel (Bottom) 1"x1/4"x 54" Angle Iron
16 Outer Door Gasket Channel (Side) 1"x 1/4"x 62" Angle Iron
17 Outer Door Gasket Channel (Side) 1"x 1/4"x 62" Angle Iron
18 Inner Door Gasket Channel (Top) 3/4"x 1/4"x 54" Flat Steel
19 Inner Outer Door Gasket Channel (Bottom) 3/4"x 1/4"x 54" Flat Steel
20 Inner Door Gasket Channel (Side) 3/4"x 1/4"x 62" Flat Steel
21 Inner Door Gasket Channel (Side) 3/4"x 1/4"x 62" Flat Steel
22 Door Frame (Top) 1"x 1/4"x 54" Angle Iron
23 Door Frame (Bottom) 1"x1/4"x 54" Angle Iron
24 Door Frame (Right Side) 1"x 1/4"x 62" Angle Iron
25 Door Frame (Left Side) 1"x 1/4"x 62" Angle Iron
26 Fire Door Back 58" x 50" x 3/16"
27 Fire Door Front (Door Cutout Remnant) Approximately 59" x 52" x 3/16"
28 Firedoor Top 1"x 1/4"x 52" Flat
The following "Item Numbers" are noted on the Drawings

Numbered Parts List
29 Firedoor Bottom 1"x 1/4"x 52" Flat
30 Firedoor Side 1"x 1/4"x 60" Flat
31 Firedoor Side 1"x 1/4"x 60" Flat
28A Draftway Top 1"x 1/4"x 16" Flat
29A Draftway Bottom 1"x 1/4"x 16" Flat
30A Draftway Side 1"x 1/4"x 6" Flat
31A Draftway Side 1"x 1/4"x 6" Flat
32 Fire Door Upper Support 1-1/2"x 1/4"x 60" Square Tube
33 Fire Door Lower Support 1-1/2"x 1/4"x 60" Square Tube
34 Firedoor Hinge Side Support 1-1/2"x 1/4"x 60" Square Tube
35 Firedoor Upper Latch Side Support 1-1/2"x 1/4"x 30" Square Tube
36 Firedoor Lower Latch Side Support 1-1/2"x 1/4"x 30" Square Tube
37 Firedoor Handle 1-1/2"x 1/4"x 60" Square Tube
38 Crank Screw 3/4-10 x 16" Long Threaded Rod
39 Crank Handle Support 1"x 1/4"x12" Flat Steel
40 Inner Crank Screw Stop 3/4-13 Nut
41 Inner Crank Screw Washer 3/4" Flat Washer
42 Outer Crank Screw Washer 3/4" Flat Washer
43 Outer Crank Screw Stop 3/4-10 Nut
44 Crank Screw Weld Flange 3/4-10 Nut
45 Door Handle Bolt 7/16-18 x 4-1/2" Long Bolt
46 Door Handle 3/8"x 2" Pipe Coupling
47 Door Handle Lock Nut 7/16-18 Nut
48 Door Handle Lock Nut 7/16-18 Nut
49 Door Latch Support 1-1/2"x 3/16"x 6"" Angle Iron
50 Door Latch Nuts 3/4-10 Coupler Nut (2 Required)
51 Lower Hinge Support Bracket 2"x 1/4"x 12" Square Tube (Cut in half lengthwise)
52 Upper Hinge Support Bracket 2"x 1/4"x 12" Square Tube (Other half of item 51))
53 Adjustable Hinge Bolt (4 Required) 1/2 x 4" Carriage Bolt
54 Lower Door Hinge 2"x 1/4"x 16" Square Tube
55 Upper Door Hinge 2"x 1/4"x 16" Square Tube
56 Door Water Inlet 1-1/4" Pipe Coupler
57 Door Water Outlet 1-1/4" Pipe Coupler

Numbered Parts List
58 Upper Door Hinge Pin 5/8 x 5" Machine Bolt
59 Lower Door Hinge Pin 5/8 x 5" Machine Bolt
60 Overflow Coupler 3/4" Pipe Coupler
61 Upper Draftway Cover Support 2"x 1/8"x16" Angle Iron
62 Lower Draftway Cover Support 2"x 1/8"x16" Angle Iron
63 Draftway Side Cover Support 2"x 1/8"x6" Angle Iron
64 Draftway Side Cover Support 2"x 1/8"x6" Angle Iron
65 Boiler Inlet Coupler 1-1/4" Pipe Coupler
66 Boiler Outlet Coupler 1-1/4" Pipe Coupler
67 Fill Tube Coupler 1-1/4" Pipe Coupler
68 Drain Coupler 3/4" Pipe Coupler
69 Left Baffle Support 1"x 1/4"x 46" Angle Iron
70 Right Baffle Support 1"x 1/4"x 46" Angle Iron
71 Baffle 51"x 46"x 1/8"

3
Construction Tips
♦ If you have access to a wire feed welder, try and use it, or better yet, if youdon’t know how to weld, have a friend do it for you. I used an arc welder,which did the job, however, a wire feed would have sped up the weldingprocess and yielded less initial leaks.
♦ Plan on a minimum of 80 hours to construct the firebox, jacket, and firedoorassemblies. This does not include water-testing/re-welding, insulating, orconstruction of the housing.
♦ Take your time. Start many months before winter. Make it a fun project. Invitesome friends over to help, especially to help rotate and handle the boiler as ittakes shape. Completed, it will weigh a minimum of 2300 lbs.
♦ I used c-clamps, pipe clamps, and a floor jack, to help force and holdcomponents into position, for welding.
♦ I used a sabre saw with a fine tooth metal cutting blade, to cut the flue pipeopening in the jacket top, and a circular saw with a 7 inch abrasive metal cutoff blade for the firedoor, and similar cuts. Make sure the saw has a metalguard, as the sparks made from cutting metal, would quickly destroy a plasticguard.
♦ Weld all joints on both sides, if possible. If you use an arc welder with weldingrods, chip off all slag before water-testing, as the slag will conceal leaks. Bepatient during all water-testing phases. This is the obviously, the mostimportant part of the construction. If water is able to leak into the firebox, thelife of the stove will be severely shortened. Water leaking from the waterjacket to the outside, however, is not as much of a threat, but rather anuisance.
♦ Place your completed boiler to the southeast of your house, if possible, withthe loading door facing west. This will keep smoke away from your residencea majority of the time, and also tend to minimize smoke, during loading. If youplan to use your stove to heat your pool, plan the stove location so thatexhaust smoke doesn't blow across the pool area. This stove design is to beplaced outdoors, not inside a building.
♦ Use this procedure to weld pipe couplers:a) drill and tap the coupler location, for a 1\4-20 boltb) secure the coupler with a bolt and fender washerc) weld the coupler to the boiler and allow to coold) remove the bolt and enlarge the hole ( weld or drill )

Fully weld the front to the fireboxassembly. This may require rollingthe assembly so that all welding isdone in a horizontal direction. Theauthor flipped the assembly forwardwith the front down to facilitate thefinal welding process as shownhere.
Orient the firebox so the front isskyward. Mark the fire door openingon the face of the front. The markshould be 1/2" inward on each sideso a welding flange will be availableafter the door opening is cut. Theauthor originally planned to use 2"wide masking tape to facilitate themarking but found a black magicmarker to work the best.
Cut the door opening. The authorused a circular saw with abrasivemetal cutting blades. The saw needsto have a metal blade guard as aplastic guard will heat up anddeform from the heat. This is a slowjob and you could use 4-6 bladesduring the process. Check yourprogress periodically to insure youare not cutting into the side-wall.This is why straight fireboxside-walls are necessary.

Move the stove to its finaldestination and raise it stove to thedesired level.
The author used solid 8" wide x 16"long by 4" thick solid concreteblocks on solid, undisturbed groundalong with varying thickness' ofplywood and shim material. Thestove should be level and solidlysupported around the entireperimeter.
The completed stove with water willeasily weigh more than 2 tons sotake your time with the supportinstallation and leveling.

31
Construct the Damper Assembly
This damper assembly is built with a blower fan that utilizes a small gear motor to openand close the damper. The design uses a 2-stage draft control system. When the primaryboiler thermostat closes, the damper is energized allowing airflow into the firebox. Ifinsufficient natural draft occurs and the boiler water temperature drops further, the blower fanis energized by a secondary thermostat, insuring continued combustion and coal life.
The following procedure documents the construction of the damper assembly.1) Fasten 2 weatherproof electrical boxes together with small metal straps as shown in
Figure 1.2) Print the motor template from the following page, cutout the template, and fasten it to the
box assembly as shown with tape or glue.(See Figure 1)3) Mark the spots to be drilled with a center punch or nail, and drill out the holes to the
diameter specified on the motor template.4) Remove the template and disassemble the 2 electrical boxes.
Benchtesting
thecompleted
damperassembly.

8
Operation of your new heating plantInitially, check the water level and reload the firebox every 12 hours, until
you are satisfied that the system is functioning properly. At this point the loadingcould be done daily, depending on the heat load, with a water level check,weekly. If you are burning pallets be alert for flare-ups when you open the fire-door. It is advisable to only fill the stove when the firebox is near empty. Theauthor usually also positions all the pallets close to the stove to minimize theamount of time the fire door is open. Rake some of the coals towards the firedoor prior to loading. This helps get the new load started quickly. As a rule, you'llonly have to start a new fire, once per season. Coals last a long time so even ifthe fire seems dead, you'll be surprised how easily a new load starts after stirringthe coals.
Once per week or two, clean out the firebox by removing all but a coupleinches of the firebox ashes. Leave some embers so that the fire will restart, afterreloading.
During the off season, add some automotive cooling system rust inhibitorto the stove, and circulate it, prior to turning the pump off.
Cutting wood for your new heating plantSince the author has been using these types of stoves, there has been no
need to split wood. The firebox can accommodate pallets as well as extremelylarge logs, however you still need to lift them. If you have a large diameter log, 30inches as an example, simply cut the log into 3-4" pancakes, or what everthickness you can easily lift. This may mean more saw cuts, but this is mucheasier than splitting wood, even with a power splitter. You are not limited to onlyhardwood with this stove. It will burn anything, including unseasoned wood.
Additional uses for your stove♦ Heat your domestic hot water using a "side arm water heater" coupled to yourstove.♦ Heat your pool or spa using a liquid to liquid heat exchanger coupled to yourstove.Construction plans for both of these projects are available through DEB Design,at http://www.deb-design.com/
Copyright 2003 DEB Design. DEB Design takes noresponsibility for the use of any of the materials or methods
described neither in this publication nor for the products thereof