adobe experience manager training handout
TRANSCRIPT
Adobe Experience Manager
Web Content Management System
(AEM WCMS)
Old Dominion University Training
University Web & Digital Communication
Web Solutions Center: www.odu.edu/websolutions
AEM Author: www.odu.edu/author
Quick Topics
Changing Your Password .............................................................. 5
Sidekick ............................................................................................ 8
Creating a Calendar Entry ........................................................... 19
Creating a News/Announcement Item ...................................... 24
Places/Hours ................................................................................. 24
Q&As .............................................................................................. 26

Index of Topics
Section 1: Concept & Governance .............................................................................................................................................. 1
Overview ................................................................................................................................................................................ 1
ODU Website Concept.............................................................................................................................................................. 1
Office Pages ............................................................................................................................................................................... 1
Functions of Office Pages .................................................................................................................................................... 2
Redirects & Shortcuts ............................................................................................................................................................... 2
Governance ............................................................................................................................................................................... 3
Content Owner Content Manager Content Contributor ................................................................................................. 3
Web Communication Partners/Liaisons ................................................................................................................................ 3
Web Communications Liaisons: www.odu.edu/website/liaisons .................................................................................. 3
AEM Users Group...................................................................................................................................................................... 3
AEM Users Group: www.odu.edu/websolutions/usersgroup ........................................................................................ 3
Section 2: AEM Basics ................................................................................................................................................................... 3
Overview ................................................................................................................................................................................ 3
Accessing AEM ........................................................................................................................................................................... 3
User Interface ............................................................................................................................................................................ 4
Websites................................................................................................................................................................................. 5
Digital Assets .................................................................................................................... Error! Bookmark not defined.
Changing Your Password ..................................................................................................................................................... 5
AEM Concepts ........................................................................................................................................................................... 6
Parent/Child & Inheritance .................................................................................................................................................. 6
Grid System ........................................................................................................................................................................... 6
Section 3: Editing & Publishing .................................................................................................................................................... 7
Overview ................................................................................................................................................................................ 7
Edit Page View ........................................................................................................................................................................... 7
Finder ..................................................................................................................................................................................... 7
Sidekick .................................................................................................................................................................................. 8
Dropzone ............................................................................................................................................................................... 9
Page Properties ....................................................................................................................................................................... 10
Basic ..................................................................................................................................................................................... 10
Image .................................................................................................................................................................................... 11
Header Image ...................................................................................................................................................................... 11
Main Content Area – Using the Dropzones ......................................................................................................................... 12
Sample Page Set-Up ........................................................................................................................................................... 12
Populating Content ............................................................................................................................................................ 13
The Sidebar .............................................................................................................................................................................. 15
Adding to the Sidebar ........................................................................................................................................................ 15
Creating a New Sidebar ..................................................................................................................................................... 15
Adding Contact Information.............................................................................................................................................. 15
Previewing the Page ............................................................................................................................................................... 17
Hard Preview ....................................................................................................................................................................... 17
Redirected Pages ................................................................................................................................................................ 17
Working in Multiple Tabs ................................................................................................................................................... 17
Exiting Preview Mode ......................................................................................................................................................... 17
Activating/Publishing the Page ............................................................................................................................................. 17
Deactivation......................................................................................................................................................................... 18
Activate/Deactivate Later................................................................................................................................................... 18
Section 4: Creating Pages & Digital Assets .............................................................................................................................. 18
Section 5: Calendar ..................................................................................................................................................................... 19
Overview .............................................................................................................................................................................. 19
Accessing the Calendar .......................................................................................................................................................... 19
Adding a New Event................................................................................................................................................................ 19
Short Title............................................................................................................................................................................. 19
Title ....................................................................................................................................................................................... 19
Description .......................................................................................................................................................................... 19
Event Tags ............................................................................................................................................................................ 20
Fee ........................................................................................................................................................................................ 21
Location/Room .................................................................................................................................................................... 21
Start Date ............................................................................................................................................................................. 21
End Date .............................................................................................................................................................................. 22
Image .................................................................................................................................................................................... 22
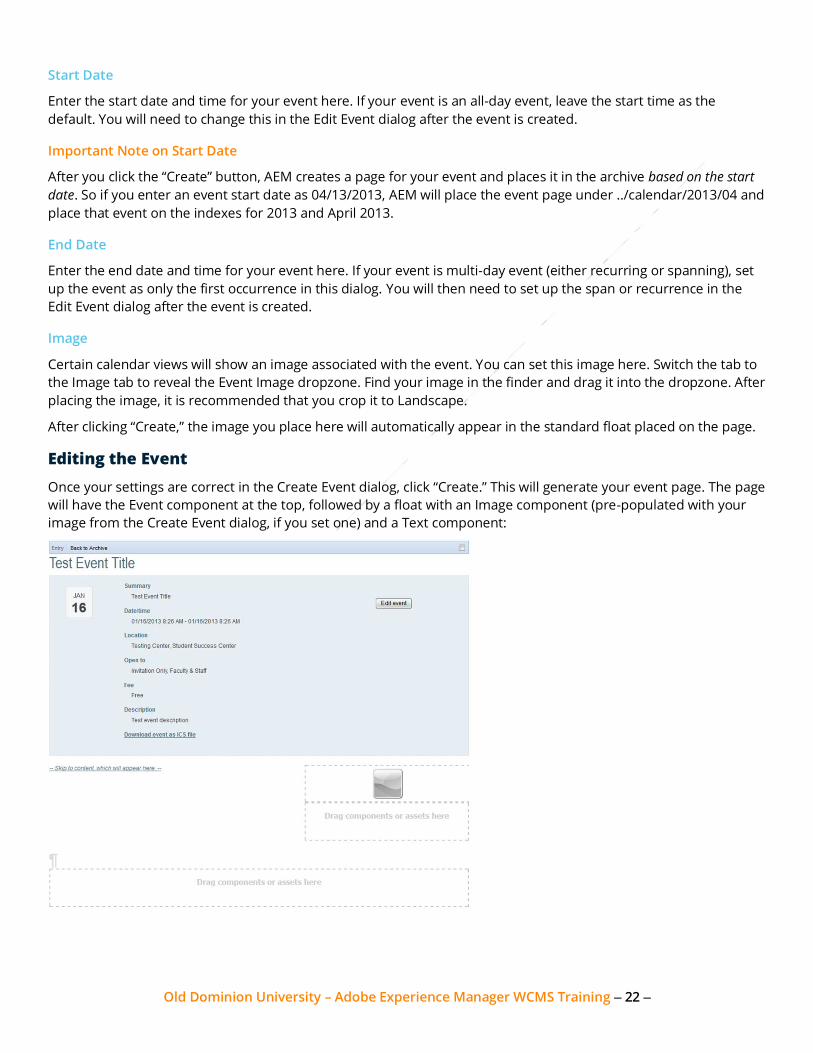
Editing the Event ..................................................................................................................................................................... 22
All Day Event ........................................................................................................................................................................ 23
Repeating Events ................................................................................................................................................................ 23
Additional Event Page Elements ....................................................................................................................................... 23
Activating the Event ............................................................................................................................................................ 24
Deleting an Event ................................................................................................................................................................ 24
Section 6: News/Entries System ................................................................................................................................................ 24
Overview .............................................................................................................................................................................. 24
Full guide to the News/Entries system: www.odu.edu/websolutions/manual/using-aem/news ............................ 24
Section 7: Places/Hours .............................................................................................................................................................. 24
What are “Places?” .................................................................................................................................................................. 24
Full guide to Places: www.odu.edu/websolutions/manual/using-aem/places .......................................................... 24
Section 8: Other Components ................................................................................................................................................... 24
Q&As ............................................................................................................................................................................................. 25
Questions about the new website ........................................................................................................................................ 25
General Content Questions ............................................................................................................................................... 25
University Calendar ............................................................................................................................................................ 25
Video & Interactivity ........................................................................................................ Error! Bookmark not defined.
Website ................................................................................................................................................................................ 25
Using Adobe Experience Manager ....................................................................................................................................... 26
Design .................................................................................................................................................................................. 26
Directory .............................................................................................................................................................................. 26
Events & News .................................................................................................................................................................... 27
Forms ................................................................................................................................................................................... 28
Images & Video ................................................................................................................................................................... 28
Office Pages ......................................................................................................................................................................... 28
Site Structure ....................................................................................................................................................................... 29
Social Media ........................................................................................................................................................................ 30
If I have questions, who can I ask?............................................................................................................................................ 30
Old Dominion University – Adobe Experience Manager WCMS Training – 1 –
Section 1: Concept & Governance
Overview
- The ODU website is topic-based with a user-centric focus. This differs from its former organizational
hierarchy structure.
- User content lives in the “core” of the website with other related content, regardless of ownership.
- Content about organization, unit mission or goals and information internally specific to particular unit lives
on or under the unit’s “office page.”
- University Web & Electronic Communications (Webcomm) is the primary contact for the ODU website.
- There are three website management roles: content owner, content manager, content contributor.
ODU Website Concept
The ODU website is structured for “browseability,” meaning that related pieces of content are housed together
within the site structure, regardless of organizational hierarchy. The question that should be answered is:
If I'm looking at this piece of content, in what other content would I be interested?
This concept opens the opportunity for pages and site sections to be comprised of content from two or more
offices.
Most of the website content should live in the core of the website. The website core is comprised of the major
sections of the site, including the ones listed in the universal navigation: About ODU, Academics, University Life,
Admission & Financial Aid, Research & Impact, Faculty & Staff and Employment. Additional content may be housed
in secondary sections such as the "New to the University" section and the hubs.
You can view the site map document online using any browser other than Internet Explorer at
blue.odu.edu/ao/webcomm/mm/.
The ODU website should present a unified presence in design, language and navigability. While each unit is
responsible for its own content, the website should read and function as one unified website rather than many
separate websites housed together in one place.
Office Pages
Your office page should answer the following questions:
What does your office do at the University?
What services does your office provide?
Who is in your office/how do users contact your office?
Content such as missions, purpose statements and welcome letters are items that should remain with the office
page, as they are not appropriate for the site core.
What should appear on your office page? Mission statements are acceptable or the office may choose to create
some personable prose. Welcome letters should not appear on the main page of an office page - these can be
linked from the main page. Additional required elements of an office page are: contact information and a link to
your directory. You may request to have your Index of Content page published or leave it solely available on AEM
author. Directory pages are maintained by Web Communication. Index of Content pages are system-generated.
Index of Content
The Index of Content page is a system-generated page that shows all of the pages in the WCMS tagged with that
particular unit. The index is presented as a listing in context of the site structure by default. This helps users to

Old Dominion University – Adobe Experience Manager WCMS Training – 2 –
become familiar with the new site structure. An "A to Z" view is also available. The Index of Content pages are not
editable.
Directory
Every office page has a directory page that is tied into the master directory system. At minimum, directory pages
must provide a listing of key personnel within the office. Offices can choose to work with Web Communication to
enhance their directory pages with information about contact protocols, quick information or links to contact forms.
Information on directory pages, minus employee information, must be semi-permanent. Users are not permitted to
directly edit directory pages, so all changes must go through Web Communication. Employee data is driven solely
through human resources position numbers. This allows the system to self-maintain the employee listing. The only
time this listing may change after initial set-up is when positions are eliminated or added.
Functions of Office Pages
Beyond explaining the office's function, there are two possible functions for the new office pages, listed below.
Functional Routing
Some offices, such as Information Technology Services, frequently utilize their office pages as menus of their
services. If your office has such a need, Web Communication will work with you to structure "routers" to your
content in the site core.
Collaboration/Communication Space
A unique opportunity presented by the new site structure is to convert the office page into a communication hub
for your office. Recreation & Wellness, for example, is establishing sections under their office page for trainers,
instructors and other members of their team who need specific information, but that information is likely not
something that the average user will want to see. Web Communications can help you plan out this approach.
A blend of the above would be ideal. The Web Communication team is available as a resource to help you
determine the best fit for your office.
Redirects & Shortcuts
All University offices have a shortcut URL to access their office pages (i.e. http://www.odu.edu/webcomm).
Significant topic areas (such as Safety, Housing and Student Health) also have top-level shortcuts for users to
directly access the information. These topic areas directly address common user needs and/or support the mission
of the University and its strategic plan.
Additional redirects will only be granted on a temporary basis for marketing purposes that directly support the
university's strategic plan. Granting of temporary redirects is at the discretion of the Director of University Web &
Digital Communication and the Assistant Vice President for Strategic Communication & Marketing.

Old Dominion University – Adobe Experience Manager WCMS Training – 3 –
Governance
The ODU website is a joint effort of University Web & Digital Communication (WebComm) and the Information
Technology Services with University Web & Digital Communication serving as the primary contact. All questions and
requests must come through WebComm.
Within each office, there are three potential website management roles:
Content Owner
Content Manager
Content Contributor
Descriptions of each of these roles are available online at
www.odu.edu/website/content-management/responsibilities
No role has permissions to create pages, delete pages, change the page URL or edit directory or index of content pages.
Web Communication Partners/Liaisons
There is a specific member of the University Web & Digital Communication team assigned as the liaison to each
office or unit at the University.
Web Communication Partners: www.odu.edu/website/liaisons
AEM Users Group
All content managers and contributors are encouraged to join the AEM Users Group. The group meets once a
month for advanced training, review of best practices, preview upcoming functionality, examine issues and other
topics.
AEM Users Group: www.odu.edu/websolutions/usersgroup
Section 2: AEM Basics
Overview
- AEM can only be accessed via ODU’s internal network.
- You will primarily use the “Websites” module after logging in. You can also browse the digital assets by
choosing the “Digital Assets” module.
- The tree pane allows you to see the entire website tree.
- The pages pane allows you to view the child pages of a page and choose a page for editing.
- The ODU website is comprised entirely of pages. There are no “directories” or “folders” in the traditional
sense.
- AEM uses the parent/child concept. Items that fall under or within another item are considered “child” items.
- ODU’s template uses a grid system. The standard page has a 12 column content area and a 4 column
sidebar.
Accessing AEM
Adobe Experience Manager is a Web-based platform. You do not need to install any special software to access the
system. However, the system is only available from the internal campus network. This means you must:
A. Be plugged into a campus Ethernet port;
B. Be on the campus virtual private network (VPN) or
C. Connect to the Monarch Virtual Environment (move.odu.edu)
Old Dominion University – Adobe Experience Manager WCMS Training – 4 –
AEM is not available on the campus wireless networks (AccessODU, MonarchODU, eduRoam) without a VPN
connection.
The recommended browser is Firefox. AEM also works well with Google Chrome. You may also use Opera, Safari or
Microsoft Edge. AEM does not work with Microsoft Internet Explorer (any version).
The URL for accessing the authoring environment is:
http://www.odu.edu/author
Logging In
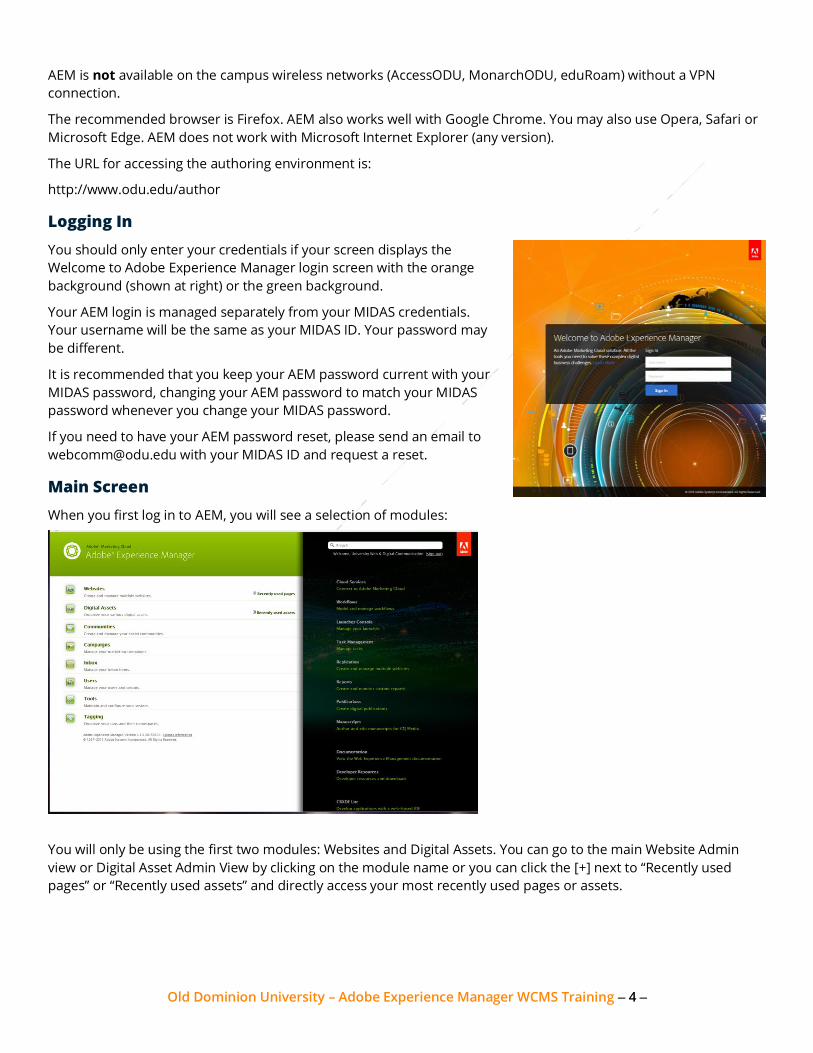
You should only enter your credentials if your screen displays the
Welcome to Adobe Experience Manager login screen with the orange
background (shown at right) or the green background.
Your AEM login is managed separately from your MIDAS credentials.
Your username will be the same as your MIDAS ID. Your password may
be different.
It is recommended that you keep your AEM password current with your
MIDAS password, changing your AEM password to match your MIDAS
password whenever you change your MIDAS password.
If you need to have your AEM password reset, please send an email to
[email protected] with your MIDAS ID and request a reset.
Main Screen
When you first log in to AEM, you will see a selection of modules:
You will only be using the first two modules: Websites and Digital Assets. You can go to the main Website Admin
view or Digital Asset Admin View by clicking on the module name or you can click the [+] next to “Recently used
pages” or “Recently used assets” and directly access your most recently used pages or assets.
Old Dominion University – Adobe Experience Manager WCMS Training – 5 –
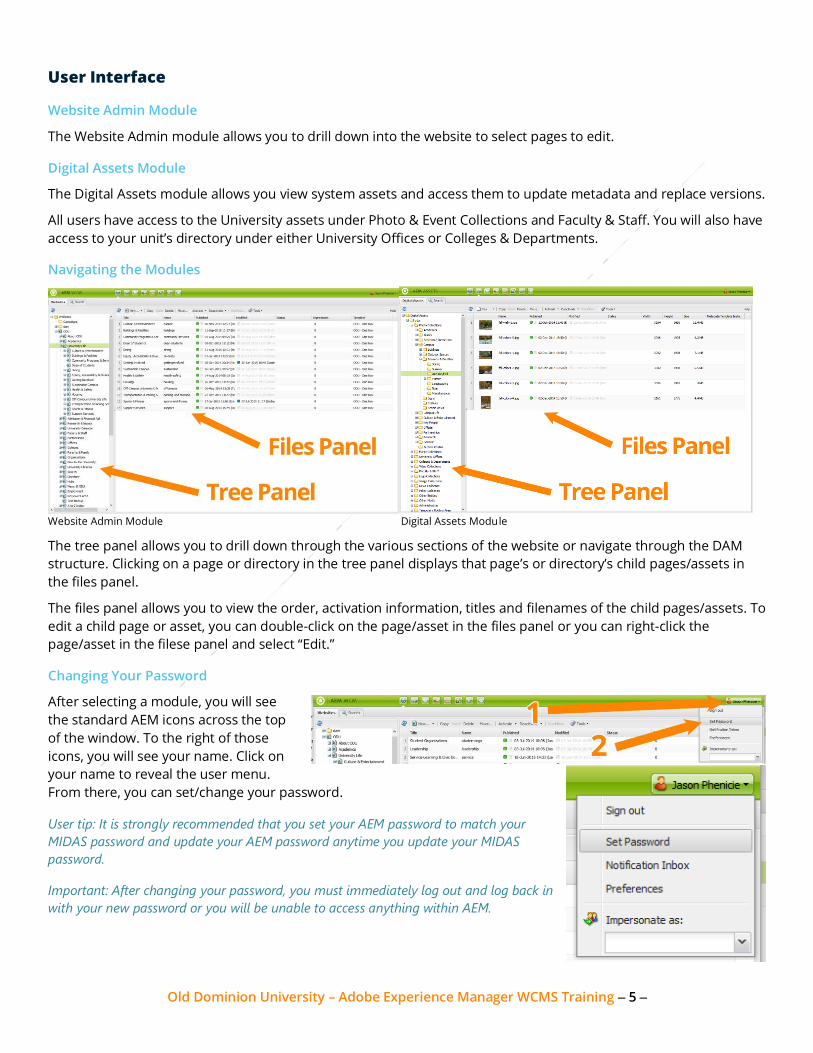
User Interface
Website Admin Module
The Website Admin module allows you to drill down into the website to select pages to edit.
Digital Assets Module
The Digital Assets module allows you view system assets and access them to update metadata and replace versions.
All users have access to the University assets under Photo & Event Collections and Faculty & Staff. You will also have
access to your unit’s directory under either University Offices or Colleges & Departments.
Navigating the Modules
Website Admin Module Digital Assets Module
The tree panel allows you to drill down through the various sections of the website or navigate through the DAM
structure. Clicking on a page or directory in the tree panel displays that page’s or directory’s child pages/assets in
the files panel.
The files panel allows you to view the order, activation information, titles and filenames of the child pages/assets. To
edit a child page or asset, you can double-click on the page/asset in the files panel or you can right-click the
page/asset in the filese panel and select “Edit.”
Changing Your Password
After selecting a module, you will see
the standard AEM icons across the top
of the window. To the right of those
icons, you will see your name. Click on
your name to reveal the user menu.
From there, you can set/change your password.
User tip: It is strongly recommended that you set your AEM password to match your
MIDAS password and update your AEM password anytime you update your MIDAS
password.
Important: After changing your password, you must immediately log out and log back in
with your new password or you will be unable to access anything within AEM.
Old Dominion University – Adobe Experience Manager WCMS Training – 6 –
AEM Concepts
Parent/Child & Inheritance
AEM does not use directories or folders like some websites. Instead, pages can have child pages. The child pages
should contain a deeper look at the content introduced on the parent page. This encourages content development
in the same manner as a user would browse for information.
This child/parent relationship creates URLs that resemble folders. If the page name for Web Communication’s main
page is “webcomm” and there is a child page called “Web Communication News” with the name “news,” then the
URL for that page would be: odu.edu/webcomm/news.
Certain elements within the ODU template are inherited elements. In these cases, child pages inherit these
elements from their parent pages. Common inheritances are: page theme, header image and sidebar.
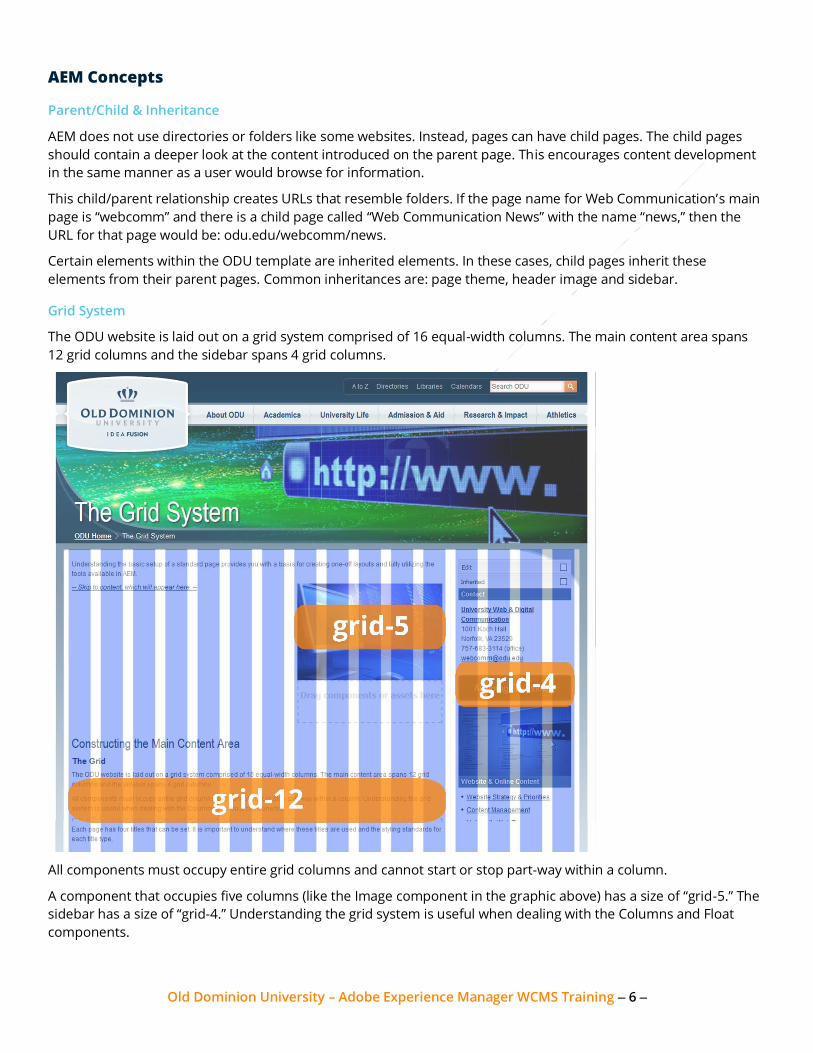
Grid System
The ODU website is laid out on a grid system comprised of 16 equal-width columns. The main content area spans
12 grid columns and the sidebar spans 4 grid columns.
All components must occupy entire grid columns and cannot start or stop part-way within a column.
A component that occupies five columns (like the Image component in the graphic above) has a size of “grid-5.” The
sidebar has a size of “grid-4.” Understanding the grid system is useful when dealing with the Columns and Float
components.
Old Dominion University – Adobe Experience Manager WCMS Training – 7 –
Section 3: Editing & Publishing
Overview
- The Edit Page view uses three elements: finder, sidekick and dropzone.
- The sidekick contains your components and controls for the page.
- Page properties include the page’s titles, its description and associated image.
- Your primary content should be placed in the main content area.
- The sidebar should contain related information. The sidebar is inherited from a page’s parent unless
settings are changed.
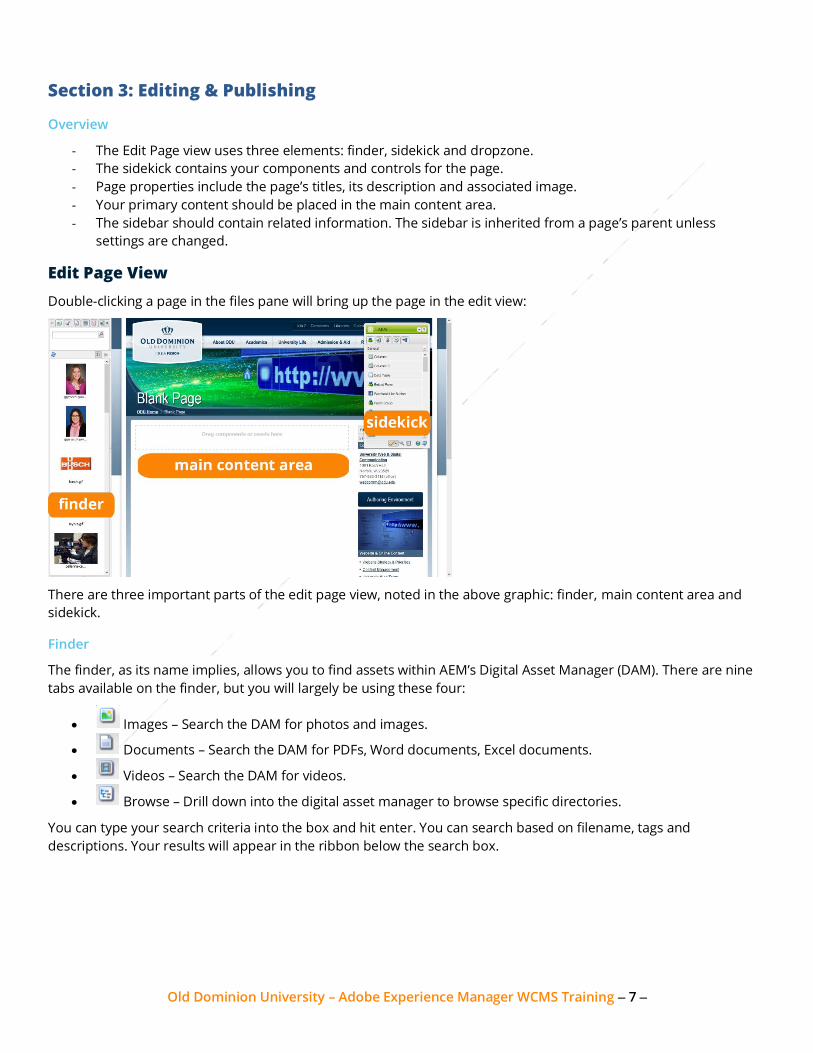
Edit Page View
Double-clicking a page in the files pane will bring up the page in the edit view:
There are three important parts of the edit page view, noted in the above graphic: finder, main content area and
sidekick.
Finder
The finder, as its name implies, allows you to find assets within AEM’s Digital Asset Manager (DAM). There are nine
tabs available on the finder, but you will largely be using these four:
Images – Search the DAM for photos and images.
Documents – Search the DAM for PDFs, Word documents, Excel documents.
Videos – Search the DAM for videos.
Browse – Drill down into the digital asset manager to browse specific directories.
You can type your search criteria into the box and hit enter. You can search based on filename, tags and
descriptions. Your results will appear in the ribbon below the search box.

Old Dominion University – Adobe Experience Manager WCMS Training – 8 –
Sidekick
The sidekick is your control panel within AEM. Here are the sidekick elements:
Components Tab
The components tab contains all of the components available for use on the page. A complete reference of current
AEM components can be found at www.odu.edu/websolutions/manual/components. Components are divided into
four categories.
General
The General components contain the components will you use most often, including Image, Text and Float.
Academics (administrators only)
The Academics components control much of the back-end functionality of academics and academic programs on
the site.
Lists
The Lists components take advantage of AEM’s automatic listing and metadata capabilities.
Other
The Other components include social integration and additional back-end functionality of AEM.
Page Control Tab
The pages tab provides functions available to perform on the current page.
Page Properties…
This brings up the Page Properties dialog, which allows you to set the titles, description and images associated with
the current page.
Activate Page
This activates (publishes) the current page, making it live and public.
Lock Page/Unlock Page
This locks the page so that only you or an administrator can edit or publish the page. This is useful for working on a
page in an office where multiple people might be working on the office ’s pages at once. Important Note: Be sure to
unlock your page as soon as you are done with your work. No other users, including administrators, can unlock a
page that you have locked.
Old Dominion University – Adobe Experience Manager WCMS Training – 9 –
Show References…
Show references brings up a dialog showing what pages are linking to or utilizing content from the current page.
Info Tab
The Info Tab provides access to a list of the permissions groups that are part of your AEM access profile and the
audit log for the current page.
Versioning Tab
Versioning allows you to take a snapshot of your page in its current state so that you can restore to this state in the
future. A full guide to versioning is available at www.odu.edu/websolutions/manual/using-aem/versions.
Workflows Tab
There are currently no workflows available for users, so you will not be using this tab.
Edit Mode (button)
The Edit Mode button places your instance of AEM into edit mode, so you can manipulate the components on the
page. This is the default state.
Preview Mode (button)
The Preview Mode button places your instance of AEM into preview mode, where it attempts to approximate what
your live page will look like. See the section on Previewing the Page for important information about preview.
Website Admin (button)
This button will open up a new browser tab with the Website Admin interface so you can select another page.
Refresh (button)
This button performs the same action as the refresh button in your browser.
Main Content Area
This is where you will create the majority of your content by dragging and dropping components into the
dropzones.
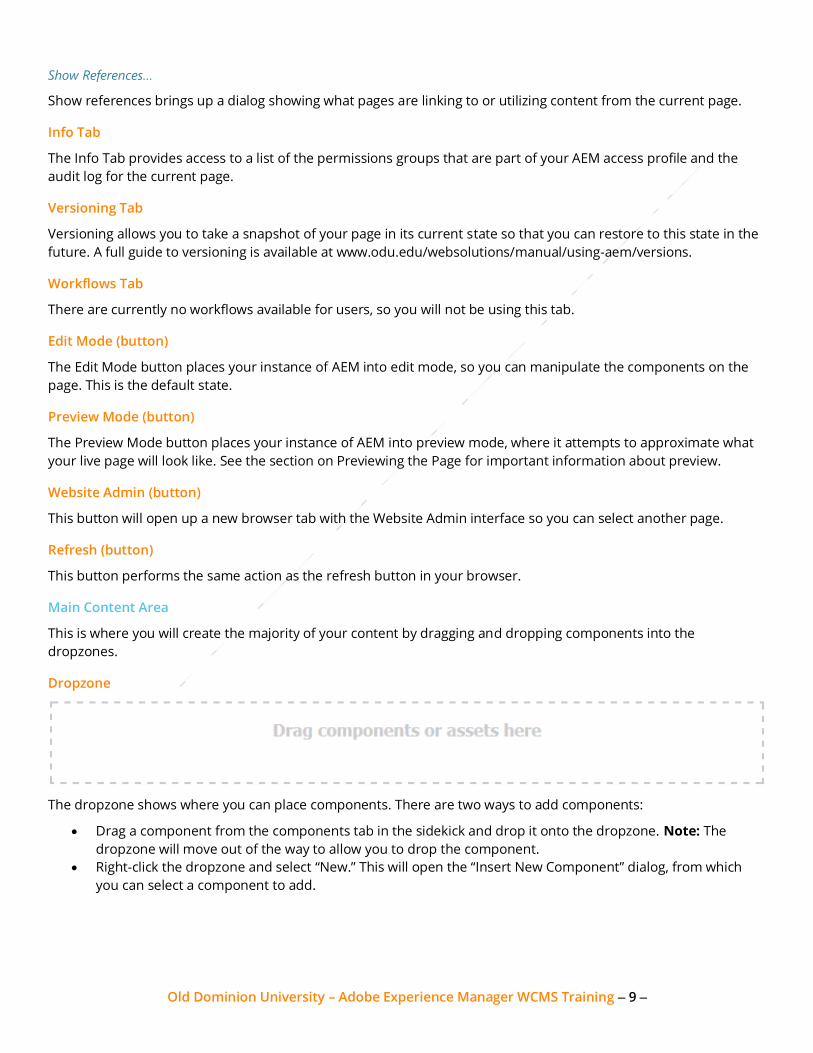
Dropzone
The dropzone shows where you can place components. There are two ways to add components:
Drag a component from the components tab in the sidekick and drop it onto the dropzone. Note: The
dropzone will move out of the way to allow you to drop the component.
Right-click the dropzone and select “New.” This will open the “Insert New Component” dialog, from which
you can select a component to add.
Old Dominion University – Adobe Experience Manager WCMS Training – 10 –
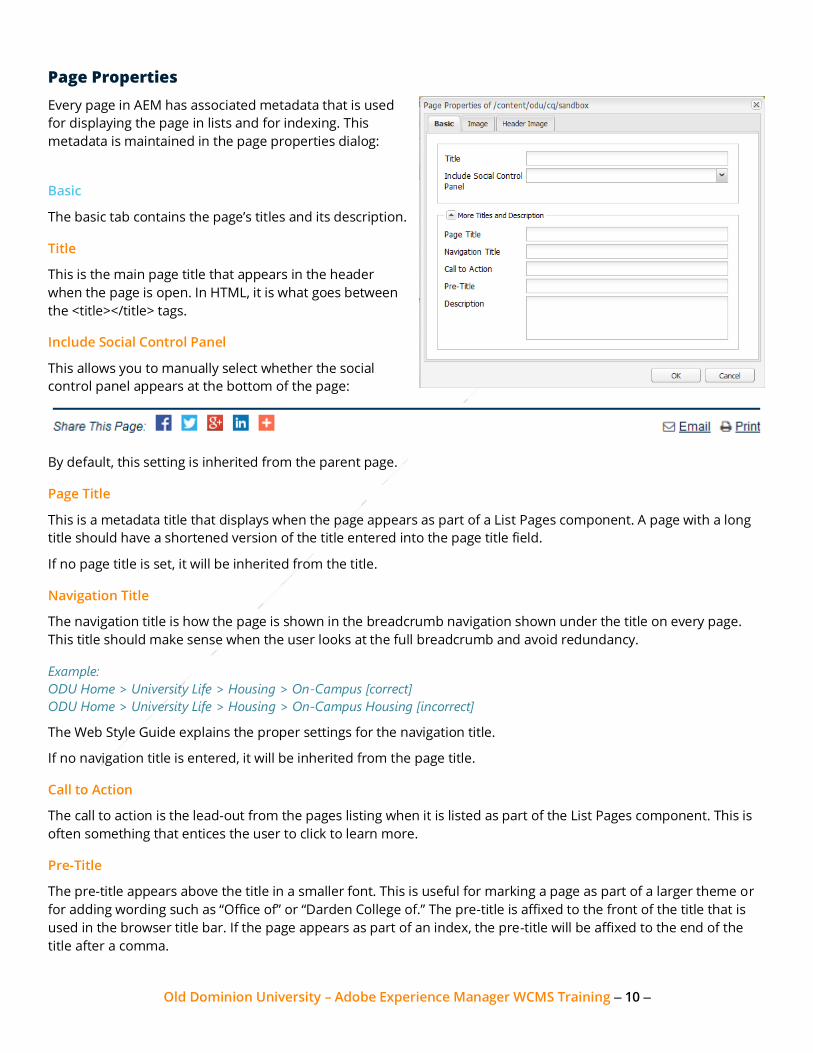
Page Properties
Every page in AEM has associated metadata that is used
for displaying the page in lists and for indexing. This
metadata is maintained in the page properties dialog:
Basic
The basic tab contains the page’s titles and its description.
Title
This is the main page title that appears in the header
when the page is open. In HTML, it is what goes between
the <title></title> tags.
Include Social Control Panel
This allows you to manually select whether the social
control panel appears at the bottom of the page:
By default, this setting is inherited from the parent page.
Page Title
This is a metadata title that displays when the page appears as part of a List Pages component. A page with a long
title should have a shortened version of the title entered into the page title field.
If no page title is set, it will be inherited from the title.
Navigation Title
The navigation title is how the page is shown in the breadcrumb navigation shown under the title on every page.
This title should make sense when the user looks at the full breadcrumb and avoid redundancy.
Example:
ODU Home > University Life > Housing > On-Campus [correct]
ODU Home > University Life > Housing > On-Campus Housing [incorrect]
The Web Style Guide explains the proper settings for the navigation title.
If no navigation title is entered, it will be inherited from the page title.
Call to Action
The call to action is the lead-out from the pages listing when it is listed as part of the List Pages component. This is
often something that entices the user to click to learn more.
Pre-Title
The pre-title appears above the title in a smaller font. This is useful for marking a page as part of a larger theme or
for adding wording such as “Office of” or “Darden College of.” The pre-title is affixed to the front of the title that is
used in the browser title bar. If the page appears as part of an index, the pre-title will be affixed to the end of the
title after a comma.

Old Dominion University – Adobe Experience Manager WCMS Training – 11 –
Examples:
If the Title is “Education” and the pre-title is “Darden College of” then in the title bar of your browser, it will show
“Darden College of Education.” In an index, it would show as “Education, Darden College of.”
If no pre-title is entered, nothing will show.
Description
The description is a field that tells the user what is on the page. It can be a summary or some verbiage that entices
the user to click the call to action to learn more. This text should be written for user reading, as it will appear when
the page appears as a result of the List Pages component.
Basic Tab Elements in Use
Image
The image tab contains a dropzone for the image that will be associated with the page wherever the page appears
as part of the List Pages component (see above). Simply find your image using the finder, open up the Image tab
and drag your image over from the finder and then crop it appropriately.
The image must be cropped to Landscape (6x4).
Every page should have an image set for it. The image will also appear as part of the native AEM search results.
Header Image
The header image tab contains a dropzone that allows you to set the image that appears in the header behind the
title. The header image does not have to be set for each page. Pages that do not have header images will inherit its
header image from its parent page.
To set the header image, simply drag an image asset over from the finder into the header image dropzone. Select
“Crop” at the bottom of the window and choose Wide.
The header image must be cropped to Wide.

Old Dominion University – Adobe Experience Manager WCMS Training – 12 –
Main Content Area – Using the Dropzones
Your primary content for the page should appear in the main content area. On new pages, this will be represented
by an empty dropzone. You can drag components over from the sidekick to begin adding content to the page.
Sample Page Set-Up
This example will help you set up the standard page layout:
First, find the Float component in your sidekick and drag it onto the main dropzone. When you’ve positioned the
cursor someplace where it is acceptable to place the float, you will see the outline change and the dropbox will
move to accommodate the component:
Release the mouse to place the component. You should now have two dropzones.
Next, find the Image component and drag it into the smaller dropzone inside the float component and release:

Old Dominion University – Adobe Experience Manager WCMS Training – 13 –
Find the Text component and drag and drop it into the main dropzone:
We forgot that this page has a subtitle, so we’ll need to add a heading. Find the Heading component (not the Header
component) and drag it onto the main content area and hover it over the ¶ symbol for the Text component. The
Text component will drop down and the outline of the heading component will appear above it. Release your
mouse. This is how you insert components between other components.
Populating Content
Setting the Image Component
In the finder, make sure you are on the images tab and type in a search term for a photo you might like to place.
Drag the image from the finder over to your Image component. When you are correctly positioned within the
component, it will have a green outline:
Release your mouse to place the image. You can view the image’s properties by hovering over the image. Now,
right-click the image and choose Edit to bring up the Image properties dialog. You can review the various settings
via the online component reference. For now, switch to the advanced tab, scroll down and click “Show Lightbox.”
Old Dominion University – Adobe Experience Manager WCMS Training – 14 –
This will set the image so that when the user hovers over it, they will be offered a link to “Show Large” so they can
see a larger version of the image. Click OK.
Setting the Heading Component
Hover over the “Edit Heading” text, right-click and choose “Edit” to bring up the heading properties dialog. Enter a
heading in the first line. This is going to act as a subtitle for our page, so in the Type dropdown, choose “Extra Large
(h1).” Click OK. Heading levels must be used in accordance with the Web Style Guide.
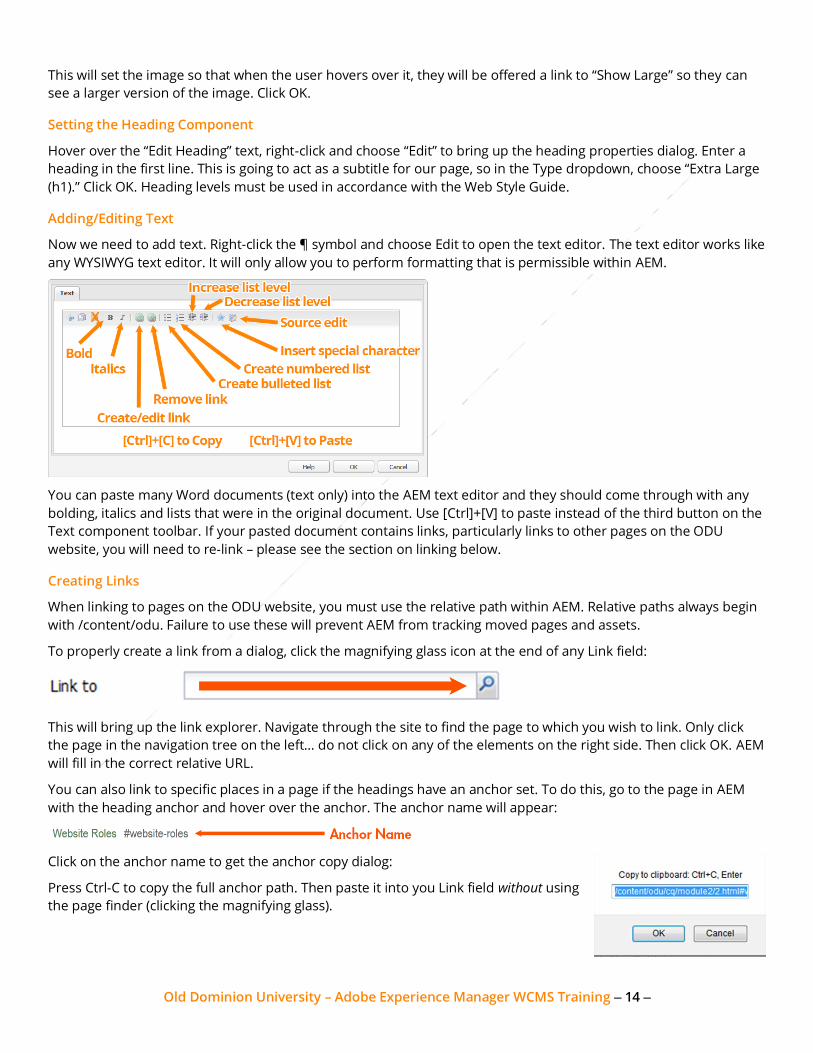
Adding/Editing Text
Now we need to add text. Right-click the ¶ symbol and choose Edit to open the text editor. The text editor works like
any WYSIWYG text editor. It will only allow you to perform formatting that is permissible within AEM.
You can paste many Word documents (text only) into the AEM text editor and they should come through with any
bolding, italics and lists that were in the original document. Use [Ctrl]+[V] to paste instead of the third button on the
Text component toolbar. If your pasted document contains links, particularly links to other pages on the ODU
website, you will need to re-link – please see the section on linking below.
Creating Links
When linking to pages on the ODU website, you must use the relative path within AEM. Relative paths always begin
with /content/odu. Failure to use these will prevent AEM from tracking moved pages and assets.
To properly create a link from a dialog, click the magnifying glass icon at the end of any Link field:
This will bring up the link explorer. Navigate through the site to find the page to which you wish to link. Only click
the page in the navigation tree on the left… do not click on any of the elements on the right side. Then click OK. AEM
will fill in the correct relative URL.
You can also link to specific places in a page if the headings have an anchor set. To do this, go to the page in AEM
with the heading anchor and hover over the anchor. The anchor name will appear:
Click on the anchor name to get the anchor copy dialog:
Press Ctrl-C to copy the full anchor path. Then paste it into you Link field without using
the page finder (clicking the magnifying glass).
Old Dominion University – Adobe Experience Manager WCMS Training – 15 –
The Sidebar
The sidebar is the content the runs down the right side of each page. In the standard template, the sidebar occupies
a space of grid-4. This is where information that is related to or supplemental to the main content should be placed.
The sidebar should not be utilized as a navigation device unless it is absolutely necessary. The Web Style Guide has
more specifics about using the sidebar.
By default, a page inherits its sidebar from its parent. It is recommended that the sidebar be consistent throughout
subsections of the site.
Adding to the Sidebar
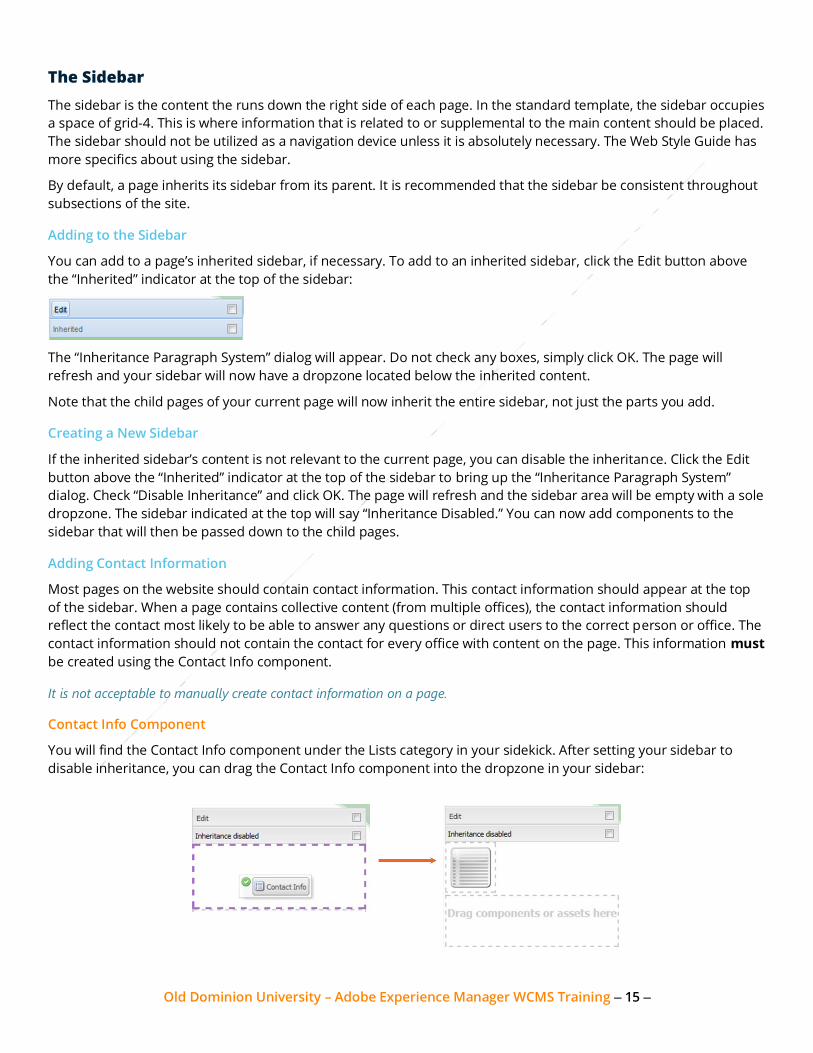
You can add to a page’s inherited sidebar, if necessary. To add to an inherited sidebar, click the Edit button above
the “Inherited” indicator at the top of the sidebar:
The “Inheritance Paragraph System” dialog will appear. Do not check any boxes, simply click OK. The page will
refresh and your sidebar will now have a dropzone located below the inherited content.
Note that the child pages of your current page will now inherit the entire sidebar, not just the parts you add.
Creating a New Sidebar
If the inherited sidebar’s content is not relevant to the current page, you can disable the inheritance. Click the Edit
button above the “Inherited” indicator at the top of the sidebar to bring up the “Inheritance Paragraph System”
dialog. Check “Disable Inheritance” and click OK. The page will refresh and the sidebar area will be empty with a sole
dropzone. The sidebar indicated at the top will say “Inheritance Disabled.” You can now add components to the
sidebar that will then be passed down to the child pages.
Adding Contact Information
Most pages on the website should contain contact information. This contact information should appear at the top
of the sidebar. When a page contains collective content (from multiple offices), the contact information should
reflect the contact most likely to be able to answer any questions or direct users to the correct person or office. The
contact information should not contain the contact for every office with content on the page. This information must
be created using the Contact Info component.
It is not acceptable to manually create contact information on a page.
Contact Info Component
You will find the Contact Info component under the Lists category in your sidekick. After setting your sidebar to
disable inheritance, you can drag the Contact Info component into the dropzone in your sidebar:
Old Dominion University – Adobe Experience Manager WCMS Training – 16 –
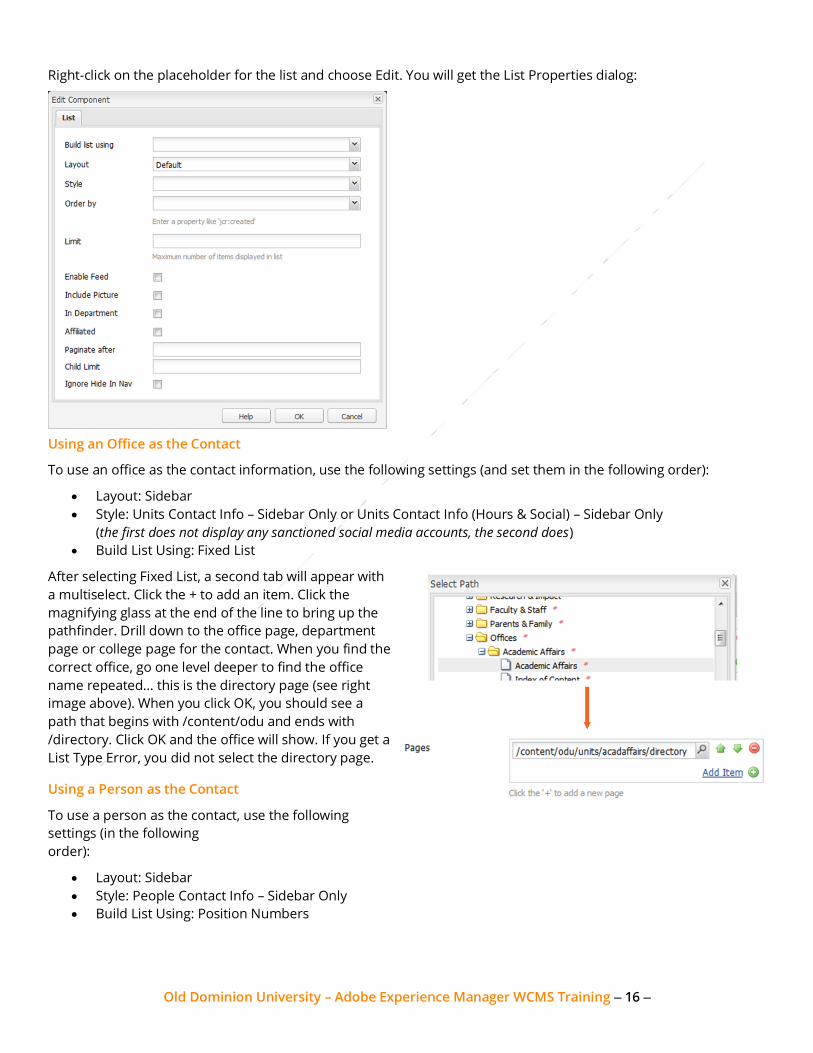
Right-click on the placeholder for the list and choose Edit. You will get the List Properties dialog:
Using an Office as the Contact
To use an office as the contact information, use the following settings (and set them in the following order):
Layout: Sidebar
Style: Units Contact Info – Sidebar Only or Units Contact Info (Hours & Social) – Sidebar Only
(the first does not display any sanctioned social media accounts, the second does)
Build List Using: Fixed List
After selecting Fixed List, a second tab will appear with
a multiselect. Click the + to add an item. Click the
magnifying glass at the end of the line to bring up the
pathfinder. Drill down to the office page, department
page or college page for the contact. When you find the
correct office, go one level deeper to find the office
name repeated… this is the directory page (see right
image above). When you click OK, you should see a
path that begins with /content/odu and ends with
/directory. Click OK and the office will show. If you get a
List Type Error, you did not select the directory page.
Using a Person as the Contact
To use a person as the contact, use the following
settings (in the following
order):
Layout: Sidebar
Style: People Contact Info – Sidebar Only
Build List Using: Position Numbers

Old Dominion University – Adobe Experience Manager WCMS Training – 17 –
When surfacing people as contacts, you must use the Position Numbers
option. This allows for continuity of contact information.
After selecting Position Numbers, a new tab will appear with a multiselect. Click the + to add an item. You will then
need to enter the Position # for the person who is the desired contact. Here are examples of properly
formatted position numbers:
Classified: 00165A, 01032A
Administrative Faculty: FA145A, FP444A, GA102A, GP075A
Teaching Faculty: F0472A, F0026A
Hourly Positions: HR4622, HR3296
Those are the only types of employees who can be surfaced using the Contact Info component.
Using position numbers ties the contact to a position, rather than a specific person. If a person is the contact and he
or she leaves, his or her replacement would likely be the new contact. The position number allows the WCMS to
remove the departed person and then automatically add the new person when the position is filled.
Previewing the Page
You can preview your page at any time by clicking the preview mode button at the bottom of your sidekick. The
initial preview will attempt to approximate what your page will look like when published to the live server.
To exit preview mode, click the down arrow on the “rolled-up” sidekick.
Hard Preview
Some components, such as Tabs, will not display correctly with simple preview mode. To see these components
properly, you will need to perform a hard preview. Enter preview mode and then refresh your browser window.
Exiting hard preview mode is the same as for regular preview.
Redirected Pages
If the page you are working on is redirecting, you can only do a simple preview and you cannot navigate to other
pages. If you do either, the redirect will take effect and you will not be able to view the page.
If you accidentally do a hard preview or navigate, you will need to close the tab and open up a non-redirected page
(About ODU is recommended) and return to edit mode.
Working in Multiple Tabs
If you are working in multiple tabs, your AEM mode is persistent across all of them. So if you enter preview mode in
one tab and switch to another already open tab, you will be in preview mode in that tab, even if it looks like you are
in edit mode.
Exiting Preview Mode
After entering preview mode, AEM will “roll up” the sidekick. To exit preview mode, click
the down arrow.
Activating/Publishing the Page
All changes made within AEM are instantly saved and are only viewable from within the AEM authoring
environment. In order to make the changes public, you must activate the page.

Old Dominion University – Adobe Experience Manager WCMS Training – 18 –
From the edit page view, switch your sidekick to the page tab. You will see Activate Page (or Activate Entry) in the
sidekick. Click that button. After a moment, you will see a
notification slide in at the top right of the screen indicating that
the page has been activated.
Note: Only content managers can activate pages. Content
contributors must notify an appropriate content manager that edits
are complete so the page can be reviewed and activated.
If your page uses unactivated or updated assets, AEM will
display the activate dialog. Click “Activate” to ensure all page
assets are appropriately activated. You may need to contact
WebComm to activate assets that are not part of your
permissions group.
Deactivation
Deactivating a page removes it from the live website. Pages can only be deactivated from the websites view.
Navigate to and click on the parent page in the tree pane to list the child pages in the pages pane. Find the page you
wish to deactivate and select it. You can either right-click and choose Deactivate or click Deactivate in the menu bar.
Deactivating a page will also remove it from view in all published instances of the list pages and will also remove any
referenced content.
Important: Deactivating a page will also deactivate all of its child pages. If you deactivate a page by mistake, you
will need to individually reactivate each of its child pages.
Activate/Deactivate Later
You can schedule a page to be activated or deactivated at a later time. This is particularly useful if you have new (or
embargoed) information that should not be visible until a certain date and time. You can edit the page and load in
the information and just set the activate later so that the changes will take effect when specified.
To activate or deactivate later, select the parent page in the websites view tree pane and then select the page in the
pages pane. Click the dropdown next to either Activate or Deactivate and choose Activate Later or Deactivate Later
from the dropdown. Set the desired date and time in the resulting dialog and click OK.
Please be mindful and careful when using this capability. Once the workflow to activate later or deactivate later has been
initiated, it can only be cancelled by a Web Development system administrator.
Section 4: Creating Pages & Digital Assets
Users cannot create new pages directly. New pages must be requested via the New Page Request Form at
odu.edu/websolutions.
If your unit is a DAM self-service unit, you can add assets to the DAM directly. Please carefully review the digital
asset standards and DAM manual at www.odu.edu/websolutions/manual/dam.
Assets that do not meet the digital asset standards are subject to deactivation and deletion.
Content managers and contributors can create new calendar and news entries without submitting a new page
request.
Old Dominion University – Adobe Experience Manager WCMS Training – 19 –
Section 5: Calendar
Overview
- Every unit has a calendar.
- The unit calendar can be used to populate other calendars through tags.
- Tagging is important in using the calendar system.
- Calendar pages can be very simple or as complex as a regular page.
Accessing the Calendar
Your unit’s calendar is located under “Offices” and then your unit name. To access it, click on your unit’s name under
Offices in the tree pane of the websites view. Next, double-click on the calendar page in the pages pane.
All unit calendars will be set up in calendar view, showing only the events from that particular unit.
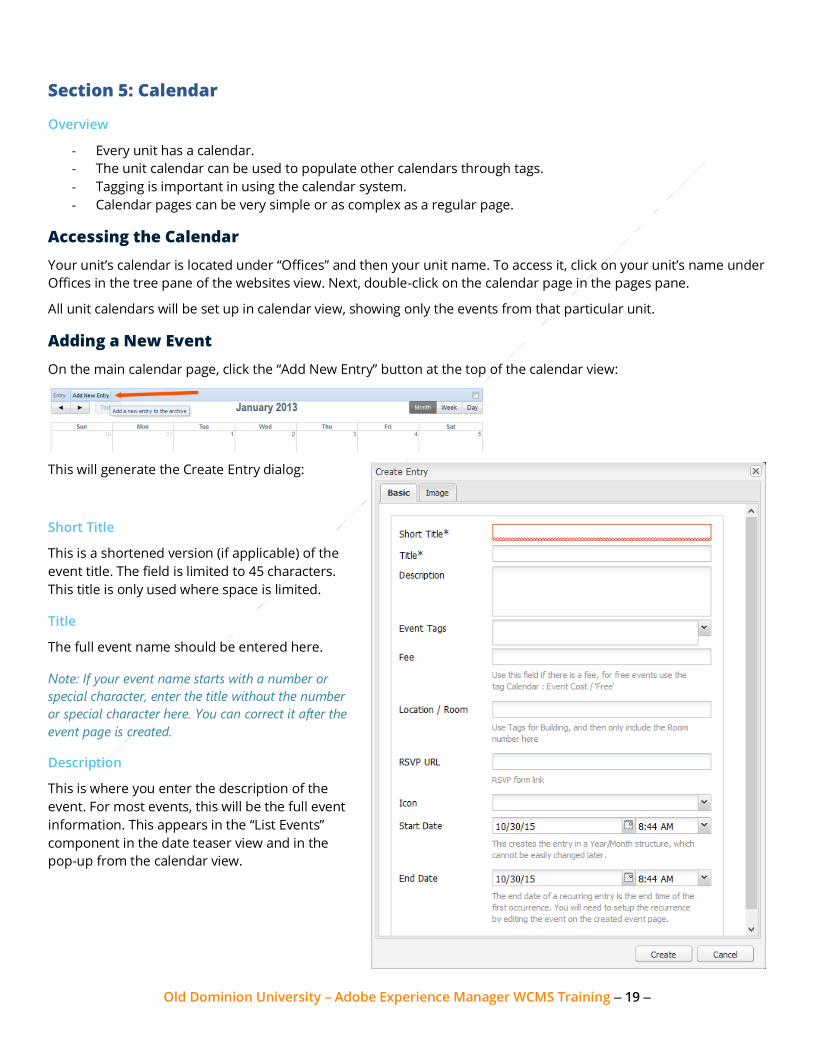
Adding a New Event
On the main calendar page, click the “Add New Entry” button at the top of the calendar view:
This will generate the Create Entry dialog:
Short Title
This is a shortened version (if applicable) of the
event title. The field is limited to 45 characters.
This title is only used where space is limited.
Title
The full event name should be entered here.
Note: If your event name starts with a number or
special character, enter the title without the number
or special character here. You can correct it after the
event page is created.
Description
This is where you enter the description of the
event. For most events, this will be the full event
information. This appears in the “List Events”
component in the date teaser view and in the
pop-up from the calendar view.
Old Dominion University – Adobe Experience Manager WCMS Training – 20 –
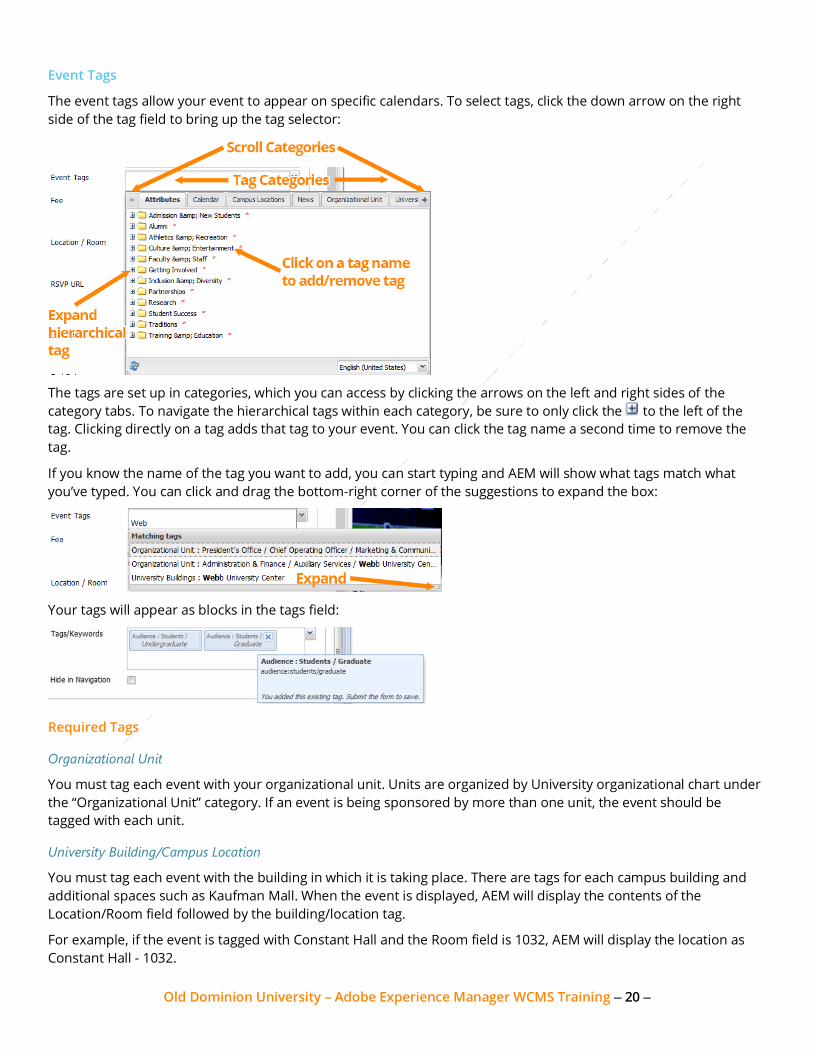
Event Tags
The event tags allow your event to appear on specific calendars. To select tags, click the down arrow on the right
side of the tag field to bring up the tag selector:
The tags are set up in categories, which you can access by clicking the arrows on the left and right sides of the
category tabs. To navigate the hierarchical tags within each category, be sure to only click the to the left of the
tag. Clicking directly on a tag adds that tag to your event. You can click the tag name a second time to remove the
tag.
If you know the name of the tag you want to add, you can start typing and AEM will show what tags match what
you’ve typed. You can click and drag the bottom-right corner of the suggestions to expand the box:
Your tags will appear as blocks in the tags field:
Required Tags
Organizational Unit
You must tag each event with your organizational unit. Units are organized by University organizational chart under
the “Organizational Unit” category. If an event is being sponsored by more than one unit, the event should be
tagged with each unit.
University Building/Campus Location
You must tag each event with the building in which it is taking place. There are tags for each campus building and
additional spaces such as Kaufman Mall. When the event is displayed, AEM will display the contents of the
Location/Room field followed by the building/location tag.
For example, if the event is tagged with Constant Hall and the Room field is 1032, AEM will display the location as
Constant Hall - 1032.
Old Dominion University – Adobe Experience Manager WCMS Training – 21 –
Reach/Audience (under the Calendar category)
Each event should be tagged with its reach (who is eligible to participate). The reach tags are located under the
Calendar category and the Reach subcategory. These will appear as a comma-separated list after the words “Open
to:” on your event listing. Please note that “Campus Community” is hierarchical tag that divides the campus
community into smaller subsets in case, for example, your event is only open to graduate students.
Free Events
If there is no charge for your event, you should tag it with the Free tag under the Calendar category and Cost
subcategory. This will cause AEM to indicate that the event is free. This will override any entry in the Fee field.
Optional Tags
You can also utilize appropriate tags under the Attributes category to specify the event type. These are used to
populate specific calendars. For example, an “Arts” calendar might pull all items tagged with any subtag under
“Culture & Entertainment,” regardless of which unit posted it.
Future AEM development will enable users to see only calendar events belonging to a specific category. This
functionality will be based off of these Attribute tags.
University Master Calendar
Most events should be placed on the University’s master calendar. To place your event on the master calendar,
select the University Master Calendar tag under the “Calendar” category.
A Note on Tags
You should not tag something with a particular tag and its parent tag. When a component is pulling items based on
tags and selects the parent tag, it will pick up items tagged with the parent and its child tags.
Example: An event is tagged with “Dance.” A List Events component is set to pick up anything tagged “Culture &
Entertainment.” This List Events component will list the Dance event because “Dance” is a child tag of “Culture &
Entertainment.”
Fee
If your event is not free, you should enter the entrance/participation fee here. Note that if you have added the
“Free” tag above, it will override anything entered into this field.
Location/Room
Enter the actual room number/name here. If your event is in 1032 Constant Hall, you will tag the event with
Constant Hall and then enter 1032 here. AEM will display the location as “Constant Hall – 1032.” If you’re using a
named room, in Webb Center for example, enter the room name. If you enter “Board of Visitors Room” and tag
Webb University Center, AEM will display “Webb University Center – Board of Visitors Room.”
RSVP URL
If you have set up a page with an RSVP form or RSVP information, enter that URL here.
Icon
The portal’s List Events component displays an icon for each event. Your calendar page has a pre-set icon that all of
your events will inherit by default. You can override the default icon by selecting a new one here.
Old Dominion University – Adobe Experience Manager WCMS Training – 22 –
Start Date
Enter the start date and time for your event here. If your event is an all-day event, leave the start time as the
default. You will need to change this in the Edit Event dialog after the event is created.
Important Note on Start Date
After you click the “Create” button, AEM creates a page for your event and places it in the archive based on the start
date. So if you enter an event start date as 04/13/2013, AEM will place the event page under ../calendar/2013/04 and
place that event on the indexes for 2013 and April 2013.
End Date
Enter the end date and time for your event here. If your event is multi-day event (either recurring or spanning), set
up the event as only the first occurrence in this dialog. You will then need to set up the span or recurrence in the
Edit Event dialog after the event is created.
Image
Certain calendar views will show an image associated with the event. You can set this image here. Switch the tab to
the Image tab to reveal the Event Image dropzone. Find your image in the finder and drag it into the dropzone. After
placing the image, it is recommended that you crop it to Landscape.
After clicking “Create,” the image you place here will automatically appear in the standard float placed on the page.
Editing the Event
Once your settings are correct in the Create Event dialog, click “Create.” This will generate your event page. The page
will have the Event component at the top, followed by a float with an Image component (pre-populated with your
image from the Create Event dialog, if you set one) and a Text component:
Old Dominion University – Adobe Experience Manager WCMS Training – 23 –
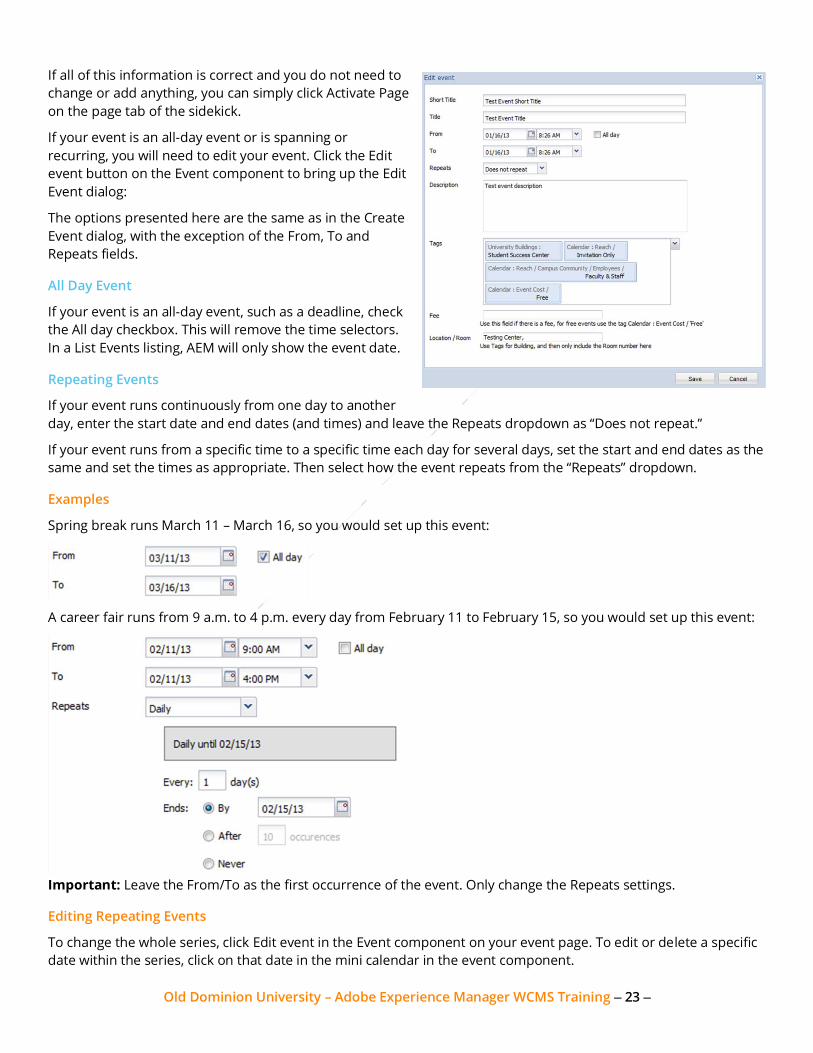
If all of this information is correct and you do not need to
change or add anything, you can simply click Activate Page
on the page tab of the sidekick.
If your event is an all-day event or is spanning or
recurring, you will need to edit your event. Click the Edit
event button on the Event component to bring up the Edit
Event dialog:
The options presented here are the same as in the Create
Event dialog, with the exception of the From, To and
Repeats fields.
All Day Event
If your event is an all-day event, such as a deadline, check
the All day checkbox. This will remove the time selectors.
In a List Events listing, AEM will only show the event date.
Repeating Events
If your event runs continuously from one day to another
day, enter the start date and end dates (and times) and leave the Repeats dropdown as “Does not repeat.”
If your event runs from a specific time to a specific time each day for several days, set the start and end dates as the
same and set the times as appropriate. Then select how the event repeats from the “Repeats” dropdown.
Examples
Spring break runs March 11 – March 16, so you would set up this event:
A career fair runs from 9 a.m. to 4 p.m. every day from February 11 to February 15, so you would set up this event:
Important: Leave the From/To as the first occurrence of the event. Only change the Repeats settings.
Editing Repeating Events
To change the whole series, click Edit event in the Event component on your event page. To edit or delete a specific
date within the series, click on that date in the mini calendar in the event component.
Old Dominion University – Adobe Experience Manager WCMS Training – 24 –
Additional Event Page Elements
You can build an event page just like a regular page, utilizing the same components.
Activating the Event
When you are satisfied that your event is set up correctly, switch your sidekick to the page tab and choose Activate
Page.
Deleting an Event
If you should need to delete an event, open up the event page. Switch to the page tab in the sidekick and choose
“Delete Page.” This will delete the event, event page and its occurrence in any List Events component listings.
Section 6: News/Entries System
The news system allows you to post news articles for your office. It functions similarly to the calendar system.
Overview
- Every unit has an entries system.
- The entries system allows you to populate items such as news or announcements.
- Tagging is important in using the entries system.
- Entry pages can be very simple or as complex as a regular page.
- Specialized entries systems can be set up for purposes such as a blog or journal.
Full guide to the News/Entries system: www.odu.edu/websolutions/manual/using-aem/news
Section 7: Places/Hours
What are “Places?”
The Places feature serves two purposes. The first is it allows offices to maintain their own operating hours, which
can then be displayed on the website through the Places Info component. The second purpose is that it allows
entities that are not separate offices to have contact information and hours, such as Starbucks or the Math &
Science Resource Center.
Full guide to Places: www.odu.edu/websolutions/manual/using-aem/places
Section 8: Other Components
ODU’s implementation of Adobe AEM features a wealth of other components that can be used to create layout and
content. University Web & Digital Communication is constantly working to increase the specific content about these
components. Completely component information is available at www.odu.edu/websolutions/manual/components.

Old Dominion University – Adobe Experience Manager WCMS Training – 25 –
Q&As
Questions about the new website
General Content Questions
Who updates content?
Each unit is responsible for its own website content. Each unit must have at least one trained content manager who
has access to AEM and can make page edits and activate those changes.
How do I request content updates?
You can contact the responsible unit to request a change. If you’re uncertain who to contact, send your request to
[email protected]. University Web & Digital Communication will send the request to the appropriate content
manager.
University Calendar
How do I add an event to the University Master Calendar?
You should contact your department’s Web content manager. The content managers have access to post events to
the master calendar. Content managers simply need to add the University Master Calendar tag to the event and
activate the event to cause it to appear on the University Master Calendar.
Website
What does ww2.odu.edu mean? What does blue.odu.edu mean?
“ww2” is the prefix for the legacy website, which is the term for the “old” website. All content on ww2 will be deleted.
“blue.odu.edu” is the applications environment, which hosts some advanced functionality and will continue to
coexist with www.odu.edu.
How do I print the new website?
The website template allows for printing pages in a structured format. If you wish to print a page “as it displays,” you
can download a screenshot extension/plug-in for your browser. Nimbus Screenshot is recommended and is
available for Mozilla Firefox and Google Chrome browsers.
Why a web content management system (WCMS)? What are the benefits?
Content management helps promote the cross-use and re-use of content throughout the site, prevents duplication
of content, allows the editing of content in one place and helps with oversight to ensure that content is refreshed at
appropriate intervals. The system also helps provide consistency in user experience.

Old Dominion University – Adobe Experience Manager WCMS Training – 26 –
Using Adobe Experience Manager
Design
Why is my page a particular color? How were colors chosen? Can I change the color?
For the core site, theme colors were chosen based on the page’s location within the information architecture. For
office pages, colors were assigned based on academic college or vice presidential area. Any requests to change a
section’s color must be submitted to [email protected].
How was the new site designed?
The site design was a collaboration between the Web Development group in ITS and University Web & Digital
Communication with input from the University’s marketing consultants and campus and constituent research. The
site’s design incorporates key elements of the University’s branding, including color pallet, aesthetic and University
logo.
Where are the left and right menus? How do I navigate
the site?
The new site uses “navigation as content.” This
eliminates confusing and redundant menus and gives
users contextual cues to help them determine which
path to follow in browsing the site. Each choice should
have a title, visual, description and a selection of any
subpages that fall under that choice.
Why doesn’t the site take up the whole screen? Why
were these fonts chosen?
The standard site size is based on current best practices.
In most browsers, the site will detect the viewport size
(the size of the area you can see) and adjust the site to
one of the following formats:
Wide
Standard
Tablet Landscape
Tablet Portrait
Mobile
The fonts are based on current best practices for readability and accessibility and are widely used by many
universities.
Directory
My personal directory page/contact info is incorrect, how do I fix it? How do I update my profile?
Information displayed in the new directory system comes from Banner and that is then overlaid with information
from the Faculty Activity System (FAS/Digital Measures), if the person has an account on that system. Changes to
personnel data (address, phone number, name) must be processed through Human Resources.
How do I get my photo in the directory?
You can schedule a headshot (head and shoulders portrait) with the university photographer who will then submit
your completed headshot for uploading. If you already have a headshot, it must show only your chest or shoulders
Navigation as Content
Old Dominion University – Adobe Experience Manager WCMS Training – 27 –
upward and be at least 1000 pixels in height. If your headshot meets these criteria, you can email it as a JPEG (JPG)
or PNG format file to [email protected] with your name and MIDAS ID.
How can I be removed from the directory?
As an employee of the Commonwealth of Virginia, certain information about your employment is considered public
information. Any requests to redact this information must be processed through Human Resources and
implemented in Banner.
How do I update my office’s directory page?
The directory page for administrative offices is handled by Banner through position numbers. As employee
turnover occurs, the former employee will disappear from the page. When new incumbents are hired, they will
appear on the page once they are activated in Banner. If you need to add or delete positions or change web-friendly
working titles, view the instructions on the Web Solutions Center site (www.odu.edu/websolutions).
For academic department directories, the administrative positions are still handled by position number. Positions
that are tied to a person rather than a specific position number must be updated manually. These include
Department Chair, Chief Advisor, GPD, etc. Please refer to the instructions in the Web Solutions Center
(www.odu.edu/websolutions).
Events & News
What is the difference between a calendar event and an announcement?
There are two systems in AEM that can be used to manage date-based content: the calendar system and the entries
system. In both systems, entries are stored in the following structure: [Entry Year]/[Entry Month]/[Entry] and can be
surfaced by tagging entries appropriately and calling for those tags in the appropriate list component (List Entries or
List Events).
Calendar System
The calendar system stores date-based content with options that are similar to your calendar in Microsoft Outlook
(with event location, start and end times and recurrence). Calendar system entries can be displayed as bullets with
the start and end dates/times listed under each one, in block format with a “calendar page” box showing the event
date to the left or as a navigable calendar.
Entries System
The entries system is more general than the calendar system and can be used for items like news stories,
announcements and blogs. Entries do not have start and end dates and times, only an entry date. Display options
for the entries system include bullets, a horizontal teaser where the page photo is displayed to the left with the title
and description on the right, a vertical teaser where the page photo is displayed on top with the title and description
under it and a photo teaser where the page photo is displayed with the description as a caption.
How do I add a news story?
You will locate your office’s entries system under your office page (under /content/odu/units). This page is called
“news.” Click Create New Entry and complete the Title and Description fields. Be certain to add any appropriate tags,
especially your office under the “Organizational Unit” namespace. After clicking Create, you can construct your news
page just like any other page in AEM. Be certain to Activate your entry when you are done.
Old Dominion University – Adobe Experience Manager WCMS Training – 28 –
Forms
How do I create a form?
Forms are created in the ODU Forms Application (www.odu.edu/formsadmin). Forms can be set to collect data in a
simple backend retrieval database or to collect the data and email the data to any email address(es) you specify.
Can I create a dynamic form where form fields change as the user inputs information? Can I create a form that
shows the user a preview prior to submitting?
These capabilities are currently unavailable.
How do I add a form to my page?
You must first create the form in the ODU Forms Application. Make note of the form ID. You can then place the
Embed Form component on your page. Right-click it, choose Edit and enter the form ID. Click OK and AEM will
import your form. Note that if you change your form, you will need to right-click, Edit and click OK again for AEM to
re-import your form.
Images & Video
Can we have rotating page header images? Video in the headers?
The page header is a required element and must be a static image.
How do I place video on my page?
Contact your Web Communication Partner (you can find your partner at www.odu.edu/website/liaisons). Your
partner will work with you to get the video and either add it to the ODU YouTube channel or add it to the DAM. You
can then add the video to your page using either the Video component or YouTube Player component.
Office Pages
What is the office page? Why isn’t my main content page my office page?
The office page is your office’s presence in the new website. This is where you can talk about your office or
department as an organization – your mission, goals, staff, etc. You can also create space for resources for your
office’s staff.
The main content pages in the core of the site are for users and should be relatively free of university hierarchy to
provide an intuitive, user-friendly experience. Contact information for the appropriate office(s) will appear on most
pages, but the content should read as though it is being offered by the University and not by a specific office.
Do I have to have an office page?
Yes. The directory system and the index of content system are tied to the office pages. Even if your office page only
contains these two items and links out to your content, the office page must remain. In promoting your office, you
might consider a core site URL shortcut, versus the shortcut to your office page.
Why is there so little on my office page?
One of the main goals of the redesign project was to move user content out into the core of the website. As a result,
most office pages will only contain information about the office itself (directory, mission, goals, organizational chart,
etc.). Significant functions that your office handles will be presented as “routers” on your office page, to direct users
out to the core of the site where that content lives.

Old Dominion University – Adobe Experience Manager WCMS Training – 29 –
Why did my URL change?
The URL structure for the new site gives every office a URL off of the ODU root (www.odu.edu). This makes URLs
readily usable for marketing, advertising, memorization, etc. It also eliminates obscure paths such as /ao/ and /af/
that have little meaning to external users.
What URL should I use for advertising/publications? How do I get a new short URL?
The URL for your office page will be the new, shorter URL (odu.edu/office). However, if the purpose of your
publication is to direct the reader to functional content (which now lives in the core of the site), contact University
Web & Digital Communication in advance at [email protected]. Many shortcuts exist to direct users to specific
parts of the core site. If one does not exist, Web Communication can evaluate the permissibility adding a new
shortcut.
What happened to my old URL? How long will my old URL work?
Existing URLs have been mapped to the appropriate locations on the new website. You are encouraged to
immediately discontinue use of your old URLs for publications, email, etc. The legacy (old) URLs will only be
supported through January 9, 2016.
Can I switch back to my old site?
No. All University units must migrate to the new website environment.
What is an index of content?
The index of content is a listing of pages that have content for which your department is responsible. Each office
has an index of content. Users can view these listings by site hierarchy or as an A to Z index. These are particularly
useful for users who were familiar with the legacy website and need assistance locating your office’s information in
the new architecture. You can choose to have your index activated or solely on author for content manager use.
What if content for which we’re responsible isn’t listed on our index of content?
If there is content for which you believe you are responsible, please contact [email protected] with the specifics
and University Web & Digital Communication will look into the issue and provide a response.
Site Structure
How do I create a new page?
To add a new page, you must complete the New Page Request Form (www.odu.edu/websolutions). If your new page
is approved, it will be added in AEM. You can then go in and create layout and content just like any other page,
activating it when complete.
Why is my content in with content from other units? Why is content from other units in with mine?
The new site is structure based on information, not on university hierarchy. If your department manages
information that is part of a process that is shared with other departments, that information will now appear
together on the website, not on your individual office pages.
What is the “Information Architecture” document for my department?
The information architecture document shows a snapshot of your department’s content in the overall website
structure. This is your roadmap for migrating content, as it shows you where content from your legacy site must go
in the new website.
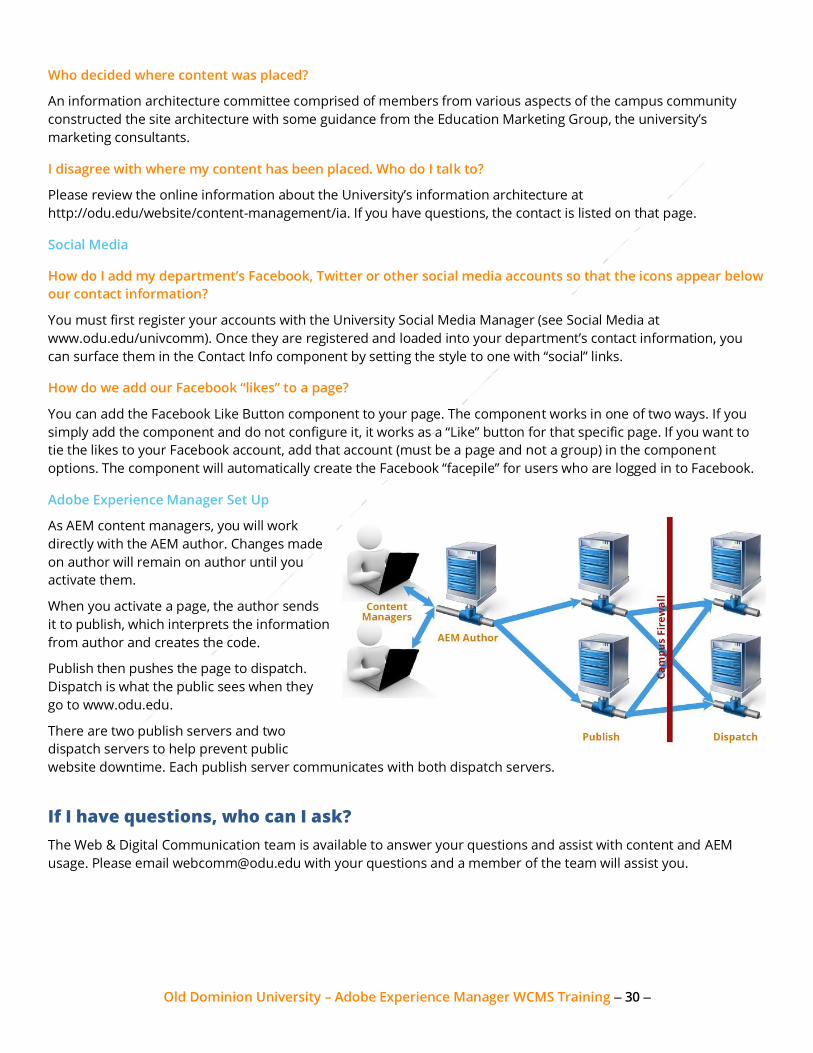
Old Dominion University – Adobe Experience Manager WCMS Training – 30 –
Who decided where content was placed?
An information architecture committee comprised of members from various aspects of the campus community
constructed the site architecture with some guidance from the Education Marketing Group, the university’s
marketing consultants.
I disagree with where my content has been placed. Who do I talk to?
Please review the online information about the University’s information architecture at
http://odu.edu/website/content-management/ia. If you have questions, the contact is listed on that page.
Social Media
How do I add my department’s Facebook, Twitter or other social media accounts so that the icons appear below
our contact information?
You must first register your accounts with the University Social Media Manager (see Social Media at
www.odu.edu/univcomm). Once they are registered and loaded into your department’s contact information, you
can surface them in the Contact Info component by setting the style to one with “social” links.
How do we add our Facebook “likes” to a page?
You can add the Facebook Like Button component to your page. The component works in one of two ways. If you
simply add the component and do not configure it, it works as a “Like” button for that specific page. If you want to
tie the likes to your Facebook account, add that account (must be a page and not a group) in the component
options. The component will automatically create the Facebook “facepile” for users who are logged in to Facebook.
Adobe Experience Manager Set Up
As AEM content managers, you will work
directly with the AEM author. Changes made
on author will remain on author until you
activate them.
When you activate a page, the author sends
it to publish, which interprets the information
from author and creates the code.
Publish then pushes the page to dispatch.
Dispatch is what the public sees when they
go to www.odu.edu.
There are two publish servers and two
dispatch servers to help prevent public
website downtime. Each publish server communicates with both dispatch servers.
If I have questions, who can I ask?
The Web & Digital Communication team is available to answer your questions and assist with content and AEM
usage. Please email [email protected] with your questions and a member of the team will assist you.