accudexa - digital dental radiography accudexa device ... the accudexa device from schick...
TRANSCRIPT

accuDEXA®
USER GUIDE
Schick Technologies, Inc.31-00 47th AvenueLong Island City, NY 11101
(888) 818-4BMD (TOLL FREE)(718) 937-5765(718) 937-5962 (FAX)
Part Number B7101220 Rev. E

F:\GENERAL\DEPTS\QA\DOCUMENT\B7101220RevE.doc
Copyright 2001 by Schick Technologies, Inc.All Rights Reserved
Part Number B7101220, Rev. EJanuary 5, 2001
!
Printed in the United States of America
This User Guide was originally drafted in English
Many of the designations used by manufacturers and sellers todistinguish their products are claimed as trademarks. Where thosedesignations appear in this document, and Schick Technologies, Inc.was aware of a trademark claim, the designations have been printed incaps or initial caps.

accuDEXA User Guide B7101220 Rev. E i
Contents
PREFACE............................................................................................................ AThe accuDEXA device...............................................................................................................................AIndications for use ......................................................................................................................................AWarnings ....................................................................................................................................................APrecautions .................................................................................................................................................ASymbols and markings................................................................................................................................BRegistering your accuDEXA......................................................................................................................C
ACCUDEXA OVERVIEW AND SETUP................................................................1Overview.................................................................................................................................................... 1The t-score and z-score .............................................................................................................................. 1Using accuDEXA t-scores in your practice................................................................................................ 1Monitoring Changes in Bone Mineral Density........................................................................................... 2Indications .................................................................................................................................................. 2Contraindications ....................................................................................................................................... 2Known adverse reactions............................................................................................................................ 2Controls and indicators............................................................................................................................... 3Printer installation ...................................................................................................................................... 3Printer connections..................................................................................................................................... 4Turning on the accuDEXA......................................................................................................................... 4Turning off the accuDEXA ........................................................................................................................ 4New features in software version 1.50 ....................................................................................................... 5Software upgrade procedure....................................................................................................................... 5Conventions used in text ............................................................................................................................ 5
USING ACCUDEXA .............................................................................................6The touch screen ........................................................................................................................................ 6Screen navigation ....................................................................................................................................... 6Finger placement ........................................................................................................................................ 6Finger placement and jewelry..................................................................................................................... 7What if hand jewelry cannot be removed? ................................................................................................. 7Obtaining successful BMD test results....................................................................................................... 7Operator checklist ...................................................................................................................................... 7Getting started ............................................................................................................................................ 8Performing a BMD test ............................................................................................................................ 11Bone densitometry report ......................................................................................................................... 18Categories of risk for fracture................................................................................................................... 20Other risk factors...................................................................................................................................... 20Changing the time..................................................................................................................................... 24Changing the date..................................................................................................................................... 25Changing the printer ................................................................................................................................. 27Printing a test page ................................................................................................................................... 29Performing a phantom test........................................................................................................................ 32Understanding phantom test results.......................................................................................................... 32Performing a system test........................................................................................................................... 40
SERVICE ............................................................................................................42Maintenance ............................................................................................................................................. 42Fuse replacement instructions .................................................................................................................. 42Cleaning instructions ................................................................................................................................ 42System checks .......................................................................................................................................... 42

ii B7101220 Rev. E accuDEXA User Guide
Static electricity........................................................................................................................................ 43
REFERENCE INFORMATION............................................................................44Technical description ............................................................................................................................... 44Duty cycle (cooling) ................................................................................................................................. 44Specifications ........................................................................................................................................... 45Electrical summary................................................................................................................................... 46
APPENDIX A......................................................................................................47Normative databases ................................................................................................................................ 47
APPENDIX B......................................................................................................48Printing and copying the Patient Log Report ........................................................................................... 48Copying the Patient Log Report into Excel .............................................................................................. 53Copying the Patient Log Report into Notepad or WordPad ..................................................................... 56
APPENDIX C......................................................................................................59Error messages ......................................................................................................................................... 59Notice messages ....................................................................................................................................... 62
APPENDIX D......................................................................................................63Troubleshooting the Canon printer........................................................................................................... 63
APPENDIX E ......................................................................................................64List of printers .......................................................................................................................................... 64
APPENDIX F ......................................................................................................65Calculating Reference BMD .................................................................................................................... 65
APPENDIX G......................................................................................................67Equipment Labels..................................................................................................................................... 67
GLOSSARY OF TERMS ....................................................................................68
INDEX.................................................................................................................69

accuDEXA User Guide B7101220 Rev. E iii
List of FiguresFigure 1. The accuDEXA Device, front view................................................................................................. 3Figure 2. The accuDEXA Device, back view................................................................................................. 3Figure 3. Typical Printer Connections............................................................................................................ 4Figure 4. Finger Placement............................................................................................................................. 6Figure 5. Welcome Screen.............................................................................................................................. 8Figure 6. System Check Screen ...................................................................................................................... 8Figure 7. Sensor Verification Initial Screen ................................................................................................... 8Figure 8. Sensor Verification Follow-up Screen............................................................................................. 9Figure 9. Exposure Screen.............................................................................................................................. 9Figure 10. Release Button Screen................................................................................................................... 9Figure 11. Test Results Screen ..................................................................................................................... 10Figure 12. Main Menu Screen ...................................................................................................................... 11Figure 13. Patient ID Screen......................................................................................................................... 11Figure 14. Age Screen .................................................................................................................................. 12Figure 15. Gender Screen ............................................................................................................................. 12Figure 16. Ethnicity Screen .......................................................................................................................... 12Figure 17. Database Information Screen ...................................................................................................... 13Figure 18. Summary Screen.......................................................................................................................... 13Figure 19. Positioning Screen....................................................................................................................... 14Figure 20. X-ray Screens .............................................................................................................................. 14Figure 21. Bone Outline Screen.................................................................................................................... 15Figure 22. Computing BMD Results Screen ................................................................................................ 16Figure 23. BMD Test Results Screen (with t- and z-scores)......................................................................... 16Figure 24. BMD Test Results Screen (without t- and z-scores).................................................................... 16Figure 25. Multiple Copies Confirmation Screen......................................................................................... 17Figure 26. Multiple Copies Screen ............................................................................................................... 17Figure 27. Printing Copies Screen ................................................................................................................ 17Figure 28. Example of Densitometry Report (with t- and z-scores) ............................................................. 21Figure 29. Example of Densitometry Report (without z-score) .................................................................... 22Figure 30. Example of Densitometry Report (no database available) .......................................................... 23Figure 31. Configuration Menu Screen ........................................................................................................ 24Figure 32. Time Screen ................................................................................................................................ 25Figure 33. Date Screen ................................................................................................................................. 26Figure 34. Printer Screen.............................................................................................................................. 28Figure 35. Printer Driver Screens ................................................................................................................. 28Figure 36. Printer Driver Changed Screen.................................................................................................... 29Figure 37. System Check Screen .................................................................................................................. 30Figure 38. Print Test Page Screen ................................................................................................................ 30Figure 39. Example of Test Page.................................................................................................................. 31Figure 44. Details of Phantom Test Report .................................................................................................. 33Figure 40. Phantom Placement ..................................................................................................................... 34Figure 41. Bone Outline Screen.................................................................................................................... 36Figure 42. Computing BMD Results Screen ................................................................................................ 37Figure 43. Phantom Test Results Screen ...................................................................................................... 37Figure 45. Example of Phantom Test Report................................................................................................ 39Figure 46. Patient Log Screen ...................................................................................................................... 49Figure 47. Print Data Screen........................................................................................................................ 49Figure 48. File Data Screen ......................................................................................................................... 49Figure 49. Transfer Date Screens ................................................................................................................. 50Figure 50. Transfer Confirmation Screen ..................................................................................................... 50Figure 51. Transfer in Process Screen .......................................................................................................... 51Figure 52. Transfer Complete Screen ........................................................................................................... 51Figure 53. Patient Log Report ...................................................................................................................... 52

iv B7101220 Rev. E accuDEXA User Guide
Figure 54. Error Message Screen.................................................................................................................. 59Figure 55. Reading the Results of the First 10 Phantom Tests ..................................................................... 65Figure 56. Example of Phantom Test Report Before Reference BMD is Available..................................... 66
accuDEXA User Guide B7101220 Rev. E A
Preface
The contents of this manual and the bundled accuDEXA software are both copyrighted bySchick Technologies, Inc. Any reproduction in whole or in part is strictly prohibited.accuDEXA™ is a trademark of Schick Technologies, Inc.
All third party products and software mentioned within this manual are registered andcopyrighted with their respective companies.
The accuDEXA deviceThe accuDEXA device from Schick Technologies, Inc. is a bone densitometer that estimatesbone mineral density (BMD) of the middle finger of the non-dominant hand. It is a self-contained, table-top unit, employing dual energy X-ray absorptiometry (DEXA) technology.After the finger is scanned, results are generated in less than one minute.
This accuDEXA User Guide contains operation and maintenance information, procedures andguidelines for testing, interpretation of test results, and technical specifications on theaccuDEXA device.
Indications for useThe accuDEXA is a dual-energy X-ray device indicated for use in estimating the bonedensity (BMD) of the middle finger of the non-dominant hand. This BMD value is arelative indicator of bone density elsewhere in the body. The accuDEXA’s BMDestimates can be used as an aid to the physician in determining fracture risk.
Warnings• This X-ray unit may be dangerous to the patient and operator unless safe operating
instructions are observed.
• The need or appropriateness for BMD measurements of phalanges in themanagement of renal osteodystrophy has not yet been established.
Precautions• Federal law restricts this device to sale by or on the order of a physician.
• The BMD values obtained with this device should be only one factor in a medicaljudgment that treatment is warranted for a disease or disorder.
• The accuDEXA compares BMD values to a reference (normative) database. Thisdatabase reflects the mean for a healthy normal (YHN) population having the samegender and ethnicity. Users are reminded of risks in misinterpretation whencomparing a patient’s BMD results with a database population of different gender orethnicity.
• In accordance with international standard IEC-601-3: General Requirements forRadiation Protection in Diagnostic X-ray Equipment, use of the accuDEXA shall belimited to no more than 20 patient scans per hour.
B B7101220 Rev. E accuDEXA User Guide
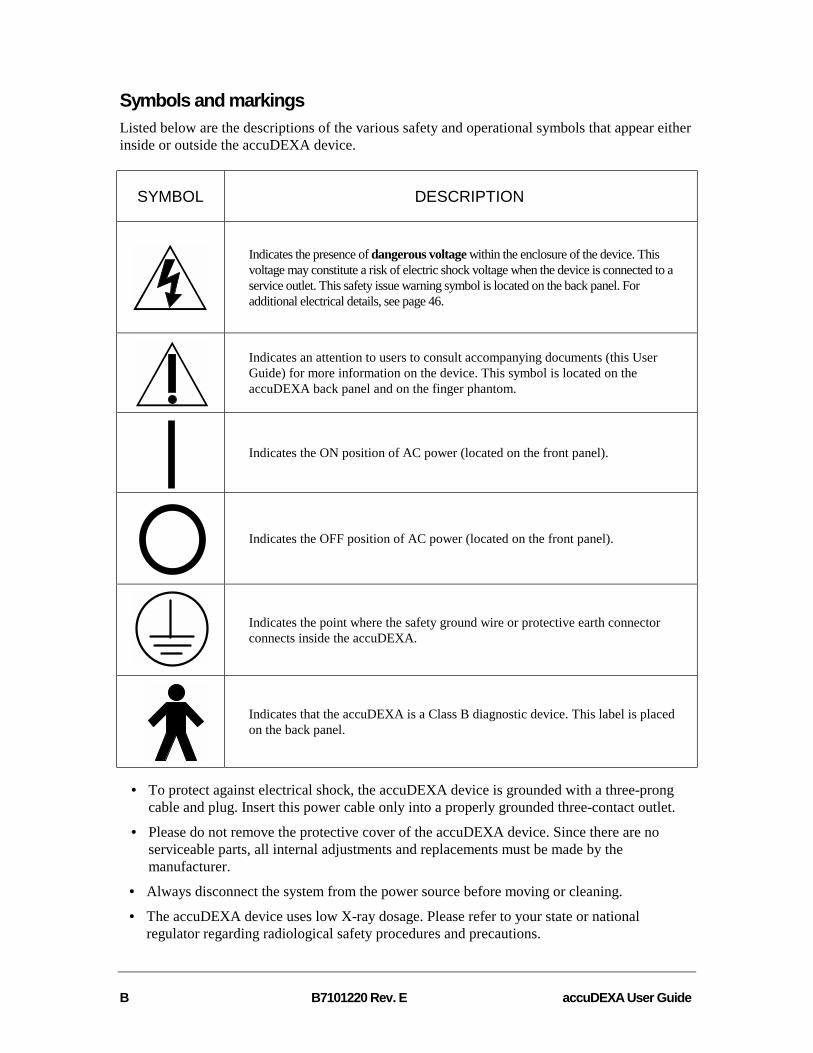
Symbols and markingsListed below are the descriptions of the various safety and operational symbols that appear eitherinside or outside the accuDEXA device.
SYMBOL DESCRIPTION
Indicates the presence of dangerous voltage within the enclosure of the device. Thisvoltage may constitute a risk of electric shock voltage when the device is connected to aservice outlet. This safety issue warning symbol is located on the back panel. Foradditional electrical details, see page 46.
Indicates an attention to users to consult accompanying documents (this UserGuide) for more information on the device. This symbol is located on theaccuDEXA back panel and on the finger phantom.
Indicates the ON position of AC power (located on the front panel).
Indicates the OFF position of AC power (located on the front panel).
Indicates the point where the safety ground wire or protective earth connectorconnects inside the accuDEXA.
Indicates that the accuDEXA is a Class B diagnostic device. This label is placedon the back panel.
• To protect against electrical shock, the accuDEXA device is grounded with a three-prongcable and plug. Insert this power cable only into a properly grounded three-contact outlet.
• Please do not remove the protective cover of the accuDEXA device. Since there are noserviceable parts, all internal adjustments and replacements must be made by themanufacturer.
• Always disconnect the system from the power source before moving or cleaning.
• The accuDEXA device uses low X-ray dosage. Please refer to your state or nationalregulator regarding radiological safety procedures and precautions.

accuDEXA User Guide B7101220 Rev. E C
Registering your accuDEXAIn most areas of the United States, users will be required to register the product with their states’radiation board. To facilitate registration, we have provided a list of contacts that you may findhelpful. This list can be found in the documentation kit supplied with your unit.
In order to register your accuDEXA, you will need to supply some basic technical information tothe state radiation board. In the following table we have included information to help yourespond to those questions correctly. More detailed specifications may be found in theSpecifications and Electrical Summary tables on pages 45 and 46, respectively, of this manual.
Maximum kVp 70 kVp
Maximum X-ray current 10 ma
Part number B7100
Serial numberCheck the product label near the fan on theback of your unit
Scatter radiation
6.1 mR/h at 1 meter distance
Time of two DEXA pulses is 60 and 90milliseconds
Absorbed dose(Effective radiation)
3E-4 uSv per scan
Number of tubes 1
X-ray head number Check the regulatory label near theelectrical inlet on the back of your unit

D B7101220 Rev. E accuDEXA User Guide
(This page intentionally left blank)

accuDEXA User Guide B7101220 Rev. E 1
accuDEXA overview and setup
OverviewThe accuDEXA is a dual-energy X-ray device that estimates the bone mineral density (BMD) ofthe region of the third finger of the non-dominant hand. Finger BMD is a relative indicator ofbone density in other parts of the body.
The t-score and z-score The accuDEXA reports an individual’s relative BMD status by calculating a t-score and z-score.This calculation is performed automatically by the accuDEXA and can be viewed on-screenand/or printed out at the conclusion of an exam. For a concise definition of t- and z-scores, pleaserefer to the glossary on page 68. The t-score or z-score is often used by a physician as one factor,in conjunction with other clinical indicators, to diagnose osteoporosis and other bone disorders.
T-scores and z-scores can only be computed if a normative database of other individuals with thesame age, gender, and ethnicity of the patient is available. When the matching reference databaseis unavailable, the patient’s BMD can still be used to compare with an initial baseline value.
Using accuDEXA t-scores in your practiceLow bone mineral density at the finger has been demonstrated to be as predictive of generalizedfracture in the elderly as measurements made at axial sites.1 All bone mineral densitymeasurements should be used in conjunction with other risk factors in determining fracture risk.Other clinical measurements such as blood pressure and cholesterol indicate risk of stroke andmyocardial infarction. Similarly, evidence of osteoporosis, according to the World HealthOrganization (WHO), indicates risk of fracture not certainty. Evidence of normal bone massaccording to WHO criteria provides no assurance that a patient will not fracture. Nevertheless,bone mineral density is just as predictive of future fracture as blood pressure measurements areof future risk of stroke.
A recent consensus article published by the scientific advisory board of the Bone MeasurementInstitute suggests using an intervention threshold on peripheral instruments of t<–1.0.1 Accordingto independent data collected on the accuDEXA, using hip DXA as the gold standard, the BoneMeasurement Institute’s suggested threshold of t<–1.0 results in good test sensitivity andmoderate test specificity.2 Nevertheless, those who chose to use the accuDEXA to maketreatment decisions may choose a somewhat lower T-score threshold of –2.0.
The National Osteoporosis Foundation suggests initiating drug therapy in women with t-scores below –2 (in the absence of risk factors) and in women with t-scores below –1.5 (ifother risk factors are present).3 Whatever intervention level you choose be aware that no singlesite BMD measurement will agree diagnostically with other measurements 100% of the time.
For more information about osteoporosis and using t-scores in your practice, please fax yourrequest for the “Physician’s Guide to Prevention and Treatment of Osteoporosis” to the
1 Miller PD, Bonnick, SL, Johnston CC, Kleerekoper M, Lindsay R, Sherwood LM, Siris E. The Challenges of Peripheral Bone
Density Testing: Which Patients Need Additional Central Density Skeletal Measurements: Journal of Clinical Densitometry,1(3):211-217.
2 Mulder JE, Michaeli D, Flaster ER, Siris E. A Comparison of Bone Mineral Density of the Phalanges with Bone Mineral Density ofthe Lumbar Spine, Hip, and Forearm for the Assessment of Osteoporosis in Postmenopausal Women: Journal of ClinicalDensitometry, December 2000 (in press).
3 Physicians Guide to Prevention and Treatment of Osteoporosis. National Osteoporosis Foundation, Exerpta Medica, 1998.
2 B7101220 Rev. E accuDEXA User Guide
National Osteoporosis Foundation (fax number (202) 223-2237).
Monitoring Changes in Bone Mineral Density BMD is an appropriate parameter by which to monitor changes in bone mineral density effectedby drug therapy or aging. Physicians should compare results of BMD tests taken on a patientover a period of time with the reported accuDEXA precision (repeatability). To determinewhether a significant change in BMD has occurred, physicians must calculate the percentagechange in results over time according to the following formula:
% change = (BMD previous exam – BMD current exam ) / BMD previous exam * 100%
The information below will help the physician determine the statistical significance of the BMDtest result changes. (As a general rule, a greater-than-1.8% difference in BMD results wouldindicate consequential change.)
Percentage Change in BMD Level of Statistical Significance2.77% 95%2.33% 90%1.84% 85%
(These values are based on accuDEXA’s published precision of 1%.)
IndicationsThe Society of Nuclear Medicine and American College of Nuclear Physicians has identifiedspecific medical indications that warrant the evaluation of a patient’s bone density. Belownormal bone density can be associated with a variety of bone conditions or disorders. Some ofthe more common conditions associated with below normal bone density include:
• Premenopausal oophorectomy• Spontaneous menopause or estrogen deficiency conditions• Treatment-related osteopenia; when the diagnosis of osteopenia is suggested or
established by other means (such as X-ray; during long-term immobilization)• Endocrinopathies associated with osteopenia; for post-gastrectomy and other
malabsorption states leading to osteopenia; during long-term corticosteroid therapy• Chronic renal disease, particularly in childhood or adolescence
In addition to the above, BMD values can be used to monitor longitudinal changes, as withtreatment programs for osteoporosis.
Contraindications• A deformity that prevents a patient’s non-dominant hand from being properly positioned.• Orthopedic hardware in the middle finger of the non-dominant hand.• Previous fracture of the middle finger of the non-dominant hand.• Pregnancy. (Although the radiation exposure from an accuDEXA BMD test is
1/150,000 of a chest X-ray, any radiation exposure during pregnancy must bedeemed medically necessary by a physician.)
Known adverse reactionsNone

accuDEXA User Guide B7101220 Rev. E 3
Controls and indicators Identified on the following figures are the external features of the accuDEXA device.
Figure 1. The accuDEXA Device, front view
Figure 2. The accuDEXA Device, back view
Printer installation 1. Verify that the printer is compatible with accuDEXA. Refer to Appendix E on page 64.2. To install a compatible printer, perform steps 3 through 6, then perform “Changing the
printer” procedure on page 27.3. Make sure the accuDEXA is off (the On/Off key switch is in the Off position).4. Attach the printer cable to the accuDEXA parallel port (Figure 2). If a power supply was
supplied with the printer, make that connection also.5. If not already connected, plug one end of the power cable to the power inlet and plug the
other end into an appropriately grounded outlet.6. Insert the key in the On/Off key switch (Figure 1) and turn it counter clock-wise to the On
position. The On/Off indicator light will illuminate and the Welcome Screen appears.
FAN
PRODUCT LABEL
FUSES
REGULATORY LABEL
POWER INLET
PARALLEL(PRINTER) PORT
DISK DRIVE
ON/OFF KEY SWITCH(SHOWN IN ON POSITION)
ON/OFF INDICATOR
X-RAY ENABLEBUTTON / LIGHT
VIEWING WINDOW
HAND SLOT
TOUCH SCREEN
CARRYING SLOT
X-RAY EXPOSURELIGHT
WARNING LABEL
HANDLE KNOB

4 B7101220 Rev. E accuDEXA User Guide
Printer connections The block diagram below details the external connections of the accuDEXA, the printer, and theprinter power supply (optional, depending on the printer).
AC lineinput
*A/C line voltage is factory set for either 115 or 230V
Printer power supply(printer-dependent)
AC lineinput
115/230 *
Typical printer
115/230 *
Figure 3. Typical Printer Connections
Turning on the accuDEXA
PLEASE NOTE: The accuDEXA must be kept in theprescribed temperature range. If this is the first time you areturning on the accuDEXA, let the unit acclimate to the indoortemperature for at least 30 minutes before turning it on. If atemperature error occurs, adjust room temperature, let the unitre-acclimate, and try again. If the error occurs again, contactSchick Technologies for assistance.
1. Ensure that the accuDEXA, the printer, and the printer power supply (depending on theprinter used with the system) are connected to each other and the A/C service outlet.
2. Insert the key into the On/Off key switch and turn it counter-clockwise to On.3. The On/Off indicator illuminates and after approximately 60 seconds, the Welcome Screen
appears on the display.
Turning off the accuDEXA1. Insert the key into the On/Off key switch (if it is not inserted already) and turn it clockwise to Off.2. The On/Off indicator will turn off and the display screen will clear.
PLEASE NOTE: Turn off the accuDEXA at the end of everyday and whenever it is not in use.

accuDEXA User Guide B7101220 Rev. E 5
New features in software version 1.50The new software release for accuDEXA includes the following features.
• New data (ages 80 to 89) for FEMALE ASIAN database• New Latin American data (ages 80 to 89) for FEMALE HISPANIC database• New sensor verification test for determining system effectiveness on start-up• New quality control test for current and ongoing review of system performance• New Patient Log Report• Support for additional printers
Software upgrade procedure To upgrade the accuDEXA with the latest software release, perform the following procedure.
PLEASE NOTE: To maintain reliable system performance, donot install older versions of accuDEXA software after upgradingyour unit.
1. If necessary, power down the accuDEXA by turning the On/Off key clockwise to Off.2. Insert the upgrade diskette into the disk drive located in the back panel.3. Power up the accuDEXA by turning the On/Off key counter-clockwise to On (indicator
illuminates). The new software will be installed automatically.4. Wait for the message, Upgrade is complete.5. Remove the upgrade disk.6. Power down the accuDEXA by turning the On/Off key switch clockwise to Off.7. Pause for ten seconds.8. Power up the accuDEXA by turning the On/Off key counter-clockwise to On.
Conventions used in textSeveral text conventions are used in this manual to emphasize the text displayed on the touchscreen and to provide additional help and information in the procedural areas.
The names of menu screens and the wordingon the LCD screen display are shown in boldwhen they appear in text.
Main Menu Screen, Ethnicity Screen, BMDTest, Change Printer, OK, Cancel, etc.
Suggestions provide usage hints or reminders. TIP: If you enter the wrong ID,press CLEAR and re-enter the number.
Items of special note provide additional userinformation or instruction.
PLEASE NOTE:If a particular ethnicity is not listed, it is notinstalled in the accuDEXA.

6 B7101220 Rev. E accuDEXA User Guide
Using accuDEXA
The touch screenThe operator enters information and initiates a BMD test by using the touch-sensitive LCDscreen. The touch screen reacts to the contact of the operator’s finger, and only minimal pressure,a simple light touch or a tap, is necessary. The touch screen will not respond if the operator iswearing a glove.
Screen navigation A description of some of the on-screen features of the accuDEXA appear below using the AgeScreen as an example.
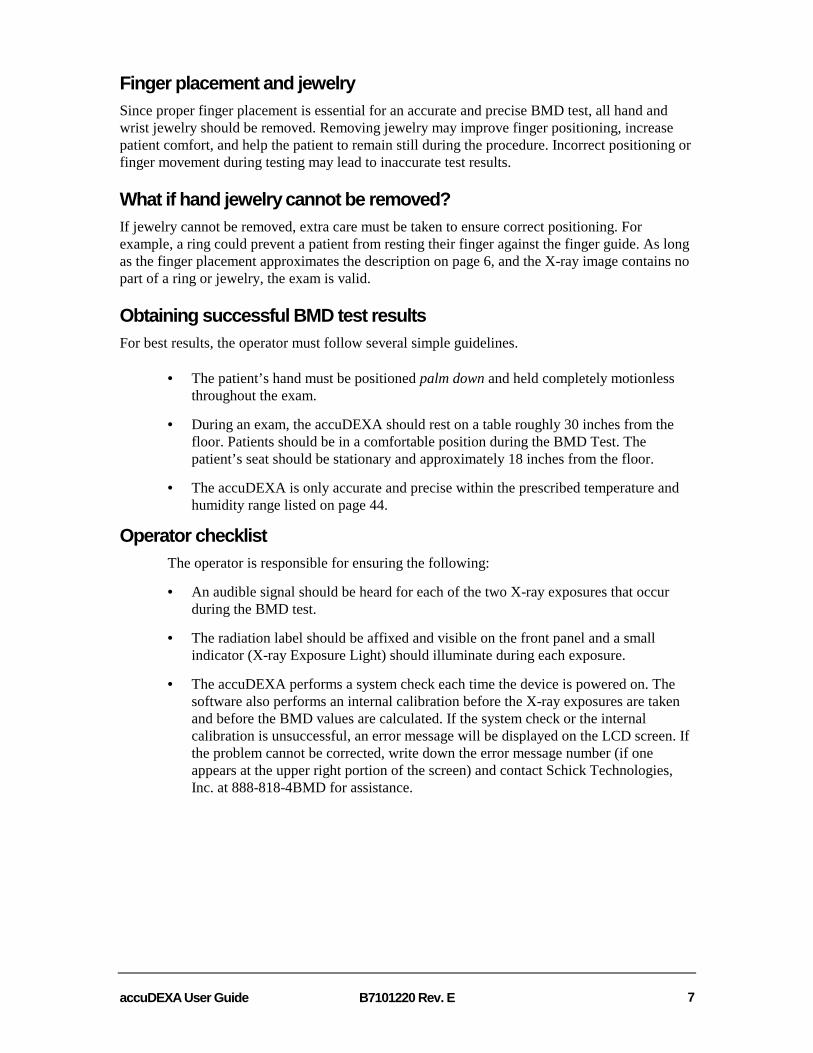
Finger placement1. Push down the handle knob. This will raise two levers located in the hand slot.2. Instruct the patient to place their non-dominant hand inside the hand slot. If the patient is
right handed, they should place their left hand into the hand slot. If the patient is left handed,they should place their right hand into the hand slot. The patient’s hand must be placed palmdown and rest as far forward as possible. Refer to the following figure.
The hand must contact the pegs at both sides ofthe middle finger at points A and B. The middlefinger must rest firmly against the guard at C.
Figure 4. Finger Placement
3. Slowly release the handle knob. This will lower two levers onto the patient’s middle finger(one lever will rest near the tip of the finger and the other will rest near the base). Theselevers will gently secure the finger in place during the BMD test.
Enter Patient Age: BACK
1 2 3 OK
4 5 6 0
7 8 9 CLEAR
BACK returns you to theprevious menu
OK accepts the entry andadvances to the next screen
CLEAR deletes the entry fromthe screen. Use this feature tore-enter information
accuDEXA User Guide B7101220 Rev. E 7
Finger placement and jewelry Since proper finger placement is essential for an accurate and precise BMD test, all hand andwrist jewelry should be removed. Removing jewelry may improve finger positioning, increasepatient comfort, and help the patient to remain still during the procedure. Incorrect positioning orfinger movement during testing may lead to inaccurate test results.
What if hand jewelry cannot be removed?If jewelry cannot be removed, extra care must be taken to ensure correct positioning. Forexample, a ring could prevent a patient from resting their finger against the finger guide. As longas the finger placement approximates the description on page 6, and the X-ray image contains nopart of a ring or jewelry, the exam is valid.
Obtaining successful BMD test results For best results, the operator must follow several simple guidelines.
• The patient’s hand must be positioned palm down and held completely motionlessthroughout the exam.
• During an exam, the accuDEXA should rest on a table roughly 30 inches from thefloor. Patients should be in a comfortable position during the BMD Test. Thepatient’s seat should be stationary and approximately 18 inches from the floor.
• The accuDEXA is only accurate and precise within the prescribed temperature andhumidity range listed on page 44.
Operator checklist The operator is responsible for ensuring the following:
• An audible signal should be heard for each of the two X-ray exposures that occurduring the BMD test.
• The radiation label should be affixed and visible on the front panel and a smallindicator (X-ray Exposure Light) should illuminate during each exposure.
• The accuDEXA performs a system check each time the device is powered on. Thesoftware also performs an internal calibration before the X-ray exposures are takenand before the BMD values are calculated. If the system check or the internalcalibration is unsuccessful, an error message will be displayed on the LCD screen. Ifthe problem cannot be corrected, write down the error message number (if oneappears at the upper right portion of the screen) and contact Schick Technologies,Inc. at 888-818-4BMD for assistance.

8 B7101220 Rev. E accuDEXA User Guide
Getting started
1.A. On the accuDEXA front panel, turnthe On/Off key switch to On. TheWelcome Screen appears
Please Wait . . .
Welcome To
Figure 5. Welcome Screen
2. The System Check Screen appears.
A. Please wait as the accuDEXAperforms its internal checks.
Running System Check
Please Wait . . .
Version 1.50 (9/20/00) NDB 1.1Unit # 1772 Sensor # 2385Checking ST2385.LO . . .
Figure 6. System Check Screen
3. The Sensor Verification Screenappears.
A. Press OK.
The system will now perform an internalcalibration check
Sensor Verification TestThis requires taking one x-ray exposure
With nothing in the hand slot
OK
Figure 7. Sensor Verification Initial Screen

accuDEXA User Guide B7101220 Rev. E 9
4. The Sensor Verification Screenappears.
A. Press OK.Sensor Verification Test
(attempt 1 of 3)Please remove everything from the
hand slot and proceed to take an x-ray
OK
Figure 8. Sensor Verification Follow-up Screen
5. The Exposure Screen appears.
A. Press and hold down the X-rayEnable button to take one test exposure.
OR
B. Press CANCEL. If CANCEL ispressed, the system will revert to thesystem check screen in Figure 6.
Ready to take x-rayPush and hold down”X-RAY ENABLE”
button to activate
CANCEL
Exposing at 50 kvp 0.25 mA-sec
Figure 9. Exposure Screen
6. The Release Button Screen appears.
A. Release the X-ray enable button.
B. Please wait for a moment while thesystem continues the test.
Release button.
R di f f
Figure 10. Release Button Screen

10 B7101220 Rev. E accuDEXA User Guide
7. When the test is complete, the systemwill pass or fail. A brief messagereporting the test results is displayed onthe touch screen.
A. The system passes and no otheractions are needed. Click OK.
OR
B. The system passes, but werecommend that users verify systemperformance by running the phantomtest. A successful phantom test providesthe best guarantee of system accuracy.Click OK.
OR
C. The system fails. An error messagewill appear on the screen. Make sureeverything is removed from the handslot. You will not be able to performBMD tests. Contact us at 888-818-4BMD for further assistance. ClickOK.
Sensor verification test passed.
Remember: Please run the ‘phantom test’periodically to verify system performance.
OK
Sensor verification test passed.
Important: Please run the “phantom test’immediately to verify system performance.
OK
Error#: xxxSensor verification test failed.
System malfunction: Call SchickTechnologies Technical Support.
OK
Figure 11. Test Results Screen
8. The Welcome Screen re-appears.
A. Touch any part of the WelcomeScreen to start using the system.
Touch anywhere to begin . . .
Welcome To

accuDEXA User Guide B7101220 Rev. E 11
Performing a BMD test Follow this procedure to generate a Bone Densitometry Report. Users are encouraged to printBMD reports when prompted by the program, particularly to retain the X-ray image and graphportion of the report.
1.If the accuDEXA is not on already, turnthe On/Off key switch to On. TheWelcome Screen appears.
A. Touch any part of the WelcomeScreen.
Touch anywhere to begin
Welcome To
2.The Main Menu Screen appears.
A. Press BMD Test. Main Menu:
BMD Test Configuration
System Check
Figure 12. Main Menu Screen
3.The Patient ID Screen appears.
A. Enter the patient’s identificationnumber. The patient’s ID number canhave a maximum of ten digits.
The ID can be a social security number,hospital chart number, or an ID numberdefined by the operator.
B. Press OK.
TIP: If you enter the wrong ID,press CLEAR and re-enter the number.
Enter Patient ID# BACK
1 2 3 OK
4 5 6 0
7 8 9 CLEAR
Figure 13. Patient ID Screen

12 B7101220 Rev. E accuDEXA User Guide
4. The Age Screen appears.
A. Enter the patient’s age. The age canbe a maximum of 3 digits and can rangefrom 1 to 120 years.
B. Press OK.
TIP: If you enter the wrong age, or an ageoutside the range of 1 to 120, press CLEARand re-enter the number.
Enter patient age: BACK
1 2 3 OK
4 5 6 0
7 8 9 CLEAR
Figure 14. Age Screen
5. The Gender Screen appears.
A. Select the patient’s gender. Enter gender: BACK
Female
Male
Figure 15. Gender Screen
6. The Ethnicity Screen appears.
A. Select the patient’s ethnicity. Enter ethnicity: BACK
Caucasian Asian
Hispanic African-American
Other
Figure 16. Ethnicity Screen
accuDEXA User Guide B7101220 Rev. E 13
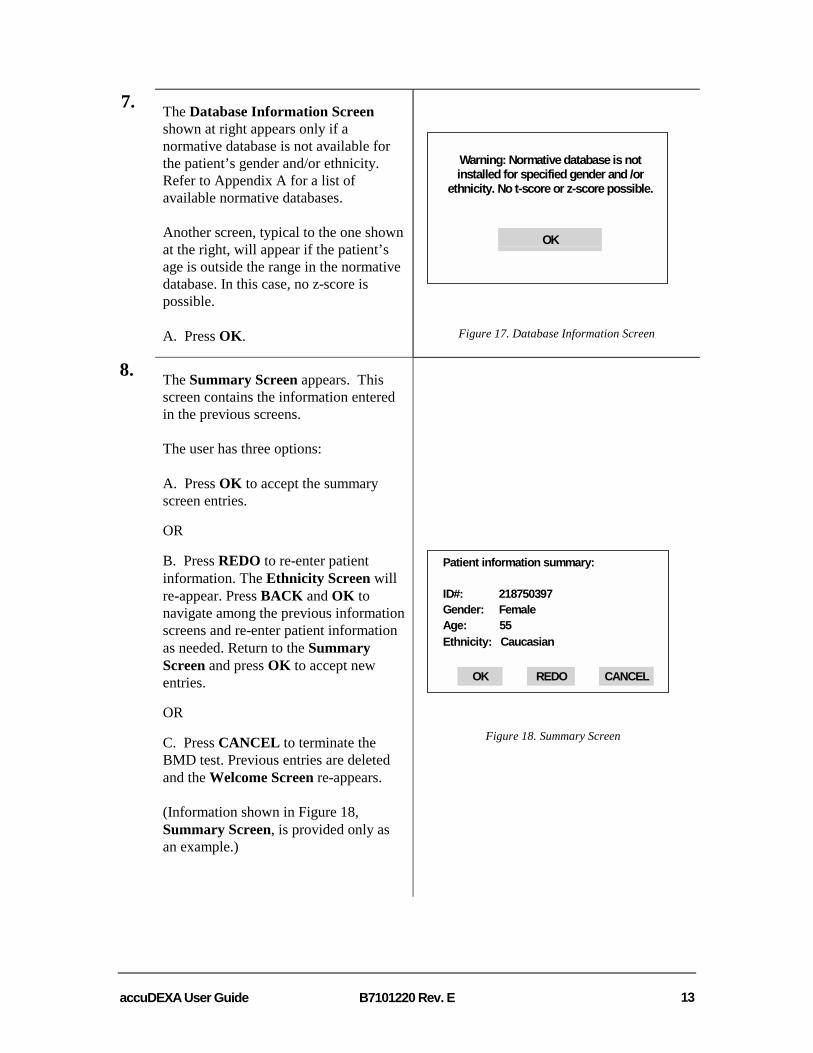
7. The Database Information Screenshown at right appears only if anormative database is not available forthe patient’s gender and/or ethnicity.Refer to Appendix A for a list ofavailable normative databases.
Another screen, typical to the one shownat the right, will appear if the patient’sage is outside the range in the normativedatabase. In this case, no z-score ispossible.
A. Press OK.
Warning: Normative database is notinstalled for specified gender and /or
ethnicity. No t-score or z-score possible.
OK
Figure 17. Database Information Screen
8. The Summary Screen appears. Thisscreen contains the information enteredin the previous screens.
The user has three options:
A. Press OK to accept the summaryscreen entries.
OR
B. Press REDO to re-enter patientinformation. The Ethnicity Screen willre-appear. Press BACK and OK tonavigate among the previous informationscreens and re-enter patient informationas needed. Return to the SummaryScreen and press OK to accept newentries.
OR
C. Press CANCEL to terminate theBMD test. Previous entries are deletedand the Welcome Screen re-appears.
(Information shown in Figure 18,Summary Screen, is provided only asan example.)
Patient information summary:
ID#: 218750397Gender: FemaleAge: 55Ethnicity: Caucasian
OK REDO CANCEL
Figure 18. Summary Screen

14 B7101220 Rev. E accuDEXA User Guide
9. The Positioning Screen appears.
Place the patient’s hand into the handslot. If needed, refer to the FingerPlacement picture on page 6.
A. Press OK and proceed to next step.
OR
B. Press CANCEL to terminate theBMD test. All entries will be deleted andthe Welcome Screen will appear.
Position patient hand now.
OK CANCEL
Figure 19. Positioning Screen
10.The first X-ray screen appears. Wait forthe X-ray Enable light to turn on.
Perform steps A through E to take the X-ray or perform step F to reposition thepatient’s hand or to terminate the BMDtest.
A. Press and hold down the X-ray Enablebutton.
B. Listen for two beeps. Each beeprepresents an X-ray exposure and thereis approximately a 5-second pausebetween each beep. During the beep, theX-ray Exposure light turns onmomentarily.
C. Release the button when the Releasebutton message appears.
D. Lower the lever knob and instruct thepatient to remove his/her hand.
E. Wait for an X-ray image to appear onthe display, as shown in step 11.
OR
F. Press CANCEL. You can eitherresume testing by repositioning thepatient’s hand or terminate the BMD testentirely. If you choose to terminate thetest, the Welcome Screen will re-appear.
Ready to take x-ray . . .
Push and hold downX-RAY ENABLE button
CANCEL
Release button.Remove patient’s hand.
Reading reference frames . . .
Figure 20. X-ray Screens

accuDEXA User Guide B7101220 Rev. E 15
PLEASE NOTE: If the patient’s handis removed during the X-ray process, orwas not positioned properly, the messageNo finger detected is displayed and thePositioning Screen will re-appear.
11. The accuDEXA produces an X-rayimage.
A. Press ACCEPT if the X-ray image isacceptable (refer to examples ofacceptable images below) and proceed tothe next step.
OR
B. Press REJECT if the X-ray image isunacceptable (refer to examples ofunacceptable images below).
When REJECT is pressed, the PositioningScreen re-appears. Re-position the patient’shand and repeat the X-ray exposure bycompleting steps 9-10.
Bone Outline
ACCEPT REJECT
Figure 21. Bone Outline Screen
Finger positioning guidelinesThe following images are acceptable because the sensor captured both sides of themiddle finger (as shown by the arrows).
ACCEPT REJECT
Bone Outline Bone Outline
REJECTACCEPT
Bone Outline
REJECTACCEPT
The following images are unacceptable. The image on the left is unacceptable becausethe sensor did not completely capture both sides of the middle finger (as shown by thearrow). The image on the right is unacceptable because a ring is within the field of view.These images will yield inaccurate results and should be rejected.
Bone Outline
REJECTACCEPT
Bone Outline
REJECTACCEPT

16 B7101220 Rev. E accuDEXA User Guide
12. The Computing BMD Screen appears.
This screen appears while theaccuDEXA is computing the results forthe BMD Test. The process takes lessthan a minute.
When completed, the accuDEXA willautomatically advance to the BMD testresults screen.
Computing BMD
Please Wait . . .
Performing analysis Step 7/9 . . .
Figure 22. Computing BMD Results Screen
13. The BMD Test Results Screen(normative database is available)appears.
The screen shows that a normativedatabase exists for the patient’s ethnicity,gender, and age. The results include theBMD, BMC, t-score, and z-score.
A. Press YES to print the test resultsand proceed to the next numbered step.
OR
B. Press NO to exit the BMD TestResults Screen. The Welcome Screenre-appears.
03/29/99 02:28 PMID# 1234567890Gender: FemaleAge: 33Ethnicity: AsianBMC: 1.363 gBMD: 0.79 g/cm∧∧∧∧ 2
t-score: -1.0z-score: -1.5
PrintYES reports? NO
Figure 23. BMD Test Results Screen (with t- and z-scores)
The BMD Test Results Screen(normative database is not available)appears.
The screen shows that a normativedatabase does not exist for the patient’sethnicity, gender, and age. The t-scoreand z-score have not been calculated.
A. Press YES to print the results andproceed to the next numbered step.
OR
B. Press NO to exit the BMD TestResults Screen. The Welcome Screenre-appears.
03/29/99 02:48 PMID# 1234567899Gender: FemaleAge: 55Ethnicity: OtherBMC: 2.146 gBMD: 0.555 g/cm∧∧∧∧ 2
t-score: N/Az-score: N/A
PrintYES reports? NO
Figure 24. BMD Test Results Screen (without t- and z-scores)

accuDEXA User Guide B7101220 Rev. E 17
14.The Confirm Multiple Copies Screenappears.
A. Press YES and proceed to the nextstep.
OR
B. Press NO to print only one copy ofthe report. After the copy is printed, theWelcome Screen re-appears.
Print multiple copies?
YES NO
Figure 25. Multiple Copies Confirmation Screen
15.The Enter Multiple Copies Screenappears.
A. Enter the number of copies to beprinted (from 1 to 9).
B. Press OK.
Enter number of copies [1-9]: BACK
1 2 3 OK
4 5 6 0
7 8 9 CLEAR
Figure 26. Multiple Copies Screen
16.The Printing Copies Screen appears.
After the last copy is printed, theWelcome Screen re-appears.
Printing report
Please Wait . . .
Printing Copy 1 . . .
Figure 27. Printing Copies Screen

18 B7101220 Rev. E accuDEXA User Guide
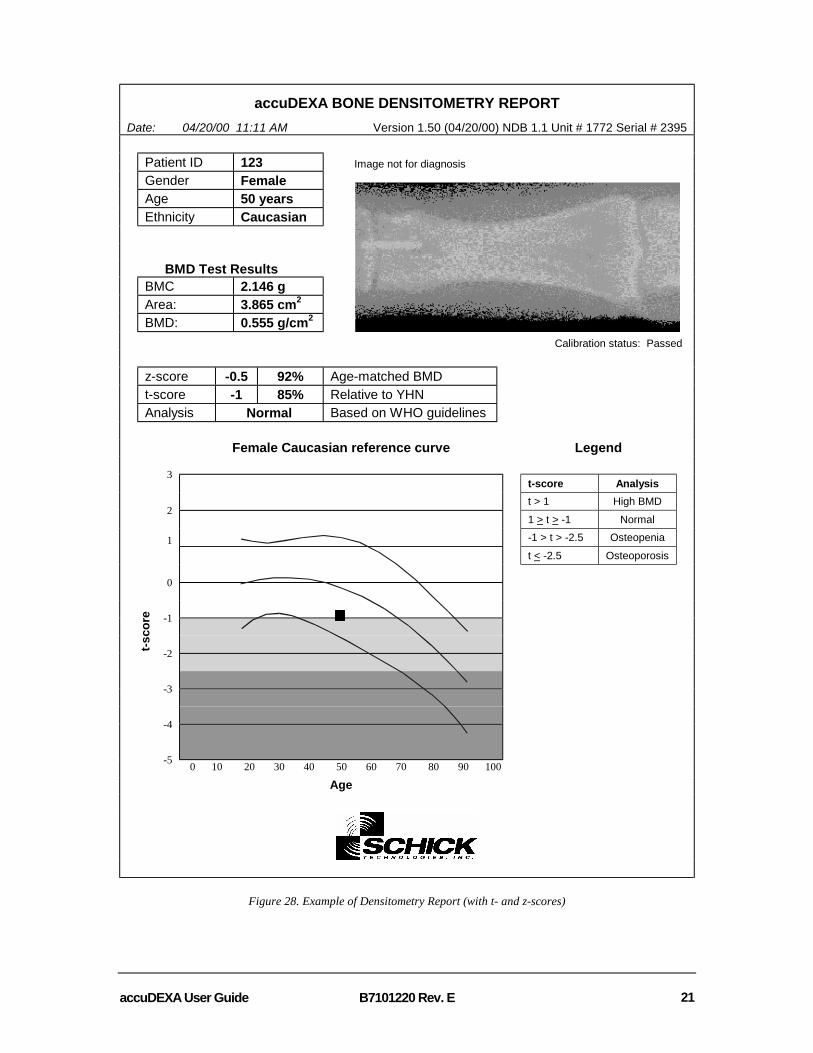
Bone densitometry report Several examples of bone densitometry reports appear on the following pages. All of the reportsshare some common features, including general report information (report date and time,software version, and device serial number), patient information (Patient ID, Gender, Age, andEthnicity), and BMD test information (X-ray image area and BMC and BMD results). There arealso some report differences as described below.
In Figure 28 a patient’s BMD results were compared with an available normative database. The t-score was calculated from the BMD results of the patient and a database population matching thepatient’s gender and ethnicity. The z-score was generated using those same parameters (genderand ethnicity) and the patient’s age.
In Figure 29 a patient’s BMD results were also compared with an available normative database.In this report, however, the z-score could not be calculated because the patient’s age (95) was“out of range” and could not be matched with an equivalent age in the database.
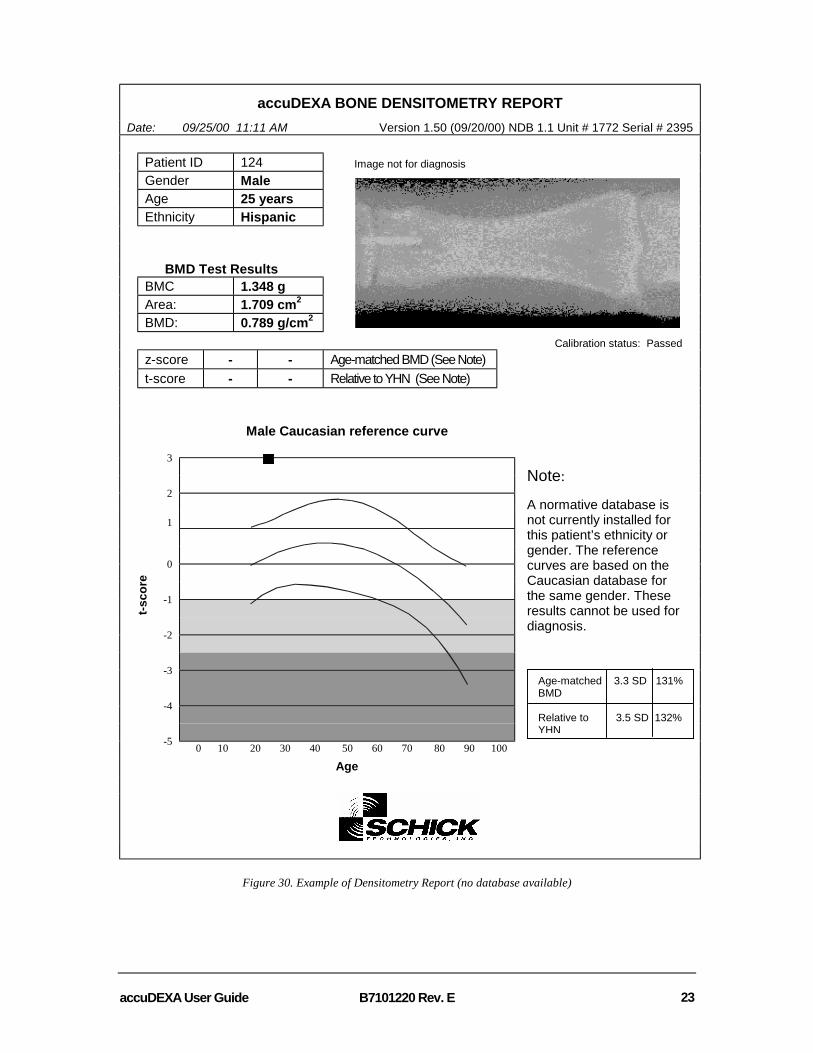
In Figure 30 a patient’s BMD results were generated but could not be compared to a databasethat matched the patient’s ethnicity and gender. Instead, the accuDEXA report will graph theresults using reference curves based on the Caucasian database for the same gender. Theseresults cannot be used for diagnosis. The t-score and z-score are omitted from the report also.Refer to Appendix A for a list of available databases.
Calculating t-scores, z-scores, and fracture riskThe following formulas are used in the accuDEXA software to calculate the t-score, z-score, andto provide, as a percentage, where those scores lie in relation to the mean BMD. The analysis iscalculated automatically, based on t-score, and reported as Normal, Osteopenia, or Osteoporosis.
SAMPLE RESULTS
t-score -1 ➀ 85% ➂ Relative to YHNz-score -0.5 ➁ 92% ➃ Age-matched BMD
Analysis Normal Based on WHO guidelines
ITEM FORMULA
t-score = ➀BMDpatient – BMDYHN
Standard Deviation
z-score = ➁BMDpatient – BMDAGE
Standard Deviation
Percentage of YHN BMD = ➂BMDpatient x 100 %
BMDYHN
Percentage of Age-matched BMD = ➃BMDpatient x 100 %
BMDAGE

accuDEXA User Guide B7101220 Rev. E 19
On the sample reference curve shown below, the scale of t-scores is shown at the left and thescale for age is at the bottom.
The three curved lines are isometric z-scores.
• The top curve represents one standard deviation above the age-matched mean BMD.• The middle curve represents the age-matched mean BMD.• The bottom curve represents one standard deviation below the age-matched mean
BMD.
Isometric t-scores are displayed on the y-axis.
• The t-scores can be positive or negative and correspond to standard deviationincreases or decreases in BMD as compared to a young, healthy normal (YHN)individual.
The range of ages for z-scores is displayed on the x-axis.
• The t-score and z-score for the scanned patient can be seen graphically on the curve,and is represented by a small square box g. In this example the patient has a lowerthan mean BMD compared to a young healthy normal (t-score) and age-matched (z-score) database.
3
High2
BMD1
0 Normal
-1
Osteopenia-2
-3
Osteoporosis-4
-5 0 10 20 30 40 50 60 70 80 90 100
Age
t-sco
re
20 B7101220 Rev. E accuDEXA User Guide
Categories of risk for fractureBone mineral estimates can be used to provide an index of fracture risk. Individuals who fallbelow the range of young healthy normal individuals are at a greater risk for fracture. The WorldHealth Organization (WHO) has established four general diagnostic categories that definecategories for low bone density.
Normal A value for bone mineral density (BMD) or bone mineralcontent (BMC) within 1 standard deviation (SD) of theyoung adult reference mean.
Low Bone Mass (osteopenia) A value for BMD or BMC more than 1 SD below the youngadult mean but less than 2.5 SD.
Osteoporosis A value for BMD or BMC of 2.5 SD or more below theyoung adult mean.
Severe Osteoporosis A value for BMD or BMC more than 2.5 SD below theyoung adult mean in the presence of one or more fragilityfractures.
The accuDEXA automatically calculates a patient’s risk based on the t-score and reports theresults as Normal, Osteopenia, or Osteoporosis. The accuDEXA cannot make an analysis ofSevere Osteoporosis, since this analysis is dependent upon the presence of one or more fragilityfractures.
Other risk factorsWhile low BMD is an important factor in determining a patient’s risk for fracture, there areseveral other factors that also contribute to risk. Patients with a combination of several riskfactors are at an increased risk of fracture. The following is a summary of risk factors, compiledby the National Osteoporosis Foundation.
• Being female• A small, thin frame• Advanced age• A family history of osteoporosis• Early menopause• Abnormal absence of menstrual periods (amenorrhea)• Anorexia nervosa or bulimia• A diet low in calcium• Use of certain medications (steroids, anticonvulsants, excessive thyroid hormones,
certain cancer treatments)• Low testosterone levels in men• A sedentary lifestyle• Cigarette smoking• Excessive alcohol intake• Malabsorption problems
accuDEXA User Guide B7101220 Rev. E 21
accuDEXA BONE DENSITOMETRY REPORTDate: 04/20/00 11:11 AM Version 1.50 (04/20/00) NDB 1.1 Unit # 1772 Serial # 2395
Patient ID 123Gender FemaleAge 50 yearsEthnicity Caucasian
BMD Test ResultsBMC 2.146 gArea: 3.865 cm2
BMD: 0.555 g/cm2
Calibration status: Passed
z-score -0.5 92% Age-matched BMDt-score -1 85% Relative to YHNAnalysis Normal Based on WHO guidelines
Female Caucasian reference curve Legend
3t-score Analysist > 1 High BMD
21 > t > -1 Normal-1 > t > -2.5 Osteopenia1t < -2.5 Osteoporosis
0
-1
-2
-3
-4
-5 0 10 20 30 40 50 60 70 80 90 100
Age
Figure 28. Example of Densitometry Report (with t- and z-scores)
t-sco
reImage not for diagnosis

22 B7101220 Rev. E accuDEXA User Guide
accuDEXA BONE DENSITOMETRY REPORTDate: 09/25/00 11:11 AM Version 1.50 (09/20/00) NDB 1.1 Unit # 1772 Serial # 2395
Patient ID 124Gender FemaleAge 95 yearsEthnicity Caucasian
BMD Test ResultsBMC 0.595 gArea: 1.674 cm2
BMD: 0.356 g/cm2
Calibration status: Passedz-score - - **Age out of range**t-score -3 69% Relative to YHNAnalysis Osteoporosis Based on WHO guidelines
Female Caucasian reference curve Legend
3t-score Analysist > 1 High BMD
21 > t > -1 Normal-1 > t > -2.5 Osteopenia1t < -2.5 Osteoporosis
0
-1
-2
-3
-4
-5 0 10 20 30 40 50 60 70 80 90 100
Age
Figure 29. Example of Densitometry Report (without z-score)
t-sco
re
Image not for diagnosis
accuDEXA User Guide B7101220 Rev. E 23
accuDEXA BONE DENSITOMETRY REPORTDate: 09/25/00 11:11 AM Version 1.50 (09/20/00) NDB 1.1 Unit # 1772 Serial # 2395
Patient ID 124Gender MaleAge 25 yearsEthnicity Hispanic
BMD Test ResultsBMC 1.348 gArea: 1.709 cm2
BMD: 0.789 g/cm2
Calibration status: Passedz-score - - Age-matched BMD (See Note)t-score - - Relative to YHN (See Note)
Male Caucasian reference curve
3
2
1
0
-1
-2
-3
-4
-5 0 10 20 30 40 50 60 70 80 90 100
Age
Figure 30. Example of Densitometry Report (no database available)
t-sco
re
Note:
A normative database isnot currently installed forthis patient’s ethnicity orgender. The referencecurves are based on theCaucasian database forthe same gender. Theseresults cannot be used fordiagnosis.
Age-matched 3.3 SD 131%BMD
Relative to 3.5 SD 132%YHN
Image not for diagnosis
24 B7101220 Rev. E accuDEXA User Guide
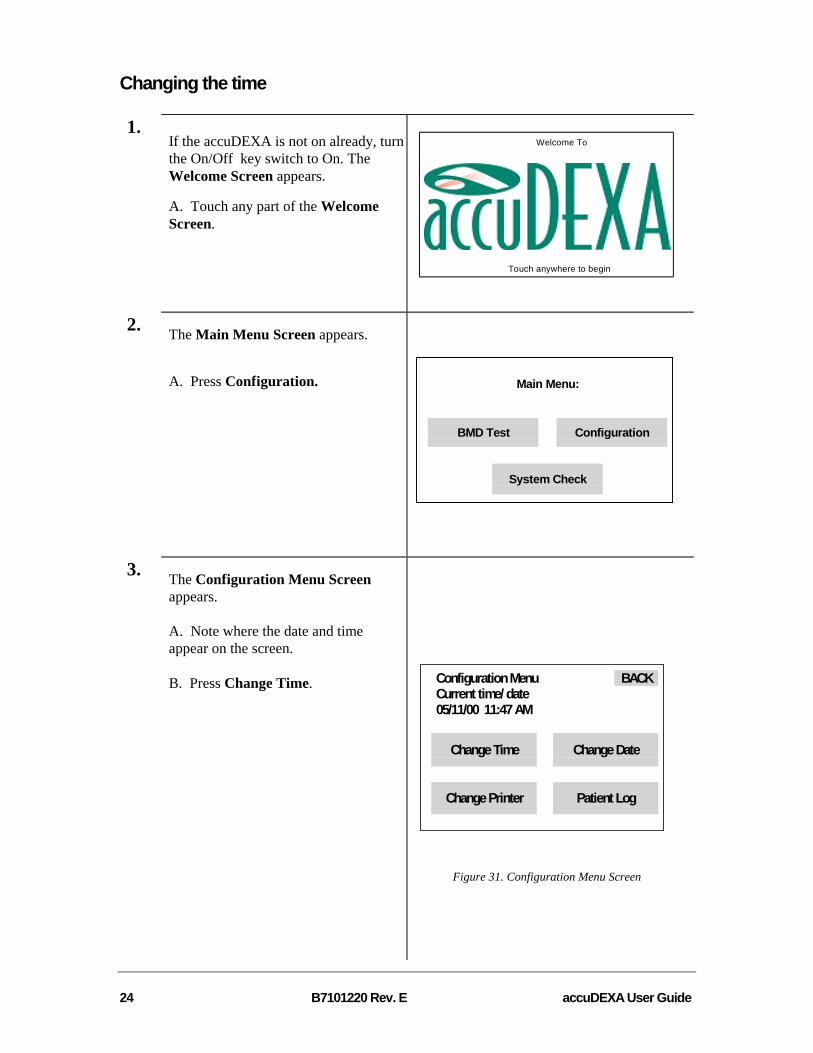
Changing the time
1.If the accuDEXA is not on already, turnthe On/Off key switch to On. TheWelcome Screen appears.
A. Touch any part of the WelcomeScreen.
Touch anywhere to begin
Welcome To
2. The Main Menu Screen appears.
A. Press Configuration. Main Menu:
BMD Test Configuration
System Check
3. The Configuration Menu Screenappears.
A. Note where the date and timeappear on the screen.
B. Press Change Time. Configuration Menu BACKCurrent time/ date05/11/00 11:47 AM
Change Time Change Date
Change Printer Patient Log
Figure 31. Configuration Menu Screen

accuDEXA User Guide B7101220 Rev. E 25
4. The Time Screen appears.
A. Enter a four-digit time value.
PLEASE NOTE:The accuDEXA uses a twenty-four hour clock(HHMM). The user must enter two digits for thehour and two digits for the minute. If an entry hasonly one digit (0-9), a zero must be added infront of it (00-09).
Below are some examples.
If the time is . . . Enter . . . To Display9:30 PM 2130 9:30 PMNoon 1200 12:00 PMMidnight 0000 12:00 AM
B. Press OK. The ConfigurationMenu Screen will re-appear with therevised time.
TIP: If you entered the wrong time, pressCLEAR and re-enter.
Enter time [HHMM] BACK
1 2 3 OK
4 5 6 0
7 8 9 CLEAR
Figure 32. Time Screen
Changing the date
1. If the accuDEXA is not on already, turnthe On/Off key switch to On. TheWelcome Screen appears.
A. Touch any part of the WelcomeScreen.
Touch anywhere to begin
Welcome To

26 B7101220 Rev. E accuDEXA User Guide
2.The Main Menu Screen appears.
A. Press Configuration. Main Menu:
BMD Test Configuration
System Check
3. The Configuration Menu Screenappears.
A. Note where the date and timeappear on the screen.
B. Press Change Date.
Configuration Menu BACKCurrent time/ date05/11/00 11:47 AM
Change Time Change Date
Change Printer Patient Log
4.The Date Screen appears.
A. Enter the six digit date, 2 digits eachfor the month, day, and year.
PLEASE NOTE: The user must entertwo digits each for the month, day, andyear. If an entry has only one digit (0-9), a zero must be added in front of it(00-09).
Below are some examples.
If the date is . . . Enter . . . To DisplayMay 3, 1998 050398 05/03/98October 10, 1998 101098 10/10/98
B. Press OK. The ConfigurationMenu Screen will re-appear with therevised date.
TIP: If you entered the wrong date, pressCLEAR and re-enter.
Enter date [MMDDYY] BACK
1 2 3 OK
4 5 6 0
7 8 9 CLEAR
Figure 33. Date Screen

accuDEXA User Guide B7101220 Rev. E 27
Changing the printer
PLEASE NOTE: Users performing this procedure should firstrefer to the printer code that applies to their printer. This codenumber can be found in Appendix E.
1. If the accuDEXA is not on already, turnthe On/Off key switch to On. TheWelcome Screen appears.
A. Touch any part of the WelcomeScreen.
Touch anywhere to begin
Welcome To
2. The Main Menu Screen appears.
A. Press Configuration. Main Menu:
BMD Test Configuration
System Check
3. The Configuration Menu Screenappears.
A. Press Change Printer.
Configuration Menu BACKCurrent time/ date05/11/00 11:47 AM
Change Time Change Date
Change Printer Patient Log

28 B7101220 Rev. E accuDEXA User Guide
4. The Printer Screen appears with thedefault printer code displayed.
A. Press CLEAR to delete the defaultprinter code from the display. Enter theappropriate printer code provided inAppendix E of this User Guide.
TIP: If your particular printer model is notlisted, try a printer code from the samemanufacturer. If you receive an errormessage, call Schick Technologies forassistance.
B. Press OK to accept the printer. Thisnumber is now stored by the system andwill be used to configure the printer.
TIP: If you entered the wrong printernumber, press CLEAR and re-enter.
Enter printer # BACK
1 2 3 OK
4 5 6 0
7 8 9 CLEAR
Figure 34. Printer Screen
5. A. If the Insert Printer Driver Screenappears, insert Printer Driver Disk #1into the floppy drive and press OK.
B. The Upgrading Printer Screenappears.
C. Upgrade is complete when thePrinter Driver Changed SuccessfullyScreen (Figure 36) appears (in aboutone minute). Remove the printer driverdisk and press OK.
D. When the Configuration MenuScreen appears, press BACK.
E. The Main Menu Screen appears.Now you can perform BMD tests usingthe new printer.
Insert accuDEXA printer driver disk #1in the floppy drive
OK
Upgrading Printer
Please Wait . . .
Figure 35. Printer Driver Screens

accuDEXA User Guide B7101220 Rev. E 29
6. A. If the Insert Printer Driver Screendid not appear, you will see the PrinterDriver Changed Screen almostinstantly. When this screen appears, theupgrade is complete.
B. Press OK
C. When the Configuration MenuScreen appears, press BACK.
D. The Main Menu Screen appears.Now you can perform BMD tests usingthe new printer.
Printer driver changed successfully
OK
Figure 36. Printer Driver Changed Screen
Printing a test page
PLEASE NOTE: If the print quality of your test page is poor,you may have the wrong printer driver selected for your printer.Refer to the section on “Changing the printer” to verify yourprinter is using the correct driver.
1. If the accuDEXA is not on already, turnthe On/Off key switch to On. TheWelcome Screen appears.
A. Touch any part of the WelcomeScreen.
Touch anywhere to begin
Welcome To
2.The Main Menu Screen appears.
A. Press System Check. Main Menu:
BMD Test Configuration
System Check

30 B7101220 Rev. E accuDEXA User Guide
3. The System Check Menu appears.
A. Press Printer Test.
System check menu: BACK
System Test Phantom Test
Printer Test
Figure 37. System Check Screen
4.The Print Test Page Screen appears.
A. Press YES to print a test page. Thetest page will print only thefollowing items:
• Print date and accuDEXAequipment information at the top ofthe page (to evaluate the readabilityof text)
• Schick Technologies logo at thebottom of the page (to evaluate theprint quality of graphics).
OR
B. Press NO. The Main Menu Screenwill appear.
TIP: If test page printing fails the firsttime, check the printer cable connectionsand the paper tray. The system will try toprint the test page a second time. If the taskfails again, the Main Menu screen willappear.
Do you want to print a test page ?
YES NO
Figure 38. Print Test Page Screen

accuDEXA User Guide B7101220 Rev. E 31
accuDEXA PRINTER TEST PAGE
Date: 09/25/00 11:11 AM Version 1.50 (09/20/00) NDB 1.1 Unit # 1772 Serial # 2395
Figure 39. Example of Test Page
32 B7101220 Rev. E accuDEXA User Guide
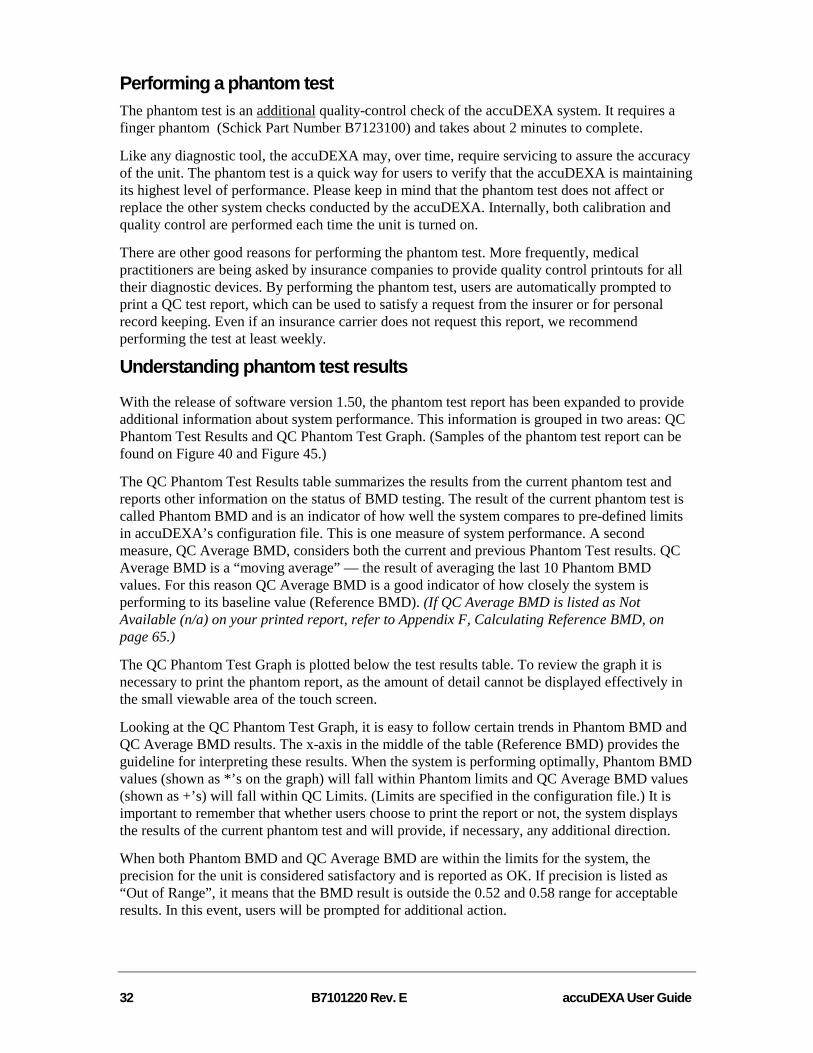
Performing a phantom test The phantom test is an additional quality-control check of the accuDEXA system. It requires afinger phantom (Schick Part Number B7123100) and takes about 2 minutes to complete.
Like any diagnostic tool, the accuDEXA may, over time, require servicing to assure the accuracyof the unit. The phantom test is a quick way for users to verify that the accuDEXA is maintainingits highest level of performance. Please keep in mind that the phantom test does not affect orreplace the other system checks conducted by the accuDEXA. Internally, both calibration andquality control are performed each time the unit is turned on.
There are other good reasons for performing the phantom test. More frequently, medicalpractitioners are being asked by insurance companies to provide quality control printouts for alltheir diagnostic devices. By performing the phantom test, users are automatically prompted toprint a QC test report, which can be used to satisfy a request from the insurer or for personalrecord keeping. Even if an insurance carrier does not request this report, we recommendperforming the test at least weekly.
Understanding phantom test results
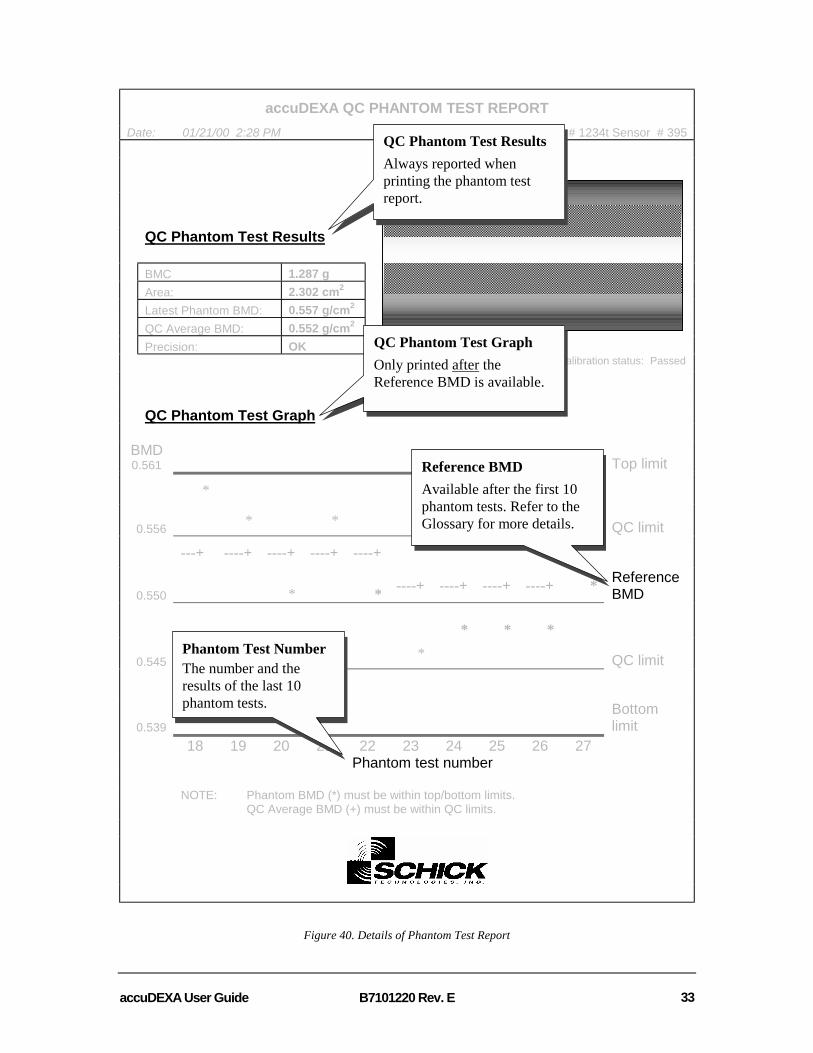
With the release of software version 1.50, the phantom test report has been expanded to provideadditional information about system performance. This information is grouped in two areas: QCPhantom Test Results and QC Phantom Test Graph. (Samples of the phantom test report can befound on Figure 40 and Figure 45.)
The QC Phantom Test Results table summarizes the results from the current phantom test andreports other information on the status of BMD testing. The result of the current phantom test iscalled Phantom BMD and is an indicator of how well the system compares to pre-defined limitsin accuDEXA’s configuration file. This is one measure of system performance. A secondmeasure, QC Average BMD, considers both the current and previous Phantom Test results. QCAverage BMD is a “moving average” — the result of averaging the last 10 Phantom BMDvalues. For this reason QC Average BMD is a good indicator of how closely the system isperforming to its baseline value (Reference BMD). (If QC Average BMD is listed as NotAvailable (n/a) on your printed report, refer to Appendix F, Calculating Reference BMD, onpage 65.)
The QC Phantom Test Graph is plotted below the test results table. To review the graph it isnecessary to print the phantom report, as the amount of detail cannot be displayed effectively inthe small viewable area of the touch screen.
Looking at the QC Phantom Test Graph, it is easy to follow certain trends in Phantom BMD andQC Average BMD results. The x-axis in the middle of the table (Reference BMD) provides theguideline for interpreting these results. When the system is performing optimally, Phantom BMDvalues (shown as *’s on the graph) will fall within Phantom limits and QC Average BMD values(shown as +’s) will fall within QC Limits. (Limits are specified in the configuration file.) It isimportant to remember that whether users choose to print the report or not, the system displaysthe results of the current phantom test and will provide, if necessary, any additional direction.
When both Phantom BMD and QC Average BMD are within the limits for the system, theprecision for the unit is considered satisfactory and is reported as OK. If precision is listed as“Out of Range”, it means that the BMD result is outside the 0.52 and 0.58 range for acceptableresults. In this event, users will be prompted for additional action.
accuDEXA User Guide B7101220 Rev. E 33
accuDEXA QC PHANTOM TEST REPORTDate: 01/21/00 2:28 PM Version 1.50 (01/18/00) Unit # 1234t Sensor # 395
QC Phantom Test Results
BMC 1.287 gArea: 2.302 cm2
Latest Phantom BMD: 0.557 g/cm2
QC Average BMD: 0.552 g/cm2
Precision: OKImage not for diagnosis Calibration status: Passed
QC Phantom Test Graph
BMD0.561 Top limit
*
0.556 * * ----+ QC limit
---+ ----+ ----+ ----+ ----+
0.550 * * ----+ ----+ ----+ ----+ * ReferenceBMD
* * *
0.545 * QC limit
0.539Bottomlimit
18 19 20 21 22 23 24 25 26 27Phantom test number
NOTE: Phantom BMD (*) must be within top/bottom limits.QC Average BMD (+) must be within QC limits.
Figure 40. Details of Phantom Test Report
Phantom Test NumberThe number and theresults of the last 10phantom tests.
Reference BMDAvailable after the first 10phantom tests. Refer to theGlossary for more details.
QC Phantom Test ResultsAlways reported whenprinting the phantom testreport.
QC Phantom Test GraphOnly printed after theReference BMD is available.

34 B7101220 Rev. E accuDEXA User Guide
1. If the accuDEXA is not on already, turnthe On/Off key switch to On. TheWelcome Screen appears.
A. Touch any part of the WelcomeScreen.
Touch anywhere to begin
Welcome To
2. The Main Menu Screen appears.
A. Press System Check. Main Menu:
BMD Test Configuration
System Check
3. The System Check Menu appears.
A. Press Phantom Test. System check menu: BACK
System Test Phantom Test
Printer Test
4. The Phantom Positioning Screenappears.
Place the finger phantom (Schick PartNumber B7123100) into the hand slot.Refer to the figure shown.
Figure 41. Phantom Placement

accuDEXA User Guide B7101220 Rev. E 35
A. Press OK and proceed to next step.
OR
B. Press CANCEL to terminate thephantom test. The Welcome Screenwill appear.
Position phantom in hand slot now.
OK CANCEL
5. Please wait for a moment while theaccuDEXA prepares to take an X-ray.
Please Wait . . .
Checking Acquisition . . .
6. The Ready to take X-ray messageappears. Wait for the X-ray Enable light toturn on. Perform steps A through E to takethe X-ray or perform step F to repositionthe phantom or to terminate the phantomtest.
A. Press and hold down the X-rayEnable button.
B. Listen for two beeps. Each beeprepresents an X-ray exposure and thereis approximately a 5-second pausebetween each beep. During the beep,the X-ray Exposure light turns onmomentarily.
Ready to take x-ray . . .
Push and hold downX-RAY ENABLE button to activate
CANCEL

36 B7101220 Rev. E accuDEXA User Guide
C. Release the button when the secondX-ray screen displays the Releasebutton message.
D. Lower the lever knob and removethe phantom.
E. Wait for an X-ray image to appearon the display, as shown in step 7.
OR
F. Press CANCEL. You can either resumetesting by repositioning the phantom orterminate the phantom test entirely. If youwish to terminate the phantom test, theWelcome Screen re-appears.
PLEASE NOTE: If the phantom isremoved during the X-ray process, or wasnot positioned properly, the message Nofinger detected is displayed. The test willbe terminated and the Phantom PositioningScreen will re-appear.
Release button.
Reading reference frames . . .
7. The Bone Outline Screen appears.
A. Press ACCEPT and proceed to thenext step.
OR
B. Press REJECT to repeat thephantom test. The PhantomPositioning Screen will appear again.
Bone outline
ACCEPT REJECT
Figure 42. Bone Outline Screen

accuDEXA User Guide B7101220 Rev. E 37
8. The Computing BMD Screen appears.
This screen appears while theaccuDEXA is computing the results forthe BMD Test. The process takes lessthan a minute.
When completed, the accuDEXA willautomatically advance to the phantomtest results screen.
Computing BMD
Please Wait . . .
Performing analysis Step 7/9 . . .
Figure 43. Computing BMD Results Screen
9. The Phantom Test Results Screenshown at right appears.
A. Press OK.
PLEASE NOTE:. If Average BMDvalue and range are listed as NotAvailable (n/a), refer to Appendix F,Calculating Reference BMD, on page65.
05/21/00 02:28 PM
BMD: 0.554 g/cm^2Phantom BMD range: 0.539 – 0.561Average BMD value: 0.551Average BMD range: 0.545 – 0.556Precision: OK
OK
Figure 44. Phantom Test Results Screen
10. Based on phantom test results, one ofthe several screens will be displayed.
At the end of a successful phantom test,users have the option of printing theresults in report format.
A. Press YES to print the report.Pressing Yes displays the ConfirmMultiple Copies Screen (shown inFigure 25). Up to 9 copies of the reportcan be printed.
B. Press NO to return to the WelcomeScreen
Phantom Test passed
Remember: Please run the ‘phantom test’periodically to verify system
performance.
PrintYES Report? NO
Phantom Test passed
Important: Please run the ‘phantom test’immediately to verify system
performance.
PrintYES Report? NO

38 B7101220 Rev. E accuDEXA User Guide
If the system fails the phantom test, anout-of-range message is displayed andthe phantom test is repeated. If thesystem fails this second test as well,you will not be able to perform BMDtests. Some features, however, likeretrieving and printing patient data, willbe available
Contact us at 888-818-4BMD forfurther assistance. Click OK.
Error#: xxxPhantom Test failed
System malfunction:Call Schick Technologies
Technical Support
OK

accuDEXA User Guide B7101220 Rev. E 39
accuDEXA QC PHANTOM TEST REPORTDate: 09/25/00 11:11 AM Version 1.50 (09/20/00) NDB 1.1 Unit # 1772 Serial # 2395
QC Phantom Test Results
BMC 1.287 gArea: 2.302 cm2
Latest Phantom BMD: 0.557 g/cm2
QC Average BMD: 0.552 g/cm2
Precision: OKCalibration status: Passed
QC Phantom Test Graph
BMD0.561 Top limit
*
0.556 * * * QC limit
----+ ----+ ----+ ----+ ----+
0.550 * * ----+ ----+ ----+ ----+ ----+ ReferenceBMD
* * * ----+
0.545 * QC limit
0.539Bottomlimit
18 19 20 21 22 23 24 25 26 27Phantom test number
NOTE: Phantom BMD (*) must be within top/bottom limits.QC Average BMD (+) must be within QC limits.
Figure 45. Example of Phantom Test Report
Image not for diagnosis
40 B7101220 Rev. E accuDEXA User Guide
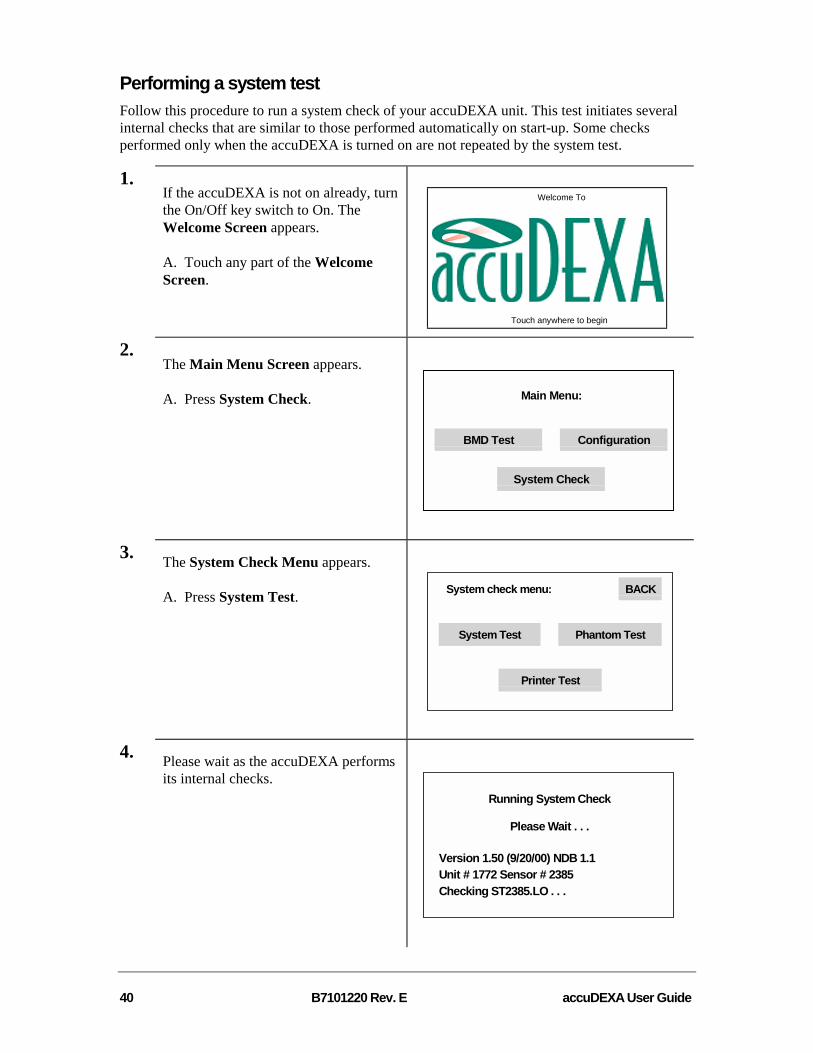
Performing a system test Follow this procedure to run a system check of your accuDEXA unit. This test initiates severalinternal checks that are similar to those performed automatically on start-up. Some checksperformed only when the accuDEXA is turned on are not repeated by the system test.
1. If the accuDEXA is not on already, turnthe On/Off key switch to On. TheWelcome Screen appears.
A. Touch any part of the WelcomeScreen.
Touch anywhere to begin
Welcome To
2. The Main Menu Screen appears.
A. Press System Check. Main Menu:
BMD Test Configuration
System Check
3. The System Check Menu appears.
A. Press System Test. System check menu: BACK
System Test Phantom Test
Printer Test
4. Please wait as the accuDEXA performsits internal checks.
Running System Check
Please Wait . . .
Version 1.50 (9/20/00) NDB 1.1Unit # 1772 Sensor # 2385Checking ST2385.LO . . .
accuDEXA User Guide B7101220 Rev. E 41
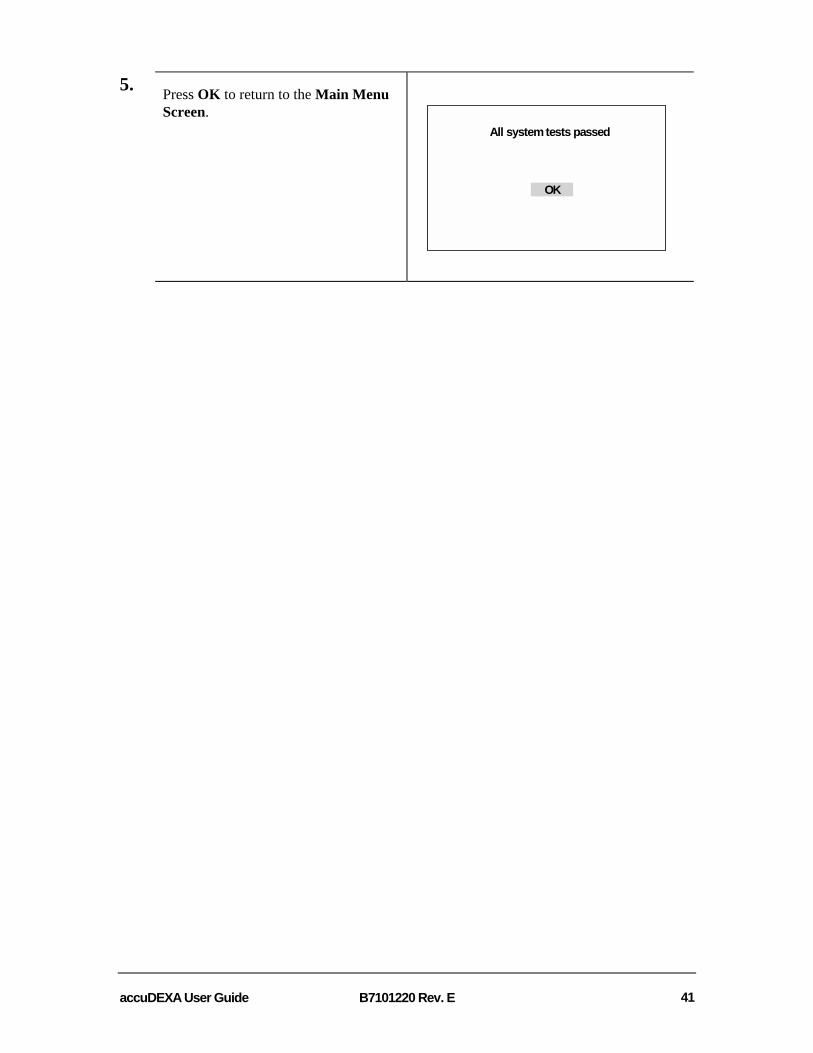
5. Press OK to return to the Main MenuScreen.
All system tests passed
OK

42 B7101220 Rev. E accuDEXA User Guide
Service
MaintenanceThere are no serviceable parts inside the accuDEXA and no scheduled maintenance is required.If there are any problems with the accuDEXA, please contact Schick Technologies at (888) 818-4BMD or 718-937-5765.
Fuse replacement instructionsReplacement fuses are provided with every accuDEXA device. If the accuDEXA does notrespond when power is applied (On/Off indicator does not light and LCD display stays blank),one of the fuses may have blown.
CAUTION: Ensure the accuDEXA is turned off and disconnectedfrom its power source before inspecting and replacing fuses.
Fuses are located on the back of the accuDEXA and can be removed by inserting a flat-bladescrewdriver into the fuseholder slot, pushing forward slightly, and turning it counterclockwise.Remove the fuse and examine it. If the fuse has blown, replace it, and reinsert the fuseholder bypushing it forward slightly with the screwdriver, then turning it clockwise to secure it.
Cleaning instructionsBefore cleaning any part of the accuDEXA, turn off power and disconnect the power cord. Keepthe fan area clean and unobstructed and vacuum it from the outside as needed.
To clean the exterior and hand plate of the accuDEXA, moisten a damp lint-free cloth with aminimal amount of rubbing alcohol. Wipe the external surfaces but avoid allowing any fluid toseep into the accuDEXA.
CAUTION: Never pour or spray any liquid cleansers into the accuDEXA.
System checksThe accuDEXA performs an automatic check of its ability to operate whenever it is turned on.Components verified by this check include:
AUTOMATIC CHECKS:• Software executable and system files• Sensor and interface• Mechanical fixture
If the device fails the system check, an error message will appear on the screen display, listingthe cause of the problem. For example, if normal operating temperature limits are exceeded, thesystem will report, Error: System temperature too hot (70-85 F/21-29 C only) or Error:System temperature too cold (70-85 F/21-29 C only) as appropriate.

accuDEXA User Guide B7101220 Rev. E 43
Users can choose to run a test of the accuDEXA system at any time. Pressing System Test at theSystem Check Menu initiates several internal checks that are similar to those performedautomatically on startup. Some checks performed only during equipment turn-on are not repeatedby the System Test.
Also available from the System Check Menu are the printer and phantom tests.
USER-INITIATED CHECKS:• System Test• Printer Test• Phantom Test
During BMD tests, the accuDEXA verifies X-ray exposures as they are taken. This verificationcalculates the difference between high and low energy exposure to ensure that only X-rays takenat the correct energy and exposure times are accepted.
Static electricity Static electricity may cause the accuDEXA touch screen to go blank. If this occurs, theaccuDEXA must be reset to resume normal operation. To do so, turn the accuDEXA off byturning the key in a clockwise direction, wait ten (10) seconds and turn the accuDEXA back on.

44 B7101220 Rev. E accuDEXA User Guide
Reference Information
Technical descriptionThe accuDEXA estimates bone mineral content (BMC, g) and bone mineral density (BMD,g/cm2) in a region of the middle phalanx of the third finger of the non-dominant hand using dual-energy X-ray absorptiometry (DEXA).
The technology used in the accuDEXA compensates for the density of soft tissue by acquiringinformation at two distinct energy levels. The accuDEXA emits a low-energy X-ray pulse at 50kVp and a high-energy X-ray pulse at 70 kVp. At 70 kVp, a zinc plate is used to filter out thelow energy X-rays.
An epoxy and an aluminum finger wedge of known density are aligned in the field of view(FOV) of the sensor. The known density of the wedge is used in bone density estimation,allowing for a relationship to be established between X-ray attenuation and density, which isapplied to every pixel of the X-ray sensor in the FOV. Furthermore, the inclusion of the wedgewithin the FOV allows a calibration test to be performed during each exam.
Duty cycle (cooling)The X-ray tube used in the accuDEXA has the following duty cycle:
DUTY CYCLE
0:00
1:00
2:00
3:00
0 60 120 180 240 300X-RAY EXPOSURE – IMPULSES
(60 impulses per second)
CO
OLI
NG
TIM
EB
ETW
EEN
EXPO
SUR
ES –
MIN
UTE
S
x
The accuDEXA pulses last approximately 0.14 seconds, which is equivalent to 8.4 pulses(indicated by the x in the above graph).
The accuDEXA has two X-ray exposures:
Impulse DurationHigh Energy .09 seconds (maximum)Low Energy .06 seconds (maximum)
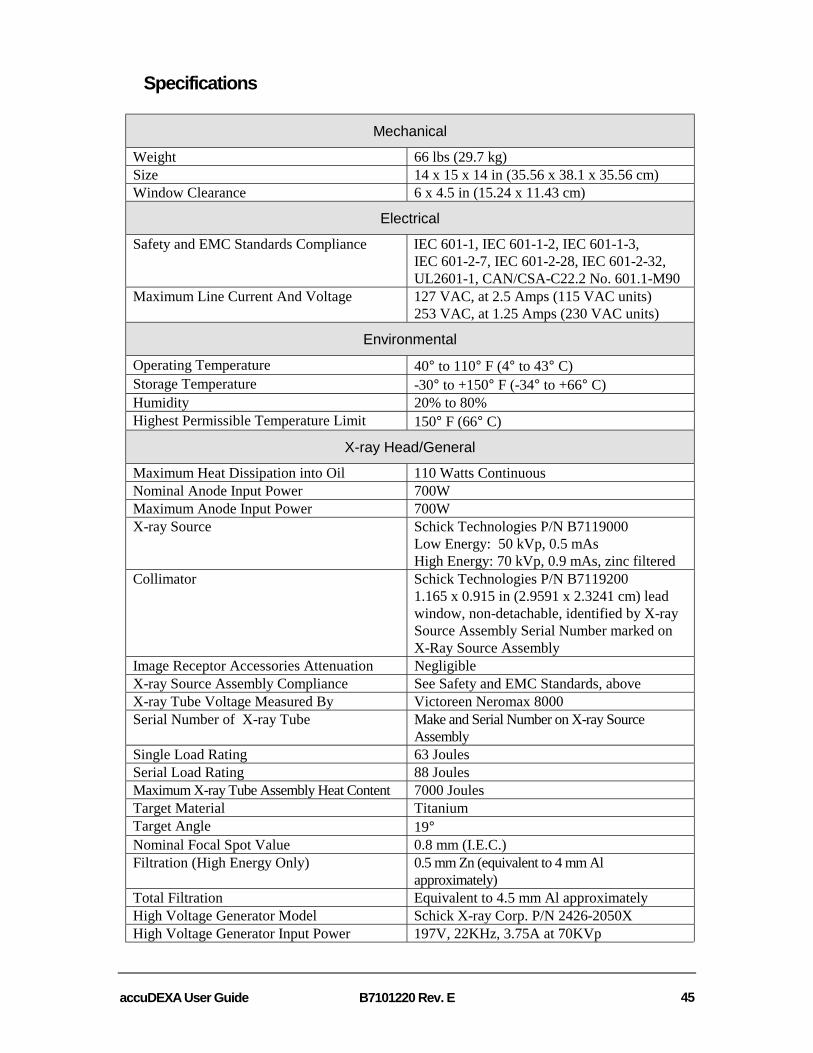
accuDEXA User Guide B7101220 Rev. E 45
Specifications
Mechanical
Weight 66 lbs (29.7 kg)Size 14 x 15 x 14 in (35.56 x 38.1 x 35.56 cm)Window Clearance 6 x 4.5 in (15.24 x 11.43 cm)
Electrical
Safety and EMC Standards Compliance IEC 601-1, IEC 601-1-2, IEC 601-1-3,IEC 601-2-7, IEC 601-2-28, IEC 601-2-32,UL2601-1, CAN/CSA-C22.2 No. 601.1-M90
Maximum Line Current And Voltage 127 VAC, at 2.5 Amps (115 VAC units)253 VAC, at 1.25 Amps (230 VAC units)
Environmental
Operating Temperature 40° to 110° F (4° to 43° C)Storage Temperature -30° to +150° F (-34° to +66° C)Humidity 20% to 80%Highest Permissible Temperature Limit 150° F (66° C)
X-ray Head/General
Maximum Heat Dissipation into Oil 110 Watts ContinuousNominal Anode Input Power 700WMaximum Anode Input Power 700WX-ray Source Schick Technologies P/N B7119000
Low Energy: 50 kVp, 0.5 mAsHigh Energy: 70 kVp, 0.9 mAs, zinc filtered
Collimator Schick Technologies P/N B71192001.165 x 0.915 in (2.9591 x 2.3241 cm) leadwindow, non-detachable, identified by X-raySource Assembly Serial Number marked onX-Ray Source Assembly
Image Receptor Accessories Attenuation NegligibleX-ray Source Assembly Compliance See Safety and EMC Standards, aboveX-ray Tube Voltage Measured By Victoreen Neromax 8000Serial Number of X-ray Tube Make and Serial Number on X-ray Source
AssemblySingle Load Rating 63 JoulesSerial Load Rating 88 JoulesMaximum X-ray Tube Assembly Heat Content 7000 JoulesTarget Material TitaniumTarget Angle 19°Nominal Focal Spot Value 0.8 mm (I.E.C.)Filtration (High Energy Only) 0.5 mm Zn (equivalent to 4 mm Al
approximately)Total Filtration Equivalent to 4.5 mm Al approximatelyHigh Voltage Generator Model Schick X-ray Corp. P/N 2426-2050XHigh Voltage Generator Input Power 197V, 22KHz, 3.75A at 70KVp
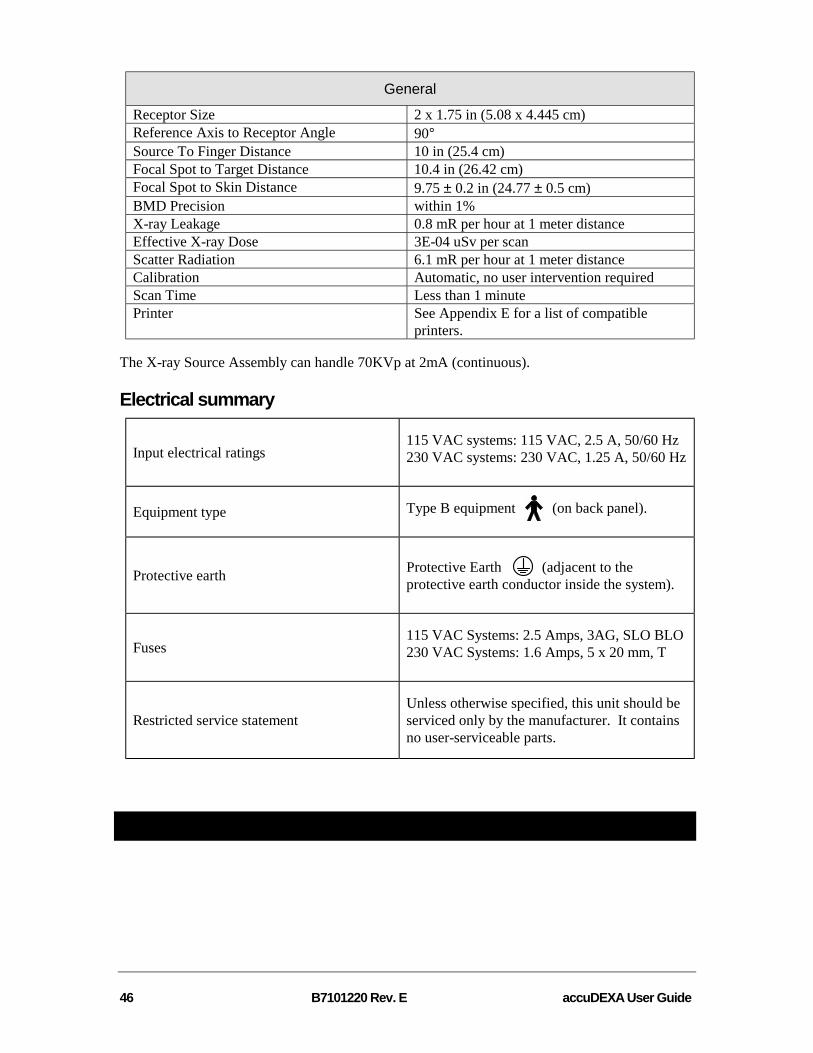
46 B7101220 Rev. E accuDEXA User Guide
General
Receptor Size 2 x 1.75 in (5.08 x 4.445 cm)Reference Axis to Receptor Angle 90°Source To Finger Distance 10 in (25.4 cm)Focal Spot to Target Distance 10.4 in (26.42 cm)Focal Spot to Skin Distance 9.75 ± 0.2 in (24.77 ± 0.5 cm)BMD Precision within 1%X-ray Leakage 0.8 mR per hour at 1 meter distanceEffective X-ray Dose 3E-04 uSv per scanScatter Radiation 6.1 mR per hour at 1 meter distanceCalibration Automatic, no user intervention requiredScan Time Less than 1 minutePrinter See Appendix E for a list of compatible
printers.
The X-ray Source Assembly can handle 70KVp at 2mA (continuous).
Electrical summary
Input electrical ratings115 VAC systems: 115 VAC, 2.5 A, 50/60 Hz230 VAC systems: 230 VAC, 1.25 A, 50/60 Hz
Equipment type Type B equipment (on back panel).
Protective earth Protective Earth (adjacent to theprotective earth conductor inside the system).
Fuses115 VAC Systems: 2.5 Amps, 3AG, SLO BLO230 VAC Systems: 1.6 Amps, 5 x 20 mm, T
Restricted service statementUnless otherwise specified, this unit should beserviced only by the manufacturer. It containsno user-serviceable parts.

accuDEXA User Guide B7101220 Rev. E 47
Appendix A
Normative databases Listed below are the current normative databases used by the accuDEXA. As databases for otherethnicities and genders become available, these databases will be incorporated into theaccuDEXA by software upgrades.
Ethnicity Age GenderCaucasian 20-89 FemaleCaucasian 20-89 Male
Asian 20-89 FemaleHispanic * 20-89 Female
African-American 20-79 Female
* The Hispanic database is representative of individuals living in Latin America and the United States.
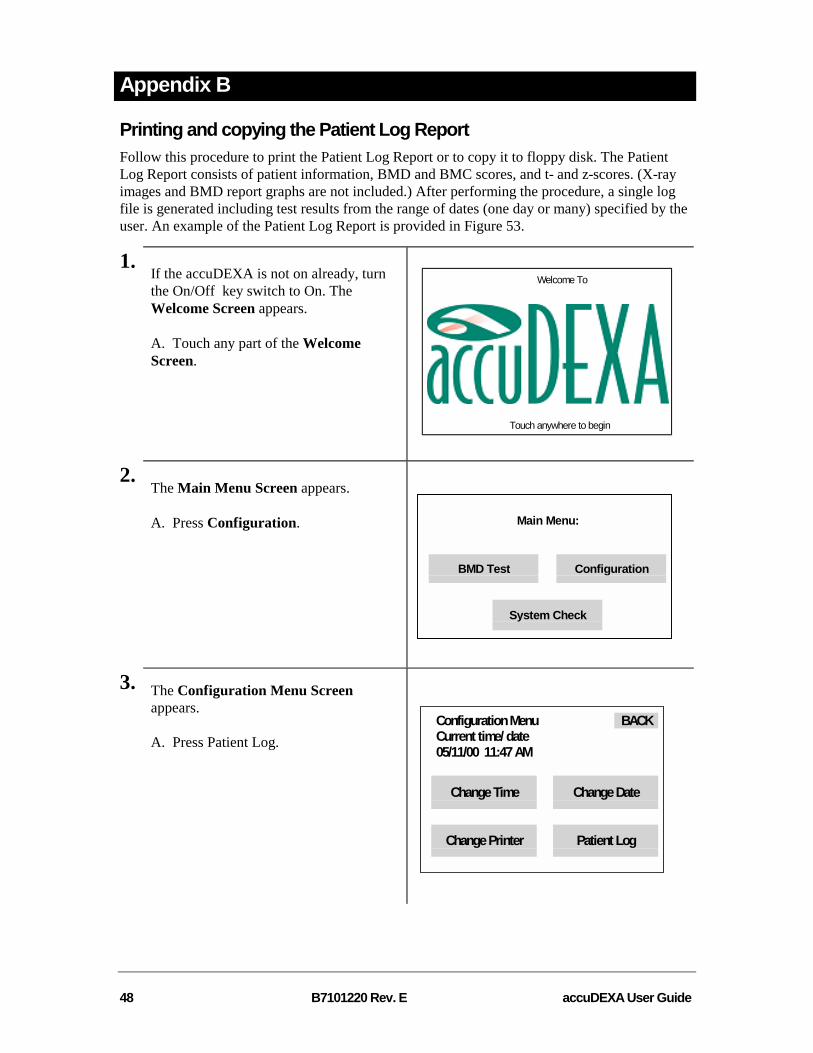
48 B7101220 Rev. E accuDEXA User Guide
Appendix B
Printing and copying the Patient Log ReportFollow this procedure to print the Patient Log Report or to copy it to floppy disk. The PatientLog Report consists of patient information, BMD and BMC scores, and t- and z-scores. (X-rayimages and BMD report graphs are not included.) After performing the procedure, a single logfile is generated including test results from the range of dates (one day or many) specified by theuser. An example of the Patient Log Report is provided in Figure 53.
1. If the accuDEXA is not on already, turnthe On/Off key switch to On. TheWelcome Screen appears.
A. Touch any part of the WelcomeScreen.
Touch anywhere to begin
Welcome To
2. The Main Menu Screen appears.
A. Press Configuration. Main Menu:
BMD Test Configuration
System Check
3. The Configuration Menu Screenappears.
A. Press Patient Log.Configuration Menu BACKCurrent time/ date05/11/00 11:47 AM
Change Time Change Date
Change Printer Patient Log

accuDEXA User Guide B7101220 Rev. E 49
4. The Patient Log Selection Screenappears.
A. Press Print to proceed to the nextscreen.
OR
B. Press File to proceed to the nextscreen.
Press’Print” if you want to printaccuDEXA Patient Log Report
Press ‘File’ if you want to save iton a diskette
Print File
Figure 46. Patient Log Screen
5. If you are printing the Patient Log report,the Print Data Screen appears. You willsee a brief message reminding you to turnon your printer.
If you are copying the Patient Log Reportto file, the File Data Screen appears.You will see a brief message promptingyou to insert a formatted (PC) disketteinto the accuDEXA floppy drive.
A. Press OK to proceed to the nextscreen and to enter the start and end dateinformation.
OR
B. Press Cancel to return to theConfiguration Menu Screen.
Ensure printer is ONand enter the start and end datesof the files you want to transfer
in a format MMDDYY
OK Cancel
Figure 47. Print Data Screen
Insert a diskette into the floppy driveand enter the start and end datesof the files you want to transfer
in a format MMDDYY
OK Cancel
Figure 48. File Data Screen
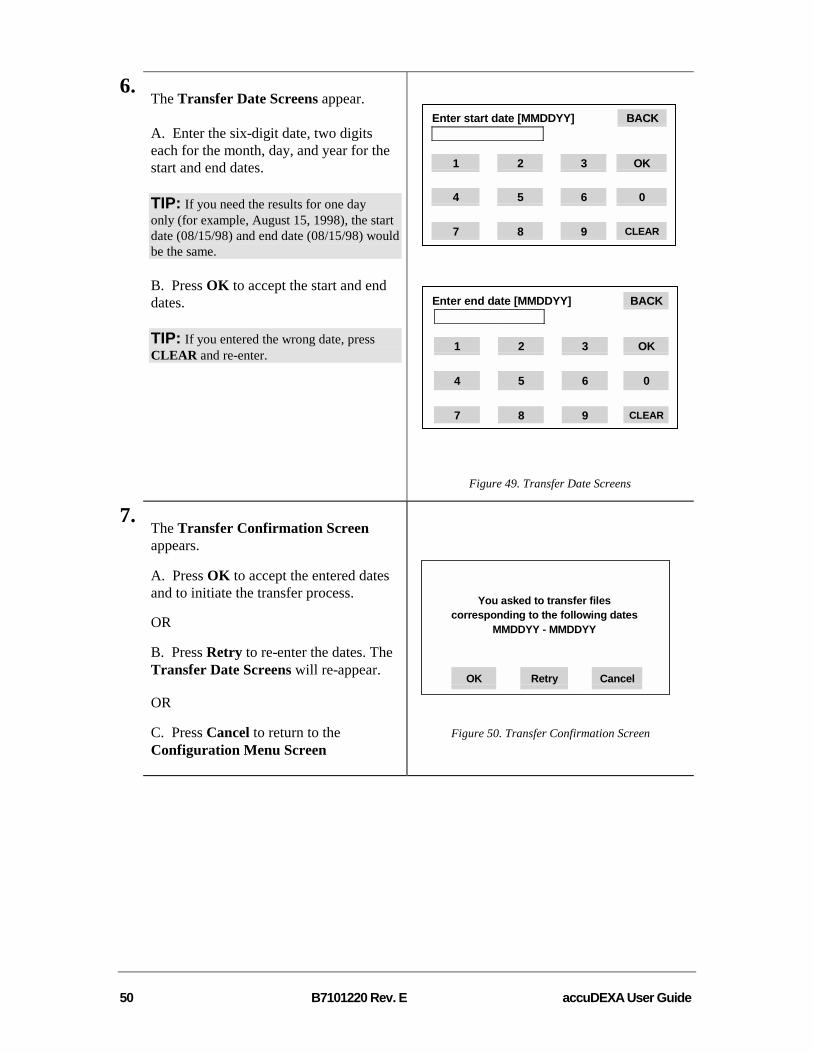
50 B7101220 Rev. E accuDEXA User Guide
6. The Transfer Date Screens appear.
A. Enter the six-digit date, two digitseach for the month, day, and year for thestart and end dates.
TIP: If you need the results for one dayonly (for example, August 15, 1998), the startdate (08/15/98) and end date (08/15/98) wouldbe the same.
B. Press OK to accept the start and enddates.
TIP: If you entered the wrong date, pressCLEAR and re-enter.
Enter start date [MMDDYY] BACK
1 2 3 OK
4 5 6 0
7 8 9 CLEAR
Enter end date [MMDDYY] BACK
1 2 3 OK
4 5 6 0
7 8 9 CLEAR
Figure 49. Transfer Date Screens
7. The Transfer Confirmation Screenappears.
A. Press OK to accept the entered datesand to initiate the transfer process.
OR
B. Press Retry to re-enter the dates. TheTransfer Date Screens will re-appear.
OR
C. Press Cancel to return to theConfiguration Menu Screen
You asked to transfer filescorresponding to the following dates
MMDDYY - MMDDYY
OK Retry Cancel
Figure 50. Transfer Confirmation Screen

accuDEXA User Guide B7101220 Rev. E 51
8. The Transfer in Process Screen appears.
A. Wait for the transfer process to finish.When the transfer has been completedsuccessfully, the following message isgenerated: Data transfer successfullycompleted.
OR
B. Press CANCEL to halt the transferprocess. The Configuration MenuScreen will re-appear
Transferring files correspondingto the following datesMMDDYY - MMDDYY
File to transfer: Filename
CANCEL
Figure 51. Transfer in Process Screen
9. A. When the transfer has been completedsuccessfully, press OK to return theConfiguration Menu Screen.
B. If you chose to print the report, thePatient Report will begin printing whendata transfer is complete.
C. If you chose to copy the Patient Reportto floppy disk, remove the disk when datatransfer is complete.
D. If you wish to use the Patient Reportin another application, continue with thesection, “Copying the Patient Log Reportinto Excel” on page 53 or “Copying thePatient Log Report into Notepad orWordPad” on page 56.
Data transfer successfully completed
OK
Figure 52. Transfer Complete Screen

52 B7101220 Rev. E accuDEXA User Guide
accuDEXA PATIENT LOG REPORTDate: 01/21/00 2:28 PM
Unit #701T
Date Time ID # Age Ethnicity Gender BMC BMD T-score Z-score
Figure 53. Patient Log Report
2/25/00 10:59 AM 1 85 Asian Female 1.28 0.56 0.894 3.572/25/00 11:01 AM 2 85 Hispanic Female 1.26 0.551 1.022 3.962/25/00 11:03 AM 1 85 Asian Female 1.258 0.551 0.72 3.4462/25/00 11:13 AM 1 85 Asian Female 1.259 0.55 0.718 2.8542/25/00 1:25 PM 1 25 Asian Female 1.262 0.552 0.757 0.3852/25/00 1:27 PM 2 35 Asian Female 1.261 0.552 0.745 0.3232/25/00 1:30 PM 3 35 Asian Female 1.251 0.548 0.664 0.2542/25/00 1:31 PM 4 45 Asian Female 1.245 0.545 0.618 0.3552/25/00 1:33 PM 5 55 Asian Female 1.262 0.553 0.76 0.7672/25/00 1:35 PM 6 65 Asian Female 1.247 0.546 0.634 1.2142/25/00 1:38 PM 6 65 Asian Female 1.255 0.549 0.69 1.2542/25/00 1:40 PM 7 75 Asian Female 1.256 0.549 0.701 2.0682/25/00 1:42 PM 8 85 Asian Female 1.254 0.549 0.686 2.8312/25/00 1:44 PM 2 25 Hispanic Female 1.25 0.547 0.953 0.812/25/00 1:45 PM 3 35 Hispanic Female 1.268 0.554 1.078 0.7842/25/00 1:47 PM 4 45 Hispanic Female 1.231 0.539 0.803 0.642/25/00 1:48 PM 5 55 Hispanic Female 1.252 0.548 0.963 1.0852/25/00 1:50 PM 6 65 Hispanic Female 1.246 0.546 0.922 1.5972/25/00 1:51 PM 7 75 Hispanic Female 1.261 0.552 1.034 2.5492/25/00 1:53 PM 88 85 Hispanic Female 1.253 0.548 0.971 3.9142/25/00 3:34 PM 6 65 Asian Female 1.268 0.555 0.804 1.3352/25/00 3:36 PM 7 75 Asian Female 1.27 0.556 0.819 2.1572/25/00 3:38 PM 2 25 Asian Female 0.771 0.354 -3.08 -3.1152/25/00 3:41 PM 35 35 Asian Female 0.793 0.363 -2.899 -2.7412/25/00 3:47 PM 2 25 Asian Female 0.774 0.339 -3.358 -3.3682/25/00 3:51 PM 3 35 Asian Female 0.764 0.336 -3.425 -3.1822/25/00 3:53 PM 4 45 Asian Female 0.774 0.34 -3.353 -2.5732/25/00 3:56 PM 5 55 Asian Female 0.789 0.346 -3.23 -2.0142/25/00 3:58 PM 0 65 Asian Female 0.772 0.339 -3.36 -1.6332/25/00 4:00 PM 7 75 Asian Female 0.775 0.34 -3.345 -0.9752/25/00 4:02 PM 8 88 Asian Female 0.777 0.341 -3.329 0.2492/25/00 4:03 PM 8 85 Asian Female 0.782 0.343 -3.289 -0.0062/25/00 4:04 PM 8 85 Asian Female 0.778 0.342 -3.313 -0.0232/25/00 4:06 PM 20 25 Hispanic Female 0.778 0.341 -2.773 -2.9742/25/00 4:08 PM 3 35 Hispanic Female 0.771 0.339 -2.815 -2.8212/25/00 4:09 PM 3 35 Hispanic Female 0.774 0.34 -2.797 -2.8042/25/00 4:11 PM 4 45 Hispanic Female 0.767 0.337 -2.847 -2.4032/25/00 4:12 PM 5 54 Hispanic Female 0.779 0.342 -2.758 -1.8662/25/00 4:14 PM 63 65 Hispanic Female 0.778 0.342 -2.763 -1.2182/25/00 4:15 PM 7 75 Hispanic Female 0.772 0.339 -2.816 -0.5072/25/00 4:17 PM 8 85 Hispanic Female 0.773 0.339 -2.805 0.576

accuDEXA User Guide B7101220 Rev. E 53
Copying the Patient Log Report into Excel Follow this procedure to copy the Patient Log Report into a spreadsheet program (like MicrosoftExcel). To perform this procedure you will need a floppy disk with a Patient Log Report file on itand a recent version of Microsoft’s Excel program on your computer. Your version of Windowsshould also be Windows 95B or higher. If you need information on copying log files to floppydisk, refer to the previous section.
1. A. Insert the floppy disk containing thePatient Log Report into your computer.
B. Start Windows Explorer and browseto the drive letter on your systemcorresponding to the floppy drive.
C. Do the following:
• Click once on the *.log file (thePatient Log Report) to select it.
• Press and hold down the Shiftkey.
• Click the right mouse button(right-click).
D. A short menu, similar to the oneshown, appears. Select the “Open with”option.
2. The Open With dialog box appears.
A. Scroll down the list of programs andclick once on “excel”to select it.
B. For now, make sure the checkbox for“Always use this program to openthis type of file” is clear. (You cancheck this box at a later time, if youwant to always start Excel whenopening a *.log file.)
C. Click OK.

54 B7101220 Rev. E accuDEXA User Guide
3. The Patient Log Report appears inExcel’s workbook window.
4. At this point, a few formatting steps areneeded to improve the look andreadability of the table.
A. Starting with Column B, click andhold down the remaining columns in thetable.
B. When the last column in the table isselected, release the mouse button. Theselected columns should remainhighlighted.
5. Click on the Format menu to open thelist of options. Click on Cells.

accuDEXA User Guide B7101220 Rev. E 55
6. The Format Cells dialog box appears.
A. Scroll down the list of categories andclick once on “Text” to select it.
B. Click OK.
7. A. The Excel workbook window isdisplayed again.
B. Take a moment to look over the data.If some of the data had a very long stringof numbers or letters, you may want toadjust the width of that column, asfollows.
• Click in the column heading (theshaded area)
• Drag the boundary on the rightside of the column heading to alarger width.
8. A. Click on the File menu, and then onSave As.
B. When the dialog box opens, name thefile and select Microsoft Excel Workbookfrom the Save as type drop-down box.When saving the file, make sure you saveit to your hard drive.
C. Click Save. Your data has now beensaved as an Excel spreadsheet.

56 B7101220 Rev. E accuDEXA User Guide
Copying the Patient Log Report into Notepad or WordPad Follow this procedure to copy the Patient Log Report into a text editor program (like Notepad orWordPad). To perform this procedure you will need a floppy disk with a Patient Log Report fileon it and a recent version of the Notepad or WordPad program on your computer. If you needinformation on copying log files to floppy disk, refer to the section, “Printing and copying thePatient Log Report” on page 48.
1. A. Insert the floppy disk containing thePatient Log Report into your computer.
B. Start Windows Explorer and browse tothe drive letter on your systemcorresponding to the floppy drive.
C. Do the following:
• Click once on the *.log file (thePatient Log Report) to select it.
• Press and hold down the Shiftkey.
• Click the right mouse button(right-click).
D. A short menu, similar to the oneshown, appears. Select the “Open with”option.
2. The Open With dialog box appears.
A. Scroll down the list of programs andclick once on “WORDPAD” to select it.
B. For now, make sure the checkbox for“Always use this program to open thistype of file” is clear. (You can check thisbox at a later time, if you want to alwaysstart Excel when opening a *.log file.)
C. Click OK.

accuDEXA User Guide B7101220 Rev. E 57
3. The Patient Log Report appears in theWordPad window.
4. A. At this point, a few formatting steps
are needed to improve the appearanceof the table when printed.
B. Click on the File menu to open thelist of options. Click on Page Setup.
5. The Page Setup dialog box appears.
A. Under “Orientation”, click onLandscape.
B. Under “Margins”, delete themeasurement in each text box. As themeasurements are deleted, new minimummargin values will appear in the textboxes.
C. Click OK.

58 B7101220 Rev. E accuDEXA User Guide
6. A. Click on the File menu, and then onSave As.
B. When the dialog box opens, name thefile and select Text Document from theSave as type drop-down box. Whensaving the file, make sure you save it toyour hard drive.
C. Click Save. Your data has now beensaved as a text document in WordPad.

accuDEXA User Guide B7101220 Rev. E 59
Appendix C
Error messages If a problem occurs during any procedure, the accuDEXA immediately displays an errormessage. The messages are brief and describe the cause of the problem. Some error messagesmay also include an error message number, located above the message and on the right. Refer tothe sample below.
Error # 114
Error: Timed out waiting for switch to behit
OK
Figure 54. Error Message Screen
Users may be able to correct errors reported by accuDEXA. Errors that occur during patient dataentry, data transfer, or printing can often be fixed easily. If the problem persists, however, pleasewrite down the error message number (if applicable) and call us at 888-818-4BMD forassistance.
Error MessageError
MessageNumber
Can becorrectedby user
May becorrectedby user
Cannot becorrectedby user
Data Entry ErrorsPatient ID # cannot be greater than 10 digits.Please re-enter. None
No patient ID # entered NoneAge is out of range. Please enter a numberbetween 1 and 120 None
Patient information is incomplete NoneInvalid time format; must be HHMM (24-hour clock) NoneToo many digits in time (maximum 4) NoneInvalid date format; must be MMDD orMMDDYY None
Too many digits in date (must be 4 or 6) NoneToo many digits or invalid digits in <filename> NoneToo many digits in printer number None
Printer ErrorsPrinter out of paper 121No printer attached or could not print 120Invalid printer # <printer number> NonePrinter not ready. Please push on-line button. Tryagain? 122

60 B7101220 Rev. E accuDEXA User Guide
Error MessageError
MessageNumber
Can becorrectedby user
May becorrectedby user
Cannot becorrectedby user
Could not print 146Cannot change printer driver. Floppy disk iswrong or not ready 163
Could not change printer driver 162Printing job cancelled due to repeated printererrors 167
Data Transfer ErrorsFloppy drive error: Disk is not ready 154Floppy drive error: Disk is full or damaged 155Floppy drive error: Printer driver’s disk # <disknumber> is not ready NoneDisk space is available for storing only <numberof> more patients 159
End date cannot precede the start date NoneError: Cannot find file specified None
Data Retrieval ErrorsCould not acquire image from sensor 129Cannot read data in sensor calibration file 134Initialization file <filename> cannot be read 150System file <filename> failed system check 142Could not read <filename> to perform systemcheck 145
Cannot read wedge data in setup file 133Cannot read data in normative database 135
Hardware ErrorsSwitch closed prematurely. Possible hardwareproblem 103
Incorrect X-ray exposure. Please reposition hand. 168Timed out waiting for switch to be hit 114No finger detected or x-ray source error 152Timed out waiting for limit switch and/or filtermotion 112
X-ray energy or filter failure 128Sensor or high energy X-ray emission failure 131Sensor or low energy X-ray emission failure 132Filter, solenoid and/or limit switch failed systemcheck 101
Filter/solenoid status unknown 101Filter, solenoid and/or limit switch failed systemcheck 103Hard tissue equivalent linear wedge calibrationfailure 116Soft tissue equivalent linear wedge calibrationfailure 117

accuDEXA User Guide B7101220 Rev. E 61
Error MessageError
MessageNumber
Can becorrectedby user
May becorrectedby user
Cannot becorrectedby user
Aluminum step wedge calibration failure 118Cannot store images 160
System Check ErrorsSystem temperature too cold (70-85 F/21-29 Conly) 149
System temperature too hot (70-85 F/21-29 Conly) 148
Wedge verification error: Please make sure thehand slot is empty 169Sensor verification error: Please make sure thehand slot is empty 170Sensor verification error: X-ray source failure orswitch was not pressed 172
System file <filename> failed system check 142Could not run system check on system file<filename> 151Filter, solenoid and/or limit switch failed systemcheck 108Could not read <filename> to perform systemcheck 145Sensor verification error: Sensor connectionfailure 171
Sensor malfunction 173Sensor failed system check 141
General ErrorsInternal error 113Memory failure 130

62 B7101220 Rev. E accuDEXA User Guide
Notice messagesNotice messages perform two functions: to confirm the user’s action to cancel, interrupt, orcontinue with a procedure and to indicate, prior to X-ray scans, when t- or z-scores cannot beprovided in the BMD Test Report.
Acquisition canceled upon request from userData transfer interrupted by the userTimed out waiting for switch to be hitNo finger detectedAge is outside range of normative database for specified gender and ethnicity. No z-score possible.Normative database not installed for specified gender and ethnicity. No t-score or z-score possible.

accuDEXA User Guide B7101220 Rev. E 63
Appendix D
Troubleshooting the Canon printerThe following list summarizes typical solutions in the event you experience printing problemswith the Canon BJC-250. For additional troubleshooting information, refer to the Canon printermanual. Users with printers other than the Canon BJC-250, should refer to their product manualsfor assistance.
Problem SolutionIf printing speed is too slow The printer comes supplied with a Color BJ Cartridge BC-05.
Replacing this cartridge with a less expensive Black BJCartridge BC-02 will cut printing time in half.
If the print head moves but nothingprints
Try printing a test page from the printer. See Canon’s UserManual for instructions on printing a test page using theoperator panel.
If you are still unable to print, perform at least two thoroughcleanings of the print head as described in the Printer Manual.
If the printing problem persists, replace the printer cartridge.
If the paper will not feed or if theprintout is stuck in the printer
If the paper will not feed into the printer, please ensure thepaper was placed properly in the paper tray. Remove the paperfrom the tray and make sure the edges of the paper rest againstthe back and right sides of the sheet feeder.
If the power light does not stop blinking Remove and then reinsert the printer ink cartridge.
If a printed report is scrambled andcannot be read clearly or at all
Make sure you are using the correct code number for yourprinter. Follow the steps in “Changing the printer” to verifythat your printer is using the correct code. If this does notcorrect the problem, check and/or replace the printer cable.
If the accuDEXA touch panel displaysthe error, Note: Could Not Print
Check that the printer cable is properly connected between theaccuDEXA unit and the printer. You may need to replace theprinter cable.
Check the printer cartridge. It may need to be replaced.
Try printing a test page from the printer. If the printer is able toprint a test page but not an accuDEXA printout, you may needto service the accuDEXA unit.
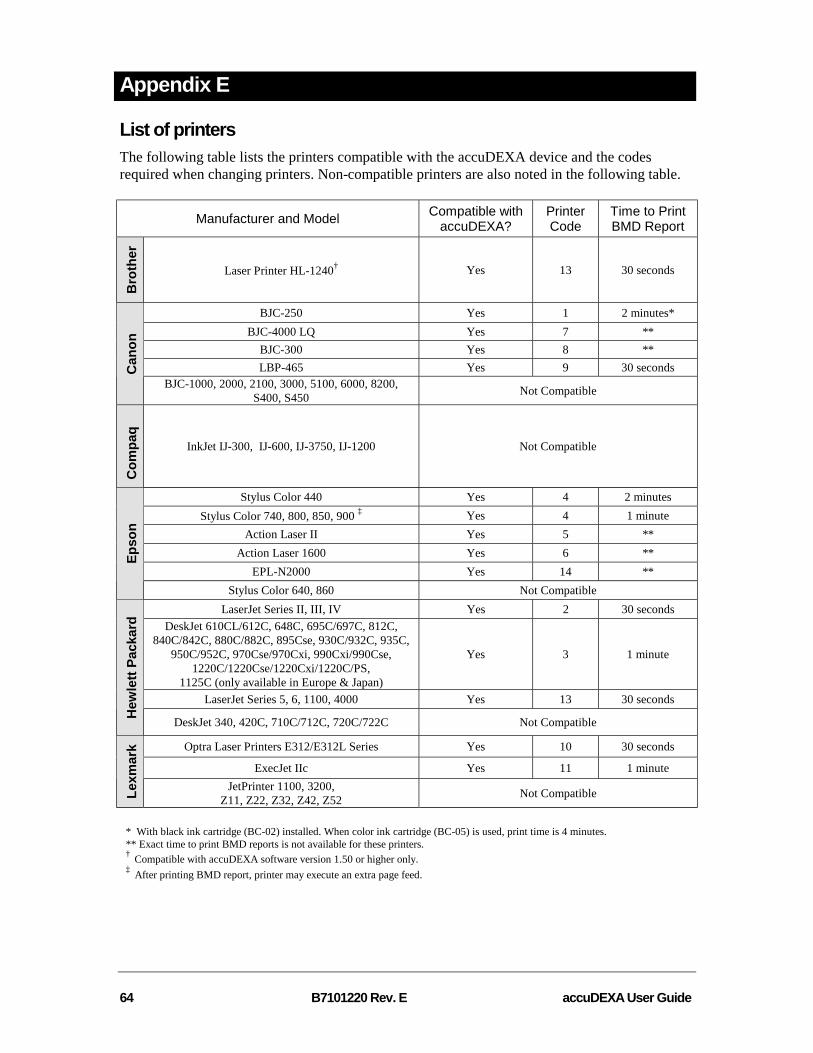
64 B7101220 Rev. E accuDEXA User Guide
Appendix E
List of printersThe following table lists the printers compatible with the accuDEXA device and the codesrequired when changing printers. Non-compatible printers are also noted in the following table.
Manufacturer and Model Compatible withaccuDEXA?
PrinterCode
Time to PrintBMD Report
Bro
ther
Laser Printer HL-1240† Yes 13 30 seconds
BJC-250 Yes 1 2 minutes*BJC-4000 LQ Yes 7 **
BJC-300 Yes 8 **LBP-465 Yes 9 30 secondsC
anon
BJC-1000, 2000, 2100, 3000, 5100, 6000, 8200,S400, S450 Not Compatible
Com
paq
InkJet IJ-300, IJ-600, IJ-3750, IJ-1200 Not Compatible
Stylus Color 440 Yes 4 2 minutesStylus Color 740, 800, 850, 900 ‡ Yes 4 1 minute
Action Laser II Yes 5 **Action Laser 1600 Yes 6 **
EPL-N2000 Yes 14 **
Epso
n
Stylus Color 640, 860 Not CompatibleLaserJet Series II, III, IV Yes 2 30 seconds
DeskJet 610CL/612C, 648C, 695C/697C, 812C,840C/842C, 880C/882C, 895Cse, 930C/932C, 935C,
950C/952C, 970Cse/970Cxi, 990Cxi/990Cse,1220C/1220Cse/1220Cxi/1220C/PS,
1125C (only available in Europe & Japan)
Yes 3 1 minute
LaserJet Series 5, 6, 1100, 4000 Yes 13 30 seconds
Hew
lett
Pack
ard
DeskJet 340, 420C, 710C/712C, 720C/722C Not Compatible
Optra Laser Printers E312/E312L Series Yes 10 30 seconds
ExecJet IIc Yes 11 1 minute
Lexm
ark
JetPrinter 1100, 3200,Z11, Z22, Z32, Z42, Z52 Not Compatible
* With black ink cartridge (BC-02) installed. When color ink cartridge (BC-05) is used, print time is 4 minutes.** Exact time to print BMD reports is not available for these printers.† Compatible with accuDEXA software version 1.50 or higher only.‡ After printing BMD report, printer may execute an extra page feed.
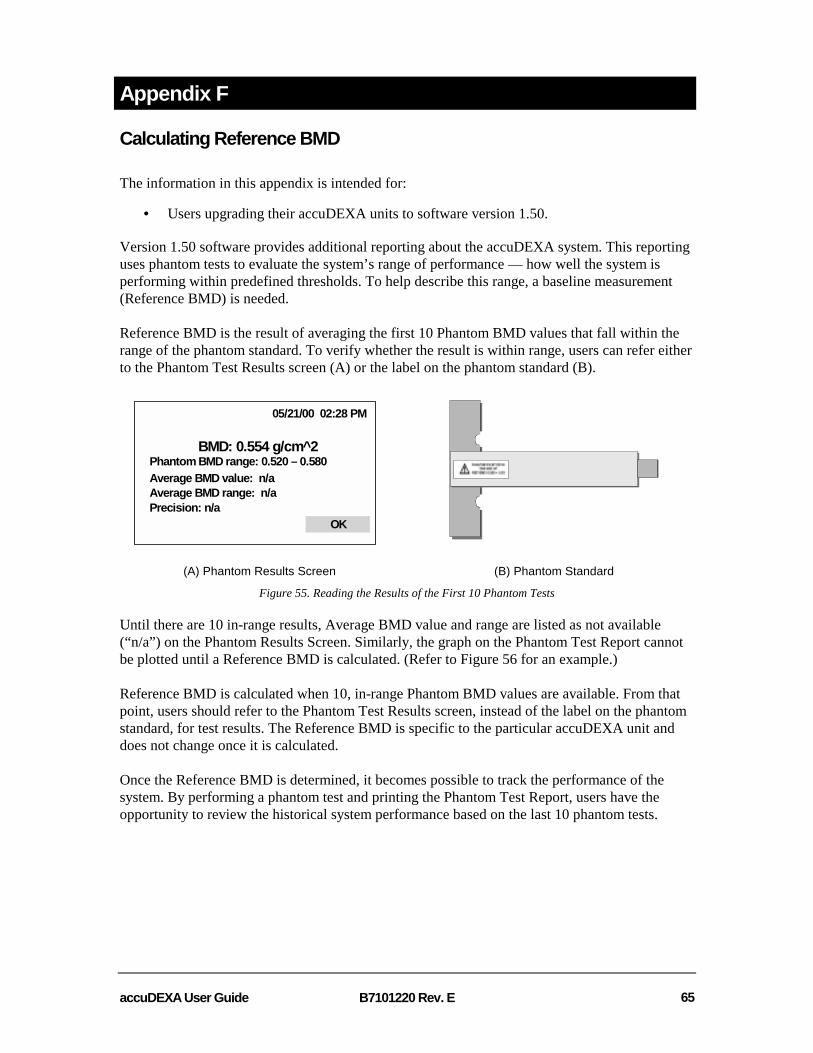
accuDEXA User Guide B7101220 Rev. E 65
Appendix F
Calculating Reference BMD
The information in this appendix is intended for:
• Users upgrading their accuDEXA units to software version 1.50.
Version 1.50 software provides additional reporting about the accuDEXA system. This reportinguses phantom tests to evaluate the system’s range of performance — how well the system isperforming within predefined thresholds. To help describe this range, a baseline measurement(Reference BMD) is needed.
Reference BMD is the result of averaging the first 10 Phantom BMD values that fall within therange of the phantom standard. To verify whether the result is within range, users can refer eitherto the Phantom Test Results screen (A) or the label on the phantom standard (B).
05/21/00 02:28 PM
BMD: 0.554 g/cm^2Phantom BMD range: 0.520 – 0.580Average BMD value: n/aAverage BMD range: n/aPrecision: n/a
OK
(A) Phantom Results Screen (B) Phantom Standard
Figure 55. Reading the Results of the First 10 Phantom Tests
Until there are 10 in-range results, Average BMD value and range are listed as not available(“n/a”) on the Phantom Results Screen. Similarly, the graph on the Phantom Test Report cannotbe plotted until a Reference BMD is calculated. (Refer to Figure 56 for an example.)
Reference BMD is calculated when 10, in-range Phantom BMD values are available. From thatpoint, users should refer to the Phantom Test Results screen, instead of the label on the phantomstandard, for test results. The Reference BMD is specific to the particular accuDEXA unit anddoes not change once it is calculated.
Once the Reference BMD is determined, it becomes possible to track the performance of thesystem. By performing a phantom test and printing the Phantom Test Report, users have theopportunity to review the historical system performance based on the last 10 phantom tests.
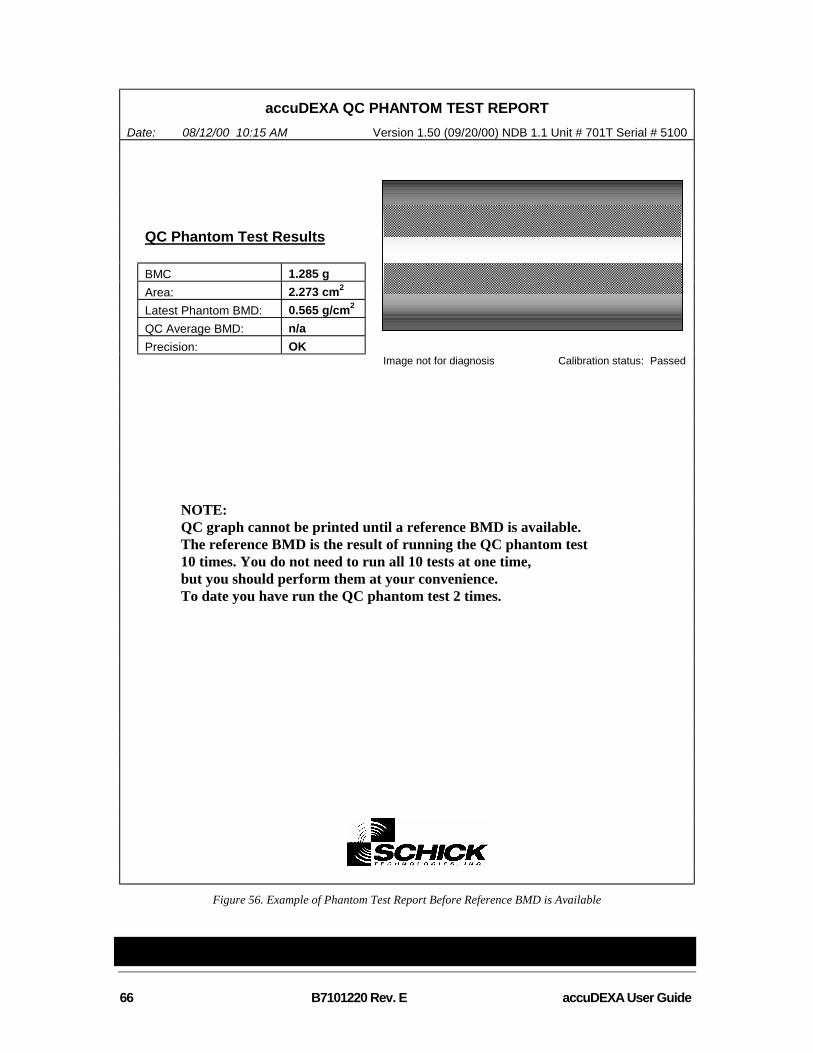
66 B7101220 Rev. E accuDEXA User Guide
accuDEXA QC PHANTOM TEST REPORTDate: 08/12/00 10:15 AM Version 1.50 (09/20/00) NDB 1.1 Unit # 701T Serial # 5100
QC Phantom Test Results
BMC 1.285 gArea: 2.273 cm2
Latest Phantom BMD: 0.565 g/cm2
QC Average BMD: n/aPrecision: OK
Image not for diagnosis Calibration status: Passed
NOTE:QC graph cannot be printed until a reference BMD is available.The reference BMD is the result of running the QC phantom test10 times. You do not need to run all 10 tests at one time,but you should perform them at your convenience.To date you have run the QC phantom test 2 times.
Figure 56. Example of Phantom Test Report Before Reference BMD is Available

accuDEXA User Guide B7101220 Rev. E 67
Appendix G
Equipment LabelsThe following labels are located on the front and back panels of the accuDEXA.
Front Panel Warning Label:
Back Panel Product Label:
COMPLIES WITH DHHS RADIATIONPERFORMANCE STANDARDS,21CFR, SUBCHAPTER J
31-00 47th AVENUELONG ISLAND CITY, NY 11101MODEL 7100SERIAL NO:MANUFACTURED:
CAUTION:FEDERAL LAW RESTRICTS THISDEVICE TO SALE BY OR ON THEORDER OF A PHYSICIAN
Back Panel Regulatory Label:
Conforms to UL Std 2601-1. Certified to CAN/CSA C22.2 No. 601.1.230V Units:____ 230VAC, 50/60 Hz, 1.25A, Fuse: 1.6 A, 250V, T115V Units ____ 115VAC, 50/60 Hz, 2.5A, Fuse: 2.5 A, 250V, SB
CAUTION: For continued protection against risk of firereplace only with same type of fuse
X-ray Head S/N: Made in USA
0413

68 B7101220 Rev. E accuDEXA User Guide
Glossary of Terms
AreaEstimated projected image area (measured in cm2).
BMCEstimated bone mineral content of the imaged portion of the finger (measured in grams).
BMDEstimated bone mineral density of the imaged portion of the finger (measured in mass per projected area).
Non-dominant HandAll accuDEXA exams are performed on the non-dominant hand. If a patient is right handed, they shouldplace their left hand into the hand slot. If the patient is left handed, they should place their right hand intothe hand slot.
Phantom BMDThe BMD of the accuDEXA phantom (P/N B7123100). When phantom BMD is reported out-of-range,there may be a problem with system performance. Users are prompted to repeat the phantom test to verifyresults and, if necessary, take additional actions.
QC (Quality Control) Average BMDA measure used in accuDEXA software to help verify system performance. QC Average BMD (also calledAverage BMD) is calculated from results of the last 10 phantom tests.
Reference BMDA measure used in accuDEXA software to help verify system performance. Reference BMD is calculatedfrom results of the first 10 phantom tests. (To be included as one of the first 10 tests, the phantom BMDmust fall within the 0.52 and 0.58 range.)
Standard Deviation (SD)A measure of the spread of a distribution. In a normal (or bell curve) distribution, 68% of all estimations liewithin one standard deviation of the mean and 95% of all measurements lie within two standard deviationsof the mean.
t-scoreA measure of a patient’s BMD compared with a young healthy normal population (ages 20-29) of the samegender and ethnicity. The t-score is reported in terms of the number of standard deviations above (positivet-score) or below (negative t-score) the mean reference BMD.
World Health Organization (WHO)A specialized agency of the United Nations promoting technical cooperation for health among nations andthe improvement in the quality of human life.
Young Healthy Normal (YHN)A population sample defined as young healthy normal adults (ages 20-29) of the same gender and ethnicity.
z-scoreA measure of how the BMD of an individual patient compares with the BMD of a reference population ofthe same age group, gender, and ethnicity. The z-score is the number of standard deviations above (positivez-score) or below (negative z-score) the mean BMD of an age-matched control.

accuDEXA User Guide B7101220 Rev. E 69
Index
AaccuDEXA: Electrical Summary, 50; General
Information, A; Indications, A; Overview, 5;Precautions, A; Registering, C; Specifications,49; Steps to Turn Off, 8; Steps to Turn On, 8;Steps to Turn On, 8; Warnings, A
Age Screen, 16
BBMC: Definition of, 72BMD: Definition of, 72; Obtaining Successful
Test Results, 11; Operator Checklist, 11BMD Test: Sample Screen, 20; Steps to Perform,
15Bone Outline Screen, 19Bone Outline Screens, 40
CCleaning Instructions, 46Computing BMD Results Screen, 20, 41Configuration Menu Screen, 28, 30, 31, 52Contraindications, 6Controls, 7Cooling Cycle, 48
DDatabase Information Screen, 17Date: Additional Details, 30; Changing, 29Date Screen, 30Densitometry Report: Description, 22; Example
of, 26, 27
EError Messages, 63Ethnicity Screen, 16Exposure Screen, 13
FFile Data Screen, 53Finger Placement, 10Finger Position: Acceptable, 19; Guidelines, 19;
Jewelry and, 11; Unacceptable, 19Fracture Risk, 24; Other Factors, 24Fuse Replacement Instructions, 46
GGender Screen, 16Getting Started, 12Glossary, 72
IIndications, 6
MMain Menu Screen, 15, 28, 30, 31, 33, 38, 44,
52, 55Maintenance, 46Monitoring, 6Multiple Copies Confirmation Screen, 21Multiple Copies Screen, 21
NNormative Databases, 51Notice Messages, 66
OOverview and Setup, 5
PPatient ID Screen, 15Patient Log Report, 56; Copying and Printing,
52; Steps to Copy into Excel, 57; Steps toCopy into Notepad or WordPad, 60
Patient Log Selection Screen, 53Phantom: Example of Report, 43; Performing
Test, 36; Placement, 38; Positioning Screen,38; Report Before Available Reference BMD,70; Report Details, 42; Results Screen andStandard, 69; Understanding Phantom TestResults, 36
Please Wait Screen, 39Positioning Screen, 18Print Data Screen, 53Printer: Changing, 31; Compatibility and Codes,
68; Connections, 8; Installation, 7; Print TestPage Screen, 34; Troubleshooting for Canon,67
Printer Driver Changed Screen, 33Printer Driver Screens, 32Printer Screen, 32Printing a Test Page, 33Printing Copies Screen, 21
RReference BMD: Calculating, 69Reference Information, 48Release Button Screen, 13
SScreen Navigation, 10Sensor Verification Screen, 12, 13Software: New Features, 9; Upgrade, 9Standard Deviation: Definition of, 72Static Electricity, 47Summary Screen, 17Symbols, B

70 B7101220 Rev. E accuDEXA User Guide
System: Checks, 46; System Check Screen, 12,34, 44; System Test Passed Screen, 45
System Check Screen, 34, 38, 44System Test: Steps to Perform, 44
TTechnical Description, 48Test Page, 35Text Conventions, 9The accuDEXA Device, back view, 7The accuDEXA Device, front view, 7Time: Additional Details, 29; Changing, 28Time Screen, 29Touch Screen, 10Transfer Complete Screen, 55Transfer Confirmation Screen, 54Transfer Date Screens, 54Transfer in Process Screen, 55t-score, 5; Definition of, 72; Using, 5
t-scores, z-scores, fracture risk: Calculations, 22
VVerification Test Results Screen, 14
WWelcome Screen, 12, 14, 15, 28, 29, 31, 33, 38,
44, 52WHO: Definition of, 72
XX-ray Screens, 18, 39, 40
YYHN: Definition of, 72
Zz-score, 5; Definition of, 72