45 june 2016 isomalt koi pond ... - cake masters · pdf file• food grade airbrush •...
TRANSCRIPT
ISSUE 45 | JUNE 2016
61MAGAZINE
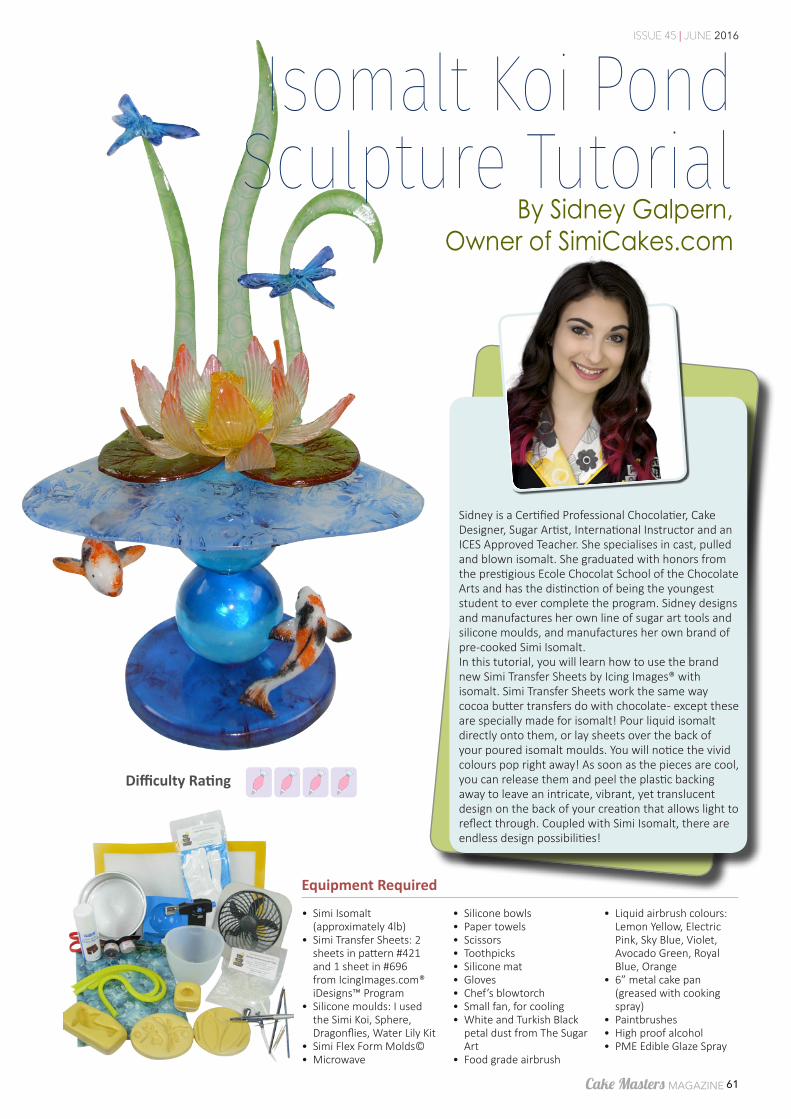
Equipment Required
By Sidney Galpern, Owner of SimiCakes.com
• Simi Isomalt (approximately 4lb)
• Simi Transfer Sheets: 2 sheets in pattern #421 and 1 sheet in #696 from IcingImages.com® iDesigns™ Program
• Silicone moulds: I used the Simi Koi, Sphere, Dragonflies, Water Lily Kit
• Simi Flex Form Molds©• Microwave
• Silicone bowls• Paper towels• Scissors• Toothpicks• Silicone mat• Gloves• Chef’s blowtorch• Small fan, for cooling• White and Turkish Black
petal dust from The Sugar Art
• Food grade airbrush
• Liquid airbrush colours: Lemon Yellow, Electric Pink, Sky Blue, Violet, Avocado Green, Royal Blue, Orange
• 6” metal cake pan (greased with cooking spray)
• Paintbrushes• High proof alcohol• PME Edible Glaze Spray
Isomalt Koi Pond Sculpture Tutorial
Sidney is a Certified Professional Chocolatier, Cake Designer, Sugar Artist, International Instructor and an ICES Approved Teacher. She specialises in cast, pulled and blown isomalt. She graduated with honors from the prestigious Ecole Chocolat School of the Chocolate Arts and has the distinction of being the youngest student to ever complete the program. Sidney designs and manufactures her own line of sugar art tools and silicone moulds, and manufactures her own brand of pre-cooked Simi Isomalt.In this tutorial, you will learn how to use the brand new Simi Transfer Sheets by Icing Images® with isomalt. Simi Transfer Sheets work the same way cocoa butter transfers do with chocolate - except these are specially made for isomalt! Pour liquid isomalt directly onto them, or lay sheets over the back of your poured isomalt moulds. You will notice the vivid colours pop right away! As soon as the pieces are cool, you can release them and peel the plastic backing away to leave an intricate, vibrant, yet translucent design on the back of your creation that allows light to reflect through. Coupled with Simi Isomalt, there are endless design possibilities!
Difficulty Rating
62
ISSUE 45 | JUNE 2016
MAGAZINE
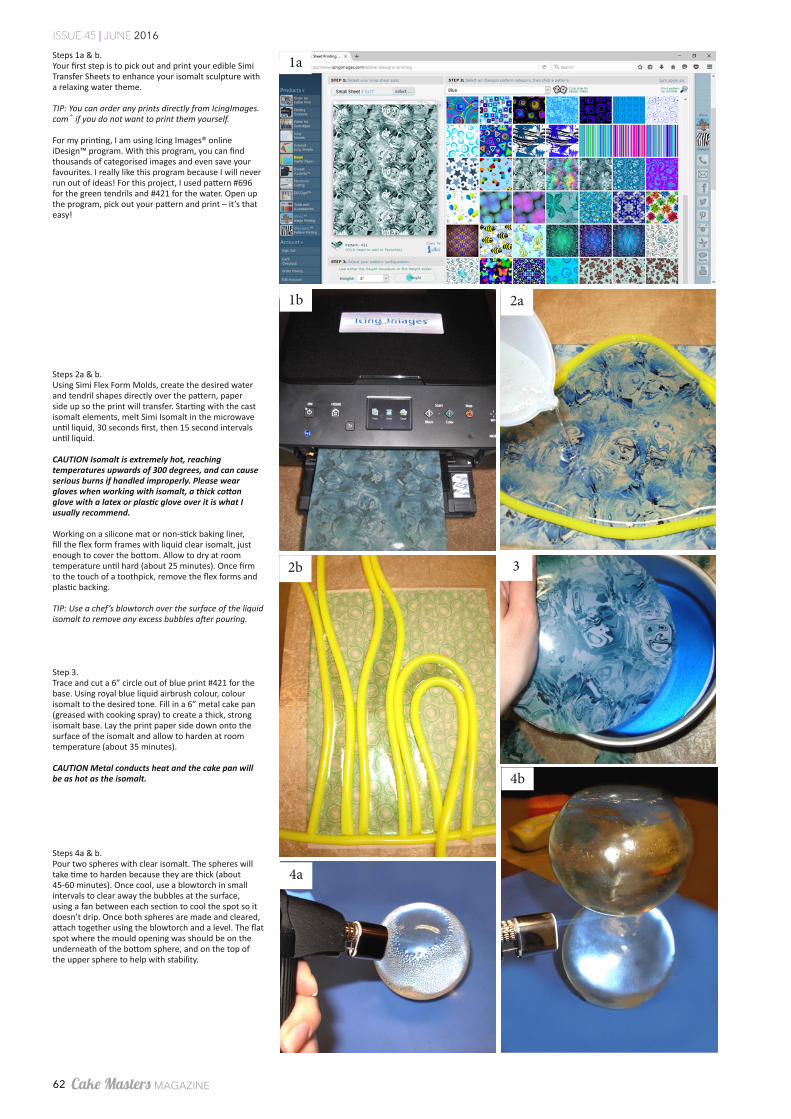
Steps 1a & b.Your first step is to pick out and print your edible Simi Transfer Sheets to enhance your isomalt sculpture with a relaxing water theme.
TIP: You can order any prints directly from IcingImages.com® if you do not want to print them yourself.
For my printing, I am using Icing Images® online iDesign™ program. With this program, you can find thousands of categorised images and even save your favourites. I really like this program because I will never run out of ideas! For this project, I used pattern #696 for the green tendrils and #421 for the water. Open up the program, pick out your pattern and print – it’s that easy!
Steps 2a & b.Using Simi Flex Form Molds, create the desired water and tendril shapes directly over the pattern, paper side up so the print will transfer. Starting with the cast isomalt elements, melt Simi Isomalt in the microwave until liquid, 30 seconds first, then 15 second intervals until liquid.
CAUTION Isomalt is extremely hot, reaching temperatures upwards of 300 degrees, and can cause serious burns if handled improperly. Please wear gloves when working with isomalt, a thick cotton glove with a latex or plastic glove over it is what I usually recommend.
Working on a silicone mat or non-stick baking liner, fill the flex form frames with liquid clear isomalt, just enough to cover the bottom. Allow to dry at room temperature until hard (about 25 minutes). Once firm to the touch of a toothpick, remove the flex forms and plastic backing.
TIP: Use a chef’s blowtorch over the surface of the liquid isomalt to remove any excess bubbles after pouring.
Step 3.Trace and cut a 6” circle out of blue print #421 for the base. Using royal blue liquid airbrush colour, colour isomalt to the desired tone. Fill in a 6” metal cake pan (greased with cooking spray) to create a thick, strong isomalt base. Lay the print paper side down onto the surface of the isomalt and allow to harden at room temperature (about 35 minutes).
CAUTION Metal conducts heat and the cake pan will be as hot as the isomalt.
Steps 4a & b.Pour two spheres with clear isomalt. The spheres will take time to harden because they are thick (about 45-60 minutes). Once cool, use a blowtorch in small intervals to clear away the bubbles at the surface, using a fan between each section to cool the spot so it doesn’t drip. Once both spheres are made and cleared, attach together using the blowtorch and a level. The flat spot where the mould opening was should be on the underneath of the bottom sphere, and on the top of the upper sphere to help with stability.
2b 3
1b 2a
1a
4b
4a

ISSUE 45 | JUNE 2016
63MAGAZINE
8b 8c
7b 8a
6 7a
5a 5b
9 10
Step 5a & b.For the small cast pieces, mix in the colours desired to the isomalt. I used white petal dust for the koi (for an opaque finish), avocado green liquid airbrush colour for the lily pads, and clear for the dragonflies.
TIP: Never mix in gel or paste colours as it will break down your isomalt and not set up correctly.
Fill in the Simi silicone moulds using a toothpick to spread into all the crevices. Allow to harden at room temperature (about 15 minutes) before removing from the mould.
TIP: If you have rough edges on your pieces, flip them face down on a silicone mat and use a blowtorch over the edges to smooth.
Step 6.For the water lily, pour 15 clear isomalt petals. Remove each from the mould as soon as they release, but before they completely harden, and bend them to a curve using an apple crate or your fingers. Pour the centre sphere and disc and once the sphere is cool, pour and attach stamens around the outside while still flexible. Using a blowtorch, soften the bottom ends of petals and cut about ½ inch off of 10 petals. Attach the first row of five cut petals to the centre with the blowtorch, followed by the next five cut petals behind them. Attach the remaining five whole petals to the underneath of the second row and allow to cool.
Steps 7a & b.Airbrush the finished clear moulded pieces in light layers. I used electric pink and lemon yellow for the water lily, sky blue for the spheres, sky blue and violet for the dragonflies, and a little bit of avocado green around the edges of the green tendrils. Hand paint the koi fish using a fluffy brush and orange liquid airbrush colour. For the black, I used Turkish Black petal dust mixed with alcohol.
Steps 8a-c.Attach the lily pads to the water base with a small puddle of liquid isomalt. Also attach a small scrap piece of isomalt between them as a lift underneath the lily, so it doesn’t tip backward in the crevice. Attach the lily to the lift and the lily pads with more liquid isomalt, leaving a small ledge of the puddle open behind it to attach the green tendrils on with isomalt.
Step 9.Pour a small puddle of clear isomalt onto the top of the spheres and place the water puddle. Do the same to attach the bottom of the spheres to the base.
TIP: Make sure you wipe any excess oil off the base before attaching or the spheres won’t stick. Also make sure to torch over the surface of the base to burn away any leftover grease before assembly.
Step 10.Attach a koi fish to the underside of the water pond and to the spheres using the blowtorch. Repeat the same process for the dragonflies onto the tendrils.
Make sure to spray your entire finished sculpture with clear Edible Glaze Spray to ensure your piece stays clear and smooth and doesn’t get sticky. Store your sculpture in a room temperature environment until delivery.
For more information about Sidney and her sugar art, visit: www.SimiCakes.com
To find out more about Icing Images and their products, visit: www.IcingImages.com