claire anderson - designer-cakes.com · pdf filenext mix the pink with a li le yellow to...
TRANSCRIPT

CLAIRE ANDERSONTHE MEADOW FAIRY

Cake FactsLevel BEGINNER/ INTERMEDIATETime to Make 5 hoursRetail Price £590 - £630
IngredientsCake (5” depth) 4”, 6”, 8” Rounds (all prepared & covered in white sugar paste)KKroma Kolors:Blue, Black, Yellow, Pink50g Royal IcingGold lustre dustRejuvinator spiritEdible Marker

Airbrush a line of pink around the top edge of the cake.Next mix the pink with a lile yellow to create a vibrant orange colour. Airbrush as before whilst revolving your turntable. Just 1 line of colour above the purple. Then on the black line & on the top of the cake.
Airbrush up to the line with the pink in the same way as before, however, this me you are covering the blue too to make a deep purple colour.
Tesng the flow of your colour first on kitchen paper, airbrush the boom er on medium mode using Kroma blue. Spin the turntable slowly as you move your arm in a sweeping moon from le to right, keeping an even flow of colour. Focusing on the boom 2 inches. Repeat this acon.
Place your boom er on the turntable & on a cake uncovered board. Use paper as a guide draw a line around the boom er roughly 2 inches from the top of the cake.
Ensure that your airbrush is clean & spraying evenly. Add a quarter of a cup of blue airbrush paint to your cap & test first on kitchen paper on medium mode. Once happy, move to cake board. Turn the turntable whilst airbrushing & focus on the outer edge. Repeat 2 or 3 mes unl desired colour is achieved & then set aside.
65
43
21

Place the boom er onto your turntable. Raise the boom er by an inch or two so that you can stencil onto the boom edge of the cake effecvely. Separators are perfect for this.
Paint over the line on the boom er with black airbrush paint to give the illusion of a horizon.
Connuing airbrushing over the pink with yellow. Be very careful as the yellow can be very vibrant. Airbrush around the circle & then remove. Set aside all 3 ers overnight if the cakes have been covered that day as the sugarpaste should not be so when using your stencils.
Place the top er on the turntable. Using sterile pins – pin a small paper circle onto the cake. Once again on medium mode whilst revolving your turntable, airbrush pink around the boom of the cake.
Build up the stripes of colour unl the whole er is covered. Set aside to dry. TIP – Be careful how you move airbrushed cakes! Either slide a cake li underneath the cake or move the board & slide the cake off. Touching must be avoided as you will leave marks on the cake.
Airbrush lines of the mixed orange & pink on the middle er. These can be quite random and in any direcon to create a sunset set sky effect.
1211
109
87

Moving onto the middle er of the cake, place the cake on top of a separator. Posion the “Sweetheart” stencil onto the cake. Using 2 ribbons, thread and knot through the holes and then e in a bow at the back. However it is important that the cake has been covered and le overnight so that the sugarpaste is not so.
carefully airbrush the leaves on the tree, moving the stencil in your hand into different posions. Once again be careful not to go over the leaves you have just done otherwise they will smudge, build the leaves up gradually. If your stencil gets too wet with colour ,remember to dab off any excess between 2 pieces of kitchen paper.
Once you are happy with the fairy on the right hand side of the cake hand paint a simple twiggy tree. You don’t have to be an expert arst to do this.
You can leave your fairy how it is but feel free to paint extra details on the wings and possibly a toadstool for her to sit on.
Once you have completed the meadow around the cake & the design is dry, place the Meadow Fairy stencil on the le-hand side of the cake. You can airbrush one set of the lile buerflies so that they appear to be flying from the fairy’s hand. Airbrush the fairy into posion using black and ensure the airbrush is on minimum mode.
Using the Meadow Stencil, airbrush with the black the boom part of the design around the cake avoiding the buerflies. Build up the colour slowly. As you move around the cake, leave a space in-between so that your last bit can dry as you work your way around the cake. Fill in the gaps & it doesn’t maer if the design overlaps.
1817
1615
1413
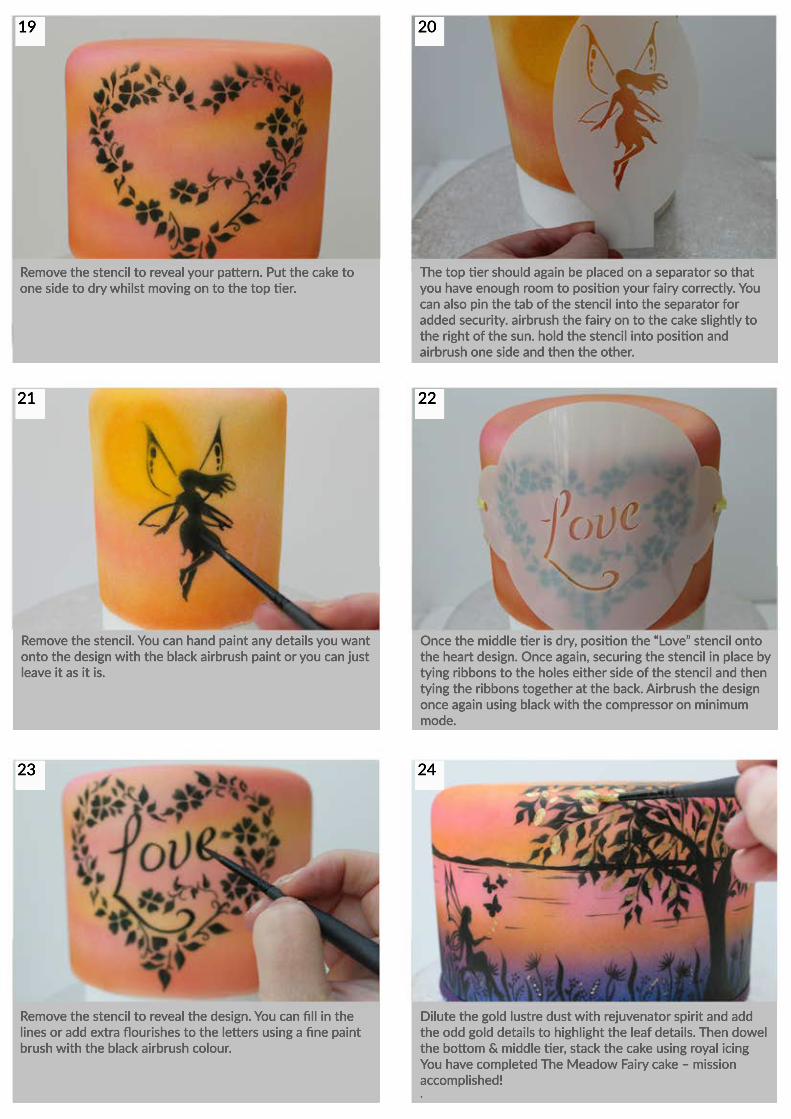
Dilute the gold lustre dust with rejuvenator spirit and add the odd gold details to highlight the leaf details. Then dowel the boom & middle er, stack the cake using royal icing You have completed The Meadow Fairy cake – mission accomplished! .
Remove the stencil to reveal the design. You can fill in the lines or add extra flourishes to the leers using a fine paint brush with the black airbrush colour.
Once the middle er is dry, posion the “Love” stencil onto the heart design. Once again, securing the stencil in place by tying ribbons to the holes either side of the stencil and then tying the ribbons together at the back. Airbrush the design once again using black with the compressor on minimum mode.
Remove the stencil. You can hand paint any details you want onto the design with the black airbrush paint or you can just leave it as it is.
The top er should again be placed on a separator so that you have enough room to posion your fairy correctly. You can also pin the tab of the stencil into the separator for added security. airbrush the fairy on to the cake slightly to the right of the sun. hold the stencil into posion and airbrush one side and then the other.
Remove the stencil to reveal your paern. Put the cake to one side to dry whilst moving on to the top er.
2423
2221
2019