1.2 — managing views - agiloft
TRANSCRIPT

© Copyright 2021 Agiloft Inc. All Rights Reserved. HELP-31Mar2021
1.2 — Managing Views

1. Views . . . . . . . . . . . . . . . . . . . . . . . . . . . . . . . . . . . . . . . . . . . . . . . . . . . . . . . . . . . . . . . . . 31.1 View Wizard . . . . . . . . . . . . . . . . . . . . . . . . . . . . . . . . . . . . . . . . . . . . . . . . . . . . . . . . 41.2 Default Views . . . . . . . . . . . . . . . . . . . . . . . . . . . . . . . . . . . . . . . . . . . . . . . . . . . . . . 91.3 Row Coloring . . . . . . . . . . . . . . . . . . . . . . . . . . . . . . . . . . . . . . . . . . . . . . . . . . . . . . . 111.4 Notification Icons . . . . . . . . . . . . . . . . . . . . . . . . . . . . . . . . . . . . . . . . . . . . . . . . . . . 121.5 Views and Permissions . . . . . . . . . . . . . . . . . . . . . . . . . . . . . . . . . . . . . . . . . . . . . . 131.6 Quick Edit . . . . . . . . . . . . . . . . . . . . . . . . . . . . . . . . . . . . . . . . . . . . . . . . . . . . . . . . . 16
CONTENTS
Views

3© 2021 Agiloft Inc.
Views determine the way records are displayed in a table. Views make it easy to show different users and teams the information most relevant to them and their workflows.
Views define:
Which columns appear, and in what default orderRow ordering and colorsView and field widthsNumber of records per pageCell borders, if anyQuick Edit fieldsWhich fields are included in when a user clicks Search from the table viewQuick Search
From the table view, click the Views button to access options to create, edit, and manage views; reset any drag-and-drop adjustments you might have made to the columns; and select another view. For details on creating and editing views, refer to .View Wizard
Views
Views do not affect the data shown in the tables. This is controlled by . Conversely, saved searchingsearches can be configured with a specific view so that selecting the search automatically applies that view.
Working with Views
View Wizard

4© 2021 Agiloft Inc.
1. 2.
1.
Views determine the way records are displayed within a table, such as the fields that are displayed, row ordering and colors, layout, and the number of records per page. Views allow individuals and teams to have their own settings for the same table.
Every table should have at least two views: a default view with the key facts for that table's records, and another view with more detail and more fields. Tables also always have three : Personal, Mobile, Default Viewsand Summary.
If you in the records of other tables, you should also design a view specifically for that use to embed the tableremove repetitive information. For example, in the default view for the People table, it makes sense to show the Company field, but if you embed the People table in a Company record, the Company field would show the same value for each record. Instead, create an additional view in the People table that does not include the Company field.
Admins can create views and apply them to teams of users, making them available in the drop-down or the default view for that table. See for more information.Views and Permissions
To create or edit a view:
From a table's action bar, click Views.Choose whether you want to create a new view or configure existing views:
Select New to create a new view.Select Edit to edit the current view.Select Manage to display all the existing views you can edit for the table. Then, click the edit icon for the view you want to edit.
Use the the Fields tab to configure field and record display options.
View Wizard
Planning and Managing Views
Saved searches can be configured to apply a specified view when the search runs. This is particularly useful with hierarchical data, as different subtables often have different optimal views of relevant fields. For more information, see .Using Saved Searches to Work Efficiently
Creating and Editing Views
Fields Tab

5© 2021 Agiloft Inc.
1.
2.
3. a.
b.
c.
d.
e.
f.
Select whether the selection checkboxes and different icons are displayed. Generally, you should at least include an edit icon.Select the maximum lines to display per record and per linked field. For a clean look, this should be set to 3 or fewer lines.For each field you want to include in the view:
Select the Display checkbox so it shows in the view. Only display relevant fields; showing too many can make the list slow to load, while showing too few can slow down user productivity.Set the Column Width and Column Width Size, if desired. Users can adjust the Column Width by clicking and dragging the column borders in the table view. In most cases, you should select Automatic, but for Date/Time fields, set the width to 14 to force the data to wrap onto two lines.Add a Cell Link, if desired. To save space, you can show the ID field and set the Cell Link field to View instead of showing a view icon. This is also useful for views used in reports, so users can jump from the report directly to the record.Select the checkbox if you want users to be able to edit the field directly from the table Quick Editview. This is only available if the field is configured to allow it, and if your group permissions allow you to create Quick Edit views.Select the checkbox if you want the field to appear as a default option when users Quick Searchclick Search from the table view. Adding a field to Quick Search makes it easier for users to filter records based on that field.Select Right Align for fields whose content should be formatted this way. This is typically only used for currency.
Use the Order/Colors tab to select the order in which fields are displayed, as well as the row coloring and notification icons. Users can adjust the column order by dragging and dropping if they need to, but it won't overwrite the default order defined here.
Order/Colors Tab

6© 2021 Agiloft Inc.
1.
2.
3.
1. 2. 3.
4.
Drag and drop fields into the left-right order you want. If you are editing an existing view, newly added fields appear to the far right. In general, always place the ID field in the leftmost position, and continue from there placing the most relevant fields to the left of less relevant fields.
If you have a lengthy text field that you want to show across the full width of the screen, drag the field name down to the No items to drag area. The content of a field in this position is shown without a field label. In most cases, try to keep record information on a single row to improve readability.Click Set Row Coloring and Define Notification Icons to define row coloring, fonts, text highlighting, and icons. See and for more information.Row Coloring Notification Icons
Use the General tab to configure settings for the view.
Enter a name for the view.Set whether the record can be deleted.Define a maximum and minimum view width, as well as a minimum field width. For these, we recommend:
Set a Maximum View Width of at least 100 to 120. The best choice depends on the fields in your view and the number of characters in those fields.Set the Minimum View Width to Same as Action Bar. When this is set to None, the view is only as wide as the data being displayed, which can sometimes look too narrow.
Choose how many records to display per page. If pages take too long to load, consider lowering this value. A reasonable starting number is 30 records per page.
General Tab

7© 2021 Agiloft Inc.
5.
1.
2.
3.
Select whether cell borders are displayed.
Use the Apply tab to choose to which teams have access to the view. This tab is only visible if you have permission to publish views to other users.
Choose whether to keep or change the current visibility settings for the view. If you choose to change them, you must also choose whether the view is available to yourself, which teams can see the view, and whether subteams and new teams can see the view.Choose whether to keep or change the settings for which teams have the view as a default. If you choose to change them, choose whether the view is the default for yourself, which teams have the view as a default, and whether subteams and new teams have the view as a default.Click Finish.
Apply Tab

8© 2021 Agiloft Inc.
1. 2. 3. 4.
Known Issue: Disappearing or reappearing table borders
Showing borders around rows and cells in a view is one of the settings in the View wizard. However, a setting in the Look and Feel wizard can override the settings in a view. If you see borders but the view doesn't have borders applied, or if you don't see borders but the view does have borders applied, check the following setting:
Go to .Setup > Look and FeelClick to resolve the issue in the corresponding interface.Power User Interface or End User SchemesEdit the look and feel scheme that is applied to the users experiencing the issue.On the Tables tab, check the settings under Table Border and Cells. The Table View Borders Visibility setting can override settings for all views.
Team membership affects default and available views:
A user on multiple teams can see all views that are available to any of their teams.A user’s default view is the default assigned to their primary team. A team has only one default view.The user's personal view is their primary team's default view until the user customizes their personal view.
Troubleshooting
Default Views

9© 2021 Agiloft Inc.
Views are specific to the tables for which they are created. When you create a table, three predefined views are created by default: Personal, Mobile, and Summary.
If you change your own personal view, it has no effect on other users' personal views. By contrast, if you change any other view you're allowed to edit, it affects all users with access to it.
Personal views aren't overwritten when default views are modified. If a team member using the team's default view makes changes, those changes are saved to the user's personal view. The user's personal view also isn't changed if updates are later made to the team default view, which enables users to have their own personal view and a team default view.
The mobile view shows only one field by default: Created By. The Mobile view cannot be deleted, but it can be edited. Mobile views are designed to be used when a user is viewing the system on a mobile device or when logged in with an ADA-compliant interface.
Default Views
Personal View
Mobile View

10© 2021 Agiloft Inc.
The summary view shows only two fields by default: Record ID and Creator Login. As with the mobile view, the summary view cannot be deleted, but it can be edited. The summary view is the default view until an admin applies a different default view for a team.
Summary View
Row Coloring

11© 2021 Agiloft Inc.
In order to provide a visual aid to easily identify specific record attributes, records can be color-coded based upon the value of a selected choice field. In a table, navigate to to open the View wizard, then Views > Editclick the Order/Colors tab and click the Set Row Coloring button to open the Set Row Coloring window. On the Field tab, select the choice field that will serve as the trigger for the row coloring. Then, on the Colors tab, change the text size, font, color, and background color for each value of the choice field.
For example, if you want to highlight records by Status, you can configure records with a Draft status to show in gray and records with a Pending Approval status to show in yellow.
Row Coloring
Notification Icons
12© 2021 Agiloft Inc.
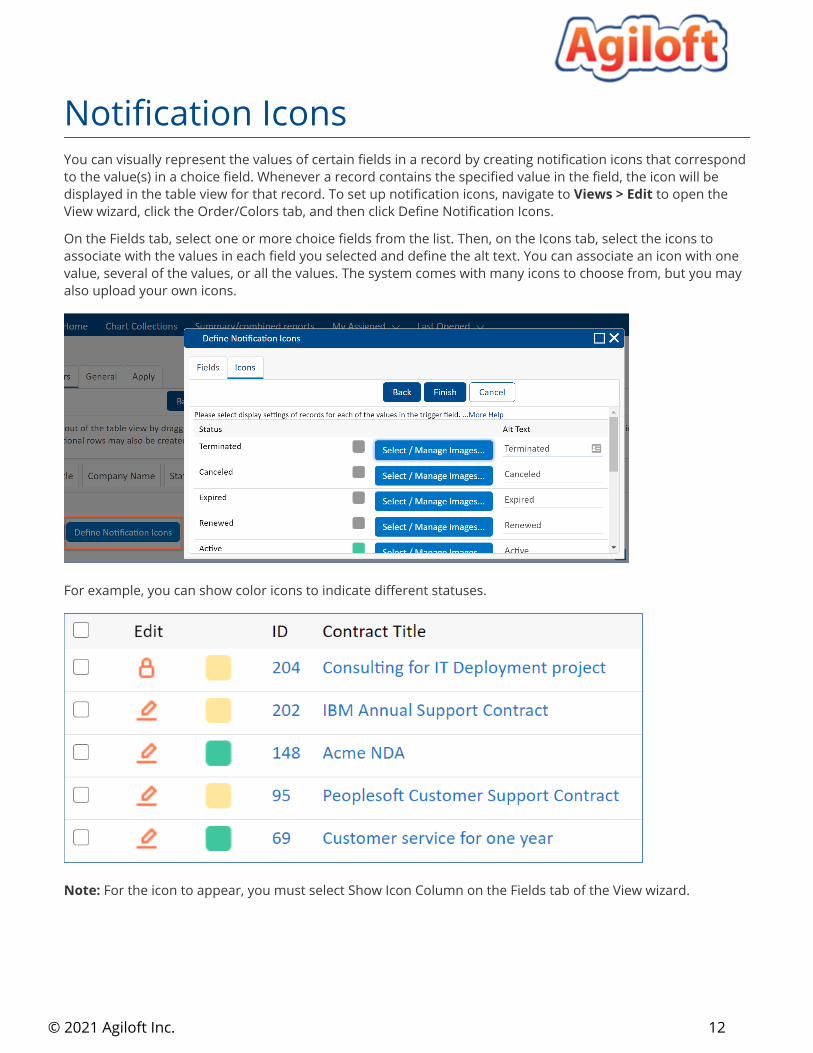
You can visually represent the values of certain fields in a record by creating notification icons that correspond to the value(s) in a choice field. Whenever a record contains the specified value in the field, the icon will be displayed in the table view for that record. To set up notification icons, navigate to Views > Edit to open the View wizard, click the Order/Colors tab, and then click Define Notification Icons.
On the Fields tab, select one or more choice fields from the list. Then, on the Icons tab, select the icons to associate with the values in each field you selected and define the alt text. You can associate an icon with one value, several of the values, or all the values. The system comes with many icons to choose from, but you may also upload your own icons.
For example, you can show color icons to indicate different statuses.
For the icon to appear, you must select Show Icon Column on the Fields tab of the View wizard.Note:
Notification Icons
Views and Permissions

13© 2021 Agiloft Inc.
1. 2. 3. 4. 5.
Access to views is controlled by a user's teams and group permissions. Admin users can decide which groups can create and edit views, which groups can publish views to other users, and who can use views with Quick
.Edit
The following tips enable you to set view permissions for groups.
To allow a group to edit and create views...
Note: A user must have the appropriate group permission to create their own views in order to edit their Personal view.
Navigate to and edit a group.Setup > Access > Manage GroupsIn the Groups wizard, click Next to access the Tables tab.Edit the table for which the group will have permission to create and manage views.In the Table Permissions wizard, navigate to the Menu Permissions tab.Under Allow creating/editing/deleting Views?.. select "Allow for their own views" to grant permission to create and edit their own views only, or select "Allow for all views" to grant permission to edit views created by other users.
To allow a group to publish views to other users....
On the Menu Permissions tab of the Table Permissions wizard, select the "Allow publishing Views" checkbox. This permission enables the options on the Apply tab when working in the View wizard.
Users with the permission to publish views can assign them to users in other teams and set a view as the default for other users.
Views and Permissions
Setting View Permissions
Applying Views to Teams

14© 2021 Agiloft Inc.
1. 2. 3. 4.
5.
1. 2.
3. 4.
1. 2. 3.
1.
2.
To make a view visible to users...
In the table view, select .Views > Manage...Edit the relevant view.On the Apply tab, under "Make this view visible to:", select Change Settings.Select the appropriate user teams. Optionally choose to include subteams and new teams created in the future.Click Finish.
To set the default view for user teams...
Be aware that when a default view is assigned to selected teams, it overrides the Personal view which is otherwise the user's default.
Edit the view that should be applied to user teams.From the Apply tab of the View wizard, locate the option "Make this a default view for:" and multi-select the appropriate user teams.Optionally include subteams and new teams created in the future.Click Finish.
To see a list of views and teams with access...
From the table view, select ...Views > ManageIn the list of views, the Teams with Access column shows which teams are allowed to use each view.The Default for Teams column shows which teams use this view as their default.
Views that contain editable fields require special permissions to enable . There are two settings in Quick Editthe Groups wizard that enable users to create Quick Edit views and edit records in Quick Edit from within a Table View. To begin, navigate to and edit the relevant group. In the Setup > Access > Manage GroupsGroups wizard:
Edit each table where users will use Quick Edit.
Menu Permissions tab: Optionally, you can grant users the ability to create Quick Edit views. Select the
Group Permissions to Enable Quick Edit
15© 2021 Agiloft Inc.
2.
3.
4.
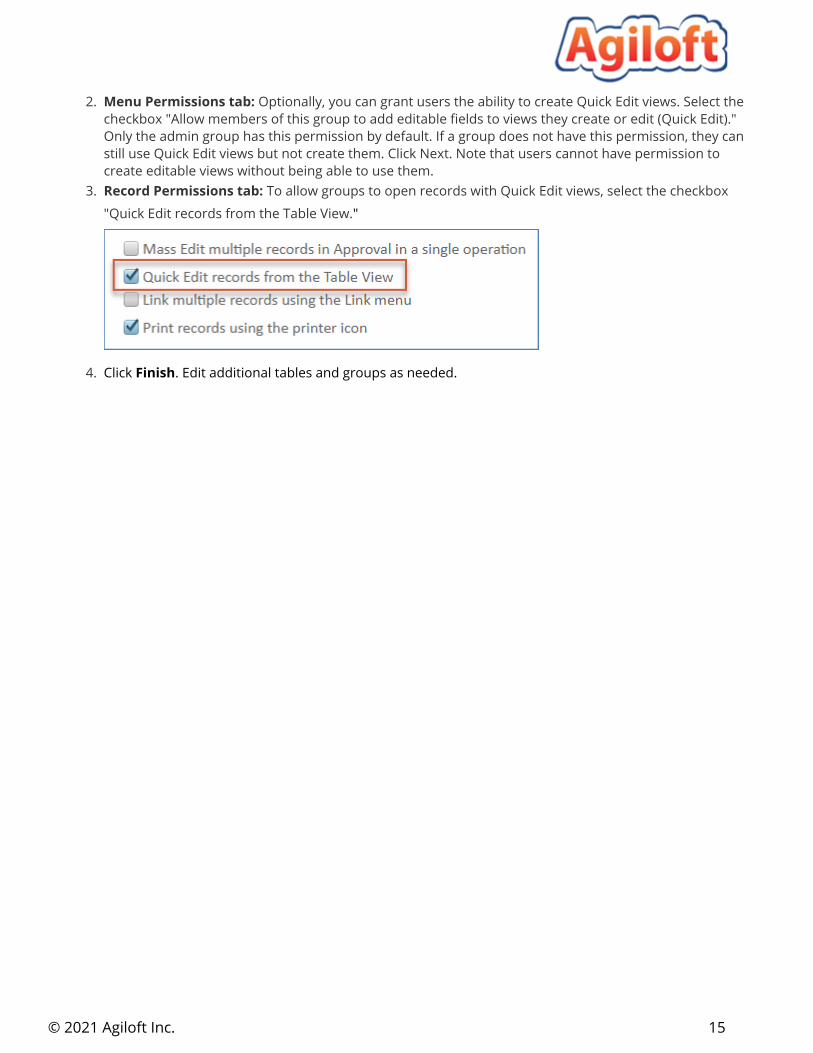
Menu Permissions tab: Optionally, you can grant users the ability to create Quick Edit views. Select the checkbox "Allow members of this group to add editable fields to views they create or edit (Quick Edit)." Only the admin group has this permission by default. If a group does not have this permission, they can still use Quick Edit views but not create them. Click Next. Note that cannot users have permission to create editable views without being able to use them.Record Permissions tab: To allow groups to open records with Quick Edit views, select the checkbox "Quick Edit records from the Table View."
Click . Edit additional tables and groups as needed.Finish
Quick Edit

16© 2021 Agiloft Inc.
1. 2.
3.
The Quick Edit feature allows users to edit fields directly a table view. The admin can determine which users can enable or disable Quick Edit within particular tables by setting up the required permissions. Before using Quick Edit, you must , enable Quick Edit for , and then .define two group permissions each field create the view
In a quick edit view, a pencil icon appears in the column heading above each editable field. Two buttons, Save Changes and Cancel Changes, appear in the table's .action bar
Click the field in a record row to begin editing. Update the field value. The input aid depends on the type of field: for example, a choice list uses a drop-down selector, while an HTML field opens the HTML editor.
When finished, click Next to move to the next editable field, Save to save the change without opening another editable field, or Cancel to revert your changes.
Quick Edit
Using Quick Edit

17© 2021 Agiloft Inc.
4.
1. 2.
After editing several fields using Next, use the Save Changes button in the action bar to save. Click Cancel Changes to roll back all field edits since the last save.
Quick Edit is not enabled for fields by default. You can use the to enable several set field properties buttonfields at once for quick edit. To turn on Quick Edit for a field:
Go to and edit the field.Setup Table] > Fields [On the Permissions tab of the field wizard, scroll down to find the "Allow this field to be edited directly from a table view" option and select Yes.
Now that Quick Edit permissions have been enabled for the field, edit the relevant view and select the Quick Edit checkbox for the relevant field.
The following types of fields cannot be edited in a Quick Edit table view:
PasswordCalculated ResultCalculation on multiple linked recordsCompound
File (File with Versioning)Image (Image with Versioning)Action buttonsURL
Hierarchical Dependence
Enabling Quick Edit
Field Type Limitations

18© 2021 Agiloft Inc.
Hierarchical DependenceHierarchically dependent fields can be edited in Quick Edit views, but only if the parent field is also be included in the view so that the system can read the parent field data.
For example, suppose you have two choice fields, Type and Subtype, and Subtype is hierarchically dependent on Type. If you want to use the Subtype field in a quick edit view, Type must also be added to the view.
Conditional RequirementConditionally required fields can be added to quick edit views, and the requirement condition is applied regardless of whether the parent field is included in the view. If a conditionally required field meets the requirement condition but does not appear in the view, it is not enforced. This parallels the behavior of conditionally required fields in a record: If the user cannot see a field, it is not required.
Visibility DependenceVisibility dependent fields appear in a view regardless of the visibility condition. However, if the condition is not met and the field should not appear in the record, users cannot edit the field. A warning icon is displayed if users attempt to edit a field which does not meet its visibility requirement.
Conditional EditingIf a field has been set up to allow editing based on the values in another field, and the condition is not met, users see a warning icon if they attempt to edit it.
Validation ActionsValidation actions that present a pop-up message to the user are not applied during quick edit.

19© 2021 Agiloft Inc.
The Save Changes / Cancel Changes buttons do not appear.
The Save / Cancel Changes buttons are part of the table’s action bar. You must include an action bar for the buttons to appear. With no action bar, users must save changes individually. If you want users to see only the Save / Cancel Changes buttons but no other action bar items, you can include an empty action bar.
When I use Quick Edit, sometimes the changes are not saved.
Validation actions are not presented to users when quick editing records from a table view. Depending on how the actions were set up, this can prevent record changes if the data entered does not meet a validation requirement.
Troubleshooting