agiloft installation guide - agile business software. installation guide . . . . . . . . . . . . . ....
TRANSCRIPT
Agiloft Installation Guide
2017 © Agiloft Inc. HELP-13APR17
1. Installation Guide . . . . . . . . . . . . . . . . . . . . . . . . . . . . . . . . . . . . . . . . . . . . 31.1 Pre-Installation for Windows . . . . . . . . . . . . . . . . . . . . . . . . . . . . . . . . 51.2 Pre-Installation for Linux . . . . . . . . . . . . . . . . . . . . . . . . . . . . . . . . . . . 81.3 Pre-Installation for MS SQL . . . . . . . . . . . . . . . . . . . . . . . . . . . . . . . . 91.4 Initial Installation . . . . . . . . . . . . . . . . . . . . . . . . . . . . . . . . . . . . . . . . . 121.5 Working with Setup . . . . . . . . . . . . . . . . . . . . . . . . . . . . . . . . . . . . . . . 191.6 Setup Menu Features . . . . . . . . . . . . . . . . . . . . . . . . . . . . . . . . . . . . . 261.7 Additional Setup and Installation Features . . . . . . . . . . . . . . . . . . . . . 33
CONTENTS
32017 © Agiloft Inc.
The Agiloft installation package includes everything necessary for installation on 64-bit Windows andLinux servers, including a web-server and a MySQL database if you do not have one installed already.Installation, upgrades and uninstallation are all managed through the installer wizard.
The Agiloft installation process consists of two stages: initial installation and setup. During initialinstallation you will run the downloaded executable file, and the installer will ask basic questions, likewhere to install the software. Next, run the Agiloft configuration utility called Setup to complete setupand installation. The setup utility is accessed via a web browser, and can be run at any time afterinstallation to manage web server settings, backups, mail settings and other functions.
Notes
The installation bundle includes a . This is a specialized web server for providing theservlet containerdynamic web pages that make up the Agiloft interface. This servlet container is usually installed on port8080 and will not interfere with the regular web server. The installer can automatically configure webservers such as Apache to redirect Agiloft traffic to another port on the container. This allows Agiloft tobe accessed by users on port 80, just like the rest of the website.
It is possible to install Agiloft under Windows with IIS7, for example on Windows 2008 Server. Theinstaller will find the working IIS7 and automatically integrate with it.
System RequirementsPlease visit our for the most detailed, up-to-date information.system requirements page
Server Requirements
Windows 64-bit: Windows 7, Server 2003, 2008, or 2012.
or
Linux 64-bit: All major releases, including SUSE, RedHat, Debian, Fedora, and CentOS.
Hardware
The recommended minimum hardware should have at least 2 processors, a 64-bit operating systemand a minimum of 12 GB of RAM and RAID 10 hard drives. The software will not run with less than 4GB of RAM.
Browser Support
On Windows: IE 9.0, 10.0, 11+, FireFox 3.0+, Safari 2.0+, Chrome 1.0+
On Mac/Linux/Unix: FireFox 3.0+, Safari 2.0+, Chrome 1.0+
Optional Software
Microsoft Word 2010 or higher to enable .Integration with Hosted Word API Services
Default Installation DirectoriesBy default Agiloft is installed in these locations:
Installation Guide

42017 © Agiloft Inc.
Windows default directory: <System Drive>:\Agiloft
Linux default directory: /usr/local//Agiloft
52017 © Agiloft Inc.
1.
2.
This topic describes the steps required to enable integration with Word API Services when installingAgiloft on a Windows server.
Enabling Word API Features in WindowsAgiloft installation for Windows servers can include a document comparison feature which supportscomparing two MS Word files, version 2010 or higher. The Word Track Changes feature allows a userto input two versions of a given file, creating a new redlined document; the new document shows thechanges made between one version and the next.
This comparison action is triggered within Agiloft by an action type called a Document ComparisonAction. The comparison file can be downloaded through Agiloft’s user interface. In order to use thedocument comparison feature with Agiloft, the following software is required:
Microsoft Office 2010 or later. This must already be installed on the Windows server that hosts
Agiloft software.
Microsoft Office 2010: Primary Interop Assemblies Redistributable.*
Microsoft .NET Framework 4.5 or higher.
For convenience, MS Office 2010: Primary Interop Assemblies Redistributable and MS .NETFramework 4.5 are included with the Agiloft installer. You may opt to install or skip these softwareadd-ons during Agiloft installation. If you prefer, you can also download and install them from the Micro
.soft Download Center
Post-installation steps
Additional steps are required to enable the redlining feature the Windows server previously hadonly ifMS Office 1997-2003 installed, and was later upgraded to MS Office 2010 or higher. These steps canbe done while Agiloft is running.
Log on to the Windows server as the Administrator user.
Click .Start > Run > dcomcnfg
Pre-Installation for Windows
62017 © Agiloft Inc.
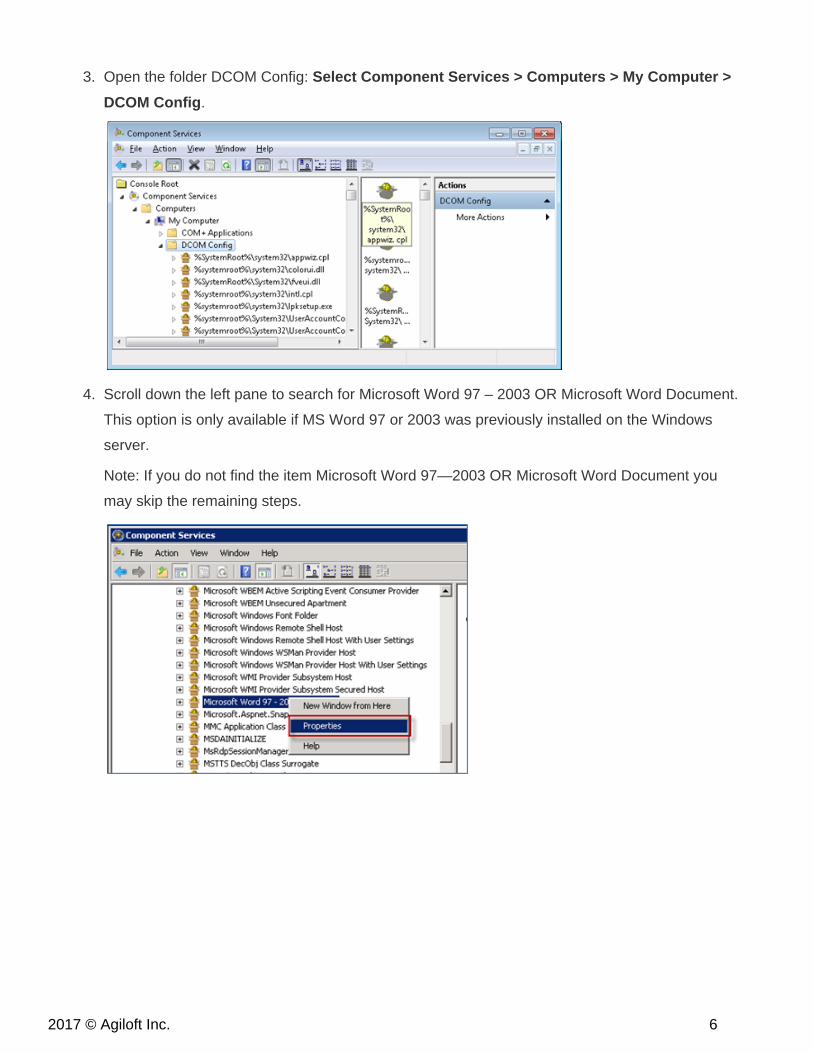
3.
4.
Open the folder DCOM Config: Select Component Services > Computers > My Computer >
.DCOM Config
Scroll down the left pane to search for Microsoft Word 97 – 2003 OR Microsoft Word Document.
This option is only available if MS Word 97 or 2003 was previously installed on the Windows
server.
Note: If you do not find the item Microsoft Word 97—2003 OR Microsoft Word Document you
may skip the remaining steps.
72017 © Agiloft Inc.
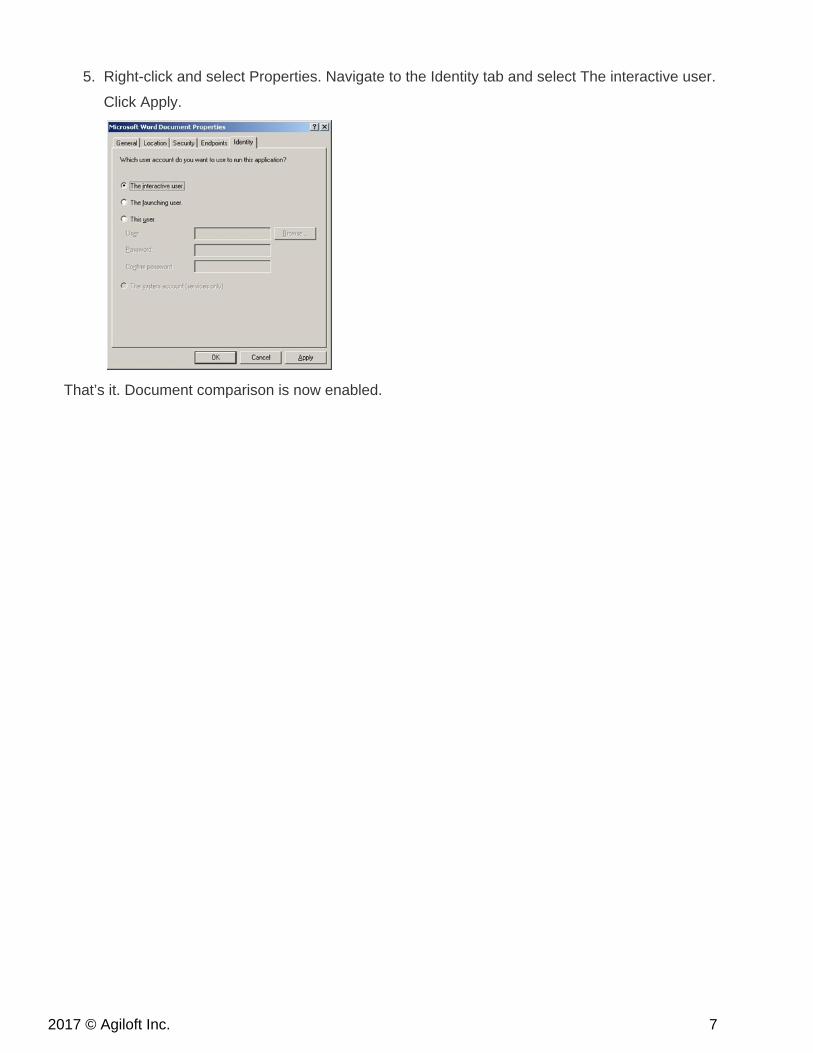
5. Right-click and select Properties. Navigate to the Identity tab and select The interactive user.
Click Apply.
That’s it. Document comparison is now enabled.
82017 © Agiloft Inc.
Installing in an NIS environment
The installation requires a user named enterprisewizard who owns the installation files. Normally theinstaller creates an appropriate local user automatically. If user IDs are managed centrally in yourenvironment (e.g., NIS), or you wish to control the creation of the user, you may create theenterprisewizard user beforehand and choose the appropriate option during installation.
Installing on remotely mounted file systems
Install Agiloft in a file system directory of the local disk for best performance. If you prefer to install ontoa remote-mounted file system, you must ensure that the mount (or auto-mount specification) isperformed before running the installation script. You must also ensure that the enterprisewizard userhas permission to write into the installation directory. If you’ve pre-created the enterprisewizard user, itis sufficient for the installation directory to be owned by enterprisewizard with write and executepermission for the owner. Otherwise you must allow write and execute permissions for “other”, so theas-yet-unknown enterprisewizard user ID can write to the installation directory (this permission shouldthen be changed after installation).
Pre-Installation for Linux
92017 © Agiloft Inc.
1.
2.
3.
4.
5.
Agiloft can integrate with an external MS SQL installation through the standard TCP/IP connection. Bydefault, the MS SQL installation may not have some of the services/protocols enabled. Here are someof the recommendations by our developers to assist the DBA in setting up the MS SQL server foroptimized integration with Agiloft.
Prerequisites
The TCP/IP connection must be set to a static port. See: https://msdn.microsoft.com/en-us/library
/ms177440.aspx
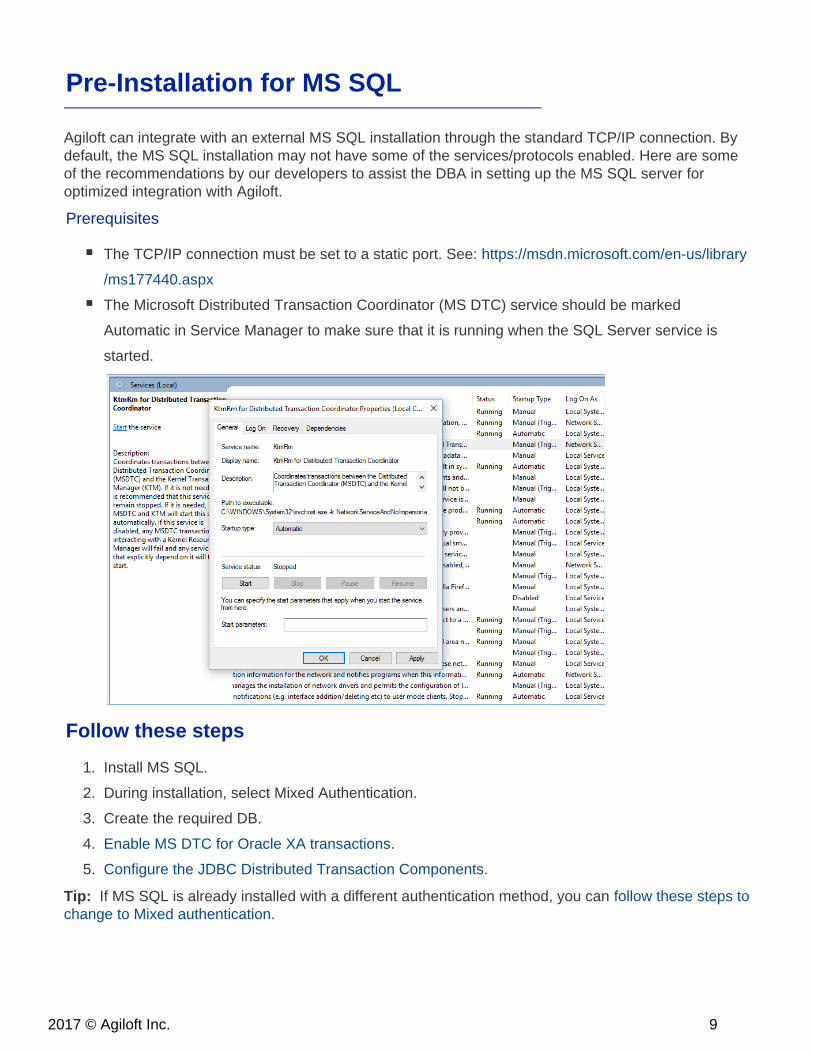
The Microsoft Distributed Transaction Coordinator (MS DTC) service should be marked
Automatic in Service Manager to make sure that it is running when the SQL Server service is
started.
Follow these steps
Install MS SQL.
During installation, select Mixed Authentication.
Create the required DB.
Enable MS DTC for Oracle XA transactions.
.Configure the JDBC Distributed Transaction Components
Tip: If MS SQL is already installed with a different authentication method, you can follow these steps tochange to Mixed authentication.
Pre-Installation for MS SQL
102017 © Agiloft Inc.
1.
a.
b.
c.
d.
e.
f.
2.
a.
b.
c.
d.
e.
f.
g.
Enable MS DTC for XA transactions
In Windows XP and Windows Server 2003:
Select .Control Panel > Administrative Tools > Component Services
In Component Services, double click Computers, right-click My Computer and select
Properties.
Select the MSDTC tab and then click Security Configuration.
Select the check box, and then click . This will cause a MSEnable XA Transactions OK
DTC service restart.
Click again to close the window, and then close .OK Properties Component Services
Restart SQL Server to ensure that it syncs up with the MS DTC changes.
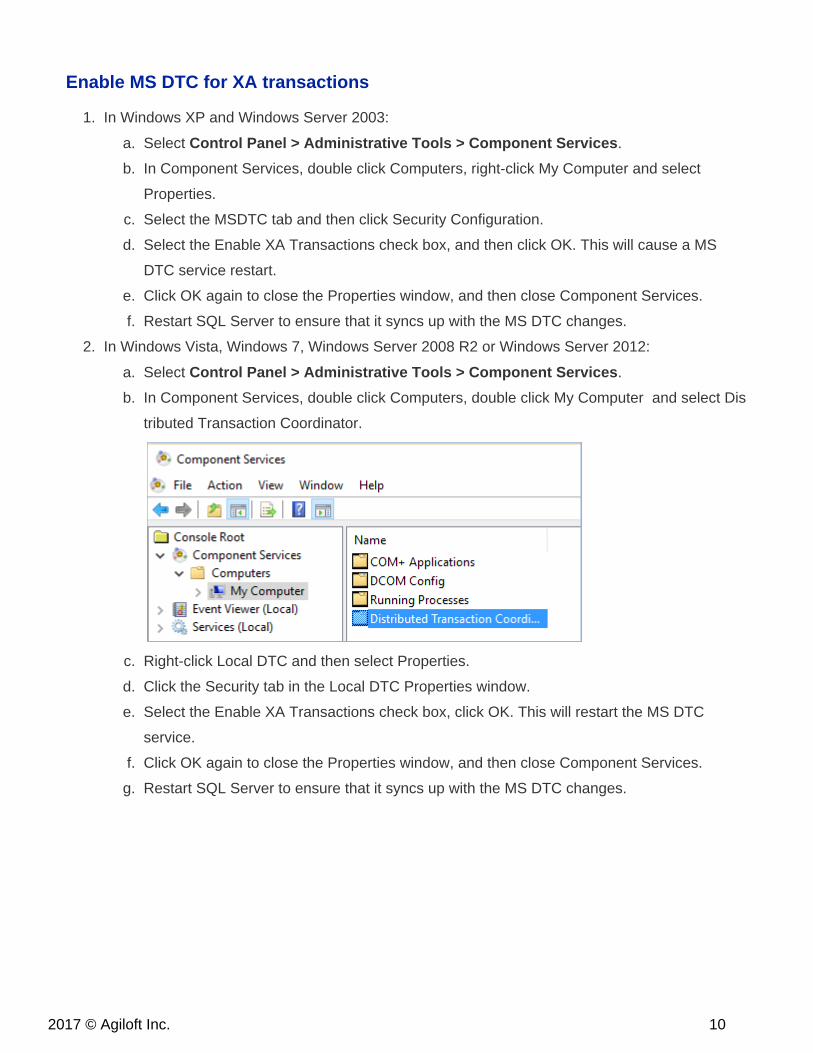
In Windows Vista, Windows 7, Windows Server 2008 R2 or Windows Server 2012:
Select .Control Panel > Administrative Tools > Component Services
In , double click , double click My Computer and select Component Services Computers Dis
.tributed Transaction Coordinator
Right-click and then select .Local DTC Properties
Click the tab in the window.Security Local DTC Properties
Select the check box, click . This will restart the MS DTCEnable XA Transactions OK
service.
Click again to close the Properties window, and then close Component Services.OK
Restart SQL Server to ensure that it syncs up with the MS DTC changes.

112017 © Agiloft Inc.
1.
2.
a.
3.
Configure the JDBC Distributed Transaction Components
Copy the file from the Agiloft/resources/java/lib/mssqlxa directory to the directsqljdbc_xa.dll Binn
ory of the SQL Server computer.
Note: For a default SQL Server install, the location is C:\Program Files\Microsoft SQL
.Server\<MSSQLSERVER>\DTS\Binn
Run the database script from on SQL xa_install.sql Agiloft/resources/java/lib/mssqlxa
Server:
In the command prompt, enter . This script installs thesqlcmd -i xa_install.sql
extended stored procedures that are called by . These extended storedsqljdbc_xa.dll
procedures implement distributed transaction and XA support for the Microsoft SQL Server
JDBC Driver. You will need to run this script as an administrator of the SQL Server
instance. You can ignore errors about being unable to drop procedures that don't exist.
Change the password and database name (sw2_std) if needed in the script andaluser.sql
run it the same way as . It will create an Agiloft user with the ability to use XAxa_install.sql
Transactions.
122017 © Agiloft Inc.
1.
2.
3.
4.
5.
6.
7.
8.
9.
a.
b.
10.
The latest Agiloft software release can be found at . Choose thehttp://www.agiloft.com/ewdownloadappropriate download file based on your operating system, Windows or Linux. Agiloft installers arenative executable files for each OS. The installers for Linux/Unix have the suffix .sh, and installers forWindows have the suffix .exe. Therefore the installer file name will be in one of these forms:
Agiloft-<Release date>-windows-64bit-setup.exe
or
Agiloft-<Release date>-linux-64bit-setup.sh
Windows InstallationThe Windows installer uses a series of dialog boxes and progress indicators to guide you through theinstallation process. You will be led through the following installation steps:
Begin installation: To launch the installation wizard, run the downloaded file.
Installer language: Select your preferred language and click OK.
License agreement: You must accept the terms of the Agiloft license agreement to install and
use the software. You may review the terms of the at any time by visiting ourLicense Agreement
website. Once you read and accept the terms of the agreement, click Next.
Welcome dialog: The installer prompts you to close other programs. Click Next to continue.
Select destination directory: The default installation directory for Windows is <system drive>:\
Agiloft. To change the destination directory enter a new file path and then click Next.
Antivirus warning: The installer prompts you with recommendations for configuring any antivirus
software running on your system. When you are finished, click Next.
Confirm installation port: Agiloft may be installed to listen on port 80 or port 8080. By default,
Agiloft installs on port 8080 if a web server is detected. Confirm port selection and then click
Next.
Calculate disk space: A minimum of 8 GB is required for new installations of Agiloft. The
installer automatically detects free disk space and will exit if there is insufficient space.
Project restore: The installer gives you the option to import existing KnowledgeBases.
Select No to create a simple Demo KnowledgeBase during installation.
Select Yes to restore or import an existing saved project from a previous backup, then
enter the path to the project files. Click Next to continue.
Extracting files: Next, the installer extracts files into the installation directory. A progress bar is
shown while the extraction runs.
Initial Installation
132017 © Agiloft Inc.
11.
a.
b.
12.
13.
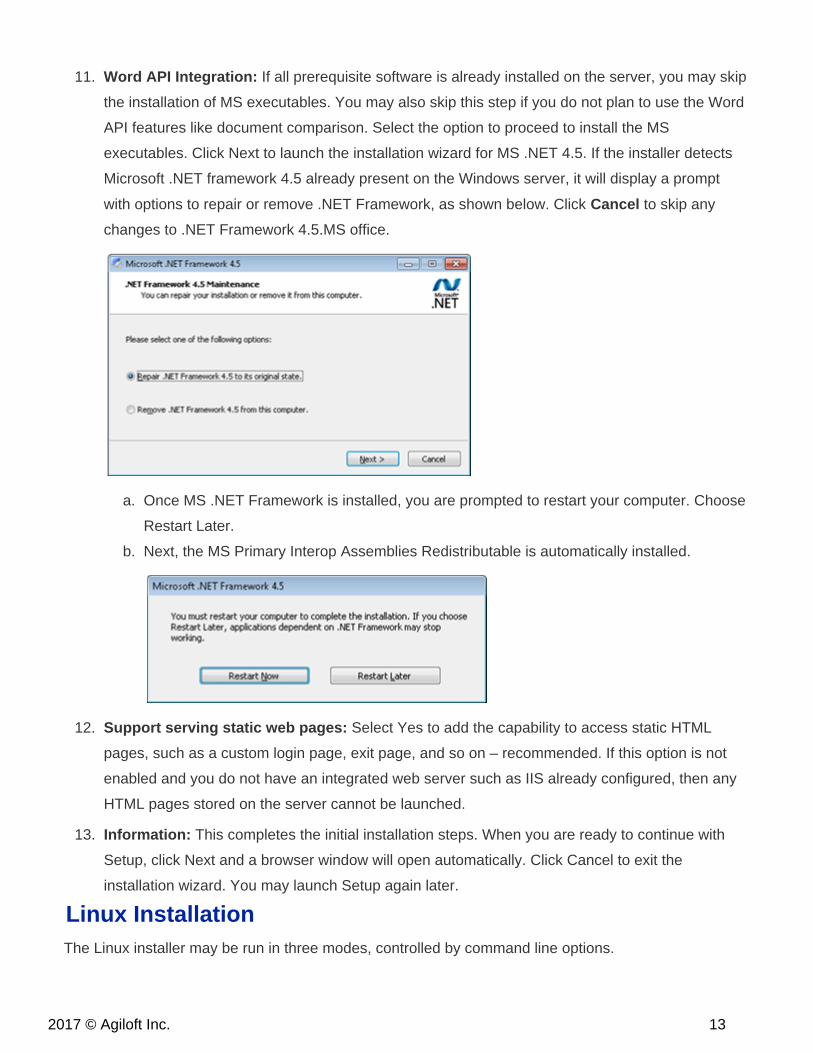
Word API Integration: If all prerequisite software is already installed on the server, you may skip
the installation of MS executables. You may also skip this step if you do not plan to use the Word
API features like document comparison. Select the option to proceed to install the MS
executables. Click Next to launch the installation wizard for MS .NET 4.5. If the installer detects
Microsoft .NET framework 4.5 already present on the Windows server, it will display a prompt
with options to repair or remove .NET Framework, as shown below. Click to skip anyCancel
changes to .NET Framework 4.5.MS office.
Once MS .NET Framework is installed, you are prompted to restart your computer. Choose
Restart Later.
Next, the MS Primary Interop Assemblies Redistributable is automatically installed.
Support serving static web pages: Select Yes to add the capability to access static HTML
pages, such as a custom login page, exit page, and so on – recommended. If this option is not
enabled and you do not have an integrated web server such as IIS already configured, then any
HTML pages stored on the server cannot be launched.
Information: This completes the initial installation steps. When you are ready to continue with
Setup, click Next and a browser window will open automatically. Click Cancel to exit the
installation wizard. You may launch Setup again later.
Linux InstallationThe Linux installer may be run in three modes, controlled by command line options.
142017 © Agiloft Inc.
1.
2.
3.
4.
GUI mode: Use defaults, or no command line options. The installer runs as a Java GUI
application, presenting dialog boxes and progress indicators. Next, it runs Setup in web mode.
You should have X-windows installed on the machine where Agiloft is installed, and you will need
good bandwidth if your X-server works on a remote machine.
Console mode: Use –c option. The installer starts as console application, showing prompts and
progress in a Unix terminal window. Then select how to run Setup: in web mode or in console
mode, accepting all defaults.
Unattended mode: Use –q option. The installer starts as console application, but uses default
values and does not prompt the user for input. Setup then runs in console mode.
The same steps are executed whether you are in GUI or console mode. Below is an installation sessionrun in console mode, with comments.
Begin installation: The Linux installer is run as .sh <installer file name>. If you choose the –c
option, the installer runs in console mode. It prints a welcome message and recommends closing
all other applications – this is optional. Press Enter to continue.
root# shAgiloft-summer-2014-release-20387-linux-64bit-setup.sh -cUnpacking JRE ...Starting Installer ...Autodetected configuration file:/etc/EnterpriseWizardConfig.xmlThis will install Agiloft on your computer.
It is recommended that you close all other applications beforecontinuing.OK [o, Enter], Cancel [c]
License agreement: You must accept the terms of the Agiloft license agreement to install and
use the software. You may review the terms of the at any time by visiting ourLicense Agreement
website. Enter 1 to accept the agreement.
Destination directory: To accept the default directory location, at /usr/local/ Agiloft for Linux,
press Enter. To install Agiloft in a non-default directory, use the additional command line option:
-dir, followed by the new installation directory name. You may also use the –dir command line
option to change the default when running the installer in unattended mode.
Antivirus warning: Next, you are prompted to configure any antivirus software running on your
system. When you are finished, press Enter.
152017 © Agiloft Inc.
5.
6.
a.
b.
Calculate disk space: A minimum of 8 GB is required for new installations of Agiloft. The
installer automatically detects free disk space and will exit if the disk has insufficient space.
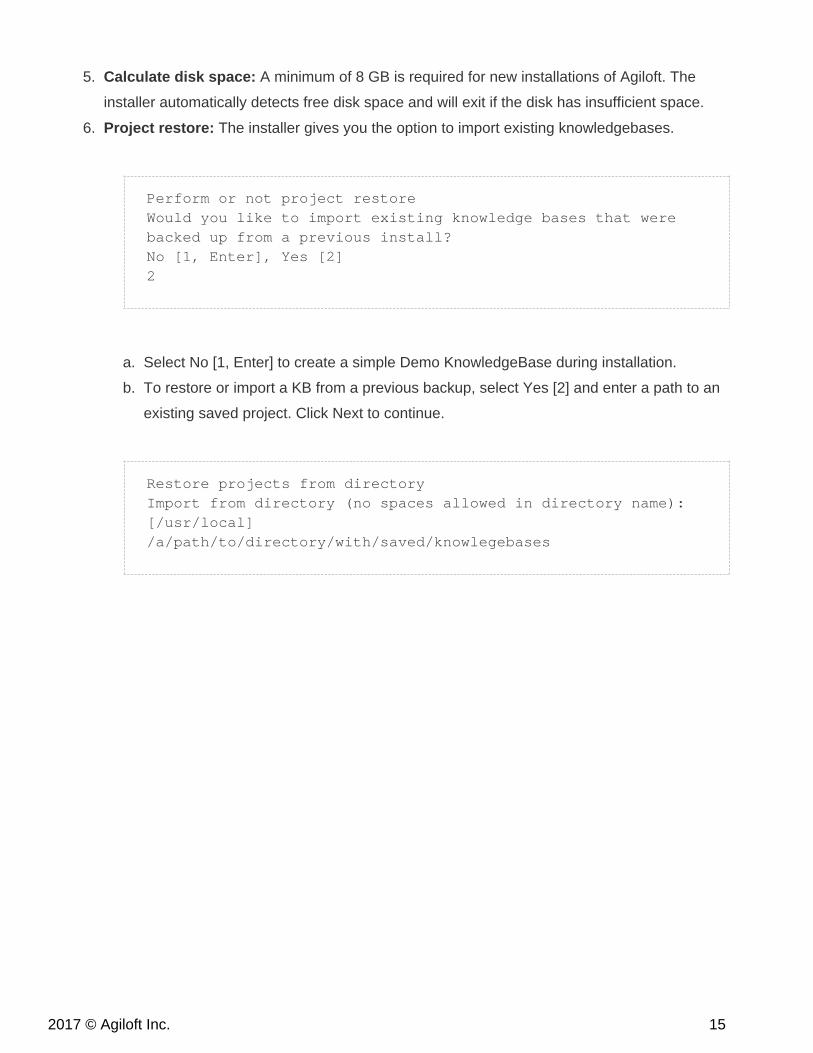
Project restore: The installer gives you the option to import existing knowledgebases.
Perform or not project restoreWould you like to import existing knowledge bases that werebacked up from a previous install?No [1, Enter], Yes [2]2
Select No [1, Enter] to create a simple Demo KnowledgeBase during installation.
To restore or import a KB from a previous backup, select Yes [2] and enter a path to an
existing saved project. Click Next to continue.
Restore projects from directoryImport from directory (no spaces allowed in directory name):[/usr/local]/a/path/to/directory/with/saved/knowlegebases
162017 © Agiloft Inc.
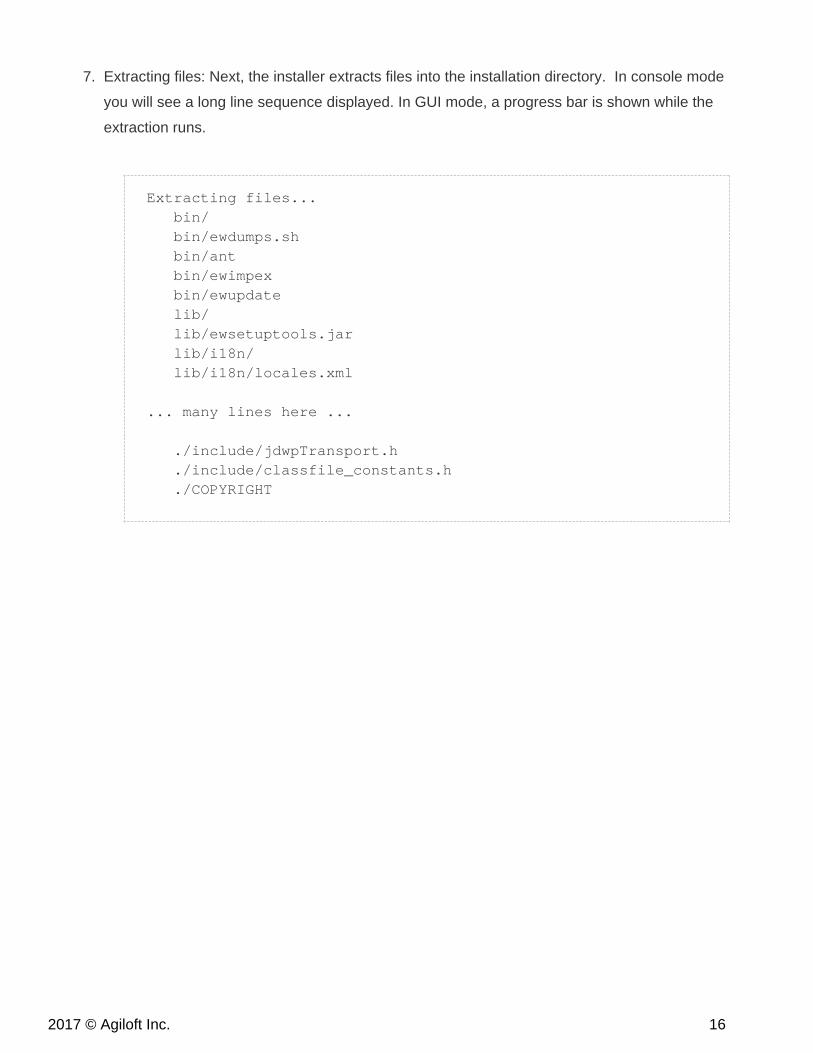
7. Extracting files: Next, the installer extracts files into the installation directory. In console mode
you will see a long line sequence displayed. In GUI mode, a progress bar is shown while the
extraction runs.
Extracting files... bin/ bin/ewdumps.sh bin/ant bin/ewimpex bin/ewupdate lib/ lib/ewsetuptools.jar lib/i18n/ lib/i18n/locales.xml
... many lines here ...
./include/jdwpTransport.h ./include/classfile_constants.h ./COPYRIGHT
172017 © Agiloft Inc.
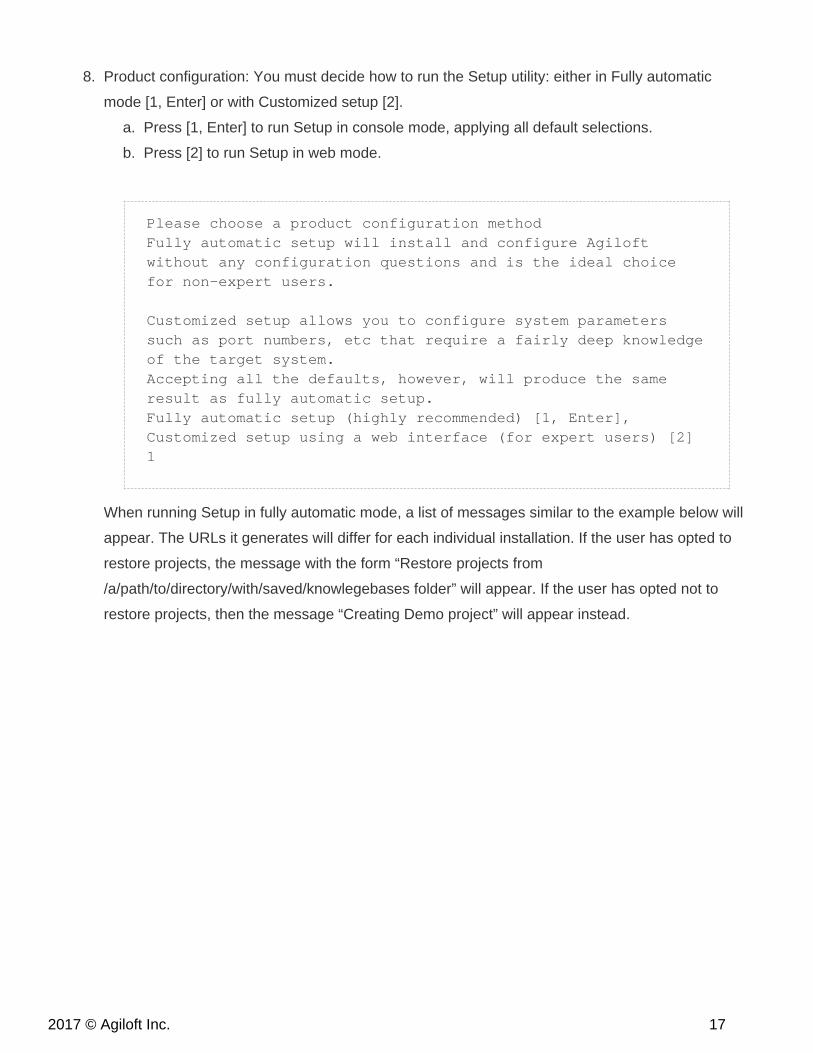
8.
a.
b.
Product configuration: You must decide how to run the Setup utility: either in Fully automatic
mode [1, Enter] or with Customized setup [2].
Press [1, Enter] to run Setup in console mode, applying all default selections.
Press [2] to run Setup in web mode.
Please choose a product configuration methodFully automatic setup will install and configure Agiloftwithout any configuration questions and is the ideal choicefor non-expert users.
Customized setup allows you to configure system parameterssuch as port numbers, etc that require a fairly deep knowledgeof the target system. Accepting all the defaults, however, will produce the sameresult as fully automatic setup.Fully automatic setup (highly recommended) [1, Enter],Customized setup using a web interface (for expert users) [2]1
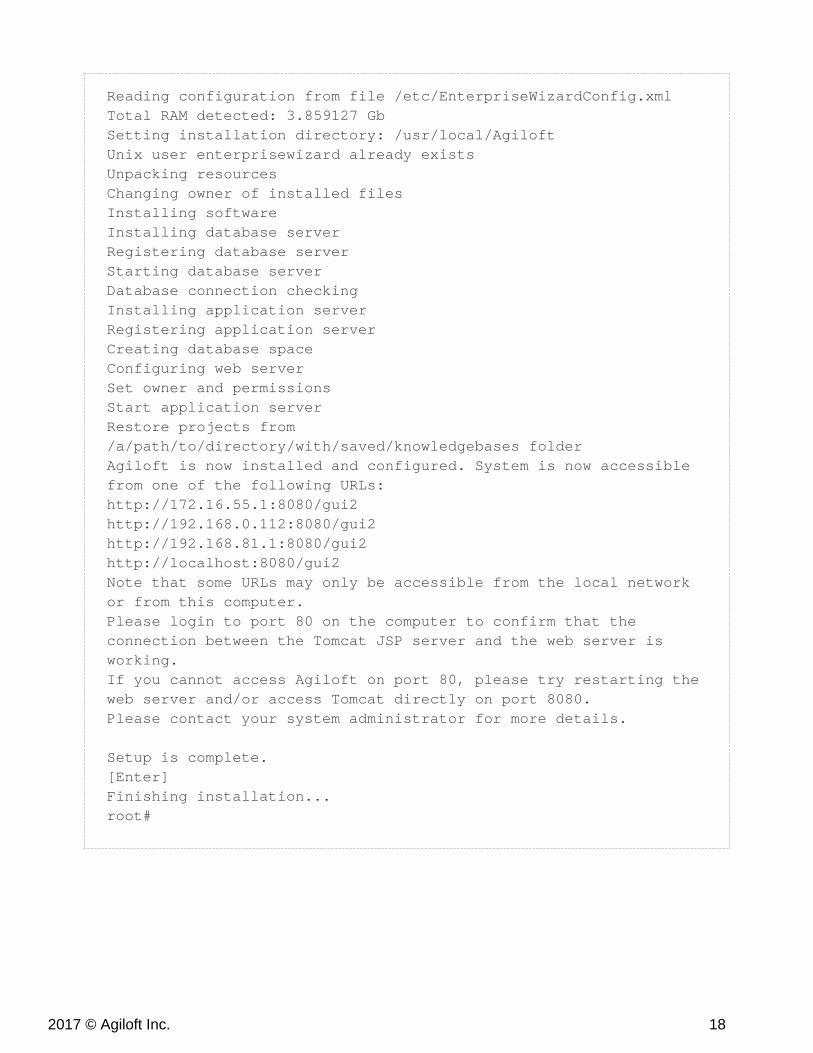
When running Setup in fully automatic mode, a list of messages similar to the example below will
appear. The URLs it generates will differ for each individual installation. If the user has opted to
restore projects, the message with the form “Restore projects from
/a/path/to/directory/with/saved/knowlegebases folder” will appear. If the user has opted not to
restore projects, then the message “Creating Demo project” will appear instead.
182017 © Agiloft Inc.
Reading configuration from file /etc/EnterpriseWizardConfig.xmlTotal RAM detected: 3.859127 GbSetting installation directory: /usr/local/AgiloftUnix user enterprisewizard already existsUnpacking resourcesChanging owner of installed filesInstalling softwareInstalling database serverRegistering database serverStarting database serverDatabase connection checkingInstalling application serverRegistering application serverCreating database spaceConfiguring web serverSet owner and permissionsStart application serverRestore projects from/a/path/to/directory/with/saved/knowledgebases folderAgiloft is now installed and configured. System is now accessiblefrom one of the following URLs:http://172.16.55.1:8080/gui2http://192.168.0.112:8080/gui2http://192.168.81.1:8080/gui2http://localhost:8080/gui2Note that some URLs may only be accessible from the local networkor from this computer. Please login to port 80 on the computer to confirm that theconnection between the Tomcat JSP server and the web server isworking. If you cannot access Agiloft on port 80, please try restarting theweb server and/or access Tomcat directly on port 8080. Please contact your system administrator for more details.
Setup is complete.[Enter]Finishing installation...root#
192017 © Agiloft Inc.
1.
2.
To finish configuring and installing the software, or to access advanced server settings at any time afterinstallation, run the Agiloft configuration utility Setup. To run Setup, open the file located in your Agiloftinstallation directory.
For initial installations on Windows, you will be prompted to run Setup once the initial installation stepsare complete. For Linux installations, you may run Setup in console mode by accepting all defaults orin web mode by selecting Customized setup.
If you run the installer in GUI mode, or if you selected the custom setup option when running theinstaller in console mode, the embedded web server starts. You will be asked how to connect to it andin the case of local installation a web browser opens.
Agiloft Setup AssistantAfter initial installation is complete, the Setup utility will guide you through a series of configurationsteps.
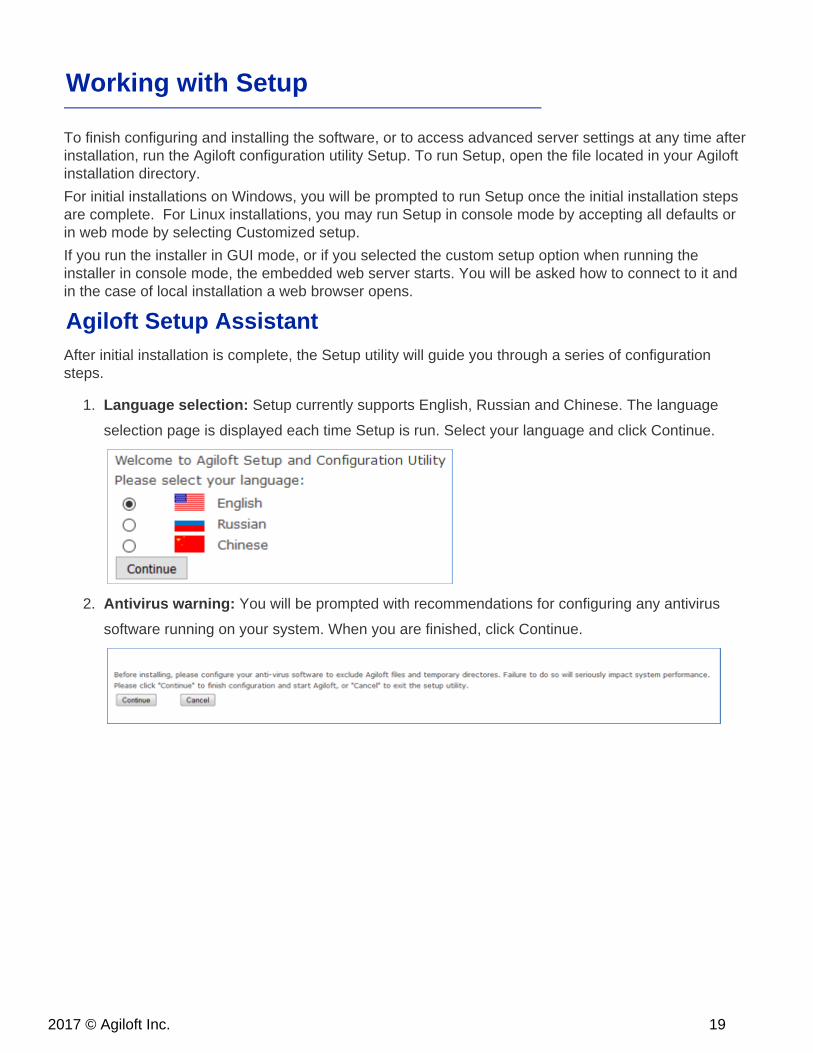
Language selection: Setup currently supports English, Russian and Chinese. The language
selection page is displayed each time Setup is run. Select your language and click Continue.
Antivirus warning: You will be prompted with recommendations for configuring any antivirus
software running on your system. When you are finished, click Continue.
Working with Setup
202017 © Agiloft Inc.
3.
4.
5.
6.
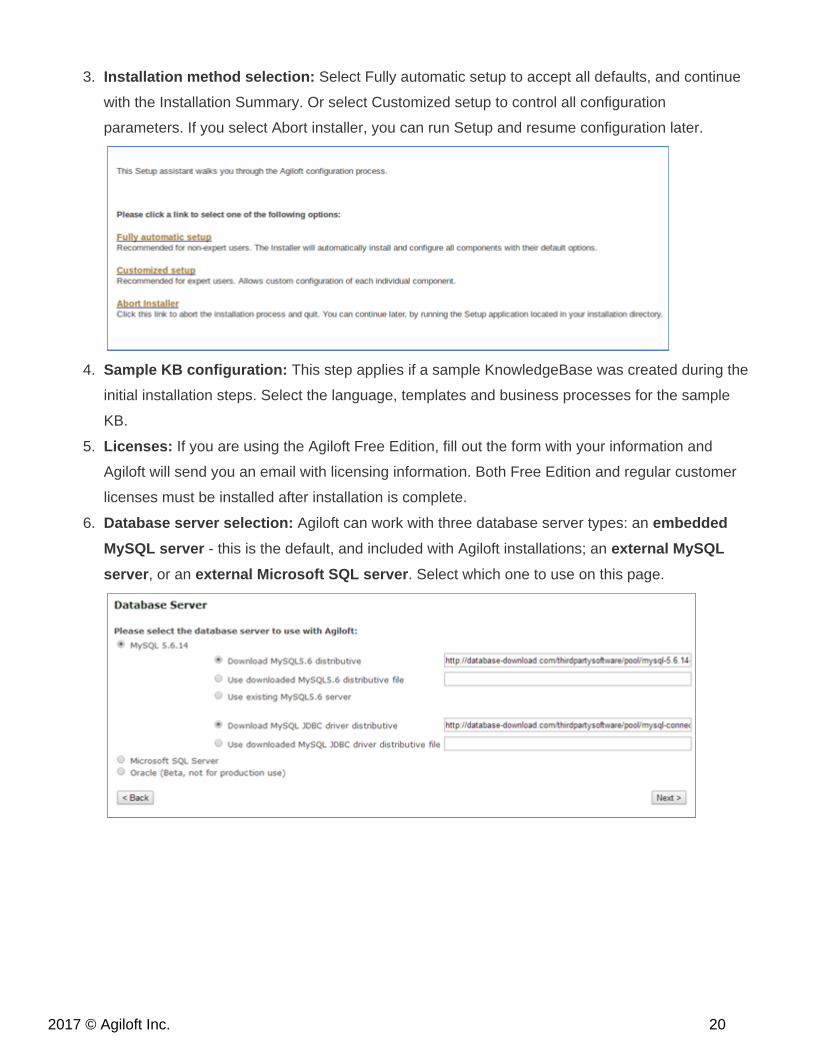
Installation method selection: Select Fully automatic setup to accept all defaults, and continue
with the Installation Summary. Or select Customized setup to control all configuration
parameters. If you select Abort installer, you can run Setup and resume configuration later.
Sample KB configuration: This step applies if a sample KnowledgeBase was created during the
initial installation steps. Select the language, templates and business processes for the sample
KB.
Licenses: If you are using the Agiloft Free Edition, fill out the form with your information and
Agiloft will send you an email with licensing information. Both Free Edition and regular customer
licenses must be installed after installation is complete.
Database server selection: Agiloft can work with three database server types: an embedded
- this is the default, and included with Agiloft installations; an MySQL server external MySQL
, or an . Select which one to use on this page.server external Microsoft SQL server
212017 © Agiloft Inc.
6.
a.
b.
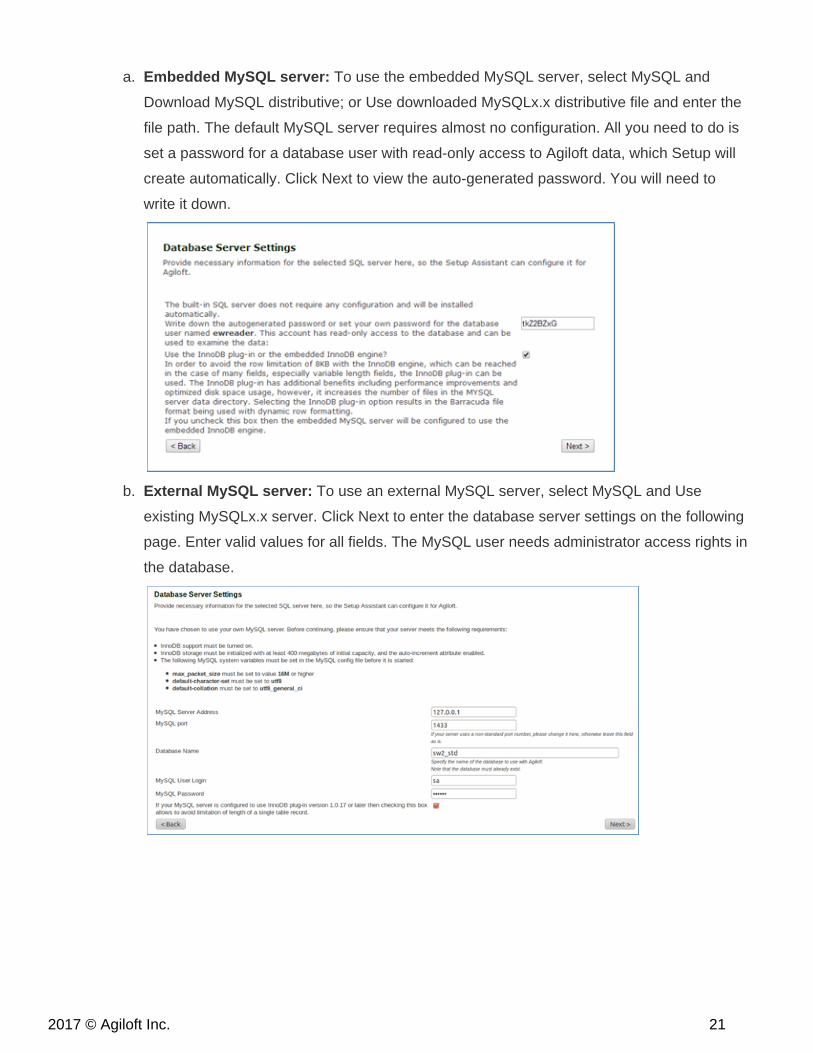
Embedded MySQL server: To use the embedded MySQL server, select MySQL and
Download MySQL distributive; or Use downloaded MySQLx.x distributive file and enter the
file path. The default MySQL server requires almost no configuration. All you need to do is
set a password for a database user with read-only access to Agiloft data, which Setup will
create automatically. Click Next to view the auto-generated password. You will need to
write it down.
External MySQL server: To use an external MySQL server, select MySQL and Use
existing MySQLx.x server. Click Next to enter the database server settings on the following
page. Enter valid values for all fields. The MySQL user needs administrator access rights in
the database.
222017 © Agiloft Inc.
6.
c.
7.
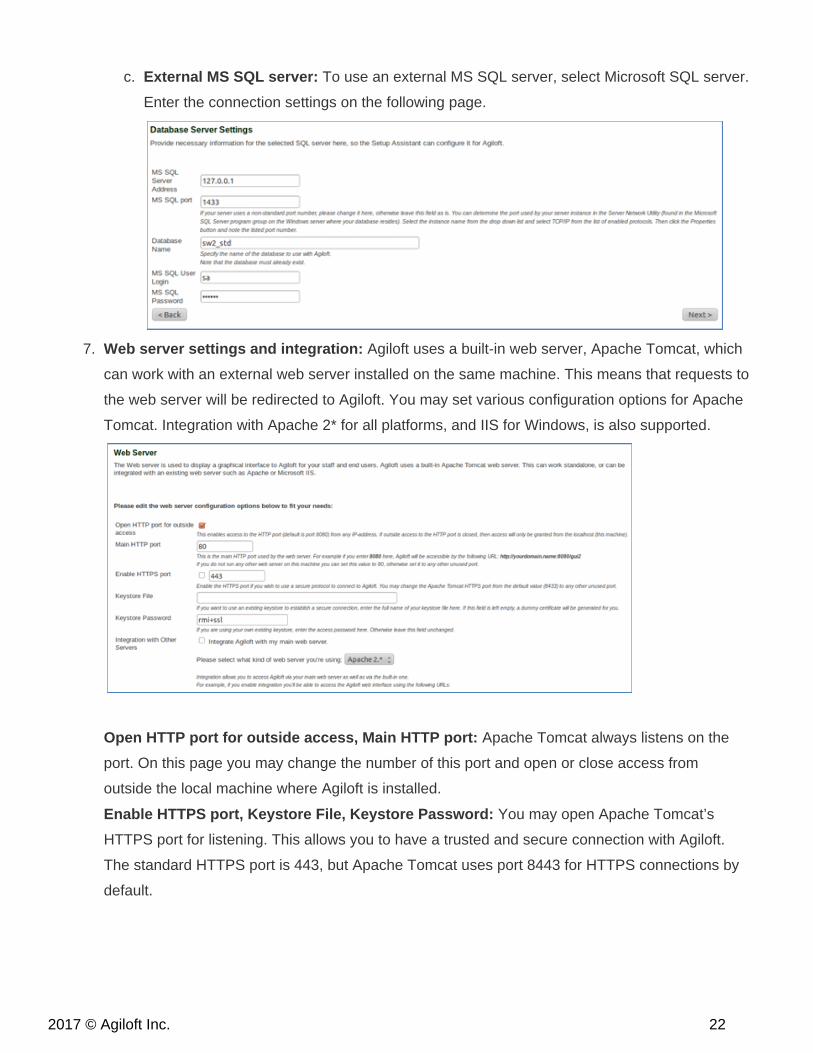
External MS SQL server: To use an external MS SQL server, select Microsoft SQL server.
Enter the connection settings on the following page.
Web server settings and integration: Agiloft uses a built-in web server, Apache Tomcat, which
can work with an external web server installed on the same machine. This means that requests to
the web server will be redirected to Agiloft. You may set various configuration options for Apache
Tomcat. Integration with Apache 2* for all platforms, and IIS for Windows, is also supported.
Apache Tomcat always listens on theOpen HTTP port for outside access, Main HTTP port:
port. On this page you may change the number of this port and open or close access from
outside the local machine where Agiloft is installed.
You may open Apache Tomcat’sEnable HTTPS port, Keystore File, Keystore Password:
HTTPS port for listening. This allows you to have a trusted and secure connection with Agiloft.
The standard HTTPS port is 443, but Apache Tomcat uses port 8443 for HTTPS connections by
default.
232017 © Agiloft Inc.
7.
Note: To enable HTTPS you will need a keystore file to keep track of your secure certificate(s).
You may use your own keystore or have a dummy keystore certificate autogenerated on
installation. To use your own keystore, enter the file name and passwords in the Keystore File
and Keystore Password fields. To automatically generate a dummy keystore, leave the fields
unchanged.
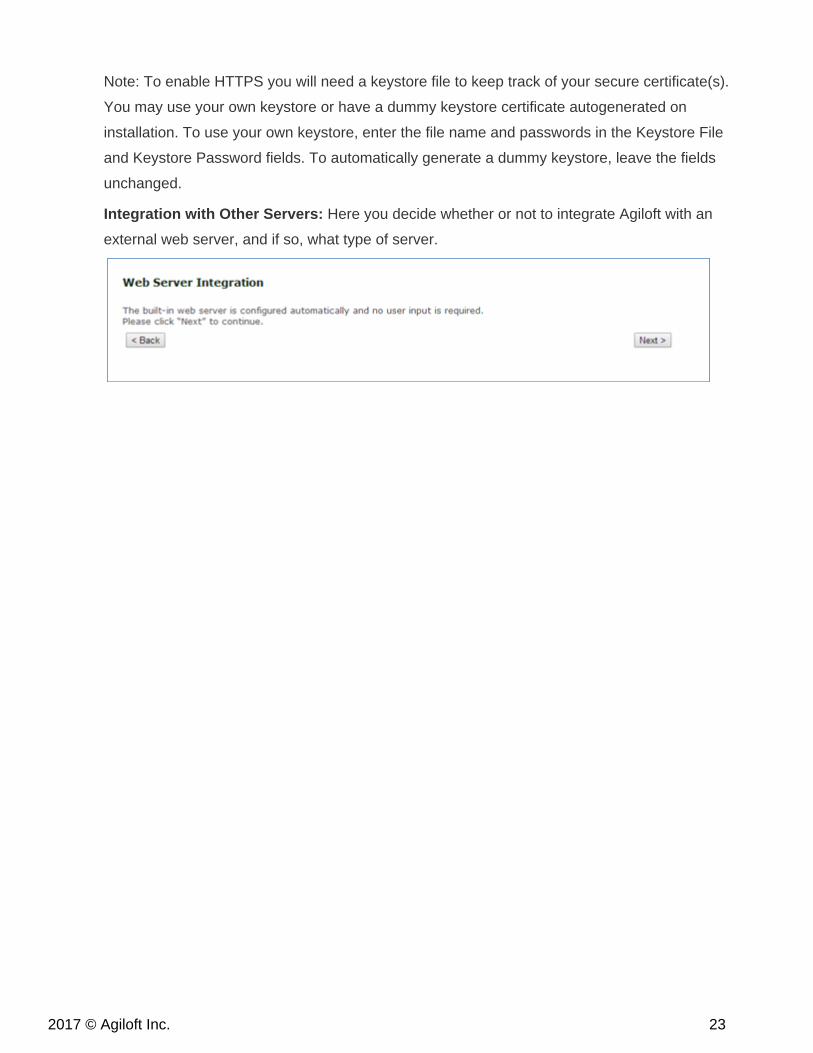
Integration with Other Servers: Here you decide whether or not to integrate Agiloft with an
external web server, and if so, what type of server.
242017 © Agiloft Inc.
7.
a.
b.
c.
8.
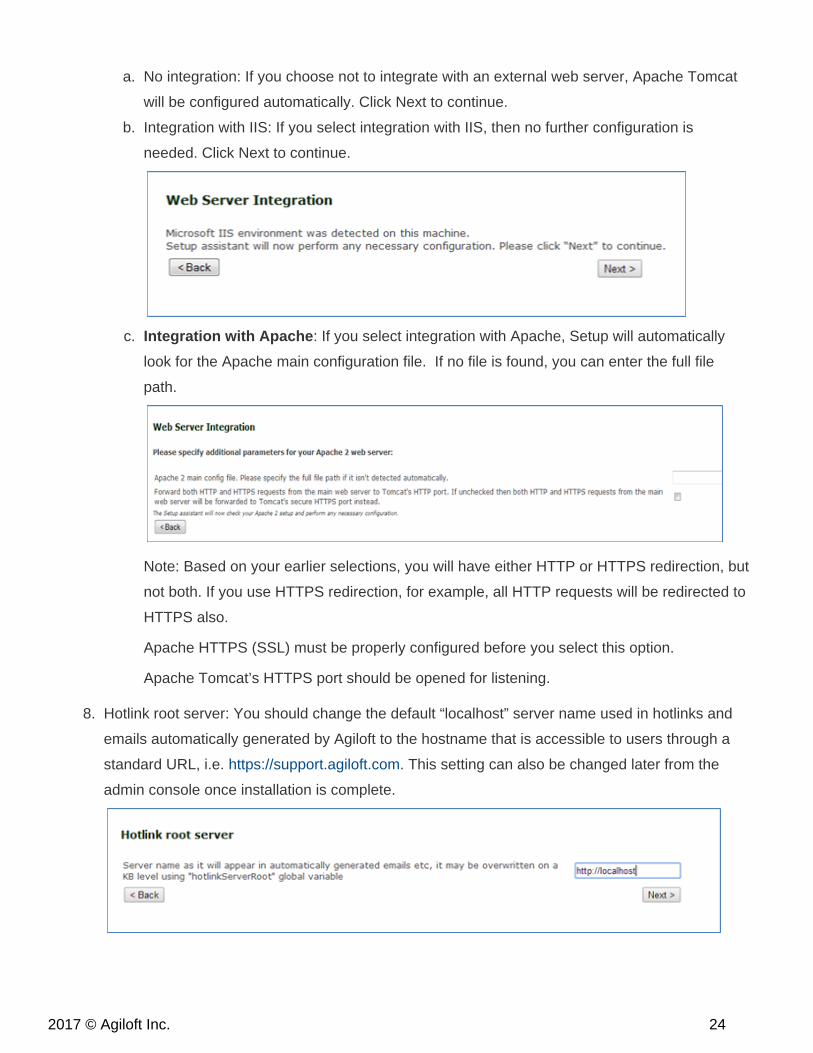
No integration: If you choose not to integrate with an external web server, Apache Tomcat
will be configured automatically. Click Next to continue.
Integration with IIS: If you select integration with IIS, then no further configuration is
needed. Click Next to continue.
Integration with Apache: If you select integration with Apache, Setup will automatically
look for the Apache main configuration file. If no file is found, you can enter the full file
path.
Note: Based on your earlier selections, you will have either HTTP or HTTPS redirection, but
not both. If you use HTTPS redirection, for example, all HTTP requests will be redirected to
HTTPS also.
Apache HTTPS (SSL) must be properly configured before you select this option.
Apache Tomcat’s HTTPS port should be opened for listening.
Hotlink root server: You should change the default “localhost” server name used in hotlinks and
emails automatically generated by Agiloft to the hostname that is accessible to users through a
standard URL, i.e. . This setting can also be changed later from thehttps://support.agiloft.com
admin console once installation is complete.
252017 © Agiloft Inc.
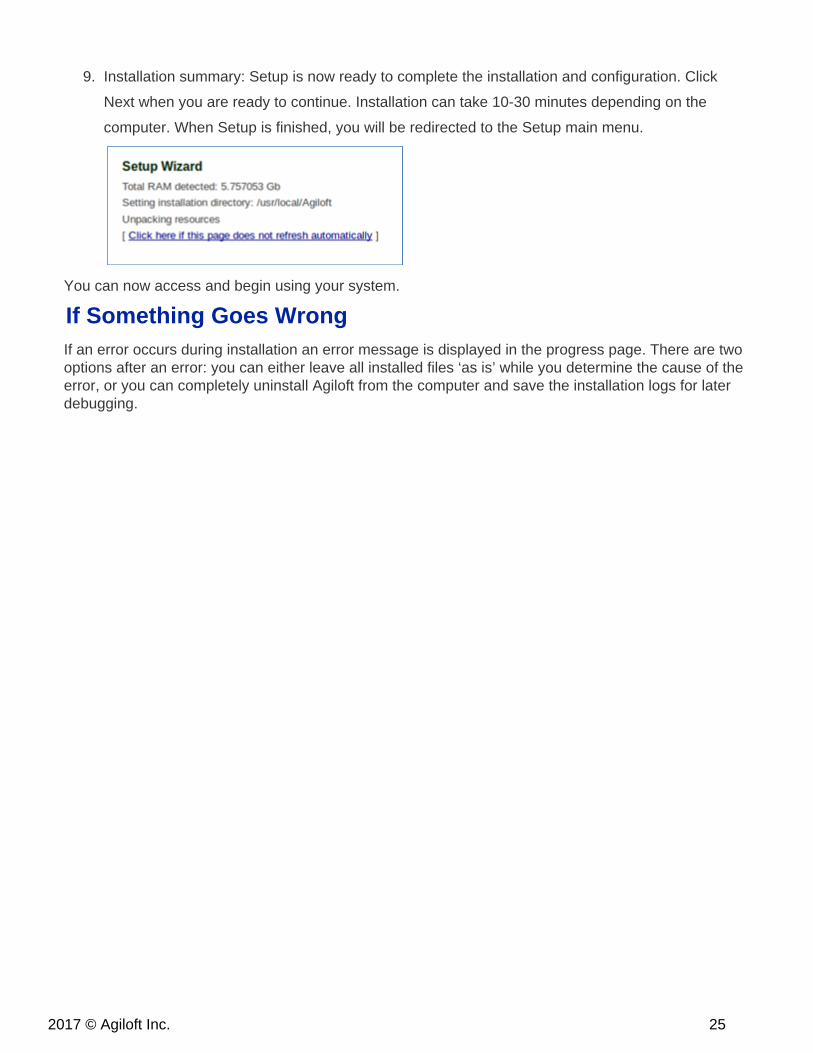
9. Installation summary: Setup is now ready to complete the installation and configuration. Click
Next when you are ready to continue. Installation can take 10-30 minutes depending on the
computer. When Setup is finished, you will be redirected to the Setup main menu.
You can now access and begin using your system.
If Something Goes WrongIf an error occurs during installation an error message is displayed in the progress page. There are twooptions after an error: you can either leave all installed files ‘as is’ while you determine the cause of theerror, or you can completely uninstall Agiloft from the computer and save the installation logs for laterdebugging.

262017 © Agiloft Inc.
Settings
Web Server
Service Control
Software Update
Update options
Backup
Restore
Product Reset
Snapshots
Mail Settings
To disable outgoing or incoming email message processing...
To clear email queues for the whole server...
Uninstall
Once Agiloft is installed, the Setup main menu can be accessed at any time. To run Setup, open the Se file located in your Agiloft installation directory. A browser window will open and display thetup.exe
main menu.
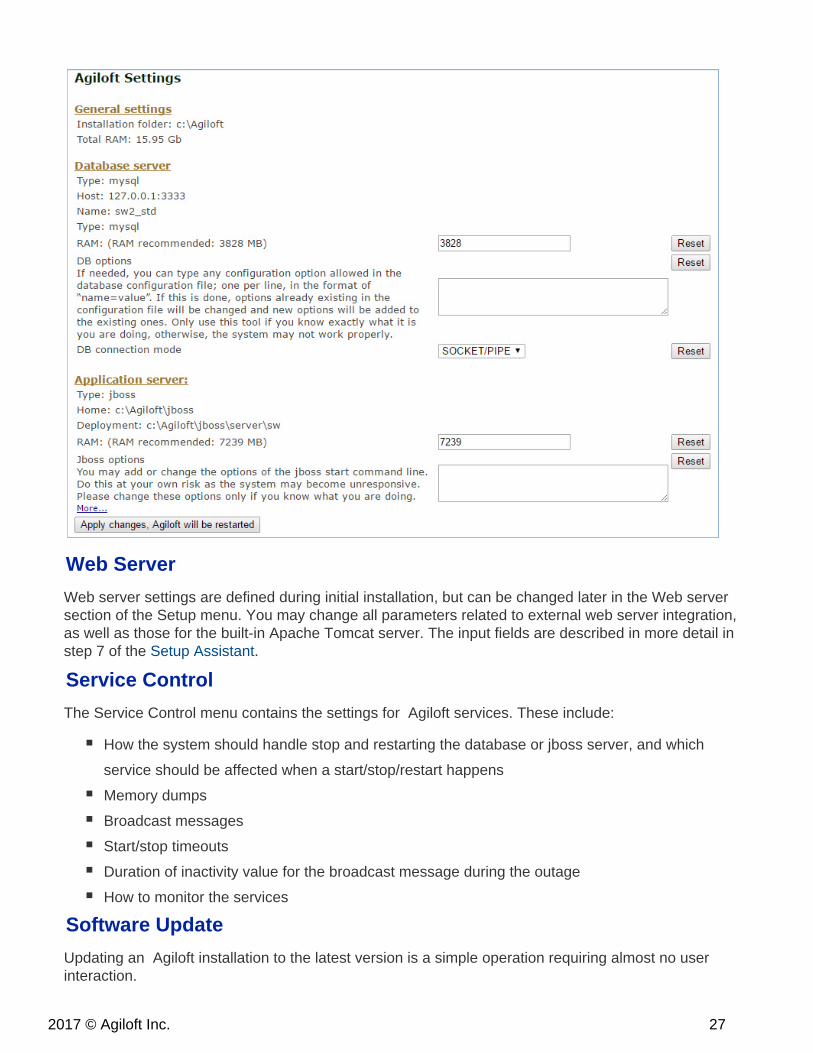
Settings
The installer automatically calculates RAM limits to run the application server and embedded MySQLserver if used. Users may change or reset these limits by accessing .Setup > Settings
Setup Menu Features
272017 © Agiloft Inc.
Web Server
Web server settings are defined during initial installation, but can be changed later in the Web serversection of the Setup menu. You may change all parameters related to external web server integration,as well as those for the built-in Apache Tomcat server. The input fields are described in more detail instep 7 of the .Setup Assistant
Service Control
The Service Control menu contains the settings for Agiloft services. These include:
How the system should handle stop and restarting the database or jboss server, and which
service should be affected when a start/stop/restart happens
Memory dumps
Broadcast messages
Start/stop timeouts
Duration of inactivity value for the broadcast message during the outage
How to monitor the services
Software Update
Updating an Agiloft installation to the latest version is a simple operation requiring almost no userinteraction.
282017 © Agiloft Inc.
1.
2.
3.
4.
1.
2.
3.
In general, the update process has the following stages:
Back up everything that should be backed up. This may include KBs, software code, database
files, etc., depending on what is to be updated.
Obtain new licenses for the new release, if it is a major upgrade with a new main version number.
Run the automated Agiloft software update to replace installed software and/or data that should
be updated.
Roll back to pre-update state if something goes wrong.
There are three ways to run the update process:
Using the Software Update option from the Setup main menu (recommended).
Manual update by running the downloaded installer.
Running the command-line utility ewupdate.
Setup > Software Update
Using the Software Update option is the simplest method. Run Setup and select Software Update fromthe main menu. Setup will automatically check to see if a new version of Agiloft is available, and if so,will download it and start the update. The user can monitor and set update options using the webinterface.
Manual update
If an earlier release of Agiloft is already installed, you can update the software by simply downloadingand installing the latest version. Run the downloaded installer as for an initial installation. The installerwill detect an existing Agiloft instance and prompt the user about a possible update. Confirm theselection, and the installer performs the update.
Command line utility ewupdate
The ewupdate command line utility performs an update with all default options if run without anyarguments. Use the –help option to print a short help screen. If you wish to use the command lineupdater with non-default options, use the command line arguments listed below.
Update options
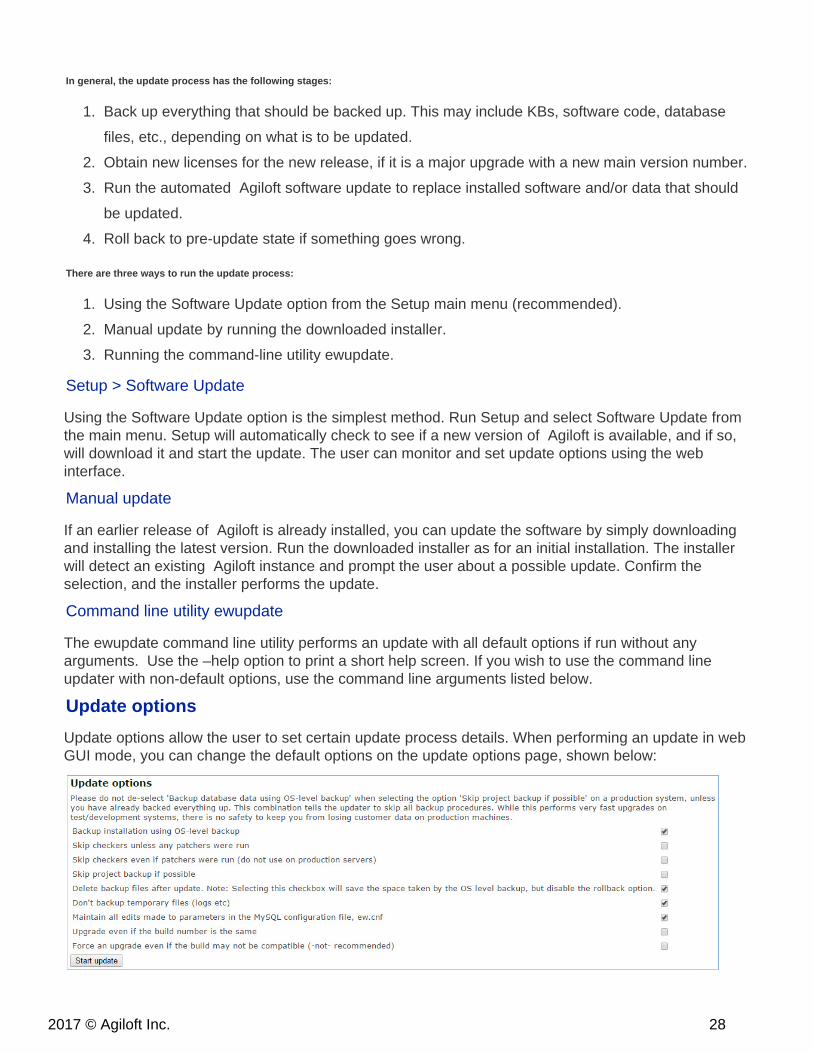
Update options allow the user to set certain update process details. When performing an update in webGUI mode, you can change the default options on the update options page, shown below:
292017 © Agiloft Inc.
These options are also available using the ewupdate utility. Default options can be changed using thecommand-line options listed, which correspond to the options presented in web GUI mode. Foradditional update options, use the –help command to print a list of commands.
Updateoption
Correspondingewupdatecommand-lineoption
Description
BackupdatabasedatausingOS-levelbackup
-k,--skiposlevel This command only applies if the built-in MySQL server is used.Under normal circumstances a full OS-level backup is made. Usethis option to skip the default OS-level backup of the MySQLdirectory. No database restoration will be possible if the upgradefails.
Skipcheckersunlessanypatcherswere run
-p,--scup When the application server starts it performs data checks forconsistency; data checking may take a long time. Use this option toskip data checking if no data was changed on update. This mayspeed the application server starting.
Skipprojectbackup ifpossible
-K,--skipprjbckp At the very beginning of the update process all existing projects aresaved to the backup directory. If this option is set then no projectbackup is performed, if allowed. Project backup is required in someupdate modes.
Don'tdeletetemporaryfiles afterupdate
-t,--keeptemp Upon update, temporary files are normally stored on the hard drive.These may include data backups, unpacked new Agiloft code, etc.By default, temporary files are removed after an update. If this optionis set then temporary files are left on the device and will only bedeleted before the next update.
Don'tbackuptemporaryfiles -logs etc
-i,--backuptemp If this option is set then no temporary files such as log files arebacked up before the update. This saves used disk space andshortens elapsed time.
Backup
The Backup feature allows you to store all Agiloft projects in platform-independent format in a default orchosen directory. These files may be stored as backups, moved to another computer for restoring, etc.Agiloft services are unavailable during the backup process, which may be lengthy depending on theamount of data.
To create a backup, click on the Backup link from the Setup main menu.
Restore
302017 © Agiloft Inc.
1.
2.
3.
The Restore option restores all projects stored in Agiloft format from a default or chosen directory. If theuser selects Clean database before restore, all existing projects are deleted before restoration runs. Inthis case, the admin console KB stored in the file should be present in the backupadmin.xml.ewdirectory. If no database cleaning is performed before restoration, then to avoid overwriting the activeadmin console KB, should not be in the directory.admin.xml.ew
Product Reset
Database resetting performs a low-level erase of the entire Agiloft database and returns the databaseto a new-install state. For obvious reasons, this option should be used with extreme caution.
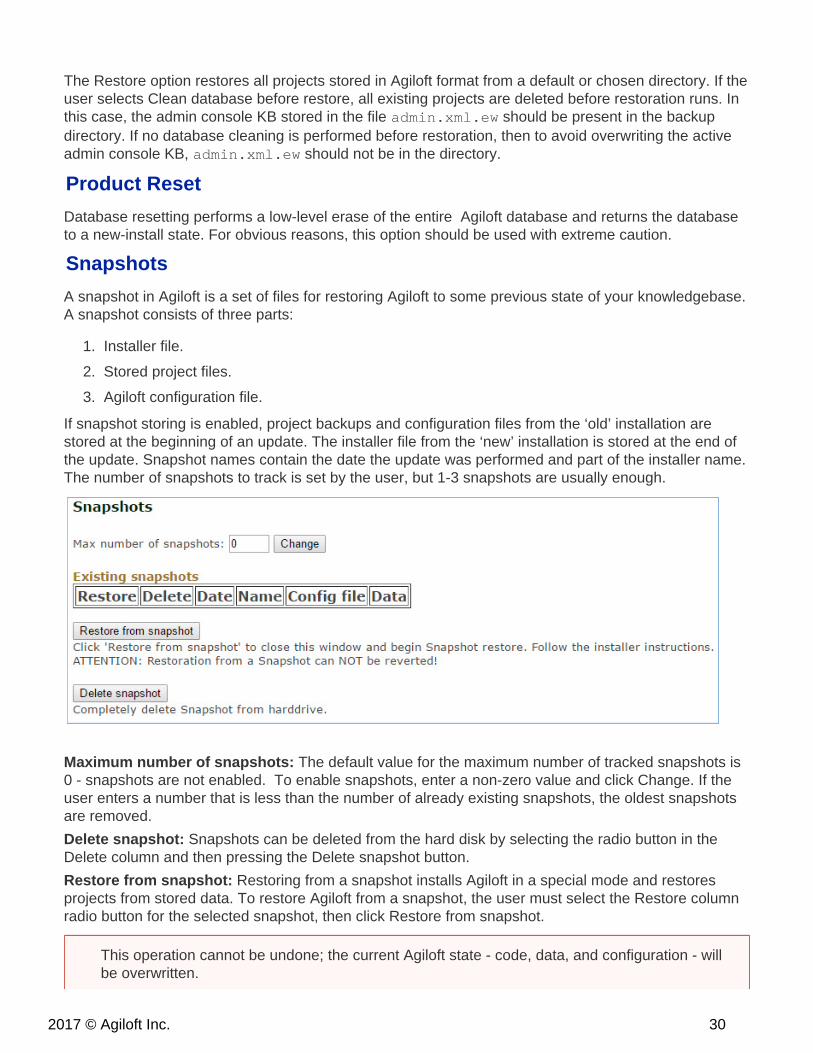
Snapshots
A snapshot in Agiloft is a set of files for restoring Agiloft to some previous state of your knowledgebase.A snapshot consists of three parts:
Installer file.
Stored project files.
Agiloft configuration file.
If snapshot storing is enabled, project backups and configuration files from the ‘old’ installation arestored at the beginning of an update. The installer file from the ‘new’ installation is stored at the end ofthe update. Snapshot names contain the date the update was performed and part of the installer name.The number of snapshots to track is set by the user, but 1-3 snapshots are usually enough.
Maximum number of snapshots: The default value for the maximum number of tracked snapshots is0 - snapshots are not enabled. To enable snapshots, enter a non-zero value and click Change. If theuser enters a number that is less than the number of already existing snapshots, the oldest snapshotsare removed.
Delete snapshot: Snapshots can be deleted from the hard disk by selecting the radio button in theDelete column and then pressing the Delete snapshot button.
Restore from snapshot: Restoring from a snapshot installs Agiloft in a special mode and restoresprojects from stored data. To restore Agiloft from a snapshot, the user must select the Restore columnradio button for the selected snapshot, then click Restore from snapshot.
This operation cannot be undone; the current Agiloft state - code, data, and configuration - willbe overwritten.
312017 © Agiloft Inc.
1.
2.
3.
1.
a.
b.
Mail Settings
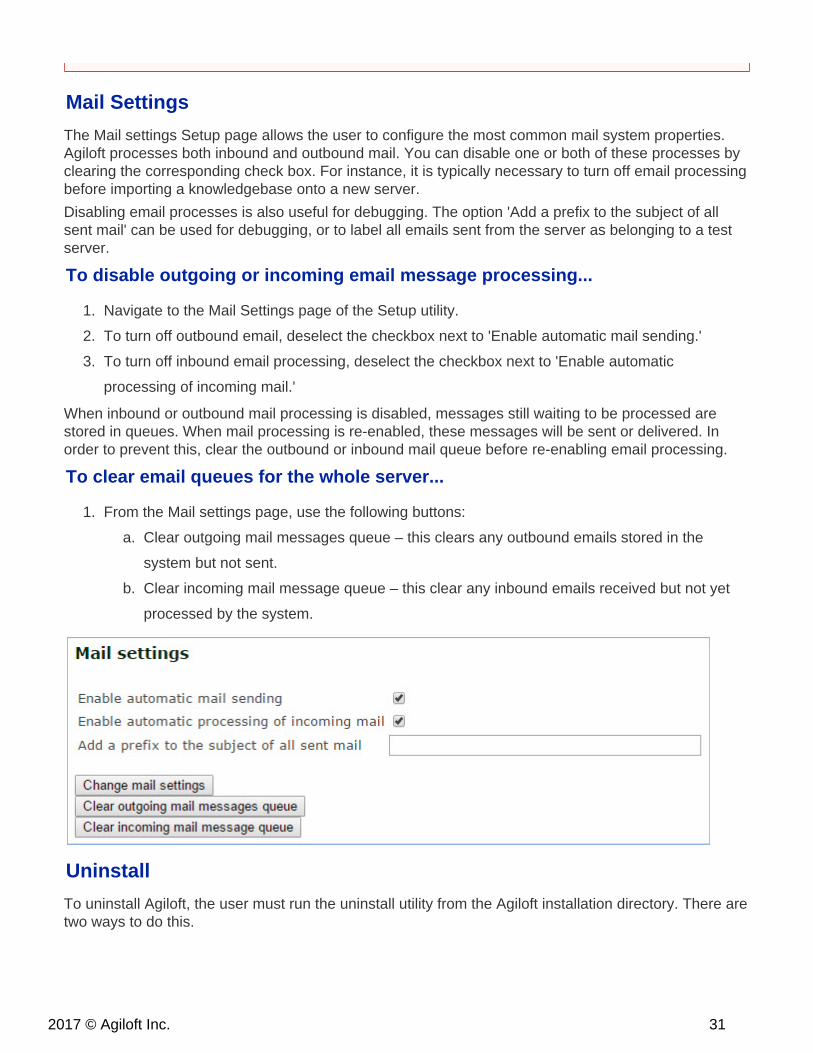
The Mail settings Setup page allows the user to configure the most common mail system properties.Agiloft processes both inbound and outbound mail. You can disable one or both of these processes byclearing the corresponding check box. For instance, it is typically necessary to turn off email processingbefore importing a knowledgebase onto a new server.
Disabling email processes is also useful for debugging. The option 'Add a prefix to the subject of allsent mail' can be used for debugging, or to label all emails sent from the server as belonging to a testserver.
To disable outgoing or incoming email message processing...
Navigate to the Mail Settings page of the Setup utility.
To turn off outbound email, deselect the checkbox next to 'Enable automatic mail sending.'
To turn off inbound email processing, deselect the checkbox next to 'Enable automatic
processing of incoming mail.'
When inbound or outbound mail processing is disabled, messages still waiting to be processed arestored in queues. When mail processing is re-enabled, these messages will be sent or delivered. Inorder to prevent this, clear the outbound or inbound mail queue before re-enabling email processing.
To clear email queues for the whole server...
From the Mail settings page, use the following buttons:
Clear outgoing mail messages queue – this clears any outbound emails stored in the
system but not sent.
Clear incoming mail message queue – this clear any inbound emails received but not yet
processed by the system.
Uninstall
To uninstall Agiloft, the user must run the uninstall utility from the Agiloft installation directory. There aretwo ways to do this.
322017 © Agiloft Inc.
Run uninstall manually. For Linux users, the uninstall utility accepts the same command line
arguments as the installer: no arguments to run it in GUI mode, -c option to run in console mode
and –q option to run in unattended mode, with no prompts or confirmation messages, using all
default options.
Or
Run Setup, then choose Uninstall from the main menu.
After confirming that you really want to uninstall the software, the uninstaller removes the currentinstance of Agiloft.
332017 © Agiloft Inc.
1.
Ignoring Import ErrorsIn some cases imported data when installing or importing may be corrupted and cannot be properlyimported. You may wish to set a special import mode when SQL import errors produce warnings thatare not fatal errors. We recommend that you do not use this option unless instructed to do so by asupport or implementation specialist. Ignoring errors may result in a corrupted database.
Setting ignore SQL errors mode in Unix
Set the environment variable to the value true, then restart theew.import.ignore.sql.errorsapplication server. You must be logged in as the Unix root user to do this.
# ew.import.ignore.sql.errors=true# export ew.import.ignore.sql.errors# /etc/init.d/ew-server restart
This example is given for bash shell. If you use a different shell, consult its documentation on how toset and export environment variables. If you want to make this mode permanent, edit the /etc/profileLinux/Unix file, and add the following lines:
ew.import.ignore.sql.errors=trueexport ew.import.ignore.sql.errors
Re-enter the Unix console session. To check if the environment variable is set correctly, execute thefollowing command:
# export | grep ew.import.ignore.sql.errors
Setting ignore SQL errors mode in Windows
Set the environment variable to true, and then restart theew.import.ignore.sql.errorsapplication server.
Click Start > (My) Computer > [ ] > Properties > Advanced > EnvironmentRight-click
.Variables > System Variables > New
Additional Setup and Installation Features
342017 © Agiloft Inc.
2.
3.
Enter the variable name and set the variable value to true.ew.import.ignore.sql.errors
Press .OK
Run command line window by clicking … Then type cmd in the Open field and pressStart > Run
OK. Restart the application server:
C:\> net stop ewserverC:\> net start ewserver
Optimizing TablesIn the bin directory there is a script named .optimize_tables
This script performs the mass execution of an optimize table SQL statement against a set of SQLtables. Running the script can often increase performance if tables have become unoptimized.