vari-grind attachment
TRANSCRIPT
Slperlor oeslgn,leuendarv Qualllv
291 Griffith Road Unit 1, Stratford, ON, NSA 654, Canada
Phone: 519-271-7611 Fax: 519-271-8892
Email: [email protected]
1-800-565-1288 WWW.OIItMIIV.CI
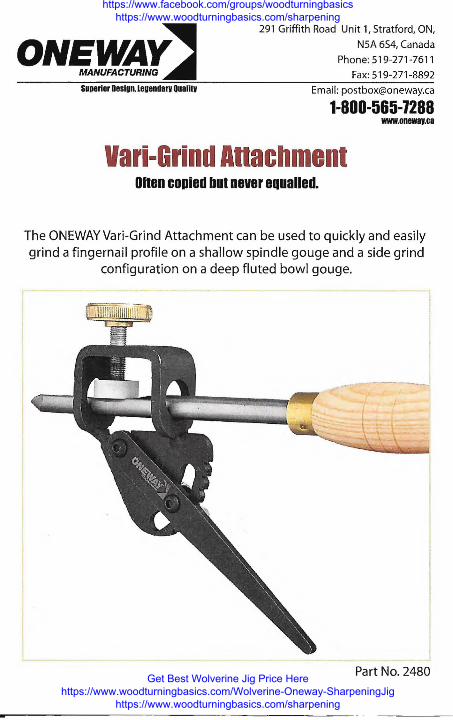
Vari-Grind Attachment Ohen copied but never equalled.
The ONEWAYVari-Grind Attachment can be used to quickly and easily grind a fingernail profile on a shallow spindle gouge and a side grind
configuration on a deep fluted bowl gouge.
Part No. 2480
Join Our WoodTurning Facebook Group https://www.facebook.com/groups/woodturningbasics
https://www.woodturningbasics.com/sharpening
Get Best Wolverine Jig Price Here https://www.woodturningbasics.com/Wolverine-Oneway-SharpeningJig
https://www.woodturningbasics.com/sharpening
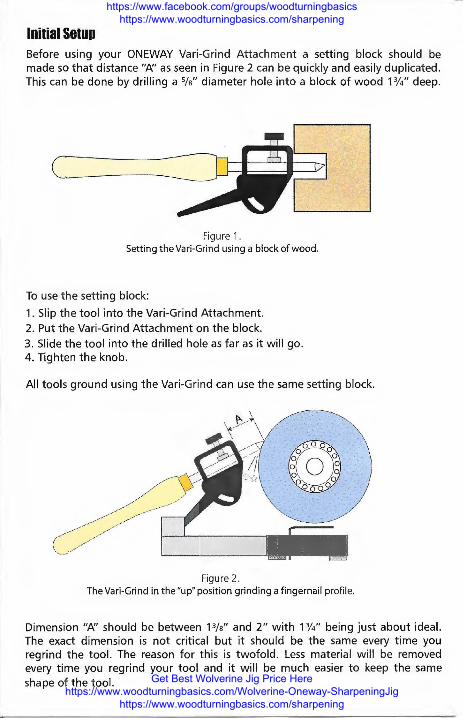
Initial Setup Before using your ONEWAY Vari-Grind Attachment a setting block should be made so that distance"/!\' as seen in Figure 2 can be quickly and easily duplicated . This can be done by drilling a 5/s" diameter hole into a block of wood 1 %" deep.
Figure 1. Setting the Vari-Grind using a block of wood.
To use the setting block: 1. Slip the tool into the Vari-Grind Attachment. 2. Put the Vari-Grind Attachment on the block. 3. Slide the tool into the drilled hole as far as it will go. 4. Tighten the knob.
All tools ground using the Vari-Grind can use the same setting block.
Figure 2. The Vari-Grind in the "up" position grinding a fingernail profile.
Dimension"/!\' should be between P/s" and 2" with 1%" being just about ideal. The exact dimension is not critical but it should be the same every time you regrind the tool. The reason for this is twofold . Less material will be removed every time you regrind your tool and it will be much easier to keep the same shape of the tool.
Join Our WoodTurning Facebook Group https://www.facebook.com/groups/woodturningbasics
https://www.woodturningbasics.com/sharpening
Get Best Wolverine Jig Price Here https://www.woodturningbasics.com/Wolverine-Oneway-SharpeningJig
https://www.woodturningbasics.com/sharpening

Using the Vari-Grind To use the Vari-Grind Attachment, perform the following:
1. Insert the leg into the vee-pocket of the Grinding Jig. 2. With the wheel stopped, lay the tool on the wheel and slide the arm in
or out until the entire length of the bevel on the tool is touching the wheel.
3. Lift the tool off the wheel and turn on the grinder. 4. Touch the tool lightly to the wheel and check that the grind marks are
even along the whole bevel. 5. Adjust the arm in or out to exactly match the bevel if neccessary. 6. Swing the tool handle back and forth to grind the tool. Let the weight
of the tool do the work.
Keep in mind that the Attachment does not control the shape of the tool. If for example, you find that the tool nose is getting more pointy than you like, spend more time grinding the tip until you get the profile you want.
An instructional video on how to use the Vari-Grind Attachment can be downloaded from our website at www.oneway.ca/multimed ia.htm
Using the Vari-Grind to Create a Side Grind A side-ground gouge should have a bevel angle on the front of the tool of about 65° (the bevel on the nose of the tool should be short) and the sides should be ground back about%". Most lathes don't have the power to remove a shaving larger than this and grinding the edge back further will only make grinding the tool more difficult.
To grind a gouge, set the gouge into the fixture while it is in the "down" position as shown in Figure 3. You may have to adjust the amount the tool sticks out from the jig to get enough clearance from guards or other things that may get in the way.
Slide the vee-arm in until you get the 65° angle on the nose. The gouge is basically ready to be ground but there are some things to keep in mind. The jig will
Side Ground Gouge Details
~:) Side Ground Gouge Top View
• Join Our WoodTurning Facebook Group https://www.facebook.com/groups/woodturningbasics
https://www.woodturningbasics.com/sharpening
Get Best Wolverine Jig Price Here https://www.woodturningbasics.com/Wolverine-Oneway-SharpeningJig
https://www.woodturningbasics.com/sharpening

ensure a perfect grind and give a perfect one facet bevel, but you control the shape of the tool that is being ground.
Areas of some tools may grind faster or slower than other areas. If the long cutting edge is not straight, but curves up, grind a bit more off. If the edge curves down next time grind less off. Pay special attention to the nose of the tool as it grinds very quickly. Use a light touch and carefully grind the radius to suit you and the shape of the tool.
Start grinding on the side of the gouge. If you are side grinding a tool for the first time there is a tremendous amount of material to come off. Work on one side and part of the nose, then do the other side and part of the nose. Finish by smoothing out the nose.
When grinding the nose there is a tendency for the j ig to slide forward in the pocket of the vee-arm so watch what you are doing.
Re-Grinding a Tool If you are re-grinding a tool, set the position of the vee-arm by matching the bevel on the side of the tool not the nose. Slide the arm in or out to match the existing bevel on the side as close as you can. Turn on the grinder and then lightly touch the side of the tool to the grinding wheel. If the angle doesn't match exactly, loosen the clamp and just tap the vee-arm in or out to fine tune the angle.
What if I don't have the Wolverine Grinding Jig? If you are using the jig without a ONEWAY Wolvering Grinding Jig, you will need to grind the 65° angle on the front of the gouge freehand . Next put the gouge in the Vari-Grind and line up the bevel you just ground with the grinding wheel and with the jig touching the bench in front of your grinder. Mark where the jig touched and drill a dimple. Use a standard J/s" drill and drill a hole as deep as just the point. This will allow the jig to pivot freely in the hole.
Figure 3. Vari-Grind in the "down " position ready for a side ground tool.
Join Our WoodTurning Facebook Group https://www.facebook.com/groups/woodturningbasics
https://www.woodturningbasics.com/sharpening
Get Best Wolverine Jig Price Here https://www.woodturningbasics.com/Wolverine-Oneway-SharpeningJig
https://www.woodturningbasics.com/sharpening