티틀x 수정본 20170613 맨처음바로뒤 - tittlegolf · specifications product name display...
TRANSCRIPT

E6GOLF.COM
USER MANUAL
by TRUGOLF
TM
Version

...............................................................................................................
CONTENTS 3
Quick Start Guide 3Tittle X device Guide 5Tittle X Guide for Windows 10 & Windows 8.1 11Tittle X Guide for Windows 7 & Windows 8 20
GETTING STARTED E6Golf
GETTING STARTED Tittle X
...............................................................................................................29Launch E6Golf 29Main Menu 29
STARTING A NEW ROUND .................................................................................................30Play 31Players 31Courses 32Golf Course List 33Settings 34Holes To Play 35Modes of Play 37Start 37
PLAYING A ROUND ............................................................................................................38On Screen Interface 38E6 Menu 39AIMING YOUR SHOT 40
SWING ANALYSIS: POST SHOT .........................................................................................41
PRACTICE .............................................................................................................................42DRIVING RANGE 43
On Screen Interface 43PRACTICE SESSION 44
Players 44Sessions 45Clubs 45Shots 46
THE SCORING ZONE 46CHIP & PUTT 48
ONLINE EVENTS .................................................................................................................49Players 49Events 49Start 50
CREATE EVENT ....................................................................................................................50
CONTENTS
FMOD Ex Sound System, Copyright © 2004-2009 Firelight Technologies.

Connection StatusConnected
by TRUGOLF
TM
by TRUGOLF
TM

by TRUGOLF
TM
by TRUGOLF
TM

Search “Tittle X” on Youtube
DEVICE GUIDE
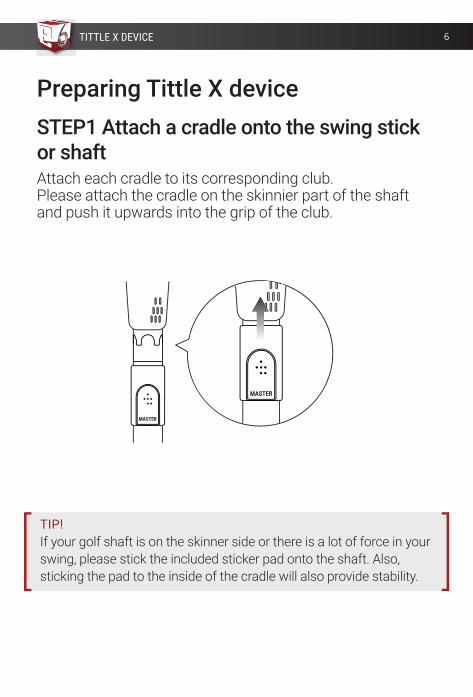
STEP1 Attach a cradle onto the swing stick or shaftAttach each cradle to its corresponding club. Please attach the cradle on the skinnier part of the shaft and push it upwards into the grip of the club.
Preparing Tittle X device
MASTER
MASTER
TITTLE X DEVICE
TIP!If your golf shaft is on the skinner side or there is a lot of force in your swing, please stick the included sticker pad onto the shaft. Also, sticking the pad to the inside of the cradle will also provide stability.
6

Preparing Tittle X deviceSTEP2 Insert Tittle X device onto the cradleAlign the marked Tittle symbol to the cradle outline and insert until you hear a clicking sound.
click
Once you attach and power on the device it will automati-cally recognize the club and enter the Ready Mode. If Tittle X device connects with golf simulator software, ‘ ’ sign will be displayed.
Connected Club Type
S/W Connected
TITTLE X DEVICE 7

STEP3 Powering up Tittle X devicePower up by tapping on the display twice.When Tittle X device is not used for over 10 minutes it will automatically go into the sleep mode.
ON!
ON!
Preparing Tittle X device
TITTLE X DEVICE
TIP!
Tittle X device is delivered to you in sleep mode. Wake up Tittle X device by connecting it to a power source using the included charging cable.
8

Caution and WarningUsage & Liabilities
Before first use, check the battery life status.Do not use the product for purposes other than its intended functions.Do not separate and disassemble the product.Do not subject the product to severe impact, such as one caused by a drop.Do not use unauthorized components.We hold no liability for information that may leak from Bluetooth communications.We hold no liability for damage to clubs such as scratch-es, spots, etc.Do not expose the product to severe temperature or humidity.Ensure there are no nearby obstacles or people when you swing.Remove device from the cradle after use.Do not use on a hard surface such as concrete or asphalt.Be careful not to damage your club grip when installing the cradle.
TITTLE X DEVICE 9
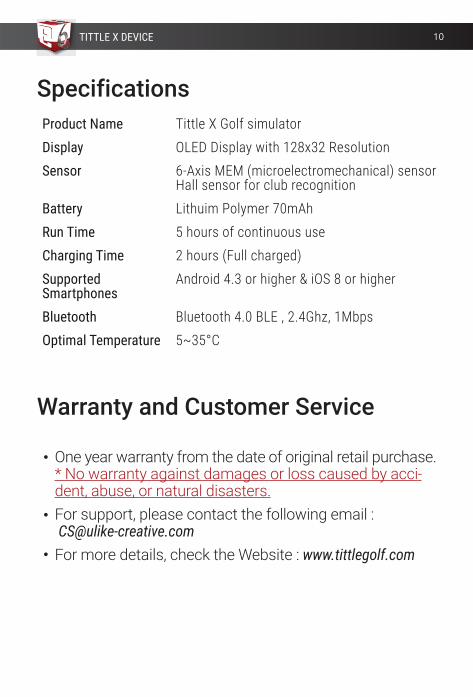
SpecificationsProduct NameDisplaySensor
BatteryRun TimeCharging TimeSupported SmartphonesBluetoothOptimal Temperature
Tittle X Golf simulatorOLED Display with 128x32 Resolution6-Axis MEM (microelectromechanical) sensorHall sensor for club recognitionLithuim Polymer 70mAh5 hours of continuous use2 hours (Full charged)Android 4.3 or higher & iOS 8 or higher
Bluetooth 4.0 BLE , 2.4Ghz, 1Mbps5~35°C
Warranty and Customer Service
One year warranty from the date of original retail purchase. * No warranty against damages or loss caused by acci-dent, abuse, or natural disasters.For support, please contact the following email : [email protected] more details, check the Website : www.tittlegolf.com
TITTLE X DEVICE 10

Search “Tittle X” on Youtube
For Windows 10 & Windows 8.1
GUIDE

INSTALLATIONTITTLE X PC APP DOWNLOAD
1. Download Tittle X PC App from http://tittlegolf.com/pc/2. Unzip and run ‘setup.exe’ then a PC icon is created for Tittle X PC APP
NOTICEThe App will automatically inform the Tittle X PC App version and Tittle X firmware version if needed. All customers should update PC App and firmware.
E6GOLF SOFTWARE DOWNLOADAccess on https://e6golf.com/tittle, please click DOWNLOAD to receive the installation file.
TITTLE X INSTALLATION 12

1. Execute ‘E6_Full.exe’.2. Click NEXT button3. Select Tittle in the select manufacturer and click NEXT.
5. E6Golf
4. The user sees all progress dialog box.
Element 6Golf 1.6
icon appears when installation is complete.
TITTLE X INSTALLATION 13

E6GOLF SOFTWARE AUTHORIZATION
TITTLE X INSTALLATION
1. Execute E6golf Program on the desktop.2. Select OTHER > E6 Info.3. Simulator ID will be displayed on this E6golf information page.
4. Access on HTTPS://E6GOLF.COM/TITTLE/AUTHORIZATION and input “NAME, EMAIL, VERIFICATION CODE AND SIMULATOR ID” and then click SUBMIT button (It will be automatically approved by TruGolf within 3 business days in max and then you can use the golf courses you got. At this time you can use one golf course for free).
14

TITTLE X INSTALLATION
When using the built-in Bluetooth
1. Make sure your Bluetooth device is turned on in your computer.2. Tap the Tittle device to turn it on.3. Pair with “tittle” found in Setting > Bluetooth in Windows menu.
4. When installation is complete, run the Tittle X PC App using theTittle X icon on your desktop. Verify “Connected” in Connection Statusand press “Start” button to launch the E6Golf program automatically.
START TITTLE X
15

TITTLE X INSTALLATION
1. If you insert the Bluetooth dongle into the USB port, it will be installedautomatically by Windows 10 or Windows 8.1.
Then follow the same procedure from step ”2.” of “When using the built-in Bluetooth”
NOTICENever install the Blutooth dongle by running the program on the installationCD or downloading it from the Internet.
When using the external Bluetooth dongle
START TITTLE X
16

TITTLE X INSTALLATION
8. When you swing, the ball will fly on the screen and Swing Analysis screen is displayed.
TIP!After entering Swing Mode, if you readjust your wrists or make other movements, swing analysis may be affected. Therefore, after entering Swing Mode, avoid making any extraneous motions before beginning your backswing (i.e. do NOT Waggle).
6. Select “Play” or “Practice” Mode in the E6Golf.
*Check SWING on the Screen!
7. When the Tittle X device is attached to the Swing Stick and you assume the address position, READY Mode on the device will change automatically to SWING Mode(Smartphone will sound “READY” when you’re in “SWING” mode).
17

TITTLE X INSTALLATION
TROUBLESHOOTINGIf the Tittle X connection does not work well after the Tittle X device is paired, delete the “tittle” device from the Bluetooth Settings and pair it again.
18

TITTLE X INSTALLATION
TROUBLESHOOTINGYou may need to install a Bluetooth dongle under these circumstances If your PC doesn’t have a Bluetooth device If the Bluetooth that’s included with your PC has a signal range so narrow that, in order to maintain connection, the Tittle X device requires you to be at a distance unsafe to swing.
If you already have a built-in Bluetooth device in your PC and need toinstall a new Bluetooth dongle because the Bluetooth signal range inyour PC is narrow, you have to set the built-in Bluetooth device to“Disable” in “Settings > System > About > Device Manager > Bluetooth”
NoticeIf you alredy have a Bluetooth dongle installed on your PC, you must firstdelete the program that was installed via the CD or Internet program providedwith your Bluetooth dongle. Then you must unplug the Bluetooth dongle andreboot your PC and insert the Bluetooth dongle again and install itautomatically on Windows.
19

Search “Tittle X” on Youtube
for Windows 7 & Window 8
GUIDE

INSTALLATIONTITTLE X SMARTPHONE APP DOWNLOAD
1. Download “Tittle X” on APP STORE or GOOGLE PLAY.2. Download the App.
NOTICEThe App will be automatically updated if needed. All customers are requiredto update their firmware.
E6GOLF SOFTWARE DOWNLOADAccess on https://e6golf.com/tittle, please click DOWNLOAD to receive the installation file.
TITTLE X INSTALLATION 21

1. Execute ‘E6_Full.exe’.2. Click NEXT button3. Select Tittle in the select manufacturer and click NEXT.
5. E6Golf
4. The user sees all progress dialog box.
Element 6Golf 1.6
icon appears when installation is complete.
TITTLE X INSTALLATION 22

E6GOLF SOFTWARE AUTHORIZATION
TITTLE X INSTALLATION
1. Execute E6golf Program on the desktop.2. Select OTHER > E6 Info.3. Simulator ID will be displayed on this E6golf information page.
4. Access on HTTPS://E6GOLF.COM/TITTLE/AUTHORIZATION and input “NAME, EMAIL, VERIFICATION CODE AND SIMULATOR ID” and then click SUBMIT button (It will be automatically approved by TruGolf within 3 business days in max and then you can use the golf courses you got. At this time you can use one golf course for free).
23

NOTICEE6Golf software of the PC must be executed before Tittle X App of smartphone.
TIP!The game will want to download additional data, please allow it to do so.Until authorization is complete, you will only be able to play the Wade Hampton course.
TITTLE X INSTALLATION
3. Execute Tittle X App on your smartphone.
4. Log in if you are member or register. You can select GUEST button. 5. Place the Tittle X device beside smartphone. The device should automatically be recognized by the app.
START TITTLE X1. PC and smartphone’s WiFi must be connected to the same router.2. Launch E6Golf.
iPhoneAndroid Phone
In Android smartphone, Check NOTIFICATION.
In iPhone, Select PAIR button.
In case of iPhone, select PAIR if requested.For Android smartphone - if disconnected, pull down the notification drawerat the top of the screen and select Pairing.
24
TITTLE X INSTALLATION
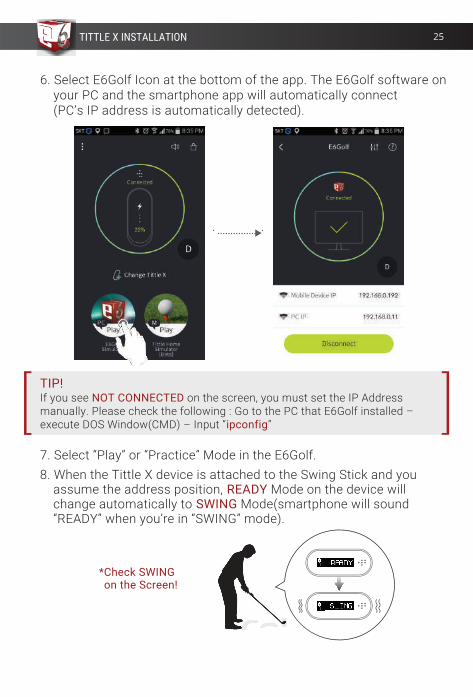
7. Select “Play” or “Practice” Mode in the E6Golf.
*Check SWING on the Screen!
6. Select E6Golf Icon at the bottom of the app. The E6Golf software on your PC and the smartphone app will automatically connect (PC’s IP address is automatically detected).
TIP!If you see NOT CONNECTED on the screen, you must set the IP Address manually. Please check the following : Go to the PC that E6Golf installed – execute DOS Window(CMD) – Input “ipconfig”
8. When the Tittle X device is attached to the Swing Stick and you assume the address position, READY Mode on the device will change automatically to SWING Mode(smartphone will sound “READY” when you’re in “SWING” mode).
25

TITTLE X INSTALLATION
9. When you swing, the ball will fly on the screen and Swing Analysis screen is displayed.
TIP!After entering Swing Mode, if you readjust your wrists or make other movements, swing analysis may be affected. Therefore, after entering Swing Mode, avoid making any extraneous motions before beginning your backswing (i.e. do NOT Waggle).
26

TITTLE X INSTALLATION
TROUBLESHOOTINGDISCONNECTED SYMPTOM BETWEEN TITTLE X DEVICE AND SMARTPHONE.
DISCONNECTED SYMPTOM BETWEEN SMARTPHONE(TITTLE X APP) AND PC(E6GOLF).
SWING NOT REGISTERING ON SCREEN.
Check the battery. Double tap the Tittle X device screen and check if it is powered on and at what level the battery is. Check if there is other Tittle X device around you. (If several Tittle X devices are turned on at the same time, it may interfere with the connection.)Check Bluetooth Mark on the Tittle X screen. In iPhone, you must select “Pair” in the “Bluetooth Pairing Request”. In iPhone, if you want to change the device, you must unpair the Tittle X device.(See: Setting > Bluetooth list) In Android if smartphone is disconnected from Tittle X device, pull down the notification drawer at the top of the screen and select PAIRING.
Check if smartphone and PC are connected to the same Router.(Same WIFI Needed.)At First it is normally connected, but sometimes the PC or Smartphone may be connected to another WIFI temporarily. Check if smartphone and PC are connected to the same WIFI.E6Golf software of the PC must be executed before Tittle X App of smartphone.If you have a firewall software installed on your PC, be sure to grant permission to use E6Golf software.
SWING must display on the screen before swinging or Swing after hearingREADY sound from smartphone.“Waggle”, slow back swings or overswings will also affect the system’s swing recognition.
27

E6Golf GUIDE

29
GETTING STARTED
LAUNCH E6GOLF Launch E6Golf from the Windows start menu or from the icon on the desktop.
MAIN MENUNavigate the MAIN MENU by TAPPING any of the following menu options:
PLAY - Start or resume a round or event.1. NEW ROUND - Start a new round of golf.2. RESUME ROUND - Resume a previously play round of golf.
PRACTICE - 1. DRIVING RANGE2. PRACTICE SESSION3. SCORING ZONE4. CHIP & PUTT
EVENTS - Connect to Online EventsOTHER -
1. INFO - Information about E6GOLF Software, including version number & dongle serial#.2. SAVE DEFAULTS
EXIT - Exit E6GOLF
GETTING STARTED

STARTING A NEW ROUND
PLAYFrom the Main Menu select PLAY. The following sub menu items are available:
PLAYERS - Add Players to a roundCOURSES - Select the desired course to playSETTINGS - Set conditions and round optionsHOLES TO PLAY - Set the desired holes to playMODES OF PLAY - PREVIOUS MENU - Return to the previous menu
PLAYERS1. To add players SELECT one of the following options:
LOGINCREATE .compete in online events.GUEST - Play without cannot compete in online events.
2. CLICK to SET the desired PROFILE IMAGE, NAME, COUNTRY, TEE, HANDICAP, HAND, or BOOST.3. To REMOVE a player TAP the LOG OUT icon on the right.
STARTING A NEW ROUND 30

COURSESNAVIGATE to the COURSES screen
NOTE: There are multiple ways to navigate between screens: tap menu items, tap directional arrows, or swipe in a horizontal direction.
1. VERTICAL SWIPE or TAP the UP/DOWN ARROW buttons to browse the COURSE LIST.2. TAP the desired course to SELECT.
STARTING A NEW ROUND
Score Card Button- TAP to view the course scorecard
31

GOLF COURSE LIST
STARTING A NEW ROUND
COURSE PACK THREEAviara Resort
Auburn Grand National RTJChateau Whistler
FrankfurterMauna Lani
Oakmont Country ClubPrinceville
Royal MelbourneThe Judge Capitol Hill RTJ
Stone CanyonThanksgiving Point
STANDARD COURSE PACK
Bay Hill Club & LodgeThe Belfry
Bountiful Golf ClubCastle Pines Golf Club
Firestone Country ClubHarbour Town Golf Links
Mauna Kea ResortPar Three Ocean
Par Three MountainGleneagles Golf Club
Pinehurst Country Club #2Bethpage Black
Torrey Pines Golf ClubTroon North Golf Club
INDIVIDUAL COURSESHoltsmark Golf Club
Losby Golf ClubGolf Resort Kunětická Hora
Club de Golf Le SorcierOslo Golf ClubPGA National
0
3
6PEBBLE BEACH PACK
Pebble Beach® Golf Links*The Links at Spanish Bay®Spyglass Hill® Golf Course
COURSE PACK ONEBarton Creek
Big HornBig Horn Canyons
Cog HillCovered Bridge
Devil’s IslandDorado BeachEmerald Dunes
LatrobeSea Island
Kiawah IslandThe Tribute at Otsego Club
COURSE PACK FOURCabo del Sol
Cambrian Ridge RTJGallery North
Greywolf
King & the BearLoch Lomond
New South Wales
Raven at South MtnSkeleton Coast
Superstition Mountain
1
4
7
COURSE PACK TWOEntrada at Snow Canyon
HapunaInnisbrook Copperhead
Kapalua BayKapalua Plantation
Kapalua VillagePelican Hill
Pinehurst Country Club #8Prairie Dunes
Phoenix Country ClubThree Canyons
Valderrama
COURSE PACK FIVELe Grand George
TaghazoutWade HamptonBandon Dunes
Owl CreekLakeside
Silver Lakes - Heartbreaker RTJSilver Lakes - Mindbreaker RTJ Silver Lakes - Backbreaker RTJ
HokuliaPanther
ST ANDREWS PACKSt Andrews Old CourseSt Andrews New Course
St Andrews Jubilee Course
2
5
8
32

SETTINGSNAVIGATE to the SETTINGS screen
NOTE: There are multiple ways to navigate between screens: tap menu items, tap directional arrows, or swipe in a horizontal direction.
TAP ANY BUTTON TO CHANGE ITS DEFAULT SETTING
MULLIGANS - Mulligans are “do-overs” – re hit without penalty.• Unlimited / None / 1 / 2 / 5 / 10
GIMMIE RANGE - Gimmie Range is the distance within which you automatically hole out with a one-putt.
• Inside 2 / 4 / 6 / 8 / 10 / feet• Player Decides• Computer Decides• Auto score• Player Putts Out
PUTTING ARROW - Shows the break and elevation changes between the ball and the hole. Red indicates downhill, Green indicates uphill.
• • Play Break - Aligns the Player to the hole, regardless of break.• Align Break - Aligns the Player in the direction of the break.
PUTTING ARROW FADE - ding
• GRID - Overlays the terrain to highlight undulations and elevation changes.
• BALL SIZE - Changes the visibility of the golf ball.
• Small / Medium / LargeTERRAIN PENALTY - the grass.
• Enabled / DisabledPIN POSITIONS -
• Preset / Easy / Medium / Hard
STARTING A NEW ROUND 33

TIME OF DAY - Changes the lighting schemes.• Morning• Midday• Afternoon• Evening
SKY TYPE - Changes the visual appearance of the sky.• Clear• Partly Cloudy• Cloudy• Random
WIND - • None• Breezy• Windy• Strong
GREEN HARDNESS - Amount of bounce the golf ball has on the green.• Soft• Moderate• Hard
GREEN SPEED - Amount of roll the golf ball has on the green.• Slow• Medium• Fast
FAIRWAY HARDNESS - Amount of bounce the golf ball has on the fairway.• Soft• Moderate• Hard
MAIN VIEW TRACER - • Solid - Tracers stay permanently visible• Comet - Tracers fade away•
TOP VIEW TRACERS - •
CAMERA• Classic Mode - camera does not follow the ball• Ball Mode - Camera follows the ball• TV Mode -
SOUND •
AUTO CONTINUE - The length of time before the game automatically continues after a shot.•
FLYBYS - These are aerial previews of each new hole.•
MEASUREMENT• Imperial - yards / feet / inches• Metric - meters / centimeters
ELEVATION - Set the desired elevation• Select Elevation - Select the desired elevation• Course Elevation - Play at the actual course elevation
STARTING A NEW ROUND 34

HOLES TO PLAYNAVIGATE to the HOLES TO PLAY screen
NOTE: There are multiple ways to navigate between screens: tap menu items, tap directional arrows, or swipe in a horizontal direction.
1. By default all 18 holes have been selected to be played in order.2. Tap CLEAR To choose any combination of holes.
HOLES CURRENTLY SELECTED - A red box indicates which hole(s) will be played and in which order. PAR is indicated in the Lower Right Corner. PLAY ORDER is displayed in the Upper Left Corner of the buttons.
HOLES AVAILABLE - Will add hole to next available spot in Holes Currently Selected.ALL 18 - Override Holes Currently Selected and play all 18 holes in the correct order.
FRONT 9 - Override Holes Currently Selected and play ONLY the front 9 from the chosen course.
BACK 9 - Override Holes Currently Selected and play ONLY the back 9 from the chosen course.
REMOVE - Removes the last hole from Holes Currently Selected window.
CLEAR - Clears ALL Holes Currently Selected.
STARTING A NEW ROUND 35

MODES OF PLAYNAVIGATE to the MODES OF PLAY screen
NOTE: There are multiple ways to navigate between screens: tap menu items, tap directional arrows, or swipe in a horizontal direction.
1. VERTICAL SWIPE or TAP the UP/DOWN ARROW buttons to browse the LIST.2. TAP the desired Mode of Play to SELECT.
NOTE: Stroke is the standard mode of play. A description is displayed of the selected Mode.
STARTSelect START SELECT any of the sub menu items.
PLAYERS - Add Players to a roundCOURSES - Select the desired course to playSETTINGS - Set conditions and round optionsHOLES TO PLAY - Set the desired holes to playMODES OF PLAY - PREVIOUS MENU - Return to the previous menu
STARTING A NEW ROUND 36

PLAYING A ROUNDON SCREEN INTERFACEUSER INTERFACE:
• E6 Menu Button• Information Box
• Course Name• Hole• Par• Distance from the ball to the pin• Player Name• Scoring• Shot Number• • Tracking System Status• Wind speed and direction• Select Club (only available with some tracking systems)
• Hole Top view
QUICK ACCESS BUTTONSTo access these features, touch/click the indicated area
1. View Scorecard2. Spot Pin
PLAYING A ROUND 37

E6 MENU
ROUND MENU:MULLIGAN: If available, undo the last shot.REPLAY: Show a replay of the last shot.SCORE CARD: Display the score card for the current round.FLY BY:NEXT HOLE: Advance ALL players to the next hole; all players receive a set score based on the mode of play.GRID:SPOT PIN: Close-up view of pin locationEXIT CURRENT ROUND: Exit RoundDIAGNOSTICS: Assists in troubleshooting tracking systemMORE: More Round Settings
IN-ROUND PRACTICE: Enter Practice Mode while in-roundMODE OF PLAY RULES: Displays rules for current ModeBACK: Return to the E6 Menu
PLAYER MENU:DROP: Drop the ball.PICK UP: Advance the current player to the next hole and receive a set score based on the mode of play. CONCEDE: Concede the hole.NOTE: This option is only available in certain modes of play, such as Match Play.
To access the in game menu Tab the E6GOLF MENU ICON in the BOTTOM LEFT CORNER while in PLAY, PRACTICE OR EVENT MODES.
PLAYING A ROUND 38

BOOST: Boost your hitting power.BACK: Return to the E6 Menu. MANAGE PLAYERS: Add, remove, or change settings of a players MORE: More Player Menu settings.
STATS: Current Round StatsLIFETIME STATS: Lifetime stats for a Player (must me logged in). SKIP OPTIONS:
SKIP PLAYER ONCE: Skip the current Player one time.SKIP PLAYER TILL END OF HOLE: current Player hits again.SKIP PLAYER TILL END OF ORDER: Allow all other Players to hit before the current Player.SKIP TEAM ONCE: Same as Skip Player Once (above) in a Team mode of play.SKIP TEAM TILL END OF HOLE: See above.
BACK: Return to the E6 Menu.
OPTIONS MENU:CAMERA MODE: Classic, Ball, or TV ModeSOUND: AUTO CONTINUE: The length of time before the game automatically continues after a shot. MAIN VIEW TRACERS: TOP VIEW TRACERS: Solid or No TracerAUTO FLY BY: MEASUREMENT: Imperial or Metric
SETTINGS MENU:GIMMIES: Select the number of gimmies.PUTT ARROW: PUTT ARROW FADE: This is the length of time the Putt Arrow is on screen.GRID:BALL SIZE: Select Small, Medium, or LargeELEVATION: Select Course Elevation to play the course at its actual elevation or Select Elevation and move the slider.
CONDITIONS MENU:GREEN SPEEDS: Select Slow, Medium, or FastGREENS HARDNESS: Select Soft, Moderate, or HardFAIRWAYS HARDNESS: Select Soft, Moderate, or HardTERRAIN PENALTY: Enable or Disable
of taller grass on your ball ON or OFF.WEATHER: Select Clear, Partly Cloudy, Cloudy, or RandomWIND: Select No, Breezy, Windy, Strong Wind
e detail in Practice.TIME OF DAY: Change the time of day. This will dramatically change the lighting on the course.
CLOSE BUTTON: Press Close to take you back to the round.
PLAYING A ROUND 39

AIMING YOUR SHOTYou are automatically aimed at either the center of the fairway or the pin, whichever is appropriate. To adjust the direction you are aimed:
1. Click or touch the terrain either on the course or in the Top View window to display the red and white striped AIM MARKER.
2. Drag the AIM MARKER to where you want to aim.3. Select the CHECK MARK button.4. To cancel the alignment choice, select CANCEL (X).
To reset the aim toward the pin or center of the fairway, display the Aim Marker and then select the RESET button.
Zooms the view closer to or farther from the Aim Marker. You can move the slider to zoom in or out.
Toggles between viewing the Aim Marker from the direction of the Ball or Flag.
PLAYING A ROUND 40

SWING ANALYSIS: POST SHOT After a shot, a variety of options are displayed:
CONTINUE: Accept the shot and continue.
NOTE: By default, if the ball is in play, CONTINUE is automatically To change this setting go to Options Menu (see Options Menu page 8).
MULLIGAN: If available, select to rehit without penalty.PENALTY REHIT: If available, select to rehit with a penalty.
NOTE: This is available only after the ball is hit out of play. The errant shot counts for one stroke and there is a one-stroke penalty.
PICKUP: Advance to the next hole and receive a set score dependent on the mode of play. DROP: If available, drop the ball in the best allowable location.
NOTE: This is available only after the ball is hit out of play and only if there is an acceptable drop location. The errant shot counts for one stroke and there is a one-stroke penalty.
REPLAYS:
1. TV
2. BALL CAM
3. FORWARD: Show a replay from the golfer’s perspective.
4. REVERSE: Show a replay from where the ball came to rest.
SWING ANALYSIS: POST SHOT 41

PRACTICEFrom the MAIN MENU Select PRACTICE then select one of the following options:
1. DRIVING RANGE2. PRACTICE SESSION 3. SCORING ZONE4. CHIP & PUTT
PRACTICE 42

DRIVING RANGE1. From the Main Menu, select PRACTICE and then DRIVING RANGE.
–OR–From the Practice Area, click or touch the E6 Cube.
2. Select CHOOSE PRACTICE AREA.3. Select DRIVING RANGE.
ON SCREEN INTERFACESHOT STATISTICS
• TOTAL: Total distance of shot(s)• CARRY: Distance of shot(s) in air• LAUNCH: Shot angle• MPH: Ball speed• TO TARGET: Distance from target• DEVIATION ANGLE/DISTANCE: Consistency of shots• DISPERSION: Tracks the spread of multiple shots.• SPIN: Ball Spin (available with some tracking systems)
IMPORTANT: The Shot Statistics Box also has a drop-down menu which is opened by clicking the arrow at the bottom of the box.
WIND GAUGE1. Click or touch the WIND GAUGE to adjust the wind settings.2. Click or touch the perimeter of the Wind Gauge to change the wind direction.3. Drag the attachment on the right up or down to change the wind speed.4. Select the Check mark button to accept the new settings; select the X button to cancel.
Note: The wind can only be adjusted in Practice, and not during regular golf play.
PRACTICE 43

SHOT PROFILE VIEW• Select a color button to have your shot(s) leave a tracer of that color. This is useful for
comparing shots.• Select the arrow buttons to increase or decrease the area displayed in the TOP VIEW &
SHOT PROFILE; select the double arrow button to reset.
CLEAR SHOT STATISTICS1. Click the arrow at the bottom of the Shot Statistics box to open the drop-down menu.2. Select RESET to clear all shots –OR– select REMOVE to clear only the last shot.
PRACTICE SESSIONPractice sessions are a way to practice inside E6 and store all of your data in the cloud. Add clubs to
game. You can also compare clubs to each to see which is the best one for you or your student.1. From the Main Menu, select PRACTICE and then PRACTICE SESSION.
–OR–From the Practice Area, click or touch the E6 Cube.
2. Select CHOOSE PRACTICE AREA.3. Select PRACTICE SESSION.
PLAYERS1. To add players SELECT one of the following options:
LOGINCREATE .compete in online events.
2. ADD additional Players (8 players max)3. To REMOVE a player TAP the LOG OUT icon.
PRACTICE 44

SESSIONSNAVIGATE to the SESSIONS screen
NOTE: There are multiple ways to navigate between screens: tap menu items, tap directional arrows, or swipe in a horizontal direction.
1. VERTICAL SWIPE or TAP the UP/DOWN ARROW buttons to browse the LIST.2. TAP the desired Practice Session to SELECT.
• SELECT ADD to create a new PRACTICE SESSION.• SELECT EDIT to modify an existing PRACTICE SESSION.• SELECT REMOVE to delete a PRACTICE SESSION.
CLUBSNAVIGATE to the CLUBS screen
NOTE: There are multiple ways to navigate between screens: tap menu items, tap directional arrows, or swipe in a horizontal direction.
1. SELECT ADD to add a CLUB to the Practice Session.2. SELECT EDIT to modify a CLUB.3. SELECT COPY to duplicate a CLUB.4. SELECT REMOVE to delete the selected CLUB.
ADD/EDIT CLUBMODIFY any of the below options when you ADD or EDIT a CLUB
• Name • Shaft Flex• Manufacturer • Loft• Model • Lie• Club Type • Color Swatch• Shaft Type
PRACTICE 45

SHOTSNAVIGATE to the SHOTS screen
NOTE: There are multiple ways to navigate between screens: tap menu items, tap directional arrows, or swipe in a horizontal direction.
1. VERTICAL SWIPE or TAP the UP/DOWN ARROW buttons to browse the LIST.2. TAP the desired Practice Session to SELECT.
• SELECT DISPLAY to view the POST SHOT ANALYSIS• SELECT DELETE to remove a SHOT.
THE SCORING ZONE1. From the Main Menu, select PRACTICE and then SCORING ZONE.
–OR–From the Practice Area, click or touch the E6 Cube.
2. Select CHOOSE PRACTICE AREA.3. Select SCORING ZONE.
DISPLAY THE SCORING ZONE1. On the Driving Range, open the drop-down menu by clicking or touching the arrow at
the bottom of the Shot Statistics box.2. Select SCORING ZONE. The Scoring Zone target is displayed on the driving range
and in the Top View window.
PRACTICE 46

MOVE OR RESIZE THE SCORING ZONE1. Open the DROP-DOWN MENU.2. Select CHANGE. The following options are now available:
• Increase Width: Expand the target.• Decrease Width: Shrink the target.• Center Target: Move the target to the center of the fairway.
3. To move the Target, click or touch and drag it.4. ACCEPT TARGET.
VIEW SHOT RESULTS1. Open the DROP-DOWN MENU.2. Select VIEW.
NOTE: The shadowed area shows the Dispersion of shots taken; the cross hairs show the Dispersion midpoint.
3. The Shot box displays the number of shots taken.4. Select NEXT or PREV to cycle through the individual shots.5. Click or touch REMOVE to delete whichever shot is highlighted.6. Drag the slider to zoom in and out.7. Click or touch RETURN to resume hitting.
EXIT THE SCORING ZONERETURN TO THE DRIVING RANGE
1. Open the DROP-DOWN MENU.2. Select DRIVING RANGE.
EXIT OR SWITCH PRACTICE AREAS:1. Click or touch the E6 CUBE.2. Select EXIT PRACTICE to exit or CHOOSE PRACTICE AREA to switch Practice Areas.
VIEW SHOT RESULTS
PRACTICE 47

CHIP & PUTT1. From the Main Menu, select PRACTICE and then CHIP & PUTT.
–OR–From the Practice Area, click or touch the E6 MENU, and then select CHOOSE PRACTICE AREA.
2. Select CHIP & PUTT.3. Select the FLAG button in the top right corner.4. Move the Flag icon to – or click/touch – where you want the hole to be.5. Select the BALL button.6. Move the Ball icon to – or click/touch – where you want to putt from.
and the pin are displayed in the upper right corner.
7. Click the CHECK MARK button to accept the settings and start practice.8. Click the (X) button to return to the last setting.
READ CHIP OR PUTT 1. Click or touch anywhere on the terrain to display the AIM MARKER & GRID. 2. Move the AIM MARKER & GRID to highlight the undulations of the terrain.
NOTE: Red indicates a downhill break, green uphill. 3. Click the BALL button to toggle between an elevated and ground level view. 4. In the elevated view, click FLAG button to toggle between a view from behind the pin and
a view from behind the ball. NOTE: While in the elevated view you can move the slider to zoom in or out.
5. To set up in a direction other than at the pin, you must be at ground level. Click or touch anywhere on the terrain to display the AIM MARKER & GRID, move it to where you want to face, and then select the CHECK MARK button. NOTE: To reset view to face the pin, click or touch the terrain (to display the AIM MARKER & GRID) and then click the FLAG button.
PRACTICE 48

CHANGE THE BALL AND/OR PIN POSITION 1. Click the ARROW at the bottom of the Shot Statistics box in the upper left corner to open the
drop-down menu. 2. Select CHANGE.
ONLINE EVENTSFrom the MAIN MENU, select EVENT.
PLAYERS1. To add players SELECT one of the following options:
LOGINCREATE .compete in online events.GUEST - Guests cannot compete in online events.
2. ADD additional Players (8 players max)3. To REMOVE a player TAP the LOG OUT icon.
EVENTSNAVIGATE to the EVENTS screen
NOTE: There are multiple ways to navigate between screens: tap menu items, tap directional arrows, or swipe in a horizontal direction.
1. SELECT an EVENT by TAPPING on a row in the LIST.2. DETAILS of the Event will be displayed automatically.
DETAILS
ONLINE EVENTS 49

STARTSelect START to begin the EVENT.
–OR–NAVIGATE back to EVENTS to select another EVENT.NOTE: There are multiple ways to navigate between screens: tap menu items, tap directional arrows, or swipe in a horizontal direction.
CREATE EVENTCREATED EVENTS ARE ONLY AVAILABLE ON YOUR LOCAL SYSTEM.From the MAIN MENU, select EVENT.
PLAYERS1. LOGIN2. Navigate to EVENTS
NOTE: There are multiple ways to navigate between screens: tap menu items, tap directional arrows, or swipe in a horizontal direction.
EVENTS1. SELECT CREATE.2. SELECT the type of EVENT.
a. Closest to the Pinb. Longest Drivec. Stroke Play
3. Set the desired OPTIONS for the EVENT.4. Tap SAVE
5. Select the EVENT by TAPPING on the row in the LIST. 6. DETAILS of the Event will be displayed automatically.7. Select START to begin the EVENT.
ONLINE EVENTS 50

System Requirements:i3, i5, i7 (2.0Ghz or equivalent), 4GB RAM,25GB free hard drive space, DVD drive, Windows 7|8|101GB NVIDIA GTX 460 / ATI Radeon HD 6000 Series or higher
E6GOLF.COM
TITTLEGOLF.COM
by TRUGOLF
TM