when using windows® when using mac os x® - elecom€¦ · * the sample website used here is the...
TRANSCRIPT

- 1 -
Safety Precautions
Step1 Check USB portsCheck the USB port on your computer.
Any USB port may be used. ●This product can be connected to a USB hub. However, it may not work ●depending on the power supply capability of the USB hub.
Step2 Connecting the Mouse Activate the PC
If Windows® prompts you to choose an account (a user name) when it starts up, be sure to log ●on using an administrator account.Wait until Windows® has started up completely. ●
Insert the product's USB connector into a PC USB port.
USB Port
USB connector
Insert here.
Carefully check the orientation of the connector and the place where you will connect the ●USB connector.If you feel strong resistance when inserting the USB connector, check that the shape and ●orientation of the connector is correct. Using excessive force may damage the connector and cause injury.Do not touch the USB connector terminals. ●
The Windows mouse driver is installed automatically.
Step3 Checking operationCheck that the mouse scrolls up and down correctly in Windows® Internet Explorer.
From the [Start] menu, select [All Programs], and then [Internet Explorer].Internet Explorer will launch.
Display your favourite web site in Internet Explorer and change the size of the window so that the vertical scrollbar appears.* The sample website used here is the ELECOM homepage.
Scrollbar
Scroll the wheel back and forth.
The mouse is operating normally if the screen moves up and down as you scroll the wheel.
In applications that do not support scrolling, the screen will not move when you scroll the wheel.
Click either of the links on the page to proceed to the next page.
Operation is normal if pressing the Back button ( ) takes you to the previous page and pressing the Forward button ( )takes you to the next page.
In certain applications, the function will not work when you press the Back or Forward buttons.
USB port
When using Windows®
Meaning of symbols��
WARNING Failure to observe precautions may result in serious personal injury or death due to fire, electric shock, or other causes.
CAUTION Failure to observe precautions may result in personal injury due to electric shock or other causes, and may damage other equipment.
Prohibited action
Mandatory action
Situation that needs attention
Notes and reference information
Observe these precautions carefully to avoid personal injury, damage, fire, and other problems.
WARNINGIf a foreign object (water, metal chip, etc.,) enters the product, immediately stop using the product and disconnect it from the PC. If you continue to use the product under these conditions, it may cause a fire or electric shock.
If an abnormality is found with this product (emission of heat, smoke or abnormal smell from the product), or if a foreign object (water, metal chip, etc.) enters the product, immediately stop using the product and disconnect the product from the PC. After doing this, contact the retailer from whom you purchased the product.If you continue to use the product under these conditions, it may cause a fire or electric shock.
Do not drop or hit this product.If this product is damaged, immediately stop using the product and disconnect the product from the PC. After doing this, contact the retailer from whom you purchased the product.If you continue to use the product in a damaged condition, it may cause a fire or electric shock.
Do not attempt to disassemble, modify or repair this product by yourself, as this may cause a fire, electric shock or product damage.
Do not put this product in fire, as the product may burst, resulting in a fire or injury.
Do not connect or disconnect the connector with a wet hand, modify the connector or bend it forcibly, as this may cause a fire or electric shock.
CAUTIONDo not place this product in any of the following environments:
In a car exposed to sunlight, a place exposed to direct sunlight, or a place that becomes hot (around ya heater, etc.)In a moist place or a place where condensation may occur yIn an uneven place or a place exposed to vibration yIn a place where a magnetic field is generated (near a magnet, etc.) yIn a dusty place y
This product does not have a waterproof structure. Use and store this product in a place where the product body will not be splashed with water or other liquid.Rain, water mist, juice, coffee, steam or sweat may also cause product damage.
Do not use this product with any device that may significantly affect other equipment in the event ●that it malfunctions.If this product is used on a transparent surface such as glass or a highly reflective surface such as ●a mirror, the optical sensor will not function correctly and mouse cursor movement will become unstable.When not using the mouse for one month or more, remove the connector from the PC. ●When you no longer need to use this product, be sure to dispose of it in accordance with the local ●ordinances and laws of your area.Avoid looking directly at the light of the sensor as doing so may cause eye damage. ●
Cleaning the Mouse��
If the product body becomes dirty, wipe it with a soft, dry cloth.
Use of a volatile liquid (paint thinner, benzene, alcohol, etc.) may affect the material quality and colour of the product.
Package ContentsThis product’s packaging contains the items listed below. Before using the product, check that all items are present. We make every effort to ensure that all products are packaged correctly. However, in the event that an item is missing or damaged, contact the retailer from whom you purchased the product.
Mouse x1 (cable length: 1.0 m)• User’s Manual x1•
Part Names
The illustration depicts M-M8UR, but part names and functions are the same for M-M9UR.
⑦
(Bottom view)
a WheelThe wheel can be turned back and forward with your finger or pressed like a button to operate the PC.
Right buttonUsed for right-click operation.
Left buttonUsed for left-click operation.
dForward button/eBack button
Forward buttonProceeds to the next
browser screen
Back buttonReturns to the previous
browser screen
Back buttonPerforms the back action in a web browser.
Forward buttonPerforms the forward action in a web browser.
To use the Back and Forward buttons with a Mac, you need to install the ELECOM Mouse Assistant 2 Mac OS X version that can be downloaded from the ELECOM website.
Using the button allocation functions (See reverse)
f USB connector (Male)Connected to a PC USB port.
g Optical sensorIlluminates red when the mouse body is turned on. When the mouse body is moved, this sensor detects mouse movement.* Avoid looking directly at the light of the sensor as doing so may cause eye damage.
5-button optical mouse
M-M8UR SereisM-M9UR Series
User's Manual
Thank you for purchasing the ELECOM M-M8UR/M-M9UR Series 5-button optical mouse.This manual describes the operating instructions and safety precautions for using the M-M8UR/M-M9UR Series. Ensure that you have read this manual before using the product. After reading this manual, store it somewhere safe for future reference.* Except in certain cases, the M-M8UR/M-M9UR Series is referred to as “this product” in this manual.
Step1 Check USB portsCheck the USB port on your computer.
Any USB port may be used. ●This product can be connected to a USB hub. However, it may not work ●depending on the power supply capability of the USB hub.
Step2 Connecting the Mouse Start up your Mac.
Wait until Mac OS X has started up completely. ●
Connect the product's USB connector to a USB port on your Mac.
USB port
USB connector
Insert here.
Carefully check the orientation of the connector and the place where you will connect the ●USB connector.If you feel strong resistance when inserting the USB connector, check that the shape and ●orientation of the connector is correct. Using excessive force may damage the connector and cause injury.Do not touch the USB connector terminals. ●
The driver is installed automatically.
Step3 Checking operationCheck that the vertical and horizontal scrolling functions are working correctly in Safari.
Click the Safari icon in the Dock.Safari will launch.
If Safari is not in the Dock, double-click the Safari icon in the Applications folder.
Display your favourite web site in Safari and change the size of the window so that the vertical and horizontal scrollbars appear.* The sample website used here is the ELECOM homepage.
Scrollbar
Scroll the wheel back and forth.
The mouse is operating normally if the screen moves up and down as you scroll the wheel.
In applications that do not support scrolling, the screen will not move when you scroll the ●wheel.To use the Back and Forward buttons with a Mac, you need to install the ELECOM Mouse ●Assistant 2 Mac OS X version that can be downloaded from the ELECOM website. Proceed to “Using the button allocation function” on the reverse of this sheet.
USB port
When using Mac OS X®
Disconnecting the Mouse��
This product is hot-pluggable. It is possible to disconnect the mouse when PC is running.
Operation may become unstable if the mouse is disconnected and reconnected several times when PC is running. If this occurs, restart PC.
- 2 -
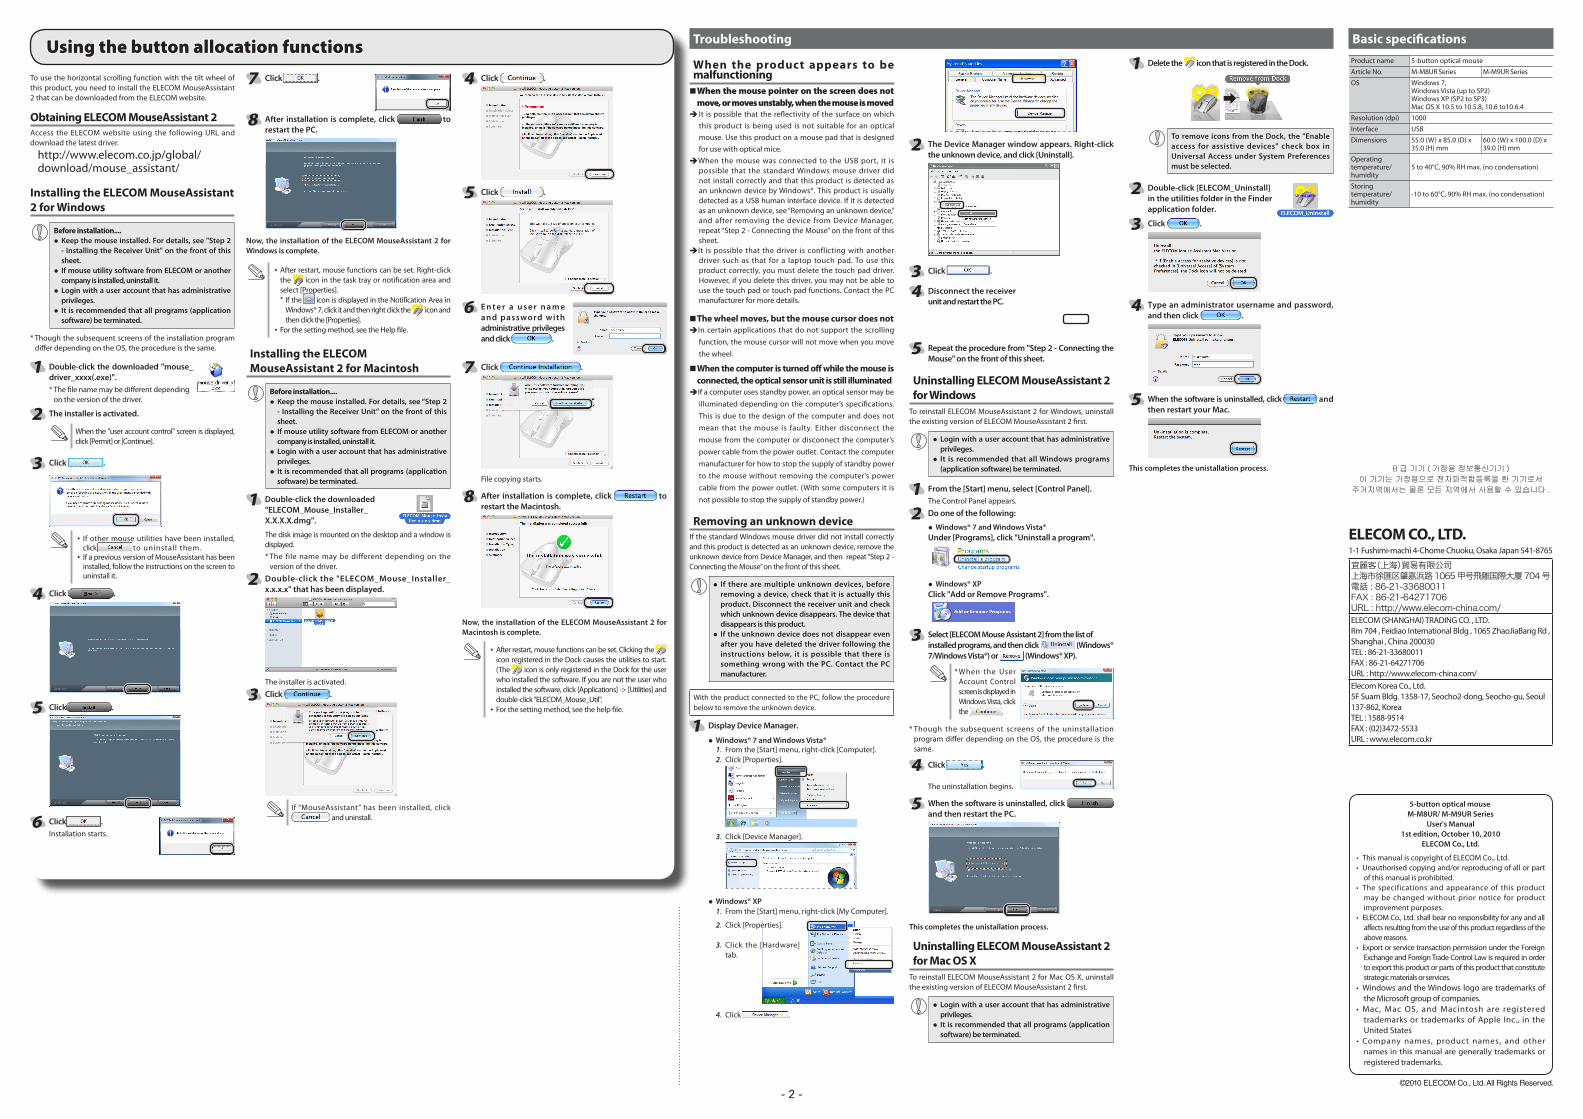
Troubleshooting
The Device Manager window appears. Right-click the unknown device, and click [Uninstall].
Click .
Disconnect the receiver unit and restart the PC.
Repeat the procedure from "Step 2 - Connecting the Mouse" on the front of this sheet.
Uninstalling ELECOM MouseAssistant 2 for Windows
To reinstall ELECOM MouseAssistant 2 for Windows, uninstall the existing version of ELECOM MouseAssistant 2 first.
Login with a user account that has administrative ●privileges.It is recommended that all Windows programs ●(application software) be terminated.
From the [Start] menu, select [Control Panel].The Control Panel appears.
Do one of the following:
Windows® 7 and Windows Vista® ● Under [Programs], click "Uninstall a program".
Windows® XP ● Click "Add or Remove Programs".
Select [ELECOM Mouse Assistant 2] from the list of installed programs, and then click (Windows® 7/Windows Vista®) or (Windows® XP).
* When the User Account Control screen is displayed in Windows Vista, click the .
* Though the subsequent screens of the uninstallation program differ depending on the OS, the procedure is the same.
Click .
The uninstallation begins.
When the software is uninstalled, clickand then restart the PC.
This completes the unistallation process.
Uninstalling ELECOM MouseAssistant 2 for Mac OS X
To reinstall ELECOM MouseAssistant 2 for Mac OS X, uninstall the existing version of ELECOM MouseAssistant 2 first.
Login with a user account that has administrative ●privileges.It is recommended that all programs (application ●software) be terminated.
Delete the icon that is registered in the Dock.
To remove icons from the Dock, the "Enable access for assistive devices" check box in Universal Access under System Preferences must be selected.
Double-click [ELECOM_Uninstall] in the utilities folder in the Finder application folder.
Click .
Type an administrator username and password, and then click .
When the software is uninstalled, click and then restart your Mac.
This completes the unistallation process.
Basic specificationsProduct name 5-button optical mouse
Article No. M-M8UR Series M-M9UR Series
OS Windows 7, Windows Vista (up to SP2)Windows XP (SP2 to SP3)Mac OS X 10.5 to 10.5.8, 10.6 to10.6.4
Resolution (dpi) 1000
Interface USB
Dimensions 55.0 (W) x 85.0 (D) x 35.0 (H) mm
60.0 (W) x 100.0 (D) x 39.0 (H) mm
Operating temperature/humidity
5 to 40°C, 90% RH max. (no condensation)
Storing temperature/humidity
-10 to 60°C, 90% RH max. (no condensation)
When the product appears to be malfunctioning
When the mouse pointer on the screen does not ��move, or moves unstably, when the mouse is moved
It is possible that the reflectivity of the surface on which this product is being used is not suitable for an optical mouse. Use this product on a mouse pad that is designed for use with optical mice.
When the mouse was connected to the USB port, it is possible that the standard Windows mouse driver did not install correctly and that this product is detected as an unknown device by Windows®. This product is usually detected as a USB human interface device. If it is detected as an unknown device, see “Removing an unknown device,” and after removing the device from Device Manager, repeat “Step 2 - Connecting the Mouse” on the front of this sheet.
It is possible that the driver is conflicting with another driver such as that for a laptop touch pad. To use this product correctly, you must delete the touch pad driver. However, if you delete this driver, you may not be able to use the touch pad or touch pad functions. Contact the PC manufacturer for more details.
The wheel moves, but the mouse cursor does not��In certain applications that do not support the scrolling
function, the mouse cursor will not move when you move the wheel.
When the computer is turned off while the mouse is ��connected, the optical sensor unit is still illuminated
If a computer uses standby power, an optical sensor may be illuminated depending on the computer’s specifications. This is due to the design of the computer and does not mean that the mouse is faulty. Either disconnect the mouse from the computer or disconnect the computer’s power cable from the power outlet. Contact the computer manufacturer for how to stop the supply of standby power to the mouse without removing the computer’s power cable from the power outlet. (With some computers it is not possible to stop the supply of standby power.)
Removing an unknown deviceIf the standard Windows mouse driver did not install correctly and this product is detected as an unknown device, remove the unknown device from Device Manager, and then repeat “Step 2 - Connecting the Mouse” on the front of this sheet.
If there are multiple unknown devices, before ●removing a device, check that it is actually this product. Disconnect the receiver unit and check which unknown device disappears. The device that disappears is this product.If the unknown device does not disappear even ●after you have deleted the driver following the instructions below, it is possible that there is something wrong with the PC. Contact the PC manufacturer.
With the product connected to the PC, follow the procedure below to remove the unknown device.
Display Device Manager.
Windows® 7 and Windows Vista® ●1. From the [Start] menu, right-click [Computer].2. Click [Properties].
3. Click [Device Manager].
Windows® XP ●1. From the [Start] menu, right-click [My Computer].
2. Click [Properties].
3. Click the [Hardware] tab.
4. Click .
To use the horizontal scrolling function with the tilt wheel of this product, you need to install the ELECOM MouseAssistant 2 that can be downloaded from the ELECOM website.
Obtaining ELECOM MouseAssistant 2Access the ELECOM website using the following URL and download the latest driver.
http://www.elecom.co.jp/global/download/mouse_assistant/
Installing the ELECOM MouseAssistant 2 for Windows
Before installation....Keep the mouse installed. For details, see "Step 2 ●- Installing the Receiver Unit" on the front of this sheet.If mouse utility software from ELECOM or another ●company is installed, uninstall it.Login with a user account that has administrative ●privileges.It is recommended that all programs (application ●software) be terminated.
* Though the subsequent screens of the installation program differ depending on the OS, the procedure is the same.
Double-click the downloaded "mouse_driver_xxxx(.exe)".* The file name may be different depending
on the version of the driver.
The installer is activated.
When the "user account control" screen is displayed, click [Permit] or [Continue].
Click .
If other mouse utilities have been installed, • click to uninstall them.If a previous version of MouseAssistant has been • installed, follow the instructions on the screen to uninstall it.
Click .
Click .
Click .Installation starts.
Click .
After installation is complete, click to restart the PC.
Now, the installation of the ELECOM MouseAssistant 2 for Windows is complete.
After restart, mouse functions can be set. Right-click • the icon in the task tray or notification area and select [Properties].* If the icon is displayed in the Notification Area in
Windows® 7, click it and then right click the icon and then click the [Properties].
For the setting method, see the Help file.•
Installing the ELECOM MouseAssistant 2 for Macintosh
Before installation....Keep the mouse installed. For details, see “Step 2 ●- Installing the Receiver Unit” on the front of this sheet.If mouse utility software from ELECOM or another ●company is installed, uninstall it.Login with a user account that has administrative ●privileges.It is recommended that all programs (application ●software) be terminated.
Double-click the downloaded "ELECOM_Mouse_Installer_X.X.X.X.dmg".
The disk image is mounted on the desktop and a window is displayed.* The file name may be different depending on the
version of the driver.
Double-click the "ELECOM_Mouse_Installer_x.x.x.x" that has been displayed.
The installer is activated.
Click .
If “MouseAssistant” has been installed, click and uninstall.
Click .
Click .
E n t e r a u s e r n a m e and password with administrative privileges and click .
Click .
File copying starts.
After installation is complete, click to restart the Macintosh.
Now, the installation of the ELECOM MouseAssistant 2 for Macintosh is complete.
After restart, mouse functions can be set. Clicking the• icon registered in the Dock causes the utilities to start. (The icon is only registered in the Dock for the user who installed the software. If you are not the user who installed the software, click [Applications] -> [Utilities] and double-click "ELECOM_Mouse_Util".For the setting method, see the help file.•
Using the button allocation functions
5-button optical mouseM-M8UR/ M-M9UR Series
User's Manual1st edition, October 10, 2010
ELECOM Co., Ltd.
This manual is copyright of ELECOM Co., Ltd.• Unauthorised copying and/or reproducing of all or part • of this manual is prohibited.The specifications and appearance of this product • may be changed without prior notice for product improvement purposes.ELECOM Co., Ltd. shall bear no responsibility for any and all • affects resulting from the use of this product regardless of the above reasons.Export or service transaction permission under the Foreign • Exchange and Foreign Trade Control Law is required in order to export this product or parts of this product that constitute strategic materials or services.Windows and the Windows logo are trademarks of • the Microsoft group of companies.Mac, Mac OS, and Macintosh are registered • trademarks or trademarks of Apple Inc., in the United StatesCompany names, product names, and other • names in this manual are generally trademarks or registered trademarks.
©2010 ELECOM Co., Ltd. All Rights Reserved.
ELECOM CO., LTD.1-1 Fushimi-machi 4-Chome Chuoku, Osaka Japan 541-8765
宜麗客(上海)貿易有限公司上海市徐匯区肇嘉浜路 1065 甲号飛雕国際大厦 704 号電話 : 86-21-33680011FAX : 86-21-64271706URL : http://www.elecom-china.com/ELECOM (SHANGHAI) TRADING CO. , LTD.Rm 704 , Feidiao International Bldg , 1065 ZhaoJiaBang Rd , Shanghai , China 200030TEL : 86-21-33680011FAX : 86-21-64271706URL : http://www.elecom-china.com/Elecom Korea Co., Ltd.5F Suam Bldg. 1358-17, Seocho2-dong, Seocho-gu, Seoul 137-862, KoreaTEL : 1588-9514FAX : (02)3472-5533URL : www.elecom.co.kr
B 급 기기 ( 가정용 정보통신기기 ) 이 기기는 가정용으로 전자파적합등록을 한 기기로서
주거지역에서는 물론 모든 지역에서 사용할 수 있습니다 .