wallet - verypurplepersonverypurpleperson.com/wp-content/uploads/2010/02/vpp_wallet.pdf · 1. mark...
TRANSCRIPT
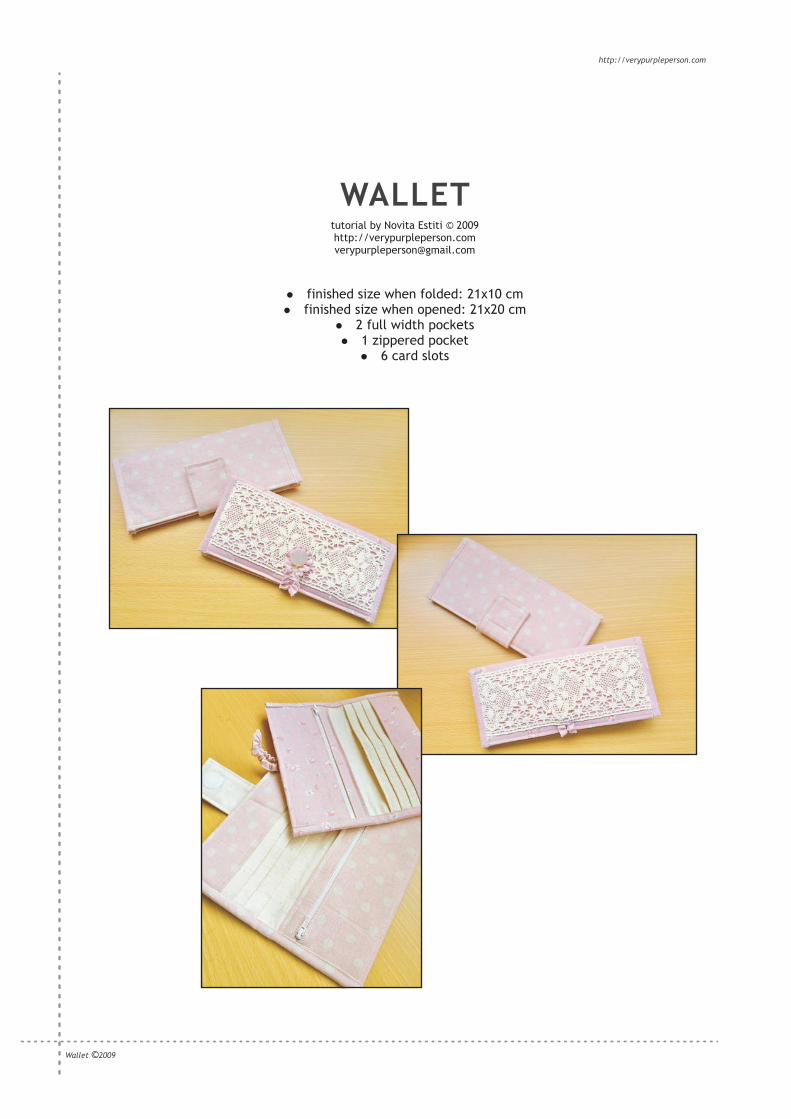
WALLET
lfinished size when folded: 21x10 cmlfinished size when opened: 21x20 cm
l2 full width pocketsl1 zippered pocket
l6 card slots
tutorial by Novita Estiti © 2009http://[email protected]
Wallet 2009©
http://verypurpleperson.com
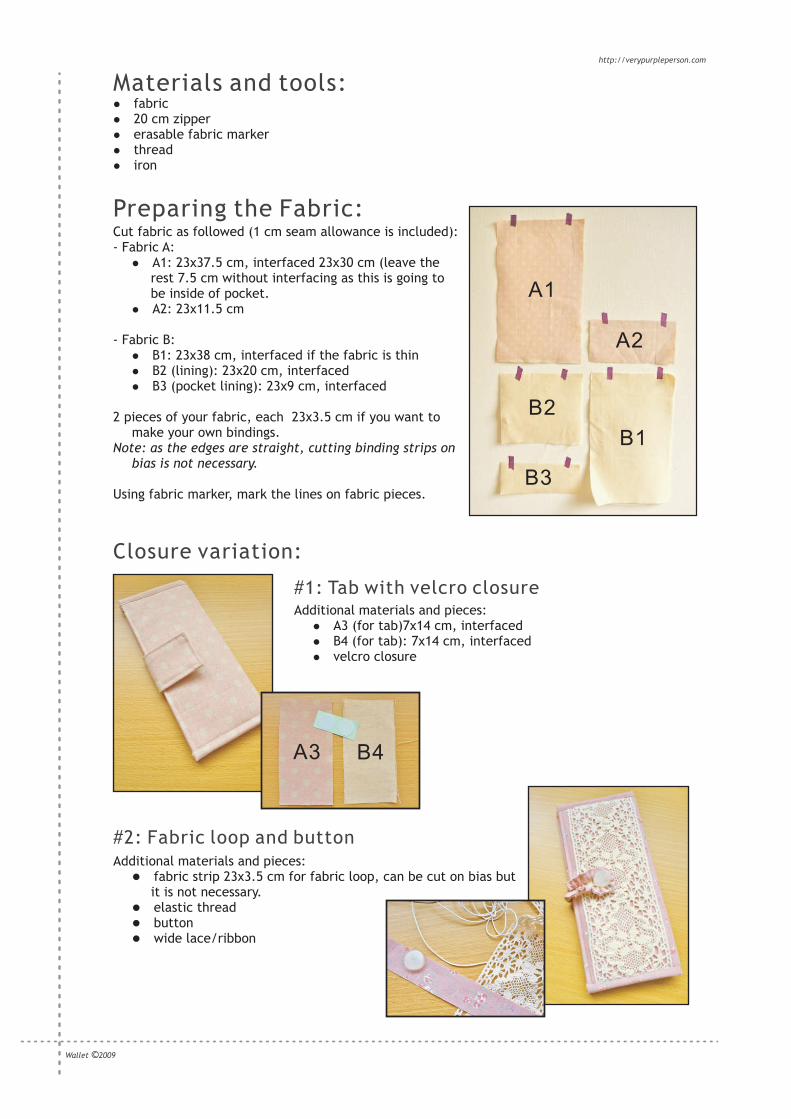
lfabricl20 cm zipperlerasable fabric markerlthreadliron
Materials and tools:
Closure variation:
Additional materials and pieces:lA3 (for tab)7x14 cm, interfacedlB4 (for tab): 7x14 cm, interfacedlvelcro closure
Additional materials and pieces:lfabric strip 23x3.5 cm for fabric loop, can be cut on bias but
it is not necessary.lelastic threadlbuttonlwide lace/ribbon
Preparing the Fabric:Cut fabric as followed (1 cm seam allowance is included):- Fabric A:
lA1: 23x37.5 cm, interfaced 23x30 cm (leave the rest 7.5 cm without interfacing as this is going to be inside of pocket.
lA2: 23x11.5 cm
- Fabric B:lB1: 23x38 cm, interfaced if the fabric is thinlB2 (lining): 23x20 cm, interfacedlB3 (pocket lining): 23x9 cm, interfaced
2 pieces of your fabric, each 23x3.5 cm if you want to make your own bindings.
Note: as the edges are straight, cutting binding strips on bias is not necessary.
Using fabric marker, mark the lines on fabric pieces.
#1: Tab with velcro closure
#2: Fabric loop and button
A1
A2
B2
B3
B1
A3 B4
Wallet 2009©
http://verypurpleperson.com

Marking lines on fabrics:
F a b r i c A
5
5
20
6 .5
12 3
9
1 .51
1 1 .5
2 3
A 2
9
2 3
B 3
F a b r i c B
2 3
20 B 2
9
7
5
6
5
6
38
23
B 1
37 .5 A 1
interface from bottom line
unti l this l ine.
Wallet 2009©
http://verypurpleperson.com

Fold on all lines and iron the crease. Notice the accordion arrangement for B1.
Pockets:
5
1A 11
A 2
9
B 1
9
6
Put zipper foot on sewing machine.
Place the folded 1 cm of A1 on one side of zipper and topstitch on the zipper.
Place the folded 1 cm of A2 on the other side of zipper and topstitch.
Note:
1. Open the zipper halfway before started sewing, then pin zipper to the fabric.
2. Sew until almost reaching the zipper pull.
3. Put the needle down and lift the sewing foot, then close the zipper. A little wriggling might be needed here, but don’t worry, the needle will keep the fabric in place.
4. After closing the zipper, put the sewing foot again and continue sewing until reaching the end.
Sewing the zipper:
1 2
34
Wallet 2009©
http://verypurpleperson.com
topstitch
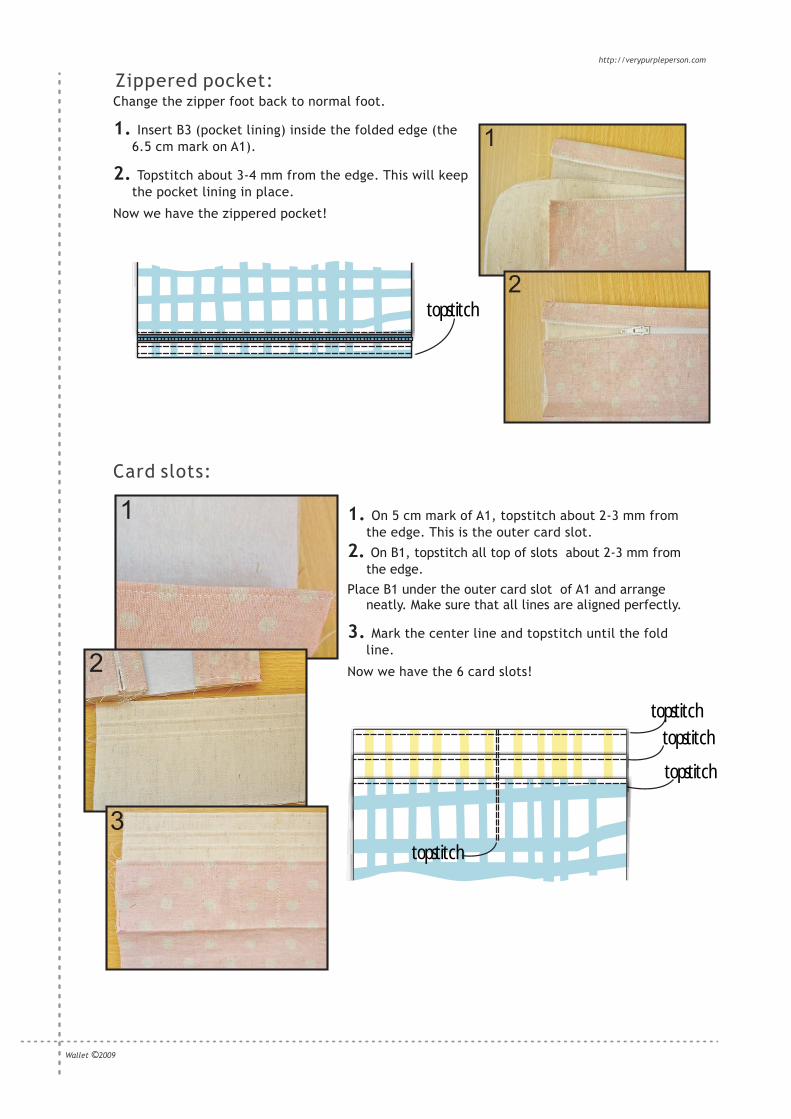
Change the zipper foot back to normal foot.
1. Insert B3 (pocket lining) inside the folded edge (the 6.5 cm mark on A1).
2. Topstitch about 3-4 mm from the edge. This will keep the pocket lining in place.
Now we have the zippered pocket!
1. On 5 cm mark of A1, topstitch about 2-3 mm from the edge. This is the outer card slot.
2. On B1, topstitch all top of slots about 2-3 mm from the edge.
Place B1 under the outer card slot of A1 and arrange neatly. Make sure that all lines are aligned perfectly.
3. Mark the center line and topstitch until the fold line.
Now we have the 6 card slots!
Zippered pocket:
topstitch
topstitch
topstitch
topstitch
1
Card slots:
1
2
2
3
Wallet 2009©
http://verypurpleperson.com

1. Mark velcro placement on wallet, about 2 cm from the folded edge. Sew velcro in place.
Mark velcro placement on B3 tab, about 2 cm from the raw edge. Sew velcro in place.
2. Fold the top and bottom of A3 and B4 1 cm from the edge, iron. Put right sides of A3 and B4 together and sew the sides with 1 cm allowance.
3. Turn right sides out and iron. Now we have a tab with the top and bottom still open. Topstitch all around.
4. Mark tab placement on wallet, 4 cm from the edge. Sew tab on wallet. You can sew the tab with a rectangle shape, or put an X inside.
Note: this is also the right time to sew embell ishment on the outer side of wallet if preferred.
#1 Tab with velcro:
Wallet closure
o r
1
2
Fold the fabric strip as if making a 1 cm binding. You can also use a binding maker to do this.
Topstitch 1 mm from the edge.
1. Using a long blunt needle, thread thin elastic inside. Pull elastic until the fabric tube measured about 14 cm.
2. Mark loop placement on the right side of A1, on the center point of the edge line, about 1-1.5 cm from the edge.
3. Put loop on the mark and sew in place. Sew lace/ribbon across the wallet, over the loop. This will cover the raw edges of fabric loop.
4. If you want symmetrical look, sew lace/ribbon across the other side of wallet.
#2 Fabric loop and button:
1
3 4
23
4
Wallet 2009©
http://verypurpleperson.com

Place B2 (lining) on wallet under all pockets, arrange all folds neatly.
Make sure that all edges are aligned to each other.
Notes: to ensure fitting, trim the edges of inner pieces if necessary.
Topstitch the top and bottom folded edges, catching all layers.
Measure wallet at 21 cm width, or mark each side at 10.5 cm from center line of wallet.
Baste the sides and trim the sides so that the wallet width is now 21 cm.
Sew binding strips on both edges of the wallet.
For variation #2, sew button securely on the outer side of wallet, about 4 cm from the edge.
Assembling all pieces:
Finishing:
Now make more! Combine different colours and patterns together. You can also use snap-on button, magnetic closure, or plain elastic without the fabric loop.
You’re done!
You may use the finished products for both personal and commercial use (craft shops or markets only - no mass production).
Please do not pass off this tutorial as your own.
Thank you! (^.^)
This is a free tutorial
Wallet 2009©
http://verypurpleperson.com