vfr communications for idiots - west wings inc. · pdf filevfr communications for idiots gary...
TRANSCRIPT

VFR COMMUNICATIONS
FOR IDIOTS
Gary Gandy
A
CRANIUM RECTUM EXTRACTUS
PUBLICATION
INTRODUCTION
The crowded nature of today’s aviation environment and the affordability of VHF transceivers
for general aviation aircraft have caused the development of two-way radio communication skills
to be included in a modern flight instruction curriculum. While radio communication is not
required at uncontrolled airports, safety is greatly enhanced by the use of proper radio technique.
Moreover, the inclusion of more and more airspace under the positive control of Air Traffic
Control (ATC), inside which two-way radio communication is mandatory, has made competency
in radio skills necessary if general aviation aircraft are to be fully utilized.
This article has been written to introduce the primary pilot to current radio communication
techniques by using familiar examples and by avoiding confusing technobabble. Please
remember that the phraseology and techniques presented here are not carved in stone! Fashions
in radio communications have changed in the past, and they will certainly change in the future to
satisfy the requirements of an evolving aviation environment. These recommendations should
provide a starting point that will allow each pilot to develop an individual style within a
framework of efficient communications.
RADIO TECHNIQUE
1. Make sure the radio is audible. Select the TEST position or turn down the squelch until static
can be heard. Turn up the volume to the desired level, then deselect TEST or turn up the
squelch until the static is eliminated. Don’t miss critical radio calls just because the volume
is too low. This is a very common cause of “communication failure.”
2. Make sure that all microphone jacks are completely plugged in, including the hand mike! If
you are using a push-to-talk switch, check both jacks for security. Failure to assure this will
prevent your voice from being transmitted. This is the most common form of radio
failure! If you hear the air traffic controller say, “Aircraft calling (tower), carrier only, no
modulation,” this is almost certainly your problem.

Also, if the aircraft has concealed jacks, such as in the Cessna 150 or 152 with factory
wiring, make sure that the headset microphone jack and the hand microphone jack are not
switched. Jacks in these aircraft are located out of sight beneath the control panel, making
this mistake easy to make.
3. If the aircraft you are flying is equipped with an audio panel, make sure you know how to use
it. Improper audio panel operation is the second-most common form of “radio failure!” If
you are unfamiliar with this type of equipment, get some advice before you use it. (See
Appendix A)
4. Place the microphone close to you lips, perhaps even touching them. If you are using a hand
mike, make sure that your finger is not covering the noise-canceling opening on the back or
top of the mike. Failure to follow these instructions will cause only unintelligible noise to be
transmitted.
5. Listen before you transmit, especially if you have just changed frequencies. Simultaneous
transmissions are counter-productive. Make sure the frequency is clear. Also, you may hear
exactly what you need to know without transmitting.
6. Think before you transmit. Knowing what you want to say will shorten the transmission,
increasing efficiency of communications. Keeping the microphone switch depressed while
you think of what you want to say will simply congest the frequency and perhaps deprive
another pilot of critical information from the controller.
7. Speak clearly. Communication of information requires that the information be received and
understood, as well as transmitted. Adherence to the phraseology is preferred, but not
absolutely required. In any event make every effort to ensure that your meaning is clear.
8. If you don’t receive an immediate reply to your transmission, be patient. The air traffic
controller or flight service station (FSS) specialist you are calling has likely received your
call, and will answer as soon as workload permits.
9. Always use your full aircraft call sign when making the initial contact with a controller or
FSS specialist. If the controller shortens your call sign to the last three characters (which is
the common practice), then you may use the shortened form in your further transmissions to
that controller. If you are handed off to another controller, use your full call sign. The full
call sign should always be used, however, when there are two or more aircraft on the
frequency with similar call signs (Example: “Cessna Three Three Three Zulu Hotel” and
“Cessna Three Three Three Zero Hotel”). The controller will often warn you of this
situation.

GROUND STATION TERMINOLOGY
The following examples demonstrate the proper form of address for ground facilities:
Airport Unicom………………………………………………...…… “Huntsville Unicom”
Common Traffic Advisory Frequency (CTAF)………………………. “Navasota Traffic”
Airport Control Tower……………………………………………… “Easterwood Tower”
Airport Ground Control…………………………………….……… “Easterwood Ground”
Flight Service Station (FSS)……………………………….. “Montgomery County Radio”
Clearance Delivery…………………………………….…… “Austin Clearance Delivery”
Air Route Traffic Control Center (ARTCC)…….………………..……. “Houston Center”
Radar Approach Control………………….……………………….….. “Austin Approach”
Radar Departure Control……………………………………..………. “Hobby Departure”
PROCEDURES AT UNCONTROLLED AIRPORTS
Airport Advisories
If an airport advisory is desired when approaching an uncontrolled airport with an attended
unicom, the following format should be used:
Example:
“Huntsville Unicom, Cessna Two One Two Bravo Sierra, five miles northwest, inbound for
landing, airport advisory please.”
Notes:
Information obtained from an attended unicom is advisory in nature only! It must NEVER
be regarded as any form of air traffic control.
Unicom facilities are often not attended. If airport personnel are fueling aircraft, mowing
grass, etc., you may not get a reply to your request. Providing airport advisories is not a
mandatory duty of airport personnel, and you should not expect or demand it.
If an airport depicted on an aeronautical chart has a Common Traffic Advisory Frequency
(CTAF) of 122.9 (also known as Multicom), it does not have an attended unicom. Asking
for an airport advisory on this frequency is a waste of time and VHF bandwidth. It will also
provide proof of your ignorance.
Position Reports
When flying in the traffic pattern at an uncontrolled airport (attended or unattended), radio
transmissions should have the following format:
Where you are.
Who you are.
What you intend to do.
Where you are (again)

Example:
“Brenham traffic, Cessna One Zero Seven Echo Sierra, left downwind for runway One Six,
touch-and-go, Brenham.”
Notes:
It is always best to end the transmission with a repetition of the airport name. The number of
unicom frequencies is limited, so you will receive traffic calls from aircraft at nearby airports
using the same frequency. The first announcement of location in your transmission often
serves only to catch the attention of other pilots monitoring that frequency. The inclusion of
the second location call reduces the possibility of confusion.
Just because you don’t hear any other aircraft making traffic calls at the airport you are using
doesn’t mean they aren’t there! Two-way radio communication is not required at
uncontrolled airports, and it is each pilot’s responsibility to maintain visual separation from
other aircraft. Remember: Your primary job is to fly your airplane. The least important
aspect of that job is talking on the radio!
Always have a current Sectional Aeronautical Chart on board, even when flying to local
uncontrolled airports. Double check to confirm that you are transmitting on the proper
frequency. If you aren’t, you radio calls are an exercise in futility!
Before flying to unfamiliar uncontrolled airports, check sources, such as the Airport/Facility
Directory (Chart Supplement) to determine traffic patterns and runway orientation. This will
help you make radio calls for the proper runway without seeing the runway number (which
may not be readily visible).
COMMUNICATIONS WITH ATC
When flying into airspace that is under the authority of Air Traffic Control (ATC), two-way
radio communication is mandatory unless prior arrangements have been made. When you
receive instruction from ATC, you must comply, as long as your compliance does not violate
regulations or create an unsafe condition. If you cannot comply with instructions from ATC,
advise the controller as soon as it is possible to do so.
When you receive a transmission from ATC, you are required to respond. The nature of your
responses is essential to the efficient operation of the air traffic control system. Keep your
transmissions as brief as possible, but make sure you communicate your understanding of the
controller’s instructions. It is best to repeat the controller’s instructions “in shorthand”; complete
enough to assure the controller that you understand the clearance or instruction, and brief enough
to avoid undue congestion on the frequency.
Poor technique:
Tower: “Cessna One Zero Seven Echo Sierra, Easterwood Tower, enter left base, runway one
six, report two mile left base.”
N107ES: Seven Echo Sierra, roger.”

This response indicates that the pilot has received a transmission, but it does nothing to
assure the controller that the pilot understood the instructions.
Good technique:
Tower: “Cessna One Zero Seven Echo Sierra, Easterwood Tower, enter right downwind,
runway three four, report midfield abeam the tower.”
N107ES: Report midfield, right downwind, three four, Cessna One Zero Seven Echo
Sierra.”
This response contains all the essentials of the original instructions without cluttering up
precious frequency space.
GENERAL PROCEDURES: CONTROL TOWERS WITHOUT APPROACH RADAR
Approaching
The initial contact should be made between five and ten miles from the airport, after acquiring
the current recorded airport information from the Automatic Terminal Information Service
(ATIS) or the Automatic Surface Observation System (ASOS). Your transmission should follow
this format:
Who you are calling.
Who you are.
Where you are.
What you are requesting.
Confirmation that you have received the current airport information.
Example:
Cessna N107ES: “Easterwood Tower, Cessna One Zero Seven Echo Sierra, eight miles
southwest, inbound for landing with Kilo.”
Note:
This is all the information required for the initial contact in this circumstance. Keep it brief;
if the controller needs to know your altitude, your aircraft type, your aircraft color, or the
outcome of your mother’s gall bladder operation, he or she will request further information.
Easterwood Tower: “Cessna One Zero Seven Echo Sierra, Easterwood Tower, enter right
downwind, runway one six, report entering right downwind.”
Cessna N107ES: “Seven Echo Sierra will report right downwind, one six.”
Cessna N107ES (upon entering the traffic pattern): “Easterwood Tower, Seven Echo Sierra,
right downwind, one six.”
Easterwood Tower: “Cessna Seven Echo Sierra, cleared to land runway one six”
Cessna N107ES: “Cleared to land, one-six, Seven Echo Sierra.”

Note:
If you have been cleared to land, do not perform a touch-and-go! A touch-and-go clearance
is actually two clearances: a landing clearance and a takeoff clearance. If you execute a
touch-and-go with a landing clearance, you have made a takeoff without a proper clearance,
and you are in violation. Naturally, a go-around may be executed at any time without a
specific clearance.
Easterwood Tower (on rollout after landing): “Seven Echo Sierra, turn left next taxiway,
contact Ground (Control), one two eight point seven, leaving the runway.”
Cessna N107ES: “Left turn, contact Ground, Seven Echo Sierra.”
Note:
Clearance is not required to leave the runway and turn onto a taxiway, so don’t expect this
instruction. Do not turn onto another runway unless you are specifically directed to do so.
Many ground control frequencies begin with 121, and controllers will commonly issue an
instruction such as: “Contact ground, point seven.” This controller shorthand for 121.70.
You should interpret “point nine” as 121.90. If you don’t understand, ask the controller for
clarification.
Do not back-taxi on the runway unless the tower controller specifically clears you to do so.
Note:
If you need time to switch to the ground control frequency, do not stop your aircraft until it is
clear of the runway and completely across the hold line (See Appendix B).
Taxiing on the airport taxiways requires a clearance. Failure to obtain a taxi clearance is a
major cause of controller irritation and may result in a violation.
Cessna N107ES: “Easterwood Ground, Cessna Seven Echo Sierra, taxi to transient parking.”
Easterwood Ground: “Cessna Seven Echo Sierra, taxi to parking.”
Cessna N107ES: “Taxi to parking, Cessna Seven Echo Sierra.”
Departing
The initial contact with Ground Control after engine start should take the following format:
Who you are calling.
Who you are.
Where you are.
What you are requesting.
Your direction of departure.
Confirmation that you have received the current airport information.

Example:
Cessna N172RK (after listening to the current ATIS): “Easterwood Ground: Cessna One
Seven Two Romeo Kilo, at line service, taxi for takeoff with (ATIS information) Lima,
southwest departure.”
Easterwood Ground Control: “Cessna One Seven Two Romeo Kilo, Easterwood Ground,
taxi to runway one six via taxiway alpha, cross runway two-two.”
Cessna N172RK: “Taxi one six via alpha, cross two-two, Cessna Two Romeo Kilo.”
Cessna N172RK (on tower frequency, when ready for takeoff): “Easterwood Tower, Cessna
One Zero Seven Echo Sierra, ready for takeoff.”
Note: If you are performing and intersection takeoff, include the name of the intersection in
this transmission.
Easterwood Tower: “Cessna One Seven Two Romeo Kilo, cleared for takeoff one-six, right
turn approved.”
Cessna N172RK: “Cleared for takeoff one-six, right turn, Two Romeo Kilo.”
Note:
Your aircraft must remain completely behind the hold line until you are cleared onto the
runway by the tower controller (See Appendix B).
The tower transmission “hold short” means: remain clear of the runway, with your aircraft
completely behind the hold line. Pilots are REQUIRED to read back all hold short
clearances. If the controller does not hear the words “hold short” in the reply, the instruction
will be repeated until a proper reply is received.
The tower transmission “Line up and wait” means: taxi onto the runway, stopping in the
takeoff position, awaiting a takeoff clearance.
The tower instruction “cleared for immediate takeoff” means: you are cleared for takeoff,
provided it can be done with no delay. If you cannot comply, hold short and notify the tower
of your intentions.
You are required to monitor the tower frequency and comply with ATC instructions (if any)
until you are five statute miles away from the airport unless the controller issues you an early
frequency change. No contact is required on your part upon leaving the Class D.

GENERAL PROCEDURES: CONTROL TOWERS WITH RADAR
Approaching
The initial contact should be made about ten miles from the airport or at a distance specified on
charts (i.e. 20 nautical miles in the case of Class C airspace). The information required by the
approach controller will vary, depending on where you are and the radar equipment installed, but
the following format should suffice at most facilities:
Who you are calling.
Who you are.
Where you are.
What your altitude is.
What you are requesting.
Confirmation that you have received the current ATIS or ASOS information (if your
intention is to land).
Example:
Cessna N212BS (after listening to ATIS or ASOS): “Austin Approach, Cessna Two One
Two Bravo Sierra, over Elgin at three thousand, inbound for landing with (information)
Lima.”
Note:
The inclusion of your altitude in this radio call enables the radar approach controller to
confirm the accuracy of his/her altitude readout on the radar display without an additional
radio call.
Whenever possible, identify your position by reference to the established reporting points
depicted on your Sectional and Terminal Area charts by an underlined and boldfaced name,
accompanied by a flag:
Approach Control: “Cessna Two One Two Bravo Sierra, Austin Approach, squawk zero
four two two, and ident.”
Cessna N212BS: “Squawk zero four two two, and ident, Cessna Two Bravo Sierra.”
ELGIN

Note:
If the aircraft is equipped with an analog transponder, switch the function to the standby
(SBY) position before changing the transponder code. This procedure eliminates the
possibility of inadvertently passing through assigned discrete or emergency codes. After
selecting the code, set the switch to the altitude encoding (ALT) position. Press the IDENT
button ONLY if requested to do so by the controller.
Approach Control: “Cessna Two One Two Bravo Sierra, radar contact, two miles southwest
of Elgin, altitude indicates three thousand one hundred.”
Note:
Altitude discrepancies of less than 200 feet are acceptable. Greater deviations will require
further confirmation.
Cessna N212BS: “Two Bravo Sierra.”
Approach Control: “Cessna Two Bravo Sierra traffic, eleven o’clock, opposite direction,
altitude indicates three thousand five hundred.”
Note:
“Altitude indicates” means that the controller has an altitude readout on the traffic, but is not
in radio contact with that traffic. Its altitude has not been confirmed verbally.
Just because the radar controller does not call possible traffic conflicts to you does not mean
they do not exist! VFR traffic advisories are provided on a workload-permitting basis only.
If the controller is busy with IFR traffic, there may not be time to call your traffic. Also, the
approach control radar may not “skin paint” aircraft that are not transponder-equipped.
Don’t become complacent when you are in contact with a radar controller. It is still your
responsibility as a VFR pilot in command to maintain traffic separation.
Cessna N212BS: “Two Bravo Sierra has traffic in sight.”
Approach Control: “Cessna Two Bravo Sierra, maintain visual separation with that traffic
and contact Austin Tower, One One Niner Point Seven.”
Note:
When being “handed off” to tower by the approach controller, it is usually not necessary to
confirm ATIS or ASOS, or to restate your intentions.
Departing:
A pilot departing an airport that has radar services available will probably have to deal with a
more complex set of ATC procedures than will be encountered at a non-radar tower. The
sequence of communications described here is typical of situations in which VFR aircraft are
assigned discrete transponder codes and are worked into a safe and orderly system of
departure from the airport along with IFR aircraft.

The first step in departing a radar-equipped airport is to obtain the current ATIS or ASOS
information. In addition to the normal information, VFR pilots will be instructed to contact
Clearance Delivery prior to taxi. The clearance delivery frequency will normally be provided
on the ATIS recording.
Example:
Cessna N212BS (on clearance Delivery frequency after listening to ATIS): “Austin
Clearance Delivery, Cessna Two One Two Bravo Sierra, (information) Juliet, VFR to
College Station, cruising five thousand five hundred.”
Note:
The information usually required by Clearance Delivery: status of the flight (IFR or VFR),
direction of flight, intended cruising altitude, and confirmation of ATIS information.
Clearance Delivery: “Cessna Two One Two Bravo Sierra, Austin Clearance, squawk two
three one four, departure frequency will be one two zero point niner.”
Note:
Clearance will have the format: transponder code and departure frequency. Make sure you
write this information down! You will be required to read it back to the controller. Even if
you can remember it for the readback, it is very easy to forget it when it is time to use it.
Cessna N212BS: “Squawk two three one four, departure one two zero point niner, Two
Bravo Sierra.”
Clearance Delivery: “Cessna Two Bravo Sierra, readback correct. Contact Ground, one two
one point niner prior to taxi.”
Cessna N212BS: “Contact Ground, Seven Echo Sierra.”
Cessna N212BS (on Ground Control frequency): “Austin Ground, Cessna Two One Two
Bravo Sierra, at Austin Aero, taxi for takeoff.”
Note:
Since ATIS information has been confirmed with Clearance Delivery, further confirmation at
this point is usually not required.
Ground Control: “Cessna Two One Two Bravo Sierra, Austin Ground, taxi runway one
seven left via taxiway Kilo taxiway Bravo.”
Cessna N212BS: “Taxi one seven left via Kilo Bravo, Cessna Two Bravo Sierra.”
Cessna N212BS (on tower frequency when ready for takeoff): “Austin Tower, Cessna Two
One Two Bravo Sierra, ready for takeoff, one-seven left.”

Tower: “Cessna Two One Two Bravo Sierra, turn left, heading zero niner zero, cleared for
takeoff one seven left.”
Cessna N212BS: “Left to zero niner zero, cleared for takeoff, Cessna Two Bravo Sierra.”
Tower (on climbout): Cessna Two Bravo Sierra, contact departure.
Cessna N212BS: “Contact departure, Cessna Two Bravo Sierra.”
Note:
This instruction is usually issued at a very busy time in the cockpit. If you are working with
two communication radios, or one with “flip-flop” frequencies, you should have the
departure frequency already set on standby.
Cessna N212BS (on departure frequency): “Austin Departure, Cessna Two One Two Bravo
Sierra, leaving one thousand two hundred.”
Departure Control: “Two One Two Bravo Sierra, proceed on course.”
Cessna N212BS: “Proceed on course, Cessna Two Bravo Sierra.”
Departure control, (upon your leaving the radar coverage area: “Cessna Two One Two
Bravo Sierra, radar service terminated, squawk one two zero zero, frequency change
approved.”
Cessna N212BS: “Squawk VFR, Cessna Two Bravo Sierra.”
Note:
You must continue to monitor the departure frequency until you are released by this
clearance.
If you require further flight following services, request it at this time, and the controller will
usually provide you with the appropriate enroute ATC frequency.

COMMUNICATIONS WITH FLIGHT SERVICE STATIONS
Services provided by Flight Service Stations include dissemination of weather information;
filing, opening, and closing of flight plans; and location and reorientation of lost pilots.
Frequencies of Flight Service Stations are found on Sectional Aeronautical Charts above the
frequency boxes of VOR facilities. Additionally, frequency boxes for remote
communications outlets (RCO’s) are displayed in blue on Sectional Charts and are not
associated with VOR’s.
Opening a Flight Plan
Although a flight plan is filed with the Flight Service Station (FSS) over the telephone, it is
not activated, or opened, until radio contact is made once the flight is in progress. At that
time, the Flight Service Station Specialist retrieves the flight plan from the computer and
enters the actual time of departure.
Example:
Cessna N66464: “Montgomery County Radio, Cessna Six Six Four Six Four, on one two
two point six five.”
Note:
The Flight Service Station Specialist monitors several frequencies, so it is good practice to
mention the frequency you are using.
After making this call, be patient and allow the Specialist time to respond. He or she may be
handling an aircraft on another frequency that you can’t hear.
Montgomery County Radio: “Cessna Six Six Four Six Four, Montgomery County Radio,
say your request.”
Cessna N66464: “Cessna Six Six Four Six Four, I would like to open my VFR flight plan at
one seven two two zulu.”
Montgomery County Radio: “Roger, I will activate your flight plan at two two past the hour.
College Station altimeter is three zero zero five.”
Note:
If you did not record your takeoff time, or you simple did not provide it to the FSS specialist,
the departure time will be recorded as the time of radio contact with FSS.
Closing a Flight Plan:
A flight plan may be closed by contacting the FSS on the radio while in the air, or by
telephone once you are on the ground. If you are going to do this while still airborne, it is
good practice to wait until you have the destination airport in sight.
Example:
Cessna 66464: “Montgomery County Radio, Cessna Six Six Four Six Four, on one two two
point six five.”
Montgomery County Radio: “Cessna Six Six Four Six Four, Montgomery County Radio, go
ahead.”
Cessna N66464: “Cessna Six Six Four Six Four, I have Navasota in sight. I would like to
close my VFR flight plan at this time.”
Montgomery County Radio: “Roger, I show your flight plan closed at one niner two five
zulu.”
APPENDIX A
Audio Panels:
Many modern aircraft are equipped with avionics systems that are more elaborate than the
single nav-com found in many smaller training aircraft. Although communications
management can be efficiently accomplished by means of an audio panel, misuse of this
piece of equipment is a common cause of communication failure. Unfortunately, instructions
for the use of the audio panel are seldom available to the renter, and a checkout by an
instructor rarely covers the proper use of this equipment adequately.
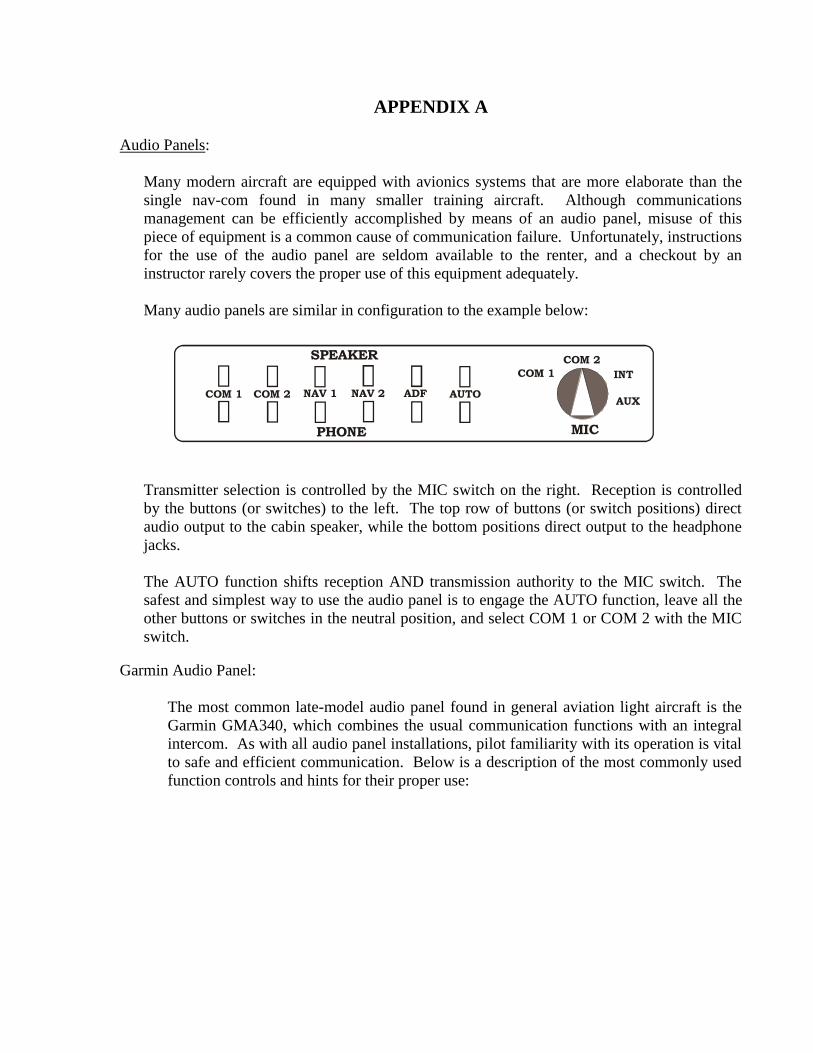
Many audio panels are similar in configuration to the example below:
Transmitter selection is controlled by the MIC switch on the right. Reception is controlled
by the buttons (or switches) to the left. The top row of buttons (or switch positions) direct
audio output to the cabin speaker, while the bottom positions direct output to the headphone
jacks.
The AUTO function shifts reception AND transmission authority to the MIC switch. The
safest and simplest way to use the audio panel is to engage the AUTO function, leave all the
other buttons or switches in the neutral position, and select COM 1 or COM 2 with the MIC
switch.
Garmin Audio Panel:
The most common late-model audio panel found in general aviation light aircraft is the
Garmin GMA340, which combines the usual communication functions with an integral
intercom. As with all audio panel installations, pilot familiarity with its operation is vital
to safe and efficient communication. Below is a description of the most commonly used
function controls and hints for their proper use:
MIC
COM 1
COM 2
INT
AUX
SPEAKER
PHONE
COM 1 COM 2 NAV 1 NAV 2 ADF AUTO

1 -- The COM1 MIC button when selected allows transmitting and receiving on the
number one communication radio. The COM1 indicator will illuminate at the same
time.
2 -- The COM1 button when selected will allow receiving ONLY on the number one
communication radio. Only the COM1 indicator will illuminate when this selection
is made.
3 -- The COM2 MIC button when selected allows transmitting and receiving on the
number two communication radio. The COM2 indicator will illuminate at the same
time.
4 -- The COM2 button when selected will allow receiving ONLY on the number two
communication radio. Only the COM2 indicator will illuminate when this selection
is made.
5 – The pilot intercom volume knob (the smaller inner knob) controls the volume of the
intercom ONLY in the pilot’s headphone. This knob WILL NOT adjust the volume
of any radio installed in the aircraft.
6 – The pilot intercom squelch knob (the larger outer knob) controls the static squelch
from the intercom ONLY in the pilot’s headphone. Proper method of operation: turn
the squelch knob full down (counter clockwise); adjust the volume knob until the
static is at a comfortable level; turn the squelch (outer) knob clockwise until the static
is just squelched; you may have to adjust the squelch knob again in flight when the
noise level in the cabin causes the static to reoccur.
7 -- The copilot intercom volume knob (the smaller inner knob) controls the volume of
the intercom ONLY in the copilot’s headphone. This knob WILL NOT adjust the
volume of any radio installed in the aircraft. This is also the volume control for the

rear-seat passengers. Their volume is adjusted by pulling the volume knob out to its
detent and rotating the knob until the desired volume level is achieved.
8 -- The copilot intercom squelch knob (the larger outer knob) controls the static squelch
from the intercom in the copilot’s headphone and the rear-seat passengers’
headphones.
9 – The NAV1 button when selected will allow the signal from the number one VOR
receiver to be heard. The NAV1 indicator light will illuminate when depressed.
10 -- The NAV2 button when selected will allow the signal from the number two VOR
receiver to be heard. The NAV2 indicator light will illuminate when depressed.
11 – The ADF button when selected will allow the audio from the automatic direction
finder to be heard. The ADF indicator light will illuminate when depressed.
12 – The PILOT intercom isolation button when selected will allow the pilot to
communicate over the aircraft’s communication radios without the distraction of
conversation over the intercom. In this mode of operation, the copilot and the rear-
seat passengers will be able to communicate over the intercom without hearing the
output of the aircraft’s communication radios. The also will not be able to
communicate with the pilot on the intercom.
13 – The CREW intercom isolation button when selected will allow the pilot and the
copilot to communicate over the aircraft’s communication radios and with each other
over the intercom without the distraction of conversation between the rear-seat
passengers over the intercom. In this mode of operation, the rear-seat passengers will
be able to communicate over the intercom without hearing the output of the aircraft’s
communication radios. They also will not be able to communicate with the pilot or
the copilot on the intercom.
14 – The COM1/2 button when selected allows the pilot to communicate over the
aircraft’s number one communications radio while the copilot can communicate over
the number two comm radio. In this mode, they will not be able to communicate with
each other over the intercom system or hear each other’s radio transmissions. A
common use for this switch is for the copilot to access ATIS or ASOS information
while the pilot is communicating with ATC.

APPENDIX B
Runway Hold Lines:
RUNWAYNO CLEARANCE REQUIRED TO CROSS
HOLD LINE IN THIS DIRECTION
TAXIWAY
CLEARANCE REQUIRED TO CROSSHOLD LINE IN THIS DIRECTION
16 A
LIGHTED SIGN COINCIDES
WITH HOLD LINE
DASHED LINES INDICATEAPPROACHING HOLD LINE
All aircraft on the runway side of the hold line are under the authority of the tower controller.
Before crossing the hold line onto the active runway, pilots of taxiing aircraft must receive a
clearance to do so from the tower controller.
Pilots of aircraft on the taxiway side of the hold line must comply with clearances and
instructions issued by the ground controller.
When exiting the active runway, pilots must taxi across the hold line and then contact ground
control or monitor frequencies as directed by ATC. To be considered clear of the active
runway, all parts of the aircraft must be on the taxiway side of the hold line. No other
aircraft may be cleared to take off or land until the exiting aircraft has crossed the hold line.
Current standardized airport lighting format requires lighted runway signs to coincide in
location with the hold lines, decreasing the possibility of runway incursions in conditions of
darkness, when hold lines painted on the surface would be invisible to the pilot. In the
example above, the hold line is on Taxiway Alpha at Runway One Six.

APPENDIX C
NON-MOVEMENT AREA
CLEARANCE REQUIRED FROM GROUND CONTROL TO CROSS
HOLD LINE IN THIS DIRECTION
NO CLEARANCE REQUIRED TO
TAXI IN THE AREA BEHIND THIS LINE
MOVEMENT AREACONTROLLED BY
GROUND CONTROL

APPENDIX D
GLOSSARY
ASOS: Automatic Surface Observation System.
ATIS: Automatic Terminal Information Service. This is continuous-loop tape that plays over a
discrete frequency and provides current weather conditions and notices to airmen at a tower-
controlled field. You should listen to this information and be familiar with it before initial
contact with the controller. The ATIS information is updated every hour (on the hour), more
frequently if there is a significant change in weather or airport conditions before the regularly
scheduled hourly update. Each edition of the ATIS information is identified with successive
letters of the phonetic alphabet (see APPENDIX D). Use the appropriate letter to inform the
controller that you have the current ATIS information.
AWOS: Automatic Weather Observation System. Normally provides the same information as
ASOS, but is funded by a different entity.
Cancel clearance: Previously-issued taxi or takeoff clearance is no longer valid. Hold your
position and await further instructions.
Example: “Cessna Two One Two Bravo Sierra, cancel takeoff clearance, landing traffic on
the runway. Continue holding short of one-six.
Closed traffic: Instruction issued for practicing touch-and-go landings at a tower-controlled
field. Closed traffic is a direction for an aircraft to remain in the traffic pattern.
Example: “Warrior One One Seven, after completion of touch-and-go, make right closed
traffic.”
Continue downwind: Instruction issued to an aircraft in the traffic pattern to provide adequate
spacing between arriving aircraft. Fly downwind, and wait for further instructions.
Example: “Cessna One Zero Seven Echo Sierra, continue downwind. I’ll call your turn to
base.”

Extend upwind: Instruction issued to an aircraft in the traffic pattern to provide adequate spacing
between arriving aircraft. Delay your crosswind turn for a proscribed distance.
Example: “Cessna Two One Two Bravo Sierra, extend your upwind one mile, then left
closed traffic.”
1 Mile
UPWIND LEG16
34
DOWNWIND LEG No
rmal C
rossw
ind
Leg
Assig
ned
Cro
sswin
d L
eg
Fly runway heading: After takeoff, continue climbout without turning until further advised by
the controller to avoid a traffic conflict.
Turning instructions will follow, after the conflict had been resolved.
Example:
“Cessna Six Two Zero Niner Quebec, cleared for takeoff, fly runway heading.”
Hold position: Stop where you are immediately on the airport.
Hold short: Taxi clearance is limited to a defined point on a taxiway.
Example:
“Cessna Seven Echo Sierra, taxi runway one six, hold short of runway Two-Two on
taxiway Alpha.”
Note:
Every hold short clearance must be read back.
Ident: Press and release the IDENT button on your transponder. This causes your radar return to
be highlighted, allowing the radar controller to quickly identify you.
Immediate takeoff: Takeoff clearance issued when a safe takeoff and departure can be executed
as long as the pilot is prepared to take off without delay. If you are not prepared to depart
immediately, inform the controller, and the clearance will be cancelled.
Example:
“Cessna Six Six Four Six Four, cleared for immediate takeoff runway one-six, landing
traffic on a two mile final.”

Land and hold short (LAHSO): landing clearance issued when two different runways are in use
and a possible conflict exists.
Example:
“Cessna Six Six Four Six Four, cleared to land runway one six, hold short of runway two
eight.”
Note:
If you don’t think you can comply with the Land and Hold Short instruction, you should
decline to accept it, and the controller will issue different instructions.
A student pilot is not allowed to accept a Land and Hold Short clearance.
LAHSO is not available at all towered airports.
Line up and wait: Clearance to taxi onto the runway centerline and stop, awaiting a takeoff
clearance.
Example:
“Warrior Two November Alpha, Runway One Four, line up and wait.”
Note:
Not all control towers meet the staffing requirements necessary to be allowed to issue line
up and wait instructions.
Low approach (only): Clearance to perform a go-around (often received when landing closely
behind a heavy aircraft. Do not land!
Example:
“Cessna One Zero Seven Echo Sierra, cleared for low approach only.”
Monitor frequency: Listen to the designated frequency; no transmission by the pilot is required.
Example:
“Cessna One Zero Seven Echo Sierra, taxi to parking, monitor Ground.”
No delay: Execute the assigned clearance or instruction with all reasonable speed consistent
with safety in order to avoid a traffic conflict. If you are not prepared to take action
immediately, inform ATC and do not accept the clearance. You will be reissued the clearance
or instruction later, after the traffic conflict is resolved.
Example:
“Cessna One Two Six Four Golf, cleared for takeoff, no delay, traffic on a one-mile
final.”
Example:
“Seneca One Niner Niner Juliet Sierra, cross Runway One Two Left without delay,
traffic on a half-mile final.”

Offset: Instruction issued to a slower departing aircraft to provide a clear departure path for a
faster departing aircraft to follow. This instruction will also be issued to ensure a clear
departure path for an arriving faster aircraft in the event of a go-around.
Example:
“Cessna One Seven Two Romeo Kilo, offset twenty degrees left for departing traffic.”
16
34
Option: Clearance authorizing you to perform a touch-and-go, a stop-and-go, a landing (full
stop), or a go-around.
Example:
“Tomahawk Niner Six Echo, cleared for the option.”
Say again: Please repeat.
Example:
“Cessna Seven Echo Sierra, say again request.”
Say altitude: Report your current altitude.
Example:
Tower: “Arrow Niner Three Two One November, say altitude.”
N9321N: “Two thousand, five hundred, Two One November.”
Say intentions: Tell the controller what you want to do.
Example:
Tower: “Cessna One Niner Six Six Foxtrot, say intentions after touch-and-go.”
N1966F: “Six Six Foxtrot will depart to David Wayne Hooks, VFR.”

Say position: Tell the controller where you are.
Example:
N494JB: “Easterwood Tower, Cessna Four Niner Four Juliet Bravo, inbound
for landing with information Kilo.” (omits location)
Tower: “Cessna four Niner Four Juliet Bravo, say position.”
N494JB: “Four Juliet Bravo is niner miles southeast.”
Short approach: Turn base early and expedite your landing.
Example:
“Tomahawk Niner Six Echo, make short approach.”
Note:
If you don’t think this procedure can be safely executed, or you don’t feel prepared to
modify your approach to this extent, notify the tower controller and you will be issued
alternate instructions.
16
34
Normal approach
Short approach
Speed and altitude permitting……: Instruction usually issued to an aircraft immediately after
takeoff in order to clear the departure path for a faster aircraft departing immediately from
the same runway. As always, your compliance with this instruction depends on your ability
to comply while maintaining safe operational conditions.
Example:
“Mooney Seven Four Three Three Victor, speed and altitude permitting, begin your left
turnout.”

Square your turn to base (or final, or both): Fly a precisely rectangular traffic pattern. This
instruction is issued to provide more time for preceding traffic to clear.
Example:
“Cessna Two Romeo Kilo, square your turn to final. I’ll be rolling departure traffic prior
to your arrival.”
16
34
Aircraft clearedfor takeoff
Assigned squared traffic pattern
Your normal sloppy traffic pattern
Squawk: Set your transponder code.
Example:
“Cessna Six Six Four Six Four, squawk zero two five four.”
Squawk VFR: Set transponder code to 1200.
Three-sixty: Execute a 360-degree turn and re-enter the traffic pattern downwind to provide
traffic spacing.
Example:
“Cessna Four Six Four, make a right three-sixty for spacing.”
Required action:
16
34
DOWNWIND
BASE

Two-seventy: Execute a 270-degree turn at the end of the downwind leg, and re-enter the traffic
pattern on base to provide for traffic spacing.
Example:
“Cessna Four Six Four, make a right two-seventy to base for spacing.”
Required action:
When able: Comply with the accompanying ATC instruction as soon as it can be safely
accomplished.
Example:
Tower: “Cessna Six Three Six Niner Hotel, pass behind the Cherokee turning a close-in
downwind, on course when able.”
16
34
DOWNWIND
BASE

APPENDIX E
Phonetic Alphabet
Alpha November
Bravo Oscar
Charlie Papa
Delta Quebec
Echo Romeo
Foxtrot Sierra
Golf Tango
Hotel Uniform
India Victor
Juliet Whiskey
Kilo X-ray
Lima Yankee
Mike Zulu